
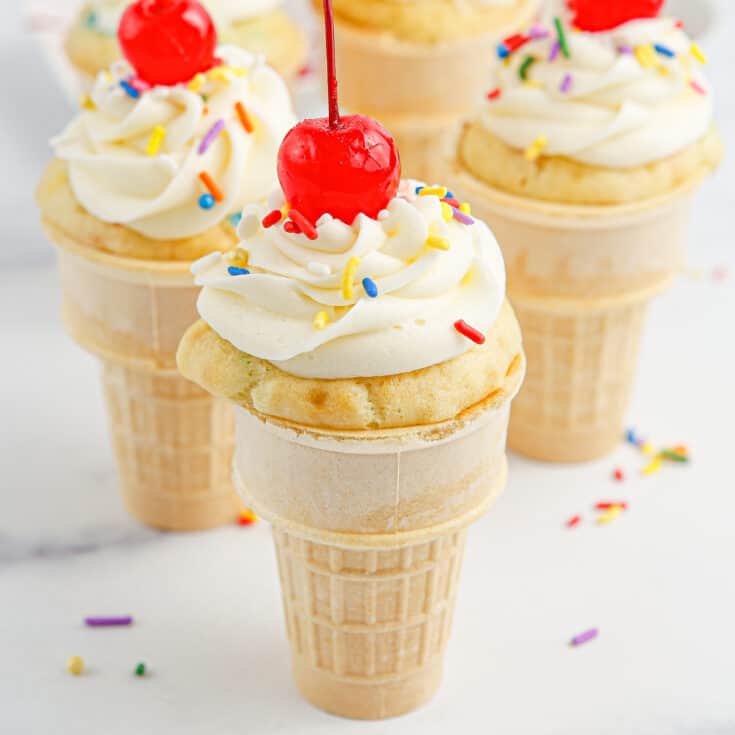
Ice Cream Cone Cupcakes are the cutest cupcakes for summer! Funfetti cake baked into ice cream cones and topped with frosting, rainbow sprinkles, and a cherry.

Ice cream cone cupcakes may be my favorite cupcakes of all time. They are so cute and just scream summer. If you have a bbq or a birthday party coming up, these are the perfect dessert!
They are also super customizable. I used a funfetti mix and a vanilla frosting but you can use any combination of cake mix and frosting that you want! How fun would a chocolate cake with strawberry frosting be?!

Why You’re Going To Love This Recipe
- Ice cream cone cupcakes are the cutest cupcakes you can serve, especially during summer. They look like ice cream sundaes but you don’t have to worry about ice cream melting.
- They are so easy to make! I like to use a box mix for these cupcakes but you can use your favorite homemade cake batter if you prefer. I even use a tub of storebought frosting to make my life even easier.

Ingredients
- Funfetti cake mix – you also need all ingredients the box calls for, usually oil, water, and eggs. Or you could use your favorite homemade funfetti recipe. Or any flavor of cake mix you prefer.
- Ice cream cones – make sure you are buying ice cream cones with a flat bottom so they will stand up in the cupcake pan.
- Frosting – you can use a can of store-bought frosting or a homemade recipe.
- Sprinkles – I like rainbow sprinkles so it looks like an ice cream sundae.
- Maraschino cherries – these are optional but really make the cupcakes look like ice cream.
Instructions
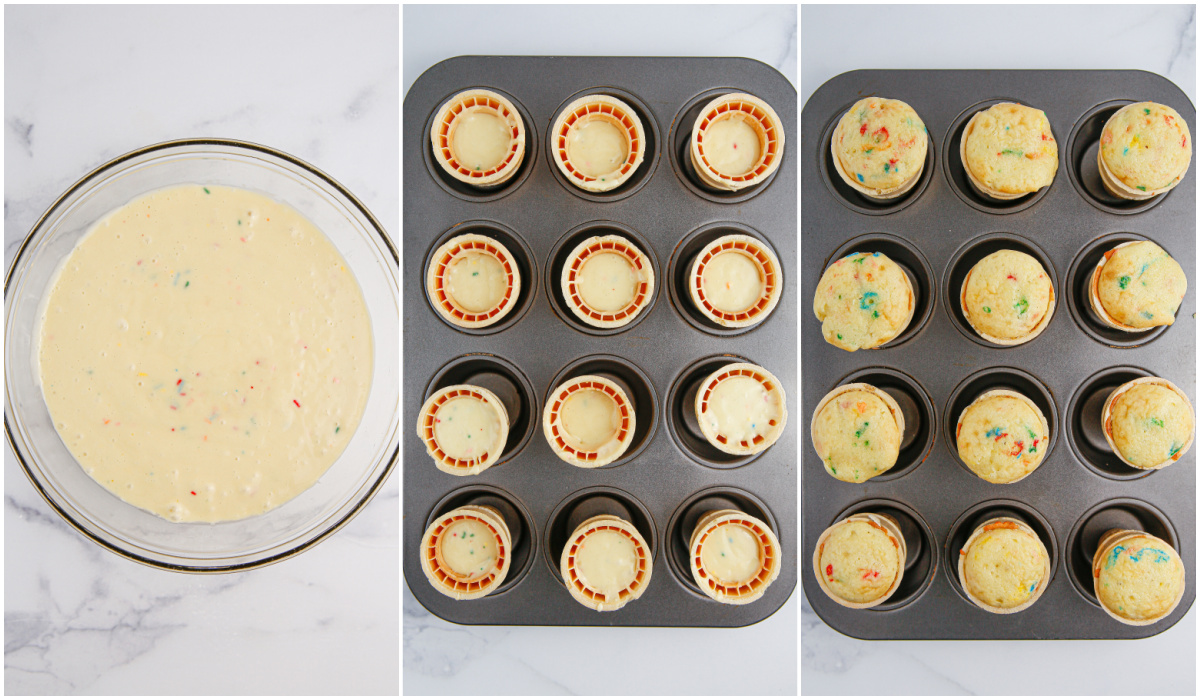
- Make batter. Follow the instructions on the funfetti cake mix box to prepare the cake batter.
- Prepare cones. Scoop the batter with a spoon into each ice cream cone until about halfway full. cones into a cupcake pan.
- Bake. Carefully transfer cupcake pan to oven. Bake at 350F for about 20 minutes.
- Cool. Allow the cupcakes to full cool completely before frosting.
- Frost cupcakes. Use a piping bag and medium star shaped tip to swirl frosting onto the top of the cooled cupcakes.
- Decorate and serve.Garnish with sprinkles and a cherry. Enjoy!

How Long Are They Good For?
Ice cream cone cupcakes will be good for 2 – 3 days after baking. Make sure to store them in an airtight container.
And keep in mind that the cone will soften as it absorbs the moisture from the cake.
Can You Make It Ahead?
You can make these ice cream cone cupcakes the day before you plan on serving but the cone may soften slightly.

More Cupcakes Recipes
- Cherry Coke Cupcakes
- Strawberry Lemonade Cupcakes
- Carrot Cake Cupcakes with Cream Cheese Frosting
- Peanut Butter Cupcakes with Chocolate Buttercream
- Cookies & Cream Cupcakes
- Caramel Filled Chocolate Cupcakes
Make sure you subscribe to my email list to get all my new recipes delivered right to your inbox!
You can also follow me on Instagram, Facebook, or Pinterest for even more!
Ice Cream Cone Cupcakes
Ice Cream Cone Cupcakes are the cutest cupcakes for summer! Funfetti cake baked into ice cream cones and topped with frosting, rainbow sprinkles, and a cherry.
Ingredients
- 1 box Funfetti cake mix + all ingredients the box calls for
- 12 flat bottom ice cream cones
- 1 can frosting (or homemade frosting of your choice)
- sprinkles and marschino cherries, for garnish
Instructions
- Preheat your oven to 350F.
- Follow the instructions on the funfetti cake mix box to prepare the cake batter.
- Scoop the batter with a spoon into each ice cream cone until about halfway full.
- Place prepared ice cream cones into a cupcake pan.
- Carefully transfer cupcake pan to oven. Bake in the preheated oven for about 20 minutes or until a toothpick inserted into the cupcake comes out clean.
- Allow the cupcakes to full cool completely before frosting.
- Use a piping bag and medium star shaped tip to swirl frosting onto the top of the cooled cupcakes.
- Garnish with sprinkles and a cherry. Enjoy!
Recommended Products
As an Amazon Associate and member of other affiliate programs, I earn from qualifying purchases.

Nutrition Information:
Yield:
12Serving Size:
1Amount Per Serving: Calories: 446Total Fat: 15gSaturated Fat: 9gTrans Fat: 0gUnsaturated Fat: 5gCholesterol: 50mgSodium: 441mgCarbohydrates: 72gFiber: 2gSugar: 47gProtein: 6g
Felicia says
Couldn’t you just use a pop over pan to transport them? Or if you decided to just fill the cones, would a pop over pan work?
Simone says
how do these hold up the day after baking? do the cones get soggy? i’m looking to bake on monday night and take them to friends on tuesday morning. thoughts?
amanda says
No, they shouldn’t get soggy. I would just keep them covered and refrigerated overnight. Thanks for commenting! :)
gail says
i have looked at many recipes to do this and your is the first with photos for the upside cone thanks for the post!!
I also saw photos for the fill the cone methos but didn’t like how flat they come out. I saw how you could fill the base with candy to stablize the cone and then put inverted cupcakes ontop but i like how your way actually fills up some of the cone.
Having said all this i do actually have a question :)
if the cone is on top how do you know when the cupcake is finished? is there room to prick with toothpick?
amanda says
Yes, there is room around the outside of the cupcake to poke it. You could also flip one upside down and poke through the wrapper to be extra sure.
Thanks for commenting! :)
Nikki says
Can I make these the night before? I just want to make sure the cones won’t get soggy.
Thanks!
amanda says
I didn’t try them after the first day but I can tell you that they didn’t get so soggy that they would fall over or anything like that. My 3 year old and husband had no problem eating them the next day so I’m thinking they were fine. I’m sorry I couldn’t help more! :(
Paula says
that`s really helpful idea for winter! :)
.-= Paula´s last blog ..Kolorowe Pierogi =-.
Steph@PlainChicken says
what a great idea! much easier than filling the cones with the batter. I’ll have to try this.
.-= Steph@PlainChicken´s last blog ..Zesty Lemon Pie =-.
Heidi says
I always fill the cones one top of the stove and just lower the pan into the oven afterwards so I never have had issues with that, then if I want the “ice cream” on top I use a snowball from hostess or little debbie. It just seems like you would have empty space in your cone doing it this way. I will have to try the box with holes in it to transport them that is the hardest thing for me to do without tipping all my decorated cones over.
kathy says
this is really stupid…don’t the cones crack or get weird, mushy after they bake? don’t laught at me for asking this. i’m serious. i don’t bake at all but i would love to do this for the kids in the neighborhood. thanks. i’m 66yrs old and don’t bake. no kids, no grandkids. so bare w/me on this. thanks.
amanda says
Nope, the cones stay pretty much the same. You’d think they would crack, like you said, but for some reason they stay the same. Good luck! :)
megan @ whatmegansmaking says
so cute! Did you see that betty crocker posted your link on facebook? I’m guessing you did, since you’re likely getting tons of hits thanks to that ;) way to go!
.-= megan @ whatmegansmaking´s last blog ..How To Freeze Peaches =-.
amanda says
Thanks! It was a nice surprise this morning. :)
Jamie says
these are precious! my birthday is coming up soon and im think i will make these for my dance class :) *we always bring something for everyone even though ill be 19 lol* but my question is, wouldnt the cones burn if you bake them? i can see in your picture that they dont and i havnt seen anyone mention it in any of the other comments but i was just wondering..
amanda says
Yeah, it seems like they would burn but nope, not burnt at all. Good luck with them! :)
Jules says
That sounds easy, one? though. Doesn’t that make them a little top heavy?
amanda says
Mine were not all that top heavy, they stood up on their own with no problem.
Thanks for commenting! :)
Janet says
So I have an even better solution. Use a tin cupcake pan on the bottom and use an up-side-down silicone pan inverted with the bottom cut off of each cup cake hole. Play with it, some best inverted some best righ-side-up. Like using a douple pan on top of each other. They can also be carried this way, just set the cup cake pan into a box. They will come out straight so they will stand up on their own. Note: don’t cut the silicone pan until you have the measurement of the cone.
Michele Marko says
actually, you dont have to cook them upside down using muffin cups. Just put the batter right into the cones and cook them upright. Ive been doing this for years.
LJ says
Look great!
You can also cover a pan tightly with foil and make a bunch of x’s in the foil and push the cones through then add batter. They stand up perfectly and are easy to move.
amanda says
Awesome idea! I will be doing that next time. Thanks! :)
debbie says
Wow! I have been making these with my mom for years. Only difference is we fill the cone itself. Problem is…there is no height and I had to use frosting to create the height. This is such a simple fix! Thanks!
Rosemary says
It would overflow in the pan and make a mess! You could fill the cones and cook them , then fill the liners and place the cooled cone upside down on top to cook it together. I believe that would work and make them more balanced instead of top heave with an empty cone.
Denese says
This is a great idea, but doesnt this leave the cone empty inside? I want cake in my cone too, not just on top. Also seems like it would make the cone top heavy once it was cooked.
amanda says
I have a picture of how much of the cone gets filled here: http://farm5.static.flickr.com/4118/4945118161_df49f2a74d.jpg
I didn’t have a problem with my cones being top heavy but I’m sure if the liners weren’t filled enough that would be a problem.
Thanks for commenting! :)
Irishize says
I’m going to try putting a marshmallow and/or some chocolate chips in the bottom of the cone and see what happens. Seems like there should be something cute to put in the bottom, but you’d almost have to put a marshmallow to hold whatever it is in place since the cone will be upside down.
Tina Bloom says
Thanks for posting this recipe. I use to eat these when I was a kid, my grandma use to make them. Now I can make them for my own kids.
Linda says
This seems like a great idea. I have never tried this before, but when you put the cone upside down on top of the batter, once baked wouldnt that leave the bottom half of the cone empty?
amanda says
Yeah, that’s the downside to this method. I have a picture of how much of the cone gets filled here: http://farm5.static.flickr.com/4118/4945118161_df49f2a74d.jpg if you want to see.
Karen says
Awesome….I never would have thought of that! I avoided making them thinking I would have the “domino” effect either putting them in the oven or watching that happen in the oven. This is a great idea!