• Skip to primary navigation
  • Skip to main content
  • Skip to primary sidebar
  • Home
  • About
  • Recipes

Fake Ginger

menu icon
go to homepage
  • Recipe Index
  • About
  • Subscribe
    • Facebook
    • Instagram
    • Pinterest
  • subscribe
    search icon
    Homepage link
    • Recipe Index
    • About
    • Subscribe
    • Facebook
    • Instagram
    • Pinterest
  • ×
    Home » Page 53

    French Dip

    French Dip

    May 17, 2011

    If you follow me on Twitter, this is probably old news to you but I thought I would share on the good ol’ blog too. My husband recently came home after being gone since January. I didn’t tell you guys because I’m paranoid cautious, but don’t feel bad because I didn’t even tell my Facebook friends. But like I said: old news. The best thing about having him home is that I have a reason to cook things besides pasta and eggs! I’m taking full advantage of that and kicked off this week with something I’ve been wanting to try forever. The French dip!

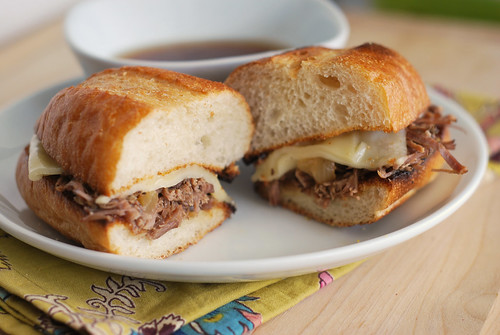
    So this sandwich, which I don’t think I’ve ever had before, is just beef that’s slow cooked in a flavorful broth (or jus, if you’re fancy) and then put on crusty bread with cheese. Then you get the dip the entire sandwich in the broth that you cooked the beef in!

    Fantastic does not describe how good these are! We had these for an early dinner and then a few hours later when my husband went to workout, I snuck into the kitchen to have another. Then when he came home, I caught him in the kitchen having another one! This is a definite keeper and I see myself making it frequently once winter hits.

    📖 Recipe

    Yield: about 8 servings

    French Dip

    French Dip
    Prep Time 10 minutes
    Cook Time 7 hours
    Total Time 7 hours 10 minutes

    Ingredients

    • 1 medium yellow onion
    • 1 10- ounce can beef broth
    • ¼ cup soy sauce
    • 1 tablespoon Worcestershire sauce
    • 1 tablespoon Creole mustard
    • 2 cloves garlic roughly chopped
    • 3 pound chuck roast
    • salt
    • pepper
    • 6-8 sandwich rolls split
    • 6-8 slices of provolone or Swiss cheese

    Instructions

      1. Slice the onion into ~¼-inch rounds. Keeping the rounds intact, place them in the bottom of the slow cooker. Add beef broth, soy sauce, Worcestershire sauce, mustard, and garlic to the slow cooker. Salt and pepper both sides of the roast and place on top of the onions. Cook on low 6-7 hours until beef is fall-apart tender.
      2. Transfer the roast to a cutting board and shred using two forks. Remove the onions and set aside. Use a spoon (or fancy instrument if you have one) to remove the fat from the broth. Return the roast, juice, and onions to the slow cooker for up to an hour before serving.
      3. Heat the broiler. Place the split sandwich rolls on a lined baking sheet and toast for 1 minute or just until the bread begins to brown. Remove the tops from the pan. Scoop the beef onto the bottom of the rolls and top with cheese. Return to the oven just until cheese is melted. Top with sandwich halves and serve with small bowls of jus.

    Recommended Products

    As an Amazon Associate and member of other affiliate programs, I earn from qualifying purchases.

    • Programmable Slow Cooker
      Programmable Slow Cooker

    Nutrition Information:

    Yield:

    8

    Serving Size:

    1

    Amount Per Serving: Calories: 713Total Fat: 40gSaturated Fat: 19gTrans Fat: 2gUnsaturated Fat: 19gCholesterol: 173mgSodium: 1383mgCarbohydrates: 29gFiber: 2gSugar: 1gProtein: 59g

    Did you make this recipe?

    Tag me in your Instagram photo - @fakeginger

    © Amanda Livesay
    Cuisine: American / Category: slow cooker

    Cinnamon Sugar Pull-Apart Bread

    May 11, 2011

    Cinnamon Sugar Pull-Apart Bread is a soft, buttery layered loaf with cinnamon sugar brushed on each layer, baked to golden perfection. This easy-to-make treat is a delightful twist on classic monkey bread.

    cinnamon sugar pull apart bread on a white plate

    Every once in awhile I make something that completely baffles my husband. Like this bread. It’s supposed to be like monkey bread, except in a loaf pan, right? My dear usband thought I had taken store-bought bread, sprinkled it with cinnamon sugar, and then baked it. When I tried to explain to him that it was just monkey bread in a different shape, I was met with a blank stare. Because he had no idea what monkey bread is. No idea what monkey bread is. Tell me, how does someone go 25 years without ever even seeing monkey bread?!

    Regardless, he loved this bread. All my boys did actually. It didn’t stand a chance in this house and was gone before the day was over! It’s the softest bread you can imagine on the inside but the bottom crust gets a little caramel-y from the sugar settling at the bottom of the pan and the top crust gets nice and toasty. In other words, the most perfect piece of bread you can imagine.

    It’s also shockingly easy to make. The dough is not sticky at all which made rolling it out and cutting it very quick. The only thing I would change would be to double it next time around. You’re going to regret it if you don’t!

    (Yes, I will be making monkey bread this weekend.)

    overhead shot of cinnamon sugar pull apart bread

    Ingredients

    • All-purpose flour
    • Granulated sugar – you will need sugar for the bread and the filling.
    • Instant yeast
    • Salt – just a tiny bit to help bring out the flavor of the bread.
    • Unsalted butter – you need this for the bread itself and the filling.
    • Whole milk
    • Vanilla
    • Eggs
    • Cinnamon

    How To Make Cinnamon Sugar Pull Apart Bread

    • Make dough. Combine the flour, sugar, yeast and salt in the bowl of a mixer fitted with a dough hook. Combine the butter and milk in a small saucepan and heat just until the butter is melted. Set aside and let cool briefly. Add the milk mixture, water, vanilla and eggs to the mixer bowl. Mix on low speed until a cohesive dough forms. Continue to knead until smooth and elastic, adding additional flour as needed 1 tablespoon at a time until the dough clears the sides of the bowl and is tacky but not sticky. Knead about 3-5 minutes.
    • Transfer. Transfer the dough to a lightly oiled bowl, turning once to coat, and cover.
    • Rise. Let rise in a warm place until doubled in bulk, about 1 hour.
    • Make filling. While the dough rises, combine the sugar and cinnamon in a small bowl and mix well.
    • Shape. Transfer the dough to a lightly floured work surface. Roll into a ball, cover with a clean towel and let rest for 5 minutes. Roll the dough out into an approximately 12 x 20-inch rectangle.
    • Top. Brush the dough with the melted butter. Sprinkle the cinnamon-sugar mixture over the dough in an even layer.
    • Shape. Slice the dough vertically into 6 even strips. Stack the strips on top of each other and again cut again into 6 equal slices. Stack all the squares on top of each other and set into a greased 9×5-inch loaf pan.
    • Rise. Cover loosely and let rise in a warm place, 30-45 minutes.
    • Bake. Bake at 350F for 30-35 minutes, until the top is golden brown.
    • Cool. Remove from the oven and let cool in the pan 20-30 minutes.
    • Serve. Run a knife around the edges of the pan to loosen and carefully turn the loaf out, transferring to a serving plate. Serve warm.
    slices of cinnamon toast on a white plate

    📖 Recipe

    Yield: 1 loaf

    Cinnamon Sugar Pull-Apart Bread

    Cinnamon Sugar Pull-Apart Bread

    Cinnamon Sugar Pull-Apart Bread is a soft, buttery layered loaf with cinnamon sugar brushed on each layer, baked to golden perfection. This easy-to-make treat is a delightful twist on classic monkey bread.

    Prep Time 30 minutes
    Cook Time 35 minutes
    Additional Time 1 hour 30 minutes
    Total Time 2 hours 35 minutes

    Ingredients

    • For the dough:
    • 2 ¾ cups all-purpose flour plus more as needed
    • ¼ cup granulated sugar
    • 2 ¼ teaspoon instant yeast
    • ½ teaspoon salt
    • 4 tablespoons unsalted butter
    • ⅓ cup whole milk
    • ¼ cup water
    • 1 teaspoon vanilla extract
    • 2 large eggs
    • For the filling:
    • 2 tablespoons unsalted butter melted
    • 1 cup sugar
    • 2 teaspoon ground cinnamon

    Instructions

      1. To make the dough, combine the flour, sugar, yeast and salt in the bowl of a mixer fitted with a dough hook.
      2. Combine the butter and milk in a small saucepan and heat just until the butter is melted. Set aside and let cool briefly, until the mixture registers 115-125 F on an instant-read thermometer.
      3. Add the milk mixture, water, vanilla and eggs to the mixer bowl. Mix on low speed until a cohesive dough forms. Continue to knead until smooth and elastic, adding additional flour as needed 1 tablespoon at a time until the dough clears the sides of the bowl and is tacky but not sticky. Knead about 3-5 minutes.
      4. Transfer the dough to a lightly oiled bowl, turning once to coat, and cover.
      5. Let rise in a warm place until doubled in bulk, about 1 hour. (After the dough has doubled, it can be wrapped in plastic wrap and refrigerated overnight. Let stand at room temperature 30 minutes before proceeding.)
      6. While the dough rises, combine the sugar and cinnamon in a small bowl and mix well.
      7. Transfer the dough to a lightly floured work surface and gently deflate. Roll into a ball, cover with a clean towel and let rest for 5 minutes. Roll the dough out into an approximately 12 x 20-inch rectangle. Brush the dough with the melted butter. Sprinkle the cinnamon-sugar mixture over the dough in an even layer.
      8. Lightly grease a 9 x 5-inch loaf pan.
      9. Slice the dough vertically into 6 even strips. Stack the strips on top of each other and again cut again into 6 equal slices. Stack all the squares on top of each other and set into the prepared loaf pan. Cover loosely with a kitchen towel and let rise in a warm place, 30-45 minutes.
      10. Preheat the oven to 350 F. Transfer the loaf to the oven and bake 30-35 minutes, until the top is golden brown. (If the top seems to be browning too quickly, cover loosely with foil at the end of baking.) Remove from the oven and let cool in the pan 20-30 minutes. Run a knife around the edges of the pan to loosen and carefully turn the loaf out, transferring to a serving plate. Serve warm.

    Recommended Products

    As an Amazon Associate and member of other affiliate programs, I earn from qualifying purchases.

    • Pastry Brush
      Pastry Brush
    • Loaf Pan
      Loaf Pan

    Did you make this recipe?

    Tag me in your Instagram photo - @fakeginger

    © Amanda Livesay
    Cuisine: American / Category: braed

    New York Style Coffee Cake

    Apr 21, 2011

    New York Style Coffee Cake is a delicious moist coffee cake topped with a crumb topping. The BEST coffee cake!

    New York Style Coffee Cake - delicious moist coffee cake topped with a crumb topping. The BEST coffee cake!

    I’ve been hearing rumors that Starbucks has done a complete overhaul of their pastries and that, my friends, makes me sad. I love cupcakes and cake pops (lies) as much as the next person, but who wants that with coffee? Hey Starbucks, quit trying to keep up with the trends and stick with things that go with coffee… like uhh, coffee cake.

    Anyway.

    This coffee cake is a lot like one of my favorite Starbucks pastries, the New York Style Coffee Cake. Except I think Starbucks calls (called?) it crumb cake. Or I called it crumb cake. Once of us definitely called it crumb cake.

    The cake is so soft thanks to the yogurt in the recipe. And by the way, I used honey flavored Greek yogurt in this and it turned out fantastic. If you have some in your fridge, use it for this cake! The crumb topping is unbelievable. I could have eaten the entire recipe of crumb topping by itself. If you’re into nuts, I think you could get away with tossing some finely chopped walnuts or pecans into the topping too.

    More Coffee Cake Recipes

    • Lemon Raspberry Coffee Cake
    • Sour Cream Coffee Cake
    • Peanut Butter Chocolate Chip Coffee Cake
    • Blueberry Orange Coffee Cake

    Make sure you subscribe to my email list to get all my new recipes delivered right to your inbox!

    You can also follow me on Instagram, Facebook, or Pinterest for even more! 

    📖 Recipe

    Yield: 24 servings

    New York Style Coffee Cake

    New York Style Coffee Cake
    Prep Time 30 minutes
    Cook Time 55 minutes
    Total Time 1 hour 25 minutes

    Ingredients

    • 1 cup firmly packed brown sugar
    • ½ cup granulated sugar
    • ½ teaspoon salt
    • 1 ½ tablespoons cinnamon
    • 1 cup (2 sticks) melted butter
    • 2 ½ cups all-purpose flour

    For the cake:

    • 2 ½ cups all-purpose flour
    • ¾ teaspoon baking powder
    • 1 teaspoon baking soda
    • ½ teaspoon salt
    • 12 tablespoons (1 ½ sticks) butter
    • 1 ½ cups granulated sugar
    • 2 large eggs
    • 1 ¼ cups plain yogurt
    • 1 teaspoon vanilla extract

    Instructions

  • Preheat the oven to 350 degrees. Butter the sides and bottom of a glass 9×13 pan. You can use a metal pan, but the edges may get a bit crispy.
  • To make the crumb topping, mix both sugars, salt, and cinnamon in a medium bowl. Add the melted butter and whisk until combined. Fold in the flour until it is absorbed. Spread out a large sheet of parchment paper on the counter and spread this mixture out on the parchment paper to dry while you make the cake mixture.
  • To make the cake, sift the flour, baking powder, baking soda, and salt together in a medium bowl and set aside.
  • Cream the butter until it is smooth and ribbon-like in the bowl of a stand mixer fitted with the paddle. Scrape down the bowl and add the sugar. Beat until fluffy. Add the eggs, one at a time, and beat until incorporated. Scrape the bowl and mix again for 30 seconds. Add the yogurt and vanilla and beat just until incorporated. Add the dry ingredients in three parts, scraping down the bowl before each addition, beating only until it is just incorporated.
  • To assemble the cake, pour the batter in the prepared pan. Use your hands to scoop up a handful of the topping and make a fist. The topping should hold together. Break off in chunks and drop them over the cake. Repeat to use all the topping. Remember, the topping layer will look very thick.
  • Bake the cake for 45 to 55 minutes, or until a toothpick inserted in the middle comes out clean. Rotate the pan two times during the baking process. Cool the entire pan on a wire rack for 30 minutes before serving.
  • The cake will last for 3 days, tightly covered, at room temperature.
  • Recommended Products

    As an Amazon Associate and member of other affiliate programs, I earn from qualifying purchases.

    • Stand Mixer
      Stand Mixer
    • 9x13-inch pan
      9x13-inch pan

    Nutrition Information:

    Yield:

    24

    Serving Size:

    1

    Amount Per Serving: Calories: 267Total Fat: 14gSaturated Fat: 9gTrans Fat: 1gUnsaturated Fat: 4gCholesterol: 51mgSodium: 270mgCarbohydrates: 35gFiber: 1gSugar: 24gProtein: 2g

    Did you make this recipe?

    Tag me in your Instagram photo - @fakeginger

    Category: cake

    Baked Seasoned Potato Wedges

    Apr 18, 2011

    These potatoes are my new favorite thing. I would eat these every single day for the rest of my life if I could. They’re slightly spicy with a crisp outside and pillow-y soft inside. Perfection in the form of a potato, pretty much.

    I think this was the first time I’ve roasted the yukon golds and I have to say, they definitely make the best potato wedges. There’s something different about their texture that just makes them almost melt in your mouth once roasted. If your store doesn’t have the yukon golds (my store seems to run out of them quickly), the little red potatoes would be almost as good.

    Be prepared to lose control around these wedges. They are addictive!

    📖 Recipe

    0 from 0 votes
    Print

    Baked Seasoned Potato Wedges

    adapted from Skinny Taste

    Ingredients

    • 1 ½ pounds baby yukon gold potatoes washed
    • 2 teaspoon olive oil
    • 1 tablespoon herbs de provence or use a combo of dried rosemary, thyme, marjoram
    • ¼ teaspoon oregano
    • ½ teaspoon smoked paprika
    • ¼ teaspoon chili powder
    • ¼ teaspoon onion powder
    • ¼ teaspoon garlic powder
    • ¼ teaspoon fresh cracked pepper

    Instructions

    1. Preheat oven to 400F. Line baking sheet with foil for easy clean-up. Lightly coat with cooking spray.
    2. Cut each potato into quarters.
    3. In a large bowl, whisk together oil and all herbs and spices. Add potatoes and toss to coat, making sure each potato is covered. Place in a single layer on a lightly greased baking sheet. Bake uncovered for about 25 minutes or until tender crisp, turning once half way through.

    Funfetti Blondies

    Apr 13, 2011

    The cake batter trend has taken the blog world by storm recently and as with most trends, I’ve been hesitant to dive in. I do love my birthday cake ice cream but beyond that, I wasn’t sure about using cake mix in items that weren’t, well, cake. These blondies changed my mind though – I saw them and was in the kitchen 15 minutes later. Blondies + sprinkles? How could I not make them?

    These are baked so they obviously don’t have that cake batter taste that something not baked would have, like the ice cream. They’re still delicious, don’t get me wrong, but just didn’t have the cake batter taste that I expected. The sprinkles more than made up my very slight disappointment and reminded me of the Funfetti cupcakes everyone loves.

    📖 Recipe

    5 from 1 vote
    Print

    Funfetti Blondies

    Ingredients

    • 1 cup cake mix
    • 1 cup flour
    • ¼ teaspoon baking soda
    • ¾ cup butter melted & cooled slightly
    • 1 egg
    • 1 egg yolk
    • 2 teaspoons vanilla
    • ½ cup sugar
    • ½ cup brown sugar
    • 4 heaping tablespoons sprinkles of your choice

    Instructions

    1. Preheat oven to 350F. Prepare an 8 x 8 inch pan with parchment (or aluminum foil).
    2. In a mixing bowl, beat together sugars, butter, vanilla, egg, and egg yolk until creamy and smooth. Stir in flour, cake mix, and baking soda until well combined. Mix in the sprinkles.
    3. Spread dough evenly in prepared pan, smoothing with a spatula.
    4. Bake for 30-35 minutes until top is lightly browned and middle still jiggles slightly. Allow to cool for 15-20 minutes before removing foil from pan and cutting into squares.


    Chocolate Chip Waffles

    Apr 12, 2011

    Easy homemade Chocolate Chip Waffles topped with whipped cream and mini chocolate chips!

    Chocolate chip waffles topped with whipped cream and mini chocolate chips

    I have been trying to put more of an effort into breakfast. My children are content with yogurt, fruit, frozen waffles, toast, whatever I can get them quickly pretty much, but every once in a while I get hit with that nagging mommy guilt that tells me that I can – and should – do more.

    Waffles are probably the easiest way to ease into cooking breakfast on a regular basis (as long as you have a waffle maker, of course). They don’t require as much attention as pancakes or eggs or anything like that. I pretty much just put the batter in and look over every few minutes to see if steam is still coming out of it. Easy peasy and always a crowd pleaser. Especially if you put chocolate chips in them!

    These were insanely good. I know it looks like a lot of buttermilk in the recipe but they can really handle the tang from it because of the super sweet chocolate chips. My children loved these and have asked for them every morning since I made them. And despite what the recipe says, whipped cream is not optional!

    Can You Freeze Them?

    You can freeze chocolate chip waffles for up to 6 months. Let them cool completely and then put them in an airtight container, like a freezer ziploc bag.

    When you are ready to serve them, let them defrost overnight in the fridge. I recommend reheating in a toaster or toaster oven so they get a little crispness back.

    More Waffle Recipes

    • Yeasted Brown-Butter Waffles
    • Peanut Butter Waffles
    • Oatmeal Waffles
    • Pumpkin Waffles
    • Red Velvet Waffles

    Make sure you subscribe to my email list to get all my new recipes delivered right to your inbox!

    You can also follow me on Instagram, Facebook, or Pinterest for even more! 

    📖 Recipe

    Yield: 2 servings

    Chocolate Chip Waffles

    Chocolate Chip Waffles

    Easy homemade Chocolate Chip Waffles topped with whipped cream and mini chocolate chips!

    Ingredients

    • Cooking spray
    • 1 ¾ cups all-purpose flour
    • 2 teaspoons baking powder
    • ½ teaspoon salt
    • 1 ½ cups buttermilk
    • 1 tablespoon butter (melted)
    • 1 teaspoon vanilla extract
    • 1 large egg yolk
    • 1 large egg white
    • 1 tablespoon sugar
    • ½ cup semisweet chocolate mini chocolate chips
    • whipped cream and chocolate chips for topping (optional)

    Instructions

      1. Coat a waffle iron with cooking spray, and preheat.
      2. Lightly spoon flour into dry measuring cups; level with a knife. Combine flour, baking powder, and salt in a large bowl. Place milk, butter, vanilla, and egg yolk in a bowl; stir with a whisk. Add to flour mixture, stirring until blended. Beat egg white and sugar with a mixer at high speed until stiff peaks form. Fold into flour mixture. Fold in mini chocolate chips.
      3. Spoon about ½ cup batter onto hot waffle iron, spreading batter to edges. Cook 3 to 5 minutes or until done; repeat procedure with remaining batter.

    Recommended Products

    As an Amazon Associate and member of other affiliate programs, I earn from qualifying purchases.

    • Waffle Maker
      Waffle Maker
    • Mixing Bowls
      Mixing Bowls

    Did you make this recipe?

    Tag me in your Instagram photo - @fakeginger

    © Amanda Livesay
    Cuisine: American / Category: breakfast

    Honey Chicken

    Apr 06, 2011

    Takeout inspired crispy chicken tossed in a sweet honey sauce. Honey Chicken is ready in about 30 minutes and is a dinner the whole family will love!

    Fried chicken bites tossed in a honey sauce and topped with sesame seeds on a bed of rice in a white bowl with broccoli in the background

    I, on more than one occasion, have professed my love of Chinese buffets. My family would be there once a week if my husband allowed it.

    My family thing is all the crispy fried chicken in sticky sweet sauces. You know, sesame chicken, sweet and sour chicken, and Sweet and Sour Pork.

    This recipe is exactly like that honey chicken I love so much! My kids even ate it which says a lot because neither of them are big chicken eaters unless it comes in a cardboard box and with a toy.

    Ingredients

    • Chicken – I used chicken breasts but thighs work as well.
    • Oil
    • Cornstarch
    • Flour
    • Baking powder
    • Eggs – you need one whole egg and one egg white.
    • Olive oil
    • Ginger
    • Garlic
    • Honey
    • Rice wine vinegar
    • Sesame seeds

    Instructions

    • Make the batter. Mix together cornstarch, flour, baking powder, water, salt, egg, and egg white. Cover and allow to sit for at least 30 minutes.
    • Fry the chicken. Add chicken to the batter, tossing to coat. Heat oil to 350F. Fry chicken in batches for about 2 minutes, or until batter becomes firm. Drain on paper towels.
    • Make honey sauce. Heat olive oil over medium-high heat. Add garlic and ginger and stir fry for 30 seconds. Add salt, honey, vinegar, and water. Mix well. Combine 1 teaspoon water and 1 teaspoon cornstarch. Add to the sauce and simmer until thickened, about 2 minutes.
    • Serve the honey chicken. Toss the fried chicken with the sauce and top with toasted sesame seeds. Serve on rice.

    More Chicken Recipes

    • Chicken and Biscuits
    • Chicken Marsala
    • Black Pepper Chicken
    • Chicken and Wild Rice Soup
    • Chicken with 40 Cloves of Garlic

    Make sure you subscribe to my email list to get all my new recipes delivered right to your inbox!

    You can also follow me on Instagram, Facebook, or Pinterest for even more! 

    📖 Recipe

    Yield: about 6 servings

    Honey Chicken

    Honey Chicken
    Prep Time 15 minutes
    Cook Time 15 minutes
    Additional Time 30 minutes
    Total Time 1 hour

    Ingredients

    • 1 ½ lbs boneless skinless chicken breasts (cut into 1" chunks
    • Oil (for deep frying)

    For the batter:

    • ¼ cup cornstarch
    • ¼ cup flour
    • 1 teaspoon baking powder
    • ½ cup water
    • ½ teaspoon salt
    • 1 egg
    • 1 egg white

    For the sauce:

    • 1 ½ tablespoons olive oil
    • 2 teaspoon ginger (minced)
    • 3 tablespoons garlic (minced)
    • 1 teaspoon salt
    • 3 tablespoons honey
    • 1 teaspoon rice wine vinegar
    • ½ cup water
    • 1 teaspoon cornstarch (mixed with 1 teaspoon water)
    • toasted sesame seeds (for garnish)

    Instructions

    1. In a large bowl mix all batter ingredients together until smooth. Cover and allow the batter to site for at least 30 minutes. Add the chicken to the batter tossing to coat.
    2. In a large dutch oven, heat several inches of oil to 350F.
    3. Fry chicken in batches for 2 minutes or until batter becomes firm. Drain on paper towels.
    4. To make the sauce, heat 1½ tablespoons of oil over medium-high heat in a skillet. Add garlic and ginger and stir fry for 30 seconds. Add salt, honey, vinegar, and water. Mix well.
    5. Combine 1 teaspoon of water with 1 teaspoon of cornstarch. Add to the sauce and Simmer for 2 minutes.
    6. Coat chicken with the sauce and garnish with sesame seeds. Serve with rice.

    Recommended Products

    As an Amazon Associate and member of other affiliate programs, I earn from qualifying purchases.

    • Dutch Oven
      Dutch Oven
    • Toasted Sesame Seeds
      Toasted Sesame Seeds

    Nutrition Information:

    Yield:

    6

    Serving Size:

    1

    Amount Per Serving: Calories: 361Total Fat: 13gSaturated Fat: 2gTrans Fat: 0gUnsaturated Fat: 10gCholesterol: 127mgSodium: 719mgCarbohydrates: 21gFiber: 1gSugar: 9gProtein: 38g

    Did you make this recipe?

    Tag me in your Instagram photo - @fakeginger

    © Amanda Livesay
    Category: chicken

    Pulled Pork with Alabama Barbeque Sauce

    Mar 05, 2011

    We’ve been having some crazy warm weather lately. We’re used to warm weather but 80 in February? That was a little insane! The warm weather has got me looking forward to all the foods that I typically associate with summer, especially barbecue.

    This sandwich jumped out at me because of my deep love of pulled pork. This recipe has an interesting twist on cooking method though – it’s cooked for a relatively short time and in a mixture of apple cider vinegar, brown sugar, and spices. I always thought that pork needed to cook all day long to get that nice shred but this turned out perfectly in just an hour!

    About the Alabama barbecue sauce – I’ve lived in Alabama all my life and never once saw a white barbecue sauce before I started reading blogs so I have no idea how authentic this is. The recipe is pretty much just a spicy coleslaw dressing which would make sense considering that some people (weirdos) put coleslaw on their pulled pork. It was actually really good on the pork and it was definitely a nice change from the normal smoky barbecue sauce.

    Make sure you subscribe to my email list to get all my new recipes delivered right to your inbox!

    You can also follow me on Instagram, Facebook, or Pinterest for even more! 

    📖 Recipe

    Yield: 4 servings

    Pulled Pork with Alabama Barbeque Sauce

    Ingredients

    • ½ cup mayonnaise
    • 2 tablespoons white vinegar
    • 1 teaspoon coarsely ground fresh pepper
    • 1 teaspoon fresh lemon juice
    • Dash of salt
    • Pork:
    • 1 ¼ pounds pork tenderloin (trimmed)
    • ½ cup apple cider vinegar
    • ½ cup water
    • 3 tablespoons brown sugar
    • 2 teaspoons kosher salt
    • ¾ teaspoon freshly ground black pepper
    • ½ teaspoon chili powder
    • ¼ teaspoon garlic powder

    Instructions

    1. To prepare sauce, combine the first 5 ingredients in a small bowl. Cover and chill.
    2. To prepare pork, cut pork in half lengthwise; cut crosswise into 2 ½-inch pieces.
    3. Combine apple cider vinegar, water, brown sugar, salt, pepper, chili powder, and garlic powder in a medium saucepan; bring to a boil.
    4. Add pork to pan. Cover, reduce heat, and simmer 1 hour or until tender.
    5. Remove pork from cooking liquid; shred with 2 forks.
    6. Place pork in a serving dish; pour cooking liquid over pork.
    7. Bring sauce to room temperature before serving with pork.

    Did you make this recipe?

    Tag me in your Instagram photo - @fakeginger

    © Amanda Livesay

    Caramel-Filled Chocolate Cookies

    Dec 21, 2010

    You know when you see a recipe and it’s all you can think about until you eventually cave and make it? That’s what happened to me when I saw someone make these cookies. I don’t even like chocolate cookies but the idea of a chocolate cookies with caramel inside? Yes please.

    The trick with these guys is that you use those fantastic Rolo candies in the center so not only are you getting the caramel, you’re also getting a double dose of chocolate! They’re fantastic cookies that would make just about anyone happy. One word of advice: try one hot out of the oven. In fact, eat the entire batch hot out of the oven. I won’t tell anyone.

    📖 Recipe

    0 from 0 votes
    Print

    Caramel-Filled Chocolate Cookies

    Ingredients

    • 2 ½ cups flour
    • ¾ cup unsweetened cocoa
    • 1 teaspoon baking soda
    • 1 cup sugar
    • 1 cup firmly packed brown sugar
    • 1 cup butter softened
    • 2 teaspoons vanilla
    • 2 eggs
    • 48 Rolo Chewy Caramels in Milk Chocolate unwrapped
    • ¼ cup sugar

    Instructions

    1. In medium bowl, combine flour, cocoa and baking soda; mix well.
    2. In large bowl, combine 1 cup sugar, brown sugar and butter; beat until light and fluffy. Add vanilla and eggs; beat well. Add flour mixture; blend well. If necessary, cover with plastic wrap; refrigerate 30 minutes for easier handling.
    3. Heat oven to 375F. For each cookie, with floured hands, shape about 1 tablespoon dough around 1 caramel candy, covering completely.
    4. Put sugar in a small bowl. Roll ball of dough in sugar. Place 2 inches apart on ungreased cookie sheets.
    5. Bake at 37F. for 7 to 10 minutes or until set and slightly cracked. Cool 2 minutes; remove from cookie sheets. Cool on wire rack for 15 minutes or until completely cooled.

    Cookies & Cream Fudge

    Dec 18, 2010

    Cookies and Cream Fudge is an easy 3 ingredient white chocolate fudge with chopped Oreos! Perfect for holiday cookie tins and parties.

    I also have a Cookies and Cream Cookies recipe that is absolutely delicious!

    Cookies and Cream Fudge - easy 3 ingredient white chocolate fudge with chopped Oreos! Perfect for holiday cookie tins and parties.

    I am having the worst time coming up with Christmas goodies this year!

    I always want to make something that just screams CHRISTMAS but I just haven’t stumbled upon much inspiration.

    So I guess I’m sticking with the treats I make every year. Starting with this one!

    I love this Oreo Fudge because it is SO EASY. It’s just 3 ingredients and you literally just combine them and let it set for a couple hours. It doesn’t get any easier than that!

    Cookies and Cream Fudge - easy 3 ingredient white chocolate fudge with chopped Oreos! Perfect for holiday cookie tins and parties.

    Ingredients for Cookies & Cream Fudge

    • White baking chocolate – you can find this with the chocolate chip in the grocery store.
    • Sweetened condensed milk
    • Oreo cookies – switch up the Oreo flavors with the seasons if you want!

    Instructions

    • Prepare. Line an 8 x 8 inch pan with parchment paper.
    • Melt chocolate. Put white baking chocolate and sweetened condensed milk in a saucepan over low heat and stir frequently until chocolate is completely melted.
    • Add cookies. Stir in Oreo cookies.
    • Transfer. Pour mixture into the prepared pan.
    • Let set. Refrigerate for 2 hours or until set. Slice and bring to room temperature before serving.
    Cookies and Cream Fudge - easy 3 ingredient white chocolate fudge with chopped Oreos! Perfect for holiday cookie tins and parties.

    How Long Is It Good For?

    Cookies & cream fudge is good for several weeks in the refrigerator. Make sure to store it in an airtight container.

    Can You Freeze It?

    You can freeze homemade fudge for up to 3 months. I recommend wrapping it tightly in plastic wrap and then putting it in freezer ziploc bags.

    More Fudge Recipes

    • Cranberry Macadamia Nut Fudge
    • Pumpkin Pie Fudge
    • Maple Bacon Fudge
    • Peppermint Fudge
    • Eggnog Fudge
    • Candy Corn Fudge

    Make sure you subscribe to my email list to get all my new recipes delivered right to your inbox!

    You can also follow me on Instagram, Facebook, or Pinterest for even more! 

    📖 Recipe

    Yield: 36

    Cookies & Cream Fudge

    Cookies & Cream Fudge

    Cookies and Cream Fudge is an easy 3 ingredient white chocolate fudge with chopped Oreos! Perfect for holiday cookie tins and parties.

    Prep Time 10 minutes
    Cook Time 10 minutes
    Total Time 20 minutes

    Ingredients

    • 18 ounces white baking chocolate
    • 1 14-ounce can of sweetened condensed milk
    • 3 cups Oreo cookies, chopped

    Instructions

    1. Line an 8 x 8 inch pan with parchment paper.
    2. Put white baking chocolate and sweetened condensed milk in a saucepan over low heat and stir frequently until chocolate is completely melted. Stir in Oreo cookies. Pour mixture into the prepared pan. Refrigerate for 2 hours or until set. Slice and bring to room temperature before serving.

    Recommended Products

    As an Amazon Associate and member of other affiliate programs, I earn from qualifying purchases.

    • 8-inch Cake Pan
      8-inch Cake Pan
    • Parchment Paper
      Parchment Paper

    Nutrition Information:

    Yield:

    36

    Serving Size:

    1

    Amount Per Serving: Calories: 226Total Fat: 12gSaturated Fat: 6gTrans Fat: 0gUnsaturated Fat: 5gCholesterol: 5mgSodium: 96mgCarbohydrates: 26gFiber: 3gSugar: 16gProtein: 4g

    Did you make this recipe?

    Tag me in your Instagram photo - @fakeginger

    © Amanda Livesay
    Cuisine: American / Category: candy


    Peanut Butter Squares

    Dec 03, 2010

    Happy Friday! It’s an even happier Friday this week because I’ve got a great giveaway for you!

    Peanut Butter Squares

    from Tate’s Bake Shop Cookbook

    • ¾ cup firmly packed dark or light brown sugar
    • 3 cups powdered sugar
    • ½ cup salted butter (softened)
    • 2 cups smooth peanut butter
    • 2 cups semisweet chocolate chips
    • 1 tablespoon salted butter
    1. In a large bowl, combine the brown sugar, powdered sugar, butter, and peanut butter, and beat them with an electric mixer until they are smooth and well blended. Pat into an ungreased 15 ½ x 10 ½ x 1-inch pan. Roll the mixture flat on top with a rolling pin.
    2. Melt the chocolate chips and butter on top of a double boiler or in the microwave. Spread the chocolate mixture over the peanut butter mixture and cut into squares while the chocolate is still warm and soft.
    3. Chill the mixture for about 15 minutes and remove the squares from the pan.
     

    Garlic-Thyme Focaccia

    Nov 20, 2010

    .

    Bread, the obvious choice for me. I’ve made no secret of my love of focaccia and have gone on and on about it.

    This bread, it’s good. I ate the end pieces (I know) without complaint. I do think that it needs more salt in the dough but that’s an easy fix. I found the dough difficult to stretch even after a rest and my round loaf, which I’d planned to give away, turned out horribly mangled. (I was too embarrassed to give it away.) It also didn’t hold the indentions very well.

    HOWEVER, the sea salt on top? Spectacular! I have never been so excited by salt before. My all-time favorite herb is thyme so of course I loved it on top. And garlic? You can never go wrong with garlic.

    Overall, a very good bread considering that it does has less calories than a regular focaccia. I was very impressed by how crisp the crust was even though it only called for 1 tablespoon of olive oil.

    📖 Recipe

    0 from 0 votes
    Print

    Garlic-Thyme Focaccia

    Ingredients

    • 1 teaspoon sugar
    • 1 package dry yeast about 2 ¼ teaspoons
    • 1 cup warm water
    • ½ teaspoon fine sea salt
    • 2 ⅓ cups plus 2 tablespoons all-purpose flour divided (about 11 ¼ ounces)
    • Cooking spray
    • 1 tablespoon olive oil
    • 2 garlic cloves thinly sliced
    • 1 tablespoon chopped fresh thyme
    • ¾ teaspoon coarse sea salt

    Instructions

    1. Dissolve sugar and yeast in 1 cup warm water in a large bowl; let stand 5 minutes. Stir in fine sea salt. Lightly spoon flour into dry measuring cups and spoons; level with a knife. Add 2 cups plus 2 tablespoons flour, stirring to form a soft dough. Turn dough out onto a floured surface. Knead dough until smooth and elastic (about 8 minutes); add enough of remaining ⅓ cup flour, 1 tablespoon at a time, to prevent dough from sticking to hands.
    2. Place dough in a large bowl coated with cooking spray, turning to coat top. Cover and let rise in a warm place (85°), free from drafts, 45 minutes or until doubled in size. (Gently press two fingers into dough. If indentation remains, dough has risen enough.)
    3. Heat oil in a small skillet over medium-low heat. Add garlic; cook 5 minutes or until fragrant. Remove garlic from oil with a slotted spoon; discard garlic, and remove pan from heat.
    4. Place dough on a baking sheet coated with cooking spray; pat into a 12 x 8-inch rectangle. Brush garlic oil over dough; sprinkle with thyme. Cover and let rise 25 minutes or until doubled in size.
    5. Preheat oven to 425F.
    6. Make indentations in top of dough using the handle of a wooden spoon or your fingertips; sprinkle dough evenly with coarse sea salt. Bake at 425F for 14 minutes or until lightly browned. Remove from pan; cool on a wire rack.

    Pumpkin Maple Pie

    Nov 17, 2010

    I’m about to tell you something that you probably don’t want to hear. Cover your ears eyes if you can’t handle disappointment.

    Ready?

    I don’t like pumpkin pie!

    Not at all. I always thought I did and then one Thanksgiving I had a revelation. It reminds me of baby food in a pie crust. Appetizing, right? From that year on, I cut out pumpkin pie and doubled my intake of pecan pie to make up for it.

    But as a blogger, I feel like I need to have an amazing pumpkin pie recipe since that’s what people are searching for this time of year. This one is perfection as far as baby food pies go. The maple is subtle but really adds another dimension to an otherwise simple pie. My husband said it’s the best pumpkin pie he’s ever had and the baby had a piece for breakfast (I know…) so if you like pumpkin pie, you will definitely love this!

    (Do not be intimidated by the pie crust recipe calling for a food processor. If you don’t own one, just freeze the butter for a few minutes and then grate it over the flour mixture. You can use your hands or a fork to combine it from there. Just work quickly so the butter doesn’t melt.)

    📖 Recipe

    Yield: 8 servings

    Pumpkin Maple Pie

    Pumpkin Maple Pie
    Prep Time 30 minutes
    Cook Time 1 hour 10 minutes
    Total Time 1 hour 40 minutes

    Ingredients

    • 1 ½ cups all-purpose flour
    • 2 tablespoon sugar
    • ¾ teaspoon salt
    • 1 ¼ sticks 10 tablespoons very cold (frozen is fine) unsalted butter, cut into tablespoon-size pieces
    • 2 ½ tablespoons very cold frozen is even better vegetable shortening, cut into 2 pieces
    • About ¼ cup ice water

    For the pie:

    • 2 eggs
    • 1 15- ounce can pumpkin puree
    • ½ cup heavy cream
    • ½ cup milk
    • ½ cup pure maple syrup
    • ¾ teaspoon cinnamon
    • ¼ teaspoon ground ginger
    • ½ teaspoon salt
    • pinch of cloves

    Instructions

      1. To make the crust:
      2. Put the flour, sugar and salt in a food processor fitted with a metal blade; pulse just to combine the ingredients. Drop in the butter and shortening and pulse only until the butter and shortening care cut into the flour. Don't overdo the mixing - what you're aiming for is to have some pieces the size of fat green peas and others the size of barley. Pulsing the machine on and off, gradually add about 3 tablespoons of the water - add a little water and pulse once, add some more water, pulse again and keep going that way. then use a few long pulses to get the water into the flour. If, after a dozen or so pulses, the dough doesn't look evenly moistened or form soft curds, pulse in as much of the remaining water as necessary, or even a few drops more, to get a dough that will stick together when pinched. Big pieces of butter are fine. Scrape the dough out of the work bowl and onto a work surface.
      3. Shape the dough into a disk and wrap in plastic. Refrigerate the dough for at least 1 hour before rolling. (If your ingredients were very cold and you worked quickly, though, you might be able to roll the dough immediately: the dough should be as cold as if it had just come out of the fridge.)
      4. To roll out the dough: Have a buttered 9-inch pie plate at hand.
      5. You can roll the dough out on a floured surface or between sheets of wax paper or plastic wrap or in a rolling slipcover. (I usually roll this dough out on the floured counter.) If you're working on a counter, turn the dough over frequently and keep the counter floured. If you are rolling between paper, plastic or in a slipcover, make sure to turn the dough over often and to life the paper, plastic or cover frequently so that it doesn't roll into the dough and form creases.
      6. If you've got time, slide the rolled-out dough into the fridge for about 20 mins to rest and firm up.
      7. Fit the dough into the pie plate and, using a pair of scissors, cut the excess dough to a ¼- to ½-inch overhang. Fold the dough under itself, so that it hangs over the edge just a tad, and flute or pinch the crust to make a decorative edge. Alternatively, you can finish the crust by pressing it with the tines of a fork.

    To make the pie:

    1. Set an oven rack in the lowest position and heat oven to 350F. Place the pie plate on a foil-lined baking sheet.
    2. In a large bowl, whisk together the eggs, pumpkin, cream, milk, maple syrup, cinnamon, ginger, salt, and cloves.
    3. Pour the pumpkin mixture into the crust and bake until the center is set, 60 to 70 minutes. Let cool to room temperature before serving.

    Nutrition Information:

    Yield:

    8

    Serving Size:

    1

    Amount Per Serving: Calories: 387Total Fat: 23gSaturated Fat: 14gTrans Fat: 1gUnsaturated Fat: 8gCholesterol: 104mgSodium: 479mgCarbohydrates: 40gFiber: 2gSugar: 18gProtein: 6g

    Did you make this recipe?

    Tag me in your Instagram photo - @fakeginger

    © Amanda Livesay
    Cuisine: American / Category: pie

    Vanilla Bean Cupcakes

    Nov 11, 2010

    As you’re reading this, I’m probably on a plane somewhere en route to NYC for the I Can’t Believe It’s Not Butter Holiday Bakeoff. Don’t forget to enter the giveaway if you haven’t already!

    I went to a General Mills blog event back in August and really learned a lot about myself on that trip. See, GM was awesome and put together a booklet with all of the bloggers’ pictures, blog URLs, and a blurb about each person. As I was on the plane, I was reading Twitter reports about how it said so-and-so was a homeschooling mom of 6 kids who loves housework and also runs a business out of her home while coaching little league and keeping up with her yoga practice. Okay, I might be exaggerating slightly but seriously, amazing things about these amazing women.

    So I get to the hotel and flip open the book to see what it says about me. Any guesses?

    Anyone?

    “Amanda blogs about food and really likes the Real Housewives.”

    Done.

    I about fell on the floor.

    And then I realized it’s my own fault. Because I talk about the Real Housewives. A lot. Way more than is probably considered “normal”. In fact, I bet that while you’re reading this I’m on the plane wondering if the hotel we’re staying at will have Bravo because tonight is the fight between Camille and Kyle.

    I have a problem. I recognize it now and today I am here to tell you 7 things that you may not know about me so that next time someone needs to include me in a “Get to know your fellow bloggers” booklet, there’s something semi-interesting to say about me.

    1. My first car was a 1985 Z28 Camaro.
    2. Once, in a fit of blind rage, I bit a hole in my parent’s shower curtain.
    3. My best friend and I once ate an entire cheesecake while doing serious MySpace stalking.
    4. My favorite color is purple.
    5. My first job was at McDonald’s.
    6. I own every Anne Hathaway movie ever.
    7. I drink my wine on ice, in a plastic Starbucks cup.


    📖 Recipe

    0 from 0 votes
    Print

    Vanilla Bean Cupcakes

    Ingredients

    For the cupcakes:

    • 1 ½ cups all-purpose flour
    • 1 cup granulated sugar
    • 1 ½ teaspoons baking powder
    • ½ teaspoon table salt
    • 8 tablespoons unsalted butter 1 stick, room temperature
    • ½ cup sour cream
    • 1 large egg room temperature
    • 2 large egg yolks room temperature
    • 1 vanilla bean split and scraped to remove seeds

    For the frosting:

    • 5 tablespoons flour
    • 1 cup milk
    • 1 teaspoon vanilla
    • 1 cup butter
    • 1 cup granulated sugar

    Instructions

    To make the cupcakes:

    1. Adjust oven rack to middle position; heat oven to 350 degrees F. Line standard muffin/cupcake tin with paper or foil liners.
    2. Whisk together flour, sugar, baking powder, and salt in bowl of standing mixer fitted with paddle attachment. Add butter, sour cream, egg and egg yolks, and vanilla bean seeds; beat at medium speed until smooth and satiny, about 30 seconds. Scrape down sides of bowl with rubber spatula and mix by hand until smooth and no flour pockets remain.
    3. Divide batter evenly among cups of prepared tin. Bake until cupcake tops are pale gold and toothpick or skewer inserted into center comes out clean, 20 to 24 minutes. Remove the cupcakes from tin and transfer to wire rack; cool cupcakes to room temperature before frosting.

    To make the frosting:

    1. In a small saucepan, whisk flour into milk and heat, stirring constantly, until it thickens. You want it to be very thick, thicker than cake mix, more like a brownie mix is. Remove from heat and let it cool to room temperature. (If I’m in a hurry, I place the saucepan over ice in the sink for about 10 minutes or so until the mixture cools.) It must be completely cool before you use it in the next step. Stir in vanilla.
    2. While the mixture is cooling, cream the butter and sugar together until light and fluffy. You don’t want any sugar graininess left. Then add the completely cooled milk/flour/vanilla mixture and beat the living daylights out of it. If it looks separated, you haven’t beaten it enough! Beat it until it all combines and resembles whipped cream. Spread on cooled cupcakes and dip in sprinkles if you wish!

    Red Velvet Cupcakes

    Nov 09, 2010

    We had a small family reunion recently and I offered to bring cupcakes, mainly because I didn’t know what else to bring. My plan was 3 dozen in 3 different flavors and obviously red velvet had to be one of them. Red velvet is always a crowd pleaser!

    Honestly, I didn’t try these but they were definitely the most popular cupcake and I do believe I heard physical threats over them. (I kid.) I did try the cream cheese icing which is always excellent. My only problem with it is that it’s not stiff enough to pipe and really pile on top of the cupcake.

    The recipe was simple. I did only make half of the recipe (which was a mistake) and it turned out fine. So if you’re not looking to have 24 cupcakes on hand, keep that in mind. Like I said, I didn’t taste these cupcakes but I liked the look of this recipe much more than others because of how little cocoa powder it calls for.

    📖 Recipe

    0 from 0 votes
    Print

    Red Velvet Cupcakes

    Ingredients

    For the cupcakes:

    • 2 ½ cups sifted cake flour
    • 1 teaspoon baking powder
    • 1 teaspoon salt
    • 2 tablespoons unsweetened cocoa powder
    • 2 oz. red food coloring two bottles
    • ½ cup unsalted butter softened
    • 1 ½ cups sugar
    • 2 eggs at room temperature
    • 1 teaspoon vanilla extract
    • 1 cup buttermilk at room temperature
    • 1 teaspoon white vinegar
    • 1 teaspoon baking soda

    For the cream cheese frosting:

    • 16 oz. cream cheese 2 packages, softened
    • ½ cup unsalted butter one stick, softened
    • 1 teaspoon vanilla extract
    • 2 ½ cups powdered sugar sifted
    • pinch of salt

    Instructions

    For the cupcakes:

    1. Preheat oven to 350 degrees. Line two 12-cup muffin tins with cupcake papers.
    2. Sift together the cake flour, baking powder, and salt into a medium bowl; set aside. In a small bowl, mix food coloring and cocoa powder to form a thin paste without lumps; set aside.
    3. In a large bowl, using a hand mixer or stand mixer, beat butter and sugar together until light and fluffy, about three minutes. Beat in eggs, one at a time, then beat in vanilla and the red cocoa paste, scraping down the bowl with a spatula as you go. Add one third of the flour mixture to the butter mixture, beat well, then beat in half of the buttermilk. Beat in another third of flour mixture, then second half of buttermilk. End with the last third of the flour mixture, beat until well combined, making sure to scrape down the bowl with a spatula.
    4. In a small bowl, mix vinegar and baking soda. Yes, it will fizz! Add vinegar mixture to the cake batter and stir well to combine. Using an ice cream scoop, fill cupcake cups with cake batter (they should be ⅔ – ¾ full). You may not fill all the cups, I ended up with 20 cupcakes. Place muffin tins on the middle rack of a preheated 350 degree oven. Bake for approximately 20-22 minutes, rotating pans halfway through. Cupcakes are done when a toothpick inserted in the center comes out clean. Check early and don’t overbake!
    5. Cool the cupcakes in their tins on a wire rack for 10 minutes then remove and allow to cool completely before frosting. Frost cupcakes with cream cheese icing

    For the cream cheese frosting:

    1. With an electric mixer, blend together cream cheese and butter until smooth. Turn mixer to low speed and blend in powdered sugar, salt and vanilla extract. Turn mixer on high and beat until light and fluffy. Use immediately or refrigerate, covered, until ready to use. If refrigerated, the frosting will need to be brought to room temperature before using (after frosting softens up, beat with mixer until smooth).

    « Previous Page
    Next Page »

    Primary Sidebar

    Amanda Livesay
    Hi, I'm Amanda! DFW food blogger, mom of boys, and crazy dog lady.
    Read more
    Privacy Policy
    Privacy Policy

    Footer

    ↑ back to top

    About

    • Privacy Policy
    • About Fake Ginger

    Newsletter

    • Sign Up for weekly emails featuring new recipes!

    As an Amazon Associate I earn from qualifying purchases.

    Copyright © 2024 FakeGinger.com