• Skip to primary navigation
  • Skip to main content
  • Skip to primary sidebar
  • Home
  • About
  • Recipes

Fake Ginger

menu icon
go to homepage
  • Recipe Index
  • About
  • Subscribe
    • Facebook
    • Instagram
    • Pinterest
  • subscribe
    search icon
    Homepage link
    • Recipe Index
    • About
    • Subscribe
    • Facebook
    • Instagram
    • Pinterest
  • ×
    Home » Page 51

    Sweet Potato Casserole

    Sweet Potato Casserole

    Nov 22, 2011

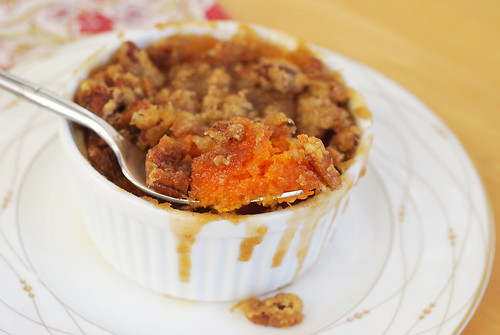
    Ahh, sweet potatoes – the most important part of Thanksgiving! I love sweet potatoes anyway but the Thanksgiving sweet potatoes are even better with all their brown sugar and pecans and extra extra butter. This version is a pretty standard sweet potato casserole but the amount of topping is so great that it actually becomes like a crust on top of the sweet potatoes.

    For this I used roasted sweet potatoes (just baked for about 45 minutes at 400F, or until they’re easy to mash) but you can use the canned ones if you want. They can also be prepared in advance – I wouldn’t add the topping until they are ready to go in the oven but the topping can be mixed up and refrigerated until you’re ready.

    📖 Recipe

    0 from 0 votes
    Print

    Sweet Potato Casserole

    Ingredients

    For the Crust:

    • 1 cup brown sugar
    • ⅓ cup flour
    • 1 cup chopped pecans
    • ⅓ cup butter melted

    Sweet Potato Mixture:

    • 3 cups cooked and mashed sweet potatoes
    • 1 cup sugar
    • ½ teaspoon salt
    • 1 teaspoon vanilla
    • 2 eggs well beaten
    • ½ cup 1 stick butter, melted
    • splash of milk if needed

    Instructions

    1. To make the crust, combine brown sugar, flour, nuts and butter in mixing bowl. Set aside.
    2. Preheat oven to 375F. Spray a medium-size casserole dish with nonstick spray.
    3. Combine sweet potatoes, sugar, salt, vanilla, eggs and butter in a large mixing bowl in the order listed. Beat thoroughly with a hand mixer for about 3-4 minutes to increase the fluffiness of the sweet potato mixture. Add a splash of milk if needed and mix.
    4. Pour mixture into the baking dish. Bake for 25 minutes. At this point, dish can be covered and refrigerated for a couple of days.
    5. Sprinkle the surface of the sweet potato mixture evenly with the crust mixture and return to oven for 10 minutes. Allow to set at least 30 minutes before serving.
    6. The brown sugar and pecan crust should be slightly browned and crunchy.

    Dinner Rolls

    Nov 19, 2011

    Bread is, of course, one of my favorite things in the world. I think it really completes a meal and homemade bread? It just makes everything better! These fancy rolls (that really aren’t complicated at all!) are perfect for wowing your Thanksgiving guests. Make them the day before and just reheat right before serving.

    These rolls are supposed to be like the famous Lambert’s Throwed Rolls. I have never visited Lambert’s so I can’t vouch for that but they are terrific! Soft and buttery and everything a good roll should be. To really put these over the top, mix a little softened butter and honey together for serving. They will blow your mind!

    📖 Recipe

    0 from 0 votes
    Print

    Dinner Rolls

    Ingredients

    • 1 teaspoon sugar
    • 2 ¼ teaspoons 1 pkg. active dry yeast
    • ¼ cup warm water 110-115 degrees F
    • 1 cup warm milk 110-115 degrees F
    • ¼ cup ½ stick melted butter
    • ¼ cup sugar
    • 1 egg lightly beaten
    • 1 teaspoon salt
    • 4 cups all-purpose or bread flour

    Instructions

    1. In a small bowl, combine the teaspoon of sugar and the yeast with the warm water and allow to foam (5-10 minutes).
    2. In a large mixing bowl, mix the warm milk, melted butter, sugar, egg and salt. Add the yeast mixture and stir.
    3. Stir in 3 cups of flour. Stir or knead in another cup of flour (or more, if needed) and knead for 5-10 minutes to make a smooth, elastic dough.
    4. Scrape the large mixing bowl clean (or as clean as possible) and place dough in the bowl. Grease the top of the dough with butter or oil and cover with a clean cloth. Place in a warm location (I turn the oven on for 1-2 minutes, then turn OFF and place covered bowl in the warm oven to rise) and let rise until doubled in size, about 60-90 minutes.
    5. Liberally butter a 12-cup muffin pan. With buttery hands, deflate the dough and divide into 24 pieces. Roll each piece into a ball. Place two balls in each muffin cup. Gently grease the tops and cover with a clean towel.
    6. Let rolls rise in a warm place until nearly doubled in size, about 45 minutes. Preheat oven to 350 degrees Fahrenheit and bake rolls for 20-25 minutes, until tops are browned and rolls are done. (Check rolls after 15 minutes, and cover loosely with foil to prevent excess browning, if needed.)

    Grandma’s Cinnamon Rolls

    Nov 13, 2011

    We’re about a week and a half away from Thanksgiving so it’s about time I start giving you some holiday recipes, huh? Recently Red Star Yeast contacted me and asked if I wanted to bake up some of their holiday treats to share with you guys. How could I say no? Working with yeast is one of my favorite things in the world and I’m thrilled to bring you some recipes that will hopefully make your holiday meals even better!

    We’re kicking the festivities off with the perfect Thanksgiving morning breakfast! It’s just what you need the morning of – a little sweetness before a day filled with savory eats!

    I’m not sure whose grandma created this created this recipe but she’s a smart cookie, that grandma. The dough is deliciously sweet and rises perfectly to create light and fluffy rolls. The filling is a fairly standard cinnamon roll filling: butter, sugar, cinnamon, and nuts – all the good stuff, of course. And the glaze, oh my goodness, the glaze. Normally I use heavy cream to thin out glazes but this recipe calls for butter! I cannot even begin to describe how amazing it is. It also includes maple flavoring (you could use syrup if you don’t have flavoring – just use a tablespoon and decrease the butter to 2 tablespoons) and coffee which just puts these bad boys completely over the top.

    This recipe makes a ton so it’s perfect if you’ve got a house full of people and if not, it’s easily halved and still turns out perfectly.

    For the dough:

    • ¾ cup water
    • ¾ cup milk
    • ¼ cup butter (at room temperature)
    • 2 eggs (at room temperature)
    • 1½ teaspoon salt
    • ½ cup sugar
    • 5¾ cup bread flour
    • 4½ teaspoons yeast

    For the filling:

    • ⅓ cup butter (melted)
    • ½ cup nuts (chopped (I used pecans))
    • ¾ cup sugar
    • 2 tablespoons cinnamon

    For the glaze:

    • 2 cups powdered sugar
    • ½ teaspoon maple flavoring
    • 2 tablespoons melted butter
    • 3 – 4 tablespoons hot coffee
    1. In large mixer bowl, combine 2 cups flour, yeast, ½ cup sugar, and salt; mix well. Heat milk, water and butter to 120F to 130F; butter does not need to melt. Add to flour mixture; add eggs. Blend at low speed until moistened; beat 3 minutes at medium speed. By hand, gradually stir in enough remaining flour to make a soft dough. Knead on floured surface until smooth and elastic, 5 to 8 minutes. Place in greased bowl, turning to grease top. Cover; let rise in warm place until dough tests ripe.
    2. To make the filling, combine ¾ cup sugar, nuts, and cinnamon; set aside.
    3. Punch down dough. Divide into 2 parts. On lightly floured surface, roll or pat each half to a 12 x 9-inch rectangle. Brush each part with half of melted butter; sprinkle half of Filling over dough. Starting with 12-inch side, roll up tightly. Pinch edges to seal. Cut into 12 slices. Place in greased 13 x 9-inch pans. Cover; let rise until indentation remains after lightly touching side of roll.
    4. Bake at 375F for 20 to 25 minutes until golden brown.
    5. Combine all Glaze ingredients; blend until smooth. Drizzle Glaze over hot rolls; cool.
     

    Pasta Fagioli

    Nov 10, 2011

    Pasta Fagioli is a hearty soup is filled with spicy Italian sausage, veggies, pasta, and beans and topped with fresh shredded Parmesan cheese. It is serious comfort food that the whole family will love! And it tastes just like the Olive Garden version!

    Pasta Fagioli - Olive Garden copycat recipe. This hearty soup is filled with spicy Italian sausage, veggies, pasta, and beans and topped with fresh shredded Parmesan cheese. It is serious comfort food that the whole family will love!

    This is one of my favorite soups in the world. Pasta Fagioli means “pasta and beans” but it’s so much more than that. It’s a spicy tomato-based soup made with Italian sausage, vegetables, beans, and pasta. And then it’s topped with Parmean cheese.

    It is my go to on cold nights or just days when I need a bowl of warm comfort food. I’ve even been known to leave out the Italian sausage when I want something a little lighter but still cozy.

    This is one of the soup options at Olive Garden and I have to tell you, I like my version better.

    Pasta Fagioli - Olive Garden copycat recipe. This hearty soup is filled with spicy Italian sausage, veggies, pasta, and beans and topped with fresh shredded Parmesan cheese. It is serious comfort food that the whole family will love!

    Ingredients

    Scroll down for exact amounts.

    • Olive oil
    • Onion
    • Carrot
    • Celery
    • Garlic
    • Hot Italian sausage – use mild if you don’t want too much heat in your soup.
    • Italian seasoning
    • Red pepper flakes – adjust to your taste.
    • Crushed tomatoes
    • Chicken stock – use homemade or store-bought. I buy a low-sodium chicken stock so that I can control how salty my soup is.
    • Cannellini beans – these beans are so hearty, they are perfect in a soup like this.
    • ditalini pasta – if you can’t find ditalini pasta, use another small pasta shape.
    • Parmesan cheese – this is for sprinkling on top before serving.

    Instructions

    • Heat olive oil in a large heavy pot over medium high heat.
    • Add the diced onion and cook until it just begins to soften, about 2 minutes. Add celery and carrots; cook, stirring frequently, for another 3 minutes. Add garlic and cook just until fragrant, about 30 seconds.
    • Add the sausage to the pot, crumbling as it cooks. Cook until the sausage is no longer pink.
    • Stir in Italian seasoning and red pepper. Stir in tomatoes and stock.
    • Bring the mixture to a boil. Reduce heat and simmer 30 minutes.
    • Stir in the beans and ditalini. (Add an extra cup of stock or water at this point if it’s boiled down too much.)
    • Simmer for 6- 8 minutes or until pasta is tender.
    • Serve piping hot with Parmesan cheese.
    Overhead shot of Pasta Fagioli with rolls on the side
    How Long Is It Good For?

    Pasta Fagioli will stay good for 3 – 5 days in the refrigerator. Make sure to store it in an airtight container – these airtight containers are my absolute favorite for leftovers.

    The pasta will continue to absorb the liquid as it sits so you may need to add more chicken broth to the soup when you reheat it. You can reheat in the microwave or on the stovetop.

    Can You Freeze It?

    Yes! It freezes very well! I recommend freezing it in airtight freezer-safe soup containers.

    My favorite way to reheat it from frozen is to add it (frozen) to the slow cooker with a couple extra splashes of broth and let it warm for a couple hours. You can also let it thaw in the fridge and reheat on the stove or microwave if you prefer. 

    What To Serve With It?

    I like to serve Pasta Fagioli with a green salad and some kind of bread to dip into the broth. It is also perfectly fine on it’s own, especially on a cold day. 

    Soup with Italian sausage, pasta, beans, and vegetables in a spicy tomato-based broth. With Parmesan cheese and green onions on top.

    More Soup Recipes

    • Creamy Tomato Tortellini Soup 
    • Chicken and Wild Rice Soup
    • Broccoli Cheddar Soup 
    • Autumn Squash Soup
    • Dill Pickle Soup
    • Mom’s Homemade Chicken Noodle Soup

    Make sure you subscribe to my email list to get all my new recipes delivered right to your inbox!

    You can also follow me on Instagram, Facebook, or Pinterest for even more! 

    📖 Recipe

    Yield: 8 servings

    Pasta Fagioli

    Pasta Fagioli

    Pasta Fagioli is a hearty soup is filled with spicy Italian sausage, veggies, pasta, and beans and topped with fresh shredded Parmesan cheese. It is serious comfort food that the whole family will love! And it tastes just like the Olive Garden version!

    Prep Time 10 minutes
    Cook Time 40 minutes
    Total Time 50 minutes

    Ingredients

    • 1 tablespoon olive oil
    • 1 onion, chopped
    • 1 carrot, peeled & chopped
    • 1 stalk celery, chopped
    • 2 cloves garlic, finely chopped
    • 1 lb hot Italian sausage, casings removed if necessary
    • 1 tablespoon Italian seasoning
    • 1 -2 teaspoon red pepper flakes, to taste
    • 1 15- ounce can crushed tomatoes
    • 3 - 4 cups chicken stock, or vegetable stock
    • 1 can cannellini beans
    • 1 cup ditalini, or other small pasta
    • Parmesan cheese, for serving

    Instructions

    1. Heat olive oil in a large heavy pot over medium high heat. Add the diced onion and cook until it just begins to soften, about 2 minutes. Add celery and carrots; cook, stirring frequently, for another 3 minutes. Add garlic and cook just until fragrant, about 30 seconds.
    2. Add the sausage to the pot, crumbling as it cooks. Cook until the sausage is no longer pink. Stir in Italian seasoning and red pepper. Stir in tomatoes and stock.
    3. Bring the mixture to a boil. Reduce heat and simmer 30 minutes.
    4. Stir in the beans and ditalini. (Add an extra cup of stock or water at this point if it's boiled down too much.) Simmer for 6- 8 minutes or until pasta is tender.
    5. Serve piping hot with Parmesan cheese.

    Recommended Products

    As an Amazon Associate and member of other affiliate programs, I earn from qualifying purchases.

    • Barilla Ditalini
      Barilla Ditalini
    • Dutch Oven
      Dutch Oven

    Nutrition Information:

    Yield:

    8

    Serving Size:

    1

    Amount Per Serving: Calories: 478Total Fat: 22gSaturated Fat: 7gTrans Fat: 0gUnsaturated Fat: 16gCholesterol: 44mgSodium: 1319mgCarbohydrates: 42gFiber: 5gSugar: 10gProtein: 27g

    Did you make this recipe?

    Tag me in your Instagram photo - @fakeginger

    © Amanda Livesay
    Cuisine: italian / Category: soup

    Pumpkin Whoopie Pies

    Nov 04, 2011

    I blame Nicole for these.

    See, she tweeted a link for her pumpkin whoopie pie recipe sometime last week and all I could think about the rest of the morning was pumpkin whoopie pies. And I don’t even like whoopie pies! Do I even have to tell you what I ended up baking that very afternoon?

    I didn’t use Nicole’s recipe because I was missing some ingredients but the recipe I used turned out fantastic! The cakes were so moist and just pumkin-y enough and the cream cheese frosting? Always good. I’m not gonna lie, after making a few whoopie pies, I ended up just smearing cream cheese frosting on the rest of the cakes. You get more cream cheese frosting per cake that way. ;)

    📖 Recipe

    0 from 0 votes
    Print

    Pumpkin Whoopie Pies

    from Everyday with Rachael Ray

    Ingredients

    For the cakes:

    • ½ cup 1 stick butter, melted and cooled slightly
    • 1 cup packed light brown sugar
    • 2 large eggs at room temperature, lightly beaten
    • 1 cup canned pure pumpkin puree
    • 1 tablespoon pumpkin pie spice
    • 1½ teaspoons pure vanilla extract
    • 1 teaspoon baking powder
    • 1 teaspoon baking soda
    • ¾ teaspoon salt
    • 1-⅔ cups flour

    For the frosting:

    • ½ stick 4 tablespoons unsalted butter, softened
    • 4 ounces cream cheese softened
    • 1 cup powdered sugar
    • pinch of salt

    Instructions

    1. Preheat the oven to 350F. Line two baking sheets with parchment paper.
    2. In a large bowl, whisk together the melted butter and brown sugar until smooth. Whisk in the eggs, pumpkin puree, pumpkin pie spice, 1 teaspoon vanilla, the baking powder, the baking soda and ¾ teaspoon salt. Using a rubber spatula, fold in the flour.
    3. Using an ice cream scoop or tablespoon, drop 12 generous mounds of batter, spaced evenly, onto each baking sheet. Bake until springy to the touch, about 10 minutes. Transfer to a rack to cool completely.
    4. Meanwhile, using an electric mixer, cream the softened butter with the cream cheese. Add the powdered sugar, ½ teaspoon vanilla and the pinch of salt; mix on low speed until blended, then beat on medium-high speed until fluffy, about 2 minutes.
    5. Spread the flat side of 12 cakes with the cream cheese frosting. Top each with another cake.


    Honey BBQ Meatloaf

    Nov 03, 2011

    Easy and delicious Honey BBQ Meatloaf recipe made with ground beef and topped with a sauce made from barbecue sauce and honey. The whole family is going to love this dinner!

    If you love meatloaf as much as I do, try Bacon Wrapped Meatloaf and Mini Turkey Meatloaves!

    Can I confess something?

    I have a deep love for meatloaf.

    Still here?

    I know, I know – no one likes to talk about meatloaf. First of all, the word meatloaf is horrible. Beyond horrible even. It just sounds unappetizing. Second, the idea of a big log of ground meat? Also unappetizing.

    But I love it. Looooove it. I would make it weekly if I thought my husband wouldn’t complain. I have a favorite recipe (the one my mom made when I was growing up, of course) but I’ve been trying to shake things up lately.

    This is a pretty normal meatloaf but it has BBQ sauce mixed right into the meat and then it’s topped with BBQ sauce and honey. I can’t even talk about how good that smelled in the oven.

    Ingredients

    • Lean ground beef – I suggest 90/10 ground beef for this meatloaf recipe.
    • Panko bread crumbs
    • Worcestershire sauce
    • Dijon mustard
    • Barbecue sauce – use a smoky barbecue sauce instead of one that has honey or brown sugar added. This is going in the meatloaf itself and the topping.
    • Honey – this is going in the meatloaf and in the topping.
    • Salt and pepper

    How To Make BBQ Meatloaf

    • Make meat mixture. Mix together the ground beef, panko bread crumbs, 2 tablespoons worcestershire sauce, the dijon mustard, ½ cup of the barbecue sauce, 1 tablespoon honey, salt, and black pepper.
    • Shape. Shape the mixture into a long, thick log and place in an oiled rimmed baking dish.
    • Make sauce. In a small bowl, whisk together the remaining ¼ cup barbecue sauce, 1 tablespoon honey, and 2 teaspoons worcestershire sauce.
    • Add sauce to meat. Spread half of this mixture evenly all over the meatloaf. Reserve the other half for serving.
    • Bake. Bake at 350F for 45 minutes to an hour.
    • Add more sauce and serve. Slice and drizzle with reserved honey barbecue sauce.

    How Long Is Meatloaf Good For?

    Meatloaf is good for up to 3 days in the refrigerator. Make sure to store it in an airtight container.

    You can reheat in the microwave or oven.

    Can You Freeze It?

    You can freeze it for up to 3 months. I would freeze before adding the sauce to the top. Wrap it tightly in plastic wrap and then place in a freezer ziploc bag.

    When you are ready to serve, let it defrost overnight in the fridge and bake as the recipe says.

    More Ground Beef Recipes

    • Ground Beef Stroganoff
    • Ground Beef Enchiladas
    • Baked Spaghetti Casserole
    • Teriyaki Ground Beef
    • Frito Pie Casserole

    Make sure you subscribe to my email list to get all my new recipes delivered right to your inbox!

    You can also follow me on Instagram, Facebook, or Pinterest for even more! 

    📖 Recipe

    Yield: about 6 servings

    Honey BBQ Meatloaf

    Honey BBQ Meatloaf

    Easy and delicious Honey BBQ Meatloaf recipe made with ground beef and topped with a sauce made from barbecue sauce and honey. The whole family is going to love this dinner!

    Ingredients

    • 1 pound 90% lean ground beef
    • ½ cup panko bread crumbs
    • 2 tablespoons plus 2 teaspoons worcestershire sauce (divided)
    • 1 tablespoon dijon mustard
    • ¾ cup smoky barbecue sauce (divided)
    • 2 tablespoons honey (divided)
    • 1 teaspoon salt
    • 1 teaspoon black pepper

    Instructions

      • In a large bowl, use your hands to mix together the ground beef, panko bread crumbs, 2 tablespoons worcestershire sauce, the dijon mustard, ½ cup of the barbecue sauce, 1 tablespoon honey, salt, and black pepper.
      • Shape the mixture into a long, thick log and place in an oiled rimmed baking dish. Be careful not to pack the meat too tightly or you'll end up with a very dense, tough loaf.
      • In a small bowl, whisk together the remaining ¼ cup barbecue sauce, 1 tablespoon honey, and 2 teaspoons worcestershire sauce. Spread half of this mixture evenly all over the meatloaf. Reserve the other half for serving.
      • Bake for 45 minutes to an hour. Slice and drizzle with reserved honey barbecue sauce.

      Recommended Products

      As an Amazon Associate and member of other affiliate programs, I earn from qualifying purchases.

      • Rimmed Baking Sheet
        Rimmed Baking Sheet

      Did you make this recipe?

      Tag me in your Instagram photo - @fakeginger

      © Amanda Livesay
      Cuisine: American / Category: beef

      Pork Milanese

      Nov 01, 2011

      I have a serious love/hate relationship with pork chops. I love how inexpensive there are, I hate how bland they can be. I vary rarely buy them because of the bland factor but sometimes the grocery sales get the best of me. I’m glad I finally have a fantastic recipe to make!

      Pork Milanese is one of those things I always saw on restaurant menus but I never really knew what it was until I made it. It’s basically a pork chop that has been pounded thin, coated in panko and Parmesan, and then pan-fried until brown and delicious. And then, as if that isn’t tasty enough, you squeeze some fresh lemon over the top.

      This was probably one of my favorite things I’ve cooked for dinner in a very long time. The tartness of the lemon is amazing with the salty Parmesan. I seriously thought about frying some bread crumbs in butter, squeezing a lemon over the top, and then eating it with a spoon after we ran out of pork chops. That good.

      📖 Recipe

      0 from 0 votes
      Print

      Pork Milanese

      Prep Time 15 minutes
      Cook Time 30 minutes

      Ingredients

      • 1 cup panko bread crumbs
      • ½ cup finely grated Parmesan
      • 2 large eggs
      • 6 boneless pork loin chops pounded thin to ⅓ inch-thick
      • Salt and freshly ground black pepper
      • ¼ cup plus 3 tablespoons olive oil
      • 6 lemon wedges

      Instructions

      1. Preheat the oven to 200 degrees F.
      2. Coarsely crush the panko into a large shallow bowl. Stir the cheese into the panko.
      3. Lightly beat the eggs in another large shallow bowl.
      4. Sprinkle the pork generously with salt and pepper. Dip the pork, 1 piece at a time, in the egg, allowing the excess to drip off, then dredge the pork in the crumb mixture, patting to coat completely. Place the pork on a small baking sheet.
      5. Heat ¼ cup of oil in a heavy large skillet over medium-high heat. Add half of the pork to the hot oil and cook until golden brown and just cooked through, about 3 minutes per side. Transfer to paper towels to drain, then transfer them to a clean baking sheet and keep them warm in the oven. Add the remaining 3 tablespoons of oil to the skillet and fry the remaining pork.
      6. Transfer the pork to plates and serve with lemon wedges.

      Pumpkin Snickerdoodles

      Oct 31, 2011

      I loooove snickerdoodles. I mean, I really love snickerdoodles. They’re probably my favorite Christmas cookie ever so y’all know that as soon as I saw a pumpkin version, I had to give it a go.

      There’s nothing I didn’t love about this cookie. It was soft on the inside with just a slight pumpkin flavor and then crispy on the outside from the cinnamon sugar mixture. Perfection, I tell you. Perfection.

      I do suggest you double the recipe because these will go fast!

      📖 Recipe

      0 from 0 votes
      Print

      Pumpkin Snickerdoodles

      Ingredients

      For the cookies:

      • 1 cup 2 sticks salted butter, at room temperature
      • 1 cup granulated white sugar
      • ½ cup light brown sugar
      • ¾ cup pumpkin puree
      • 1 large egg
      • 2 teaspoons vanilla extract
      • 3 ¾ cups all-purpose flour
      • 1 ½ teaspoons baking powder
      • ½ teaspoon salt
      • ½ teaspoon ground cinnamon

      For the cinnamon sugar:

      • ½ cup granulated white sugar
      • 1 teaspoon ground cinnamon

      Instructions

      1. In a large bowl, use an electric mixer to cream the butter until fluffy. Add sugars and pumpkin puree and beat well. Mix in egg and vanilla, scraping down sides of the bowl to incorporate all of the ingredients.
      2. In a medium bowl, whisk together flour, baking powder, salt and ground cinnamon. Beat flour mixture into liquid mixture a little at a time just until incorporated.
      3. Cover dough with plastic and chill at least an hour, or until dough becomes slightly firm.
      4. When ready to bake, preheat oven to 350°F. Line baking sheets with parchment paper (or spray with nonstick spray). Mix rolling sugar ingredients in a small bowl.
      5. Remove cookie dough from refrigerator. Use a medium cookie scoop (1 ½ Tablespoons) or a large spoon to scoop out dough and roll into balls. Use your hands to roll the balls in the cinnamon sugar and make sure they're coated really well. Place 2 inches apart on the prepared baking sheets. Use a glass with a nice, flat bottom to dip in sugar and flatten the balls.
      6. Bake for 10 to 14 minutes, or until they are slightly firm to the touch. Let cool on baking sheets for 5 minutes or so, then remove them to a wire rack to cool completely.

      Three Musketeers

      Oct 27, 2011

      Homemade Three Musketeers made with only 3 ingredients! These taste just like the real thing and they are so easy!

      Homemade Three Musketeers - only 3 ingredients! These taste just like the real thing and they are so easy!

      This right here is the easiest candy recipe you will ever see.

      (It will be even easier for you than it was for me because I know you don’t suck at melting chocolate. I, however, consider myself lucky that I got 2 decent looking bars. Someone come give me chocolate melting lessons. Please.)

      So I don’t love Three Musketeers. I think it is the lamest candy bar. I mean, have you ever heard someone say, “Wow, I’m really craving a Three Musketeers”? Yeah, I haven’t either. BUT I saw this recipe on Beantown Baker almost a year ago and I remember tweeting about it.

      It’s not often that I remember tweeting something. That recipe made a serious impression on me.

      When I set out to do Halloween week, I immediately thought of the recipe. I pulled it up, saw the super short ingredient list, and made it that day.

      They taste exactly like a Three Musketeers bar only better because hello! homemade. It’s got that bizarre spongy texture that the store-bought version has! Who knew Cool Whip and melted chocolate could create that! I’m so in love with these, y’all.

      Ingredients

      • Cool Whip
      • Semisweet chocolate chips
      • Milk chocolate chips
      • Vegetable oil

      Instructions

      • Prepare. Line an 8 or 9-inch square pan with wax paper.
      • Melt chocolate. In a medium bowl, melt semi-sweet chocolate chips in the microwave at fifty percent power, or use a double boiler.
      • Add Cool Whip. Using an electric mixer on high speed, beat melted chocolate for about 30 seconds. Add Cool Whip to melted chocolate and beat until well combined and fluffy, 30-60 seconds more.
      • Transfer to pan. Spread chocolate mixture evenly into prepared pan (if mixture is too stiff, press into pan with lightly dampened hands).
      • Chill. Place in freezer for 30 minutes.
      • Cut into squares. Remove pan from freezer and turn chocolate mixture onto a cutting board; cut into one-inch squares. Return squares to freezer for another 15-20 minutes.
      • Melt chocolate. Meanwhile, melt milk chocolate chips with 2 tablespoons of vegetable oil and stir until well combined.
      • Coat in chocolate. Dip frozen chocolate squares into melted chocolate to coat. Place on wax paper to set.
      • Store. Keep chocolates in an airtight container in the refrigerator.

      More Chocolate Recipes

      • Fudge Rounds
      • Chocolate Truffle Pie
      • Chocolate Pudding Pie
      • Buckeye Fudge
      • Crockpot Candy

      Make sure you subscribe to my email list to get all my new recipes delivered right to your inbox!

      You can also follow me on Instagram, Facebook, or Pinterest for even more! 

      📖 Recipe

      Three Musketeers

      Three Musketeers

      Homemade Three Musketeers made with only 3 ingredients! These taste just like the real thing and they are so easy!

      Ingredients

      • 1 8 oz container Cool Whip
      • 2 cup semi sweet chocolate chips
      • 2 cup milk chocolate chips
      • 2 tablespoon vegetable oil

      Instructions

      1. Line an 8 or 9-inch square pan with wax paper.
      2. In a medium bowl, melt semi-sweet chocolate chips in the microwave at fifty percent power, or use a double boiler.
      3. Using an electric mixer on high speed, beat melted chocolate for about 30 seconds.
      4. Add whipped topping to melted chocolate and beat until well combined and fluffy, 30-60 seconds more.
      5. Spread chocolate mixture evenly into prepared pan (if mixture is too stiff, press into pan with lightly dampened hands). Place in freezer for 30 minutes.
      6. Remove pan from freezer and turn chocolate mixture onto a cutting board; cut into one-inch squares. Return squares to freezer for another 15-20 minutes.
      7. Meanwhile, melt milk chocolate chips with 2 tablespoons of vegetable oil and stir until well combined. Dip frozen chocolate squares into melted chocolate to coat. Place on wax paper to set. Keep chocolates in an airtight container in the refrigerator.

      Recommended Products

      As an Amazon Associate and member of other affiliate programs, I earn from qualifying purchases.

      • Electric Mixer
        Electric Mixer
      • 9x9-inch Square Pan
        9x9-inch Square Pan

      Did you make this recipe?

      Tag me in your Instagram photo - @fakeginger

      © Amanda Livesay
      Cuisine: American / Category: candy

      Candy Corn Cookies

      Oct 26, 2011

      Use storebought refrigerated sugar cookie dough to make these cute Candy Corn Cookies!

      Candy Corn Cookies - sugar cookies that look like candy corn! The cutest cookies for Halloween parties. 

      How cute are these Candy Corn Cookies?!

      I have been meaning to make these cookies for probably 3 years now but I always forget about them! I’m so happy that I finally managed to get it done.

      These are the easiest and cutest Halloween cookies you will ever make! And it all starts with refrigerated sugar cookie dough!

      Candy Corn Cookies - sugar cookies that look like candy corn! The cutest cookies for Halloween parties. 

      Ingredients

      • 1 batch sugar cookie dough – homemade or store-bought
      • yellow food coloring – the amount you use will vary based on what kind you use and how deep you want the color
      • orange food coloring – see above
      • sanding sugar

      Instructions

      • Divide prepared sugar cookie dough into three equal portions.
      • Leave one as is and color one other portion yellow and another portion orange. Line a standard loaf pan with plastic wrap.
      • Gently press layer of uncolored dough into bottom of pan and smooth flat, keeping it at least ½-3/4 inches high (you don’t have to use the whole pan if you have a small batch of dough) or larger if desired. Layer orange dough on top of previous layer and smooth. Finally layer yellow dough and smooth on top.
      • Wrap plastic over dough and chill until firm, 30-60 minutes in freezer or 1-2 hours in fridge. Or you can store the dough in fridge for 2-3 days before baking.
      • Remove plastic and slice loaf into ¼ inch slices. Trim top of slice to make straight line. Cut each slice into triangle shape and dip top side in sugar if desired.
      • Bake according to sugar cookie directions.
      • Cool completely.
      Candy Corn Cookies - sugar cookies that look like candy corn! The cutest cookies for Halloween parties. 

      How Long Are They Good For?

      These sugar cookies will be good for about a week stored at room temperature in an airtight cookie container.

      Can You Freeze Sugar Cookies?

      You can freeze these sugar cookies for up to 3 months. I recommend wrapping them tightly in plastic wrap and then putting them in a freezer ziploc bag.

      When you are ready to serve them, let them sit at room temperature for several hours or overnight.

      More Halloween Treats

      • Candy Corn Fudge
      • Halloween Confetti Cookies
      • Caramel Corn Treats
      • Ghostly Snack Mix
      • Candy Corn Roll-Up Cookies
      • Halloween Sugar Cookie Bars

      Make sure you subscribe to my email list to get all my new recipes delivered right to your inbox!

      You can also follow me on Instagram, Facebook, or Pinterest for even more! 

      📖 Recipe

      Candy Corn Cookies

      Candy Corn Cookies

      Ingredients

      • one batch sugar cookie dough, homemade or store-bought
      • yellow and orange food coloring
      • sanding sugar or clear sprinkles

      Instructions

      1. Divide prepared sugar cookie dough into three equal portions. Leave one as is and color one other portion yellow and another portion orange.
      2. Line a standard loaf pan with plastic wrap. Gently press layer of uncolored dough into bottom of pan and smooth flat, keeping it at least ½-3/4 inches high (you don't have to use the whole pan if you have a small batch of dough) or larger if desired. Layer orange dough on top of previous layer and smooth. Finally layer yellow dough and smooth on top. Wrap plastic over dough and chill until firm, 30-60 minutes in freezer or 1-2 hours in fridge. Or you can store the dough in fridge for 2-3 days before baking.
      3. Remove plastic and slice loaf into ¼ inch slices. Trim top of slice to make straight line. Cut each slice into triangle shape and dip top side in sugar if desired. Bake according to sugar cookie directions. Cool completely.

      Recommended Products

      As an Amazon Associate and member of other affiliate programs, I earn from qualifying purchases.

      • Clear Sanding Sugar
        Clear Sanding Sugar
      • Loaf Pan
        Loaf Pan

      Did you make this recipe?

      Tag me in your Instagram photo - @fakeginger

      © Amanda Livesay
      Cuisine: American / Category: cookie

      Oreo Mummies

      Oct 25, 2011

      Oreo Mummies are so cute in their Halloween costumes! Oreo cookies coated in white chocolate and decorated with M&Ms to look like mummies.

      Aren’t these the cutest little cookies?!

      (And yes, those are lentils.)

      These are by far the cutest and easiest Halloween treats ever! 3 ingredients – Oreos (the Halloween ones taste better), white almond bark, and M&Ms. That’s it. My kids went absolutely crazy over them and even my husband was impressed at the cuteness factor.

      If you make one Halloween treat, make it this one. Because how can you go wrong with white chocolate covered Oreos?!

      📖 Recipe

      Yield: 30 servings

      Oreo Mummies

      Oreo Mummies

      Oreo Mummies are so cute in their Halloween costumes! Oreo cookies coated in white chocolate and decorated with M&Ms to look like mummies.

      Prep Time 30 minutes
      Total Time 30 minutes

      Ingredients

      • 1 package of Oreo cookies about 30 cookies
      • 1 pound package of white almond bark
      • small bag of M&M candies
      • lollipop sticks
      • wax paper

      Instructions

        1. Melt ¾ of the white almond bark according to package instructions.
        2. While the bark is melting, stick lollipop sticks through the cream filling of the Oreos. You want the stick to go almost all the way through the cookie.
        3. Once the bark has melted, remove it from the heat and take 1 cookie at a time and, over the bowl of bark, spoon the chocolate on the cookie. (You can dip it but you risk getting crumbs in the chocolate.) Make sure the cookie is coated and the gently tap the lollipop on the sude of the bowl to remove the excess. Place on wax paper and stick M&Ms on where the eyes should go. Continue with all the cookies. Allow them to cool completely before "wrapping" the mummies.
        4. Melt the remaining almond bark. Once melted, remove from the heat and allow to cool for a few minutes. You just want it to thicken up slightly so it doesn't run right out of your pastry bag. Once it's cooled a bit, spoon it into a pastry bag fitted with the tip of your choice (or a ziploc bag - just snip a corner off once you have it filled!). Drizzle the chocolate over the cookies to make them look like cute little mummies! Allow them to cool completely before serving.

      Recommended Products

      As an Amazon Associate and member of other affiliate programs, I earn from qualifying purchases.

      • White Almond Bark
        White Almond Bark

      Nutrition Information:

      Yield:

      30

      Serving Size:

      1

      Amount Per Serving: Calories: 249Total Fat: 16gSaturated Fat: 3gTrans Fat: 0gUnsaturated Fat: 12gCholesterol: 0mgSodium: 171mgCarbohydrates: 25gFiber: 2gSugar: 12gProtein: 5g

      Did you make this recipe?

      Tag me in your Instagram photo - @fakeginger

      © Amanda Livesay
      Cuisine: American / Category: holiday

      Caramelized Carrot Risotto

      Oct 20, 2011

      Caramelized Carrot Risotto – rich and creamy risotto with caramelized carrots and Parmesan cheese.

      I am loving the risotto recipes right now! The last one I made really got me in a mood to try new flavors in risotto so I was pretty excited to find this carrot recipe.

      Not gonna lie, I was kind of hesitant because carrots? In risotto? Exactly.

      But I have to say, they became so sweet when caramelized and somehow just worked perfectly with the Parmesan. Everyone in the family, including the kids (!!) loved this one and sadly for me, there were zero leftovers. I think I could’ve eaten this for a week straight without getting sick of it.

      Forget everything you’ve heard about how difficult it is to make risotto – you absolutely must give this one a try! As long as you’re prepared to hover over the stove for about 30 minutes, you’ll be fine!

      Caramelized Carrot Risotto - rich and creamy risotto with caramelized carrots and Parmesan cheese.

      More Risotto Recipes

      • Smoked Gouda Risotto with Mushrooms
      • Risotto with Caramelized Onions, Mushrooms and Chickpeas
      • Shrimp and Curried Coconut Risotto

      Make sure you subscribe to my email list to get all my new recipes delivered right to your inbox!

      You can also follow me on Instagram, Facebook, or Pinterest for even more! 

      📖 Recipe

      Yield: 6 - 8 servings as side dish

      Carrot Risotto

      Carrot Risotto
      Prep Time 15 minutes
      Cook Time 30 minutes
      Total Time 45 minutes

      Ingredients

      • 2 tablespoons vegetable oil, divided
      • 3 tablespoons unsalted butter, divided
      • 6 medium carrots, peeled and chopped as finely and evenly as possible (about 3 cups)
      • ½ teaspoon salt
      • 1 teaspoon sugar
      • 5 cups reduced-sodium chicken broth
      • ⅓ cup minced onion
      • 1 ½ cups Arborio rice
      • ½ cup dry white wine
      • ¼ cup freshly shredded parmesan cheese, plus ½ cup for garnish
      • 1 teaspoon roughly chopped fresh thyme
      • ⅛ teaspoon pepper

      Instructions

      1. Heat 1 tablespoon oil and 1 tablespoon butter over medium heat in a medium heavy-bottomed pot; add carrots and stir with a wooden spoon until well coated. Add ½ cup water, ½ teaspoon salt, and the sugar; cover and cook 5 minutes, or until tender. Uncover and cook, stirring occasionally, until water evaporates and carrots are just starting to brown, a few minutes more. Reserve half of the carrots. In a blender, purée other half with ¾ cup hot water.
      2. Bring chicken broth to a simmer and keep at a simmer, covered, over low heat.
      3. Heat remaining oil and butter over medium heat in same (unwashed) pot used for carrots. Add onion and cook until translucent, about 3 minutes. Add rice, stirring with a wooden spoon to coat rice with oil, 1 minute. Add wine and cook, stirring, until wine evaporates. Add carrot purée and cook, stirring, until mixture no longer looks soupy.
      4. Add ½ cup hot broth, stirring often, until rice absorbs most of the liquid. Repeat process, adding ½ cup broth at a time and stirring often till each addition is absorbed before adding the next, until rice is al dente (about 20 minutes).
      5. Fold in reserved carrots ¼ cup Parmesan, and the thyme. Add up to 1 cup broth (¼ cup at a time) to loosen the risotto. Season with salt and white pepper to taste.
      6. Sprinkle each bowl of risotto with some of remaining ½ cup parmesan; serve immediately

      Recommended Products

      As an Amazon Associate and member of other affiliate programs, I earn from qualifying purchases.

      • Dutch Oven
        Dutch Oven

      Nutrition Information:

      Yield:

      6

      Serving Size:

      1

      Amount Per Serving: Calories: 234Total Fat: 12gSaturated Fat: 5gTrans Fat: 0gUnsaturated Fat: 7gCholesterol: 20mgSodium: 780mgCarbohydrates: 21gFiber: 2gSugar: 4gProtein: 7g

      Did you make this recipe?

      Tag me in your Instagram photo - @fakeginger

      © Amanda Livesay
       

      Balsamic Honey Pulled Pork Sliders

      Oct 15, 2011

      Can we talk about how excited I am to share this recipe?! It’s no secret that I love pulled pork but with a homemade balsamic honey BBQ sauce? You cannot go wrong. And you won’t even believe how easy these are!

      The pork is made in the slow cooker (see, easy!) and then all you have to do is simmer a few ingredients for the BBQ sauce and you’re done. You can buy deli coleslaw or make your own but you definitely need it to put on your sandwich.

      For the sauce, I used this balsamic vinegar:

      If you are not putting this on everything you eat, you are not living. Best thing ever. It gave the BBQ sauce a slight fruity taste that just made it even more awesome. Of course you can use a regular balsamic vinegar too.

      Looking for a slider bun recipe? I got you covered.

      📖 Recipe

      5 from 1 vote
      Print

      Balsamic Honey Pulled Pork Sliders

      Prep Time 30 minutes
      Cook Time 10 minutes

      Ingredients

      • 2 ½- to 3- pound boneless pork shoulder roast
      • 1 cup chopped onion 1 large
      • 1 teaspoon dried thyme crushed
      • ½ teaspoon dried rosemary crushed
      • ½ cup chicken broth

      For the sauce

      • 1 cup balsamic vinegar
      • ¾ cup ketchup
      • ⅓ cup packed brown sugar
      • ¼ cup honey
      • 1 tablespoon Worcestershire sauce
      • 1 tablespoon Dijon-style mustard
      • 1 clove garlic minced
      • ½ teaspoon ground black pepper
      • ¼ teaspoon salt
      • slider buns
      • coleslaw

      Instructions

      1. Trim fat from meat. If necessary, cut meat to fit into a 3 ½- or 4-quart slow cooker. Place onion in bottom of slow cooker. Add meat; sprinkle with thyme and rosemary. Pour broth over meat.
      2. Cover and cook on low-heat setting for 9 to 10 hours or on high-heat setting for 4 ½ to 5 hours.
      3. Meanwhile, for barbecue sauce, in a medium saucepan, combine vinegar, ketchup, brown sugar, honey, Worcestershire sauce, mustard, garlic, black pepper, and salt. Bring to boiling; reduce heat. Simmer, uncovered, for 20 to 25 minutes or until slightly thickened, stirring occasionally.
      4. Transfer meat to a cutting board. Using two forks, pull meat apart into shreds, discarding fat. Strain onions, discarding liquid. Return shredded meat and onions to cooker. Stir in barbecue sauce. If using high-heat setting, turn to low-heat setting Cover and cook for 1 hour.
      5. To serve, spoon meat mixture onto bun bottoms. Top with coleslaw. Add bun tops.

      Buffalo Chicken Pizza

      Oct 14, 2011

      For the first couple years of my marriage, I made this pizza at least once a week. We loved it that much. Then, of course, we got sick of it. When I made those sliders a couple weeks ago, they reminded me about my love of the pizza and I knew I’d have to make it soon.

      If you’ve never tried this recipe, you absolutely must. The best part is that it’s so easily customizable. There was a point (I’m sure I was pregnant) where I was literally dumping an entire bottle of hot sauce into the sauce but nowadays I’m sticking pretty close to the recipe. If you don’t like blue cheese, leave it off. It’s perfectly yummy with just the Monterey Jack.

      Oh, and I usually buy the refrigerated Pillsbury stuff because I like it’s flakiness with the spicy sauce but feel free to make your own! (I had bought a Pillsbury dough for this one… but it disappeared. Yeah, how does a roll of pizza dough disappear from the fridge?!) I use the Montreal grill seasoning mostly because I don’t like the look of a naked crust. It pretty much tastes like garlic so you could brush it with garlic powder or any other seasoning you enjoy.

      📖 Recipe

      Yield: 1 pizza

      Buffalo Chicken Pizza

      Buffalo Chicken Pizza
      Prep Time 10 minutes
      Cook Time 18 minutes
      Total Time 28 minutes

      Ingredients

      • 2 cups cooked and cubed or shredded chicken
      • 1 pizza dough store bought
      • Cornmeal or flour to handle dough
      • 2 tablespoons butter
      • 1 tablespoons Worcestershire sauce eyeball it
      • ⅓ to ½ cup hot sauce I use Frank's Red Hot
      • 1 cup tomato sauce
      • 1 cup shredded Monterey Jack cheese
      • ½ cup blue cheese crumbles
      • 3 scallions thinly sliced
      • 2 tablespoons olive oil
      • 1 tablespoon Montreal poultry grill seasoning

      Instructions

        1. Preheat oven to 425 degrees F.
        2. Stretch dough to form pizza using cornmeal or flour to help you handle it. If you let it rest and warm up a few minutes it will handle even easier. Set pizza on pizza pan to the side.
        3. In a medium skillet over medium heat, melt butter and stir in Worcestershire, hot sauce, and tomato sauce.
        4. Add chicken to sauce and coat. Cover the pizza dough with the saucy Buffalo chicken, cheeses, and half the scallions. Use a pastry brush to brush the exposed crust with olive oil. Sprinkle grill seasoning over olive oil.
        5. Bake 18 minutes or until crisp. Sprinkle the remaining scallions on top before serving.

      Did you make this recipe?

      Tag me in your Instagram photo - @fakeginger

      © Amanda Livesay

      Buffalo Chicken Sliders

      Oct 08, 2011

      So I gave you my slider bun recipe yesterday and now I have the first of the two sliders I made this week!

      This one is a buffalo chicken burger and it’s fantastic. I went through a buffalo chicken phase a few years ago and literally made so much with buffalo sauce that I couldn’t stomach it until now. I got a random craving for the sauce and these definitely hit the spot.

      I used ground turkey in these (because ground chicken was $5 a pound at my grocery store! Eep!) and they still tasted like buffalo chicken. The blue cheese, hot sauce, and green onions are mixed right into the meat so they’re super flavorful! Definitely have some extra hot sauce on hand if you’re like me and can’t get enough!

      📖 Recipe

      0 from 0 votes
      Print

      Buffalo Chicken Sliders

      Prep Time 2 hours 20 minutes
      Cook Time 30 minutes

      Ingredients

      • 2 pounds ground chicken
      • 1 tablespoon grill seasoning such as McCormick's Montreal Steak Seasoning
      • 2 garlic cloves chopped
      • 4 green onions finely chopped
      • ¼ cup panko breadcrumbs
      • ¼ cup crumbled blue cheese
      • ¼ cup hot sauce such as Frank's Red Hot
      • slider buns
      • preferred slider toppings

      Instructions

      1. Combine all the ingredients except the buns in a large bowl. Form 10-12 large meatballs and transfer them to a plate. Cover with plastic wrap and chill for at least 2 hours.
      2. Heat up a grill or large skillet with oil. Place a few meatballs on the grill/skillet and flatten down to ¾ inch thick. Cook for 5-7 minutes on each side.
      3. Place on bun bottoms, top with preferred toppings and top with other bun half.

      « Previous Page
      Next Page »

      Primary Sidebar

      Amanda Livesay
      Hi, I'm Amanda! DFW food blogger, mom of boys, and crazy dog lady.
      Read more
      Privacy Policy
      Privacy Policy

      Footer

      ↑ back to top

      About

      • Privacy Policy
      • About Fake Ginger

      Newsletter

      • Sign Up for weekly emails featuring new recipes!

      As an Amazon Associate I earn from qualifying purchases.

      Copyright © 2024 FakeGinger.com