• Skip to primary navigation
  • Skip to main content
  • Skip to primary sidebar
  • Home
  • About
  • Recipes

Fake Ginger

menu icon
go to homepage
  • Recipe Index
  • About
  • Subscribe
    • Facebook
    • Instagram
    • Pinterest
  • subscribe
    search icon
    Homepage link
    • Recipe Index
    • About
    • Subscribe
    • Facebook
    • Instagram
    • Pinterest
  • ×
    Home » Page 43

    Peanut Butter & Oats Doggy Treats

    Peanut Butter & Oats Doggy Treats

    Nov 12, 2013

    You guys.

    Penelope turns one today. *sniffle*

    Y’all remember when we brought her home and she was the angriest husky on the block?

    She sadly grew out of her angry looks but she grew into quite a character. She is my constant companion and the biggest pain in my booty. I have to zip tie her into her crate whenever I leave the house! She’s that bad/smart. But she’s so lovable and patient with the kids. And I don’t know what I would do without her.

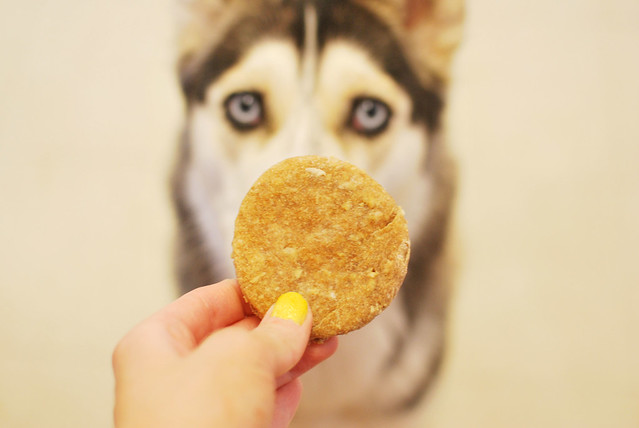
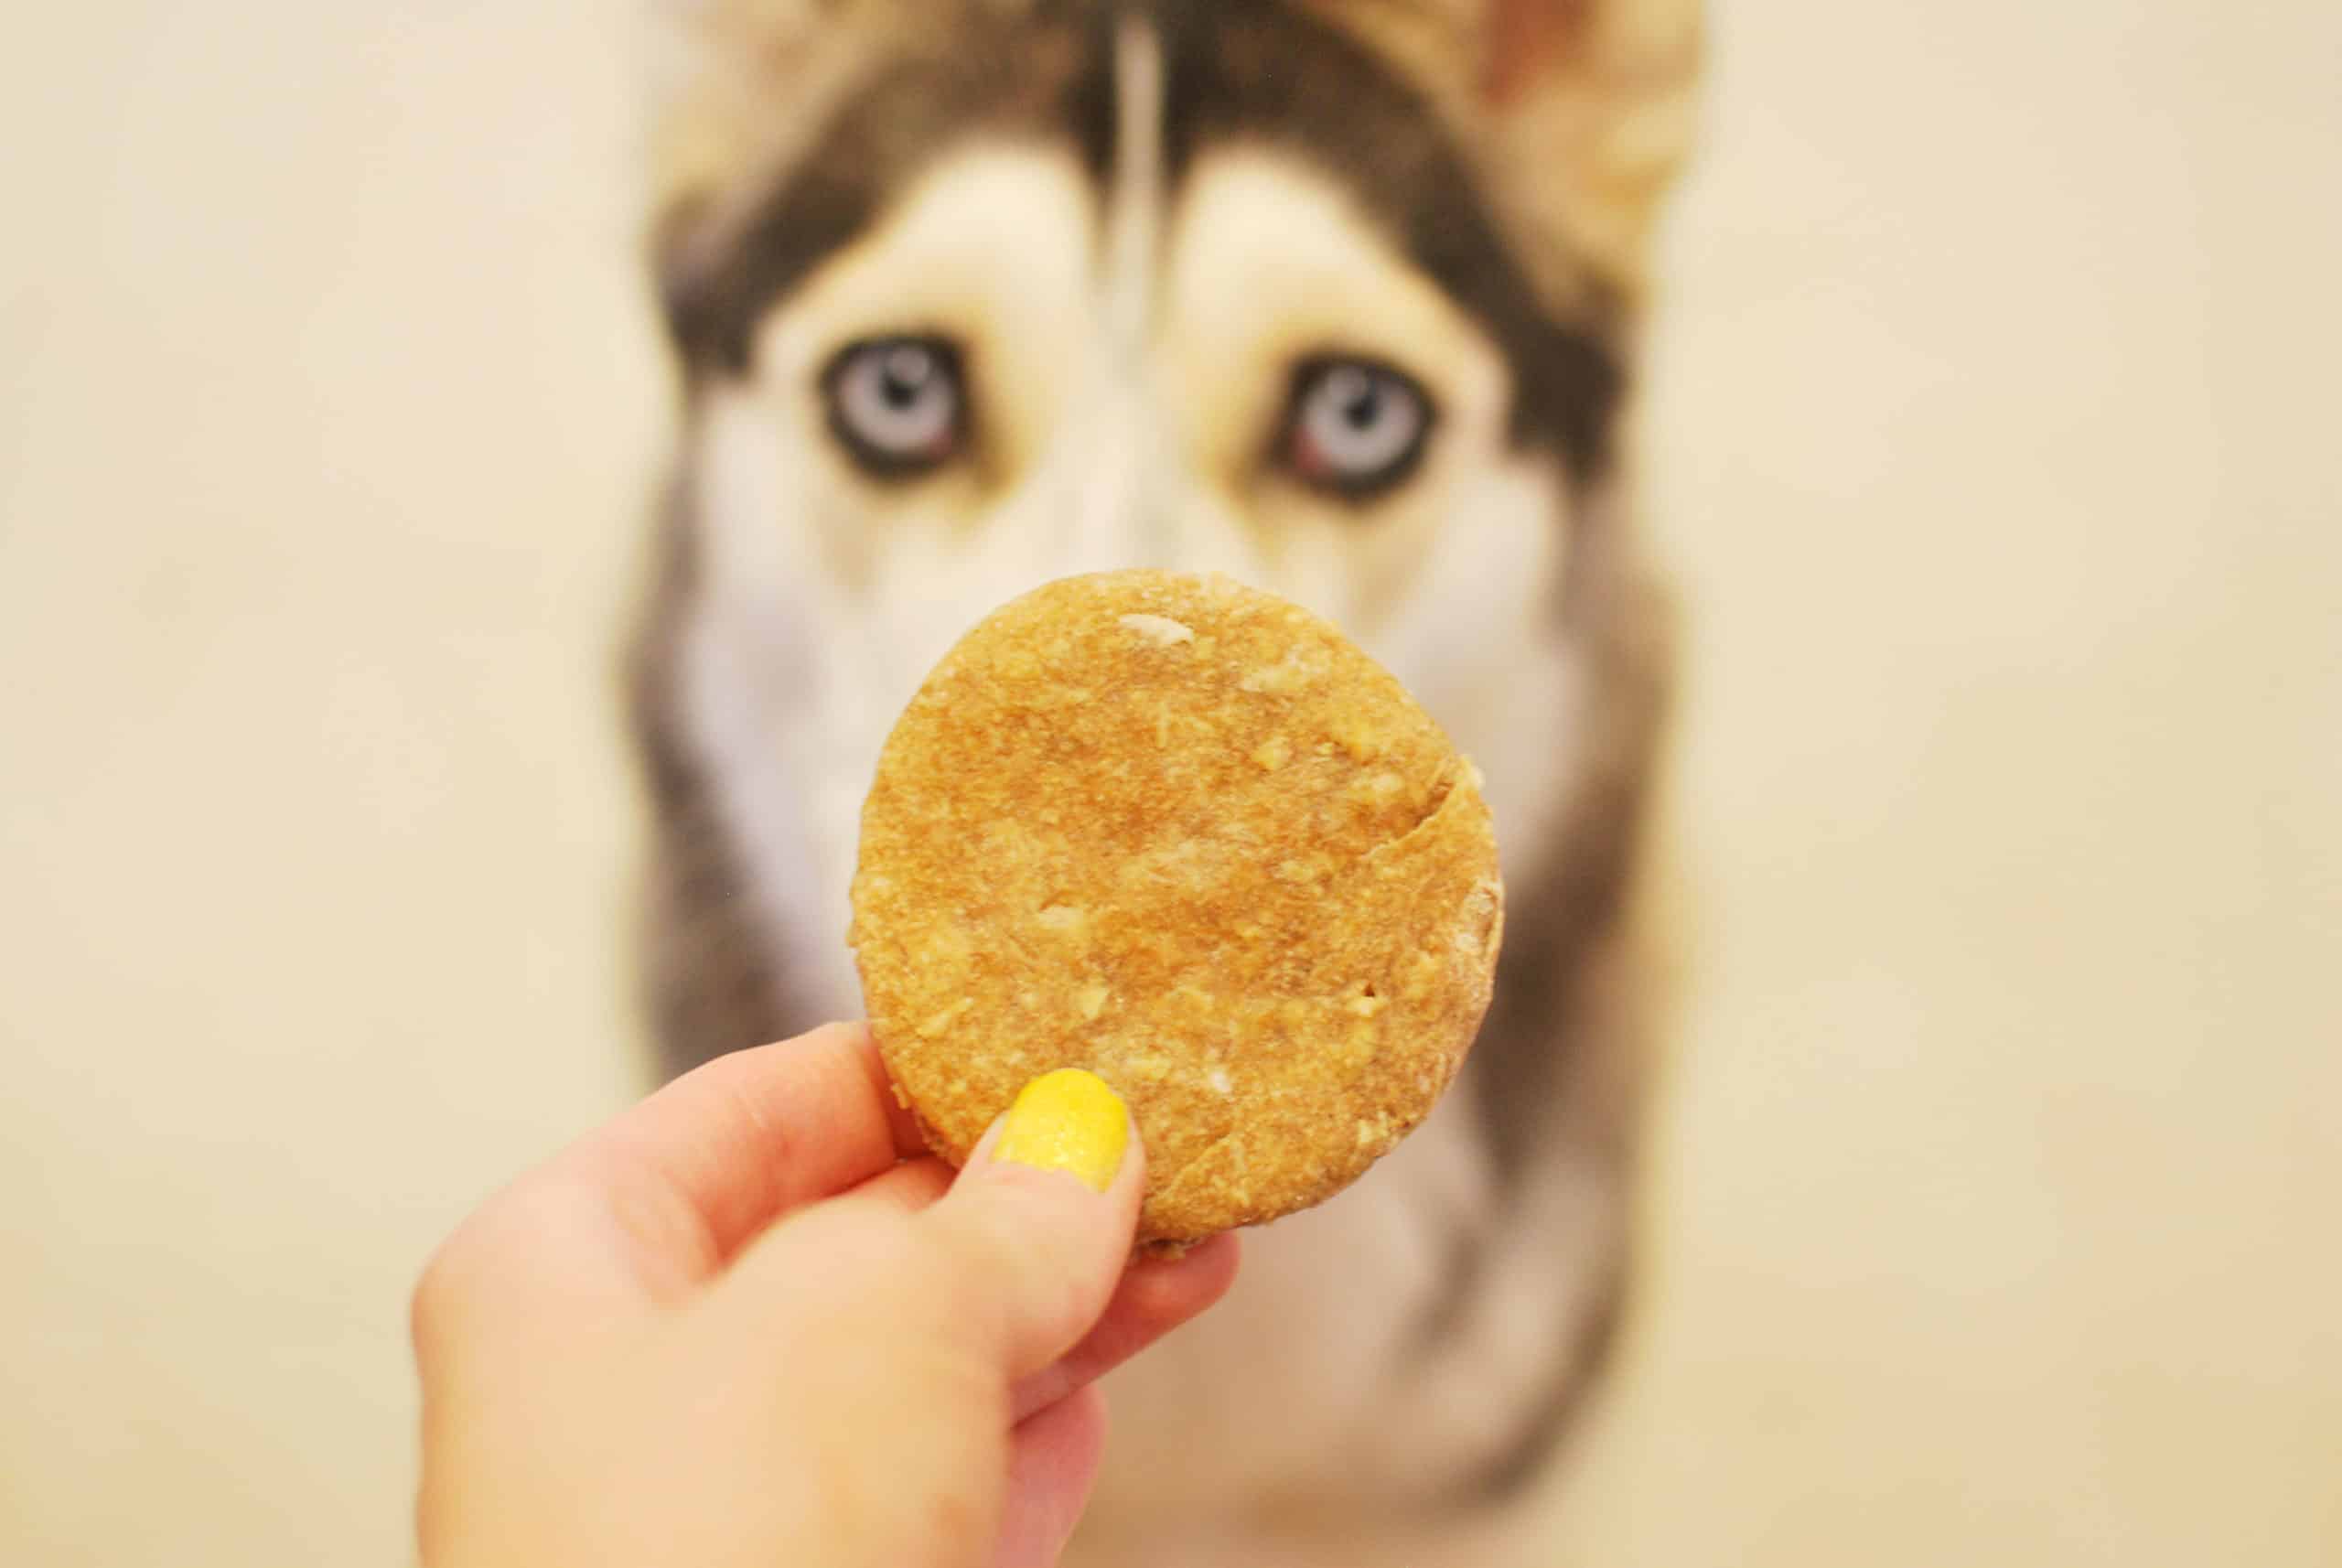
    In celebration of her birthday, we made some doggy treats! Peanut butter, oats, honey, all stuff that pups love. And my dogs did, indeed, love them. Clementine (the other dog in my life) gobbled them up and she is usually pretty picky when it comes to treats.

    Funny story: I tricked my husband into trying the dough because he wouldn’t leave alone when I was baking yesterday. He wasn’t a fan.

    Make sure you subscribe to my email list to get all my new recipes delivered right to your inbox!

    You can also follow me on Instagram, Facebook, or Pinterest for even more! 

    📖 Recipe

    Yield: 12 servings

    Peanut Butter & Oats Doggy Treats

    Peanut Butter & Oats Doggy Treats

    from Tide and Thyme

    Prep Time 20 minutes
    Cook Time 16 minutes
    Total Time 36 minutes

    Ingredients

    • ½ cup peanut butter
    • ¼ cup honey
    • 1 tablespoon olive oil
    • 1 cup chicken broth
    • 1 cup rolled oats
    • 1 cup whole wheat flour
    • 1 cup unbleached all-purpose flour

    Instructions

    1. Preheat oven to 350F.
    2. Whisk together peanut butter, honey, oil and chicken broth. In a separate bowl, combine flours and oatmeal. Mix dry ingredients into wet ingredients.
    3. Place dough on flour dusted surface. Roll or press dough out to about ½” inch thick. Use a small cookie cutter to cut out cookies, or just cut into squares using a pairing knife.
    4. Roll out leftover scraps and cut out as many as possible. Put cut out cookies on a parchment lined baking sheet. Bake for 14-16 minutes. Transfer to a cooling rack. Cool for 2 hours before storing in an airtight container for up to 2 weeks.

    Recommended Products

    As an Amazon Associate and member of other affiliate programs, I earn from qualifying purchases.

    • Rolling Pin
      Rolling Pin
    • Bone Cookie Cutters
      Bone Cookie Cutters

    Nutrition Information:

    Yield:

    12

    Serving Size:

    1

    Amount Per Serving: Calories: 193Total Fat: 7gSaturated Fat: 1gTrans Fat: 0gUnsaturated Fat: 5gCholesterol: 0mgSodium: 129mgCarbohydrates: 28gFiber: 3gSugar: 7gProtein: 6g

    Did you make this recipe?

    Tag me in your Instagram photo - @fakeginger

    © Amanda Livesay

    Puff Pastry Apple Turnovers

    Nov 11, 2013

    Do you have a go-to breakfast for mornings when you’re hosting overnight guests?

    We are officially in that time of year where family is coming in and out of town and if you’re anything like me, you’re looking for delicious meal ideas that won’t keep you in the kitchen all day long.

    I’ve got a great one for you that takes no time to throw together and only requires 2 ingredients!

    You need a package of puff pastry sheets (thawed in the fridge overnight) and apple pie filling. Ignore the egg in the photo. I actually did an egg wash on the first batch and didn’t like how it seemed to weigh the puff pastry down. So I left it off the second batch and the puff pastry was much puffier.

    If you remember to thaw the puff pastry in the refrigerate overnight, these will seriously take about 5 minutes to assemble and about 15 minutes to bake. You can’t run out to the bakery for turnovers in 20 minutes! Plus, it’s too cold to be running around so early in the morning!

    All I did was cut the puff pastry into 6 pieces and then put a couple pieces of apple with the delicious gooey filling in the center. I folded those up, making sure not to completely seal it so the steam can escape, and then baked them. Once they came out of the oven, I made a simple glaze with powdered sugar and heavy cream to drizzle on top.

    They are so good! Like little apple pies but with flaky, airy crust!

    📖 Recipe

    Yield: 18 servings

    Puff Pastry Apple Turnovers

    Puff Pastry Apple Turnovers
    Prep Time 15 minutes
    Cook Time 17 minutes
    Total Time 32 minutes

    Ingredients

    • 1 pack Pepperidge Farm Puff Pastry Sheets
    • 1 can apple pie filling
    • ½ cup powdered sugar
    • ½ – 1 tablespoon heavy cream, or milk

    Instructions

    1. Preheat oven to 375F. Line a baking sheet with parchment or spray with oil.
    2. Lay out one sheet of Pepperidge Farm Puff Pastry. Following the lines on the pastry, cut into 3 strips. Cut each strip in half to make 6 rectangles.
    3. Spoon a heaping spoonful of pie filling onto each rectangle.
    4. Fold up gently, pinching to seal. Place folded turnovers on prepared sheet.
    5. Bake 15 – 17 minutes or until golden brown.
    6. While turnovers are baking, whisk together powdered sugar and heavy cream. Once turnovers come out of the oven, glaze immediately.
    7. Look cool slight on a wire rack before serving.
    8. Repeat with remaining sheet of puff pastry.

    Recommended Products

    As an Amazon Associate and member of other affiliate programs, I earn from qualifying purchases.

    • Rimmed Baking Sheet
      Rimmed Baking Sheet
    • Parchment Paper
      Parchment Paper

    Nutrition Information:

    Yield:

    18

    Serving Size:

    1

    Amount Per Serving: Calories: 41Total Fat: 1gSaturated Fat: 0gTrans Fat: 0gUnsaturated Fat: 1gCholesterol: 2mgSodium: 16mgCarbohydrates: 7gFiber: 0gSugar: 5gProtein: 1g

    Did you make this recipe?

    Tag me in your Instagram photo - @fakeginger

    © Amanda Livesay

    Sausage and Cheddar Stuffed Mushrooms

    Nov 04, 2013

    Sausage and Cheddar Stuffed Mushrooms are the perfect party snack. Mushrooms baked with a creamy, cheesy sausage filling.

    I love getting to peek into other people’s Thanksgiving meals. Whether it’s via Instagram or a blog post or just hearing someone talk about their holiday. Thanksgiving is such a traditional meal and I think most of us tend to make the same things year after year. I love seeing other people’s menus for inspiration to change it up a little.

    I never considered stuffed mushrooms a Thanksgiving dish but on the first Thanksgiving my husband and I spent together, I ate my weight in them at his mom’s house. And they have been a holiday staple in our house ever since.

    I don’t think I’ve ever met a stuffed mushroom that I didn’t love but I like to make mine with sausage, a good cheddar, and cream cheese to give the stuffing that super creamy texture.

    Can You Make Them Ahead?

    You can make the filling ahead and fill the mushrooms. I would wait to bake them until you plan to serve them so they are nice and hot.

    How Long Are They Good For?

    Stuffed mushrooms are fine for up to 3 days but the mushrooms will likely get soggy the longer they sit.

    More Appetizer Recipes

    • Spinach and Artichoke Stuffed Mushrooms
    • Cheesy Sausage Dip
    • Caesar Deviled Eggs
    • Avocado Salsa

    Make sure you subscribe to my email list to get all my new recipes delivered right to your inbox!

    You can also follow me on Instagram, Facebook, or Pinterest for even more! 

    📖 Recipe

    Yield: about 8 servings

    Sausage and Cheddar Stuffed Mushrooms

    Sausage and Cheddar Stuffed Mushrooms
    Prep Time 20 minutes
    Cook Time 20 minutes
    Total Time 40 minutes

    Ingredients

    • 24 small white mushrooms, stems carefully removed and discarded
    • ½ pound breakfast sausage
    • 3 cloves garlic, minced
    • 8 ounces cream cheese
    • ½ cup cheddar cheese
    • ¼ teaspoon salt
    • ¼ teaspoon pepper
    • ¼ teaspoon onion powder
    • ¼ cup grated Parmesan, for sprinkling

    Instructions

    1. Preheat oven to 350F. Spray a large, rimmed baking sheet with oil and place mushrooms in a single
    2. layer on it.
    3. To make the stuffing, cook the breakfast sausage over medium heat until no pink remains. Drain off fat. Add garlic and cook for about 30 seconds or until fragrant. Add cream cheese and stir around until completely melted. Add Smoked Seaside, salt, pepper, and onion powder. Stir until the cheese is melted and mixture is fairly smooth.
    4. Spoon mixture into mushroom caps. Sprinkle with Parmesan.
    5. Bake for 20 minutes or until mushrooms have softened considerably.

    Recommended Products

    As an Amazon Associate and member of other affiliate programs, I earn from qualifying purchases.

    • Parchment Paper
      Parchment Paper
    • Rimmed Baking Sheet
      Rimmed Baking Sheet

    Nutrition Information:

    Yield:

    8

    Serving Size:

    1

    Amount Per Serving: Calories: 279Total Fat: 24gSaturated Fat: 12gTrans Fat: 0gUnsaturated Fat: 10gCholesterol: 71mgSodium: 543mgCarbohydrates: 5gFiber: 1gSugar: 2gProtein: 12g

    Did you make this recipe?

    Tag me in your Instagram photo - @fakeginger

    © Amanda Livesay

    Cranberry Orange Muffins

    Oct 29, 2013

    I’m obsessed with muffins right now. But I’m also incredibly busy lazy right now so instead of making my own muffins, I’ve been hitting the Starbucks drive-thru (because getting out of the car is too much work) and getting a 500 calorie monster pumpkin muffin whenever the craving strikes. I think I’ve put on 5 pounds of muffin in the last few weeks.

    Well the past few days I’ve had the urge to bake! everything! all! day! My oven has been on nonstop and my kids are eating everything faster than I can get it baked.

    I made these on Sunday and threatened everyone in the house because THESE WERE FOR MONDAY’S BREAKFAST and no one was allowed to eat any. And then I ate 3 for dinner and I couldn’t really get mad at anyone else.

    I think 5 muffins made it to breakfast.

    They are so good, so soft, and they didn’t require me to make the 10 foot frigid walk to my car to hit Starbucks.

    …

    Read More

    Pumpkin Cheese Ball

    Oct 23, 2013

    Pumpkin Cheese Ball is a savory cheese ball filled with salsa and cheddar cheese and covered in crushed Doritos to look like a pumpkin. How cute for Halloween!

    I was sitting next to my husband on the couch while I was working on these photos yesterday and kept asking him “If I call this a pumpkin cheese ball, will they assume there’s pumpkin in it? That I rolled a ball of pumpkin in Doritos crumbs? WILL THEY CLICK THAT X UP THERE AS SOON AS THEY SEE THE TITLE?!”

    He has assured me that you won’t think that. So here’s hoping he’s right.

    It definitely doesn’t have any pumpkin in it but it is rolled in those Doritos crumbs I mentioned and then topped with a bell pepper stem so it looks like a pumpkin. It’s actually kind of taco-y.

    My husband’s mom makes a taco salad dip that starts with a layer of cream cheese mixed with taco seasoning and this reminded me so much of that. If you’ve had that kind of dip, you will know what I’m talking about.

    It was so delicious and addictive. I found myself making unnecessary trips to the kitchen just so I could grab another chip covered in cheesiness. My husband was on 24-hour staff duty the day I made it and I swear I got 6 texts during that time reminding me not to eat all of it.

    And look how cute it is!

    Ingredients

    • Cream cheese – make sure it’s softened to room termpature before you start the recipe.
    • Cheddar cheese
    • Onion
    • Salsa
    • Ground cumin
    • Doritos – use the nacho cheese flavored Doritos so the pumpkin turns out orange.
    • Green bell pepper stem

    Instructions

    • In the bowl of a stand mixer, beat together the cream cheese, cheddar cheese, onion, salsa, and cumin. Beat until well mixed and creamy.
    • Scoop the mixture into plastic wrap and shape into a ball.
    • Refrigerate for at least 2 hours.
    • When ready to serve, roll ball in Doritos until covered.
    • Place bell pepper stem on top.
    • Serve with tortilla chips, crackers, or fresh veggies.

    More Halloween Recipes

    • Halloween Sugar Cookie Bars
    • Bloody Tooth Cocktail
    • Candy Corn Cookies
    • Mummy Oreo Truffles
    • Jack-O-Lantern Layer Dip
    • Batty Brownies

    Make sure you subscribe to my email list to get all my new recipes delivered right to your inbox!

    You can also follow me on Instagram, Facebook, or Pinterest for even more! 

    📖 Recipe

    Yield: 16 servings

    Pumpkin Cheese Ball

    Pumpkin Cheese Ball

    adapted from Family Fresh Meals

    Prep Time 20 minutes
    Additional Time 2 hours
    Total Time 2 hours 20 minutes

    Ingredients

    • 16 ounces cream cheese, softened
    • 2 cups cheddar cheese
    • 3 tablespoons finely diced onion
    • ½ cup chunky salsa
    • 1 teaspoon ground cumin
    • 2 cups Doritos, crumbled
    • top of 1 green bell pepper for stem garnish

    Instructions

    1. In the bowl of a stand mixer, beat together the cream cheese, cheddar cheese, onion, salsa, and cumin. Beat until well mixed and creamy.
    2. Scoop the mixture into plastic wrap and shape into a ball. Refrigerate for at least 2 hours.
    3. When ready to serve, roll ball in Doritos until covered. Place bell pepper stem on top. Serve with tortilla chips, crackers, or fresh veggies.

    Recommended Products

    As an Amazon Associate and member of other affiliate programs, I earn from qualifying purchases.

    • Stand Mixer
      Stand Mixer

    Nutrition Information:

    Yield:

    16

    Serving Size:

    1

    Amount Per Serving: Calories: 314Total Fat: 23gSaturated Fat: 10gTrans Fat: 0gUnsaturated Fat: 11gCholesterol: 44mgSodium: 443mgCarbohydrates: 21gFiber: 2gSugar: 3gProtein: 8g

    Did you make this recipe?

    Tag me in your Instagram photo - @fakeginger

    © Amanda Livesay

    Spooky Snack Mix

    Oct 21, 2013

    Are you ready for 5 days of Halloween ideas? I am!

    And by the way, I’m pretending that I didn’t blog at all last week because I was busy preparing for this super fun Halloween-themed week but the reality is – and if you’ve been here awhile, you’ve heard this all before – I got the urge to watch The Tudors from start to finish so I signed up for Netflix and spent all of last week watching it. And also watching all 13 episodes of Orange is the New Black in one day. I do this at least once a year though. I get an overwhelming urge for some Henry VIII drama so I sign up for Netflix and try to watch everything I want to watch within the month. Because I’m cheap.

    But anyway, I did make and eat this last week while in the middle of a television marathon. It’s the perfect TV snack because it’s sweet, salty, crunchy, soft. I mean, basically everything you could want. If you wanted to be extra festive, you could do pumpkin seeds instead of the peanuts. Or if you wanted to make this in the middle of July, you can just leave out the candy corn. It’s all up to you.

    Two years ago: Pumpkin from the Past
    Three years ago: Tofu Pad Thai
    Five years ago: Pasta with Pumpkin and Sausage

    📖 Recipe

    0 from 0 votes
    Print

    Spooky Snack Mix

    adapted from Karo Syrup

    Ingredients

    • 5 cups Corn Chex
    • 2 cups cinnamon-flavored Teddy Grahams
    • 2 cups salted peanuts
    • 2 cups tiny twist pretzels
    • 1 cup sugar
    • ½ cup light corn syrup
    • ½ cup butter or margarine
    • 2 teaspoons vanilla
    • 2 cups mini marshmallows
    • 2 cups candy corn
    • ½ cup white chocolate chips
    • 2 teaspoons coconut oil

    Instructions

    1. Stir together cereal, crackers, peanuts and pretzels in a large bowl that has been sprayed with cooking spray.
    2. Combine sugar, corn syrup and butter in saucepan over medium-high heat. Stirring frequently, bring to boil and cook for 1 minute. Remove from heat and add vanilla. Drizzle glaze over snack mix and toss to coat. Gently stir in marshmallows and candy corn; immediately spread on baking sheet that has been sprayed with cooking spray.
    3. Melt white chocolate chips and coconut oil until smooth. Drizzle over snack mix and allow to sit for about 2 hours until chocolate has set completely.
    4. Store in airtight container.

    Pumpkin Spice Rice Krispies Treats

    Oct 08, 2013

    I forgot to blog yesterday.

    I mean, seriously. And that never happens. (Being lazy is a different story. That happens all the time).  I swear I’m losing my mind. Last Thursday I forgot to cook dinner. Just forgot. My husband came home and I followed him into the kitchen and then was all “CRAP! I KNEW THERE WAS SOMETHING I NEEDED TO DO!” And then Saturday night he was nice enough to go get me some Chinese food and on the way out the door he asked if I’d make a pot of coffee and I swear it immediately left my brain.

    I’m blaming the weather. Or maybe I’m just getting old.

    I made these Rice Krispies Treats yesterday because I’m obsessed with Rice Krispies Treats right now. This was one of those times I told myself I was only going to take a nibble to test it out and then feed the rest to the kids. Do I need to tell you how that turned out?

    …

    Read More

    Pumpkin Roll Bars

    Oct 01, 2013

    Pumpkin Roll Bars – everything you love about a pumpkin roll without all the work! Delicious pumpkin cake with cream cheese swirl!

    Pumpkin season is my favorite season! Some of my other pumpkin favorites are Pumpkin Crunch Cake, Pumpkin Chocolate Chip Muffins, and Pumpkin Spice Cupcakes!

    Pumpkin Roll Bars - everything you love about a pumpkin roll without all the work! Pumpkin cake with cream cheese swirl!

    IT’S MY FAVORITE DAY OF THE YEAR!

    It is officially acceptable to start posting pumpkin recipes! I started making pumpkin stuff weeks ago but I haven’t even been taking photos because I’m so weird about waiting until October 1.

    But you better believe I am celebrating with a pumpkin spice latte and one of these babies for breakfast.

    Pumpkin Roll Bars - everything you love about a pumpkin roll without all the work! Pumpkin cake with cream cheese swirl!

    Ingredients

    • Unsalted butter
    • Granulated sugar
    • Eggs
    • Pumpkin
    • Flour
    • Cinnamon
    • Ground cloves
    • Ground ginger
    • Ground nutmeg
    • Vanilla
    • Baking soda
    • Baking powder
    • Salt
    • Cream cheese

    Instructions

    • Preheat oven to 350F. Line a 9 x 13 inch baking pan with aluminum foil or spray pan with non-stick cooking spray.
    • In a bowl, with an electric mixer on medium speed, beat butter and 1 ½ cup sugar until smooth. Beat in 2 eggs, pumpkin, vanilla and water until well blended.
    • In a separate bowl, sift together flour, cinnamon, cloves, ginger, nutmeg, baking soda, baking powder, and salt; add the dry ingredients to the pumpkin/butter mixture and combine until well blended.
    • Spread about ⅔ of the batter evenly into the prepared pan. In a bowl, with an electric mixer on medium speed, beat cream cheese, 1 egg, ¼ cup sugar, and ½ teaspoon of vanilla until smooth.
    • Spread cream cheese mixture evenly over the pumpkin batter. Dollop the remaining pumpkin batter over the cream cheese batter and spread out as evenly as possible. Use a table knife to swirl together the cream cheese and top layer of pumpkin batter.
    • Bake for 30-35 minutes, or until the center of the pumpkin batter springs back when touched.
    • Cool completely in pan, then cut into bars.

    How Long Are They Good For?

    Pumpkin Roll Bars are good for up to 3 – 4 days at room temperature. Make sure to store them in an airtight container to keep them as fresh as possible.

    Can You Freeze Them?

    You can freeze pumpkin bars for up to 3 months. I recommend wrapping them individually in plastic wrap and then putting them in a freezer ziploc bag.

    When you are ready to enjoy them, you can defrost them one at a time by letting them sit at room temperature for several hours.

    More Pumpkin Recipes

    • Pumpkin Whoopie Pies with Marshmallow Cream Cheese Frosting
    • Pumpkin Banana Muffins
    • Pumpkin Pie Fudge
    • Pumpkin Pie Milkshakes
    • Classic Pumpkin Pie

    Make sure you subscribe to my email list to get all my new recipes delivered right to your inbox!

    You can also follow me on Instagram, Facebook, or Pinterest for even more! 

    📖 Recipe

    Yield: 20 bars

    Pumpkin Roll Bars

    Pumpkin Roll Bars

    Prep Time 25 minutes
    Cook Time 35 minutes
    Total Time 1 hour

    Ingredients

    Pumpkin batter:

    • 6 tablespoons unsalted butter, melted
    • 1 ½ cups granulated sugar
    • 2 large eggs
    • 1 15 ounce. can pumpkin
    • ¼ cup water
    • 2 cups all-purpose flour
    • 2 teaspoons ground cinnamon
    • ½ teaspoon ground cloves
    • ½ teaspoon ground ginger
    • ½ teaspoon ground nutmeg
    • 1 teaspoon vanilla
    • 1 teaspoon baking soda
    • ½ teaspoon baking powder
    • ¼ teaspoon salt

    Cream Cheese Filling

    • 8 ounces cream cheese, softened
    • ¼ cup granulated sugar
    • ½ teaspoon vanilla
    • 1 large egg

    Instructions

    1. Preheat oven to 350F. Line a 9 x 13 inch baking pan with aluminum foil or spray pan with non-stick cooking spray.
    2. In a bowl, with an electric mixer on medium speed, beat butter and sugar until smooth. Beat in eggs, pumpkin, vanilla and water until well blended.
    3. In a separate bowl, sift together flour, cinnamon, cloves, ginger, nutmeg, baking soda, baking powder, and salt; add the dry ingredients to the pumpkin/butter mixture and combine until well blended.
    4. Spread about ⅔ of the batter evenly into the prepared pan.
    5. In a bowl, with an electric mixer on medium speed, beat cream cheese, 1 egg, ¼ cup sugar, and ½ teaspoon of vanilla until smooth.
    6. Spread cream cheese mixture evenly over the pumpkin batter. Dollop the remaining pumpkin batter over the cream cheese batter and spread out as evenly as possible. Use a table knife to swirl together the cream cheese and top layer of pumpkin batter.
    7. Bake for 30-35 minutes, or until the center of the pumpkin batter springs back when touched. Cool completely in pan, then cut into bars.

    Recommended Products

    As an Amazon Associate and member of other affiliate programs, I earn from qualifying purchases.

    • 9x13-inch pan
      9x13-inch pan
    • Pumpkin Puree
      Pumpkin Puree
    • Stand Mixer
      Stand Mixer

    Nutrition Information:

    Yield:

    20

    Serving Size:

    1

    Amount Per Serving: Calories: 201Total Fat: 8gSaturated Fat: 5gTrans Fat: 0gUnsaturated Fat: 3gCholesterol: 49mgSodium: 149mgCarbohydrates: 29gFiber: 1gSugar: 18gProtein: 3g

    Did you make this recipe?

    Tag me in your Instagram photo - @fakeginger

    © Amanda Livesay
    Category: bars


    Caramel Apple Cider

    Sep 26, 2013

    Caramel Apple Cider is the most delicious drink for chilly days! Hot apple cider and caramel sauce with whipped cream on top. Only 3 ingredients and so delicious.

    Apple cider is my favorite during fall and winter. If you’re looking for something a little boozy, try Sparkling Apple Cider Sangria or Apple Cider Jello Shots.

    It’s been a year since Nicole and I started this Thirsty Thursday thing. Crazy, right? We’ve thrown around ideas of what to do next – do we continue with drinks? Switch to something else? Stop completely? We’re still trying to figure it out.

    Our final theme was apples! I am officially obsessed with honeycrisps right now and just about cried when I couldn’t find any yesterday. It’s so hard to go from honeycrisp to the regular ol’ red delicious!

    I made a caramel apple cider because it’s one of my absolute favorite Starbucks drinks ever. And the homemade version is even better since you can use real cider instead of apple juice like Starbucks does. Plus you can be like me and put half a container of Cool Whip on top.

    Ingredients

    • caramel sauce
    • Apple cider – I like these powdered apple cider mixes because I don’t have to worry about going through a big bottle of cider
    • Whipped cream

    Instructions

    • Put tablespoon of caramel in a coffee mug. Set aside.
    • In a small pot, heat apple cider over high heat until apple cider is at desired temperature. Pour into mug, over the caramel. Stir to melt caramel.
    • Top with whipped cream and a caramel drizzle.

    More Recipes Using Apple Cider

    • Pork Chops with Cider Bacon Glaze
    • Apple Cider Doughnuts
    • Slow Cooker Apple Cider Braised Pork
    • Chicken with Cider & Bacon Sauce

    Make sure you subscribe to my email list to get all my new recipes delivered right to your inbox!

    You can also follow me on Instagram, Facebook, or Pinterest for even more! 

    📖 Recipe

    Yield: 1

    Caramel Apple Cider

    Caramel Apple Cider

    Caramel Apple Cider is the most delicious drink for chilly days! Hot apple cider and caramel sauce with whipped cream on top. Only 3 ingredients and so delicious.

    Prep Time 10 minutes
    Total Time 10 minutes

    Ingredients

    • 1 tablespoon caramel sauce, plus more for drizzling
    • 1 ½ cups apple cider
    • whipped cream

    Instructions

    1. Put tablespoon of caramel in a coffee mug. Set aside.
    2. In a small pot, heat apple cider over high heat until apple cider is at desired temperature. Pour into mug, over the caramel. Stir to melt caramel.
    3. Top with whipped cream and a caramel drizzle.

    Recommended Products

    As an Amazon Associate and member of other affiliate programs, I earn from qualifying purchases.

    • Apple Cider Mix
      Apple Cider Mix
    • Caramel Sauce
      Caramel Sauce

    Nutrition Information:

    Yield:

    1

    Serving Size:

    1

    Amount Per Serving: Calories: 231Total Fat: 2gSaturated Fat: 1gTrans Fat: 0gUnsaturated Fat: 1gCholesterol: 5mgSodium: 85mgCarbohydrates: 54gFiber: 1gSugar: 48gProtein: 1g

    Did you make this recipe?

    Tag me in your Instagram photo - @fakeginger

    © Amanda Livesay
    Cuisine: American / Category: drink

    Cheesy Chicken Hobo Packs

    Sep 24, 2013

    Cheesy Chicken Hobo Packs – stuffing, chicken, broccoli, bacon, and cheese all layered and cooked in foil packets. They can be grilled or baked! Easiest dinner ever. 

    Cheesy Chicken Hobo Packets - stuffing, chicken, broccoli, bacon, and cheese all layered and cooked in foil packets. They can be cooked in the oven or on the grill. Easiest dinner ever!

    Today I brought you a mess of a dinner.

    Trust me, I realize it’s not much to look at.

    But it’s one that my kids LOVED so I figured I had no choice but to share it with you.

    Have you ever made hobo packs? The idea is that you just pile everything into aluminum foil, seal it, and then put it on the grill until everything is cooked through.

    So they are great to do while camping but since I’m not much of a camper, I did these in the oven. Either way works though!

    They were delicious and clean up was so simple since it was all contained in the aluminum foil. These are going to become a summer staple for us!

    Cheesy Chicken Hobo Packets - stuffing, chicken, broccoli, bacon, and cheese all layered and cooked in foil packets. They can be cooked in the oven or on the grill. Easiest dinner ever!

    Ingredients

    • Chicken flavored stuffing
    • Boneless, skinless chicken breasts
    • Broccoli
    • Cheddar cheese
    • Bacon
    • Ranch dressing

    How To Make Cheesy Chicken Hobo Packs 

    • Spray 4 large sheets of aluminum foil with oil
    • In a bowl, mix stuffing and water together
    • Spoon ¼ of the stuffing onto each aluminum foil sheet
    • Place a chicken breast on top of each stuffing pile
    • Top each one with ½ cup broccoli
    • Sprinkle ¼ of the cheese and ¼ of the bacon on each one
    • Top it all with a drizzle of ranch dressing
    • Fold the sides of the foil up into a packet and place on baking sheet
    • Bake 20 – 25 minutes

    How to Grill Hobo Packs

    To change the recipe from the oven to the grill, just cook the hobo packs over medium heat for 20 – 25 minutes, until the chicken is cooked through.

    Cheesy Chicken Hobo Packets - stuffing, chicken, broccoli, bacon, and cheese all layered and cooked in foil packets. They can be cooked in the oven or on the grill. Easiest dinner ever!

    More Recipes for the Grill

    • Lemon Thyme Pork Chops with Peaches 
    • Grilled Pineapple Jerk Pork Tenderloin 
    • Grilled Tequila Steak Pizza
    • Grilled Stuffed Peppers

    Make sure you subscribe to my email list to get all my new recipes delivered right to your inbox!

    You can also follow me on Instagram, Facebook, or Pinterest for even more! 

    📖 Recipe

    Yield: 4 servings

    Cheesy Chicken Hobo Packs

    Cheesy Chicken Hobo Packs

    Prep Time 15 minutes
    Cook Time 25 minutes
    Total Time 40 minutes

    Ingredients

    • 1 box chicken flavored stuffing
    • 1 ¼ cups Water
    • 4 boneless, skinless chicken breasts
    • 2 cups chopped broccoli
    • 1 cup shredded cheddar cheese
    • 4 slices cooked bacon; crumbled
    • 4 tablespoons ranch dressing

    Instructions

    1. Preheat oven to 400F.
    2. Spray 4 large sheets of aluminum foil with oil. Set aside.
    3. Mix stuffing and water together in a mixing bowl. Spoon ¼ of the mixture onto each aluminum foil sheet and set a chicken breast on top of each. Top each one with ½ cup of broccoli. Sprinkle with ¼ cup cheese, ¼ of the bacon, and a drizzle of ranch dressing.
    4. Fold the sides of the foil up into a packet.
    5. Place all the packs onto a baking sheet and bake 20 - 25 minutes depending on the thickness of the chicken.
    6. Let stand about 5 minutes before serving.

    Nutrition Information:

    Yield:

    4

    Serving Size:

    1

    Amount Per Serving: Calories: 518Total Fat: 28gSaturated Fat: 10gTrans Fat: 0gUnsaturated Fat: 16gCholesterol: 165mgSodium: 686mgCarbohydrates: 9gFiber: 3gSugar: 2gProtein: 55g

    Did you make this recipe?

    Tag me in your Instagram photo - @fakeginger

    © Amanda Livesay

    Sparkling Apple Cider Sangria

    Sep 19, 2013

    Happy Thursday! We have almost made it to Friday and you know what that means: drink time!

    This week Nicole and I are celebrating the 75th anniversary of The Wizard of Oz because the IMAX version comes out this weekend. I’m not much of a movie person and I am forever getting The Wizard of Oz confused with Willa Wonka. Isn’t that weird? Like, they are nothing alike but I always have to stop and think about which is which.

    I do know that there are ruby slippers in The Wizard of Oz and I never miss an opportunity to make something red and sparkly. I decided to put an apple cider sangria in my sprinkle-rimmed glasses because it’s just the perfect time of year for cider. Plus honeycrisps showed up in my grocery store this week! Yeeeesss!

    The sangria is amazing. I love that it’s super fall-ish with the cider but the bubbly wine makes it seem less heavy and rich. I love it and I see it becoming a big favorite for fall and winter parties.

    …

    Read More

    Slow Cooker Caramel Apple Crumble

    Aug 26, 2013

    Slow Cooker Caramel Apple Crumble has cinnamon apples topped with a crumbly oat mixture – and it’s made in the crockpot so it is super simple! A delicious fall dessert recipe.

    Crockpot Caramel Apple Crumble - delicious fall dessert recipe! Cinnamon apples topped with a crumbly oat mixture - and it's made in the slow cooker!

    This Slow Cooker Caramel Apple Crumble is one of my favorite fall recipes!

    I love a crockpot dessert and this one couldn’t be any simpler. I’m willing to bet that you already have ever single ingredient in your kitchen so now you just have to put it all together in your slow cooker and let it work it’s magic.

    I love making this one for the parties we host during football season because it’s hands off and it’s always such a hit. Someone always asks for this recipe!

    If you want a more traditional apple dessert, try Apple Crisp or Apple Cider Doughnuts!

    Crockpot Caramel Apple Crumble - delicious fall dessert recipe! Cinnamon apples topped with a crumbly oat mixture - and it's made in the slow cooker!

    Ingredients

    • Brown sugar and granulated sugar – these are going to cook down and create the caramel.
    • Apples – you can use any apple that you want but I suggest a granny smith because the caramel is going to be very sweet and a little tartness is nice in this recipe.
    • Cinnamon – what goes better with apples than cinnamon?
    • Old fashioned oats – don’t try to use steel cut or instant oats in this recipe.
    • Flour – this is going to create the crumble part of this recipe.
    • Butter – just a little bit for that nice butter flavor.
    • Vanilla extract – just a hint of vanilla.
    Crockpot Caramel Apple Crumble - delicious fall dessert recipe! Cinnamon apples topped with a crumbly oat mixture - and it's made in the slow cooker!

    Instructions

    • Make apple mixture. Combine brown sugar, granulated sugar, apples, salt, and cinnamon. Spread onto bottom of slow cooker.
    • Make crumble. Mix your crumble topping ingredients until it comes together. Sprinkle it over top of the apples.
    • Cook. Cook on low for 4 hours, or high for 2 hours.
    • Let sit. Turn off heat and let sit, covered, for one hour to let the caramel thicken.

    But Where Is the Caramel?

    I get a lot of questions asking why caramel isn’t listed in the ingredients.

    Because caramel is just caramelized sugar!

    The sugars turn into the caramel when they are cooked. And since this recipe calls for both brown sugar and granulated sugar, they turn into a super thick, super delicious caramel that coats the apples perfectly.

    Crockpot Caramel Apple Crumble - delicious fall dessert recipe! Cinnamon apples topped with a crumbly oat mixture - and it's made in the slow cooker!

    How Long Is It Good For?

    Apple crumble will be good for about 5 days in an airtight container in the fridge. These airtight glass containers are my favorite for pretty much everything.

    I definitely recommend warming it up before serving it.

    Can You Freeze Apple Crumble?

    You can freeze this apple crumble. Make sure to cool it completely and then transfer to a freezer-safe container. It can be frozen for up to 3 months.

    When you are ready to serve it, let it defrost overnight in the fridge and then you can warm it up in the microwave, oven, or even put it back in the slow cooker for an hour or so.

    Crockpot Caramel Apple Crumble - delicious fall dessert recipe! Cinnamon apples topped with a crumbly oat mixture - and it's made in the slow cooker!

    More Desserts in the Slow Cooker

    • Crockpot Candy 
    • Slow Cooker Chocolate Chip Brownie Cake 
    • Crockpot Crunchy Drop Cookies 
    • Slow Cooker Italian Style Cheesecake 
    • White Chocolate Crockpot Candy

    Make sure you subscribe to my email list to get all my new recipes delivered right to your inbox!

    You can also follow me on Instagram, Facebook, or Pinterest for even more! 

    📖 Recipe

    Yield: 6 servings

    Slow Cooker Caramel Apple Crumble

    Slow Cooker Caramel Apple Crumble
    Prep Time 10 minutes
    Cook Time 4 hours
    Total Time 4 hours 10 minutes

    Ingredients

    For the apples:

    • 1 cup brown sugar
    • ½ cup granulated sugar
    • 5 large apples, peeled and cut into chunks
    • ¼ teaspoon salt
    • 1 teaspoon cinnamon

    For the topping:

    • ⅔ cup old fashioned oats
    • ⅔ cup loosely packed brown sugar
    • ¼ cup flour
    • ½ teaspoon cinnamon
    • 3-4 tablespoons softened butter
    • 1 teaspoon vanilla extract

    Instructions

    1. In a mixing bowl, combine brown sugar, granulated sugar, apples, salt, and cinnamon. Spread onto bottom of slow cooker.
    2. Mix your crumble topping ingredients until it comes together. Sprinkle it over top of the apples. Cook on low for 4 hours, or high for 2 hours.
    3. Turn off heat and let sit, covered, for one hour to let the caramel thicken.

    Recommended Products

    As an Amazon Associate and member of other affiliate programs, I earn from qualifying purchases.

    • Programmable Slow Cooker
      Programmable Slow Cooker

    Nutrition Information:

    Yield:

    6

    Serving Size:

    1

    Amount Per Serving: Calories: 479Total Fat: 9gSaturated Fat: 5gTrans Fat: 0gUnsaturated Fat: 3gCholesterol: 20mgSodium: 166mgCarbohydrates: 103gFiber: 6gSugar: 85gProtein: 2g

    Did you make this recipe?

    Tag me in your Instagram photo - @fakeginger

    © Amanda Livesay
    Cuisine: American / Category: pie

    Spicy Cilantro Margarita

    Aug 15, 2013

    I have absolutely nothing to blog about today so let’s talk TV.

    Last week when my husband was in the field, I binge watched Under the Dome. I really like it but I feel like I’m in for another LOST. Like I’m going to spend the next 6 years of my life waiting for answers that I’m never going to get.

    The Housewives are so boring these days. I skipped pretty much all of the OC this year but you better believe I was there for the reunion. I’m hoping some hair gets pulled or something next week. I haven’t even watched New Jersey! I’m so over the Joe/Melissa/Teresa/other Joe drama. And finally, I made it about 15 minutes into the Miami premiere before I put my ear thingies in and listened to the 90s alternative Spotify playlist.

    Honey Boo Boo and Duck Dynasty last night? Yes, please. Best night of TV in awhile.

    And as always, I’m obsessed with Big Brother. OBSESSED. I stay up way too late watching the feed, I obsessively read updates. I can’t get enough.

    What are you watching? What should I be watching? Are you not-so-patiently waiting for Homeland to come back next month like me?

    …

    Read More

    Orange Teriyaki Salmon

    Aug 06, 2013

    My husband is still on his diet. This means I’m cooking super healthy when he’s home and hitting the Taco Bell drive thru when he’s not. It’s all about balance, right?

    Speaking of my husband not being here, he was supposed to be guarding their field equipment this past weekend and the Humvee they were driving got swept away in a freak flash flood. This is Colorado. It hardly rains. We actually laugh whenever we’re under flash flood warning because seriously, the most it ever rains here is 15 minutes.

    But yeah, the Humvee got picked up and they had to jump out and swim.

    And then I had to pay $169 for a new phone for him.

    Well anyway, he’s been asking for more salmon lately but since the rest of us aren’t huge fans, I’ve been searching for ways to jazz it up. And by “jazz it up” I mean make it not taste so salmon-y.

    This recipe calls for orange marmalade and teriyaki sauce and it is absolutely delicious. The salmon is all bundled up in aluminum foil for cooking so it’s an easy dinner with really, really easy clean-up.

    …

    Read More

    Smoky Margarita

    Jul 25, 2013

    I feel like Julie in Julie & Julia right now because all I want to say about this drink is “Grilled fruit is a revelation!” I got my husband to grill a bunch of fruit for me when he was doing kebabs last weekend and I couldn’t stop smelling the limes. They smelled like honey and pie and all kinds of things that they definitely don’t smell like when they aren’t grilled.

    I really, really enjoyed this drink. I don’t know if it tasted super different from a regular non-grilled margarita but the grilled fruit slices on the glasses were so delicious that I don’t even care.

    I’m pretty excited to grill some more fruit for drinks, starting with the Grilled Peach and Jalapeno Margarita that Nicole made this week. The only way to improve a margarita is to add a little kick and those look amazing!

    …

    Read More

    « Previous Page
    Next Page »

    Primary Sidebar

    Amanda Livesay
    Hi, I'm Amanda! DFW food blogger, mom of boys, and crazy dog lady.
    Read more
    Privacy Policy
    Privacy Policy

    Footer

    ↑ back to top

    About

    • Privacy Policy
    • About Fake Ginger

    Newsletter

    • Sign Up for weekly emails featuring new recipes!

    As an Amazon Associate I earn from qualifying purchases.

    Copyright © 2024 FakeGinger.com