• Skip to primary navigation
  • Skip to main content
  • Skip to primary sidebar
  • Home
  • About
  • Recipes

Fake Ginger

menu icon
go to homepage
  • Recipe Index
  • About
  • Subscribe
    • Facebook
    • Instagram
    • Pinterest
  • subscribe
    search icon
    Homepage link
    • Recipe Index
    • About
    • Subscribe
    • Facebook
    • Instagram
    • Pinterest
  • ×
    Home » Page 44

    Watermelon Daiquiri

    Watermelon Daiquiri

    Jul 18, 2013

    Did you watch Honey Boo Boo last night?! Tell me you had your scratch & sniff card! Because I know I did.

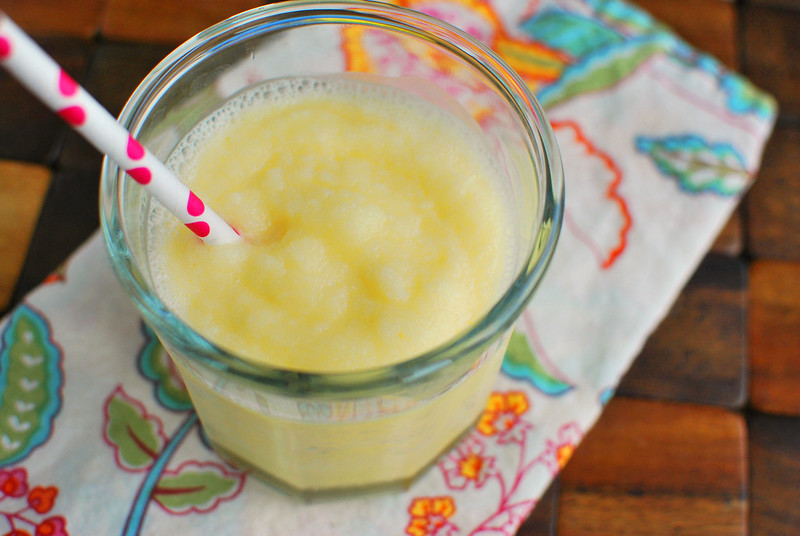
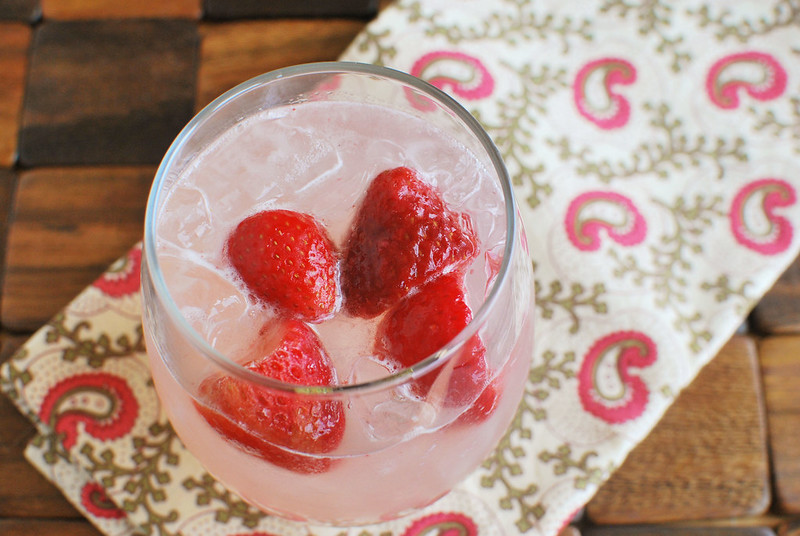
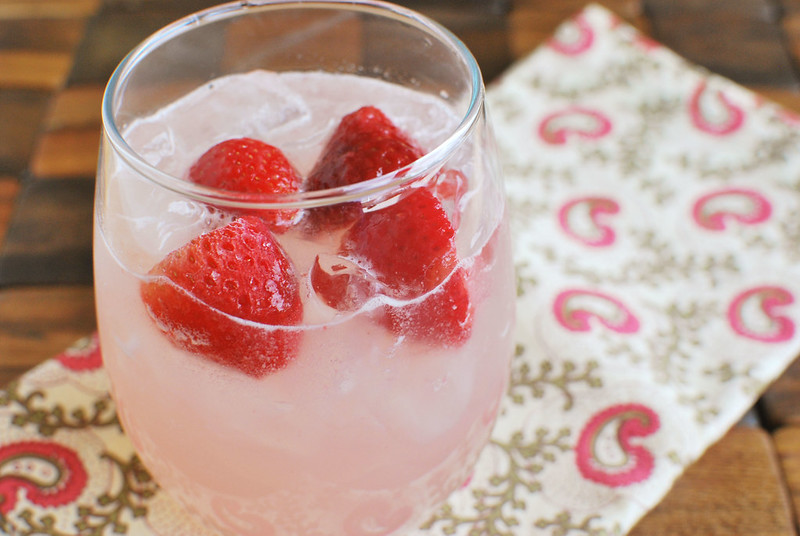
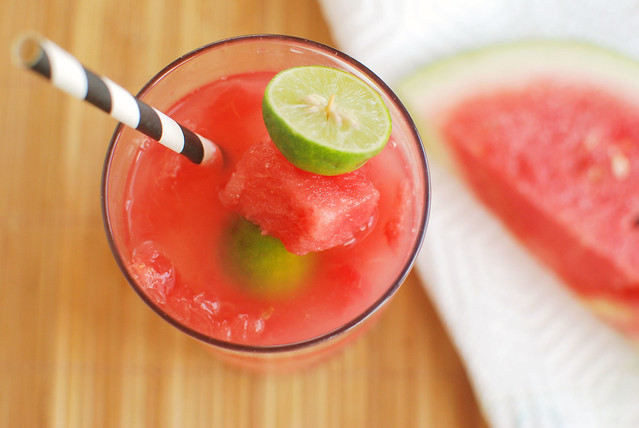
    We actually made a family grocery store run a few days ago to get the scratch & sniff card and ended up with a ginormous watermelon too. Normally when summer rolls around and I crave watermelon, I just buy one of the tiny ones or even some some packaged slices because I know no one else will eat it. But we ended up with that huge one and then it sat on our counter for 24 hours before I gave up on anyone else eating it and made a cocktail.

    This is probably one of my favorite drinks I’ve ever made. It was sweet but still tart and the cubes of watermelon on top made it super refreshing. It’s the perfect summer drink! Better make it before the watermelons disappear!

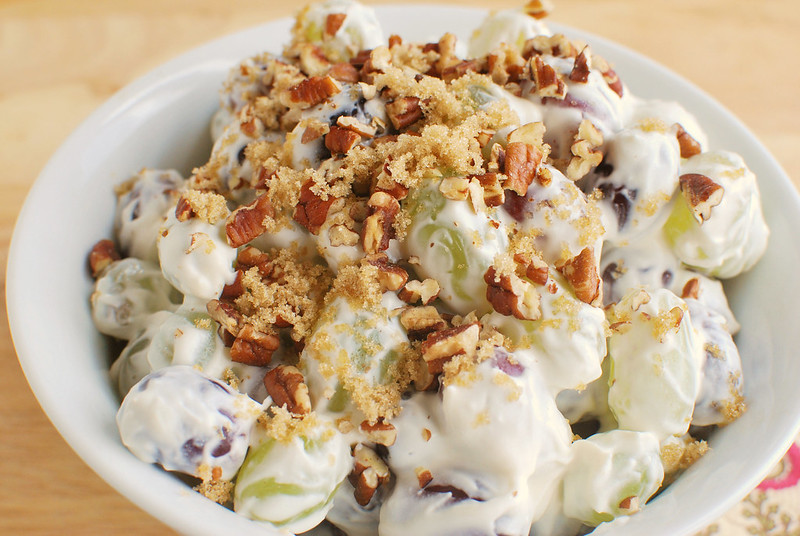
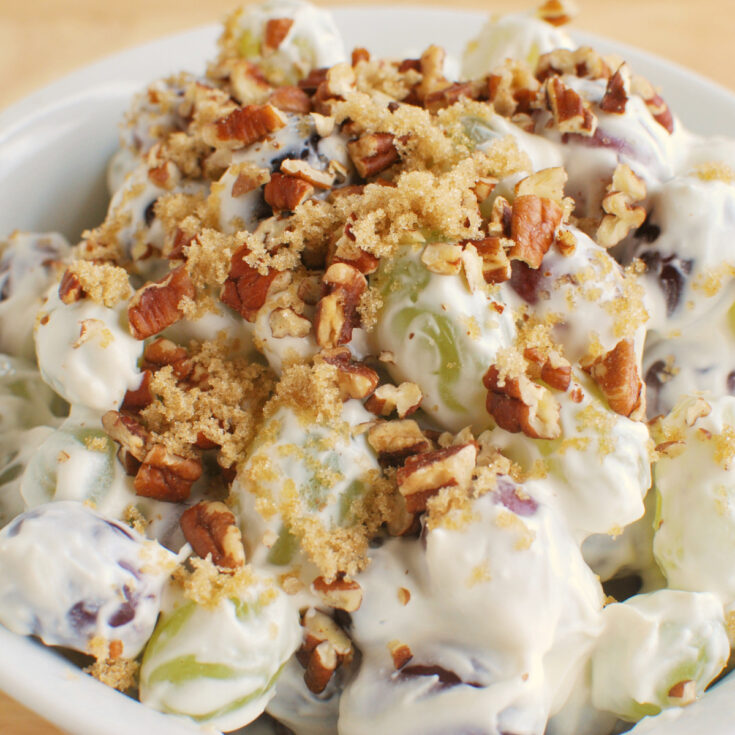
    Nicole made a banana daiquiri! I’m kind of obsessed with both bananas and coconut milk right now so I’m thinking that daiquiri will be how I use the rest of my rum.

    …

    Read More

    Chocolate Chip Pudding Cookies

    Jul 16, 2013

    Chocolate Chip Pudding Cookies are the softest cookies ever! Classic chocolate chip cookies made with pudding mix to keep them chewy and soft. 

    Chocolate Chip Pudding Cookies - the softest cookies ever! Classic chocolate chip cookies made with pudding mix to keep them chewy and soft.

    Everyone in my house loves chocolate chip cookies! Some of our other favorites are Candied Bacon Chocolate Chip Cookies, Chocolate Chip Pizookie, and Gluten Free Peanut Butter Chocolate Chip Cookies!

    I’ve seen cookies made with pudding mix around the internet for years now but I never have pudding in the house and I don’t ever plan to make cookies when I’m working on my grocery list.

    But I somehow ended up with pudding in my pantry this week and knew it was time to finally try these cookies.

    They’re so good! They don’t really taste different from a normal chocolate chip cookie but they are super soft, just how I like my cookies. I’m really happy that I finally got around to trying them and hopefully I remember to stock up on pudding so I can try different versions. Definitely make these if you’re a fan of soft cookies!

    Ingredients

    • Butter – make sure to bring it to room temperature before beginning the recipe.
    • Brown sugar – this recipe uses more brown sugar than granulated sugar which helps to keep them soft and chewy.
    • Sugar
    • Instant vanilla pudding – this is what keeps the cookies soft and it also adds extra vanilla flavor.
    • Eggs
    • Vanilla
    • All-purpose flour
    • Baking soda
    • Chocolate chips – I used semisweet but you can use milk chocolate or dark chocolate if you prefer.

    Instructions

    • Dry ingredients. Sift together flour and baking soda; set aside.
    • Wet ingredients. Cream together butter and sugars until light and fluffy. Add in pudding mix and beat until well blended. Add eggs and vanilla.
    • Combine. Add flour mixture slowly until well incorporated.
    • Chocolate chips. Add chocolate chips and beat just until they are incorporated.
    • Shape. Roll into 1″ balls and place on greased baking sheet.
    • Bake. Bake at 350F for 8-12 minutes.

    How Long Are Pudding Cookies Good For?

    These chocolate chip pudding cookies will stay fresh for up to 4 days. Make sure to store them in an airtight container at room temperature to keep them fresh for as long as possible.

    You can stretch out their life a couple days by storing them in the fridge (also in an airtight container) but that will cause the cookies to be a little less soft.

    Can You Freeze Pudding Cookies?

    Yes, you can freeze these cookies! Make sure they are completely cooled and then put them in an airtight container (I like using freezer ziploc bags – squeeze all the air out!) and freeze for up to 3 months. 

    Let them defrost on the counter before serving. 

    Can You Freeze the Dough?

    You can freeze the unbaked cookie dough for up to 3 months. You can either freeze it in one big disc or in preportioned dough balls. Wrap it several layers of plastic wrap and then I would also put it in a freezer ziploc bag for extra protection.

    When you are ready to bake it, let it defrost overnight in the fridge and follow baking instructions.

    More Pudding Cookie Recipes:

    • M&Ms Chocolate Chip Pudding Cookies 
    • Chunk Chocolate Pudding Cookies
    • Pumpkin Pudding Snickerdoodles 
    • Sweet and Salty Pudding Cookies
    • Peanut Butter Chocolate Chunk Pudding Cookies
    • Butterscotch Pudding Cookies

    Make sure you subscribe to my email list to get all my new recipes delivered right to your inbox!

    You can also follow me on Instagram, Facebook, or Pinterest for even more! 

    Chocolate Chip Pudding Cookies - the softest cookies ever! Classic chocolate chip cookies made with pudding mix to keep them chewy and soft.

    📖 Recipe

    Yield: 24 cookies

    Chocolate Chip Pudding Cookies

    Chocolate Chip Pudding Cookies

    Chocolate Chip Pudding Cookies are the softest cookies ever! Classic chocolate chip cookies made with pudding mix to keep them chewy and soft. 

    Prep Time 15 minutes
    Cook Time 12 minutes
    Total Time 27 minutes

    Ingredients

    • 1 ½ sticks, ¾ cup butter, softened
    • ¾ cup brown sugar
    • ¼ cup sugar
    • 1 3.4 oz package instant vanilla pudding
    • 2 eggs
    • 1 teaspoon vanilla
    • 2 ¼ cups flour
    • 1 teaspoon baking soda
    • 2 cups chocolate chips

    Instructions

    1. Preheat oven to 350F.
    2. Sift together flour and baking soda; set aside.
    3. In the bowl of a stand mixer fitted with a paddle attachment, cream together butter and sugars until light and fluffy. Add in pudding mix and beat until well blended. Add eggs and vanilla.
    4. Add flour mixture slowly until well incorporated. Add chocolate chips and beat just until they are incorporated.
    5. Roll into 1" balls and place on greased baking sheet.
    6. Bake at 350F for 8-12 minutes.

    Recommended Products

    As an Amazon Associate and member of other affiliate programs, I earn from qualifying purchases.

    • Instant Vanilla Pudding
      Instant Vanilla Pudding
    • Silicone Baking Mat
      Silicone Baking Mat
    • Rimmed Baking Sheet
      Rimmed Baking Sheet
    • Electric Mixer
      Electric Mixer

    Nutrition Information:

    Yield:

    24

    Serving Size:

    1

    Amount Per Serving: Calories: 232Total Fat: 14gSaturated Fat: 8gTrans Fat: 0gUnsaturated Fat: 5gCholesterol: 38mgSodium: 138mgCarbohydrates: 27gFiber: 1gSugar: 16gProtein: 3g

    Did you make this recipe?

    Tag me in your Instagram photo - @fakeginger

    © Amanda Livesay
    Cuisine: American / Category: cookie

    Italian Chopped Salad

    Jul 15, 2013

    Pasta salads have quickly become my go to side dish this summer. They’re usually pretty no-fuss, you can make them hours before you need them, and they’re always a crowd-pleaser.

    This one isn’t your typical pasta salad since it’s more salad than pasta but hey, I’m still counting it. I made this for the 4th of July (because of the cute little star pasta!) and it was a hit with everyone. My kids won’t typically eat olives, tomatoes, cucumbers, or chickpeas but they were all over this. And I may have hidden the tiny bit we had leftover so my husband couldn’t get to it before I did.

    If you have someone who claims to hate salads in your life, try this recipe on them! There’s so much good stuff going on that they won’t even realize they’re eating a salad!

    …

    Read More

    Skinny Frozen Pina Colada

    Jul 11, 2013

    Don’t give up your favorite frozen cocktail during bikini season! Skinny Frozen Pina Colada is an easy 3 ingredient, low calorie pina colada!

    Skinny Frozen Pina Colada - don't give up your favorite frozen cocktail during bikini season! Easy 3 ingredient, low calorie pina coladas!

    I told you guys that my husband and I have been having a competition to see who can be the healthiest person ever, right? Surprisingly I am pretty good at this game for most of the day. I work out first thing in the morning, take the dogs/kids for a run, eat well all day… and then find myself in the Taco Bell drive-thru at 10 pm.

    That really happened the other night. And then I went home and parked myself in front of Dance Moms while I stuffed my face with nachos bellgrande and guzzled (not diet) Mountain Dew.

    I’m trying to change my ways though so I wanted to make a skinny drink for Thirsty Thursday this week.

    Nicole and I decided on doing frozen drinks this week and I’ve been on a real coconut kick so you know I had to make a pina colada. This drink comes to 148 calories which is half the calories that you’d get in one of the frozen pouch drinks or a restaurant pina colada. Which means you can have 2 of them! Duh.

    (I think this was just sweet enough, but if you need a little added sweetness, you can add a few drops of a liquid, no-calorie sweetener to the blender.)

    Nicole made strawberry daiquiris! One of my all-time favorites!

    Skinny Frozen Pina Colada - don't give up your favorite frozen cocktail during bikini season! Easy 3 ingredient, low calorie pina coladas!

    Ingredients

    • Coconut rum – such as Malibu.
    • Light coconut milk – the kind in the can. Make sure it says lite or light on it because full-fat coconut milk has a lot of calories.
    • Pineapple juice – you can switch this up with a pineapple mango juice or any variety of pineapple juice.
    • Ice

    How To Make Skinny Frozen Pina Coladas

    • Blend coconut rum, light coconut milk, pineapple juice, and ice together 
    • Add more ice or liquid until it reaches desired consistency

    Easiest frozen drink recipe ever!

    Can You Make Them Ahead?

    These drinks are best served as soon as they are made. They will start to melt the longer they sit. Good thing they are super quick and easy to make!

    More Frozen Drink Recipes

    • Frozen Raspberry Margaritas
    • Grown Up Strawberry Slushies
    • Frozen Prickly Pear Margaritas
    • Mango Margaritas

    Make sure you subscribe to my email list to get all my new recipes delivered right to your inbox!

    You can also follow me on Instagram, Facebook, or Pinterest for even more! 

    📖 Recipe

    Yield: 1 drink

    Skinny Frozen Pina Colada

    Skinny Frozen Pina Colada

    Don't give up your favorite frozen cocktail during bikini season! Skinny Frozen Pina Colada is an easy 3 ingredient, low calorie pina colada!

    Prep Time 5 minutes
    Total Time 5 minutes

    Ingredients

    • 1 ½ ounces coconut rum
    • ¼ cup light coconut milk
    • ¼ cup pineapple juice
    • 1 cup ice

    Instructions

    1. Blend all ingredients until smooth.
    2. Add more ice or liquid to reach desired consistency.
    3. Serve immediately.

    Recommended Products

    As an Amazon Associate and member of other affiliate programs, I earn from qualifying purchases.

    • My Favorite Blender
      My Favorite Blender

    Nutrition Information:

    Yield:

    1

    Serving Size:

    1

    Amount Per Serving: Calories: 147Total Fat: 4gSaturated Fat: 4gTrans Fat: 0gUnsaturated Fat: 0gCholesterol: 0mgSodium: 9mgCarbohydrates: 16gFiber: 0gSugar: 14gProtein: 1g

    Did you make this recipe?

    Tag me in your Instagram photo - @fakeginger

    © Amanda Livesay
    Cuisine: American / Category: drink

    Reese’s Pieces Milkshake

    Jun 13, 2013

    Reese’s Pieces Milkshake is a homemade peanut butter milkshake with Reese’s Pieces candy! Only 4 ingredients! Top it with whipped cream, chocolate syrup, and more candy for the most decadent treat. 

    Reese's Pieces Milkshake - homemade peanut butter milkshakes with Reese's Pieces candy! Only 4 ingredients! Top it with whipped cream, chocolate syrup, and more candy for the most decadent treat. 

    It’s been quiet around here this week, huh? Normally I prep all my weekly posts on the weekend so that all I have to do is go in the night before it posts and write a bunch of nonsense about my dogs, kids, nails, whatever. But since my husband was gone last weekend, I spent my time watching that Game of Thrones episode (you know the one) 5 times and trying on every piece of clothing in my closet. It’s what I do when I’m alone. Along with sleeping on the couch, working out twice a day, and sitting on the back porch talking to the neighbor’s dogs at all hours of the night.

    Thankfully I have this Thursday series going with Nicole so I had to stop being lazy at least once.

    Reese's Pieces Milkshake - homemade peanut butter milkshakes with Reese's Pieces candy! Only 4 ingredients! Top it with whipped cream, chocolate syrup, and more candy for the most decadent treat. 

    We’re still doing our milkshake thing and this week we decided to do candy shakes! Because the only way to improve on a milkshake is to add candy! I really wasn’t sure what I was going to do until I was standing in the candy aisle, spotted some Reese’s Pieces, and said “PEANUT BUTTER MILKSHAKES!” a little too loudly.

    I went with vanilla ice cream since I was really into the peanut butter idea but you could definitely use chocolate to make it a little more Reese’s like. They’re really yummy, especially with the little pieces of candy mixed in. I always forget how good Reese’s Pieces are until I randomly pick up a bag. Yum!

    Reese's Pieces Milkshake - homemade peanut butter milkshakes with Reese's Pieces candy! Only 4 ingredients! Top it with whipped cream, chocolate syrup, and more candy for the most decadent treat. 

    How To Make Reese’s Pieces Milkshakes

    • Blend together vanilla ice cream, milk, and peanut butter until it reaches desired consistency
    • Add in Reese’s Pieces candy and pulse the blender a few times, just until the candy is slightly chopped
    • Serve immediately with whipped cream, chocolate syrup, and Reese’s Pieces on top

    More Milkshake Recipes

    • Homemade Shamrock Shake
    • Chocolate Malted Milkshake
    • Frozen Hot Chocolate
    • Pumpkin Pie Milkshake

    Make sure you subscribe to my email list to get all my new recipes delivered right to your inbox!

    You can also follow me on Instagram, Facebook, or Pinterest for even more! 

    📖 Recipe

    Yield: 4 servings

    Reese's Pieces Milkshake

    Reese's Pieces Milkshake
    Prep Time 10 minutes
    Total Time 10 minutes

    Ingredients

    • 1 ½ cups vanilla ice cream
    • ½ - ¾ cup milk
    • ½ cup peanut butter
    • 1 small bag Reese's Pieces, divided
    • whipped cream
    • chocolate syrup

    Instructions

    1. Blend together ice cream, milk, and peanut butter until the desired consistency is reached. Add in about ¼ cup of Reese's Pieces and pulse the blender a few times, just until the candy is slightly chopped up. Serve immediately with whipped cream, chocolate syrup, and more Reese's Pieces on top.

    Recommended Products

    As an Amazon Associate and member of other affiliate programs, I earn from qualifying purchases.

    • My Favorite Blender
      My Favorite Blender

    Nutrition Information:

    Yield:

    4

    Serving Size:

    1

    Amount Per Serving: Calories: 393Total Fat: 25gSaturated Fat: 9gTrans Fat: 0gUnsaturated Fat: 13gCholesterol: 25mgSodium: 235mgCarbohydrates: 34gFiber: 3gSugar: 24gProtein: 11g

    Did you make this recipe?

    Tag me in your Instagram photo - @fakeginger

    © Amanda Livesay
    Category: frozen goodies

    Chocolate Malted Milkshake

    Jun 06, 2013

    The most delicious Chocolate Malted Milkshake! Only 3 ingredients and it tastes just like a frozen Whoppes candy!

    Growing up, my mom always made yogurt and fruit smoothies and called them milkshakes. I swear I didn’t know the difference until I was much older.

    Well as I was making these super rich and delicious chocolate malted milkshakes, I heard my oldest kid telling his brother that he’s had milkshakes before at my mom’s house and I knew that she’d tricked him too.

    I really, really, really love anything with malted milk powder and this was no exception. Every sip is like a frozen Whopper.

    Nicole made a S’Mores Milkshake for her contribution to milkshake month which I will be making very soon because y’all know I get a little obsessed with s’mores this time of year.

    Ingredients

    • 2 ½ cups chocolate ice cream
    • ½ cup malted milk powder
    • ½ – 1 cup milk
    • whipped cream
    • malted milk chocolate balls

    Instructions

    • Add chocolate ice cream and malted milk powder to blender. Add milk ¼ cup at a time, blending between each addition, until desired consistency is reached.
    • Top with whipped cream and malted milk chocolate balls.

    Where To Buy Malted Milk Powder?

    You should be able to find malted milk powder in any large grocery store. It will be either with the chocolate milk powdered mixes or with the powdered milk in the baking aisle.

    If you can’t find it anywhere, you can always order it online!

    More Milkshake Recipes

    • Pumpkin Pie Milkshake
    • Reese’s Pieces Milkshake
    • Cake Batter Milkshakes

    Make sure you subscribe to my email list to get all my new recipes delivered right to your inbox!

    You can also follow me on Instagram, Facebook, or Pinterest for even more! 

    📖 Recipe

    Yield: 4 milkshakes

    Chocolate Malted Milkshake

    Chocolate Malted Milkshake

    The most delicious Chocolate Malted Milkshake! Only 3 ingredients and it tastes just like a frozen Whoppes candy!

    Prep Time 10 minutes
    Total Time 10 minutes

    Ingredients

    • 2 ½ cups chocolate ice cream
    • ½ cup malted milk powder
    • ½ to 1 cup milk
    • whipped cream (for garnish)
    • malted milk chocolate balls (for garnish)

    Instructions

    Add chocolate ice cream and malted milk powder to a blender. Add milk a quarter cup at a time, blending between each addition, until the desired consistency is reached. Top with whipped cream and malted milk chocolate balls.

    Recommended Products

    As an Amazon Associate and member of other affiliate programs, I earn from qualifying purchases.

    • Malted Milk Chocolate Balls
      Malted Milk Chocolate Balls
    • Malted Milk Powder
      Malted Milk Powder
    • My Favorite Blender
      My Favorite Blender

    Nutrition Information:

    Yield:

    4

    Serving Size:

    1

    Amount Per Serving: Calories: 419Total Fat: 15gSaturated Fat: 9gTrans Fat: 0gUnsaturated Fat: 5gCholesterol: 34mgSodium: 167mgCarbohydrates: 67gFiber: 3gSugar: 54gProtein: 7g

    Did you make this recipe?

    Tag me in your Instagram photo - @fakeginger

    © Amanda Livesay
    Category: frozen goodies

    7Up Biscuits

    Jun 05, 2013

     7Up Biscuits – only 4 ingredients for the fluffiest, most delicious biscuits ever!

    7Up Biscuits - only 4 ingredients for the fluffiest, most delicious biscuits ever!

    Never in my life has my husband asked me, midway through dinner, to make more of something.

    Until these 7Up biscuits.

    I’m gonna go ahead and warn you that these biscuits are addictive and you’ll consider making them every night after you try them the first time.

    When I saw this recipe, I really didn’t know what to expect.

    I mean, 7Up? In biscuits?

    That’s just kind of weird.

    I thought for sure they would be oddly sweet and more like a dessert biscuit than a buttery dinner biscuit. Not the case at all! You would never guess that it’s 7Up in them. They’re so fluffy and pretty much the most perfect biscuit you can imagine. We haven’t given it a try (yet) but I imagine these would be great for breakfast with some bacon, eggs, and cheese stuffed in the middle.

    They’re really easy and only require 4 ingredients!

    We went through almost 2 batches during dinner the night I made these and the remaining 2 didn’t last until morning. You HAVE to give these a try if you’re like me and have always been disappointed in biscuit recipes.

    7Up Biscuits - only 4 ingredients for the fluffiest, most delicious biscuits ever!

    Ingredients

    • Butter
    • Bisquick
    • Sour cream
    • 7Up – you can use Sprite instead

    Instructions

    • Preheat oven to 450F. Melt butter by placing it in a 9×9-inch baking dish and letting it sit in the preheating oven.
    • In a mixing bowl, mix together Bisquick, sour cream, and 7Up.
    • Once butter is melted, remove from oven and pat the dough into the pan, making sure to cover the bottom of the pan. Use a sharp knife to cut into 9 squares.
    • Bake for 12 – 15 minutes, until golden brown.

    What To Serve With 7Up Biscuits

    • Lemon Chicken and Rice Soup
    • Broccoli Cheddar Soup
    • Chicken Tortellini Soup
    • Slow Cooker Mississippi Roast
    • Slow Cooker Salisbury Steak

    More Easy Bread Recipes

    • Honey Yeast Rolls
    • Cheesy Garlic Crescent Rolls
    • Homemade Crescent Rolls
    • Cheesy Garlic Knots

    Make sure you subscribe to my email list to get all my new recipes delivered right to your inbox!

    You can also follow me on Instagram, Facebook, or Pinterest for even more! 

    📖 Recipe

    Yield: 9 servings

    7Up Biscuits

    7Up Biscuits
    Prep Time 15 minutes
    Cook Time 15 minutes
    Total Time 30 minutes

    Ingredients

    • ¼ cup butter
    • 2 cups Bisquick
    • ½ cup sour cream
    • ½ cup 7Up

    Instructions

    1. Preheat oven to 450F. Put butter in a 9x9-inch baking pan and place in oven to melt (it's fine to do this while oven is preheating).
    2. Mix Bisquick, sour cream, and 7Up together in a mixing bowl, being careful not to overwork the dough.
    3. Remove baking pan from oven when butter is melted. Careful pat the dough into the pan, making sure to cover the entire surface. Use a sharp knife to cut into 9 squares.
    4. Bake for 12-15 minutes or until golden brown.

    Recommended Products

    As an Amazon Associate and member of other affiliate programs, I earn from qualifying purchases.

    • Bisquick Baking Mix
      Bisquick Baking Mix
    • 9x9-inch Square Pan
      9x9-inch Square Pan

    Nutrition Information:

    Yield:

    9

    Serving Size:

    1

    Amount Per Serving: Calories: 191Total Fat: 12gSaturated Fat: 6gTrans Fat: 0gUnsaturated Fat: 5gCholesterol: 22mgSodium: 388mgCarbohydrates: 19gFiber: 1gSugar: 5gProtein: 3g

    Did you make this recipe?

    Tag me in your Instagram photo - @fakeginger

    © Amanda Livesay
    Category: Sides

    Slow Cooker Cheesy Chicken and Rice

    May 29, 2013

    Slow Cooker Cheesy Chicken and Rice is total comfort food! Chicken, rice, and corn in a creamy cheesy sauce.

    I love chicken and rice in any form. If you’re looking for more chicken and rice recipes, try Lemon Chicken and Rice Soup and Chicken and Wild Rice Soup!

    Chicken with yellow rice, cheese, and corn.

    Back in the day, I was deeply opposed to “cream of” soups. I had it in my head that they were the worst things you could possibly buy at the grocery store and whenever a recipe called for one, I would either skip it completely or make a homemade version which never really tasted like the real thing.

    These days I am all about those soups. You really can’t beat how easy they make dinner!

    This is one of those recipes that calls for a can of soup and I’m so happy I didn’t skip it. My family loves chicken and rice of all varieties but I knew they would especially love a version that calls for yellow rice, cheese, and corn. And they did! My husband said that this is a recipe that I can make frequently – but I have to also make those 7UP Biscuits you see on the plate!

    Most of the cooking for this recipe is done is the slow cooker and then right before serving, you stir in the rest of the ingredients which makes it perfect for a busy weeknight or a lazy weekend day.

    Ingredients for slow cooker cheesy chicken and rice

    Ingredients

    Scroll down for ingredient amounts.

    • Boneless, skinless chicken breasts – I think that thighs would be too fatty for this recipe and would cause the mixture to be oily.
    • Onion – white or yellow onion works for this recipe.
    • Cream of chicken soup – you can use cream of mushroom if you prefer. You can also use the low fat or “healthy” version of the soup.
    • Zatarain’s Yellow Rice Mix – there are several brands that make a yellow rice mix if you can’t find the Zatarain’s.
    • Cheddar cheese – this gets stirred in at the very end.
    • Canned whole kernel corn – you can use frozen corn but you may need to add a few minutes to the cooking time after you add the corn.
    how to make cheesy chicken and yellow rice

    How To Make Cheesy Chicken and Rice

    • Prep. Place chicken in the slow cooker. Sprinkle chopped onion over top and dollop cream of chicken soup over top.
    • Cook. Allow to cook on low for 7 hours or high for 3 hours.
    • Rice. About 30 minutes before serving, cook the rice according to package instructions.
    • Shred. Remove chicken from slow cooker and shred; return to slow cooker.
    • Combine. Once rice is cooked, stir it into the chicken mixture in the slow cooker.
    • Add cheese and corn. Stir in shredded cheese and corn. Continue cooking just until cheese is melted.

    Can You Put Raw Chicken in the Crockpot?

    It’s perfectly fine to put raw chicken in the crockpot with the rest of the ingredients. It will cook completely in the time the recipe states.

    How Long Is It Good For?

    This Slow Cooker Cheesy Chicken and Rice will be good in the fridge for up to 3 days. Make sure to store it in an airtight container (these are my favorite!) to keep it as fresh as possible.

    The best way to reheat this dish is in the microwave in 30 second increments until it reaches the desired temperature. Make sure to give it a good stir after each 30 second increment!

    crockpot cheesy chicken and rice

    Can You Freeze It?

    Yes, you can freeze this chicken and rice for Tup to 3 months. I recommend using a large freezer ziploc container and squeezing out as much air as possible.

    When you’re ready to serve it, let it defrost overnight in the fridge and then you can reheat on the stove or microwave. If it’s too thick, use a splash or chicken broth or water to get it back to it’s original consistency.

    Tips & Tricks

    • If you want to make dinner really easy, cook the rice the night before and store it in the fridge. That way all you have to do is shred the chicken and stir the rice, corn, and cheese in.

    What To Serve With It?

    I think this is a complete meal on it’s own (with the 7Up Biscuits, of course) but it never hurts to put a veggie on the side.

    • Roasted Broccoli
    • Spicy Honey Brussels Sprouts
    • Green Beans Almondine
    • Glazed Ranch Carrots

    Or if you want different bread options, try Oatmeal Rolls or Cheesy Broccoli Cornbread!

    More Slow Cooker Chicken Recipes

    • Slow Cooker Huli Huli Chicken
    • Slow Cooker Honey Sesame Chicken
    • Slow Cooker Orange Chicken
    • Slow Cooker Teriyaki Chicken
    • Slow Cooker White Chicken Chili

    Make sure you subscribe to my email list to get all my new recipes delivered right to your inbox!

    You can also follow me on Instagram, Facebook, or Pinterest for even more! 

    📖 Recipe

    Yield: 8 servings

    Slow Cooker Cheesy Chicken and Rice

    Slow Cooker Cheesy Chicken and Rice

    Slow Cooker Cheesy Chicken and Rice is total comfort food! Chicken, rice, and corn in a creamy cheesy sauce.

    Prep Time 10 minutes
    Cook Time 7 hours
    Total Time 7 hours 10 minutes

    Ingredients

    • 1 pound boneless, skinless chicken breasts
    • 1 large onion, chopped
    • 1 10.5 ounce can cream of chicken soup
    • 1 8 ounce box Zatarain's Yellow Rice Mix
    • 1 cup shredded cheddar cheese
    • 1 15 ounce can whole kernel corn, drained

    Instructions

    1. Place chicken in the slow cooker. Sprinkle chopped onion over top and dollop cream of chicken soup over top. Allow to cook on low for 7 hours or high for 3 hours.
    2. About 30 minutes before serving, cook the rice according to package instructions.
    3. Remove chicken from slow cooker and shred; return to slow cooker.
    4. Once rice is cooked, stir it into the chicken mixture in the slow cooker. Stir in shredded cheese and corn. Continue cooking just until cheese is melted.

    Recommended Products

    As an Amazon Associate and member of other affiliate programs, I earn from qualifying purchases.

    • Zatarain's Yellow Rice
      Zatarain's Yellow Rice
    • Programmable Slow Cooker
      Programmable Slow Cooker

    Nutrition Information:

    Yield:

    8

    Serving Size:

    1

    Amount Per Serving: Calories: 289Total Fat: 11gSaturated Fat: 4gTrans Fat: 0gUnsaturated Fat: 5gCholesterol: 65mgSodium: 518mgCarbohydrates: 24gFiber: 2gSugar: 4gProtein: 24g

    Did you make this recipe?

    Tag me in your Instagram photo - @fakeginger

    © Amanda Livesay
    Cuisine: American / Category: slow cooker

    Banana Split Ice Cream

    May 28, 2013

    Banana Split Ice Cream is homemade ice cream with banana, marshmallows, pineapple, and maraschino cherries. Top it with chocolate syrup and sprinkles for the perfect banana split treat! 

    I asked my husband what kind of ice cream he’d like me to make and he, of course, wanted strawberry even though we already have strawberry ice cream in the freezer! Men. He finally decided on banana split and I have always loved Blue Bell’s version so I was pretty excited.

    The beginning of this recipe is a little weird – it starts with water – but it really turned out well. The base has marshmallows melted into it which I don’t think is traditional in a banana split but hey, who am I to say no to marshmallow ice cream? It also has crushed pineapple, banana, and maraschino cherries. And you top it all off with chocolate syrup and sprinkles.

    This recipe does make a ton and I ended up having to freeze it in 2 batches but no one complained about the large amount of ice cream when it was done. You can always cut the recipe in half if you want. But why would you?!

    More Ice Cream Recipes

    • Vanilla Bean Ice Cream
    • Chocolate Ganache Ice Cream
    • Birthday Cake Ice Cream
    • Ginger Peach Ice Cream
    • Coffee Ice Cream
    • Strawberry Sour Cream Ice Cream

    Make sure you subscribe to my email list to get all my new recipes delivered right to your inbox!

    You can also follow me on Instagram, Facebook, or Pinterest for even more! 

    📖 Recipe

    Yield: 6 servings

    Banana Split Ice Cream

    Banana Split Ice Cream

    Banana Split Ice Cream is homemade ice cream with banana, marshmallows, pineapple, and maraschino cherries. Top it with chocolate syrup and sprinkles for the perfect banana split treat! 

    Prep Time 20 minutes
    Cook Time 5 minutes
    Additional Time 15 minutes
    Total Time 40 minutes

    Ingredients

    • ¾ cup plus 2 tablespoons sugar
    • 1 cup water
    • 1 cup milk
    • 2 cups miniature marshmallows
    • 4 teaspoons lemon juice
    • 1 can, 8 ounces crushed pineapple, undrained
    • 2 medium ripe bananas, finely chopped
    • ½ cup chopped maraschino cherries, drained and patted dry
    • 1 cup heavy whipping cream, whipped
    • Chocolate syrup and sprinkles, for serving

    Instructions

    1. Bring the sugar, water, and milk to a boil in a heavy saucepan. Reduce heat; cook until sugar is dissolved. Add marshmallows and stir until melted. Remove from the heat; cool for 15 minutes. Stir in lemon juice. Cover and refrigerate for 8 hours or overnight.
    2. Stir in the pineapple, bananas and cherries. Fold in whipped cream. Fill bowl of ice cream freezer two-thirds full; freeze according to manufacturer's directions. Refrigerate remaining mixture until ready to freeze. Allow firm up in the freezer for 2-4 hours before serving. Serve with chocolate syrup and sprinkles, if desired.

    Nutrition Information:

    Yield:

    6

    Serving Size:

    1

    Amount Per Serving: Calories: 327Total Fat: 16gSaturated Fat: 10gTrans Fat: 1gUnsaturated Fat: 5gCholesterol: 48mgSodium: 54mgCarbohydrates: 46gFiber: 2gSugar: 34gProtein: 4g

    Did you make this recipe?

    Tag me in your Instagram photo - @fakeginger

    © Amanda Livesay
    Cuisine: American / Category: frozen goodies

    Sarasota Lemonade

    May 23, 2013

    Sarasota Lemonade is the perfect summer cocktail! Pink lemonade with white wine, 7Up, and strawberries!

    Sarasota Lemonade - the perfect summer cocktail! Pink lemonade with white wine, 7Up, and strawberries!

    My kid’s last day of school is tomorrow.

    How crazy is that?

    It’s really hard to believe that summer is so close considering we just had snow 3 weeks ago!

    Well since Memorial Day is only days away and since that pretty much signifies the beginning of grilling/picnic/pool season, Nicole and I decided to do a drink along those lines.

    I made this Sarasota Lemonade because what says summer more than lemonade?

    I’m not really sure the origins of the name of this recipe but it’s definitely delicious. It’s white wine mixed with pink lemonade and Sprite.

    It’s sweet and bubbly and everything I look for in a drink. I love using frozen fruit in drinks like this because it keeps them nice and cold but doesn’t water them down.

    Nicole made Red, White, and Blue Sangria – perfect for your Memorial Day barbecue!

    Sarasota Lemonade - the perfect summer cocktail! Pink lemonade with white wine, 7Up, and strawberries!

    Ingredients

    • White wine – use your favorite white wine and it doesn’t need to be expensive. I like to use a pinot grigio.
    • Pink lemonade concentrate – the frozen stuff in the can. Strawberry lemonade concentrate would also be delicious.
    • Sprite – or any other lemon lime soda. You can use diet soda or even unsweetened lime sparkling water.
    • Frozen strawberries

    How To Make Sarasota Lemonade

    • Combine. Stir together the white wine, pink lemonade concentrate, and soda.
    • Serve. Fill each glass with frozen strawberries and ice. Pour drink over top.

    More Wine Cocktail Recipes

    • Pineapple Lemonade Sangria
    • Melon Ball Sangria
    • Mimosas
    • Peach Cherry Sangria

    Make sure you subscribe to my email list to get all my new recipes delivered right to your inbox!

    You can also follow me on Instagram, Facebook, or Pinterest for even more! 

    📖 Recipe

    Yield: about 12 servings

    Sarasota Lemonade

    Sarasota Lemonade

    Sarasota Lemonade is the perfect summer cocktail! Pink lemonade with white wine, 7Up, and strawberries!

    Prep Time 10 minutes
    Total Time 10 minutes

    Ingredients

    • 2 bottles white wine
    • 1 can pink lemonade concentrate, thawed
    • 3 cups 7Up or Sprite
    • frozen strawberries
    • ice

    Instructions

    1. In a large pitcher, stir together the white wine, pink lemonade concentrate, and soda. Before serving, fill each glass with frozen strawberries and ice. Pour drink over top.

    Nutrition Information:

    Yield:

    12

    Serving Size:

    1

    Amount Per Serving: Calories: 121Total Fat: 0gSaturated Fat: 0gTrans Fat: 0gUnsaturated Fat: 0gCholesterol: 0mgSodium: 13mgCarbohydrates: 27gFiber: 0gSugar: 20gProtein: 1g

    Did you make this recipe?

    Tag me in your Instagram photo - @fakeginger

    © Amanda Livesay
    Cuisine: American / Category: drink

    Apricot Chicken

    May 22, 2013

    Apricot Chicken is an easy baked chicken recipe that the whole family will love. It’s coated in a sauce made from Catalina dressing, onion soup mix, and apricot preserves.

    Sliced chicken breast with a red sauce made from Catalina dressing, onion soup mix, and apricot preserves

    My husband and I clash when it comes to food sometimes. We both tend to go for things that we grew up eating. Like, the other day I was making egg-in-the-holes for the kids and he was all “Eww! What is that?!” Because apparently when his mom did the egg and toast thing, she mixed everything together in a cup and he thought my way was completely wrong.

    Well years ago I made that Dorito taco salad with Catalina dressing that is so delicious and I was sure he would love it.  Because who doesn’t love a taco salad made with Doritos and a sweet dressing? He didn’t like it. Because it wasn’t the taco salad he grew up with.

    Every once in a while I get a random craving for that salad so when I stumbled upon this chicken recipe that calls for Catalina dressing, I knew I had to make it. Hoping to quell that craving, I guess! Y’all know I’m a sucker for onion soup mix in recipes too so really, this was a win all around. Plus who doesn’t like to have pink chicken? As long as it’s fully-cooked pink chicken!

    Definitely put some foil in your pan before you make it. All the sugar in the dressing and preserves burn after awhile and really makes clean-up a pain. I learned the hard way.

    Sliced chicken breast coated in apricot sauce

    Ingredients

    • Chicken – I used boneless, skinless chicken breasts but you can use whatever cut you like, bone in or bone out.
    • Onion soup mix – this is a powdered soup mix that adds so much flavor to whatever dish you add it to. It’s also very salty so if you think you want to add extra salt, taste the sauce first.
    • Catalina dressing – this a sweet tomato-based dressing that works so well with the rest of the ingredients.
    • Apricot preserves – this adds a sweetness and works so well with this dish.

    How To Make Apricot Chicken

    • Make sauce. In a mixing bowl, whisk together onion soup, Catalina dressing, and apricot preserves.
    • Prep. Place chicken breasts into a baking dish lined with parchment paper.
    • Top. Pour sauce over top. Use a pastry brush to make sure it is coated well.
    • Bake. Bake at 400F for about 1 hour, spooning sauce over the chicken every 15 minutes.

    How Long Is It Good For?

    Apricot chicken will be good for up to 3 days. Make sure to store it in an airtight container in the fridge.

    When you are ready to serve it, reheat in the microwave.

    Make sure you subscribe to my email list to get all my new recipes delivered right to your inbox!

    You can also follow me on Instagram, Facebook, or Pinterest for even more! 

    📖 Recipe

    Yield: 4 servings

    Apricot Chicken

    Apricot Chicken

    Sweet and Tangy Chicken is an easy baked chicken recipe that the whole family will love. It's coated in a sauce made from Catalina dressing, onion soup mix, and apricot preserves.

    Prep Time 10 minutes
    Cook Time 1 hour
    Total Time 1 hour 10 minutes

    Ingredients

    • 1 pound boneless, skinless chicken breasts
    • 1 package onion soup mix
    • 1 cup Catalina dressing
    • 1 cup apricot preserves

    Instructions

    1. Preheat oven to 400F. Line a 9x13-inch pan with aluminum foil to help with cleanup.
    2. In a mixing bowl, whisk together onion soup, Catalina dressing, and apricot preserves.
    3. Place chicken breasts in the prepared pan and pour sauce over top. Use a pastry brush to make sure it is coated well.
    4. Bake for about 1 hour, spooning sauce over the chicken every 15 minutes, or until the chicken is fully cooked.

    Recommended Products

    As an Amazon Associate and member of other affiliate programs, I earn from qualifying purchases.

    • 9x13-inch pan
      9x13-inch pan

    Nutrition Information:

    Yield:

    4

    Serving Size:

    1

    Amount Per Serving: Calories: 563Total Fat: 16gSaturated Fat: 4gTrans Fat: 4gUnsaturated Fat: 11gCholesterol: 96mgSodium: 955mgCarbohydrates: 70gFiber: 1gSugar: 52gProtein: 36g

    Did you make this recipe?

    Tag me in your Instagram photo - @fakeginger

    © Amanda Livesay
    Cuisine: American / Category: chicken

    Grape Salad

    May 21, 2013

    Cool and creamy Grape Salad is the perfect refreshing dessert for summer! Red and green grapes in a vanilla dressing and topped with crunchy pecans and brown sugar.

    If you love fruit salads, try Pineapple Fluff Salad and Banana Split Fluff!

    Grape Salad - red and green grapes tossed in a sweet creamy sauce and topped with brown sugar and pecans! This is so delicious and perfect for summer parties!

    Don’t let the name of this fool you.

    It may be called a salad but there is absolutely nothing healthy about it! But man, is it good!

    I made this strawberry pretzel salad last week and my 3 year old kept asking me why it was red. After telling him over and over again that it was because it had strawberries in it, he told me that he wanted a purple one.

    With grapes.

    And grape jello.

    And while I couldn’t stomach anymore jello I knew the whole family would love this classic Grape Salad recipe.

    It’s fresh grapes with a creamy dressing and topped with a sweet, crunchy topping! Everyone loved it and it was so easy to put together!

    ingredient for grape salad

    Ingredients

    • Cream cheese – make sure to soften it before starting the recipe so you get a really creamy dressing.
    • Sour cream – this adds just a bit of tanginess to the sweet dressing.
    • Sugar
    • Vanilla
    • Red grapes – you can use all one color of grapes if you prefer but I like how it looks with multiple colors.
    • Green grapes
    • Brown sugar – this is going on top of the salad. It adds a little extra sweetness plus a nice crunch.
    • Pecans – the crunch of the pecans are such a nice contrast to the juicy grapes and creamy dressing.

    Instructions

    • Make dressing. Use an electric mixer to beat cream cheese, sour cream, sugar, and vanilla until well combined.
    • Combine everything. Add grapes and toss to coat.
    • Chill. Refrigerate until ready to serve.
    • Add toppings. Before serving, sprinkle with brown sugar and chopped pecans.
    Grape Salad - red and green grapes tossed in a sweet creamy sauce and topped with brown sugar and pecans! This is so delicious and perfect for summer parties!

    How Long Is It Good For?

    Grape salad is best eaten within 3 – 4 days. Make sure you’re storing it in an airtight container in the refrigerator to keep it fresh for as long as possible.

    Can You Make It Ahead?

    You can make this fruit salad the morning before or even the night before you plan to serve it. I wouldn’t add the brown sugar and pecans until right before serving though.

    Make sure to store it in the fridge in an airtight container.

    More Fruit Salad Recipes

    • Tropical Marshmallow Fruit Salad
    • Marshmallow Fruit Salad
    • Pistachio Marshmallow Salad
    • Cherry Fluff
    • Rainbow Honey Lime Fruit Salad

    Make sure you subscribe to my email list to get all my new recipes delivered right to your inbox!

    You can also follow me on Instagram, Facebook, or Pinterest for even more! 

    📖 Recipe

    Yield: 12 servings

    Grape Salad

    Grape Salad

    Cool and creamy Grape Salad is the perfect refreshing dessert for summer! Red and green grapes in a vanilla dressing and topped with crunchy pecans and brown sugar.

    Prep Time 10 minutes
    Total Time 10 minutes

    Ingredients

    • 1 package, 8 ounces cream cheese, softened
    • 1 cup 8 ounces sour cream
    • ⅓ cup sugar
    • 2 teaspoons vanilla
    • 2 pounds seedless red grapes
    • 2 pounds seedless green grapes
    • 3 tablespoons brown sugar
    • 3 tablespoons chopped pecans

    Instructions

    1. Use an electric mixer to beat cream cheese, sour cream, sugar, and vanilla until well combined.
    2. Add grapes and toss to coat. Refrigerate until ready to serve.
    3. Before serving, sprinkle with brown sugar and chopped pecans.

    Recommended Products

    As an Amazon Associate and member of other affiliate programs, I earn from qualifying purchases.

    • Electric Mixer
      Electric Mixer

    Nutrition Information:

    Yield:

    12

    Serving Size:

    1

    Amount Per Serving: Calories: 254Total Fat: 12gSaturated Fat: 6gTrans Fat: 0gUnsaturated Fat: 4gCholesterol: 30mgSodium: 69mgCarbohydrates: 38gFiber: 2gSugar: 33gProtein: 3g

    Did you make this recipe?

    Tag me in your Instagram photo - @fakeginger

    © Amanda Livesay
    Cuisine: American / Category: Sides


    Grapefruit Margaritas

    May 16, 2013

    Can you tell that I really love margaritas? I know tequila is really a love or hate thing and I definitely love it. My husband, on the other hand, gags at the very smell of it. More margarita for me!

    We decided to focus on limes this week which, of course, made me automatically think of margaritas. And grapefruit is super cheap right now so this was the perfect time to finally try a grapefruit margarita! I’ve been wanting to make the forever but even though I love grapefruit, I was worried they would just be too tart. The ruby red grapefruits are actually really sweet though and this drink doesn’t even require a simple syrup which means there’s hardly any prep involved in these. You just have to squeeze the fruit and then stir it all together in a big pitcher.

    They are so yummy and so easy to drink more than you actually mean to. Whoops! I’ll definitely be making these throughout the summer!

    Nicole made a really fun Brazilian Lemonade that involved blending whole limes and calls for one of my favorite ingredients: sweetened condensed milk!

    …

    Read More

    Cheese Stromboli

    May 14, 2013

    It seems like it’s been forever since I’ve blogged about something doughy. I’m really weird about blogging and sometimes start to think that I’ve blogged everything there is to possibly blog about. Which is silly because there’s an endless supply of recipes and ideas out there.

    So today I’m sharing something I’ve never blogged, never made, and never even eaten before now! I was always kind of confused about stromboli because it seems like every time I see it at a restaurant it looks just like a calzone – folded over pizza dough with stuff inside. But as it turns out, a stromboli is actually rolled up, cinnamon roll style, once it’s stuffed with your choice of toppings. This one is only cheese (smoked gruyere!) but you can pretty much add anything you want. Meat, different cheeses, and veggies.

    This dough recipe from Red Star Yeast is pretty fantastic. It’s light and airy and the perfect compliment to all the cheese. I’m a big believer in waiting for a bread to cool completely before cutting for the best texture but with something like this, you just gotta cut into it as soon as it comes out of the oven and the bread doesn’t suffer at all for it.

    I’m still obsessed with Platinum yeast and if you haven’t given it a try yet, you absolutely must. It makes baking with yeast completely foolproof! I was able to skip the first step of the recipe (softening the yeast) thanks to the magic of Platinum.

    …

    Read More

    Mimosas

    May 09, 2013

    Nicole left it up to me to choose this week’s Thirsty Thursday theme and maybe it’s because I’ve been dreaming of the Mimosas I plan on having on Sunday, but I suggested a Mother’s Day theme. Because every mom needs a cocktail on Mother’s Day, right?

    I love these things so much. They take no time to whip up – you can either do them one at a time or do an entire batch if you’re serving a crowd. Seriously, can’t get easier! Or more delicious!

    Ingredients

    • Champagne – you can also use a sparkling white wine.
    • Orange juice – I don’t recommend using an orange juice with pulp for this.

    How To Make Mimosas

    • Combine. Pour champagne and orange juice into a glass.
    • Serve. Serve immediately.

    Make sure you subscribe to my email list to get all my new recipes delivered right to your inbox!

    You can also follow me on Instagram, Facebook, or Pinterest for even more! 

    📖 Recipe

    Yield: 1 serving

    Mimosas

    Mimosas

    Prep Time 5 minutes
    Total Time 5 minutes

    Ingredients

    • 2 ounces Champagne (or other sparkling wine), chilled
    • 2 ounces orange juice
    • orange slices, for garnish

    Instructions

    1. Pour champagne and orange juice in a champagne flute. Garnish with orange slice.
    2. (To make a batch of Mimosas (12 servings), pour one bottle (750 ml) chilled Champagne into a pitcher. Stir in 3 cups orange juice.)

    Nutrition Information:

    Yield:

    1

    Serving Size:

    1

    Amount Per Serving: Calories: 239Total Fat: 0gSaturated Fat: 0gTrans Fat: 0gUnsaturated Fat: 0gCholesterol: 0mgSodium: 11mgCarbohydrates: 18gFiber: 0gSugar: 12gProtein: 1g

    Did you make this recipe?

    Tag me in your Instagram photo - @fakeginger

    © Amanda Livesay
    Cuisine: American / Category: drink
    « Previous Page
    Next Page »

    Primary Sidebar

    Amanda Livesay
    Hi, I'm Amanda! DFW food blogger, mom of boys, and crazy dog lady.
    Read more
    Privacy Policy
    Privacy Policy

    Footer

    ↑ back to top

    About

    • Privacy Policy
    • About Fake Ginger

    Newsletter

    • Sign Up for weekly emails featuring new recipes!

    As an Amazon Associate I earn from qualifying purchases.

    Copyright © 2024 FakeGinger.com