• Skip to primary navigation
  • Skip to main content
  • Skip to primary sidebar
  • Home
  • About
  • Recipes

Fake Ginger

menu icon
go to homepage
  • Recipe Index
  • About
  • Subscribe
    • Facebook
    • Instagram
    • Pinterest
  • subscribe
    search icon
    Homepage link
    • Recipe Index
    • About
    • Subscribe
    • Facebook
    • Instagram
    • Pinterest
  • ×
    Home » Page 47

    Candied Apple Chips

    Candied Apple Chips

    Sep 24, 2012

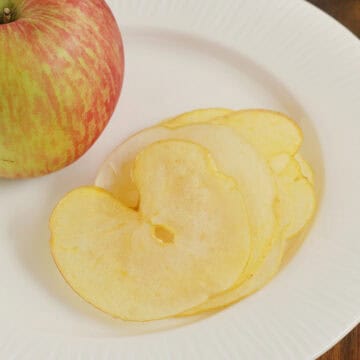
    Candied Apple Chips are crunchy baked apple slices! The perfect snack for kids and adults.

    Candied Apple Chips - crunchy baked apple slices! The perfect snack for kids and adults.

    Back in our childless days I opened a Starbucks every morning which means I was usually off work hours before my husband came home. He used to joke that he knew everyday he’d come home to find me either asleep on the couch or on our back porch with my computer on my lap and a giant bag of apple chips in my hand.

    It’s really simple and you’ll see that it’s the world’s shortest ingredient list – just 3 things! And one ingredient is water!

    The apple is sliced really thin with a mandoline slicer and then boiled in a simple syrup before being baked. It only took about 30 minutes from start to finish.

    Candied Apple Chips - crunchy baked apple slices! The perfect snack for kids and adults.

    More Apple Recipes

    • Slow Cooker Caramel Apple Crumble
    • Apple Upside Down Side Cake
    • Apple Fritters
    • Apple Galette
    • Deep Dish Apple Pie

    Make sure you subscribe to my email list to get all my new recipes delivered right to your inbox!

    You can also follow me on Instagram, Facebook, or Pinterest for even more! 

    📖 Recipe

    Yield: 2 serving

    Candied Apple Chips

    Candied Apple Chips

    Prep Time 5 minutes
    Cook Time 25 minutes
    Additional Time 1 minute
    Total Time 31 minutes

    Ingredients

    • 1 small apple
    • 1 cup sugar
    • 1 cup water

    Instructions

    1. Preheat oven to 350F. Place a wire rack inside of a rimmed baking sheet and spray lightly with a nonstick spray.
    2. Use a mandoline to make really thin slices of apple. There is no need to core and peel the apple but make sure you remove any seeds.
    3. Bring the sugar and water to a boil in a saucepan. Add the apple slices and cook, stirring frequently, for about 10 minutes or until the slices are translucent. Use tongs to remove the slices from the syrup and place them on the wire rack in a single layer. (You can discard the syrup or save it - it's amazing apple-flavored simple syrup!)
    4. Bake for about 15-20 minutes, or until they're golden.The chips may not be crisp at this point but they will crisp up almost as soon as you pull them out of the oven. Transfer the chips to a sheet of wax paper and let them cool completely.

    Recommended Products

    As an Amazon Associate and member of other affiliate programs, I earn from qualifying purchases.

    • Hand-Held Mandoline Slicer
      Hand-Held Mandoline Slicer

    Nutrition Information:

    Yield:

    2

    Serving Size:

    1

    Amount Per Serving: Calories: 426Total Fat: 0gSaturated Fat: 0gTrans Fat: 0gUnsaturated Fat: 0gCholesterol: 0mgSodium: 6mgCarbohydrates: 110gFiber: 2gSugar: 108gProtein: 0g

    Did you make this recipe?

    Tag me in your Instagram photo - @fakeginger

    © Amanda Livesay
    Cuisine: American / Category: snack

    Carrot Cream Cheese Muffins

    Sep 18, 2012

    Carrot Cream Cheese Muffins are light and fluffy carrot muffins with a sweet cream cheese filling.

    Y’all remember this time last year when I excitedly bought a can of pumpkin only to realize it had expired 2 years before?

    I feel like I never really got over that. Don’t get me wrong, I was definitely beating down Starbucks’ door the day the PSLs were released but I just haven’t been excited to bake with pumpkin this year. But I’m still craving those fall flavors, you know?

    So I was catching up on my DVR’d shows this past weekend and saw the Pioneer Woman making a carrot cake and, ding ding ding, immediately knew how to get my fall flavor fix! Carrot cake muffins! With sweetened cream cheese in the center!

    You can’t go wrong with a muffin like this. The only way these could be better is if they had a ton of pecans in them! These were very moist and I didn’t even have to adjust them for the altitude! The carrots aren’t super obvious – you could probably get away with adding more than a cup. And like I said, pecans would be an excellent addition! And raisins! Mmm!

    Make sure you subscribe to my email list to get all my new recipes delivered right to your inbox!

    You can also follow me on Instagram, Facebook, or Pinterest for even more! 

    📖 Recipe

    Carrot Cream Cheese Muffins

    Carrot Cream Cheese Muffins

    from King Arthur Flour

    Ingredients

    For the filling:

    • 1 8- ounce package cream cheese, low-fat is fine
    • ¼ cup sugar
    • dash of vanilla

    For the muffins:

    • 2 ¼ cups flour
    • 1 ½ teaspoons baking powder
    • ¼ teaspoon baking soda
    • 1 ½ teaspoons ground cinnamon
    • ¾ teaspoon ground ginger
    • ¾ teaspoon salt
    • ½ cup sugar
    • ¼ cup brown sugar, firmly packed
    • 2 large eggs
    • ¾ cup water
    • ⅓ cup vegetable oil
    • 1 cup grated carrots, lightly packed; about 2 large carrots

    Instructions

    1. Preheat oven to 400F. Line or grease a 12-cup muffin tin.
    2. To make the filling, microwave the cream cheese in a microwave safe bowl for about 40 seconds on low. Stir in sugar an vanilla. Set aside.
    3. Sift together flour, baking powder, baking soda, cinnamon, ginger, and salt. Set aside.
    4. In the bowl of a mixer, beat together the sugar, brown sugar, eggs, water, and vegetable oil until light. Slowly add in the dry ingredients and beat until just moistened. Add carrots and beat just a couple seconds until the carrots are dispersed.
    5. Put about 2 tablespoons of batter into each muffin cup. Add a heaping tablespoon into the center of each cup. Top with another couple tablespoons of batter, making sure the cream cheese is completely covered.
    6. Bake for about 20 minutes or until golden and a toothpick inserted into the center (of the actual muffin, not cream cheese) comes out clean. Cool completely on a wire rack.
    7. Repeat with remaining batter (or use a second muffin tin if you have it.)

    Recommended Products

    As an Amazon Associate and member of other affiliate programs, I earn from qualifying purchases.

    • Parchment Muffin Liners
      Parchment Muffin Liners
    • My Favorite Muffin Tin
      My Favorite Muffin Tin

    Nutrition Information:

    Yield:

    12

    Serving Size:

    1

    Amount Per Serving: Calories: 258Total Fat: 10gSaturated Fat: 2gTrans Fat: 0gUnsaturated Fat: 7gCholesterol: 41mgSodium: 310mgCarbohydrates: 37gFiber: 1gSugar: 18gProtein: 5g

    Did you make this recipe?

    Tag me in your Instagram photo - @fakeginger

    © Amanda Livesay

    Slow Cooker Mississippi Roast

    Sep 13, 2012

    Only 5 ingredients for this delicious crockpot meal! Slow Cooker Mississippi Roast is slow cooked tender beef with a savory gravy.

    We love slow cooker recipes for weeknight dinners! Some of our other favorites are Slow Cooker Apple Kielbasa Bites, Crockpot Cheeseburgers, and Slow Cooker Salisbury Steak Meatballs.

    Slow Cooker Mississippi Roast - only 5 ingredients for this delicious, kid-friendly, crockpot meal! Serve over mashed potatoes or rice.

    You know those weeks months where nothing you cook turns out?

    I’m having one of those right now.

    I told y’all about all my cookies spreading but didn’t mention that it’s everything I cook. I don’t know what’s up with me but I’m sick of it!

    In an effort to make something my kids wouldn’t spit out (yeah, that bad) I decided to make this super easy Mississippi Roast that I knew they would love.

    It’s a beef roast that turns super tender (like fall apart tender) in the slow cooker and it’s cooked in a delicious gravy made from ranch seasoning and pepperoncini peppers!

    It’s so delicious and we couldn’t get enough of the gravy poured over mashed potatoes.

    Slow Cooker Mississippi Roast - only 5 ingredients for this delicious, kid-friendly, crockpot meal! Serve over mashed potatoes or rice.

    What is Mississippi Roast?

    Mississippi roast is an easy pot roast recipe that’s cooked in the slow cooker. It combines several ingredients you wouldn’t normally combine but it makes the most delicious, savory roast.

    The story says that it’s called Mississippi Roast just because the person that created the recipe is from Mississippi. I love Mississippi and I love this roast so it works for me.

    Ingredients in Mississippi Roast

    • Chuck roast – this is a fairly inexpensive cut of beef that becomes really tender when it’s slow cooked
    • Dry ranch dressing – get the packets of dry seasoning and not the bottle of liquid ranch dressing.
    • Au Jus mix – this is a gravy mix. Find it with all the single seasoning mixes in your grocery store.
    • Butter – I recommend unsalted butter as the ranch seasoning and the au jus mix are both pretty salty.
    • Pepperoncini – these are pickled peppers that add such a delicious and interesting flavor to the roast.

    Instructions

    • Prep. Place the roast in the slow cooker.
    • Top. Sprinkle the Ranch dressing and the Au Jus mix over it. Place butter on top; followed by Pepperoncini.
    • Slow cooker. Cook on low for 8 hours
    • Serve. Shred the meat and serve with gravy

    How Long Is It Good For?

    This roast will stay good for up to 3 days in the refrigerator. Make sure to store it in an airtight container to keep it fresh for as long as possible.

    You can reheat the meat and gravy in the microwave or on the stovetop. If the gravy has thickened a little too much, just add a little beef broth or water to thin it out.

    Can You Freeze Mississippi Roast?

    Yes! Mississippi Roast freezes beautifully! I like to shred the meat and put it in a freezer ziploc bag with some of the gravy. And then I just let it defrost overnight in the fridge before serving.

    You can reheat in the microwave, stovetop, or even put it back in the slow cooker. If the gravy is too thick, add a splash of beef broth or water to loosen it up. 

    It will stay good in the freezer for up to 3 months. 

    What To Serve with Mississippi Roast?

    I always serve Mississippi Roast with either Roasted Garlic Mashed Potatoes or Red Skin Mashed Potatoes so the potatoes can soak up all that delicious gravy. You could also do rice or mashed cauliflower. 

    More Slow Cooker Recipes

    • Slow Cooker Steak Bites
    • Slow Cooker White Chicken Chili
    • Slow Cooker Salisbury Steak Meatballs
    • Slow Cooker Beer and Brown Sugar Kielbasa
    • Slow Cooker Cheesy Tortellini

    Make sure you subscribe to my email list to get all my new recipes delivered right to your inbox!

    You can also follow me on Instagram, Facebook, or Pinterest for even more! 

    📖 Recipe

    Yield: 10 servings

    Mississippi Roast

    Mississippi Roast

    Only 5 ingredients for this delicious crockpot meal! Slow Cooker Mississippi Roast is slow cooked tender beef with a savory gravy.

    Prep Time 5 minutes
    Cook Time 8 hours
    Total Time 8 hours 5 minutes

    Ingredients

    • 1 3- pound chuck roast
    • 1 1- ounce pack of dry Ranch dressing
    • 1 1- ounce pack of Au Jus mix
    • ½ cup 1 stick butter or margarine
    • 5 - 6 pepperoncini

    Instructions

    1. Place the roast in the slow cooker. Sprinkle the Ranch dressing and the Au Jus mix over it. Place butter on top; followed by Pepperoncini.
    2. Cook on low for 8 hours.
    3. Shred and serve with gravy.

    Recommended Products

    As an Amazon Associate and member of other affiliate programs, I earn from qualifying purchases.

    • Programmable Slow Cooker
      Programmable Slow Cooker
    • Au Jus Mix
      Au Jus Mix
    • Ranch Dressing Mix
      Ranch Dressing Mix

    Nutrition Information:

    Yield:

    10

    Serving Size:

    1

    Amount Per Serving: Calories: 426Total Fat: 32gSaturated Fat: 15gTrans Fat: 2gUnsaturated Fat: 15gCholesterol: 138mgSodium: 737mgCarbohydrates: 2gFiber: 1gSugar: 2gProtein: 34g

    Did you make this recipe?

    Tag me in your Instagram photo - @fakeginger

    © Amanda Livesay
    Cuisine: American / Category: slow cooker


    Mississippi Mud Brownies

    Aug 29, 2012

    Mississippi Mud Brownies are the richest, most delicious brownies ever! A layer of brownies topped with layers of peanut butter, marshmallows, and toasted pecans. Then they get topped with a thick layer of chocolate frosting. 

    Mississippi Mud Brownies Recipe - chocolate, marshmallows, peanut butter, pecans, and more! These are so rich and delicious!

    I didn’t plan on sharing these Mississippi Mud Brownies with y’all.

    I was so disappointed with how they looked when they came out of the oven and even more disappointed with my photos.

    But then the other night I had a Lean Cuisine for dinner and then chased it with 3 of these and decided that ehh, they might be hideous but they were way too good to not share!

    Mississippi Mud Brownies - chocolate, marshmallows, peanut butter, pecans, and more! These are so rich and delicious!

    How To Make Mississippi Mud Brownies

    There are a take on the classic Mississippi Mud Pie which is typically a a chocolate cookie crust with a rich cake baked into it. Then it gets chocolate pudding on top of the cake and finally, a layer of freshly whipped cream and some chopped pecans.

    For theese Mississippi Mud Brownies, you make a fairly standard brownie recipe  but then you cover them with peanut butter, marshmallows, pecans, and a deliciously rich chocolate frosting.

    All my favorites. 

    Which means these regular brownies become magical brownies and before you know it, you’ll have eaten 3 of them while staring out your kitchen window at absolutely nothing. They are just so rich and delicious! 

    These are so quick and such an easy way to jazz up the regular brownie. You could even start with a brownie mix which is probably what I’ll do next time just to make it even easier.

    And yeah, I will definitely be making these again. And again and again!

    That good.

    More Brownie Recipes

    • Cosmic Brownies
    • Peanut Butter Cup Brownies
    • Caramel-Filled Brownies
    • Peanut Butter Pretzel Brownies
    • Peppermint Chip Brownies

    Make sure you subscribe to my email list to get all my new recipes delivered right to your inbox!

    You can also follow me on Instagram, Facebook, or Pinterest for even more! 

    📖 Recipe

    Yield: about 16 servings

    Mississippi Mud Brownies

    Mississippi Mud Brownies

    Prep Time 30 minutes
    Cook Time 25 minutes
    Total Time 55 minutes

    Ingredients

    • ¾ cup all-purpose flour
    • 2 tablespoons cocoa powder
    • ½ teaspoon salt
    • ½ cup (1 stick) unsalted butter, softened
    • 1 cup sugar
    • ¾ teaspoon vanilla
    • 2 eggs
    • ¾ cup semisweet chocolate chips
    • ½ cups peanut butter
    • 1 ½ teaspoon canola oil
    • 2 cups mini marshmallows
    • ½ cups pecans, chopped and toasted
    • 2 cups powdered sugar
    • ⅛ teaspoon salt

    For the frosting:

    • 4 tablespoons butter
    • 2 tablespoons cocoa powder
    • ¼ cup plus 2 tablespoons milk
    • ¼ teaspoon vanilla

    Instructions

    1. Preheat oven to 350F. Line an 8x8-inch baking pan with parchment paper or foil. Spray it with cooking spray.
    2. In a mixing bowl, sift together flour, 2 tablespoons cocoa powder, and ½ teaspoon salt. Set aside.
    3. In the bowl of a stand mixer fitted with the paddle attachment, beat together ½ cup butter, sugar, and ¾ teaspoons vanilla until light and fluffy. Add the eggs one at a time, mixing sure each is fully incorporated. Mix dry ingredients into batter just until combined. Pour batter into prepared pan and spread evenly. Sprinkle with chocolate chips. Bake in preheated oven for 22-25 minutes or until a toothpick inserted into the center comes out clean.
    4. When brownies are done baking, combine peanut butter and oil in a microwave safe bowl and microwave on high for 20 seconds to soften. Pour over hot brownie and spread it to the sides. Sprinkle with marshmallows. Return to oven to bake for 3 more minutes, or until the marshmallows puff. Remove from oven and top with toasted pecans.
    5. To make frosting, combine confectioners sugar and salt in the bowl of a stand mixer fitted with a paddle attachment. In a saucepan, melt 4 tablespoons butter over medium heat. When butter is melted, add the 2 Tablespoons of cocoa powder and ¼ cup of the milk and heat until the mixture just comes to boil. Pour this mixture into confectioners sugar/salt mixture and beat on moderately high speed until smooth and glossy. If frosting is not pourable at this point, add remaining 2 tablespoons of milk Lastly, beat in ¼ teaspoon vanilla, then pour evenly over puffed marshmallows and pecans.
    6. Let cool completely before cutting into squares.

    Recommended Products

    As an Amazon Associate and member of other affiliate programs, I earn from qualifying purchases.

    • Parchment Paper
      Parchment Paper
    • 8-inch Cake Pan
      8-inch Cake Pan

    Nutrition Information:

    Yield:

    16

    Serving Size:

    1

    Amount Per Serving: Calories: 348Total Fat: 19gSaturated Fat: 8gTrans Fat: 0gUnsaturated Fat: 9gCholesterol: 46mgSodium: 160mgCarbohydrates: 44gFiber: 2gSugar: 35gProtein: 4g

    Did you make this recipe?

    Tag me in your Instagram photo - @fakeginger

    © Amanda Livesay
    Cuisine: American / Category: bars


    S’mores Ice Cream

    Aug 23, 2012

    S’mores Ice Cream has marshmallow ice cream with fudge swirls and graham crackers mixed in. It’s the perfect summer dessert!

    Can I tell you about yesterday? Mmmkay.

    Yesterday I decided to give up coffee. Which was kind of a big deal because I drink a pot every morning and about half a pot every afternoon. But lately I haven’t liked how I felt after drinking it. Like, it didn’t hurt my stomach but it didn’t feel nice either. So anyway, I decided to quit cold turkey. Got up, drank a 32 ounce bottle of water, and was all “Weeeeee! I don’t need caffeine!” as I walked the kid to school, bought and sent my last care package to the husband (!!), walked back to school (with the dog in tow), and then cooked lunch for everyone.

    Then I crashed. Quite literally. Walked to my bedroom for a highlighter and woke up 30 minutes later with a kid poking me in the head asking for a cookie. (Don’t worry, the baby was safe in his crib!)

    So at 1:15 pm I was making coffee. Uggghhh. But at that point it was kind of too late and I just stayed in a funk. You know how it is.

    The high point of my day was this ice cream.

    Every night (well almost…) I look forward to my workout but yesterday someone hid my DVD player remote so I couldn’t do it because Insanity has this stupid music that I can’t turn off without the remote, so I said screw it and did what any sane person would do: got a cheesecake bar. I left it on the arm of the couch while I did who knows what and came back to no cheesecake bar. Sadface.

    AND THEN I remembered that I had this ice cream in the freezer and my bad day was forgotten! This ice cream plus DVR’d Pretty Little Liars was just what I needed.

    It’s ice cream that’s made with blended up toasted marshmallows! Yeah. And then it has a fudge swirl and graham crackers! Y’all know that I’m pretty much a vanilla only person when it comes to ice cream but this is definitely one of my favorites! I think I could just make the marshmallow base without the add-ins and be happy too.

    Make sure you subscribe to my email list to get all my new recipes delivered right to your inbox!

    You can also follow me on Instagram, Facebook, or Pinterest for even more! 

    📖 Recipe

    Yield: about 8 servings

    S'mores Ice Cream

    S'mores Ice Cream

    S'mores Ice Cream is marshmallow ice cream with fudge swirls and graham crackers mixed in. It's the perfect summer dessert!

    Prep Time 1 hour
    Additional Time 2 hours
    Total Time 3 hours

    Ingredients

    For the Toasted Marshmallow Ice Cream:

    • 1 10-ounce bag large marshmallows
    • 1 vanilla bean
    • 2 cups whole milk
    • 5 egg yolks
    • ½ cup granulated sugar
    • Pinch of salt
    • 1 cup heavy cream
    • 1 teaspoon vanilla extract
    • 1 ½ cups coarsely chopped graham crackers

    For the Fudge Swirl:

    • ½ cup granulated sugar
    • ½ cup water
    • ⅓ cup light corn syrup
    • 6 tablespoons Dutch-process cocoa powder
    • ½ teaspoon vanilla extract

    Instructions

    To make the ice cream:

    1. Heat your broiler. Spread the marshmallows in a single layer on a parchment-lined baking sheet. Place them under the broiler for 30 seconds to 1 minute, or until toasted and golden. Take them out and, using tongs, flip them over and pop them back under the broiler for another 30 seconds or so, until the other side is toasted. (Alternately, you can use a kitchen torch to toast them right there on the pan.) Set the marshmallows aside.
    2. Place the milk in a heavy-bottomed saucepan. Split the vanilla bean down the middle and scrape the seeds into the pan with the milk. Set the pan over medium heat and bring the mixture to a simmer.
    3. While the milk is coming up to a simmer, whisk together the egg yolks, sugar and salt in a large, heatproof bowl. Slowly add the warm milk mixture to the egg mixture, whisking constantly. Pour the mixture back into the saucepan. Put the heat on medium-low and cook, stirring constantly, until the mixture thickens enough to coat the back of a wooden spoon (it should be between 170 and 175 degrees F on a thermometer). Strain through a fine-mesh sieve into a heatproof bowl. Allow to cool for about 20 minutes before proceeding.
    4. Place the toasted marshmallows in the blender, then pour the custard into the blender as well. Puree until the marshmallows are completely broken down and the mixture is smooth. Add the heavy cream and vanilla extract and blend again for about 5 to 10 seconds to combine. Pour the mixture into a bowl, cover andrefrigerate overnight.

    To make the fudge swirl:

    1. Whisk together the sugar, water, corn syrup and cocoa powder in a medium saucepan over medium heat until the mixture begins to bubble at the edges. Cook for about 1 minute, whisking the entire time. Remove from the heat, stir in the vanilla and let cool. Chill in the refrigerator for at least 2 hours before using. It can be stored for up to 2 weeks, covered, in the refrigerator.

    To churn the ice cream:

    1. Freeze in your ice cream maker according to the manufacturer’s directions. When it’s done churning, gently fold in the chopped graham crackers. Spoon some of the fudge swirl onto the bottom of the storage container. As you remove the ice cream from the machine, layer generous spoonfuls of the sauce between layers of the ice cream, ending with a top layer of ice cream. Do not stir the fudge into the ice cream, as it will make the ice cream muddy looking. Freeze until the ice cream is firm, at least 2 hours.

    Recommended Products

    As an Amazon Associate and member of other affiliate programs, I earn from qualifying purchases.

    • Ice Cream Container
      Ice Cream Container
    • Ice Cream Maker
      Ice Cream Maker

    Nutrition Information:

    Yield:

    8

    Serving Size:

    1

    Amount Per Serving: Calories: 398Total Fat: 18gSaturated Fat: 9gTrans Fat: 0gUnsaturated Fat: 7gCholesterol: 155mgSodium: 139mgCarbohydrates: 55gFiber: 1gSugar: 44gProtein: 6g

    Did you make this recipe?

    Tag me in your Instagram photo - @fakeginger

    © Amanda Livesay
    Cuisine: American / Category: frozen goodies

    S’mores Cheesecake Bars

    Aug 22, 2012

    S’mores Cheesecake Bars are delicious chocolate chip cheesecake bars topped with marshmallows, graham crackers, and Hershey’s bars! 

    If you love cheesecake bars, try Key Lime Cheesecake Bars and Pineapple Cheesecake Bars!

    S'mores Cheesecake Bars - delicious chocolate chip cheesecake bars topped with marshmallows, graham crackers, and Hershey's bars!

    When I’m not eating cheesecake, I am 100% convinced that I don’t like it. Which is ridiculous for a couple reasons. A) Cheesecake is DELICIOUS and B) I once admitted to eating an entire cheesecake with my BFF while myspace stalking our ex-boyfriends.

    So when Nicole and I set out on this s’mores week project I decided to make a cheesecake because I, like just about every other wife of a deployed serviceman, am trying to lose a few pounds before my husband comes home and I knew without a doubt that the cheesecake would not sit in the fridge and call my name until I finally got out of bed at 5:30 am to have a piece. Because I don’t like cheesecake.

    Duh.

    But guess who was standing in front of the fridge yesterday morning with a cheesecake bar in her hand while she waited for the coffee to brew.

    I love making cheesecake bars instead of a cheesecake because they are so much easier. No worrying about a water bath or a cracked top. They come out perfect every time!

    S'mores Cheesecake Bars - delicious chocolate chip cheesecake bars topped with marshmallows, graham crackers, and Hershey's bars!

    How Long Are They Good For?

    Cheesecake bars are good for up to 4 – 5 days in an airtight container in the refrigerator.

    You can serve them straight from the fridge or let them sit for 5 – 10 minutes at room temperature to take the chill off.

    Can You Freeze Cheesecake Bars?

    Yes, you can freeze these S’mores Cheesecake Bars! 

    I like to freeze in individual portions by wrapping each bar in plastic wrap and then placing all the slices in a freezer ziploc bag. You can also freeze the entire pan by covering it tightly. 

    Cheesecake will stay good in the freezer for up to 2 months. Defrost in the fridge overnight before serving. 

    S'mores Cheesecake Bars - delicious chocolate chip cheesecake bars topped with marshmallows, graham crackers, and Hershey's bars!

    More S’mores Recipes

    • S’mores Rice Krispies Treats
    • S’mores Campfire Cones
    • Doughnut S’mores
    • S’mores Frozen Hot Chocolate
    • S’mores Banana Bread

    Make sure you subscribe to my email list to get all my new recipes delivered right to your inbox!

    You can also follow me on Instagram, Facebook, or Pinterest for even more! 

    📖 Recipe

    Yield: 20 servings

    S'mores Cheesecake Bars

    S'mores Cheesecake Bars

    S'mores Cheesecake Bars are delicious chocolate chip cheesecake bars topped with marshmallows, graham crackers, and Hershey's bars! 

    Prep Time 30 minutes
    Cook Time 40 minutes
    Total Time 1 hour 10 minutes

    Ingredients

    • 2 cups graham crackers
    • ⅓ cup butter, melted
    • 3 tablespoons sugar
    • 4 bricks, 8 ounces each cream cheese, softened
    • 1 cup sugar
    • 1 tablespoon vanilla
    • 3 tablespoons flour
    • 4 eggs
    • ½ cup semisweet chocolate chips
    • ½ cup chopped Hershey's chocolate bar
    • 1 cup mini marshmallows
    • 4 graham crackers, coarsely chopped

    Instructions

    1. Preheat oven to 350F. Line a13x9-inch pan with foil, with ends of foil extending over sides.
    2. Mix with the graham cracker crumbs, butter and 3 tablespoons sugar together until all the crumbs are moistened; press onto bottom of prepared pan.
    3. In the bowl of a mixer fitted with a paddle attachment, beat together cream cheese, 1 cup sugar and vanilla in large bowl until smooth. Sift in flour; mix well. Add eggs, 1 at a time, mixing on low speed after each just until blended. Stir chocolate chips into cream cheese mixture with a rubber spatula. Pour over crust.
    4. Bake 30 minutes; remove from oven and sprinkle with Hershey's chocolate bar, mini marshmallows, and chopped graham crackers. The top of the cheesecake will be almost set - don't be afraid to press the toppings down into it slightly. Bake for another 10 minutes or until center is almost set. Cool completely. Refrigerate at least 4 hours. Use foil handles to lift cheesecake from pan before cutting into bars.

    Recommended Products

    As an Amazon Associate and member of other affiliate programs, I earn from qualifying purchases.

    • Electric Mixer
      Electric Mixer
    • 9x13-inch pan
      9x13-inch pan

    Nutrition Information:

    Yield:

    20

    Serving Size:

    1

    Amount Per Serving: Calories: 352Total Fat: 23gSaturated Fat: 13gTrans Fat: 0gUnsaturated Fat: 8gCholesterol: 92mgSodium: 239mgCarbohydrates: 32gFiber: 1gSugar: 23gProtein: 6g

    Did you make this recipe?

    Tag me in your Instagram photo - @fakeginger

    © Amanda Livesay
    Cuisine: American / Category: bars


    Pecan Pie Ice Cream

    Aug 19, 2012

    Pecan Pie Ice Cream – rich and creamy homemade ice cream that tastes just like pecan pie! Brown sugar, a little bit of butter, gooey pecan filling, and topped with crisp pie crust!

    Pecan pie ice cream topped with star shaped pie crust cut outs in a blue bowl

    Happy Sunday! I hope y’all are enjoying the weekend so far!

    My friend Brandy is hosting an Ice Cream Social on her blog and I’m here to invite you to the party! I was in a mood for fall (I switched all my wallflowers over to fall scents this week! Leaves is my favorite!) so I made some Pecan Pie Ice Cream!

    …

    Read More

    Bakery Style Blueberry Muffins

    Aug 16, 2012

    Bakery Style Blueberry Muffins are the perfect soft and fluffy muffins! They are even better than your favorite coffee shop.

    Blueberry Muffins - the perfect soft and fluffy blueberry muffin recipe. These are even better than the muffins at your favorte coffee shop!

    I do this thing at the beginning of every school year where I, FOR SOME REASON, decide I’m one of those moms who make bento box lunches and homemade breakfasts and all that.

    I’m not that mom. I make it about 2 ½ days before I’m at King Soopers buying cereal and Lunchables.

    So I would like to thank that optimistic version of me for making a ton of these bakery style blueberry muffins to keep in the freezer. They are my absolute favorite muffins. So soft and fluffy.

    Blueberry Muffins - the perfect soft and fluffy blueberry muffin recipe. These are even better than the muffins at your favorte coffee shop!

    Ingredients

    • All-purpose flour
    • Baking powder
    • Butter – make sure to bring the butter to room temperature before beginning.
    • Granulated sugar
    • Eggs
    • Milk
    • Vanilla
    • Blueberries – fresh or frozen blueberries.

    Instructions

    • Dry ingredients. Whisk together the flour, baking powder and salt.
    • Wet ingredients. Cream butter and sugar together until light and fluffy. Add eggs one a time. Add milk and vanilla.
    • Combine. Mix in dry ingredients just until moistened.
    • Add blueberries. Fold in frozen blueberries.
    • Transfer. Fill prepared muffin cups two-thirds full.
    • Bake. Bake at 350F in the preheated oven 18 – 22 minutes.
    • Cool. Transfer to a wire rack to cool completely before serving.

    How Long Are Blueberry Muffins Good For?

    These muffins will be good at room temperature for about 2 days. Make sure to store them in an airtight container to keep them fresh for as long as possible.

    I love this muffin tin with a lid because you can bake the muffins in it and then pop the lid on once they are cool! No need to dirty another dish.

    If you need to stretch the life of these muffins, put them in the fridge for up to 5 days. The fridge will start to dry them out so keep that in mind. I would also let them sit at room temperature for about 20 minutes before servings.

    Blueberry Muffins - the perfect soft and fluffy blueberry muffin recipe. These are even better than the muffins at your favorte coffee shop!

    Can You Freeze Muffins?

    Yes, you can freeze these muffins! Make sure to let them cool completely and then wrap them tightly with plastic wrap. From there, put them in a freezer-safe airtight container like freezer ziploc bags.

    They can be frozen for up to 3 months. When you are ready to serve them, let them sit at room temperature until they reach the desired temperature, probably a few hours.

    More Muffin Recipes

    • Pumpkin Chocolate Chip Muffins
    • Pumpkin Banana Muffins
    • Strawberry Chocolate Chip Muffins
    • Pumpkin Blueberry Muffins
    • Sour Cream Banana Nut Muffins
    Blueberry Muffins - the perfect soft and fluffy blueberry muffin recipe. These are even better than the muffins at your favorte coffee shop!

    Make sure you subscribe to my email list to get all my new recipes delivered right to your inbox!

    You can also follow me on Instagram, Facebook, or Pinterest for even more! 

    📖 Recipe

    Bakery Style Blueberry Muffins

    Bakery Style Blueberry Muffins

    Bakery Style Blueberry Muffins are the perfect soft and fluffy muffins! They are even better than your favorite coffee shop.

    Prep Time 20 minutes
    Cook Time 22 minutes
    Total Time 42 minutes

    Ingredients

    • 4 cups all-purpose flour
    • 4 teaspoons baking powder
    • ½ teaspoon salt
    • 1 cup butter, softened
    • 2 cups sugar
    • 4 eggs
    • 1 cup milk
    • 2 teaspoons vanilla extract
    • 2 cups blueberries

    Instructions

    1. Preheat oven to 375F. Line 2 12-cup muffin tins with paper liners.
    2. In a large bowl, whisk together the flour, baking powder and salt.
    3. In the bowl of a mixer, cream butter and sugar together until light and fluffy.
    4. Add eggs one a time. Add milk and vanilla.
    5. Mix in dry ingredients just until moistened.
    6. Fold in frozen blueberries.
    7. Fill the prepared muffin cups two-thirds full.
    8. Bake in the preheated oven 18 - 22 minutes, or until a toothpick inserted into the center comes out clean.
    9. Transfer to a wire rack to cool completely before serving.

    Recommended Products

    As an Amazon Associate and member of other affiliate programs, I earn from qualifying purchases.

    • Parchment Muffin Liners
      Parchment Muffin Liners
    • My Favorite Muffin Tin
      My Favorite Muffin Tin

    Nutrition Information:

    Yield:

    24

    Serving Size:

    1

    Amount Per Serving: Calories: 234Total Fat: 9gSaturated Fat: 5gTrans Fat: 0gUnsaturated Fat: 3gCholesterol: 52mgSodium: 204mgCarbohydrates: 35gFiber: 1gSugar: 19gProtein: 4g

    Did you make this recipe?

    Tag me in your Instagram photo - @fakeginger

    © Amanda Livesay
    Cuisine: American / Category: breakfast

    S’mores Pizza

    Aug 08, 2012

    S’mores Pizza is a fun twist on the classic s’mores! It’s a giant chocolate chip cookie topped with graham crackers, chocolate, and toasted marshmallows.

    One of the things I’ve always wanted to do was start a Friday night homemade pizza and a movie tradition. I have tried over and over again and completely failed at it but I swear I’ve tried.

    Every time I tried to make a pizza it was a huge flop. We’re talking straight-into-the-trashcan kind of flops. Then I realized that our grocery store does $5 take-and-bakes on Friday and it was like a sign from up above that I didn’t need to make anymore awful pizzas.

    I’m only making pizza that starts with a cookie dough crust from now on.

    Ingredients for S’mores Pizza

    • Chocolate chip cookie dough – I used store-bougt for this recipe but you can use your favorite homemade recipe if you prefer.
    • Graham crackers – these are going to get broken up and scattered on top.
    • Milk chocolate candy bars – you can use the classic Hershey’s bars or whatever your favorite chocolate it.
    • Miniature marshmallows – the most important part of a s’mores! These gets nice and toasty on top.

    How To Make S’mores Pizza

    • Prepare. Preheat oven to 350F. Line a large baking sheet with parchment. Use your hands to form the cookie dough into a large circle, about ¼″ thick.
    • Bake. Bake in preheated oven for about 20 minutes or until the cookie is a deep golden and the center is no longer gooey. Remove from oven.
    • Add toppings. Sprinkle graham crackers evenly over the cookie. Top with chocolate pieces and marshmallows.
    • Toast marshmallows. Return to the oven under the broiler for about 5 minutes, until the marshmallows are toasted.
    • Serve. Serve warm, sliced like a pizza.

    Make sure you subscribe to my email list to get all my new recipes delivered right to your inbox!

    You can also follow me on Instagram, Facebook, or Pinterest for even more! 

    📖 Recipe

    Yield: about 12 servings

    S'mores Pizza

    S'mores Pizza

    S'mores Pizza is a fun twist on the classic s'mores! It's a giant chocolate chip cookie topped with graham crackers, chocolate, and toasted marshmallows.

    Prep Time 20 minutes
    Cook Time 25 minutes
    Total Time 45 minutes

    Ingredients

    • 1 16- ounce package of chocolate chip cookie ough
    • 1 cup small pieces graham crackers
    • ½ cup small pieces milk chocolate candy bars
    • 2 cups miniature marshmallows

    Instructions

    1. Preheat oven to 350F. Line a large baking sheet with parchment. (Optional: trace a circle onto the parchment, flip so the circle is facing the baking sheet. You should still be able to see what you drew.)
    2. Use your hands to form the cookie dough into a large circle, about ¼" thick.
    3. Bake in preheated oven for about 20 minutes or until the cookie is a deep golden and the center is no longer gooey. Remove from oven. Turn on your broiler and move an over rack up to the top if necessary.
    4. Sprinkle graham crackers evenly over the cookie. Top with chocolate pieces and marshmallows.
    5. Return to the oven for about 5 minutes, until the marshmallows are toasted.
    6. Serve warm! Slice it like a pizza!

    Recommended Products

    As an Amazon Associate and member of other affiliate programs, I earn from qualifying purchases.

    • 14 inch Pizza Pan
      14 inch Pizza Pan

    Nutrition Information:

    Yield:

    12

    Serving Size:

    1

    Amount Per Serving: Calories: 267Total Fat: 11gSaturated Fat: 4gTrans Fat: 0gUnsaturated Fat: 6gCholesterol: 2mgSodium: 165mgCarbohydrates: 40gFiber: 1gSugar: 21gProtein: 3g

    Did you make this recipe?

    Tag me in your Instagram photo - @fakeginger

    © Amanda Livesay
    Cuisine: American / Category: cookie

    Baked Chicken Fingers

    Aug 07, 2012

    The perfect crispy Baked Chicken Fingers recipe! Chicken tenders coated in panko breadcrumbs and baked until crispy and delicious.

    I have been searching for the perfect baked, breaded chicken recipe for years now. It seems like even when I would find one that was perfectly crunchy it wouldn’t get brown enough. Or if I would leave it in the oven until it was beautifully golden, the chicken would be dry and gross. Well y’all, I have found the perfect recipe!

    Before breading these chicken fingers, you toast the panko breadcrumbs in some oil! Seriously, how did I not think of this before?! The chicken was perfectly crunchy and brown but still moist and delicious on the inside.

    This will definitely be my new go-to for baked chicken and I’m excited to play around and see how it turns out with some cheese mixed into the breadcrumbs!

    Ingredients

    • Panko breadcrumbs
    • Oil
    • all-purpose flour
    • Garlic powder
    • Cayenne pepper
    • Egg whites
    • Dijon mustard
    • Dried thyme
    • Chicken tenderloins – you could also use boneless, skinless chicken breasts cut into strips.

    Instructions

    • Toast breadcrumbs. Toast breadcrumbs in oil in a skillet.
    • Make breading. Whisk together the flour, garlic powder, and cayenne.
    • Make wet mixture. Whisk the egg whites, water, dijon mustard and thyme.
    • Bread chicken. Working with one strip at a time, dredge the chicken in the flour mixture then dip in the egg whites making sure to coat both sides completely. Place in the toasted breadcrumbs, turning to coat both sides.
    • Transfer. Transfer to a wire rack on top of a rimmed baking sheet.
    • Repeat. Repeat with the rest of the chicken.
    • Spray. Spray the chicken lightly with cooking spray.
    • Bake. Bake at 475F for 10 – 12 minutes or until the chicken is cooked through.

    How Long Are Chicken Tenders Good For?

    These Baked Chicken Tenders will be fine for about 3 days in an airtight containers in the fridge – these airtight glass containers are my favorite for all our leftovers.

    I recommend reheating in the oven or a toaster oven to crisp up the breadcrumbs again.

    More Chicken Recipes

    • Rosemary Ranch Chicken Kabobs
    • Chicken Marsala
    • Honey Mustard Chicken Wings
    • Bacon Spinach Feta Chicken
    • Chicken Thighs with Creamy Rosemary Mushrooms

    📖 Recipe

    Yield: about 6 servings

    Baked Chicken Fingers

    Baked Chicken Fingers

    Cook Time 30 minutes
    Total Time 30 minutes

    Ingredients

    • 2 cups panko breadcrumbs
    • 2 tablespoons canola oil
    • ½ cup all-purpose flour
    • 1 teaspoon garlic powder
    • ⅛ teaspoon cayenne pepper
    • 3 large egg whites
    • 1 tablespoon water
    • 1 tablespoon Dijon mustard
    • ¼ teaspoon dried thyme
    • 1½ lb chicken tenderloins, or boneless, skinless breasts cut into ¾-inch strips

    Instructions

    1. Preheat oven to 475F. Set a wire rack on a baking sheet and spray with nonstick spray.
    2. Heat a skillet over medium-high heat. Add the breadcrumbs and canola oil. Toast the breadcrumbs, stirring frequently, until they're a deep golden color.
    3. Transfer the breadcrumbs to a wide, shallow dish and set aside to cool. In a separate dish, whisk together the flour, garlic powder, and cayenne. In a third dish, whisk the egg whites, water, dijon mustard and thyme to until the mixture is foamy.
    4. Season the chicken with salt and pepper. Working with one strip at a time, dredge the chicken in the flour mixture (shaking to remove excess) then dip in the egg whites making sure to coat both sides completely. Place in the toasted breadcrumbs, turning to coat both sides. Transfer to the wire rack. Repeat with the rest of the chicken.
    5. Spray the chicken lightly with cooking spray. Bake for 10 - 12 minutes or until the chicken is cooked through.

    Recommended Products

    As an Amazon Associate and member of other affiliate programs, I earn from qualifying purchases.

    • Wire Rack
      Wire Rack
    • Parchment Paper
      Parchment Paper
    • Rimmed Baking Sheet
      Rimmed Baking Sheet

    Nutrition Information:

    Yield:

    6

    Serving Size:

    1

    Amount Per Serving: Calories: 420Total Fat: 11gSaturated Fat: 2gTrans Fat: 0gUnsaturated Fat: 8gCholesterol: 96mgSodium: 443mgCarbohydrates: 35gFiber: 2gSugar: 2gProtein: 43g

    Did you make this recipe?

    Tag me in your Instagram photo - @fakeginger

    © Amanda Livesay
    Category: chicken

    Fudge Rounds

    Aug 06, 2012

    A homemade copycat recipe of the classic Little Debbie Fudge Rounds! Soft chocolate cookies with chocolate buttercream and a chocolate drizzle.

    More Little Debbie copycat recipes: Cosmic Brownies and Oatmeal Cream Pies!

    Fudge Rounds - a homemade copycat recipe of the classic Little Debbie treat! Soft chocolate cookies with chocolate buttercream and a chocolate drizzle.

    Fudge Rounds are such a classic afterschool snack. I haven’t had one in years and years but I remember really loving them as a kid. 

    Is it a cookie?! Is it a cake?!

    Fudge Rounds are a Little Debbie treat you can buy at pretty much any grocery or convenience store.

    Little Debbie calls them soft sandwich cookies but the texture of the cookie is so much more cake like to me. They’re almost whoopie pies in my mind.

    The cookies are light and fluffy and they’re filled with a fudge cream and then drizzled with chocolate! They’re decadent without being too rich and definitely a chocolate lover’s dream.

    Fudge Rounds - a homemade copycat recipe of the classic Little Debbie treat! Soft chocolate cookies with chocolate buttercream and a chocolate drizzle.

    Ingredients

    • Unsalted butter – you are going to use butter in both the cookies and the filling.
    • Granulated sugar
    • Egg
    • Vanilla extract – you are going to need it for the cookies and the filling.
    • All purpose flour
    • Cocoa powder – this is going in both the cookies and the buttercream filling.
    • Baking soda
    • Salt
    • Powdered sugar – you want to use powdered sugar in your buttercream because it melts into the butter better than granulated sugar and makes a really smooth and creamy filling.
    • Heavy cream – just a tiny bit to get the filling to the right consistency. You can use milk or half and half.
    • Semisweet chocolate chips – these are going to get melted to create the drizzle on top.
    • Canola oil – this is to create a really smooth and shiny chocolate drizzle.

    How To Make Fudge Rounds

    • Combine wet ingredients. Cream butter and sugar together until light and fluffy; add egg and vanilla
    • Sift dry ingredients. Sift together flour, cocoa powder baking soda, and salt
    • Combine wet and dry ingredients. Add dry ingredients to wet ingredients; beat until just combined
    • Place on baking sheets. Scoop balls of batter onto prepared baking sheet
    • Bake cakes. Bake about 10 minutes. Cool completely before frosting.
    • Make the Filling. Beat butter, vanilla, cocoa powder, and powdered sugar together; add heavy cream until it reaches desired consistency
    • Frost cakes. Spread filling on half of the cakes and top with another cake
    • Make the Chocolate Drizzle. Melt chocolate and canola oil together in microwave; stir unil smooth. Drizzle over each assembled Fudge Rounds.

    How Long Are They Good For?

    These cookies will be good for up to 5 days in the fridge. Make sure to store them in an airtight container to keep them fresh for as long as possible.

    I like to let them sit at room temperature for 10 minutes or so before serving just to get the chill off.

    Can You Freeze Homemade Fudge Rounds?

    Yes, these freeze wonderfully! I recommend wrapping them individually in plastic wrap and then put them all in a big ziploc bag. And then I just pull them out as needed.

    Let them defrost at room temperature.

    More Chocolate Cake Recipes

    • Chocolate Cream Filled Cake
    • Flourless Chocolate Cake
    • Chocolate Angel Food Cake
    • Mexican Chocolate Cake
    • Snickers Cake

    Make sure you subscribe to my email list to get all my new recipes delivered right to your inbox!

    You can also follow me on Instagram, Facebook, or Pinterest for even more! 

    📖 Recipe

    Yield: 12 cookies

    Fudge Rounds

    Fudge Rounds

    A homemade copycat recipe of the classic Little Debbie Fudge Rounds! Soft chocolate cookies with chocolate buttercream and a chocolate drizzle.

    Prep Time 30 minutes
    Cook Time 10 minutes
    Total Time 40 minutes

    Ingredients

    For the cakes:

    • ½ cup plus 2 tablespoons unsalted butter, softened
    • ¾ cup granulated sugar
    • 1 large egg
    • 1 teaspoon vanilla extract
    • 1 ¼ cups all purpose flour
    • 6 tablespoons cocoa powder
    • ½ teaspoon baking soda
    • ¼ teaspoon salt

    For the filling:

    • ½ cup unsalted butter, softened
    • ½ teaspoon vanilla extract
    • 2 tablespoons cocoa powder
    • pinch of salt
    • 1 ½ cups powdered sugar
    • 1-2 tablespoons heavy cream, or milk

    For the chocolate drizzle:

    • ¼ cup semisweet chocolate chips
    • ½ teaspoon canola oil

    Instructions

    To make the cakes:

    1. Preheat oven to 350F. Line a baking sheet with parchment paper.
    2. In the bowl of a mixer fitted with a paddle attachment, cream together butter and sugar until light in color and fluffy. Add the egg and vanilla; mix well.
    3. In a separate bowl, sift together the flour, cocoa powder, baking soda and salt. Add the dry ingredients to the butter mixture and beat just until combined.
    4. Scoop rounded pingpong ball-sized balls of batter onto the prepared baking sheet. Bake for 9-11 minutes, until the centers no longer look wet. Let cool on baking sheet for a minute or 2 and then transfer to a wire rack to cool completely. Repeat with remaining batter.

    To make the filling:

    1. In a clean bowl, cream the butter until light and fluffy. Add the vanilla and mix well. Sift the cocoa powder and powdered sugar together; add to the butter in small batches and beat until all the sugar is incorporated. Add heavy cream 1 tablespoon at a time until your filling reaches desired consistency.
    2. When cakes are cool, spread a bit of the filling on half of them and then top with another cake.

    To make chocolate drizzle:

    1. Microwave the chocolate and oil in 20 second bursts, stirring between each one, until the chocolate is melted. Drizzle over each cake. Let sit until chocolate is set.

    Recommended Products

    As an Amazon Associate and member of other affiliate programs, I earn from qualifying purchases.

    • Rimmed Baking Sheet
      Rimmed Baking Sheet
    • Electric Mixer
      Electric Mixer
    • Parchment Paper
      Parchment Paper

    Nutrition Information:

    Yield:

    12

    Serving Size:

    1

    Amount Per Serving: Calories: 293Total Fat: 13gSaturated Fat: 8gTrans Fat: 0gUnsaturated Fat: 4gCholesterol: 45mgSodium: 127mgCarbohydrates: 42gFiber: 1gSugar: 28gProtein: 4g

    Did you make this recipe?

    Tag me in your Instagram photo - @fakeginger

    © Amanda Livesay
    Cuisine: American / Category: cookie

    The Airplane Restaurant (and Pikes Peak!)

    Aug 01, 2012

    Our trip on the train to the top of Pikes Peak and a stop at The Airplane Restaurant in Colorado Springs.

    Kids playing in the cockpit at The Airplane Restaurant

    Yesterday I told y’all that my mom was here last week, right? We visited The Airplane Restaurant and also went to the top of Pikes Peak. We took the Pikes Peak Cog Railway because I am a scaredy cat when it comes to driving on mountain roads.

    Plus, we figured the kids would like the train better than riding in a car anyway.

    The view from the Pikes Peak Cog Railway

    The Train to Pikes Peak

    The train was so much fun!

    The ride was about an hour and 15 minutes each way and they allowed us about 40 minutes at the top of the mountain. They have great views (duh), a cafe, and a giftshop at the top.

    And you must get a “world famous” doughnut because they are the only doughnuts made at that high of an elevation.

    Pikes Peak is at 14,110 feet so the air is pretty thin up there. The baby cried at one point in the cafe and his lips turned completely blue. Talk about being freaked out!

    A little tip: take snacks! The website is going to tell you that you’re not allowed to but our conductor said it was fine. I’m not sure my kids would’ve survived without the stash of Nutrigrain bars in my purse!

    And yeah, that IS snow. Which apparently isn’t very common in July, even on Pikes Peak. We just lucked out!

    Snow on Pikes Peak in July; baby with Pikes Peak doughnut; flipflops in snow

    If you have the chance to head to Pikes Peak, definitely do it! But wear real shoes because even when it’s not supposed to snow, it just might.

    Outside and inside of The Airplane Restaurant in Colorado Springs CO

    The Airplane Restaurant – Colorado Springs

    And now the real purpose of this post: The Airplane Restaurant! 

    The Airplane Restaurant is quite literally a restaurant in an airplane. The airplane is attached to the actual restaurant but from what we saw, most people opt to eat in the plane – and why wouldn’t you?! The cockpit is even open for anyone who wants to go sit and mess around with the controls.

    My kids loved it! They would sit for a minute and then go back to the cockpit to play, back to sit, back to play.

    View from The Airplane Restaurant in Colorado Springs; Cheeseburger with bacon, lettuce, red onion, and fries on the side
    (We sat right on the wing!)

    The food was really good too! I ordered the BBQ Bomber Burger and it was awesome. Huge and cheesy and bacon-y. And they have sweet potato fries which is the fastest way for a restaurant to win my affection! (They do a “sticky sauce” with the sweet potato fries but order that on the side because it’s ridiculously sweet.)

    If you are ever in the Colorado Springs area, take your kids, take your husband, take your grandma! I think it’s great fun for all ages.

    Amanda Livesay and kids at The Airplane Restaurant in Colorado Springs

    This post not sponsored.

    Everything Bread

    Jul 31, 2012

    Everything Bread is yeast bread with everything bagel seasoning inside AND on top! The most delicious bread for toast!

    I have the hardest time getting back into a posting schedule after taking a blog vacation. My mom was here visiting last week and I had intended on getting a few posts up but yeah… didn’t happen.

    I did manage to make this Everything Bread and it was complete torture. I can’t wait until Wednesday when I can finally have a slice! I’ve made this recipe in the past though so I can safely say that it is absolutely amazing and it’s perfect for those of us that love the “everything” flavor but aren’t huge bagel fans.

    My favorite thing about this bread and what sets it apart from other “everything” recipes I’ve come across is that the seeds and dried onion and all that goodness are inside that bread too! So it’s double the flavor!

    You have to make avocado toast with this bread!

    Ingredients

    • Vegetable oil
    • Salt – this is going in the everything seasoning that is going inside the bread itself and on top of the bread.
    • Black pepper – also part of the everything seasoning.
    • Dried minced garlic – make sure it is the minced garlic and not granulated garlic. You want pieces of garlic not pulverized garlic. It’s going in the bread and on top.
    • Dried minced onion – make sure it’s dried minced onion and not onion powder. It it doing in the bread and in the topping.
    • Poppy seeds – these are going in bread dough and on top of the bread.
    • Sesame seeds – I think white sesame seeds look best in the everything mixture but you can use black if that’s what you have.
    • Caraway seeds – these give the mixture the distinctive everything flavor. They are going in the bread dough and on top of the bread.
    • Oatmeal – adding oatmeal to bread gives it such a nice texture.
    • Bread flour
    • Active dry yeast
    • Cornstarch – this is getting mixed into water and brushed on top of the bread. It creates a shiny top.

    How To Make Everything Bread

    • Dry ingredients. Whisk together yeast, 1 cup flour, and other dry ingredients.
    • Wet ingredients. Stir together liquids and heat to 120-130F.
    • Combine. Combine dry mixture and liquid ingredients in the bowl of a stand mixer with paddle or beaters for 4 minutes on medium speed.
    • Knead. Gradually add remaining flour and knead with dough hook 5 to 7 minutes until smooth and elastic. Place dough in lightly oiled bowl and turn to grease top. Cover.
    • Rise. Let rise until dough tests ripe, about an hour.
    • Shape. Turn dough onto lightly floured surface; punch down to remove air bubbles. Shape dough into a round loaf. Place on a parchment covered baking sheet.
    • Rise again. Cover; let rise until indentation remains after touching, another hour or so.
    • Brush. Combine 1+½ teaspoons water and cornstarch; brush on top of bread.
    • Top. Sprinkle with topping.
    • Bake. Bake in preheated 375F oven 30 to 40 minutes.

    How Long Is It Good For?

    Everything bread will be good for 3 – 4 days. Store it at room temperature in an airtight container.

    Can You Freeze It?

    You can freeze homemade bread for up to 3 months. I recommend slicing the cooled bread, wrapping it in plastic wrap, and place it in a freezer ziploc bag.

    You can pull out individual slices or the entire loaf and let it defrost at room temperature until it’s defrosted enough to toast.

    More Homemade Bread Recipes

    • Vermont Oatmeal Maple-Honey Bread
    • Cinnamon Raisin Swirl Bread
    • Oatmeal Rolls
    • Tomato Herb Focaccia
    • Crescent Rolls
    • Homemade Sandwich Bread

    Make sure you subscribe to my email list to get all my new recipes delivered right to your inbox!

    You can also follow me on Instagram, Facebook, or Pinterest for even more! 

    📖 Recipe

    Yield: about 16 servings

    Everything Bread

    Everything Bread

    Prep Time 30 minutes
    Cook Time 40 minutes
    Additional Time 2 hours
    Total Time 3 hours 10 minutes

    Ingredients

    • 1 ½ cups plus 1 tablespoon water
    • 1 tablespoons vegetable oil
    • 2 teaspoons salt
    • ½ teaspoon black pepper
    • 1 tablespoon dried minced garlic
    • 2 tablespoons dried minced onion
    • 2 tablespoons poppy seeds
    • 2 tablespoons sesame seeds
    • 1 tablespoon caraway seeds
    • 1 cup oatmeal
    • 3 cups bread flour
    • 2 ¼ teaspoons active dry yeast

    For the topping:

    • 1 ½ teaspoons water
    • 1 teaspoon cornstarch
    • ¾ teaspoon Kosher salt
    • ¾ teaspoon poppy seeds
    • pinch black pepper
    • ½ teaspoon caraway seeds
    • ½ teaspoon dried minced garlic
    • ¾ teaspoon sesame seeds
    • ¾ teaspoon dried minced onion

    Instructions

    1. Whisk together yeast, 1 cup flour, and other dry ingredients.
    2. Stir together liquids and heat to 120-130F.
    3. Combine dry mixture and liquid ingredients in the bowl of a stand mixer with paddle or beaters for 4 minutes on medium speed. Gradually add remaining flour and knead with dough hook 5 to 7 minutes until smooth and elastic.
    4. Place dough in lightly oiled bowl and turn to grease top. Cover; let rise until dough tests ripe, about an hour.
    5. Turn dough onto lightly floured surface; punch down to remove air bubbles. Shape dough into a round loaf. Place on a parchment covered baking sheet. Cover; let rise until indentation remains after touching, another hour or so.
    6. Combine 1+½ teaspoons water and cornstarch; brush on top of bread. Sprinkle with topping. Bake in preheated 375F oven 30 to 40 minutes or until tested done. Remove from baking sheet; cool.

    Recommended Products

    As an Amazon Associate and member of other affiliate programs, I earn from qualifying purchases.

    • My Favorite Yeast
      My Favorite Yeast
    • Parchment Paper
      Parchment Paper
    • Stand Mixer
      Stand Mixer

    Nutrition Information:

    Yield:

    16

    Serving Size:

    1

    Amount Per Serving: Calories: 129Total Fat: 3gSaturated Fat: 0gTrans Fat: 0gUnsaturated Fat: 2gCholesterol: 0mgSodium: 366mgCarbohydrates: 22gFiber: 2gSugar: 0gProtein: 4g

    Did you make this recipe?

    Tag me in your Instagram photo - @fakeginger

    © Amanda Livesay
    Cuisine: American / Category: breads

    Spaghetti Pie

    Jul 23, 2012

    I know what you’re thinking.

    “What the flying eff is that?!”

    But let me explain.

    Last week I shared the meal my 2 year old chose and today I’m bringing you the one my 5 year old chose. This was a tough decision for him – he went back and forth between a burger and this for probably and hour before I finally demanded an answer. And then every night he’d ask “Is it spaghetti pie night?! Is it?! IS IT?!”

    This pie is great because it’s one of those things that looks a lot more complicated than it is. It’s almost like a lasagna but more fun since you see all the thin spaghetti noodles when you cut into it. All you need to do is make your regular spaghetti recipe and then you pour it into a springform pan lined with puff pastry and top it with another sheet of puff pastry. Seriously, it could not be easier. It does have to bake forever so it’s not something you can whip up after work but it’s great for maybe a Sunday dinner.

    My kid has raved and raved about it to anyone who will listen and I’m sure it will be one of the first thing he asks me to make for his daddy when he comes home.

    🍝 Ingredients

    • 12 ounces spaghetti
    • 1 teaspoon olive oil
    • 1 pound mild Italian sausage
    • 1 green bell pepper
    • 1 onion
    • 2 cloves garlic
    • 3 cups jarred marinara sauce – you can use homemade if you prefer!
    • ½ teaspoon dried crushed red pepper flakes
    • salt and pepper
    • 2 cups shredded mozzarella cheese
    • ½ cup grated parmesan
    • 1 17¼-ounce package frozen puff pastry (2 sheets), thawed

    👩🏼‍🍳 Instructions

    • Cook the spaghetti according to package instructions. Drain and set aside.
    • Heat olive oil in a large pan over medium-high heat. Add the sausage and cook until no pink remains, breaking up the pieces as you go. Drain and return to pan.
    • Add the green pepper, onion, and mushrooms and cook until vegetables are softened. Add the garlic and saute until fragrant, about 30 seconds.
    • Stir in marinara sauce, crushed red pepper flakes, and salt and pepper as needed. Simmer for about 10 minutes.
    • Toss the cooked pasta with the sauce. Add the mozzarella and parmesan cheeses and toss to combine. Cool completely before proceeding.
    • Preheat the oven to 375F. Roll out 1 of the puff pastry sheets on a lightly floured surface to a 13½-inch square. Transfer dough to a 9-inch springform pan. Allow the excess pastry to hang over the rim. Press the pastry sheet gently into the sides of the pan to ensure the dough won’t break when you spoon in the the pasta. Fold creased pieces of the dough flat against the side of the pan.
    • Spoon the pasta mixture into the pan. Place the second pastry sheet over the pasta filling. Seal the pastry sheets together by pinching the ends together. Trim the overhanging pastry edges to about 1 inch. Fold the pastry edges in to form a decorative border. Cut a slit in the center of the top pastry to allow the steam to escape.
    • Bake in preheated oven until the pastry is brown and puffed on top, about 1 hour and 15 minutes. Let stand for 20 minutes before removing the sides of the springform pan.

    🍴 More Spaghetti Recipes

    • Homemade Spaghetti-Os
    • Four Cheese Spaghetti
    • Pizza Spaghetti

    Make sure you subscribe to my email list to get all my new recipes delivered right to your inbox!

    You can also follow me on Instagram, Facebook, or Pinterest for even more! 

    📖 Recipe

    Yield: 8 servings

    Spaghetti Pie

    Spaghetti Pie

    from Cassie Craves

    Prep Time 10 minutes
    Cook Time 1 hour 30 minutes
    Additional Time 20 minutes
    Total Time 2 hours

    Ingredients

    • 12 ounces spaghetti
    • 1 teaspoon olive oil
    • 1 pound mild Italian sausage
    • 1 green bell pepper, chopped
    • 1 onion, chopped
    • 8 ounces sliced mushrooms, roughly chopped
    • 2 cloves garlic, minced
    • 3 cups jarred, or homemade! marinara sauce
    • ½ teaspoon dried crushed red pepper flakes
    • salt and pepper
    • 2 cups shredded mozzarella cheese
    • ½ cup grated parmesan
    • 1 17¼-ounce package frozen puff pastry (2 sheets), thawed

    Instructions

    1. Cook the spaghetti according to package instructions. Drain and set aside.
    2. Heat olive oil in a large pan over medium-high heat. Add the sausage and cook until no pink remains, breaking up the pieces as you go. Drain and return to pan. Add the green pepper, onion, and mushrooms and cook until vegetables are softened. Add the garlic and saute until fragrant, about 30 seconds.
    3. Stir in marinara sauce, crushed red pepper flakes, and salt and pepper as needed. Simmer for about 10 minutes.
    4. Toss the cooked pasta with the sauce. Add the mozzarella and parmesan cheeses and toss to combine. Cool completely before proceeding.
    5. Preheat the oven to 375F. Roll out 1 of the puff pastry sheets on a lightly floured surface to a 13½-inch square. Transfer dough to a 9-inch springform pan. Allow the excess pastry to hang over the rim. Press the pastry sheet gently into the sides of the pan to ensure the dough won't break when you spoon in the the pasta. Fold creased pieces of the dough flat against the side of the pan. Spoon the pasta mixture into the pan. Place the second pastry sheet over the pasta filling. Seal the pastry sheets together by pinching the ends together. Trim the overhanging pastry edges to about 1 inch. Fold the pastry edges in to form a decorative border. Cut a slit in the center of the top pastry to allow the steam to escape.
    6. Bake in preheated oven until the pastry is brown and puffed on top, about 1 hour and 15 minutes. Let stand for 20 minutes before removing the sides of the springform pan.

    Recommended Products

    As an Amazon Associate and member of other affiliate programs, I earn from qualifying purchases.

    • Springform Pan
      Springform Pan
    • Dutch Oven
      Dutch Oven

    Nutrition Information:

    Yield:

    8

    Serving Size:

    1

    Amount Per Serving: Calories: 743Total Fat: 48gSaturated Fat: 13gTrans Fat: 0gUnsaturated Fat: 34gCholesterol: 54mgSodium: 1308mgCarbohydrates: 53gFiber: 4gSugar: 9gProtein: 26g

    Did you make this recipe?

    Tag me in your Instagram photo - @fakeginger

    © Amanda Livesay
    Category: pasta

    Chocolate-Oatmeal-Pecan Cookies

    Jul 20, 2012

    Happy Friday! I made cookies!

    Most of the time when I decide to bake something, it’s because I’ve stumbled upon a recipe that I want to try right then or I’m hit with a sudden craving for whatever it is but the other day I was in a mood to bake and for the life of me couldn’t come up with anything that sounded good. I went digging through my cookbooks and found this gem.

    I know, they look like your typical chocolate chip cookies with some nuts and oats thrown in. But they’re not! They are the most amazing chocolate chip cookies with some nuts and oats thrown in!

    No, but seriously, they have a teensy bit of molasses in them and it totally makes the cookie. It’s not so apparent that you’re like OMGWHYARETHERECHOCOLATECHIPSINMYMOLASSESCOOKIE but it definitely adds a little somethin’ somethin’.

    I think I say this every time I make a cookie but this is my new favorite and I’ve officially hidden them from myself so that they aren’t staring me down every time I walk into the kitchen.

    Make sure you subscribe to my email list to get all my new recipes delivered right to your inbox!

    You can also follow me on Instagram, Facebook, or Pinterest for even more! 

    📖 Recipe

    Yield: 48 cookies

    Chocolate-Oatmeal-Pecan Cookies

    Chocolate-Oatmeal-Pecan Cookies

    adapted from Tartine

    Prep Time 30 minutes
    Cook Time 12 minutes
    Total Time 42 minutes

    Ingredients

    • 2 cups all-purpose flour
    • 1 teaspoon baking powder
    • 1 teaspoon baking soda
    • 1 teaspoon salt
    • 2 cups old-fashioned oats
    • 1 cup unsalted butter, at room temperature
    • 1 ½ cups sugar
    • 4 teaspoons molasses
    • 2 large eggs
    • 2 tablespoons milk
    • 1 tablespoon vanilla
    • 2 cups semisweet chocolate chips
    • 1 cup pecans, chopped

    Instructions

    1. Preheat oven to 350F. Line a large baking sheet with parchment; set aside.
    2. Sift together the flour, baking powder, baking soda, and salt. Stir in oats; set aside.
    3. In a mixer fitted with a paddle attachment, cream butter and sugar until light in color and fluffy. Add the molasses and beat until combined. Add eggs, one at a time, beating well after each one. Scrape down the sides of the bowl as needed. Beat in milk and vanilla. Add in the dry ingredients and bet until just incorporated. Remove from stand mixer and fold in the chocolate chips and pecans.
    4. Use a cookie scoop (or your hands) to put ping-pong ball-sized balls of dough on prepared baking sheet, leaving a couple inches between each one. Flatten slightly with your hands.
    5. Bake for 10 – 12 minutes or until the edges are brown. Remove to a wire rack to cool.

    Recommended Products

    As an Amazon Associate and member of other affiliate programs, I earn from qualifying purchases.

    • Stand Mixer
      Stand Mixer
    • Parchment Paper
      Parchment Paper
    • Rimmed Baking Sheet
      Rimmed Baking Sheet

    Nutrition Information:

    Yield:

    48

    Serving Size:

    1

    Amount Per Serving: Calories: 129Total Fat: 8gSaturated Fat: 4gTrans Fat: 0gUnsaturated Fat: 4gCholesterol: 18mgSodium: 86mgCarbohydrates: 14gFiber: 1gSugar: 7gProtein: 2g

    Did you make this recipe?

    Tag me in your Instagram photo - @fakeginger

    © Amanda Livesay
    « Previous Page
    Next Page »

    Primary Sidebar

    Amanda Livesay
    Hi, I'm Amanda! DFW food blogger, mom of boys, and crazy dog lady.
    Read more
    Privacy Policy
    Privacy Policy

    Footer

    ↑ back to top

    About

    • Privacy Policy
    • About Fake Ginger

    Newsletter

    • Sign Up for weekly emails featuring new recipes!

    As an Amazon Associate I earn from qualifying purchases.

    Copyright © 2024 FakeGinger.com