• Skip to primary navigation
  • Skip to main content
  • Skip to primary sidebar
  • Home
  • About
  • Recipes

Fake Ginger

menu icon
go to homepage
  • Recipe Index
  • About
  • Subscribe
    • Facebook
    • Instagram
    • Pinterest
  • subscribe
    search icon
    Homepage link
    • Recipe Index
    • About
    • Subscribe
    • Facebook
    • Instagram
    • Pinterest
  • ×
    Home » Page 46

    Chewy Chocolate Gingerbread Cookies

    Chewy Chocolate Gingerbread Cookies

    Dec 03, 2012

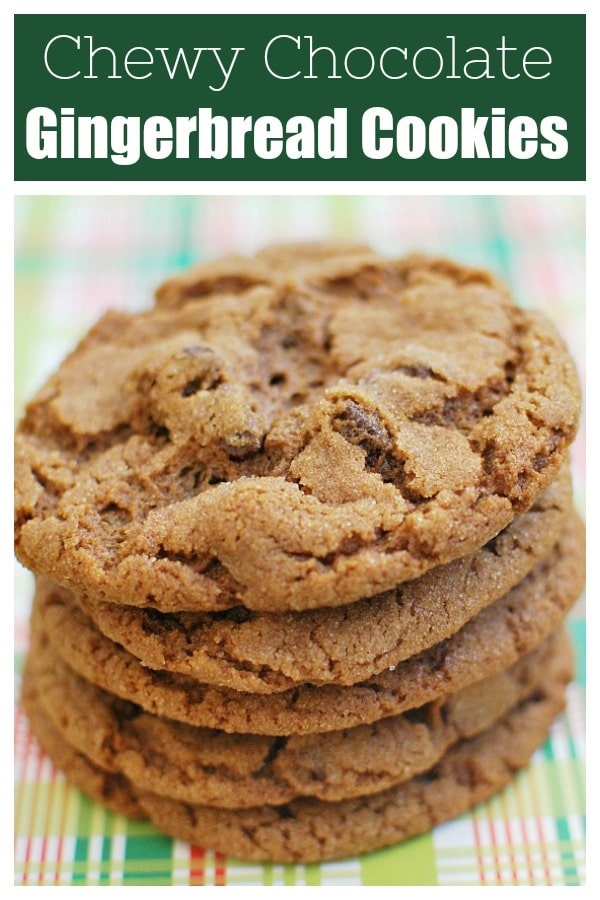
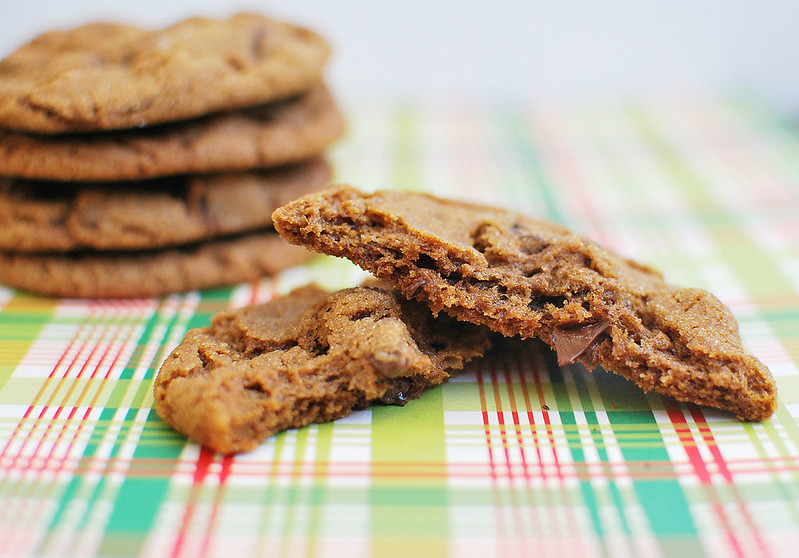
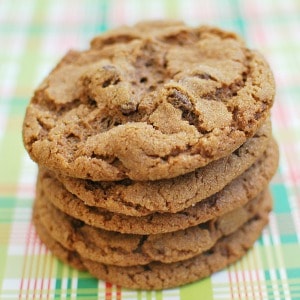
    Chewy gingerbread cookies with gooey chocolate mixed in! Santa’s going to love these Chewy Chocolate Gingerbread Cookies!

    I also have a list of 30 of the best Christmas cookie recipes if you need more ideas!

    Chewy Chocolate Gingerbread Cookies - chewy gingerbread cookies with gooey chocolate mixed in! Santa's going to love these!

    Thanks for all the kind words about my husband last week. He still isn’t home – it’s actually become pretty funny. They were ON the plane the other day and then blah blah blah happened and they had to stay. Hopefully this week! My poor, sweet 3 year old is still waiting for his birthday party that was supposed to happen 2 weeks ago! Bless his heart.

    These cookies were on my to-do list last Christmas but I just ran out of time and they never got made. I wanted to get them done early in the season this year so it wouldn’t happen again! And I’m so happy that I did. They are definitely one of my favorite cookies I’ve made this year.

    They have incredible chocolate gingerbread flavor but with chunks of chocolate mixed in. The chocolate gets all melty and delicious! These are a must make for chocolate lovers!

    Chewy Chocolate Gingerbread Cookies - chewy gingerbread cookies with gooey chocolate mixed in! Santa's going to love these!

    Ingredients

    • Semisweet chocolate
    • All-purpose flour
    • Ground ginger
    • Ground cinnamon
    • Ground cloves
    • Ground nutmeg
    • Cocoa powder
    • Unsalted butter
    • Fresh ginger
    • Dark brown sugar
    • Molasses
    • Baking soda
    • Granulated sugar

    How Long Are They Good For?

    These cookies are best within the first 5 days. Make sure you store them at room temperature in an airtight container.

    Can You Freeze Them?

    You can freeze these chocolate gingerbread cookies for up to 3 months. I would wrap them tightly in plastic wrap and then put them in a freezer ziploc bag.

    When you are ready to serve them, just let them sit at room temperature until defrosted.

    More Christmas Cookie Recipes

    • Cranberry Orange Cookies
    • Cherry White Chocolate Chip Cookies
    • Italian Sugar Cookies
    • Chocolate Snowball Cookies
    • Holly Crackles
    • Red Velvet Peppermint Thumbprints

    Make sure you subscribe to my email list to get all my new recipes delivered right to your inbox!

    You can also follow me on Instagram, Facebook, or Pinterest for even more! 

    📖 Recipe

    Yield: 24 cookies

    Chewy Chocolate Gingerbread Cookies

    Chewy Chocolate Gingerbread Cookies

    from Martha Stewart Cookies

    Prep Time 20 minutes
    Cook Time 12 minutes
    Additional Time 20 minutes
    Total Time 52 minutes

    Ingredients

    • 7 ounces semisweet chocolate
    • 1 ½ cups plus 1 tablespoon all-purpose flour
    • 1 ¼ teaspoons ground ginger
    • 1 teaspoon ground cinnamon
    • ¼ teaspoon ground cloves
    • ¼ teaspoon ground nutmeg
    • 1 tablespoon cocoa powder
    • 8 tablespoons 1 stick unsalted butter
    • 1 tablespoon freshly grated ginger
    • ½ cup dark-brown sugar, packed
    • ½ cup unsulfured molasses
    • 1 teaspoon baking soda
    • ¼ cup granulated sugar

    Instructions

    1. Line two baking sheets with parchment. Chop chocolate into ¼-inch chunks; set aside. In a medium bowl, sift together flour, ground ginger, cinnamon, cloves, nutmeg, and cocoa.
    2. In the bowl of an electric mixer, fitted with the paddle attachment, beat butter and grated ginger until whitened, about 4 minutes. Add brown sugar; beat until combined. Add molasses; beat until combined.
    3. In a small bowl, dissolve baking soda in 1 ½ teaspoons boiling water. Beat half of flour mixture into butter mixture. Beat in baking-soda mixture, then remaining half of flour mixture. Mix in chocolate; turn out onto a piece of plastic wrap. Pat dough out to about 1 inch thick; seal with wrap; refrigerate until firm, 2 hours or more.
    4. Heat oven to 325 degrees. Roll dough into 1 ½- inch balls; place 2 inches apart on baking sheets. Refrigerate 20 minutes. Roll in granulated sugar. Bake until the surfaces crack slightly, 10 to 12 minutes. Let cool 5 minutes; transfer to a wire rack to cool completely.

    Recommended Products

    As an Amazon Associate and member of other affiliate programs, I earn from qualifying purchases.

    • Parchment Paper
      Parchment Paper
    • Rimmed Baking Sheet
      Rimmed Baking Sheet

    Nutrition Information:

    Yield:

    24

    Serving Size:

    1

    Amount Per Serving: Calories: 119Total Fat: 6gSaturated Fat: 4gTrans Fat: 0gUnsaturated Fat: 2gCholesterol: 10mgSodium: 58mgCarbohydrates: 17gFiber: 1gSugar: 16gProtein: 0g

    Did you make this recipe?

    Tag me in your Instagram photo - @fakeginger

    © Amanda Livesay
    Chewy Chocolate Gingerbread Cookies - chewy gingerbread cookies with gooey chocolate mixed in! Santa's going to love these!

    Gingerbread Hot Chocolate

    Nov 29, 2012

    Warm up with a cup of Gingerbread Hot Chocolate! Hot chocolate with cinnamon, ginger, and cloves and topped with gingerbread marshmallows.

    If you love gingerbread, try Chewy Chocolate Gingerbread Cookies and Soft Gingerbread Cookies!

    Gingerbread Hot Chocolate - delicious homemade hot chocolate with classic gingerbread spices! Top with gingerbread man marshmallows for the cutest winter treat!

    Gingerbread just screams HOLIDAYS! Right?!

    Gingerbread lovers are going to go crazy for this hot chocolate made with warm spices like cinnamon, cloves, and ginger. And then you top it with gingerbread marshmallows so it’s festive and oh so cute!

    Gingerbread Hot Chocolate - delicious homemade hot chocolate with classic gingerbread spices! Top with gingerbread man marshmallows for the cutest winter treat!

    Ingredients

    • Fresh ginger
    • Whole cloves
    • Cinnamon sticks
    • Whole milk
    • Dark brown sugar
    • Bittersweet chocolate
    • Vanilla extract
    • Gingerbread marshmallows

    Instructions

    • Steep spices in milk. Combine first 3 ingredients in an 8- x 10-inch piece of cheesecloth; pull edges together, and tie to secure. Warm milk and spice bundle in a 3-quart heavy saucepan over medium-low heat. Bring to a simmer. Remove from heat, cover, and steep 30 minutes. Remove spice bundle from milk.
    • Add remaining ingredients. Heat milk mixture over medium-low heat until hot. Add brown sugar; cook, stirring constantly, until sugar melts. Add chocolate, stirring until chocolate melts. Stir in vanilla.
    • Top and serve. Serve warm, topped with gingerbread marshmallows.

    Can You Make It Ahead?

    You can make the steeped milk and spice mixture a few hours before you plan on serving it. Just let it cool and then store it in the fridge until you are ready to serve it.

    And then from there, continue with the instructions.

    More Hot Chocolate Recipes

    • Peanut Butter White Hot Chocolate
    • Peppermint White Hot Chocolate
    • Boozy Cinnamon White Hot Chocolate

    Make sure you subscribe to my email list to get all my new recipes delivered right to your inbox!

    You can also follow me on Instagram, Facebook, or Pinterest for even more! 

    📖 Recipe

    Yield: about 4 servings

    Gingerbread Hot Chocolate

    Gingerbread Hot Chocolate
    Prep Time 45 minutes
    Additional Time 2 minutes
    Total Time 47 minutes

    Ingredients

    • 1 1-inch piece fresh ginger, peeled and sliced
    • 10 whole cloves
    • 2 3-inch cinnamon sticks
    • 4 cups whole milk
    • ⅓ cup firmly packed dark brown sugar
    • 8 ounces bittersweet chocolate, chopped
    • 1 teaspoon vanilla extract
    • gingerbread marshmallows

    Instructions

    1. Combine first 3 ingredients in an 8- x 10-inch piece of cheesecloth; pull edges together, and tie to secure.
    2. Warm milk and spice bundle in a 3-quart heavy saucepan over medium-low heat. Bring to a simmer. Remove from heat, cover, and steep 30 minutes.
    3. Remove spice bundle from milk. Heat milk mixture over medium-low heat until hot. Add brown sugar; cook, stirring constantly, until sugar melts. Add chocolate, stirring until chocolate melts. Stir in vanilla. Serve warm, topped with gingerbread marshmallows.

    Recommended Products

    As an Amazon Associate and member of other affiliate programs, I earn from qualifying purchases.

    • Gingerbread Marshmallows
      Gingerbread Marshmallows
    • Cinnamon Sticks
      Cinnamon Sticks
    • Cheesecloth
      Cheesecloth

    Nutrition Information:

    Yield:

    4

    Serving Size:

    1

    Amount Per Serving: Calories: 639Total Fat: 40gSaturated Fat: 24gTrans Fat: 0gUnsaturated Fat: 14gCholesterol: 30mgSodium: 180mgCarbohydrates: 55gFiber: 10gSugar: 34gProtein: 17g

    Did you make this recipe?

    Tag me in your Instagram photo - @fakeginger

    © Amanda Livesay
    Category: drink

    Peppermint Crunch-Chocolate Chip Cookies

    Nov 26, 2012

    I am so excited that it’s time for one of my favorite parts of the holidays season: cookies! I plan on going cookie crazy over the next month so get excited!

    This first cookie I made is so awesome. It’s like a regular chocolate chip but has the Andes Peppermint Crunch pieces throughout. This was my first time buying the Peppermint Crunch and I expected it to be like the green ones but it really does have a fun little crunch. And the red is just so festive!

    I love these so much and will be including them in my Christmas Eve baking this year!

    …

    Read More

    Crescent Rolls

    Nov 13, 2012

    Crescent Rolls – easy buttery homemade crescent rolls. Skip the canned rolls and make your own!

    Crescent Rolls - easy buttery homemade crescent rolls. Skip the canned rolls and make your own!

    I’m really trying to get back into yeast breads. There was a time when I made every bread we ate and while that’s not really feasible at this point in my life I’d like to at least make it sometimes.

    I made these to go with that delicious slow cooker salisbury steak a few weeks back because I was feeling like that old-fashioned meal needed some old-fashioned crescents to go with it.

    My family loves those canned crescents rolls – and by “my family”, I mean me. I can’t even buy them anymore because I’ll eat half of the rolls before dinner is even ready. And yeah, I’m not gonna lie, I ate probably half of these before the salisbury steak was ready. But it’s okay because they’re really yummy. Plus I knew everything that went into them, they weren’t from a can, etc etc etc.

    Crescent Rolls - easy buttery homemade crescent rolls. Skip the canned rolls and make your own!

    They are way less complicated than they look and I think they’re one of those breads that you’d really have to try to screw up. The dough does has a really long rising time but I’d say mine was ready in about half the time called for in the recipe. Just watch it to see when it’s doubled. An easy way to do that is to put a piece of tape on the side of your bowl where the dough originally is.

    Your family will definitely be impressed if you put this on the table tonight.

    Crescent Rolls - easy buttery homemade crescent rolls. Skip the canned rolls and make your own!

    Homemade Rolls Recipes

    • Dinner Rolls
    • Oatmeal Rolls
    • Parker House Rolls

    Make sure you subscribe to my email list to get all my new recipes delivered right to your inbox!

    You can also follow me on Instagram, Facebook, or Pinterest for even more! 

    📖 Recipe

    Yield: 16 rolls

    Crescent Rolls

    Crescent Rolls

    Prep Time 30 minutes
    Cook Time 25 minutes
    Additional Time 3 hours
    Total Time 3 hours 55 minutes

    Ingredients

    • ¾ cup milk
    • 2 sticks, 1 cup unsalted butter, cut into 16 pieces
    • ¼ cup 1 ¾ ounces granulated sugar
    • 3 large eggs
    • 4 cups 20 ounces all-purpose flour, plus more for dusting
    • 1 teaspoon instant yeast
    • 1 ½ teaspoons salt
    • 1 egg white
    • 1 teaspoon water

    Instructions

    1. Warm the milk, butter, and sugar in a small saucepan or in the microwave until the butter is mostly melted and the mixture is about 110 degrees, whisking to dissolve the sugar.
    2. In a medium-sized mixing bowl, beat the eggs; slowly stream in about ¼ of the warm milk mixture, whisking constantly. Add the rest of the milk, continuing to whisk.
    3. In the bowl of a stand mixer fitted with a paddle attachment, combine flour, yeast, and salt.. With the mixer on low, add the milk and egg mixture. Continue mixing on low until a loose, shiny dough forms, about 1 minute. Increase the speed to medium about 5 minutes until the dough comes together. Transfer the dough to a large lightly oiled bowl, cover, and place in a warm place until the dough doubles in bulk and the surface feels tacky, about 3 hours.
    4. Turn the dough onto a lightly floured work space. Roll into a 20x13-inch rectangle. Use a pastry wheel to trim any unever edges. Cut the dough in half lengthwise, then cut 16 triangles. Before rolling into crescents stretch the dough an additional 2-3 inches in length. Starting at the wide end, gently roll up each crescent, ending with the pointed tip on bottom, and push the ends toward each other to form a crescent shape. Arrange the crescents on a parchment-lined baking sheet; cover and refrigerate for at least 2 hours (overnight at the most).
    5. Remove the baking sheet from the refrigerator and let rise until the crescents have lost their chill and feel slightly tacky and soft.
    6. Preheat the oven to 425 degrees F. Arrange your oven racks so one is in the center and one is as low as you can place it. Place a small baking pan on the lower one.
    7. Whisk the egg white and water together. Use a pastry brush to lightly brush the crescent rolls with this mixture. Transfer the baking sheet with the rolls to the middle oven rack and, working quickly, pour 1 cup hot tap water into the hot baking pan on the bottom rack. Close the door immediately and bake 10 minutes; reduce the oven temperature to 350F and continue baking until the tops are golden brown 12-16 minutes longer. Transfer the rolls to a wire rack, cool for 5 minutes, and serve warm.

    Nutrition Information:

    Yield:

    16

    Serving Size:

    1

    Amount Per Serving: Calories: 366Total Fat: 24gSaturated Fat: 15gTrans Fat: 0gUnsaturated Fat: 8gCholesterol: 97mgSodium: 225mgCarbohydrates: 31gFiber: 1gSugar: 3gProtein: 6g

    Did you make this recipe?

    Tag me in your Instagram photo - @fakeginger

    © Amanda Livesay

    Cinnamon Raisin Swirl Bread

    Nov 07, 2012

    The baby of the house looooooves raisin swirl bread. I didn’t know this about him until he started going to daycare and every time they would have raisin swirl bread for breakfast, the girls that work there would tell me that he ate 3 or 4 pieces. One day one of the girls said “I finally had to cut him off! He wanted to eat all of it!”

    After hearing that, I had to go home and make some! If he loves something that much, I might as well have some hanging around the house for him. I have heard rave reviews about this particular recipe and it didn’t disappoint. It was light and fluffy with a crisp crust and everyone in the house loved it. Especially the baby!

    I wanted to make French toast with it but the loaf was gone before I had the chance so it looks like I’ll be making it again soon!

    …

    Read More

    Slow Cooker Salisbury Steak

    Nov 06, 2012

    Slow Cooker Salisbury Steak is such an easy, kid-friendly meal! Ground beef patties with a delicious creamy gravy – all cooked in the slow cooker!

    We love comfort food like salisbury steak in our house. Some of our other favorites are Slow Cooker Mississippi Roast, Baked Spaghetti Casserole, and Chicken and Wild Rice Soup.

    Slow Cooker Salisbury Steak - easy, kid-friendly meal! Ground beef patties with a delicious creamy gravy!

    I have gotten into really bad dinner habits over the past 8 months.

    With my husband gone there was no need to have dinner ready at a certain time so sometimes we’d have “dinner” at lunchtime and then eat cereal for dinner. Or sometimes I’d skip dinner altogether and everyone would just have PB&J.

    I won’t lie, I skipped cooking a lot. A whole lot.

    In an effort to get back into a routine, I actually made a meal plan and stuck to it last week. It made my week go a lot smoother and surprisingly, was a lot of fun.

    This dinner was the favorite of the week – all 3 of the boys like it and have asked me to make it again soon! And I love that it’s made in the slow cooker and is super easy!

    Slow Cooker Salisbury Steak - easy, kid-friendly meal! Ground beef patties with a delicious creamy gravy!

    Ingredients

    • Ground beef
    • Onion soup mix
    • Italian breadcrumbs
    • Milk
    • Flour
    • Olive oil
    • Cream of mushroom soup
    • Au jus mix

    Instructions

    • In a large mixing bowl, use your hands to mix together ground beef, onion soup mix, breadcrumbs, and milk. Once thoroughly mixed, divide into 8 patties and shape into over-shaped patties.
    • Dredge in flour and set aside.
    • Heat the olive oil over medium-high heat. Brown the patties, a few at a time, for just a minute on each side.
    • Transfer to slow cooker, stacking if you need to.
    • In another mixing bowl, whisk together mushroom soup, au jus mix, and water.
    • Pour over the patties in the slow cooker.
    • Cook on low for 6 hours or high for 4 hours.

    How Long Is Salisbury Steak Good For?

    Salisbury steak will be fine in the fridge for up to 3 – 4 days. Make sure to use an airtight container to keep it fresh for as long as possible.

    To reheat, you can use a microwave or oven. If the gravy is too thick, a splash of chicken broth or water will help to loosen it up.

    Can You Freeze Salisbury Steak?

    You can definitely freeze salisbury steak. Use an airtight container (or a freezer ziploc bag with all the air squeezed out – lay it flat until frozen and then you can stack or put sideways) and eat within 3 months. 

    I would defrost overnight in the refrigerator and then reheat in the microwave or oven. 

    What To Serve with Salisbury Steak

    I like to serve Roasted Garlic Mashed Potatoes with this salisbury steak because the potatoes can soak up all the extra sauce. Rice always works the same way!

    A green vegetable is always nice with a dish like this too. Maybe Roasted Broccolini or Green Beans Almondine.

    More Slow Cooker Recipes

    • Slow Cooker Cheeseburgers
    • Slow Cooker Cheesy Tortellini
    • Slow Cooker Huli Huli Chicken
    • Slow Cooker Honey Sesame Chicken
    • Slow Cooker Cheesy Chicken and Rice

    Make sure you subscribe to my email list to get all my new recipes delivered right to your inbox!

    You can also follow me on Instagram, Facebook, or Pinterest for even more! 

    📖 Recipe

    Yield: 8 servings

    Slow Cooker Salisbury Steak

    Slow Cooker Salisbury Steak

    Slow Cooker Salisbury Steak is such an easy, kid-friendly meal! Ground beef patties with a delicious creamy gravy - all cooked in the slow cooker!

    Prep Time 15 minutes
    Cook Time 6 hours
    Total Time 6 hours 15 minutes

    Ingredients

    • 2 pounds ground beef
    • 1 pack dry onion soup mix
    • ¼ cup Italian breadcrumbs
    • ¼ cup milk
    • ¼ cup flour
    • 2 teaspoons olive oil
    • 2 cans cream of mushroom soup
    • 1 pack dry au jus mix
    • ¾ cup water

    Instructions

    1. In a large mixing bowl, use your hands to mix together ground beef, onion soup mix, breadcrumbs, and milk. Once thoroughly mixed, divide into 8 patties and shape into over-shaped patties. Dredge in flour and set aside.
    2. Heat the olive oil over medium-high heat. Brown the patties, a few at a time, for just a minute on each side. Transfer to slow cooker, stacking if you need to.
    3. In another mixing bowl, whisk together mushroom soup, au jus mix, and water. Pour over the patties in the slow cooker.
    4. Cook on low for 6 hours or high for 4 hours.

    Recommended Products

    As an Amazon Associate and member of other affiliate programs, I earn from qualifying purchases.

    • Lipton Onion Soup Mix
      Lipton Onion Soup Mix
    • Au Jus Mix
      Au Jus Mix
    • Programmable Slow Cooker
      Programmable Slow Cooker

    Nutrition Information:

    Yield:

    8

    Serving Size:

    1

    Amount Per Serving: Calories: 463Total Fat: 28gSaturated Fat: 10gTrans Fat: 1gUnsaturated Fat: 14gCholesterol: 109mgSodium: 853mgCarbohydrates: 16gFiber: 1gSugar: 5gProtein: 36g

    Did you make this recipe?

    Tag me in your Instagram photo - @fakeginger

    © Amanda Livesay
    Cuisine: American / Category: slow cooker

    Frozen Cranberry Margarita

    Nov 01, 2012

    For this week’s Thirsty Thursday theme, we went with… CRANBERRY! Just this week I spotted fresh cranberries at my grocery store so it’s perfect timing.

    This Frozen Cranberry Margarita is a great recipe for Thanksgiving or even the day after Thanksgiving because it uses canned cranberry sauce! Weird, right? So if you’re left with an extra can of the stuff, you can definitely do something besides cover a turkey sandwich with it.

    Between all the tequila and the tart cranberry sauce, this drink has quite a kick. In a good way! Those frozen margarita mixes can be way sweet so those two together keep the drink from hurting your teeth.

    Make sure you check out what Nicole made!

    …

    Read More

    Monster Munch

    Oct 29, 2012

    Two days to Halloween! I hope you’re ready! I bought a second round of candy this weekend – this time I got the Tootsie Roll pack with Dots, that way I’m not tempted because Dots? Are disgusting. And I kind of feel bad for handing them out to the neighborhood kids but you know.

    I’ve got two more Halloween recipes to get through before the big day. This one is a fun little snack mix that’s kind of like my favorite Christmas mix but this one has popcorn, pumpkin seeds and candy corn! Mmm! My kids went nuts over it, for obvious reasons.

    I have been avoiding the popcorn trend because I thought for sure that covering popcorn with something would make it soggy but that wasn’t the case with this. The popcorn was the most fought over part!

    …

    Read More

    Bloody Hot Chocolate

    Oct 25, 2012

    As promised, this week I have the perfect Halloween drink for kids! Bloody hot chocolate – yum!

    This is just a regular hot chocolate but it’s dyed red. It’s perfect for Halloween night, especially if it’s chilly whenever you are. Make this after trick-or-treating to warm up those kiddos. Not like they’ll need more sugar at that point but yeah… warmth!

    It’s very simple to make and honestly? You could totally get away with using a packet of hot chocolate mix. Just make it on the stove and stir in some red food coloring right at the end.

    Nicole made bloody punch! I hope y’all are enjoying our drink series! Much more to come in the next few months!

    …

    Read More

    Bloody Tooth Cocktail

    Oct 18, 2012

    Bloody Tooth Cocktail is the creepiest cocktail for your Halloween party! Pomegranate juice and whiskey with pomegranate arils to look like bloody teeth!

    Bloody Tooth Cocktail - the creepiest cocktail for your Halloween party! Pomegranate juice and whiskey with pomegranate arils to look like bloody teeth!

    How disgusting is this?! I just love it!

    Nicole and I decided that for the next 2 weeks we’ll be sharing Halloween drinks, one boozy and one kid-friendly. I’m starting with the boozy one. Of course.

    This blood red cocktail is a mix of pomegranate juice and whiskey that’s garnished with pomegranate seeds which look like bloody teeth hanging out at the bottom of the glass. So gross, so fantastic. I want to throw a Halloween party just so I can serve these!

    I am not a whiskey drinker but I did like it in this. I made my second one (I watched the debate while I drank these – you can’t fault me) with tequila and it was every bit as good. So switch things up as much as you want. Just make sure to use enough pom juice to get that gorgeous blood red color.

    Bloody Tooth Cocktail - the creepiest cocktail for your Halloween party! Pomegranate juice and whiskey with pomegranate arils to look like bloody teeth!

    Ingredients

    • Whiskey – use your favorite brand, it doesn’t have to be fancy or expensive.
    • Pomegranate juice
    • Simple syrup– you can use store-bought or homemade. I have a recipe for homemade simple syrup in the recipe card below.
    • Fresh lemon juice
    • Ice
    • Pomegranate seeds – this is the “teeth” part of the cocktail.
    • Lemon twist

    How To Make Bloody Tooth Cocktail

    • Combine. Combine whiskey, pomegranate juice, simple syrup, lemon juice, and ice in a cocktail shaker.
    • Shake. Shake vigorously and pour into a glass.
    • Serve. Garnish with pomegranate seeds and lemon twist.

    More Halloween Recipes

    • Halloween Confetti Cookies
    • Halloween Sugar Cookie Bars
    • Ghostly Snack Mix
    • Mummy Oreo Truffles
    • Chocolate Covered Strawberry Ghosts

    📖 Recipe

    Yield: 1 serving

    Bloody Tooth Cocktail

    Bloody Tooth Cocktail

    Bloody Tooth Cocktail is the creepiest cocktail for your Halloween party! Pomegranate juice and whiskey with pomegranate arils to look like bloody teeth!

    Prep Time 10 minutes
    Total Time 10 minutes

    Ingredients

    For the simple syrup:

    • 1 cup sugar
    • 1 cup water

    For the cocktail:

    • 1 ½ ounces whiskey
    • 1 ½ ounces pomegranate juice
    • 1 ounce simple syrup
    • ½ ounce fresh lemon juice
    • ice
    • pomegranate seeds, for garnish
    • lemon twist, for garnish

    Instructions

    To make the simple syrup:

    1. Put sugar and water in a small saucepan; bring to a boil. Stir until sugar is dissolved. Remove from heat and cool.

    To make cocktails:

    1. Place whiskey, pomegranate juice, simple syrup, lemon juice, and ice in a cocktail shaker. Shake vigorously and pour into a glass. Garnish with pomegranate seeds and lemon twist.

    Recommended Products

    As an Amazon Associate and member of other affiliate programs, I earn from qualifying purchases.

    • Cocktail Shaker
      Cocktail Shaker
    • Simple Syrup
      Simple Syrup

    Nutrition Information:

    Yield:

    1

    Serving Size:

    1

    Amount Per Serving: Calories: 1208Total Fat: 4gSaturated Fat: 0gTrans Fat: 0gUnsaturated Fat: 1gCholesterol: 0mgSodium: 27mgCarbohydrates: 281gFiber: 14gSugar: 260gProtein: 6g

    Did you make this recipe?

    Tag me in your Instagram photo - @fakeginger

    © Amanda Livesay
    Cuisine: American / Category: drink

    Peanut Butter Oatmeal Sandwich Cookies

    Oct 16, 2012

    The first thing I ever made for my husband was peanut butter cookies. I had to go out and buy not only the ingredients but also baking sheets, a mixing bowl, spatulas, all that. He had told me days before that he just didn’t like cookies and I was determined to prove that he did because umm… who doesn’t like cookies?! So for that reason peanut butter cookies always remind me of him.

    (And yeah, we decided that he did like cookies that day. But only peanut butter ones. Or double-stuffed Oreos. Or Girl Scout cookies.)

    I was craving peanut butter something fierce last week and only cookies would work. I wanted peanut butter cookies with peanut butter filling and maybe a spoonful of peanut butter on the side.

    These were so delicious and exactly what I wanted! I’m definitely not a texture person but for some reason I just love oats in cookies. And all the peanut butter! Mmm. If you aren’t into the filling, you could skip it – the cookies are perfectly delicious on their own.

    Download a digital coupon for a different product each day straight to your shopper card at the Cart Buster site for great deals on your favorite products at the Kroger Co. Family of Stores!

    …

    Read More

    Chicken Club Egg Rolls

    Oct 15, 2012

    Chicken Club Egg Rolls is the most delicious egg roll recipe! Filled with chicken, bacon, avocado, and cheddar cheese. Plus, an amazing avocado ranch dipping sauce! 

    Two egg rolls on a white plate with an avocado sauce

    I do not fry things, as a rule. It scares me, I hate how it smells, it makes such a mess. I just don’t do it. The exception to that rule is egg rolls.

    Yeah, I knoooow, you could bake them. But then don’t get crispy enough and they don’t get that gorgeous golden brown color. Egg roll wrappers just need to be fried

    These egg rolls are worth frying. They are filled with chicken, bacon, cheese, and avocado. And then, and this part is optional but not really, you make an incredible avocado ranch sauce for dipping.

    The whole thing ends up tasting like something you’d get at a restaurant. Well worth the mess that frying creates.

    The inside of an egg roll with chicken, cheese, bacon, and avocado

    Ingredients

    • Egg roll wrappers – you can find these in the refrigerated produce section of pretty much any grocery store.
    • Cooked chicken – you can cook your own chicken or it’s a great use of a rotisserie chicken.
    • Avocado – avocado is going in the egg rolls themselves and the dipping sauce.
    • Bacon – use pork bacon or turkey bacon, whichever you prefer. You are going to cook it before adding it to the egg rolls.
    • Cheddar cheese – you could use a cheddar mix. I like a really sharp cheese in these egg rolls.
    • Oil – use canola oil or vegetable oil. Don’t try to deep fry with olive oil.
    • Ranch seasoning mix – the dry mix, not the liquid dressing.
    • Plain yogurt – you could use sour cream instead.
    • Lime juice -fresh tastes best but you can use the bottled stuff if you need to.
    • Salt

    How To Make Chicken Club Egg Rolls

    • Prepare. Heat oil in a large, heavy pan to 375F.
    • Make filling. Combine chicken, diced avocado, bacon, and cheddar cheese.
    • Assemble. Lay 1 eggroll wrapper on your workspace. Put about ⅓ cup of the mixture down the center of the wrapper. Use a pastry brush to brush water around the edges of the wrapper. Fold the sides over. Then starting with edge closest to you, fold over, making sure the filling stays inside. Repeat.
    • Fry. Fry one at a time, turning occasionally until deep golden brown. Drain on paper towels.
    • Make sauce. Smash the avocado with the dry Ranch mix. Stir in yogurt, lime juice, and salt.
    • Serve. Serve egg rolls with dipping sauce.

    How Long Are They Good For?

    Egg rolls are tastiest when they are freshly fried and super crispy but these will stay good for up to 3 days in the fridge. Make sure to store them in an airtight container.

    I recommend reheating them in an air fryer or in the oven to try to get some of that crispness back. You could also, of course, warm them up in the microwave.

    Can You Freeze Them?

    You can freeze the egg rolls for up to 3 months. Let them cool completely and then transfer them to an airtight container, like a freezer ziploc bag. Squeeze all the air out to make sure they stay nice and fresh.

    When you are ready to serve them, let them defrost overnight in the fridge and then reheat in the air fryer or oven to get them crispy.

    Two egg rolls on a white plate with a spoon of avocado sauce

    More Appetizer Recipes

    • Potato Skins
    • Crawfish Dip
    • Jalapeno Popper Dip
    • Dill Pickle Dip
    • Cheesy Spinach Dip

    Make sure you subscribe to my email list to get all my new recipes delivered right to your inbox!

    You can also follow me on Instagram, Facebook, or Pinterest for even more! 

    📖 Recipe

    Yield: 8 eggrolls

    Chicken Club Egg Rolls

    Chicken Club Egg Rolls

    Chicken Club Egg Rolls is the most delicious egg roll recipe! Filled with chicken, bacon, avocado, and cheddar cheese. Plus, an amazing avocado ranch dipping sauce! 

    Prep Time 30 minutes
    Cook Time 20 minutes
    Total Time 50 minutes

    Ingredients

    For the eggrolls:

    • 8 eggroll wrappers, found in the produce section
    • 2 cups cooked chicken, diced
    • ½ avocado, diced
    • 3 strips bacon, cooked and crumbled
    • 1 cup shredded cheddar cheese
    • oil, for frying

    For the avocado ranch dipping sauce:

    • ½ avocado
    • 1 tablespoon dry Ranch mix
    • 1 tablespoon plain yogurt
    • 1 teaspoon fresh lime juice
    • ¼ teaspoon salt

    Instructions

    1. Heat oil in a large, heavy pan to 375F.
    2. In a large bowl combine chicken, diced avocado, bacon, and cheddar cheese.
    3. To assemble eggrolls, lay 1 eggroll wrapper on your workspace. Put about ⅓ cup of the mixture down the center of the wrapper. Use a pastry brush to brush water around the edges of the wrapper. Fold the sides over. Then starting with edge closest to you, fold over, making sure the filling stays inside. Use a little additional water to seal if needed. Repeat with the rest of the filling.
    4. Fry one at a time (or 2 if your pan is large enough), turning occasionally until deep golden brown. Drain on paper towels.
    5. To make the dipping sauce, mash the avocado with the dry Ranch mix. Stir in yogurt, lime juice, and salt.
    6. Serve the eggrolls with the dipping sauce.

    Recommended Products

    As an Amazon Associate and member of other affiliate programs, I earn from qualifying purchases.

    • Ranch Dressing Mix
      Ranch Dressing Mix
    • Pastry Brush
      Pastry Brush
    • Slotted Spoon
      Slotted Spoon
    • Dutch Oven
      Dutch Oven

    Nutrition Information:

    Yield:

    8

    Serving Size:

    1

    Amount Per Serving: Calories: 319Total Fat: 15gSaturated Fat: 5gTrans Fat: 0gUnsaturated Fat: 9gCholesterol: 82mgSodium: 556mgCarbohydrates: 21gFiber: 2gSugar: 0gProtein: 25g

    Did you make this recipe?

    Tag me in your Instagram photo - @fakeginger

    © Amanda Livesay
    Cuisine: American / Category: appetizer


    Cherry Beergaritas

    Oct 11, 2012

    Cherry Beergaritas – tequila, Corona, cherry 7Up, and limeade! This will be your official summer drink! 

    Cherry Beergaritas - tequila, Corona, cherry 7Up, and limeade! This will be your official summer drink!

    Happy Thirsty Thursday!

    It’s our Friday because the kid is off school on the real Friday.

    It’s conference day. Eep!

    Wish me luck – I always feel like I’m in trouble when I have to go talk to his teacher. And then I end up crying and it’s a big mess.

    My kid is in kindergarten. It shouldn’t be this hard.

    Anyway.

    Nicole & I decided on a BEER theme for this week’s drink!

    Because it’s football season and what goes better with football than beer?!

    I have been wanting to make these Cherry Beergaritas forever. They are so easy, only 4 ingredients, and a crowd favorite! I make these for all my summer barbecues and parties. 

    If you love cherry cocktails, I have a Peach Cherry Sangria that is absolutely delicious and so pretty!

    Cherry Beergaritas - tequila, Corona, cherry 7Up, and limeade! This will be your official summer drink!

    What Is a Beergarita?

    A beergarita is exactly what it sounds like! A margarita made with beer! 

    How to Make Cherry Beergaritas!

    These Cherry Beergaritas are seriously so easy and takes only minutes to prepare. 

    It’s cherry soda (I used diet Cherry 7Up which makes it low(er) calorie and that makes me super happy), frozen limeade concentrate, Corona, and tequila. Just pour all of those into a large pitcher and give it a stir.

    I always salt the rim of my glasses but you don’t have to do that. Garnish with lime slices if desired and that’s it! 

    It sounds weird, I know, but it’s amazing! It’s not too sweet, not too strong, and I just love the bubbles!

    Nicole made a fun drink called The Cure and I can’t wait to try it.

    Can You Make Beergaritas Ahead?

    I don’t recommend making these Cherry Beergaritas ahead. Two of the ingredients are bubbly and you’ll lose those bubbles if you try to make it ahead of time. 

    More Margaritas Recipes

    • Tequila Sunrise Margaritas 
    • Peach Margaritas 
    • Honeydew Margaritas 
    • Cranberry Margaritas
    • Spicy Cilantro Margaritas
    • Frozen Raspberry Margaritas
    • Blackberry Margaritas

    Make sure you subscribe to my email list to get all my new recipes delivered right to your inbox!

    You can also follow me on Instagram, Facebook, or Pinterest for even more! 

    📖 Recipe

    Yield: 6 servings

    Cherry Beergaritas

    Cherry Beergaritas

    Prep Time 10 minutes
    Total Time 10 minutes

    Ingredients

    • 12 ounces cherry soda, such as cherry 7up
    • 12 ounces tequila
    • 12 ounces Corona
    • 12 ounces frozen limeade concentrate, thawed
    • fresh limes, to garnish

    Instructions

    1. In a very large pitcher, stir together the soda, tequila, Corona, and limeade concentrate. Serve immediately. Garnish with lime wedges.

    Nutrition Information:

    Yield:

    6

    Serving Size:

    1

    Amount Per Serving: Calories: 276Total Fat: 0gSaturated Fat: 0gTrans Fat: 0gUnsaturated Fat: 0gCholesterol: 0mgSodium: 13mgCarbohydrates: 34gFiber: 2gSugar: 28gProtein: 1g

    Did you make this recipe?

    Tag me in your Instagram photo - @fakeginger

    © Amanda Livesay
    Category: drink


    Oatmeal Rolls

    Oct 09, 2012

    Oatmeal Rolls are fluffy homemade dinner rolls made with half whole wheat flour and oats! The perfect bread to go with any dinner.

    Homemade Oatmeal Rolls - old-fashioned oatmeal rolls recipe! This creates the most delicious and tender dinner rolls!

    So are we loving this weather or what?! (Those of you still have 90+ degree, I am sorry. You can come stay with me.) We actually had snow in our forecast this past weekend and although we didn’t get any, it was crazy cold and definitely soup weather! I made a big ol’ pot of soup and these rolls to go along with it.

    The rolls were perfect soup rolls! I love oat breads because while the oats aren’t really obvious, they add a certain almost nuttiness to the bread. They were super soft and perfect for sopping up that last little bit of soup left in the bowl.

    Ingredients

    • Boiling water – the oats get soaked in boiling water to soften them before they go into the dough.
    • Old fashioned oats – make sure they are old fashioned, not quick or steel cut.
    • Vegetable oil
    • Brown sugar
    • Molasses
    • Active-dry yeast
    • All-purpose flour
    • Whole wheat flour – this bread is half whole wheat flour if that sort of thing is important to you.

    How To Make Oatmeal Rolls

    • Soak oats. Stir together boiling water, oats, vegetable oil, and salt. Let side for about a minute; add cold water. Stir until slightly cooled.
    • Make dough. Pour into the bowl of a stand-mixer fitted with a paddle attachment. Add brown sugar, molasses, and yeast. Add all-purpose flour and beat till smooth. Add whole wheat flour and continue beating until the dough comes together. Switch to dough hook. Allow the mixer to knead the dough for 6 – 8 minutes, or until the dough is smooth and elastic.
    • Transfer. Transfer dough to a large oiled bowl. Cover and allow to rise for about an hour, or until doubled in size.
    • Shape. Divide the dough into 24 even pieces and shape into rolls. Place in greased pan(s). Cover and let rise for another hour, or until doubled.
    • Bake. Bake at 350F for about 20 minutes, or until browned.
    • Top. Brush with butter as soon as the come out of the oven if desired.
    Homemade Oatmeal Rolls - old-fashioned oatmeal rolls recipe! This creates the most delicious and tender dinner rolls!

    More Homemade Bread Recipes

    • Crescent Rolls
    • Vermont Oatmeal Maple-Honey Bread
    • Dinner Rolls
    • Tomato Herb Focaccia
    • Homemade Sandwich Bread

    Make sure you subscribe to my email list to get all my new recipes delivered right to your inbox!

    You can also follow me on Instagram, Facebook, or Pinterest for even more! 

    📖 Recipe

    Yield: 24 rolls

    Oatmeal Rolls

    Oatmeal Rolls

    Oatmeal Rolls are fluffy homemade dinner rolls made with half whole wheat flour and oats! The perfect bread to go with any dinner.

    Prep Time 30 minutes
    Cook Time 20 minutes
    Additional Time 2 hours
    Total Time 2 hours 50 minutes

    Ingredients

    • 1 ½ cups boiling water
    • 1 cup old-fashioned oats
    • 2 tablespoons vegetable oil
    • 2 teaspoons salt
    • ¾ cup cold water
    • ¼ cup brown sugar, or honey
    • ¼ cup molasses
    • 2 ¼ teaspoons active-dry yeast
    • 2 ½ cups all-purpose flour
    • 2 ½ cups whole wheat flour

    Instructions

    1. Stir together boiling water, oats, vegetable oil, and salt. Let side for about a minute; add cold water. Stir until slightly cooled.
    2. Pour into the bowl of a stand-mixer fitted with a paddle attachment. Add brown sugar, molasses, and yeast. Add all-purpose flour and beat till smooth. Add whole wheat flour and continue beating until the dough comes together. Switch to dough hook. Allow the mixer to knead the dough for 6 - 8 minutes, or until the dough is smooth and elastic. Transfer dough to a large oiled bowl. Cover and allow to rise for about an hour, or until doubled in size.
    3. Divide the dough into 24 even pieces and shape into rolls. Place in greased pan(s). Cover and let rise for another hour, or until doubled.
    4. Bake at 350F for about 20 minutes, or until browned. Brush with butter as soon as the come out of the oven if desired.

    Recommended Products

    As an Amazon Associate and member of other affiliate programs, I earn from qualifying purchases.

    • Rimmed Baking Sheet
      Rimmed Baking Sheet
    • Parchment Paper
      Parchment Paper

    Nutrition Information:

    Yield:

    24

    Serving Size:

    1

    Amount Per Serving: Calories: 134Total Fat: 2gSaturated Fat: 0gTrans Fat: 0gUnsaturated Fat: 1gCholesterol: 0mgSodium: 180mgCarbohydrates: 27gFiber: 2gSugar: 5gProtein: 4g

    Did you make this recipe?

    Tag me in your Instagram photo - @fakeginger

    © Amanda Livesay
    Cuisine: American / Category: breads

    Honeycrisp Apple Sangria

    Oct 04, 2012

    Honeycrisp Apple Sangria is the perfect fall drink! White wine sangria with honeycrisp apples, oranges, ginger, cinnamon, and cloves. Plus a cinnamon sugar rim!

    Honeycrisp Apple Sangria - the perfect fall drink! White wine sangria with honeycrisp apples, oranges, ginger, cinnamon, and cloves. Plus a cinnamon sugar rim!

    I think I am the last person in the universe to jump on the honeycrisp train. Just this week though, they were the cheapest apples at my grocery store so I bought them and they are amazing. Seriously, crisp like I didn’t even know apples could be!

    This sangria uses those delicious crispy apples along with bunch of other fruit, spices, Chardonnay, and peach schnapps. It’s so delicious and so easy to make. And you can make it ahead!

    It would be perfect for a Thanksgiving or Friendsgiving party.

    Honeycrisp Apple Sangria - the perfect fall drink! White wine sangria with honeycrisp apples, oranges, ginger, cinnamon, and cloves. Plus a cinnamon sugar rim!

    Ingredients

    • Honeycrisp apples – the star of this sangria. They start popping up in the grocery stores around September each year.
    • Oranges
    • Lemon
    • Lime
    • Chardonnay – you can use a cheap one since you’ll be adding so much to it. No one will even know it’s cheap!
    • Peach schnapps
    • Honey
    • Cinnamon sticks
    • Fresh ginger – you could use ground ginger if you don’t have fresh.
    • Whole cloves
    • Sugar – this is for the cinnamon sugar rim which is optional but makes the drink extra fun and festive.
    • Ground cinnamon – also for the cinnamon sugar rim. You could buy a premade cinnamon sugar mixture if you prefer.
    • Club soda – right before serving, you add the club soda so that it stays nice and bubbly. You can leave it out if you don’t want a bubbly sangria. Or if you want even more flavor, you can add a lime or lemon sparkling water instead of club soda.

    How To Make Honeycrisp Apple Sangria

    • Prep. Peel and chop one of the apples. Quarter one of the oranges, the lemon, and the lime.
    • Combine. In a large bowl, combine the wine, schnapps and honey. Stir in the chopped apple, the quartered orange, lemon, lime, cinnamon sticks, ginger and cloves.
    • Chill. Refrigerate it overnight (or at least 4 hours if you’re in a hurry).
    • Strain. Strain the sangria into a pitcher.
    • Prep garnish. Chop the remaining apple. Peel, section and chop the remaining orange. Mix the apple and orange in a bowl.
    • Make cinnamon sugar. On a small plate, stir together the sugar and cinnamon.
    • Rim the glasses. Moisten the rims of wine glasses and dip in the cinnamon sugar to coat.
    • Finish. Pour in the sangria until three-quarters full. Top with a splash of club soda. Garnish with a generous spoonful of the chopped apple and orange.

    How Long Is It Good For?

    Honeycrisp sangria will be good for up to 4 days in the fridge. Make sure to store it in an airtight pitcher so it stays fresh for as long as possible.

    Can You Make It Ahead?

    Honeycrisp apple sangria needs to be made at least 4 hours ahead but preferably overnight. So it’s perfect when you need something to prep ahead of time.

    Can You Use a Different Apple?

    Yes, of course! If it’s not honeycrisp season or they are just stupid expensive, use a similar apple like jazz, pink lady, or ambrosia. It will be just as delicious! 

    More Apple Cocktails

    • Apple Cider Jello Shots
    • Bourbon-Apple Sidecar

    Make sure you subscribe to my email list to get all my new recipes delivered right to your inbox!

    You can also follow me on Instagram, Facebook, or Pinterest for even more! 

    Honeycrisp Apple Sangria - the perfect fall drink! White wine sangria with honeycrisp apples, oranges, ginger, cinnamon, and cloves. Plus a cinnamon sugar rim!

    📖 Recipe

    Yield: about 8 servings

    Honeycrisp Apple Sangria

    Honeycrisp Apple Sangria

    Honeycrisp Apple Sangria is the perfect fall drink! White wine sangria with honeycrisp apples, oranges, ginger, cinnamon, and cloves. Plus a cinnamon sugar rim!

    Prep Time 15 minutes
    Additional Time 4 hours
    Total Time 4 hours 15 minutes

    Ingredients

    • 2 honeycrisp apples
    • 2 oranges
    • lemon
    • lime
    • One 750-milliliter bottle Chardonnay
    • ½ cup peach schnapps
    • ¼ cup honey
    • 2 cinnamon sticks
    • 2 quarter-size slices of fresh ginger
    • 3 whole cloves
    • 2 tablespoons sugar
    • ½ teaspoon ground cinnamon
    • Ice
    • Club soda

    Instructions

    1. Peel and chop one of the apples. Quarter one of the oranges, the lemon, and the lime.
    2. In a large bowl, combine the wine, schnapps and honey. Stir in the chopped apple, the quartered orange, lemon, lime, cinnamon sticks, ginger and cloves. Refrigerate it overnight (or at least 4 hours if you're in a hurry).
    3. Strain the sangria into a pitcher. Chop the remaining apple. Peel, section and chop the remaining orange. Mix the apple and orange in a bowl.
    4. On a small plate, stir together the sugar and cinnamon. Moisten the rims of wine glasses and dip in the cinnamon sugar to coat. Pour in the sangria until three-quarters full. Top with a splash of club soda. Garnish with a generous spoonful of the chopped apple and orange.

    Recommended Products

    As an Amazon Associate and member of other affiliate programs, I earn from qualifying purchases.

    • Whole Cloves
      Whole Cloves
    • Cinnamon Sticks
      Cinnamon Sticks
    • Apple Slicer
      Apple Slicer

    Nutrition Information:

    Yield:

    8

    Serving Size:

    1

    Amount Per Serving: Calories: 185Total Fat: 0gSaturated Fat: 0gTrans Fat: 0gUnsaturated Fat: 0gCholesterol: 0mgSodium: 9mgCarbohydrates: 27gFiber: 3gSugar: 19gProtein: 1g

    Did you make this recipe?

    Tag me in your Instagram photo - @fakeginger

    © Amanda Livesay
    Cuisine: American / Category: drink
    « Previous Page
    Next Page »

    Primary Sidebar

    Amanda Livesay
    Hi, I'm Amanda! DFW food blogger, mom of boys, and crazy dog lady.
    Read more
    Privacy Policy
    Privacy Policy

    Footer

    ↑ back to top

    About

    • Privacy Policy
    • About Fake Ginger

    Newsletter

    • Sign Up for weekly emails featuring new recipes!

    As an Amazon Associate I earn from qualifying purchases.

    Copyright © 2024 FakeGinger.com