• Skip to primary navigation
  • Skip to main content
  • Skip to primary sidebar
  • Home
  • About
  • Recipes

Fake Ginger

menu icon
go to homepage
  • Recipe Index
  • About
  • Subscribe
    • Facebook
    • Instagram
    • Pinterest
  • subscribe
    search icon
    Homepage link
    • Recipe Index
    • About
    • Subscribe
    • Facebook
    • Instagram
    • Pinterest
  • ×
    Home » Page 36

    Banana Pudding Poke Cake

    Banana Pudding Poke Cake

    Apr 23, 2015

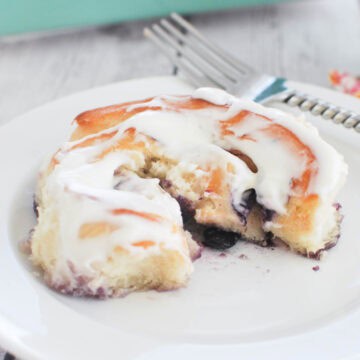
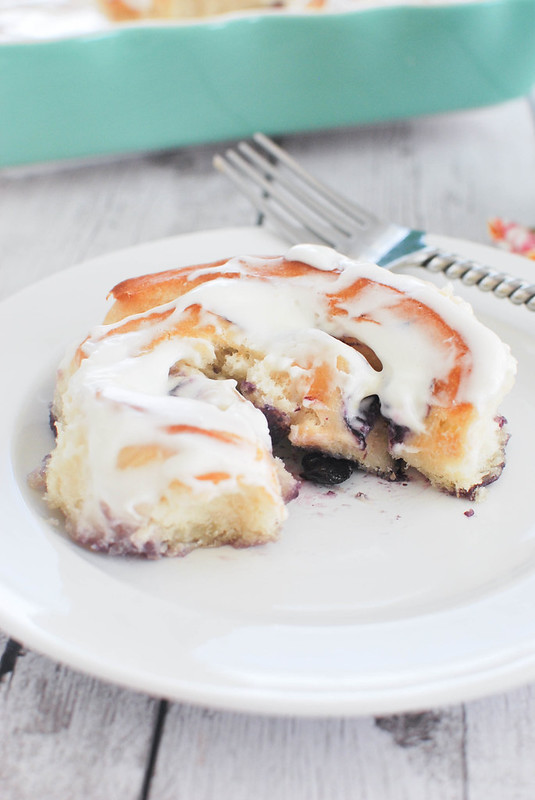
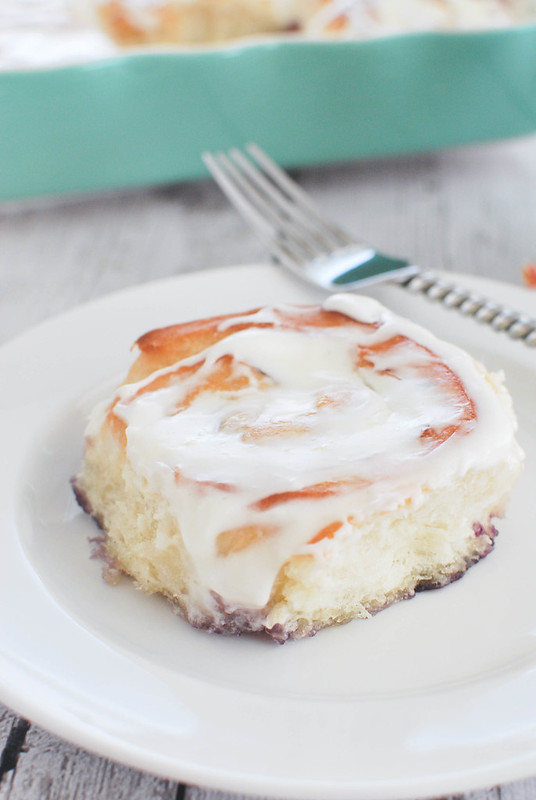
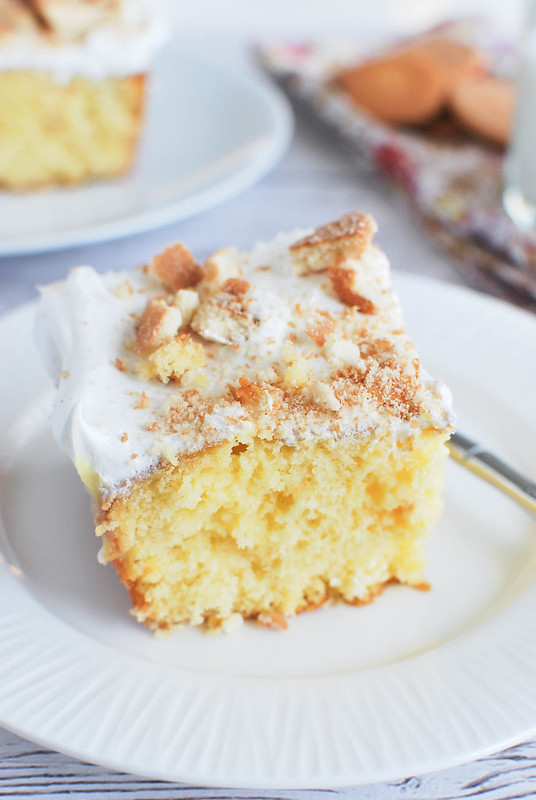
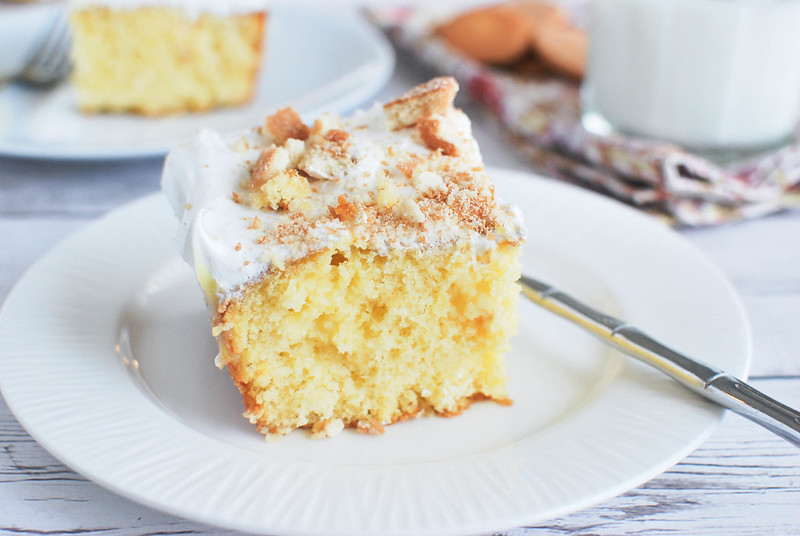
    Banana Pudding Poke Cake is a delicious cake that starts with a boxed mix and is filled with banana pudding! Tastes like an old-fashioned layered banana pudding!

    Love banana desserts? Try Banana Cream Cheesecake or Banana Pudding!

    Banana Pudding Poke Cake - super delicious cake that starts with a boxed mix and is filled with banana pudding! Tastes like an old-fashioned layered banana pudding!

    I love a poke cake. I mean, they are just the softest, moistest cakes you can imagine and you can make pretty much any flavor you want. 

    This Banana Pudding Poke Cake is my alltime favorite poke cake with my Snickers Poke Cake coming in a very close second. 

    This cake starts with a cake mix and gets filled with an instant pudding mix so it’s super easy! And it tastes just like a classic layered banana pudding without all the work!

    Banana Pudding Poke Cake - super delicious cake that starts with a boxed mix and is filled with banana pudding! Tastes like an old-fashioned layered banana pudding!

    Ingredients for Banana Pudding Poke Cake

    • Yellow cake mix
    • Banana cream pie pudding mix
    • Frozen whipped topping – defrosted in the refrigerator
    • Vanilla wafer cookies – roughly chopped

    How To Make Banana Pudding Poke Cake

    • Prepare cake mix according to package instructions in a 9×13-inch pan
    • Cool for 10 minutes
    • Use a fork to poke holes all over the cake
    • Prepare pudding mix according to package instructions and cool slightly
    • Pour pudding over the cake
    • Refrigerate until cool
    • Top with whipped topping and chopped vanilla wafers

    How Long Is Banana Pudding Poke Cake Good For?

    Banana Pudding Poke Cake will be good in the fridge for up to 3 days. Make sure to cover it tightly to prevent air from getting in.

    And if you want crispy cookies on top, wait until you’re ready to serve to add them.

    More Poke Cake Recipes

    • Strawberry Cheesecake Poke Cake
    • S’mores Poke Cake
    • Snickers Cake

    Make sure you subscribe to my email list to get all my new recipes delivered right to your inbox!

    You can also follow me on Instagram, Facebook, or Pinterest for even more! 

    📖 Recipe

    Yield: 15 servings

    Banana Pudding Poke Cake

    Banana Pudding Poke Cake

    adapted from The Country Cook

    Prep Time 10 minutes
    Cook Time 30 minutes
    Additional Time 10 minutes
    Total Time 50 minutes

    Ingredients

    • 1 box yellow cake mix, plus all ingredients to prepare
    • 1 3 ounce banana cream pie pudding mix, plus all ingredients to prepare
    • 1 8 ounce container frozen whipped topping, thawed
    • 20 vanilla wafer cookies, coarsely chopped

    Instructions

    1. Prepare cake mix and bake as a 9x13" cake, following the instructions on the box. Cool for about 10 minutes. Take a fork and poke holes all over the cake.
    2. Prepare pudding mix according to the package instructions. Let cool slightly if you had to boil it. Pour over the cake.
    3. Refrigerate until cool. Spread the frozen whipped topping over the top and sprinkle with the cookies.
    4. Refrigerate until ready to serve.

    Recommended Products

    As an Amazon Associate and member of other affiliate programs, I earn from qualifying purchases.

    • Banana Cream Pie Pudding Mix
      Banana Cream Pie Pudding Mix
    • 9x13-inch pan
      9x13-inch pan

    Nutrition Information:

    Yield:

    15

    Serving Size:

    1

    Amount Per Serving: Calories: 211Total Fat: 6gSaturated Fat: 4gTrans Fat: 0gUnsaturated Fat: 1gCholesterol: 0mgSodium: 291mgCarbohydrates: 37gFiber: 1gSugar: 21gProtein: 2g

    Did you make this recipe?

    Tag me in your Instagram photo - @fakeginger

    © Amanda Livesay
    Category: cake

    Pasta with Sausage, Artichokes, and Sun-Dried Tomatoes

    Apr 20, 2015

    Quick but delicious dinner idea! Pasta with Sausage, Artichokes, and Sun-dried Tomatoes in a delicious Parmesan cheese sauce.

    Pasta with Sausage, Artichokes, and Sun-Dried Tomatoes - a light pasta recipe that won't weigh you down.

    Happy Monday!

    I hope you had a fantastic weekend! Mine was spent mostly complaining about how I stayed up until midnight (I do anyway, let’s be real) on Saturday to get some #LillyforTarget stuffs and BEFORE IT WAS EVEN OFFICIALLY LIVE, it was all sold out.

    Y’all. I had the dress I wanted in my cart and by the time I entered my card info, it was gone. 

    The worst.

    I got very little unpacking done because I was also busy watching all the shows I missed while hotel living. I am so into Younger. So good. 

    Also, unpacking is annoying. 

    You know how when you pack your own house, you fill a single box with all your blankets? And then you put all your dishes in a box and label it “kitchen”? And all your bathroom stuff goes in one box?

    I think when we weren’t looking, our movers sprinted through the house, grabbing an item from each room, and then pulled a room out of a hat to label it. 

    I found my bathroom scale in a box labeled toys, my favorite boots in a box labeled dog pillows (I mean, what is a dog pillow?!), and I still can’t find the part of my favorite lamp that holds the lampshade.

    Why did they take apart a lamp and put all the pieces in different boxes, you ask?

    Who knows.

    Anyway, we did have this pasta over the weekend and it was absolutely delicious. It’s got three of my favorite foods: sausage, artichokes, and Parmesan! Plus pasta and sun-dried tomatoes and even some fresh basil mixed in. 

    This is my idea of a good summer pasta since it’s light but still comforting. 

    Pasta with Sausage, Artichokes, and Sun-Dried Tomatoes - a light pasta recipe that won't weigh you down.

    Make sure you subscribe to my email list to get all my new recipes delivered right to your inbox!

    You can also follow me on Instagram, Facebook, or Pinterest for even more! 

    📖 Recipe

    Yield: 6 - 8 servings

    Pasta with Sausage, Artichokes, and Sun-Dried Tomatoes

    Pasta with Sausage, Artichokes, and Sun-Dried Tomatoes

    Quick but delicious dinner idea! Pasta with Sausage, Artichokes, and Sun-dried Tomatoes in a delicious Parmesan cheese sauce.

    Cook Time 30 minutes
    Total Time 30 minutes

    Ingredients

    • ¾ cup drained oil-packed sun-dried tomatoes, sliced, plus 2 tablespoons of oil
    • 1 pound Italian hot sausages, casings removed
    • 1 15-ounce can artichoke hearts, drained
    • 2 large cloves garlic, minced
    • 1 ¾ cups chicken broth
    • ½ cup dry white wine
    • 16 ounces small pasta
    • ½ cup shredded Parmesan, plus additional for garnish
    • ⅓ cup chopped fresh basil leaves
    • ¼ cup chopped fresh Italian parsley leaves
    • Salt and freshly ground pepper

    Instructions

    1. Heat the oil reserved from the tomatoes in a heavy pan over medium-high heat.
    2. Add the sausages and cook until no pink remains, breaking it up with a wooden spoon as it cooks. Drain sausage and transfer it to a bowl; set aside.
    3. Add the artichokes and garlic to the same pan, and cook over medium heat until the garlic is fragrant, about 30 seconds. Add the broth, wine, and sun-dried tomatoes. Bring to a boil and allow cook until it thickens slightly, about 8 minutes.
    4. Meanwhile, cook the pasta according to package instructions. Drain the pasta (do not rinse). Add the pasta, sausage, ½ cup Parmesan, basil, and parsley to the artichoke mixture. Toss until the sauce is almost absorbed by the pasta. Season, to taste, with salt and pepper. Serve with more Parmesan on top.

    Recommended Products

    As an Amazon Associate and member of other affiliate programs, I earn from qualifying purchases.

    • Dutch Oven
      Dutch Oven

    Nutrition Information:

    Yield:

    8

    Serving Size:

    1

    Amount Per Serving: Calories: 383Total Fat: 23gSaturated Fat: 7gTrans Fat: 0gUnsaturated Fat: 13gCholesterol: 39mgSodium: 980mgCarbohydrates: 28gFiber: 5gSugar: 2gProtein: 15g

    Did you make this recipe?

    Tag me in your Instagram photo - @fakeginger

    © Amanda Livesay
    Cuisine: italian / Category: pasta


    Blueberry Lemon Sweet Rolls with Lemon Cream Cheese Glaze

    Apr 07, 2015

    Blueberry Lemon Sweet Rolls are delicious sweet rolls filled with lemon zest and blueberries and topped with a lemon cream cheese glaze! The perfect weekend breakfast. 

    Blueberry Lemon Sweet Rolls - delicious sweet rolls filled with lemon zest and blueberries and topped with a lemon cream cheese glaze!

    We’ve spent a full week in the hotel now. You know how these things start out super fun and then by day 5 you really feel like you’ve lost your mind? That happened.

    If I channeled my inner Bridget Jones and wrote about each day, diary-style, it’d look a little something like this:

    Day 1: THIS IS SO MUCH FUN! ADVENTURES! EXCITEMENT!

    Day 2: Still fun! Free breakfast! Free Nutrigrain bars!

    Day 3: A queen bed is definitely not big enough for 3 people and a Clementine.

    Day 4: Penelope pooped for the first time since we moved into the hotel. Hooray! Husband still not cleared to leave. FML.

    Day 5: Shattered my iPhone screen. FML.

    Day 6: Almost went to jail after dog park incident. FML.

    Today’s day 7. I think we’re leaving this morning. Maybe.

    I never thought I’d be excited to leave Colorado.

    Anyway, it hasn’t all been bad. The weather’s been amazing! The hotel on Fort Carson has playgrounds so the kids have been entertained besides that one day when it randomly snowed.

    Also, how did anyone travel before WiFi?

    I would have never survived. I think about the days when my parents had a legit map in the car when we went on vacay… like, my nightmare.

    So like I said, if my husband is finally cleared to leave, we’re making the drive to Texas today and we’re gonna hustle so we can get there in time to grab In-n-Out for dinner.

    You better believe that In-n-Out is the most exciting thing about moving to Texas! I’m gonna be there every day.

    Blueberry Lemon Sweet Rolls - delicious sweet rolls filled with lemon zest and blueberries and topped with a lemon cream cheese glaze!

    How to Make Blueberry Lemon Sweet Rolls!

    I made these Blueberry Lemon Sweet Rolls with Lemon Cream Cheese Glaze a few weeks back and meant to have them posted before Easter so you could make them for your family but man, hotel life.

    These are so good though! 

    They start with a yeast dough, very similar to a cinnamon roll dough. You have to let the dough rise for about an hour, or until it’s doubled in size. Then you roll it out just like you would do with cinnamon rolls. 

    Once the dough is rolled, it gets spread with butter and then dusted with sugar and lemon zest. And then blueberries go in! Roll it up and slice them into rolls and then you have to let them rise one more time. 

    Bake them until they are golden and beautiful and then frost them with an amazing cream cheese glaze with fresh lemon juice and lemon zest mixed in. 

    These are so good and perfect for a day when you have a little bit longer to prepare breakfast. Or just make them for dessert! 

    Blueberry Lemon Sweet Rolls - delicious sweet rolls filled with lemon zest and blueberries and topped with a lemon cream cheese glaze!

    More Blueberry Breakfast Recipes

    • Blueberry Sour Cream Pancakes 
    • Glazed Blueberry Biscuits 
    • Blueberry Overnight Oats
    • Blueberry Lemon Bread


    📖 Recipe

    Yield: 12 rolls

    Blueberry Lemon Sweet Rolls with Lemon Cream Cheese Glaze

    Blueberry Lemon Sweet Rolls with Lemon Cream Cheese Glaze

    Blueberry Lemon Sweet Rolls are delicious sweet rolls filled with lemon zest and blueberries and topped with a lemon cream cheese glaze! The perfect weekend breakfast. 

    Prep Time 30 minutes
    Cook Time 20 minutes
    Additional Time 1 hour 30 minutes
    Total Time 2 hours 20 minutes

    Ingredients

    For the dough:

    • 2 cups milk, warmed to about 100F
    • ½ cup sugar
    • ½ cup canola oil
    • 1 .25 ounce package active-dry yeast
    • 4 cups flour, plus more for dusting
    • 1 teaspoon salt

    For the filling:

    • ¼ cup ½ stick butter, softened
    • ⅓ cup sugar
    • 1 lemon, zested
    • 1 cup, fresh or frozen blueberries

    For the glaze:

    • 4 ounces cream cheese, softened
    • juice of 1 lemon
    • 1 cup powdered sugar
    • 1 lemon, zested

    Instructions

    1. In the bowl of a stand mixer fitted with a paddle attachment, combine milk, sugar, canola oil, and yeast. Let sit until bubbly, about 5 minutes. Add flour slowly and beat until combined. Switch to dough hook and knead for about 5 minutes until the dough is smooth and stretchy.
    2. Spray a large bowl with oil and transfer the dough into it, turning to coat. Cover with a towel and allow to rise until doubled, about an hour.
    3. Transfer dough to a lightly floured surface and roll into a 10x15" rectangle. Spread softened butter over top. Sprinkle sugar and lemon zest over the butter and top with the blueberries. Roll it up jelly roll style, pinching to seal. Slice into 12 rolls and place in a greased 9x13" pan. Cover and let rise until doubled, about 30 minutes.
    4. Preheat oven to 375F. Bake rolls for 15 to 20 minutes or until golden brown and cooked through.
    5. While they are baking, beat together the softened cream cheese, lemon juice, powdered sugar, and lemon zest until smooth.
    6. Once the rolls come out of the oven, spread the glaze over top.

    Recommended Products

    As an Amazon Associate and member of other affiliate programs, I earn from qualifying purchases.

    • My Favorite Yeast
      My Favorite Yeast
    • 9x13-inch pan
      9x13-inch pan
    • Stand Mixer
      Stand Mixer

    Nutrition Information:

    Yield:

    12

    Serving Size:

    1

    Amount Per Serving: Calories: 426Total Fat: 18gSaturated Fat: 6gTrans Fat: 0gUnsaturated Fat: 11gCholesterol: 23mgSodium: 260mgCarbohydrates: 61gFiber: 2gSugar: 24gProtein: 8g

    Did you make this recipe?

    Tag me in your Instagram photo - @fakeginger

    © Amanda Livesay
    Cuisine: American / Category: breakfast

    Carrot Cake with Buttermilk Glaze

    Apr 06, 2015

    Carrot Cake with Buttermilk Glaze – delicious carrot cake with pineapple, coconut, and nuts! It’s drizzled with a buttermilk glaze and topped with cream cheese frosting! 

    If you love carrot cake as much as I do, try Carrot Cake Whoopie Pies, Carrot Cake Pancakes, and Carrot Cake Roll!

    Carrot Cake with Buttermilk Glaze - delicious carrot cake with pineapple, coconut, and nuts! It's drizzled with a buttermilk glaze and topped with cream cheese frosting!

    I promise there’s a reason this looks like the biggest hot mess of a carrot cake ever.

    And that reason is because it’s the world’s best carrot cake.

    You’ve got your typical carrot cake recipe with lots of carrots, coconut, pineapple, nuts and then when you pull it out of the oven, you drizzle a buttermilk glaze over it and it all seeps in and makes the cake extra delicious.

    And then after it cools you cover it in cream cheese frosting which makes it extra, extra delicious.

    Like I said, best carrot cake ever.

    Carrot Cake with Buttermilk Glaze - delicious carrot cake with pineapple, coconut, and nuts! It's drizzled with a buttermilk glaze and topped with cream cheese frosting! 

    Ingredients

    • All-purpose flour
    • Baking soda
    • Salt
    • Ground cinnamon
    • Eggs
    • Brown sugar
    • Vegetable oil
    • Buttermilk – this makes the cake so moist and will also go in the glaze.
    • Vanilla
    • Grated carrot
    • Crushed pineapple
    • Sweetened flaked coconut
    • Pecans
    • Powdered sugar
    • Butter
    • Light corn syrup
    • Cream cheese
    • Milk

    Instructions

    • Dry ingredients. Whisk together flour, baking soda, salt, and cinnamon.
    • Wet ingredients. Beat together eggs, brown sugar, vegetable oil, buttermilk, and vanilla.
    • Combine. Add dry ingredients to wet ingredients and beat until combined.
    • Add-ins. Fold in grated carrot, crushed pineapple, coconut, and pecans.
    • Transfer. Pour into prepared pans.
    • Bake. Bake at 350F for 25 to 30 minutes.
    • Make glaze. Bring powdered sugar, baking. soda, buttermilk, and butter to a boil. Boil for 4 minutes. Remove from heat and add vanilla.
    • Glaze. Pour over cakes.
    • Cream cheese frosting. Beat together butter, cream cheese, powdered sugar, vanilla, and milk until smooth.
    • Assemble. Spread frosting on one cake layer. Top with another cake; repeat.

    How Long Is It Good For?

    Carrot cake is good for about 5 days in the fridge. Make sure to store it in an airtight cake container to keep it fresh for as long as possible.

    I recommend letting the cake sit at room temperature for 15 minutes or so before serving so the cake can soften up a bit.

    Can You Freeze It?

    You can freeze this carrot cake for up to 3 months. I recommend freezing the cake unfrosted – wrap it tightly in plastic wrap and then transfer to a freezer ziploc bag.

    If you need to freeze the already frosted cake, I would slice into individual slices and then freeze them on a baking sheet (leaving plenty of space so they don’t stick together). After an hour or so, the frosting will be freezer and you can wrap them tightly in plastic wrap and then transfer to a freezer ziploc bag.

    More Layer Cake Recipes

    • Lemon Poppy Seed Cake with Raspberry Curd
    • German Chocolate Cake
    • Chocolate Cream Filled Cake

    Make sure you subscribe to my email list to get all my new recipes delivered right to your inbox!

    You can also follow me on Instagram, Facebook, or Pinterest for even more! 

    📖 Recipe

    Yield: 24 servings

    Carrot Cake with Buttermilk Glaze

    Carrot Cake with Buttermilk Glaze

    Carrot Cake with Buttermilk Glaze - delicious carrot cake with pineapple, coconut, and nuts! It's drizzled with a buttermilk glaze and topped with cream cheese frosting! 

    Prep Time 30 minutes
    Cook Time 30 minutes
    Total Time 1 hour

    Ingredients

    For the cake:

    • 2 cups flour
    • 2 teaspoons baking soda
    • ½ teaspoon salt
    • 2 teaspoons ground cinnamon
    • 3 large eggs
    • 2 cups brown sugar
    • ¾ cup vegetable oil
    • ¾ cup buttermilk
    • 2 teaspoons vanilla
    • 2 cups grated carrot
    • 1 8-ounce can crushed pineapple, drained
    • 1 cup sweetened flaked coconut
    • 1 cup pecans, coarsely chopped

    For the buttermilk glaze:

    • 1 cup powdered sugar
    • 1 ½ teaspoons baking soda
    • ½ cup buttermilk
    • ½ cup 1 stick butter
    • 1 tablespoon light corn syrup
    • 1 teaspoon vanilla

    For the cream cheese frosting:

    • ½ cup 1 stick butter, softened
    • 1 8-ounce package cream cheese, softened
    • 3 cups sifted powdered sugar
    • 1 teaspoon vanilla
    • 1 - 2 tablespoons milk

    Instructions

    1. Line 3 (9-inch) round cakepans with wax paper; lightly grease and flour wax paper. Set pans aside.
    2. Whisk together flour, baking soda, salt, and cinnamon until no lumps remain.
    3. In a separate bowl, beat eggs, brown sugar, vegetable oil, buttermilk, and vanilla at medium speed with an electric mixer until smooth. Add flour mixture slowly, beating at low speed until combined. Fold in grated carrot, crushed pineapple, coconut, and pecans. Pour into prepared pans.
    4. Bake at 350F for 25 to 30 minutes or until a wooden pick inserted in center comes out clean.
    5. While the cakes are baking, make the buttermilk glaze by bringing the powdered sugar, baking soda, buttermilk, and butter to a boil over medium-high heat. Boil for 4 minutes, stirring often. Remove from heat and stir in vanilla. Pour over cakes when they are done baking and out of the oven.
    6. Let cool completely before frosting.
    7. To make the cream cheese frosting, beat all ingredients until no lumps remain.
    8. To frost the cake, gently remove layers from pans one at a time and place on your serving plate. Spread a generous amount of frosting on top of each layer. Repeat with remaining cake layers and frosting.

    Recommended Products

    As an Amazon Associate and member of other affiliate programs, I earn from qualifying purchases.

    • 9-inch Cake Pan
      9-inch Cake Pan
    • Icing Spatula
      Icing Spatula
    • Stand Mixer
      Stand Mixer

    Nutrition Information:

    Yield:

    24

    Serving Size:

    1

    Amount Per Serving: Calories: 410Total Fat: 23gSaturated Fat: 9gTrans Fat: 0gUnsaturated Fat: 12gCholesterol: 54mgSodium: 370mgCarbohydrates: 50gFiber: 2gSugar: 40gProtein: 4g

    Did you make this recipe?

    Tag me in your Instagram photo - @fakeginger

    © Amanda Livesay
    Category: cake

    Cinnamon Toast Crunch Cupcakes

    Mar 29, 2015

    Cinnamon Toast Crunch Cupcakes – fluffy and moist cinnamon cupcakes with Cinnamon Toast Crunch buttercream. The cereal is crushed up and used in the frosting! 

    Cinnamon Toast Crunch Cupcakes - fluffy and moist vanilla cupcakes with Cinnamon Toast Crunch buttercream! The cereal is crushed up and used in the frosting!

    Happy Sunday! Tomorrow my kids go back to school after 9 days off so we’re living it up with Cinnamon Toast Crunch Cupcakes! And probably a trip to the park to fly some kites that I found in the back of my closet while packing.

    My kids are total cereal connoisseurs so they were pretty impressed by these cupcakes. They were, however, more impressed with the Skylanders Skystones game that came in the box of Cinnamon Toast Crunch.

    Do you remember being a kid and being SO EXCITED when there was a toy in the box? I can remember standing in the cereal aisle and asking my mom for a specific kind just because it had a toy. And lucky me, I was an only child so I didn’t even have to fight anyone for the toy!

    …

    Read More

    Maple Pecan Salmon

    Mar 26, 2015

    Today is day 4 of Spring Break and I have slept past 7 am exactly zero days.

    What is wrong with me?!

    I did take 2 naps yesterday, though, which was pretty awesome. Also, it snowed yesterday and that is SO not okay. 

    Anyway, we’re continuing to clean out the freezer and things are getting desperate. I’ve finally made it through the mountains of salmon I had in there and now I’ve got a tiny mountain of tilapia to deal with.

    I will never eat fish again after this.

    Buuuut, I’ve finally figured out how I like salmon. I always thought I didn’t like it but it turns out that I just don’t like it hot. So I’ve been cooking it, letting it cool to room temp, an then loving it.

    This Maple Pecan Salmon is my current favorite way to have it. It’s really easy and the best thing about fish is how fast it cooks. This is ready in about 20  minutes! And, like I mentioned, I’ve been letting it cool and then I put it over spinach with some veggies and my beloved Newman’s Own Lite Honey Mustard Dressing – so good! 

    …

    Read More

    Hot Cross Buns

    Mar 25, 2015

    Hot Cross Buns are a classic Easter treat! Sweet yeast dough with cinnamon and raisins and icing on top.

    Hot Cross Buns - sweet yeast rolls with cinnamon and raisins and topped with icing. Traditional Easter treat.

    I think Easter’s my favorite holiday.

    And yes, I realize that I say that for literally every holiday but I’m serious this time. I think Easter’s my fave.

    I mean, Easter candy is most definitely the best candy. Plus you get to decorate with fun, bright colors and dye eggs. And you get to watch Hop as many times as you want and no one can judge you for it.

    That’s what the kids and I do. We watch it over and over and over again. It’s our fave.

    And finally, Easter food! I love the ham and the salads and, most important, the Hot Cross Buns!

    Hot Cross Buns - sweet yeast rolls with cinnamon and raisins and topped with icing. Traditional Easter treat.

    What Are Hot Cross Buns?

    Hot Cross Buns are a sweet yeasted bun filled with spices and dried fruit. And then they are decorated with an icing cross on top. They are typically made around the Easter holiday to symbolize the end of Lent.

    I like mine very simple with just cinnamon and raisins but some versions have currants or dried citrus. 

    Ingredients

    • Milk – warmed to about 100F to activate the yeast. Be careful not to make it too hot or it will kill the yeast.
    • Granulated sugar – this is going to initially be used to feed the yeast and get it activated and it is also going to sweeten the dough.
    • Active-dry yeast
    • Butter
    • Salt
    • Cinnamon
    • Eggs
    • Flour
    • Raisins – some hot cross buns will have currants or candied citrus but I like to keep them simple with just raisins.
    • Egg white – this is used for an egg wash. The tops of the rolls get brushed with the egg wash so that they end up with a shiny top.
    • Powdered sugar – this is for the icing. Make sure it’s powdered and not granulated so you get a really smooth icing consistency.
    • Milk – just a couple tablespoons to get the icing consistency correct. You want to be able to pipe it into the cross shapes.

    How To Make Hot Cross Buns

    • Let yeast bubble in a warm milk and sugar mixture
    • Add in butter, salt, cinnamon and eggs
    • Knead until the dough comes together and becomes smooth
    • Add in raisins and knead until raisins are incorporated
    • Let dough rise until doubled, for about an hour
    • Divide dough into 20 even pieces and roll into balls
    • Let rise until doubled, about another hour
    • Brush with egg wash
    • Bake for about 20 minutes, until tops are browned 
    • Once cool, decorate with icing made from powdered sugar and milk

    More Easter Recipes

    • Easter White Chocolate Covered Oreos
    • Easter Rice Krispies Nests with Nutella
    • Easter Trifle
    • Easter Popcorn
    • Easter Sugar Cookie Cups
    • Cadbury Egg Milkshakes

    Make sure you subscribe to my email list to get all my new recipes delivered right to your inbox!

    You can also follow me on Instagram, Facebook, or Pinterest for even more! 

    📖 Recipe

    Yield: 20 rolls

    Hot Cross Buns

    Hot Cross Buns

    Hot Cross Buns are a classic Easter treat! Sweet yeast rolls with cinnamon and raisins and icing on top.

    Prep Time 30 minutes
    Cook Time 20 minutes
    Additional Time 2 hours
    Total Time 2 hours 50 minutes

    Ingredients

    • 1 ¼ cups milk, warmed to 100F
    • ¾ cup granulated sugar
    • 4 teaspoons active-dry yeast
    • ¾ cup (1 ½ sticks) butter, melted
    • pinch of salt
    • ½ teaspoon cinnamon
    • 4 eggs, lightly beaten
    • 5 ½ cups flour
    • 1 ½ cups raisins
    • 1 egg white
    • 1 tablespoon water

    For the icing:

    • 2 cups powdered sugar
    • 1 – 2 tablespoons milk

    Instructions

    1. Put warmed milk, sugar, and yeast in the bowl of a stand mixer fitted with a paddle attachment. Let sit for about 5 minutes or until bubbly. If it doesn’t bubble, throw out the ingredients and start over.
    2. With the mixer on low, beat in butter, salt, cinnamon, and eggs. Add the flour slowly and beat until combined. Switch to the dough hook and knead until the dough comes together and becomes smooth. Add in raisins and knead until the raisins have been incorporated.
    3. Spray a large mixing bowl with oil and transfer the dough to the bowl. Turn to coat, cover, and let rise for about an hour or until doubled in size.
    4. Spray a large, rimmed baking sheet with oil.
    5. Turn the dough out onto a lightly floured surface. Divide into 2 and then divide each half into 10 even pieces. Roll each piece into a ball and place onto the baking sheet, leaving about ½” between each ball. Cover and let rise for about an hour or until doubled in size.
    6. Preheat oven to 375F.
    7. Whisk together the egg white and water and brush the mixture on top of the dough balls. Bake for about 20 minutes or until the tops are browned. Let cool completely before icing.
    8. To make the icing, whisk the powdered sugar and milk together until no lumps remain. Transfer to a ziptop bag and snip off one corner. Pipe crosses on each bun.

    Recommended Products

    As an Amazon Associate and member of other affiliate programs, I earn from qualifying purchases.

    • Active Dry Yeast
      Active Dry Yeast
    • 9x9-inch Square Pan
      9x9-inch Square Pan
    • Parchment Paper
      Parchment Paper

    Nutrition Information:

    Yield:

    20

    Serving Size:

    1

    Amount Per Serving: Calories: 316Total Fat: 9gSaturated Fat: 5gTrans Fat: 0gUnsaturated Fat: 3gCholesterol: 57mgSodium: 91mgCarbohydrates: 54gFiber: 2gSugar: 24gProtein: 6g

    Did you make this recipe?

    Tag me in your Instagram photo - @fakeginger

    © Amanda Livesay
    Cuisine: American / Category: breads

    Sesame Chicken

    Mar 24, 2015

    Sesame Chicken – your favorite Chinese takeout at home! Chicken in a sweet honey sesame sauce. Quick, easy, and uses simple ingredients!

    Love takeout fakeouts?! Try Sweet and Sour Pork and Honey Chicken!

    Sesame Chicken - your favorite Chinese takeout at home! Chicken in a sweet honey sesame sauce. Quick, easy, and uses simple ingredients!

    Sesame chicken is and will always be my favorite Chinese takeout dish. You don’t ever have to ask me what I want when we’re ordering takeout. Just assume it’s sesame chicken. 

    But obviously deep fried takeout chicken isn’t the best option all the time. I’ve made this recipe so many times when the sesame chicken craving hits. The chicken is just pan fried instead of battered and deep fried so you’re saving a ton of calories. And the sauce is just as delicious as any takeout!

    I also have a Sweet and Sour Chicken recipe that we love just as much as takeout sweet and sour chicken! 

    Sesame Chicken - your favorite Chinese takeout at home! Chicken in a sweet honey sesame sauce. Quick, easy, and uses simple ingredients!

    How To Make Sesame Chicken

    This is a really easy recipe with simple ingredients so it’s perfect for a weeknight dinner.

    • Cook cubed chicken in olive oil until fully cooked through
    • While chicken is cooking, whisk together honey, soy sauce, water, cornstarch, ginger, and red pepper flakes
    • Add sauce to chicken and cook until sauce thickens, about 10 minutes
    • Sprinkle with sesame seeds before serving

    How Long Is Sesame Chicken Good For?

    Sesame chicken will stay good in the refrigerator for 3 – 4 days. Make sure it’s covered tightly.

    Reheat it in the microwave or stovetop and if the sauce seems too thick, a splash of water or chicken broth will help to get it back to it’s originally consistency. 

    Can You Freeze Sesame Chicken?

    Yes, if you have extra that you won’t eat before it goes bad or just want to prep some meals in advance, you can definitely freeze Sesame Chicken! 

    I like to freeze it in a ziploc freezer bag (squeeze out as much air as possible) but any airtight container works. It will stay good in the freezer for up to 3 months. 

    Let it thaw in the refrigerator overnight before reheating and serving.

    Sesame Chicken - your favorite Chinese takeout at home! Chicken in a sweet honey sesame sauce. Quick, easy, and uses simple ingredients!

    More Chicken Recipes

    • Honey Mustard Chicken Wings
    • One Pot Lemon Chicken with Orzo
    • Chicken Thighs with Creamy Rosemary Mushrooms
    • Buffalo Chicken Tacos
    • Chicken Fajitas
    • Chicken and Wild Rice Soup

    Make sure you subscribe to my email list to get all my new recipes delivered right to your inbox!

    You can also follow me on Instagram, Facebook, or Pinterest for even more! 

    📖 Recipe

    Yield: 6 servings

    Sesame Chicken

    Sesame Chicken

    Prep Time 15 minutes
    Cook Time 20 minutes
    Total Time 35 minutes

    Ingredients

    • 1 tablespoon olive oil
    • 1 pound boneless chicken breasts, cut into chunks
    • ½ cup honey
    • ½ cup soy sauce
    • 1 cup water
    • 2 tablespoons corn starch
    • 1 teaspoon fresh grated ginger
    • ½ teaspoon red pepper flakes
    • 1 tablespoon sesame seeds, plus more for serving

    Instructions

    1. Heat olive oil over medium heat. Add chicken and cook chicken until cooked through.
    2. While the chicken is cooking, whisk together honey, soy sauce, water, corn starch, ginger, and red pepper flakes. Pour over the chicken and sprinkle in 1 tablespoon sesame seeds. Cook for about 10 minutes or until the sauce thickens and coats the chicken. Sprinkle with more sesame seeds before serving.

    Nutrition Information:

    Yield:

    6

    Serving Size:

    1

    Amount Per Serving: Calories: 260Total Fat: 6gSaturated Fat: 1gTrans Fat: 0gUnsaturated Fat: 4gCholesterol: 64mgSodium: 1226mgCarbohydrates: 27gFiber: 0gSugar: 23gProtein: 26g

    Did you make this recipe?

    Tag me in your Instagram photo - @fakeginger

    © Amanda Livesay

    Blood Orange Bellinis

    Mar 17, 2015

    Blood Orange Bellinis - the perfect brunch drink!

    Sooooo…

    I don’t know about you but my favorite thing about Easter is brunch. And my favorite thing about brunch is bellinis. 

    Last year I went to THE WORLD’S WORST EASTER EGG HUNT (not the actual name) where adults were pushing kids out of the way to get to eggs. My kids came home with 2 eggs. Between the 3 of them. 

    If you live on Fort Carson, avoid the egg hunt at all costs. I still have nightmares about it.

    I could’ve used a bellini or two that day.

    This year, we’ll be hotel living. Possibly in Texas, possibly in Colorado. What I know for sure is that I’ll definitely need bellinis. 

    And probably a few bags of white chocolate Cadbury Mini Eggs. 

    Anyway, I’m obviously still obsessed with blood oranges. I’m on my 3rd bag and I’ve yet to actually eat one. We’ve had lots of fresh juice, margaritas, and now bellinis. 

    These Blood Orange Bellinis are so yummy and so easy! All you need is the blood oranges and a bottle of Prosecco!

    …

    Read More

    Lemon Angel Food Cake with Strawberries and Mint

    Mar 12, 2015

    Lemon Angel Food Cake with Strawberries and Mint - light and fluffy cake with delicious strawberries on top!

    I have to tell you guys, I’m having a week. 

    This whole moving thing is waaaay more stressful than it needs to be. We’re 3 weeks out and STILL waiting for paperwork to be signed. We don’t have a date for the movers, I haven’t talked to the kids’ school, and my husband’s still going to work every day even though his leave was supposed to start on Monday. And to top it all off, the house that I really, really, really wanted to rent got snatched up by someone else since the rental company couldn’t hold it longer than 2 weeks. Gahhh, I only had to wait 4 or 5 more days before I could put down a deposit! 

    So now we have to find a new house. Or move on post. Which we don’t want to do. At all. 

    Stress does not describe what I’m feeling.

    Good news though! 

    I went to the eye doctor earlier this week and he said that I DEFINITELY need to be wearing glasses everyday. Which probably sounds like an “ugh” to most people but I have been actively trying to fail an eye exam since 1994. So this was good news to me. 

    Also, maybe I won’t have headaches anymore. 

    But I have to wait 3 weeks for the glasses to get here. And at that point, we may or may not be on our way to Texas. 

    I definitely had cake for dinner more than one night this week. But it’s angel food cake so it’s basically just egg whites and egg whites are a perfectly healthy dinner. Right?

    I’ve been working my way through all our herbs since we can’t really take them with us so I mixed some mint with the strawberries. I don’t really love biting into a mint leaf but I let the mixture hang out overnight in the fridge and the mint flavor really infused the strawberries. It was delicious!

    Lemon Angel Food Cake with Strawberries and Mint - light and fluffy cake with delicious strawberries on top!

    Make sure you subscribe to my email list to get all my new recipes delivered right to your inbox!

    You can also follow me on Instagram, Facebook, or Pinterest for even more! 

    📖 Recipe

    Yield: 12 servings

    Lemon Angel Food Cake with Strawberries and Mint

    Lemon Angel Food Cake with Strawberries and Mint

    angel food cake recipe from Martha Stewart

    Prep Time 20 minutes
    Cook Time 45 minutes
    Total Time 1 hour 5 minutes

    Ingredients

    For the cake:

    • 1 cup sifted cake flour
    • 1 ½ cups sugar
    • 12 large egg whites
    • 2 tablespoons finely grated lemon zest
    • 1 tablespoon plus 1 teaspoon fresh lemon juice
    • 1 teaspoon cream of tartar
    • 1 teaspoon pure vanilla extract
    • ¼ teaspoon salt

    For the strawberries:

    • 2 cups strawberries, quartered
    • 2 tablespoons sugar
    • 2 tablespoons chopped fresh mint
    • whipped cream, for serving

    Instructions

    To make the cake:

    1. Preheat oven to 325F.
    2. Sift flour and ½ cup sugar in a mixing bowl.
    3. In the bowl of a stand mixer fitted with a whisk, beat the egg whites on medium speed until frothy, about 1 minute. Add lemon zest and juice, cream of tartar, vanilla, and salt; continue beating until soft peaks form. Add the rest of the sugar with the mixer running.
    4. Increase speed to high and beat until firm peaks form. Sprinkle ⅓ of the flour mixture on the whites and fold to combine. Repeat with remaining flour mixture in 2 additions.
    5. Transfer batter to an angel food cake pan and run a knife through the center to remove bubbles. Bake until a tester inserted in the center comes out clean, about 45 minutes.
    6. Invert pan onto a wire rack and let cool completely. Run a knife around the sides and middle of the pan. Remove to a serving platter.

    To prepare the strawberries:

    1. Put all ingredients in a bowl and stir to combine. Cover and chill at least 2 hours before serving so that the strawberries release some juice.

    To assemble:

    1. Place a slice of angel food cake on a plate and spoon strawberries over top. Drizzle a little strawberry juice over top and finish with a big spoonful of whipped cream.

    Recommended Products

    As an Amazon Associate and member of other affiliate programs, I earn from qualifying purchases.

    • Electric Mixer
      Electric Mixer
    • Bundt Pan
      Bundt Pan

    Nutrition Information:

    Yield:

    12

    Serving Size:

    1

    Amount Per Serving: Calories: 176Total Fat: 0gSaturated Fat: 0gTrans Fat: 0gUnsaturated Fat: 0gCholesterol: 0mgSodium: 100mgCarbohydrates: 39gFiber: 1gSugar: 29gProtein: 5g

    Did you make this recipe?

    Tag me in your Instagram photo - @fakeginger

    © Amanda Livesay
    Lemon Angel Food Cake with Strawberries and Mint - light and fluffy cake with delicious strawberries on top!

    Peanut Butter Pupcakes

    Mar 10, 2015

    Your pup deserves a treat! Peanut Butter Pupcakes are dog-friendly peanut butter carrot cupcakes with a peanut butter frosting and a bone on top!

    Peanut Butter Pupcakes - your pup deserves a treat! Dog-friendly peanut butter carrot cupcakes with a peanut butter frosting and a bone on top!

    In case you didn’t know, I’m kind of a crazy dog lady.

    I mean, maybe.

    Just a little.

    Sometimes I look at my Instagram and think, “Omg, I’ve got to post some food or some mountains or SOMETHING before all my people unfollow me because of all the dog photos!”

    It’s bad.

    But anyway, Clementine turned 4 on Sunday which is CRAZY to me. How has 4 years passed already?!

    We got her right after we moved to Colorado – I made my husband drive up to Black Forest to put a deposit on her before we even had a house! And I’d had her name picked out for literally years.

    So for her birthday I made her some Peanut Butter Pupcakes because what pup doesn’t like homemade, dog-friendly cake for their birthday?

    Peanut Butter Pupcakes - your pup deserves a treat! Dog-friendly peanut butter carrot cupcakes with a peanut butter frosting and a bone on top!

    Ingredients To Make Pupcakes

    • Flour – you can use all-purpose or whole wheat flour.
    • Baking soda
    • Creamy peanut butter – make sure you use one that doesn’t include sugar or zylitol. I try to use on that only has peanuts as the ingredients.
    • Vegetable oil – you can also use coconut oil.
    • Carrots – carrots are good for dogs in many ways.
    • Honey – just to add a little sweetness.
    • Egg
    • Cream cheese – this is for the frosting.
    • Small dog bones – use whatever kind of dog treats you like, I think the dog bones look the cutest.

    Instructions

    • Make batter. Whisk together flour and baking soda; set aside. In a separate bowl, beat peanut butter and vegetable oil with an electric mixer until smooth. Add carrots, honey, and egg; beat until combined. Add flour mixture and beat until just combined. Divide the batter into 6 muffin cups lined with paper liners.
    • Bake pupcakes. Bake for 22 – 25 minutes. Cool completely before frosting.
    • Make frosting. Beat cream cheese and peanut butter until smooth. Top the pupcakes with a large mound of frosting. Decorate with dog bones.

    What Kind of Peanut Butter Can Dogs Have?

    Peanut butter is a great source of healthy fat and protein for your dog (not to mention a treat that all dogs love!) but you do have to look out for one ingredient. 

    Don’t buy peanut butter that has xylitol anywhere in the ingredient list! It is used as a sweetener in some peanut butters but you definitely want to avoid if it you’re sharing with your dog. It could really do a lot of harm to your pup.

    I tend to just play it safe and only buy peanut butter that is made with just peanuts (meaning peanuts is the only ingredient in the ingredients list). I figure it’s best for the humans and dogs in my house. 

    Peanut Butter Pupcakes - your pup deserves a treat! Dog-friendly peanut butter carrot cupcakes with a peanut butter frosting and a bone on top!

    How Long Are Pupcakes Good For?

    These pupcakes are good for up to 4 days if stored in an airtight container. I love muffin tins that come with an airtight lid because you can bake the pupcakes in it, let them cool, and then pop the lid on.

    Can You Freeze Pupcakes?

    You can freeze pupcakes for up to 3 months. I would freeze just the pupcakes without the frosting though, as cream cheese sometimes changes it’s texture once frozen and defrosted.

    Wrap them tightly in plastic wrap and then put them in a freezer ziploc bag, making sure to squeeze out as much air as possible.

    To defrost, just let them sit at room temperature overnight.

    More Homemade Dog Treats Recipes

    • Pumpkin Peanut Butter Dog Ice Cream 
    • Homemade Chicken Jerky for Dogs 
    • Homemade Dog Breath Fresheners 
    • Pumpkin Peanut Butter Dog Treats
    • Carrot, Peanut Butter, and Oats Dog Treats

    Make sure you subscribe to my email list to get all my new recipes delivered right to your inbox!

    You can also follow me on Instagram, Facebook, or Pinterest for even more! 

    📖 Recipe

    Yield: 6 pupcakes

    Peanut Butter Pupcakes

    Peanut Butter Pupcakes

    Peanut Butter Pupcakes - your pup deserves a treat! Dog-friendly peanut butter carrot cupcakes with a peanut butter frosting and a bone on top!

    Prep Time 20 minutes
    Cook Time 25 minutes
    Total Time 45 minutes

    Ingredients

    • 1 cup flour
    • 1 teaspoon baking soda
    • ¼ cup creamy peanut butter
    • ¼ cup vegetable oil
    • 1 cup shredded carrots
    • ⅓ cup honey
    • 1 egg

    For the frosting:

    • 4 ounces cream cheese, softened
    • ½ cup peanut butter
    • 6 small dog bones

    Instructions

    1. Preheat oven to 350F. Line 6 muffin cups with paper liners.
    2. In a mixing bowl, whisk together flour and baking soda until no clumps remain. Set aside.
    3. In a separate bowl, beat peanut butter and vegetable oil with an electric mixer until smooth. Add in carrots, honey, and the egg and beat. Add flour mixture and beat until just combined. Divide the batter into the 6 prepared muffin cups.
    4. Bake for 22 - 25 minutes or until a toothpick inserted into the center comes out clean. Cool completely on a wire rack before frosting.

    To make the frosting:

    1. Beat the cream cheese and peanut butter until smooth. Top the cupcakes with a generous mound of frosting. Decorate with dog bones.

    Recommended Products

    As an Amazon Associate and member of other affiliate programs, I earn from qualifying purchases.

    • Parchment Muffin Liners
      Parchment Muffin Liners
    • Wire Rack
      Wire Rack
    • Dog Bones for Garnish
      Dog Bones for Garnish
    • My Favorite Muffin Tin
      My Favorite Muffin Tin

    Nutrition Information:

    Yield:

    6

    Serving Size:

    1

    Amount Per Serving: Calories: 488Total Fat: 33gSaturated Fat: 8gTrans Fat: 0gUnsaturated Fat: 21gCholesterol: 50mgSodium: 448mgCarbohydrates: 42gFiber: 3gSugar: 19gProtein: 12g

    Did you make this recipe?

    Tag me in your Instagram photo - @fakeginger

    © Amanda Livesay
    Cuisine: American / Category: dog-friendly

    Cranberry Orange Scones

    Mar 05, 2015

    Cranberry Orange Scones are even better than your favorite coffee shop! Buttery scones full of orange zest and dried cranberries.

    Cranberry Orange Scones are even better than your favorite coffee shop! Buttery scones full of orange zest and dried cranberries.

    Prepare yourselves, I have a major complaint about the world.

    Okay, so, I bought a car two days ago and spent hours filling out forms. Yesterday I spent a good portion of my day filling out rental applications for the move.

    And here’s my complaint: it’s 2015. Why am I still filling out all these paper forms?

    WHY?!

    I did the online application so I could avoid printing and faxing. Why did I then have to go and fill out the same stuff on a piece of paper?! 

    I run my entire business online. I sign contracts, I fill out tax forms, I do it all online. If you need me to print something and sign it, it’ll take weeks. Weeks. Because I don’t own a printer. And if you need me to fax something… it probably won’t happen. Ever. Is that even a thing? Like, do they still sell fax machines? Why do you even have a fax number? 

    Get an email address.

    I’ll print the form (it may take awhile) and then email it to you. It works, I promise.

    Guys, I’ve been living on the internet since I built my first Geocities site in 1996. Complete with lava lamp clip art. I really thought that by this time in my life, I’d literally be able to do everything online.  

    Sometime between printing all 12 pages of the rental applications and sending them off, I made some scones. Because buttery pastry is the only thing that soothes my soul when I’m aggravated that the world won’t just do what I want it to do. 

    #onlychildproblems

    When I was in the Los Angeles airport last week, the only food places close to my gate were a Carl’s Jr and a coffee place so for lunch I had french fries and a cranberry scone. And it was the worst cranberry orange scone ever. I’ve been wanting a good one ever since and finally made a batch. They’re so good – especially if you warm them up and smear a decent amount of butter on them. Mmm! 

    Cranberry Orange Scones - even better than your favorite coffee shop! Buttery scones full of orange zest and dried cranberries.

    Ingredients

    • Flour
    • Sugar – sugar is going in the scone dough and getting sprinkled on top.
    • Baking Powder – this is the leavener in these scones which makes them rise up.
    • Salt
    • Orange Zest – use a microplane to remove the orange part of the orange rind.
    • Butter – make sure it’s very cold. You want pockets of butter in the finished scones.
    • Eggs – these are going in the dough and you’ll be making an egg wash to brush over the scones so they brown nicely.
    • Heavy cream – make sure it’s very cold when you add it to the dough.
    • Dried cranberries – I suggest the ones without added sugar for this recipe. The tart cranberries are a really nice contrast to the sweet, buttery dough.
    Cranberry Orange Scones - even better than your favorite coffee shop! Buttery scones full of orange zest and dried cranberries.

    How To Make Cranberry Orange Scones

    • Mix dry ingredients. Stir together flour, sugar, baking powder, salt and orange zest.
    • Add butter. Add the cold butter and mix at the lowest speed until the butter is the size of peas.
    • Add wet ingredients. Add eggs and heavy cream to the dry ingredients.
    • Add cranberries. Combine the dried cranberries and ¼ cup of flour, add to the dough.
    • Roll dough out. Move the dough onto a well-floured surface. Roll the dough about ¾-inch thick. Cut pieces of dough.
    • Add egg wash. Brush the tops of the scones with egg wash, sprinkle with sugar.
    • Bake. Bake at 400 for 20 to 25 minutes.

    How Long Are They Good For?

    Scones are good for 2 – 3 days. Make sure to store them in an airtight container at room temperature.

    📖 Recipe

    Yield: 14 scones

    Cranberry Orange Scones

    Cranberry Orange Scones

    Prep Time 20 minutes
    Cook Time 25 minutes
    Total Time 45 minutes

    Ingredients

    • 4 cups plus ¼ cup flour
    • ¼ cup sugar, plus additional for sprinkling
    • 2 tablespoons baking powder
    • 2 teaspoons salt
    • 1 tablespoon grated orange zest
    • ¾ pound cold unsalted butter, diced
    • 4 eggs, lightly beaten
    • 1 cup cold heavy cream
    • 1 cup dried cranberries
    • 1 egg beaten with 2 tablespoons water or milk, for egg wash

    Instructions

    1. Preheat the oven to 400F. Line a baking sheet with parchment paper.
    2. In the bowl of an electric mixer fitted with a paddle attachment, mix 4 cups of flour, ¼ cup sugar, the baking powder, salt and orange zest. Add the cold butter and mix at the lowest speed until the butter is the size of peas. Combine the eggs and heavy cream and, with the mixer on low speed, slowly pour into the flour and butter mixture. Mix until just blended. Combine the dried cranberries and ¼ cup of flour, add to the dough, and mix on low speed until blended.
    3. Move the dough onto a well-floured surface and knead it into a ball. Flour your hands and a rolling pin and roll the dough about ¾-inch thick. Flour a 3-inch cookie cutter and cut pieces of dough. Place the scones on the prepared pan. Collect the scraps neatly, roll them out, and cut more circles.
    4. Brush the tops of the scones with egg wash, sprinkle with raw sugar, and bake for 20 to 25 minutes, until the tops are browned and the insides are fully baked.

    Recommended Products

    As an Amazon Associate and member of other affiliate programs, I earn from qualifying purchases.

    • Biscuit Cutters
      Biscuit Cutters
    • Parchment Paper
      Parchment Paper
    • Pastry Blender
      Pastry Blender

    Nutrition Information:

    Yield:

    14

    Serving Size:

    1

    Amount Per Serving: Calories: 330Total Fat: 28gSaturated Fat: 17gTrans Fat: 0gUnsaturated Fat: 10gCholesterol: 153mgSodium: 559mgCarbohydrates: 17gFiber: 1gSugar: 12gProtein: 4g

    Did you make this recipe?

    Tag me in your Instagram photo - @fakeginger

    © Amanda Livesay
    Cuisine: Scottish / Category: breakfast

    Crockpot Spicy Italian Drip Beef Sandwiches

    Feb 26, 2015

    Crockpot Spicy Italian Drip Beef Sandwiches have shredded roast beef that was cooked all day in spicy broth, provolone cheese, and peppers on a toasted roll. Serve the extra broth for dipping!

    Crockpot Spicy Italian Drip Beef Sandwiches
    Crockpot Spicy Italian Drip Beef Sandwiches

    More Crockpot Beef Recipes

    • Crockpot Cheeseburgers
    • Slow Cooker Beef and Barley Stew
    • Slow Cooker Steak Bites
    • Slow Cooker Beef Burgundy Stew

    Make sure you subscribe to my email list to get all my new recipes delivered right to your inbox!

    You can also follow me on Instagram, Facebook, or Pinterest for even more! 

    Crockpot Spicy Italian Drip Beef Sandwiches

    📖 Recipe

    Yield: about 6 servings

    Crockpot Spicy Italian Drip Beef Sandwiches

    Crockpot Spicy Italian Drip Beef Sandwiches

    Crockpot Spicy Italian Drip Beef Sandwiches have shredded roast beef that was cooked all day in spicy broth, provolone cheese, and peppers on a toasted roll. Serve the extra broth for dipping!

    Prep Time 10 minutes
    Cook Time 8 hours
    Total Time 8 hours 10 minutes

    Ingredients

    • 1 tablespoon olive oil
    • 2 ½ pound chuck roast
    • salt and pepper
    • 1 cup beef broth
    • 1 16 ounce jar Pepperoncinis, with juice
    • ½ 16 ounce jar Hot Cherry Peppers, drained
    • 1 cup crushed tomatoes
    • 6 rolls
    • 6 slices provolone cheese

    Instructions

    1. Heat olive oil over medium-high heat. Sprinkle salt and pepper on all sides of the chuck roast. Brown the chuck roast in the olive oil on all sides. Transfer to crockpot. Pour beef broth, Peperoncinis and juice, Hot Cherry Peppers, and crushed tomatoes on top of the roast. Cook on low for 8 hours.
    2. If you have time, refrigerate for at least a couple hours to allow the fat to harden at the surface. Scrape that off and trash it. (If you don't have time, get rid of the fat that you can and proceed.) Use two forks to shred the meat and return it to the cooking liquid. Heat on the stovetop until hot.
    3. To serve, put a pile of meat on bottom of a roll, top with provolone cheese, and the top of the roll. Serve with a small bowl of the cooking liquid to dip.

    Recommended Products

    As an Amazon Associate and member of other affiliate programs, I earn from qualifying purchases.

    • Programmable Slow Cooker
      Programmable Slow Cooker
    • Hot Cherry Peppers
      Hot Cherry Peppers

    Nutrition Information:

    Yield:

    6

    Serving Size:

    1

    Amount Per Serving: Calories: 705Total Fat: 41gSaturated Fat: 18gTrans Fat: 2gUnsaturated Fat: 20gCholesterol: 176mgSodium: 1721mgCarbohydrates: 28gFiber: 4gSugar: 11gProtein: 58g

    Did you make this recipe?

    Tag me in your Instagram photo - @fakeginger

    © Amanda Livesay
    Cuisine: italian / Category: slow cooker

    Tequila Sunrise Margaritas

    Feb 25, 2015

    Tequila Sunrise Margaritas are going to be your favorite summer drink! It’s an orange margarita with a drop of grenadine to create the sunrise effect.

    Tequila Sunrise Margarita

    If you love a pretty cocktail, you are going to love these Tequila Sunrise Margaritas! It’s basically an orange margarita (which is my favorite!) but right before you serve it, you drop a tiny bit of grenadine into the individual glasses. It sinks down to the bottom of the glass and creates that layered sunrise effect.

    I love this recipe for a summer party because it serves a crowd and you can mix everything together in a pitcher.

    Ingredients

    • Orange liqueur – such as Triple sec.
    • Tequila – use whatever tequila you prefer but I do recommend using a clear one.
    • Orange juice – fresh squeezed orange juice will taste the best but you can use the store-bought orange juice, too.
    • Lime juice – fresh squeezed lime juice is best but you can use the bottled juice in a pinch.
    • Simple syrup – this is a sugar syrup used to sweeten the margaritas. Adjust the amount based on your preferences.
    • Grenadine syrup – this is what creates the sunrise effect. It sinks down to the bottom and gives it a layered look.

    How To Make Tequila Sunrise Margaritas

    • Prep. Rum a lime wedge around the rim of your serving glasses and then dip into coarse salt. Fill each glass with ice.
    • Combine. In a pitcher, mix together orange liqueur, tequila, orange juice, lime juice, and simple syrup.
    • Serve. Pour into the prepared glasses. Add 2 drops of grenadine syrup into each glass and wait until the grenadine settles at the bottom before serving.

    Can You Make It Ahead?

    You can prep these margaritas ahead by combining everything but the grenadine in a pitcher, cover it, and store it in the fridge until you are ready to serve.

    Tequila Sunrise Margarita

    More Margaritas

    • Melon Margaritas
    • Frozen Prickly Pear Margaritas
    • Blue Margaritas
    • Blackberry Margaritas
    • Chocolate Margaritas

    Make sure you subscribe to my email list to get all my new recipes delivered right to your inbox!

    You can also follow me on Instagram, Facebook, or Pinterest for even more! 

    📖 Recipe

    Yield: about 15 servings

    Tequila Sunrise Margarita

    Tequila Sunrise Margarita

    Tequila Sunrise Margaritas are going to be your favorite summer drink! It's an orange margarita with a drop of grenadine to create the sunrise effect.

    Prep Time 10 minutes
    Total Time 10 minutes

    Ingredients

    • 3 cups orange liqueur
    • 2 cups tequila
    • 2 cups orange juice
    • 1 ½ cups freshly squeezed lime juice
    • ½ cup - 1 cup simple syrup
    • Grenadine syrup

    Instructions

    1. Rum a lime wedge around the rim of your serving glasses and then dip into coarse salt. Fill each glass with ice. Set aside.
    2. In a pitcher, mix together orange liqueur, tequila, lime juice, and sugar. Stir until sugar is completely dissolve. Stir in orange juice.
    3. Pour into the prepared glasses. Add 2 drops of grenadine syrup into each glass and wait until the grenadine settles at the bottom before serving.

    Recommended Products

    As an Amazon Associate and member of other affiliate programs, I earn from qualifying purchases.

    • Simple Syrup
      Simple Syrup
    • Cocktail Shaker
      Cocktail Shaker
    • Citrus Juicer
      Citrus Juicer

    Nutrition Information:

    Yield:

    15

    Serving Size:

    1

    Amount Per Serving: Calories: 245Total Fat: 0gSaturated Fat: 0gUnsaturated Fat: 0gSodium: 2mgCarbohydrates: 20gFiber: 0gSugar: 17gProtein: 0g

    Did you make this recipe?

    Tag me in your Instagram photo - @fakeginger

    © Amanda Livesay
    Cuisine: Mexican / Category: drink

    Corn and Chicken Chowder

    Feb 24, 2015

    Easy and delicious Corn and Chicken Chowder is the perfect dinner for a chilly day! Chicken, potatoes, corn, and bacon in a creamy soup with cheese and extra bacon on top!

    Corn and Chicken Chowder

    Can we talk about how it just keeps snowing here in Colorado?

    I didn’t really expect snow because last I’d heard, the weather guy was literally saying “Expect between 2 inches and 32 inches” which, you know, is kind of a broad range. And the jerk’s been known to lie about snow before.

    But anyway, it snowed a ton (somewhere between 2 and 32 inches – thanks weather guy!) so it was definitely a day for soup. This Corn and Chicken Chowder was the perfect way to warm up after playing in the snow.

    Corn and Chicken Chowder

    Ingredients

    • Bacon – the crispy bacon is going on top of the soup but you will use the rendered bacon fat to cook the green onions. It adds a delicious bacon flavor to the entire soup.
    • Green onions
    • Potatoes – use any kind of potatoes that you have on hand.
    • All-purpose flour
    • Whole milk
    • Chicken broth
    • Old Bay seasoning
    • Dried parsley
    • Cayenne pepper
    • Chicken
    • Canned corn
    • Canned cream corn
    • Cheddar cheese – this is for sprinkling on top of the finished soup.

    How To Make Chicken and Corn Chowder

    • Cook bacon. In a large pot, cook bacon until crisp. Remove with a slotted spoon, leaving the fat.
    • Cook vegetables. Put green onions and sliced potatoes in pot with bacon fat and cook until the green onions have softened, just a minute or two.
    • Combine. Sprinkle flour over top and stir for another minute. Pour in milk, chicken broth, Old Bay, parsley, and cayenne pepper.
    • Cook. Bring to a boil, stirring occasionally. Lower to a simmer and cook until potatoes have softened, about 15 minutes.
    • Add the rest. Add both cans of corn and the chicken, continue cooking until everything is heated through.
    • Serve. Serve with bacon, cheddar cheese, and green onions sprinkled on top.
    Corn and Chicken Chowder

    How Long Is It Good For?

    Chicken and corn chowder will be good for up to 3 days. Make sure to store it in an airtight container (I like these soup containers) in the fridge.

    You can reheat it in the microwave or on the stovetop.

    Can You Freeze It?

    You can freeze it for up to 3 months. Let it cool completely and then put it in an airtight container.

    When you are ready to enjoy it, let it defrost overnight and then reheat on the stove or in the microwave.

    More Soup Recipes

    • Broccoli Cheddar Soup
    • Dill Pickle Soup
    • Loaded Baked Potato and Cauliflower Soup
    • Creamy Tomato Tortellini Soup
    • Chicken Gnocchi Soup

    Make sure you subscribe to my email list to get all my new recipes delivered right to your inbox!

    You can also follow me on Instagram, Facebook, or Pinterest for even more! 

    📖 Recipe

    Yield: about 8 servings

    Corn and Chicken Chowder

    Corn and Chicken Chowder

    Easy and delicious Corn and Chicken Chowder is the perfect dinner for a chilly day! Chicken, potatoes, corn, and bacon in a creamy soup with cheese and extra bacon on top!

    Cook Time 30 minutes
    Total Time 30 minutes

    Ingredients

    • 6 slices bacon, chopped
    • 8 green onions, sliced
    • 3 medium potatoes, peeled and diced
    • 2 tablespoons all-purpose flour
    • 3 cups whole milk
    • 2 cups chicken broth
    • 2 teaspoons Old Bay seasoning
    • 1 teaspoon dried parsley flakes
    • ¼ teaspoon cayenne pepper
    • 2 cups cooked and shredded chicken
    • 1 (15-ounce) can corn
    • 1 (15-ounce) can creamed corn
    • Salt and pepper, to taste
    • 1 cup shredded cheddar, for serving

    Instructions

    1. In a large pot, cook bacon until crisp. Remove with a slotted spoon, leaving the fat. Save the bacon for serving!
    2. Put green onions and sliced potatoes in pot with bacon fat and cook until the green onions have softened, just a minute or two. Sprinkle flour over top and stir for another minute. Pour in milk, chicken broth, Old Bay, parsley, and cayenne pepper. Bring to a boil, stirring occasionally. Lower to a simmer and cook until potatoes have softened, about 15 minutes. Add both cans of corn and the chicken, continue cooking until everything is heated through.
    3. Serve immediately with bacon, cheddar cheese, and green onions sprinkled on top.

    Recommended Products

    As an Amazon Associate and member of other affiliate programs, I earn from qualifying purchases.

    • Rubber Spatulas
      Rubber Spatulas
    • Dutch Oven
      Dutch Oven
    • Slotted Spoon
      Slotted Spoon

    Nutrition Information:

    Yield:

    8

    Serving Size:

    1

    Amount Per Serving: Calories: 431Total Fat: 20gSaturated Fat: 9gUnsaturated Fat: 10gCholesterol: 91mgSodium: 1048mgCarbohydrates: 32gFiber: 3gSugar: 8gProtein: 31g

    Did you make this recipe?

    Tag me in your Instagram photo - @fakeginger

    © Amanda Livesay
    Cuisine: American / Category: soup
    « Previous Page
    Next Page »

    Primary Sidebar

    Amanda Livesay
    Hi, I'm Amanda! DFW food blogger, mom of boys, and crazy dog lady.
    Read more
    Privacy Policy
    Privacy Policy

    Footer

    ↑ back to top

    About

    • Privacy Policy
    • About Fake Ginger

    Newsletter

    • Sign Up for weekly emails featuring new recipes!

    As an Amazon Associate I earn from qualifying purchases.

    Copyright © 2024 FakeGinger.com