• Skip to primary navigation
  • Skip to main content
  • Skip to primary sidebar
  • Home
  • About
  • Recipes

Fake Ginger

menu icon
go to homepage
  • Recipe Index
  • About
  • Subscribe
    • Facebook
    • Instagram
    • Pinterest
  • subscribe
    search icon
    Homepage link
    • Recipe Index
    • About
    • Subscribe
    • Facebook
    • Instagram
    • Pinterest
  • ×
    Home » Page 35

    Homemade Spaghetti-Os

    Homemade Spaghetti-Os

    Jul 07, 2015

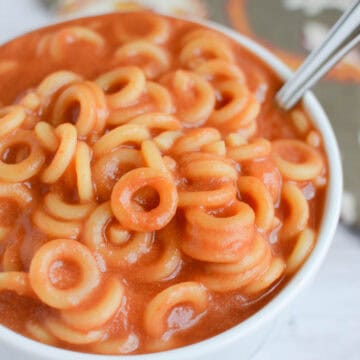
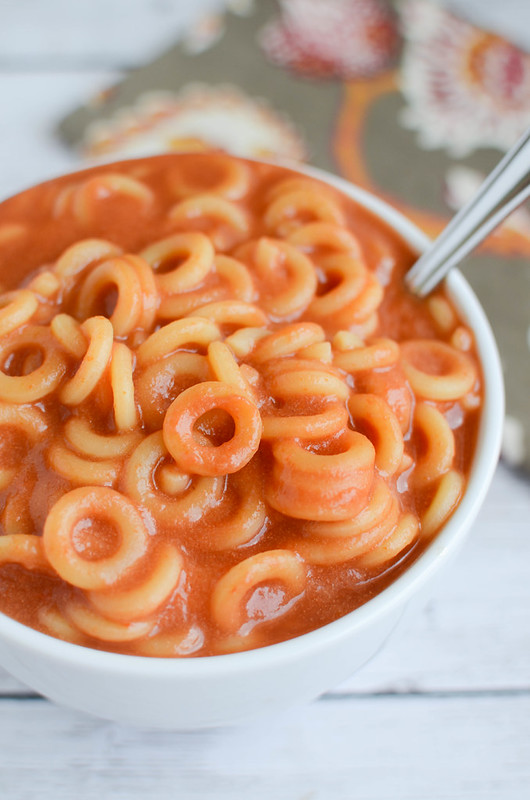
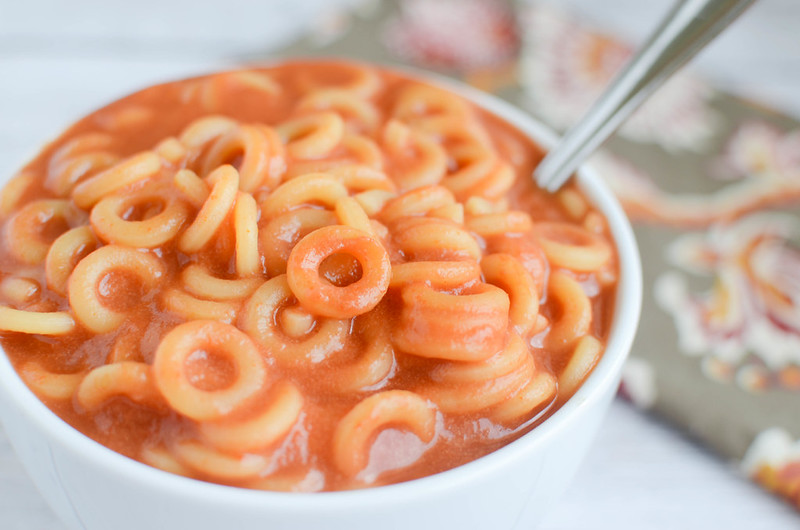
    Homemade Spaghetti-Os – a homemade version of the childhood favorite. Pasta in creamy, cheesy tomato sauce. Only 6 ingredients and so easy! 

    Homemade Spaghetti-Os - a homemade version of the childhood favorite. Pasta in creamy, cheesy tomato sauce. Only 6 ingredients and so easy!

    The problem with summer- I mean, besides the 3 year old creating giant mud puddles in the backyard and then rolling around in them in the 5 minutes it takes me to do dishes – is that my kids start asking for lunch at 9:30.

    Which is usually about an hour after they eat breakfast.

    The amount of food we’re currently going through is blowing my mind. I’ve been to the grocery store 5 times in the last week.

    So I’ve been trying to come up with easy lunch options that don’t include an entire loaf of bread and half a jar of peanut butter.

    They love canned pasta. You know, ravioli, spaghetti-os, macaroni and beef, stuff like that. Who can blame them? I’d eat that stuff if I could.

    But c’mon, I have 3 boys. If I split a can of spaghetti-os between the 3 of them, they’d laugh at me and ask where the rest is.

    I’ve made these Homemade Spaghetti-Os twice now and both times, we’ve got two lunches out of each batch.

    Homemade Spaghetti-Os - a homemade version of the childhood favorite. Pasta in creamy, cheesy tomato sauce. Only 6 ingredients and so easy!

    Ingredients

    • Tomato sauce
    • Milk
    • Cheddar cheese
    • Garlic Powder
    • Pasta rings – you can use any small pasta shape if you can’t find the rings

    How To Make Homemade Spaghetti-Os

    • Bring tomato sauce, water, and milk to a boil in a large stock pot
    • Add cheese and garlic powder
    • Lower to a simmer and stir until cheese has melted 
    • Pour in the pasta
    • Cook for 20 minutes on a low simmer, stirring occasionally to make sure pasta isn’t sticking, until pasta is al dente

    How Long Are Homemade Spaghetti-O’s Good For

    Spaghetti-Os will be good in the fridge for up to 3 – 4 days. Make sure to store them in an airtight container!

    You can reheat them in the microwave or on the stovetop.

    More Easy Pasta Recipes

    • One Pan Pizza Pasta 
    • Bacon Tortellini Bake
    • Pasta Fagioli
    • Chicken Parmesan Baked Pasta
    • Spicy Bacon Ranch Pasta
    • Spinach Artichoke Baked Pasta

    Make sure you subscribe to my email list to get all my new recipes delivered right to your inbox!

    You can also follow me on Instagram, Facebook, or Pinterest for even more! 

    📖 Recipe

    Yield: 6 servings

    Homemade Spaghetti-Os

    Homemade Spaghetti-Os

    Homemade Spaghetti-Os - a homemade version of the childhood favorite. Pasta in creamy, cheesy tomato sauce. Only 6 ingredients and so easy! 

    Prep Time 10 minutes
    Cook Time 20 minutes
    Total Time 30 minutes

    Ingredients

    • 1 (29 ounce) can tomato sauce
    • 3 cups water
    • 1 cup milk
    • 2 cups shredded cheddar cheese
    • 1 teaspoon garlic powder
    • 8 ounces small pasta

    Instructions

    1. Bring tomato sauce, water, and milk to boil in a large stock pot. Add cheese and garlic powder; lower to a simmer and stir until the cheese has melted.
    2. Pour in the pasta; cook for 20 minutes on a low simmer. Stir occasionally to make sure the pasta isn't sticking.

    Recommended Products

    As an Amazon Associate and member of other affiliate programs, I earn from qualifying purchases.

    • Pasta Rings
      Pasta Rings
    • Dutch Oven
      Dutch Oven

    Nutrition Information:

    Yield:

    6

    Serving Size:

    1

    Amount Per Serving: Calories: 270Total Fat: 14gSaturated Fat: 8gTrans Fat: 0gUnsaturated Fat: 5gCholesterol: 41mgSodium: 974mgCarbohydrates: 23gFiber: 3gSugar: 6gProtein: 14g

    Did you make this recipe?

    Tag me in your Instagram photo - @fakeginger

    © Amanda Livesay
    Cuisine: American / Category: pasta

    Bacon Cheeseburger Pizza

    Jul 02, 2015

     Bacon Cheeseburger Pizza is homemade pizza with burger sauce, ground beef, crispy bacon, 2 kinds of cheese, and pickles! The perfect way to change up pizza night!

    Bacon Cheeseburger Pizza - homemade pizza with burger sauce, ground beef, crispy bacon, 2 kinds of cheese, and pickles! The perfect way to change up pizza night!

    It should come as no surprise to anyone that I’m obsessed with bacon. I mean, I’m always obsessed with bacon but right now, I’m super obsessed.

    One day last week I had bacon for every meal. There was a sweet potato and bacon hash for breakfast, I fried up some bacon for my lunch salad, and then for dinner I had bacon in my brussels sprouts. #paleo

    I will put bacon on anything and everything. Even cookies.

    One of my favorite ways to enjoy bacon is on pizza. If you’ve ever seen any of my pizza Instagrams (they happen frequently), you know that I order my pizza exactly the same way every time. Barbecue sauce, ham, pineapple, tons of jalapeños, and BACON.

    No one ever wants to share a pizza with me and I can’t figure out why.

    Bacon Cheeseburger Pizza - homemade pizza with burger sauce, ground beef, crispy bacon, 2 kinds of cheese, and pickles! The perfect way to change up pizza night!

    Bacon Cheeseburger Pizza!

    Anyway, I’ve been switching things up recently and have found myself in love with Bacon Cheeseburger Pizza.

    Except no one does a good cheeseburger sauce so I’ve been making this myself.

    Cheeseburger sauce?

    Yeah. Just ketchup and thousand island dressing. But it’s so good.

    So this this pizza I used the cheeseburger sauce, bacon, ground beef, shredded cheddar and Monterey Jack, and topped it off with pickles.

    This pizza is so delicious. My kids loved it, I loved it, there was none left for my husband to try. You know how we do things around here.

    Bacon Cheeseburger Pizza - homemade pizza with burger sauce, ground beef, crispy bacon, 2 kinds of cheese, and pickles! The perfect way to change up pizza night!

    More Pizza Recipes

    • Mini Pizza Bagels
    • Bacon Alfredo Pizza
    • Barbecue Chicken Pizza
    • Fig, Burrata, and Prosciutto Pizza

    Make sure you subscribe to my email list to get all my new recipes delivered right to your inbox!

    You can also follow me on Instagram, Facebook, or Pinterest for even more! 

    📖 Recipe

    Yield: 8 servings

    Bacon Cheeseburger Pizza

    Bacon Cheeseburger Pizza

    Bacon Cheeseburger Pizza is homemade pizza with burger sauce, ground beef, crispy bacon, 2 kinds of cheese, and pickles! The perfect way to change up pizza night!

    Prep Time 20 minutes
    Cook Time 12 minutes
    Total Time 32 minutes

    Ingredients

    • 1 unbaked pizza dough
    • 1 teaspoon olive oil
    • ½ pound lean ground beef
    • ½ cup diced onion
    • 1 tablespoon worcestershire sauce
    • ½ cup Thousand Island dressing
    • ½ cup ketchup
    • 6 slices Wright Brand® Bacon, cooked and crumbled
    • ½ cup sharp cheddar, shredded
    • ½ cup Monterey Jack, shredded
    • ½ cup diced bread and butter pickles

    Instructions

    1. Preheat oven to 450F. Shape the dough into a large circle and place on a parchment-covered baking sheet.
    2. In a large pan, heat oven oil over medium-high heat. Add ground beef and onion. Cook, breaking up the meat as you go, until the onions are translucent and no pink remains in the meat. Add worcerstershire sauce and stir to combine. Let cool slightly.
    3. To make the sauce, whisk together Thousand Island and ketchup. Spread this sauce over the pizza crust. Sprinkle the meat mixture over the sauce, followed by the bacon and shredded cheeses.
    4. Bake 10 - 12 minutes or until the pizza crust is browned and cooked through. Sprinkle with pickles after you remove it from oven.

    Recommended Products

    As an Amazon Associate and member of other affiliate programs, I earn from qualifying purchases.

    • Pizza Stone
      Pizza Stone

    Nutrition Information:

    Yield:

    8

    Serving Size:

    1

    Amount Per Serving: Calories: 265Total Fat: 17gSaturated Fat: 6gTrans Fat: 0gUnsaturated Fat: 10gCholesterol: 51mgSodium: 624mgCarbohydrates: 12gFiber: 1gSugar: 8gProtein: 15g

    Did you make this recipe?

    Tag me in your Instagram photo - @fakeginger

    © Amanda Livesay
    Cuisine: American / Category: beef

    Caprese Salad with Warm Bacon Dressing

    Jun 30, 2015

    Caprese Salad with Warm Bacon Dressing is the classic combination of tomatoes, fresh mozzarella, and basil with a delicious warm bacon dressing drizzled over top. 

    Caprese Salad with Warm Bacon Dressing - the classic combination of tomatoes, fresh mozzarella, and basil with a deliicous warm bacon dressing drizzled over top.

    Yesterday I mentioned that our summer had been nutso but didn’t really tell you why.

    So now we’re going to talk about Hurricane Sofia.

    Yeah, the dog.

    Less than two weeks after we adopted her, she broke her leg. Having a dog with a broken leg is, like, one of the most horrible things ever.

    And no matter how many times the vet says, “It happens! Puppies are just like little kids – they break their limbs!”, I still cry “I’M AFRAID HER SPIRIT IS BROKEN!” every time we go in there.

    Which, if you follow me anywhere, you know is a lot.

    She’s on her 5th cast.

    This is only the 3rd week of having a cast.

    She ate the first one. She also ate the cone I put on her to keep her from eating it.

    The second one just fell off. Literally just fell off.

    While she was at the vet to replace the one that fell off, she chewed up the 3rd cast before they could get a cone her on. So they put another on.

    And then she needed a bigger size last week.

    5 casts.

    The ironic part is that I totally sold my husband on the idea of another puppy by saying “We only have to pay the adoption fee! She’s already fixed and everything! She will be so cheap!”

    Wrong.

    So that’s taken up a good portion of the summer. I’ve seen the vet here more in 2 months than I saw our vet in Colorado in 4 years.

    Caprese Salad with Warm Bacon Dressing - the classic combination of tomatoes, fresh mozzarella, and basil with a deliicous warm bacon dressing drizzled over top.

    Caprese Salad with Warm Bacon Dressing!

     The summer hasn’t been all vet visits though.

    My husband’s sisters and their families came to visit last week which was a lot of fun. I had a delicious caprese salad one night when we all went out and fresh mozzarella has been on my mind ever since.

    I made this Caprese Salad with Warm Bacon Dressing for a late Sunday lunch/early dinner and it was so perfect. My husband and I just stood over the counter, sharing the serving plate.

    And lucky for me, he’s not eating cheese so I got all the mozzarella!

    Caprese Salad with Warm Bacon Dressing - the classic combination of tomatoes, fresh mozzarella, and basil with a deliicous warm bacon dressing drizzled over top.

    More Salad Recipes

    • Greek Farro Salad
    • Carrot Apple Salad
    • Spinach Salad with Shrimp and Avocado

    Make sure you subscribe to my email list to get all my new recipes delivered right to your inbox!

    You can also follow me on Instagram, Facebook, or Pinterest for even more! 

    📖 Recipe

    Yield: 6 servings

    Caprese Salad with Warm Bacon Dressing

    Caprese Salad with Warm Bacon Dressing

    Caprese Salad with Warm Bacon Dressing is the classic combination of tomatoes, fresh mozzarella, and basil with a delicious warm bacon dressing drizzled over top. 

    Prep Time 15 minutes
    Cook Time 10 minutes
    Total Time 25 minutes

    Ingredients

    • 2 ½ pound tomatoes, cut into ½-inch slices
    • 1 16 ounce package fresh mozzarella cheese, cut into 12-inch slices
    • ½ cup fresh basil leaves
    • 6 thick bacon slices, chopped
    • 3 tablespoons red wine vinegar
    • ½ teaspoon salt
    • ½ teaspoon pepper

    Instructions

    1. Arrange tomatoes, cheese, and basil leaves on serving platter. Sprinkle with salt and pepper.
    2. Saute chopped bacon in a large skillet over medium heat until crisp. Remove from heat. Transfer 3 tablespoons of the bacon fat into a mixing bowl. Let stand for 1 minute. Whisk in vinegar, salt, and pepper. Still in bacon pieces. Drizzle over the salad right before serving.

    Nutrition Information:

    Yield:

    6

    Serving Size:

    1

    Amount Per Serving: Calories: 317Total Fat: 21gSaturated Fat: 11gTrans Fat: 0gUnsaturated Fat: 8gCholesterol: 71mgSodium: 854mgCarbohydrates: 9gFiber: 2gSugar: 6gProtein: 22g

    Did you make this recipe?

    Tag me in your Instagram photo - @fakeginger

    © Amanda Livesay
    Cuisine: italian / Category: salad


    Caramel Corn Ice Cream

    Jun 09, 2015

    Sweet corn ice cream with caramel swirls! Caramel Corn Ice Cream is a must make during summer when the corn is super sweet.

    Homemade Caramel Corn Ice Cream Recipe

    Second corn recipe this week! 

    You guys probably had no idea that I was so obsessed with fresh corn. And yeah, this ice cream starts with fresh corn.

    Weird, right?

    I never talk about my love of fresh summer corn here because typically we just grill it, spray it with butter, and sprinkle some salt on it. Easy easy and so good. But there’s no need for a recipe when you’re doing that. 

    My love of corn is coming out this week.

    Back when I lived in Alabama, I made frequent trips to the flea market because they had (probably still do?) a stand that did roasted corn and then they had, like, this bar of different seasonings you could sprinkle on it. 

    Omg, you guys. My favorite thing in the world. Last time we went home I told my husband we had to get some before we left and he was all, “You really want to spend your time at home at the flea market?”

    Uhhh yeah, eat corn, look for Pyrex. Does he know me at all?

    If you are into sweet corn like me, you are going to be obsessed with this ice cream. So the ice cream itself is just corn flavored. But then at the end, you mix in some caramel sauce. And then you can top it with some real caramel corn if you like a little crunch in your ice cream like me. 

    It’s so good. 

    …

    Read More

    Grilled Bacon-Wrapped Jalapeno Poppers

    Jun 04, 2015

    Grilled Bacon Jalapeno Poppers are fresh jalapenos stuffed with a creamy, cheesy filling and wrapped in bacon. Cooked on the grill!

    Happy almost Friday! 

    Today we’re talking grilling! Because we only eat grilled food from June to August.

    I even grill cocktails. 

    I’m pretty serious about grilling

    You guys remember how last summer I was obsessed with jalapeños? Like, I would go buy fast food nachos, bring them home, and then pile them with jalapeños?

    It’s happening again. We ordered pizza two nights ago and I covered mine in peppers. I am obsessed. 

    And good news! I planted a jalapeño plant this year and the first one should be ready to pick within a couple days!

    Everyone tells me that jalapeño plants go nuts so once that happens, I’ll be making these Grilled Bacon-Wrapped Jalapeño Poppers all the time. They are SO good. 

    The jalapeños are stuffed with a cream cheese and cheddar mixture and then they’re wrapped in bacon and grilled until softened and delicious.

    Have you ever grilled jalapeño poppers? They will change your life! My husband and I practically fought over the last one. 

    More Jalapeno Recipes

    • Chuy’s Creamy Jalapeño Dip
    • Jalapeno Popper Dip
    • Chorizo Jalapeno Poppers

    Make sure you subscribe to my email list to get all my new recipes delivered right to your inbox!

    You can also follow me on Instagram, Facebook, or Pinterest for even more! 

    📖 Recipe

    Yield: 30 servings

    Grilled Bacon-Wrapped Jalapeno Poppers

    Grilled Bacon-Wrapped Jalapeno Poppers

    Ingredients

    • 15 large fresh jalapenos
    • 4 ounces cream cheese, softened
    • ½ teaspoon garlic powder
    • ½ cup sharp cheddar cheese, shredded
    • 15 slices bacon, cut in half
    • toothpicks

    Instructions

    1. Heat grill to medium heat.
    2. WEAR GLOVES for this! Cut the jalapenos in half and remove all seeds.
    3. Using an electric mixer, beat together cream cheese, garlic powder, and cheddar cheese. Fill the halved jalapenos with the mixture. Wrap each jalapeno with half a slice of bacon and secure with a toothpick.
    4. Grill until the bacon is cooked and the peppers have softened significantly.

    Recommended Products

    As an Amazon Associate and member of other affiliate programs, I earn from qualifying purchases.

    • Electric Mixer
      Electric Mixer

    Nutrition Information:

    Yield:

    30

    Serving Size:

    1

    Amount Per Serving: Calories: 58Total Fat: 5gSaturated Fat: 2gTrans Fat: 0gUnsaturated Fat: 2gCholesterol: 13mgSodium: 133mgCarbohydrates: 1gFiber: 0gSugar: 0gProtein: 3g

    Did you make this recipe?

    Tag me in your Instagram photo - @fakeginger

    © Amanda Livesay
    Cuisine: American / Category: appetizer

    No Bake Granola Bars

    Jun 02, 2015

    Perfect for lunchboxes or beach bags! No Bake Granola Bars are filled with oats, Rice Krispies, mini chocolate chips, mini M&Ms, honey, and peanut butter.

    No Bake Granola Bars - perfect for kids or adults!

    If you love these, try my No Bake Trail Mix Energy Bites, too!

    The end of school is probably not the best time to be sharing a No Bake Granola Bars recipe, huh?

    My kids have been loving these in their lunch boxes but they’ll be perfect for throwing in my pool bag or whatever, too. 

    Anyway, my kid totally pulled one over on me yesterday. He’d been sick over the weekend. Like, not super sick but he had a cough and he basically slept from Thursday night to Sunday afternoon. So yesterday morning when he woke up and said he didn’t feel better, I let him stay home.

    An hour later: “Mom! I feel so much better! Can I play Playstation?!” 

    Uh huh. 

    No Bake Granola Bars - perfect for kids or adults!

    Ingredients

    • Old fashioned oats
    • Rice Krispies
    • Mini chocolate chips
    • Mini M&Ms
    • Honey
    • Peanut butter
    • Vanilla

    Instructions

    • Stir together oats, cereal, chocolate chips, and M&Ms. Set aside.
    • Melt honey and peanut butter together in a small saucepan over low heat, whisking to combine. Remove from heat and stir in vanilla.
    • Pour wet mixture over the oat mixture and gently toss to coat.
    • Press into a 9×9-inch baking dish lined with parchment paper.
    • Refrigerate for at least an hour before cutting.

    How Long Are They Good For?

    These No Bake Granola Bars will be good in the fridge for about a week. Make sure to store them in an airtight container to keep them fresh for as long as possible.

    I like to wrap them individually in plastic wrap and then put them all in one of these airtight containers.

    More Lunchbox Snacks

    • No Bake Cheerios Bars
    • Caramel Corn Treats
    • Dill Pickle Saltines
    • Cheesy Ranch Chex Mix

    Make sure you subscribe to my email list to get all my new recipes delivered right to your inbox!

    You can also follow me on Instagram, Facebook, or Pinterest for even more! 

    📖 Recipe

    Yield: about 12 servings

    No Bake Granola Bars

    No Bake Granola Bars

    Prep Time 20 minutes
    Total Time 20 minutes

    Ingredients

    • 2 cups old fashioned oats
    • 1 cup crisp rice cereal
    • ½ cup mini chocolate chips
    • ½ cup mini M&Ms
    • ⅔ cup honey
    • ⅓ cup peanut butter
    • 1 teaspoon vanilla

    Instructions

    1. Line a 9x9-inch baking dish with parchment paper.
    2. In a large mixing bowl, gently stir oats, cereal, chocolate chips, and M&Ms. Set aside.
    3. Melt honey and peanut butter together in a small saucepan over low heat, whisking to combine. Remove from heat once smooth and stir in vanilla. Pour over the oat mixture and gently toss to coat.
    4. Press into the prepared baking dish, using a good bit of pressure but not crushing anything. Refrigerate for at least an hour before cutting.

    Recommended Products

    As an Amazon Associate and member of other affiliate programs, I earn from qualifying purchases.

    • Mini M&Ms
      Mini M&Ms
    • Parchment Paper
      Parchment Paper
    • 9x9-inch Square Pan
      9x9-inch Square Pan

    Nutrition Information:

    Yield:

    12

    Serving Size:

    1

    Amount Per Serving: Calories: 263Total Fat: 10gSaturated Fat: 3gTrans Fat: 0gUnsaturated Fat: 5gCholesterol: 1mgSodium: 79mgCarbohydrates: 42gFiber: 3gSugar: 26gProtein: 5g

    Did you make this recipe?

    Tag me in your Instagram photo - @fakeginger

    © Amanda Livesay
    Cuisine: American / Category: snack

    Ramen Noodle Salad

    Jun 01, 2015

    Ramen Noodle Salad has cole slaw mix, almonds, sunflower seeds, and ramen noodles in a sweet and tangy dressing. Perfect summer side dish for parties and barbecues!

    If you love recipes like this, you’re going to love my Cole Slaw Pasta Salad, too! 

    Ramen Noodle Salad - cole slaw mix, almonds, sunflower seeds, and ramen noodles in a sweet and tangy dressing. Perfect summer side dish for parties and barbecues!

    Uggghhhh, Monday. 

    This is my last Monday of the school year though! This was the longest school year ever and I cannot wait for a summer full of ice cream, pools, and margaritas. 

    How was your weekend? 

    We haven’t had much going on recently because of all the rain. Omg, the rain! Make it stop. We need no more rain. Thankfully we haven’t had to deal with all the flooding that most of Texas is dealing with but man, it’s been a rough couple weeks. 

    So anyway, yesterday the sun finally came out and the kids got to spend the day outside with their friends. And the husband finally got to grill without getting soaked by rain. 

    I’ve been craving this Ramen Noodle Salad recently and knew it’d be perfect with some barbecue chicken. It’s basically cole slaw but with lots of crunchy stuff mixed in.

    Ramen Noodle Salad - cole slaw mix, almonds, sunflower seeds, and ramen noodles in a sweet and tangy dressing. Perfect summer side dish for parties and barbecues!

    Ingredients

    • Cole slaw mix – I like the cole slaw mix that includes red cabbage and shredded carrots but you can use the one that’s only cabbage if you prefer.
    • Green onions
    • Sunflower seeds
    • Sliced almonds – make sure they are the thinly sliced almonds. They add the perfect crunch to the salad.
    • Soy sauce ramen noodles with seasoning packets – the ramen noodles go into the salad and the seasoning packets go into the dressing.
    • Vegetable oil – you can use olive oil or avocado oil if you prefer.
    • Apple cider vinegar – this adds the perfect tanginess to the dressing.
    • Sugar – just a tiny bit to add a hint of sweetness to the dressing.

    Instructions

    • Make salad. Combine cole slaw mix, green onions, sunflower seeds, and almonds in a large bowl
    • Add ramen. Add crushed ramen noodles and toss to combine
    • Make dressing. In a small bowl, whisk ramen seasoning packets, oil, apple cider vinegar, and sugar
    • Combine everything. Pour dressing over salad and toss to make sure everything is coated
    • Chill. Refrigerate for at least an hour before serving

    Can You Make Ramen Noodle Salad Ahead?

    Yes, Ramen Noodle Salad needs to be made at least an hour ahead so the flavors can all combine and the veggies and ramen can soften. 

    Keep in mind, the longer it sits, the softer the ramen noodles and cabbage will be. So if you make it the night before, the ramen will be completely soft. So if you’re looking for that crunch, don’t make it too far in advance. 

    How Long Is Ramen Noodle Salad Good For?

    Ramen Noodle Salad is good for up to 3 days if stored in an airtight container in the refrigerator. 

    Ramen Noodle Salad - cole slaw mix, almonds, sunflower seeds, and ramen noodles in a sweet and tangy dressing. Perfect summer side dish for parties and barbecues!

    More Barbecue Side Dish Recipes

    • Pineapple Baked Beans
    • Pepperoni Pizza Pasta Salad
    • Caprese Salad with Warm Bacon Dressing
    • Bacon Wrapped Corn
    • Root Beer Baked Beans

    Make sure you subscribe to my email list to get all my new recipes delivered right to your inbox!

    You can also follow me on Instagram, Facebook, or Pinterest for even more! 

    📖 Recipe

    Yield: 12 servings

    Ramen Noodle Salad

    Ramen Noodle Salad

    Ramen Noodle Salad has cole slaw mix, almonds, sunflower seeds, and ramen noodles in a sweet and tangy dressing. Perfect summer side dish for parties and barbecues!

    Prep Time 15 minutes
    Additional Time 1 hour
    Total Time 1 hour 15 minutes

    Ingredients

    • 14 ounce bag coleslaw mix
    • ½ cup sliced green onions
    • ½ cup roasted and salted sunflower seeds
    • ½ cup sliced almonds
    • 2 packages soy sauce ramen noodles, with seasoning packets
    • 1 cup vegetable oil
    • ½ cup apple cider vinegar
    • ¼ cup sugar

    Instructions

    1. In a large bowl, combine cole slaw mix, green onions, sunflower seeds, and almonds. Crush ramen noodles and add to the bowl. Toss to combine everything.
    2. In a small bowl, whisk together the ramen seasoning packets, vegetable oil, apple cider vinegar, and sugar. Pour over the cole slaw and toss to make sure everything is coated.
    3. Refrigerate for at least an hour before serving.

    Recommended Products

    As an Amazon Associate and member of other affiliate programs, I earn from qualifying purchases.

    • Mixing Bowls
      Mixing Bowls
    • Soy Sauce Ramen Noodles
      Soy Sauce Ramen Noodles

    Nutrition Information:

    Yield:

    12

    Serving Size:

    1

    Amount Per Serving: Calories: 381Total Fat: 32gSaturated Fat: 4gTrans Fat: 0gUnsaturated Fat: 27gCholesterol: 3mgSodium: 1019mgCarbohydrates: 20gFiber: 3gSugar: 8gProtein: 5g

    Did you make this recipe?

    Tag me in your Instagram photo - @fakeginger

    © Amanda Livesay
    Cuisine: American / Category: Sides

    Homemade Peanut Butter Dog Ice Cream

    May 20, 2015

    Homemade Peanut Butter Dog Ice Cream is an easy 4 ingredient treat to keep your pup cool all summer! It starts with plain yogurt which is great for your dog’s digestive system.

    If you really want to treat your pup, we have several flavors of ice cream! Try Apple Peanut Butter Dog Ice Cream and Pumpkin Peanut Butter Dog Ice Cream!

    In case you aren’t following me on Instagram, we got a new puppy over the weekend!

    Like every dedicated crazy dog lady, one of the first things I did when we moved here was follow all the local rescue groups on Facebook. Just in case. You never know when a dog will speak to your soul.

    And now we have another dog.

    Her name is Sofia. Like the princess. She’s a mini schnauzer/dachshund mix which is very cutely nicknamed Schnoxie.

    We go through boxes and boxes of dog ice cream every summer. I always give the pups some after walks or after the dog park because who doesn’t like ice cream on a hot day?

    But that stuff is expensive. Like, super expensive. I think a box of 4 was over 4 bucks last time I bought some.  I spent around that on ingredients for this Homemade Peanut Butter Doggy Ice Cream (really just yogurt since I already keep the rest of the stuff on hand) and I have at least 20 little cups of ice cream in my freezer now.

    The dogs LOVE it.

    Ingredients

    • Bananas – make sure to use very ripe bananas.
    • Greek yogurt – plain Greek yogurt, nothing flavored or sweetened. You can also use plain regular yogurt but it may not be as thick.
    • Peanut butter – you want to check the ingredient’s on the peanut butter. Do not use any peanut butter that has xylitol in it as it is very dangerous for your dog! I like Crazy Richard’s brand for my dogs because the only ingredient is peanuts.
    • Honey – this is just used to sweeten the ice cream a little bit. You can leave it off is opposed.

    How To Make Peanut Butter Dog Ice Cream

    • Blend banana. In a food processor or blender, process banana until smooth. Transfer to a large mixing bowl.
    • Combine. Add greek yogurt, peanut butter, and honey and whisk until combined.
    • Transfer. Spoon into containers you plan on freezing.
    • Freeze. Place in freezer until your pup is ready to enjoy.

    How Long Is It Good For?

    Homemade dog ice cream will be good for about a month in the freezer.

    More Dog Treat Recipes

    • Beef Jerky for Dogs
    • Bacon Cheddar Dog Treats
    • Carrot, Peanut Butter, and Oats Dog Treats
    • Peanut Butter and Banana Frozen Dog Treats

    Make sure you subscribe to my email list to get all my new recipes delivered right to your inbox!

    You can also follow me on Instagram, Facebook, or Pinterest for even more! 

    📖 Recipe

    Yield: about 9 servings

    Homemade Peanut Butter Doggy Ice Cream

    Homemade Peanut Butter Doggy Ice Cream

    Homemade Peanut Butter Dog Ice Cream is an easy 4 ingredient treat to keep your pup cool all summer! It starts with plain yogurt which is great for your dog's digestive system.

    Prep Time 15 minutes
    Total Time 15 minutes

    Ingredients

    • 2 small, very ripe bananas
    • 1 32 ounce container plain Greek yogurt
    • 2 heaping tablespoons peanut butter
    • 2 tablespoons honey

    Instructions

    1. In a food processor or blender, process banana until smooth. Transfer to a large mixing bowl. Add greek yogurt, peanut butter, and honey and whisk until combined.
    2. Spoon into containers you plan on freezing. Place in freezer until your pup is ready to enjoy.

    Recommended Products

    As an Amazon Associate and member of other affiliate programs, I earn from qualifying purchases.

    • Plastic Cups
      Plastic Cups
    • My Favorite Blender
      My Favorite Blender

    Nutrition Information:

    Yield:

    9

    Serving Size:

    1

    Amount Per Serving: Calories: 115Total Fat: 2gSaturated Fat: 0gTrans Fat: 0gUnsaturated Fat: 1gCholesterol: 5mgSodium: 54mgCarbohydrates: 13gFiber: 1gSugar: 10gProtein: 11g

    Did you make this recipe?

    Tag me in your Instagram photo - @fakeginger

    © Amanda Livesay
    Cuisine: American / Category: dog-friendly

    Pumpkin Apple Dog Treats

    May 12, 2015

    Homemade Pumpkin Apple Dog Treats is healthy homemade treats for you pup! Only simple ingredients and so easy.

    I’ve been really into making homemade stuff for the dogs recently. I got super inspired when I realized our H-E-B has a bulk bins section of treats. With strawberry biscotti. 

    Yeah. For dogs. 

    So these have pumpkin and apple in them. Pumpkin is really good for a dog’s digestive system and apples provide vitamins that are also good for your dog.

    Both dogs gave them rave reviews which is saying something because Clem is weirdly picky about treats. 

    Ingredients

    • Flour – I used all-purpose flour but you can use whole wheat
    • Baking powder
    • Diced apple
    • Pumpkin – make sure it is pumpkin puree (pumpkin should be the only ingredient) and no pumpkin pie filling
    • Egg
    • Water

    How To Make Pumpkin Apple Dog Treats

    • Dry ingredients. Whisk together flour and baking powder to remove lumps.
    • Wet ingredients. Add diced apple, pumpkin, egg, and water and stir until all dry ingredients are moistened
    • Shape. Roll the dough on a lightly floured surface and use bone cookie cutters to cut out treats; transfer to parchment paper lined baking sheet.
    • Bake. Bake about 30 minutes depending on how thick you cut them.
    • Cool. Cool completely on a wire rack before serving to your pup.

    How Long Are Homemade Dog Treats Good For?

    These will last about a week in an airtight container in the fridge. Make sure to store them in an airtight container.

    If your dog is picky and wants room temperature treats, they will last about 3 days on the counter. Make sure you’re using an airtight container.

    Can You Freeze Homemade Dog Treats?

    Yes! If this recipe makes more treats than your dog will eat within a week, pop them in a freezer ziploc bag (squeeze all the air out) and they will last about 3 months in the freezer.

    Defrost them in the fridge before serving to your pup. 

    More Homemade Dog Treats:

    • Peanut Butter Pupcakes
    • Beef Jerky for Dogs
    • Bacon Cheddar Dog Treats
    • Apple Peanut Butter Dog Ice Cream
    • Peanut Butter and Banana Frozen Dog Treat

    Make sure you subscribe to my email list to get all my new recipes delivered right to your inbox!

    You can also follow me on Instagram, Facebook, or Pinterest for even more! 

    📖 Recipe

    Yield: 16 treats

    Pumpkin Apple Dog Treats

    Pumpkin Apple Dog Treats

    Homemade Pumpkin Apple Dog Treats is healthy homemade treats for you pup! Only simple ingredients and so easy.

    Prep Time 20 minutes
    Cook Time 30 minutes
    Total Time 50 minutes

    Ingredients

    • 2 ⅓ cups flour
    • 1 teaspoon baking powder
    • 1 cup finely diced apple
    • ½ cup pumpkin
    • 1 egg
    • ½ cup water

    Instructions

    1. Preheat oven to 350F. Line a baking sheet with parchment paper.
    2. Whisk together flour and baking powder until no lumps remain. Add diced apple, pumpkin, egg, and water and stir until all the dry ingredients are moistened.
    3. Roll the dough out on a lightly floured surface and use a cookie cutter to cut shapes. Transfer to the parchment-lined baking sheet.
    4. Bake about 30 minutes or until crisp. Cool completely on a wire rack before sharing with your pup.

    Recommended Products

    As an Amazon Associate and member of other affiliate programs, I earn from qualifying purchases.

    • Pumpkin Puree
      Pumpkin Puree
    • Parchment Paper
      Parchment Paper
    • Rolling Pin
      Rolling Pin
    • Bone Cookie Cutters
      Bone Cookie Cutters

    Nutrition Information:

    Yield:

    16

    Serving Size:

    1

    Amount Per Serving: Calories: 76Total Fat: 1gSaturated Fat: 0gTrans Fat: 0gUnsaturated Fat: 0gCholesterol: 12mgSodium: 36mgCarbohydrates: 15gFiber: 1gSugar: 1gProtein: 2g

    Did you make this recipe?

    Tag me in your Instagram photo - @fakeginger

    © Amanda Livesay
    Cuisine: American / Category: dog-friendly


    Grilled Ginger-Sesame Pork Chops with Pineapple and Scallions

    May 11, 2015

    Grilled Ginger-Sesame Pork Chops with Pineapple and Scallions – pork chops marinated in a ginger sesame citrus marinade and grilled with pineapple and green onions.

    Grilled Ginger-Sesame Pork Chops with Pineapple and Scallions - pork chops marinated in a ginger sesame citrus marinade and grilled with pineapple and green onions.

    If you need an easy summer dinner recipe that takes less than 15 minutes to cook, this is it! It’s pork chops marinated in a citrus-y, soy sauce-based marinade before being grilled. And the pineapple and green onions also get marinated in the same marinade and also get grilled!

    Everything has so much flavor and it really is so easy to throw together. The hardest part is waiting for it to marinate!

    Grilled Ginger-Sesame Pork Chops with Pineapple and Scallions - pork chops marinated in a ginger sesame citrus marinade and grilled with pineapple and green onions.

    Ingredients

    • Lime juice – fresh lime juice has the most flavor but the bottle juice will work in a pinch.
    • Sesame oil
    • Soy sauce – I recommend a low sodium soy sauce so that the final dish isn’t too salty.
    • Ginger – the recipe calls for fresh ginger but if you only have powdered ginger, it will work.
    • Oranges – you need the juice and the zest from the oranges.
    • Rice vinegar
    • Olive oil
    • Brown sugar
    • Boneless center cut pork chops
    • Pineapple
    • Scallions

    How To Make Grilled Ginger-Sesame Pork Chops with Pineapple and Scallions

    • Make marinade. Make marinade by whisking lime juice, sesame oil, soy sauce, ginger, orange juice, rice vinegar, olive oil, brown sugar, and orange zest together
    • Marinate pork. Pour ½ the marinade over pork chops
    • Marinate the rest. Pour remaining marinade over sliced pineapple and scallions
    • Chill. Marinade 30 – 45 minutes in refrigerator
    • Grill pork. Grill pork chops over medium-high heat for 3 – 4 minutes depending on the thickness of your chops
    • Grill the rest. Grill pineapple for about 2 – 3 minutes per side. Grill scallions for about 1 minute per side, until grill marks form

    How Long Are Grilled Pork Chops Good For?

    These pork chops will stay good for up to 3 – 4 days in the refrigerator. Make sure you cover them tightly. 

    Grilled Ginger-Sesame Pork Chops with Pineapple and Scallions - pork chops marinated in a ginger sesame citrus marinade and grilled with pineapple and green onions.

    More Pork Chop Recipes

    • Honey Mustard Pork Chops
    • Grilled Lemon Thyme Pork Chops with Peaches
    • Apricot Pork Chops
    • Hawaiian Pork Chops

    Make sure you subscribe to my email list to get all my new recipes delivered right to your inbox!

    You can also follow me on Instagram, Facebook, or Pinterest for even more! 

    📖 Recipe

    Yield: 6 servings

    Grilled Ginger-Sesame Pork Chops with Pineapple and Scallions

    Grilled Ginger-Sesame Pork Chops with Pineapple and Scallions

    Grilled Ginger-Sesame Pork Chops with Pineapple and Scallions - pork chops marinated in a ginger sesame citrus marinade and grilled with pineapple and green onions.

    Prep Time 15 minutes
    Cook Time 15 minutes
    Additional Time 30 minutes
    Total Time 1 hour

    Ingredients

    • ¼ cup fresh lime juice
    • ¼ cup sesame oil
    • ¼ cup reduced sodium soy sauce
    • 3 tablespoons grated fresh ginger
    • 2 tablespoons fresh orange juice
    • 2 tablespoons rice vinegar
    • 2 tablespoons extra-virgin olive oil
    • 1 tablespoon packed dark brown sugar
    • ½ teaspoon orange zest
    • Six ¾-inch-thick boneless center-cut pork chops
    • 1 pineapple, peeled, cut into ½-inch-thick rings, and cored
    • 1 bunch scallions, cleaned and trimmed

    Instructions

    1. In a small bowl, whisk the lime juice, sesame oil, soy sauce, ginger, orange juice, rice vinegar, olive oil, brown sugar and orange zest together.
    2. Place the pork chops in a single layer in a large baking dish and pour about ½ of the marinade over them. Add the pineapple rings and scallions to the bowl containing the remaining marinade and toss to coat. Place the pork and pineapple/scallion in the refrigerator and allow to marinated for 30-45 minutes, flipping the the ingredients occasionally.
    3. While everything is marinating, preheat your grill to medium-high heat.
    4. Remove the pork, pineapple, and scallions from their marinades. Season the pork on both sides with salt and pepper. Grill the pork chops for about 3-4 minutes per side (more or less depending on thickness if yours aren’t ¾-inch thick). Grill the pineapple for about 2-3 minutes per side and the scallions for about 1 minute per side, or until grill marks form.

    Recommended Products

    As an Amazon Associate and member of other affiliate programs, I earn from qualifying purchases.

    • Seasoned Rice Vinegar
      Seasoned Rice Vinegar
    • Sesame Oil
      Sesame Oil

    Nutrition Information:

    Yield:

    6

    Serving Size:

    1

    Amount Per Serving: Calories: 211Total Fat: 17gSaturated Fat: 3gTrans Fat: 0gUnsaturated Fat: 13gCholesterol: 22mgSodium: 399mgCarbohydrates: 8gFiber: 1gSugar: 5gProtein: 8g

    Did you make this recipe?

    Tag me in your Instagram photo - @fakeginger

    © Amanda Livesay
    Cuisine: Asian / Category: pork

    Banana Muffins with Nutella Swirl

    May 06, 2015

    Banana Muffins with Nutella Swirl are soft and fluffy banana muffins with a nutella swirl on top! 

    Love banana recipes? Try Banana Nut Bread!

    Banana Muffins with Nutella Swirl - soft and fluffy banana muffins with a nutella swirl on top!

    Today we’re going to talk about things I love about Texas.

    I love Texas. Which I honestly didn’t expect to say because the forever long drive through Texas from New Mexico to Louisiana made me want to punch myself in the face repeatedly on our epic roadtrips last year.

    But I love it.

    Guys, I have a Whataburger right up the road. I could walk there. I haven’t lived near a Whataburger in years!

    Also, In-n-Out.

    The cacti have flowers.

    The weather. It’s so warm. We’ve had the top off the Jeep pretty much every day since we got here! Plus! Flipflops all day, everyday.

    And it rains! Like for real rain!

    H-E-B.

    Omgggg, you guys told me I was going to love H-E-B and I doubted you. I thought nothing could be better than Trader Joe’s.

    Banana Muffins with Nutella Swirl - soft and fluffy banana muffins with a nutella swirl on top!

    These Banana Muffins with Nutella Swirl turned out so delicious. You’ve got your standard banana muffin on the bottom and then the Nutella swirl on top that sinks in in some places and stays gooey and Nutella-like in others. So good.

    If you love nutella, you have to make my Nutella Brownies!

    Ingredients

    • Flour
    • Baking soda
    • Baking powder
    • Salt – just a tiny bit to bring out the flavors of the other ingredients.
    • Bananas – make sure they are very ripe.
    • Sugar
    • Brown sugar – using brown sugar as well as granulated sugar ensures that the muffins are nice and moist.
    • Egg
    • Butter
    • Vanilla
    • Nutella – this is a chocolate hazelnut spread. A lot of stores have their own version of this so don’t feel like you have to stick with the name brand Nutella.

    Instructions

    • Dry ingredients. Whisk together flour, baking soda, baking powder, and salt. Set aside.
    • Wet ingredients. beat bananas, sugar, and brown sugar. Add egg and beat until combined. With the mixer running, slowly pour in butter. Add vanilla.
    • Combine. Slowly add dry mixture, beating just until all the flour is incorporated.
    • Transfer. Divide the batter among the 18 muffin cups, filling about ¾ full. Dollop about a teaspoon of nutella on each one and use a knife to swirl.
    • Bake. Bake at 350F for 17 – 19 minutes or until golden brown.
    • Cool. Cool completely on a wire rack before serving.

    How Long Are They Good For?

    Banana muffins are good for up to 4 days. Make sure to store them in an airtight container at room temperature.

    You may be able to get another day or 2 out of them if you store them in the fridge but you risk them drying out a bit.

    Can You Freeze Them?

    You can freeze them for up to 3 months. I like to use freezer ziploc bags to freeze muffins.

    When you are ready to serve them, let them sit at room temperature for several hours until defrosted.

    More Muffin Recipes

    • Pumpkin Apple Muffins
    • Blueberry Bran Muffins
    • Pineapple Upside Down Muffins
    • Banana Chocolate Chip Muffins
    • Strawberry Chocolate Chip Muffins

    Make sure you subscribe to my email list to get all my new recipes delivered right to your inbox!

    You can also follow me on Instagram, Facebook, or Pinterest for even more! 

    📖 Recipe

    Yield: 18 muffins

    Banana Muffins with Nutella Swirl

    Banana Muffins with Nutella Swirl

    Banana Muffins with Nutella Swirl are soft and fluffy banana muffins with a nutella swirl on top! 

    Prep Time 10 minutes
    Cook Time 20 minutes
    Total Time 30 minutes

    Ingredients

    • 2 cups flour
    • 1 teaspoon baking soda
    • 1 teaspoon baking powder
    • ½ teaspoon salt
    • 4 ripe bananas, mashed
    • ½ cup sugar
    • ½ cup brown sugar
    • 1 large egg
    • ¼ cup butter, melted and cooled
    • 1 teaspoon vanilla
    • ⅓ cup nutella

    Instructions

    1. Preheat oven to 350F. Line 18 muffin cups with paper liners.
    2. In a mixing bowl, whisk together flour, baking soda, baking powder, and salt. Set aside.
    3. With an electric mixer, beat bananas, sugar, and brown sugar. Add egg and beat until combined. With the mixer running, slowly pour in butter. Add vanilla.
    4. Slowly add dry mixture, beating just until all the flour is incorporated.
    5. Divide the batter among the 18 muffin cups, filling about ¾ full. Dollop about a teaspoon of nutella on each one and use a knife to swirl.
    6. Bake in the preheated oven for 17 - 19 minutes or until golden brown.
    7. Cool completely on a wire rack before serving.

    Recommended Products

    As an Amazon Associate and member of other affiliate programs, I earn from qualifying purchases.

    • Nutella
      Nutella
    • Parchment Muffin Liners
      Parchment Muffin Liners
    • My Favorite Muffin Tin
      My Favorite Muffin Tin

    Nutrition Information:

    Yield:

    18

    Serving Size:

    1

    Amount Per Serving: Calories: 165Total Fat: 4gSaturated Fat: 3gTrans Fat: 0gUnsaturated Fat: 1gCholesterol: 17mgSodium: 184mgCarbohydrates: 30gFiber: 1gSugar: 16gProtein: 2g

    Did you make this recipe?

    Tag me in your Instagram photo - @fakeginger

    © Amanda Livesay
    Cuisine: American / Category: breakfast

    Avocado Feta Salsa

    May 05, 2015

    Avocado Feta Salsa is avocado, tomato, feta cheese, and red onion tossed in a garlic vinaigrette. Serve with pita chips for the perfect party snack!

    Avocado Feta Salsa - avocado, tomato, feta cheese, and red onion tossed in a garlic vinaigrette. Serve with pita chips for the perfect party snack!

    This is an oldie that I’m pulling out of the archives today!

    I’ve been making this Avocado Feta Salsa for years and years and years and I blogged about it shortly after I started the blog but the pictures were horrendous. Plus, this is one recipe that deserves to be shared again.

    My mom used to make this recipe whenever we had parties and then I got addicted and started making it every time I had an excuse. And now whenever I make it, I always get at least one person addicted and they start making it for all their parties.

    For awhile there, my sister-in-law would make it and post it on social media and then that would cause me to make it and as soon as I posted it, she would make it again. We were in that cycle for a long time. 

    I’m telling you, it’s one of the best things on earth.

    If you love avocado salsa, try my Mango Avocado Salsa too!

    Avocado Feta Salsa - avocado, tomato, feta cheese, and red onion tossed in a garlic vinaigrette. Serve with pita chips for the perfect party snack!

    Ingredients

    • Avocado – make sure they are ripe. Nothing is worse than using an unripe avocado for this salsa.
    • Roma tomatoes – I suggest roma tomatoes because are less juicy that other tomatoes but if you need to use larger tomatoes, squeeze as much of the juice and seeds out as you can.
    • Red onion – red onion isn’t as onion-y as a yellow or white so it’s perfect in raw recipes like this.
    • Garlic
    • Red wine vinegar – this is for the dressing.
    • Olive oil – this is for the dressing.
    • Feta – you can use the fat free feta if you want.

    Instructions

    • Combine. Toss together avocado, tomatoes, onion, and garlic.
    • Add dressing. Gently stir in red wine vinegar and olive oil.
    • Add cheese. Stir in feta.
    • Chill. Cover and chill for at least 30 minutes.
    Avocado Feta Salsa - avocado, tomato, feta cheese, and red onion tossed in a garlic vinaigrette. Serve with pita chips for the perfect party snack!

    Can You Make It Ahead?

    Yes! You need to make this at least 30 minutes before you serve it. And don’t taste it until it’s chilled for the 30 minutes! It’s so much better once all the flavors mix together.

    It seems to get better the longer you refrigerate it. It’s even better day 2 but the avocado does tend to turn a little brown so don’t serve it to guests on day 2. But it’s still safe for you to eat it!

    A super airtight container will help to keep the avocado from turning brown if you do plan to keep it for a couple days.

    What To Serve With It

    I always serve it with pita chips but my kids always asks for tortilla chips.

    It’s also really, really good with grilled chicken in a wrap. You could put it on top of fish. You could add quinoa and grilled chicken and you have a delicious quinoa salad. There are so many ways you could enjoy this. 

    More Dip Recipes

    • 7 Layer Chili Dog Dip 
    • French Onion Dip
    • Cheesy Sausage and Spinach Dip 
    • Crawfish Dip
    • Layered Ranch Taco Dip
    • Queso Fundido

    Make sure you subscribe to my email list to get all my new recipes delivered right to your inbox!

    You can also follow me on Instagram, Facebook, or Pinterest for even more! 

    📖 Recipe

    Yield: about 4 servings

    Avocado Feta Salsa

    Avocado Feta Salsa

    Avocado Feta Salsa - avocado, tomato, feta cheese, and red onion tossed in a garlic vinaigrette. Serve with pita chips for the perfect party snack!

    Prep Time 15 minutes
    Total Time 15 minutes

    Ingredients

    • 1 avocado, chopped
    • 2 roma tomatoes, diced
    • ¼ cup red onion, finely diced
    • 1 clove garlic
    • 1 tablespoon red wine vinegar
    • 1 tablespoon olive oil
    • 4 ounces feta

    Instructions

    1. Toss together avocado, tomatoes, onion, and garlic. Gently stir in red wine vinegar and olive oil. Stir in feta. Cover and chill for at least 30 minutes.

    Recommended Products

    As an Amazon Associate and member of other affiliate programs, I earn from qualifying purchases.

    • Rubber Spatulas
      Rubber Spatulas
    • Mixing Bowls with Lids
      Mixing Bowls with Lids

    Nutrition Information:

    Yield:

    4

    Serving Size:

    1

    Amount Per Serving: Calories: 199Total Fat: 17gSaturated Fat: 6gTrans Fat: 0gUnsaturated Fat: 10gCholesterol: 25mgSodium: 266mgCarbohydrates: 8gFiber: 4gSugar: 3gProtein: 6g

    Did you make this recipe?

    Tag me in your Instagram photo - @fakeginger

    © Amanda Livesay
    Cuisine: American / Category: appetizer

    Mango Margaritas

    May 04, 2015

    Easy and delicious homemade Mango Margaritas! These are made with canned mango nectar so you can make them all year long!

    I also have a Frozen Mango Margarita recipe!

    Happy Monday!

    Tomorrow’s Cinco de Mayo! It totally snuck up on me. And I know what you’re thinking.

    How did I let the drinking holiday sneak up on me? 

    I am ashamed of myself.

    The important thing was that I did remember. Yesterday at the grocery store as I was walking past all the fruit nectars at the grocery store. 

    I saw a mango margarita recipe recently that called for the mango nectar instead of fresh mango which is genius because A) mango is annoying to cut and B) if I buy the already cut mango, I’m eating it before it makes it into a margarita. 

    So this version calls for that nectar, fresh lime juice, tequila, you know, the usual suspects. They were really, really, really good and went perfect with a Sunday afternoon Married at First Sight marathon.

    Ingredients

    • Limes – you need the lime juice and if you want to rim the glass with salt, you rub the rim with a lime wedge.
    • Salt – only if you want a salt rim. You could always do sugar if you prefer a sweeter drink.
    • Tequila – use whatever tequila you prefer.
    • Orange liqueur – such as Triple Sec.
    • Mango nectar – these are usually in cans. They’re in the juice aisle of my local grocery store but I’ve seen them in the Mexican foods aisles of some stores.

    How To Make Mango Margaritas

    • Rim the glass. Run cut limes around rim of 2 margarita glasses. Dip in salt.
    • Combine ingredients. Combine tequila, orange liqueur, lime juice, and mango nectar.
    • Shake. Add about a cup of ice and shake until cold.
    • Serve. Strain into the 2 glasses.

    More Margarita Recipes

    • Blood Orange Margaritas
    • Peach Margaritas
    • Raspberry Margaritas
    • Grapefruit Margaritas
    • Pineapple Coconut Margaritas

    Make sure you subscribe to my email list to get all my new recipes delivered right to your inbox!

    You can also follow me on Instagram, Facebook, or Pinterest for even more! 

    📖 Recipe

    Yield: 2 servings

    Mango Margarita

    Mango Margarita

    Easy and delicious homemade Mango Margaritas! These are made with canned mango nectar so you can make them all year long!

    Prep Time 10 minutes
    Total Time 10 minutes

    Ingredients

    • ½ lime, cut in half
    • salt
    • 4 ounces tequila
    • 1 ounce orange liqueur
    • juice of 1 lime
    • ⅔ cup mango nectar
    • ice

    Instructions

    1. Run the cut limes around rim of 2 margarita glasses. Dip in salt.
    2. In a shaker, combine tequila, orange liqueur, lime juice, and mango nectar. Add about a cup of ice and shake until cold. Strain into the 2 glasses.

    Recommended Products

    As an Amazon Associate and member of other affiliate programs, I earn from qualifying purchases.

    • Cocktail Shaker
      Cocktail Shaker
    • Margarita Salt
      Margarita Salt

    Nutrition Information:

    Yield:

    2

    Serving Size:

    1

    Amount Per Serving: Calories: 224Total Fat: 0gSaturated Fat: 0gTrans Fat: 0gUnsaturated Fat: 0gCholesterol: 0mgSodium: 296mgCarbohydrates: 18gFiber: 1gSugar: 15gProtein: 0g

    Did you make this recipe?

    Tag me in your Instagram photo - @fakeginger

    © Amanda Livesay
    Cuisine: Mexican / Category: drink

    Glazed Lemon Bread

    Apr 29, 2015

    Glazed Lemon Bread that tastes just like the Starbucks one! It’s light and fluffy, sweet and tart, and easy to make!

    If you love lemon, try Blueberry Lemon Bread and Lemon Poppy Seed Cookies!

    I am having the worst writer’s block recently. I have several recipes that I’ve made and photographed but I just can’t come up with anything to talk about.

    My life is so boring right now, guys.

    And yeah, I know my life of Pyrex-hunting, dog parking, and grocery shopping in Colorado Springs wasn’t exactly exciting but it was more exciting that my life right now.

    We sold my husband’s car before the move and it’d make no sense to buy another one because deployment so we’re toughing it out. Which means I’m home all. the. time. 

    And uggggghhhh, I’m so bored. 

    Anyway, I’m gonna tell you the story of selling my husband’s car.

    Also known as the day I almost killed my husband. Twice.

    It took months to convince my husband we needed to sell his car. (Which is a total exaggeration because we only had 6 weeks to prepare for the move but whatever.) He was convinced the Army would pay to have it shipped. And I was all, “Bro, I’ve been waiting for a referral from Tricare since October – the Army isn’t paying for anything they don’t absolutely have to.”

    So literally 3 days before the movers came, he finally agreed. 

    Our neighbor told us to take it to Carmax and after they looked at the car, made an offer, blah blah blah, my husband says, “I think I threw the registration out.”

    Yeah, he cleaned the car out before we drove down there and threw EVERYTHING out. EVERYTHING. 

    So we drove the 30 minutes home, dug threw the trash (that was already at the street for pickup), found the registration and drove back. 

    And then he realized he didn’t have the title either. 

    Omg. 

    So back home we went but he didn’t remember seeing the title in the car so we tore apart the house because at this point, I’m panicking. I didn’t know what we were going to do if we had to move this car with us.

    Around this time I also realized that I’m a hoarder because while tearing apart my closet, I found prescription packaging from, like, 2006. And paystubs from earlier than that.

    So he eventually found the title. In a bag that went to Afghanistan with him.

    WHAT. 

    HOW. 

    And then, 5 hours after starting this ordeal, we finally got rid of the dang car. And then got Chinese food as celebration of not having to take a 15 year old car with no a/c on a 2 day drive to Texas. 

    Anyway, Glazed Lemon Bread! 

    I finally remembered to buy baking powder and baking soda and all that! And this was delicious. In fact, I had a perfectly Paleo day yesterday and ruined it with a slice of this. Because I have no willpower. 

    Ingredients

    • Flour
    • Baking powder
    • Baking soda
    • Butter – make sure to soften it before beginning the recipe.
    • Sugar – you are going to use sugar in the bread and the syrup that gets poured over the bread.
    • Eggs
    • Lemons – you will be using the zest and juice from the lemons.
    • Sour cream – sour cream adds moistness to the bread and just a slight tang.
    • Vanilla
    • Powdered sugar – this is for the glaze. It’s more fine than granulated sugar so it makes a really smooth glaze.

    How To Make Glazed Lemon Bread

    To make the cake:

    1. Dry ingredients. Sift together flour, baking powder, baking soda, and salt.
    2. Wet ingredients. Cream butter and sugar together until light and fluffy. Add eggs, one at at time, and beat until combined. Add zest, juice, sour cream, and vanilla and beat until everything is incorporated.
    3. Combine. Slowly add in flour and beat until just combined. Pour into a prepared 9×5-inch loaf pan.
    4. Bake. Bake at 350F for 45 – 50 minutes. Cool in pan for about 10 minutes and then remove to a wire rack with aluminum foil or paper towels underneath.
    5. Prep for syrup. Use a fork to poke holes in the loaf.
    6. Make syrup. Heat lemon juice and sugar in a small saucepan over low heat until all the sugar is dissolve. Brush the mixture over the top of the bread.
    7. Make glaze. Whisk together powdered sugar and lemon juice until it reaches a drizzling consistency. Once the bread is completely cool, drizzle the glaze over top.

    More Quick Bread Recipes

    • Pumpkin Swirl Bread
    • Banana Nut Bread
    • Glazed Eggnog Bread
    • PB&J Banana Bread
    • Lemon Raspberry Zucchini Bread

    Make sure you subscribe to my email list to get all my new recipes delivered right to your inbox!

    You can also follow me on Instagram, Facebook, or Pinterest for even more! 

    📖 Recipe

    Yield: about 12 servings

    Glazed Lemon Bread

    Glazed Lemon Bread

    Prep Time 20 minutes
    Cook Time 50 minutes
    Total Time 1 hour 10 minutes

    Ingredients

    For the lemon cake

    • 1 ½ cups flour
    • 1 teaspoon baking powder
    • ⅛ teaspoon baking soda
    • ½ teaspoon salt
    • 1 cup 2 sticks unsalted butter, softened
    • 1 cup sugar
    • 4 eggs
    • 2 tablespoons lemon zest, from about 2 lemons
    • 2 tablespoons fresh lemon juice, about 1 lemon
    • ¼ cup sour cream
    • 1 teaspoon vanilla

    For the lemon syrup

    • 3 tablespoons fresh lemon juice
    • 3 tablespoons sugar

    For the glaze:

    • 1 cup powdered sugar
    • 2- 3 tablespoons fresh lemon juice

    Instructions

    To make the cake:

    1. Preheat oven to 350F. Butter a 9x5" loaf pan.
    2. Sift together flour, baking powder, baking soda, and salt. Set aside.
    3. Cream butter and sugar together until light and fluffy. Add eggs, one at at time, and beat until combined. Add zest, juice, sour cream, and vanilla and beat until everything is incorporated. Slowly add in flour and beat until just combined. Pour into the prepared loaf pan.
    4. Bake for 45 - 50 minutes, until a toothpick inserted into the center comes out clean. Cool in pan for about 10 minutes and then remove to a wire rack with aluminum foil or paper towels underneath. Use a fork to poke holes in the loaf.

    To make the syrup, heat lemon juice and sugar in a small saucepan over low heat until all the sugar is dissolve. Do not allow to boil. Brush the mixture over the top of the bread.

      To make the glaze, whisk together powdered sugar and lemon juice until it reaches a drizzling consistency. Once the bread is completely cool, drizzle the glaze over top.

        Recommended Products

        As an Amazon Associate and member of other affiliate programs, I earn from qualifying purchases.

        • Electric Mixer
          Electric Mixer
        • Loaf Pan
          Loaf Pan

        Nutrition Information:

        Yield:

        12

        Serving Size:

        1

        Amount Per Serving: Calories: 348Total Fat: 18gSaturated Fat: 11gTrans Fat: 0gUnsaturated Fat: 6gCholesterol: 105mgSodium: 170mgCarbohydrates: 44gFiber: 1gSugar: 30gProtein: 4g

        Did you make this recipe?

        Tag me in your Instagram photo - @fakeginger

        © Amanda Livesay
        Cuisine: American / Category: breads

        Southwestern Pasta Salad

        Apr 28, 2015

        Happy Tuesday, guys!

        I’m bringing you my new favorite pasta salad recipe the day after I decided to go completely Paleo for a week! Gahhhhh!

        My husband grilled both nights over the weekend and left me in charge of side dishes. (He made this chicken with thighs instead of breasts and it was delicious and then he did the boys’ favorite smoked sausage with barbecue sauce.) 

        I always go for the same couple side dishes with grilled foods. I always go for the same broccoli salad because we never get tired of it and then always pasta salad.

        I tried this Southwestern Pasta Salad recipe because it seemed lighter than most pasta salad recipes. No heavy sauce, you know? This recipe uses salsa and then a light olive oil and lime juice dressing – it’s delicious! I’m obsessed with all things bean right now (conveniently not Paleo) and I was all about the combination of  black beans, corn, and avocado. 

        …

        Read More

        « Previous Page
        Next Page »

        Primary Sidebar

        Amanda Livesay
        Hi, I'm Amanda! DFW food blogger, mom of boys, and crazy dog lady.
        Read more
        Privacy Policy
        Privacy Policy

        Footer

        ↑ back to top

        About

        • Privacy Policy
        • About Fake Ginger

        Newsletter

        • Sign Up for weekly emails featuring new recipes!

        As an Amazon Associate I earn from qualifying purchases.

        Copyright © 2024 FakeGinger.com