• Skip to primary navigation
  • Skip to main content
  • Skip to primary sidebar
  • Home
  • About
  • Recipes

Fake Ginger

menu icon
go to homepage
  • Recipe Index
  • About
  • Subscribe
    • Facebook
    • Instagram
    • Pinterest
  • subscribe
    search icon
    Homepage link
    • Recipe Index
    • About
    • Subscribe
    • Facebook
    • Instagram
    • Pinterest
  • ×
    Home » Page 56

    Chocolate Cupcakes with Peanut Butter Cream Cheese Frosting

    Chocolate Cupcakes with Peanut Butter Cream Cheese Frosting

    Jul 01, 2010

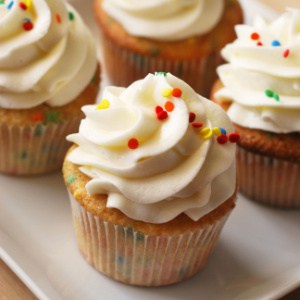
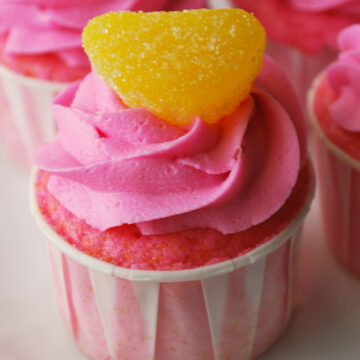
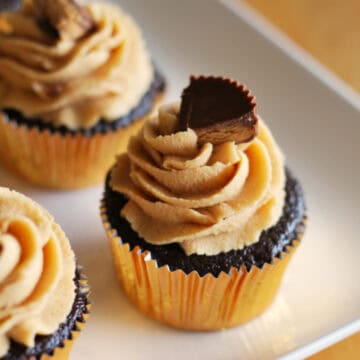
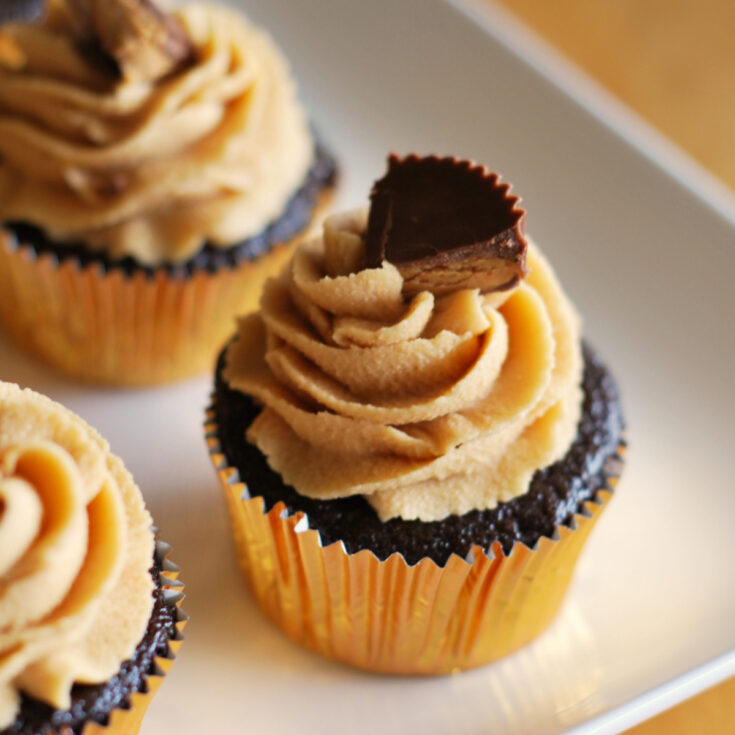
    Chocolate Cupcakes with Peanut Butter Cream Cheese Frosting are light and fluffy chocolate cupcakes topped with the most delicious frosting on top. Like a Reese’s cup as a cupcake!

    Chocolate Cupcakes with Peanut Butter Frosting - light and fluffy chocolate cupcakes topped with peanut butter cream cheese frosting. Like a Reese's cup as a cupcake!

    My husband’s birthday was this week. He said he wanted tacos for his birthday so I left that one up to him and decided to make him some cupcakes inspired by his favorite candy: the peanut butter cup!

    There are really no words to describe these cupcakes. The cake itself was moist and as light as a cake that had whipped egg whites folded in. Of course the frosting is amazing. You can’t go wrong with cream cheese and peanut butter.

    I won’t lie to you, I had 3 of these. And I don’t even like chocolate cake.

    Ingredients for Chocolate Cupcakes

    • Unsweetened cocoa powder – find this in the baking aisle of every grocery store.
    • All-purpose flour
    • Sugar
    • Baking soda
    • Baking powder
    • Salt
    • Eggs
    • Buttermilk – buttermilk helps to keep the cupcakes soft and moist for as long as possible.
    • Vegetable oil – you can use canola oil if you prefer
    • Vanilla – if you have vanilla bean paste, that’s even more delicious!

    How To Make Chocolate Cupcakes

    • Dry ingredients. Sift together cocoa powder, flour, sugar, baking soda, baking powder, and salt into a large bowl.
    • Wet ingredients. Add eggs, warm water, buttermilk, oil, and vanilla, and mix until smooth, about 3 minutes.
    • Transfer.Divide batter evenly among muffin cups, filling each ⅔ full.
    • Bake. Bake at 350F until tops spring back when touched, about 20 minutes.
    • Cool. Let cool completely.
    Chocolate Cupcakes with Peanut Butter Frosting - light and fluffy chocolate cupcakes topped with peanut butter cream cheese frosting. Like a Reese's cup as a cupcake!

    Ingredients for Peanut Butter Cream Cheese Frosting

    • Cream cheese – make sure to soften it before beginning so you can a really smooth frosting
    • Powdered sugar – powdered sugar is great in frosting because it melts into whatever you are mixing it with
    • Salt – just a tiny bit to bring out all the flavors
    • Creamy peanut butter – I don’t recommend using a natural peanut butter. Something like Jif or Skippy makes the smoothest frosting.
    • Vanilla
    • Heavy cream – this gets whipped and folded into the frosting to make it nice and light.

    How To Make Peanut Butter Cream Cheese Frosting

    • Beat. Beat cream cheese and powdered sugar until pale and fluffy. Add salt and peanut butter, and beat to combine. Beat in vanilla.
    • Whip cream. Beat cream until medium-stiff peaks form.
    • Fold. Fold cream into peanut-butter mixture.

    How Long Are Cupcakes Good For

    Because these cupcakes are made with cream cheese frosting, they need to be stored in the refrigerator. You can leave them out on the counter for up to 8 hours but after that, put them in the fridge. 

    They will stay good in the fridge for up to 3 days. 

    Can You Make It Ahead?

    Cupcakes are best made the day they are going to be served. If you do need to make them ahead, I’d recommend freezing them. Let them cool completely and then place in a freezer ziploc bag. Let them sit on the counter for several hours before frosting and serving.

    The peanut butter cream cheese frosting will be fine in the fridge for up to 2 days. Make sure to store it in an airtight container.

    Can You Freeze Them?

    The cupcakes can be frozen for up to 3 months. Freeze them in an airtight container. Let them defrost at room temperature before frosting and serving.

    The cream cheese frosting can also be frozen for up to 3 months. Make sure to store it in an airtight container like a freezer ziploc bag. Defrost it in the fridge overnight and then let me sit at room temperature until it is ready to be piped or spread onto your cupcakes.

    More Cupcakes Recipes

    • Ice Cream Cone Cupcakes
    • Cherry Coke Cupcakes
    • Strawberry Lemonade Cupcakes
    • Carrot Cake Cupcakes with Cream Cheese Frosting
    • Pink Velvet Funfetti Cupcakes

    Make sure you subscribe to my email list to get all my new recipes delivered right to your inbox!

    You can also follow me on Instagram, Facebook, or Pinterest for even more! 

    📖 Recipe

    Yield: 12 cupcakes

    Chocolate Cupcakes with Peanut Butter Cream Cheese Frosting

    Chocolate Cupcakes with Peanut Butter Cream Cheese Frosting
    Prep Time 20 minutes
    Cook Time 20 minutes
    Total Time 40 minutes

    Ingredients

    For the cupcakes:

    • ¾ cup unsweetened cocoa powder
    • 1 ½ cups all-purpose flour
    • 1 ½ cups sugar
    • 1 ½ teaspoons baking soda
    • ¾ teaspoon baking powder
    • ¾ teaspoon salt
    • 2 large eggs
    • ¾ cup warm water
    • ¾ cup buttermilk
    • 3 tablespoons vegetable or canola oil
    • 1 teaspoon pure vanilla extract

    For the frosting:

    • 6 ounces cream cheese, room temperature
    • ⅓ cup powdered sugar
    • ½ teaspoon salt
    • 1 cup creamy peanut butter, not natural
    • ½ teaspoon pure vanilla extract
    • ½ cup heavy cream

    Instructions

    For the cupcakes:

    1. Preheat oven to 350 degrees. Line standard muffin tins with paper liners; set aside. Sift together cocoa powder, flour, sugar, baking soda, baking powder, and salt into a large bowl. Add eggs, warm water, buttermilk, oil, and vanilla, and mix until smooth, about 3 minutes. Scrape down the sides and bottom of bowl to assure batter is well mixed.
    2. Divide batter evenly among muffin cups, filling each ⅔ full. Bake until tops spring back when touched, about 20 minutes, rotating pan once if needed. Transfer to a wire rack; let cool completely.

    For the frosting:

    1. With an electric mixer on medium-high speed, beat cream cheese and powdered sugar until pale and fluffy. Add salt and peanut butter, and beat to combine. Beat in vanilla.
    2. In another bowl, with an electric mixer on medium-speed, whisk cream until medium-stiff peaks form. Fold cream into peanut-butter mixture. Use immediately, or refrigerate, covered tightly, up to 2 days. Before using, bring to room temperature and stir with a flexible spatula until smooth.

    Recommended Products

    As an Amazon Associate and member of other affiliate programs, I earn from qualifying purchases.

    • Anolon Muffin Tin
      Anolon Muffin Tin
    • Parchment Muffin Liners
      Parchment Muffin Liners

    Nutrition Information:

    Yield:

    12

    Serving Size:

    1

    Amount Per Serving: Calories: 436Total Fat: 22gSaturated Fat: 8gTrans Fat: 0gUnsaturated Fat: 11gCholesterol: 57mgSodium: 600mgCarbohydrates: 53gFiber: 3gSugar: 34gProtein: 10g

    Did you make this recipe?

    Tag me in your Instagram photo - @fakeginger

    © Amanda Livesay
    Cuisine: American / Category: cake

    Lemon Poppy Seed Cake with Raspberry Curd Filling

    Jun 23, 2010

    Lemon Poppy Seed Cake with Raspberry Curd is light and fluffy lemon poppy seed cake with a homemade raspberry curd layer and a lemon buttercream. 

    If you love all things lemon poppy seed, you have to try Lemon Poppy Seed Cookies!

    Lemon Poppy Seed Cake with Raspberry Curd - light and fluffy lemon poppy seed cake with a homemade raspberry curd layer and a lemon buttercream.

    I told you in my ice cream post that I really don’t like my birthday and the only reason that I let my husband invite friends over for burgers this past weekend was because I didn’t realize it was my birthday until it was too late.

    I used my birthday/friends coming over as an excuse to make this cake that I’ve wanted to make for so long. You guys know that I am very much against fruit in desserts but the cake just spoke to me for some reason. I think it’s because I love the lemon & raspberry combination.

    This cake turned out so beautiful. I love the little black specks throughout. The lemon zest was tart and the crumb light and fluffy. The curd was smooth and a nice change from typical layer cake filling.

    Ingredients for Raspberry Curd

    • Unsalted butter – if you need to use salted butter, leave out the salt called for.
    • Ripe raspberries – you can use frozen raspberries if the fresh raspberries aren’t looking great.
    • Egg yolks – use the leftover egg whites in the cake or make Coconut Macaroons.
    • Sugar
    • Salt
    • Lemon juice – this adds a little brightness to the curd.

    How To Make Raspberry Curd

    • Melt the butter in a large saucepan over medium heat.
    • Add the raspberries, egg yolks, sugar and salt, and cook, mashing the berries.
    • Stir until thickened, about 10 minutes.
    • Pour the mixture through a coarse strainer set over a bowl, pressing hard on the solids to extract as much liquid as possible.
    • Cool to room temperature.
    • Stir in lemon juice to taste.
    • Cover and refrigerate until ready to serve.
    Lemon Poppy Seed Cake with Raspberry Curd - light and fluffy lemon poppy seed cake with a homemade raspberry curd layer and a lemon buttercream.

    Ingredients for Lemon Poppy Seed Cake

    • Cake flour – cake flour make for a lighter, fluffier cake. You can use all-purpose flour if you can’t find cake flour.
    • Baking powder
    • Salt
    • Poppy seeds – find these in the spices section of your grocery store. You may need multiple containers depending on their size.
    • Egg whites – you can use the yolks in the raspberry curd for this recipe.
    • Cream of tartar – this is going to be with the spices in the grocery store. It gets better with the egg whites to produce a fluffy mixture that doesn’t completely deflate when folded into the cake batter.
    • Sugar
    • Lemons – you will be using the zest in the cake and the juice in the buttercream frosting.
    • Butter – this is going in the buttercream frosting.
    • Powdered sugar – you want powdered sugar for your frosting because it gives you a smooth frosting that you wouldn’t get from granulated sugar.
    • Fresh raspberries – optional, but really makes the finished cake pretty.
    How Long Is It Good For?

    This cake will be fine for up to a week if covered and stored in the refrigerator. Store it in an airtight container so it doesn’t dry out. 

    I would bring it to room temperature (or at least take the chill off) by setting it on the counter for a while before serving it. 

    Lemon Poppy Seed Cake with Raspberry Curd - light and fluffy lemon poppy seed cake with a homemade raspberry curd layer and a lemon buttercream.

    More Lemon Cake Recipes

    • Lemon Angel Food Cake with Strawberries and Mint
    • Lemon Bar Cheesecake
    • Lemon Cupcakes with Strawberry Frosting
    • Lemon Lime Pound Cake
    • Meyer Lemon Strawberry Shortcakes
    • Pink Lemonade Cupcakes

    Make sure you subscribe to my email list to get all my new recipes delivered right to your inbox!

    You can also follow me on Instagram, Facebook, or Pinterest for even more! 

    📖 Recipe

    Yield: 20 servings

    Lemon Poppy Seed Cake with Raspberry Curd Filling

    Lemon Poppy Seed Cake with Raspberry Curd Filling
    Prep Time 30 minutes
    Cook Time 40 minutes
    Total Time 1 hour 10 minutes

    Ingredients

    For the cake:

    • 2 ⅓ cups cake flour
    • 2 ¾ tsp. baking powder
    • ¼ tsp. salt
    • 1 ½ tbsp. poppy seeds
    • 5 large egg whites, at room temperature
    • ¼ tsp. cream of tartar
    • 1 ½ cups sugar
    • 2 tbsp. finely grated lemon zest
    • 12 tsbp. unsalted butter, at room temperature
    • 1 cup whole milk

    For the raspberry curd:

    • 8 tbsp. unsalted butter
    • 1 pint ripe raspberries or 1 12-oz. package frozen raspberries, thawed
    • 5 large egg yolks, lightly beaten
    • ¾ cup sugar
    • Pinch of salt
    • 2-3 tsp. fresh lemon juice

    For the lemon buttercream frosting:

    • 16 tbsp. unsalted butter, at room temperature
    • 2 tbsp. finely grated lemon zest
    • 3 cups sifted powdered sugar
    • 3 tbsp. fresh lemon juice
    • Fresh raspberries, for garnish

    Instructions

    1. To make the cake, position a rack in the middle of the oven and preheat the oven to 350 degrees F. Butter and flour 2 9-inch round cake pans. Whisk together the flour, baking powder, salt, and poppy seeds in a bowl; set aside. In the clean, dry bowl of an electric mixer fitted with the whisk attachment, beat the egg whites on medium speed until foamy. Add the cream of tartar and increase the speed to medium-high. Beat just until stiff peaks form when the whisk is lifted. Transfer the egg whites to a separate bowl, clean the mixer bowl and reattach it with the paddle attachment.
    2. Add the butter to the mixer bowl and beat on medium speed until smooth. Gradually add the sugar and beat until incorporated. Mix in the lemon zest. Beat the mixture on medium-high speed until light and fluffy. Add ¼ cup of the milk and beat until just blended. Reduce the speed to low and add the flour mixture alternately with the remaining milk in three batches, beginning and ending with the flour, scraping down the sides of the bowl as necessary. Beat until just blended. Using a rubber spatula, fold one quarter of the egg whites into the batter, being careful not to deflate the mixture. Once incorporated, add in the rest of the whites and gently fold in until well combined.
    3. Pour the batter into the prepared pans and bake until golden and a toothpick inserted in the center comes out clean, about 25-30 minutes. Cool the cakes in the pan on a wire rack for 10 minutes. Run a thin knife around the outside of pans and gently turn the cakes out. Allow to cool completely.
    4. To make the raspberry curd, melt the butter in a large saucepan over medium heat. Add the raspberries, egg yolks, sugar and salt, and cook, mashing the berries. Stir frequently at first and then constantly at the end, until thickened, about 10 minutes. Pour the mixture through a coarse strainer set over a bowl, pressing hard on the solids to extract as much liquid as possible. Cool to room temperature; the curd will continue to thicken as it cools. Stir in lemon juice to taste. Cover and refrigerate until ready to serve.
    5. Layer the rounds with the cooled raspberry curd. Once layered, allow the assembled cake to cool in the refrigerator to help them set. In the meantime, make the frosting. In the bowl of an electric mixer fitted with the paddle attachment, beat the butter and zest on medium speed until light and fluffy. Gradually add the sugar and beat until smooth. Add the lemon juice and beat for one minute longer.
    6. Frost the chilled cakes with the lemon frosting. Garnish with fresh raspberries as desired.

    Recommended Products

    As an Amazon Associate and member of other affiliate programs, I earn from qualifying purchases.

    • Parchment Paper
      Parchment Paper
    • Fine Mesh Strainer
      Fine Mesh Strainer
    • 9-inch Cake Pan
      9-inch Cake Pan

    Nutrition Information:

    Yield:

    20

    Serving Size:

    1

    Amount Per Serving: Calories: 499Total Fat: 23gSaturated Fat: 14gTrans Fat: 0gUnsaturated Fat: 8gCholesterol: 112mgSodium: 144mgCarbohydrates: 70gFiber: 3gSugar: 55gProtein: 5g

    Did you make this recipe?

    Tag me in your Instagram photo - @fakeginger

    © Amanda Livesay
    Category: cake

    Black Pepper Chicken

    Jun 15, 2010

    If you know me at all, you know I have a strange love for Chinese buffets. Odds are, if we’re friends, we’ve gone at least once together. You guys might remember that my baby was in the NICU for a week back at the end of last year and wasn’t allowed to leave the house for awhile – his first outing was to a Chinese buffet. Yeah, me and the Chinese food –  we’re like this *crosses fingers*.

    I have tried time and time again to recreate my favorite Chinese dishes at home but I’ve never had much luck.

    We loved this. It actually wasn’t very spicy but that could be because I used the cheap powdered pepper. If you use the good stuff, it will probably be a good amount of spice. The sauce turned out just as I’d hoped and was perfect with the chicken and veggies. I will definitely be making this one again.

    📖 Recipe

    0 from 0 votes
    Print

    Black Pepper Chicken

    from Blog Chef

    Ingredients

    • 1 pound boneless skinless chicken breasts or thighs
    • 6 tablespoons cornstarch
    • 1 white onion diced
    • 1 cup frozen peas and carrots
    • oil

    For the sauce:

    • ¼ cup oyster sauce
    • 1 teaspoon soy sauce
    • 1 teaspoon black pepper
    • ½ teaspoon white pepper
    • 1 teaspoon rice wine vinegar
    • 1 tablespoon honey

    Instructions

    1. Mix together all sauce ingredients and set aside.
    2. Cut chicken pieces into bite sized pieces and dust in cornstarch. Fry until golden brown and cooked through. Remove from pan and drain on paper towels. Add 1 teaspoon of oil into the same pan. Saute onion until it just softens. Add peas and carrots and cook until warmed through. Pour in sauce and heat until bubbling. Add chicken and toss to coat in the sauce.

    Homemade Funfetti Cupcakes

    Jun 07, 2010

    A homemade version of everyone’s favorite party cupcake! Homemade Funfetti Cupcakes are light and fluffy vanilla cupcakes with sprinkles.

    Funfetti is my alltime favorite flavor. I love Funfetti Muddy Buddies, Funfetti Gooey Butter Cake, Funfetti Blondies, I love all things funfetti.

    These Homemade Funfetti Cupcakes are even better than the boxed mix! They are my go to cupcakes for birthdays or barbecues or any time someone needs to be cheered up.

    Ingredients

    • 1 ¼ cups all-purpose flour
    • 2 teaspoon baking powder
    • ½ teaspoon salt
    • 6 tablespoon unsalted butter
    • 1 cup sugar
    • 3 large egg whites
    • 1 teaspoon vanilla
    • ¼ teaspoon almond extract
    • ½ cup milk
    • ¼ cup rainbow sprinkles
    • 1 batch vanilla buttercream

    Instructions

    • Preheat oven to 350F. Line 12 muffin cups with parchment liners.
    • Combine flour, baking powder, and salt in a small bowl; set aside.
    • Cream butter and sugar together until light and fluffy. Add egg whites and beat until combined. Add vanilla and almond extracts; mix well.
    • Add dry ingredients to wet ingredients in 3 additions, alternating with the milk.
    • Use a rubber spatula to fold in sprinkles.
    • Divide batter evenly among the prepared muffin cups.
    • Bake about 20 minutes, until a toothpick inserted into the center of a cupcake comes out clean.
    • Cool completely before frosting.

    Can You Freeze Funfetti Cupcakes?

    Yes, you can freeze these Homemade Funfetti Cupcakes! I would freeze them without the frosting and frost them when you are ready to serve.

    I like to wrap each cupcake individually in plastic wrap and then place all of them in a freezer ziploc bag. This keeps as much air out as possible so they stay nice and fluffy.

    More Cupcakes Recipes

    • Peanut Butter Cupcakes with Chocolate Buttercream
    • Pumpkin Spice Cupcakes
    • Apple Spice Cupcakes
    • Cinnamon Toast Crunch Cupcakes
    • Small Batch Red Velvet Cupcakes

    Make sure you subscribe to my email list to get all my new recipes delivered right to your inbox!

    You can also follow me on Instagram, Facebook, or Pinterest for even more! 

    📖 Recipe

    Yield: 12 cupcakes

    Homemade Funfetti Cupcakes

    Homemade Funfetti Cupcakes

    A homemade version of everyone's favorite party cupcake! Homemade Funfetti Cupcakes are light and fluffy vanilla cupcakes with sprinkles.

    Prep Time 20 minutes
    Cook Time 20 minutes
    Additional Time 10 minutes
    Total Time 50 minutes

    Ingredients

    • 1 ¼ cups all-purpose flour
    • 2 teaspoons baking powder
    • ½ teaspoon salt
    • 6 tablespoons unsalted butter (at room temperature)
    • 1 cup sugar
    • 3 large egg whites
    • 1 teaspoon vanilla extract
    • ¼ teaspoon almond extract
    • ½ cup milk
    • ¼ cup rainbow sprinkles

    Instructions

    1. Preheat the oven to 350 degrees F. Line or spray 12 muffin cups.
    2. In a small bowl, combine the flour, baking powder, and salt. Stir together and set aside.
    3. In the bowl of a stand mixer, cream the butter and sugar until light and fluffy. Add the egg whites to the bowl and beat until combined. Add in the vanilla and almond extracts and mix until incorporated.
    4. Mix in the dry ingredients in three additions, alternating with the milk, beginning and ending with the dry ingredients. Mix just until incorporated. Fold in the sprinkles with a spatula.
    5. Divide the batter evenly between the muffin cups. Bake until a toothpick inserted in the middle comes out clean, about 20 minutes.
    6. Allow to cool in pans 10 minutes, then remove to a wire rack to cool completely.

    Recommended Products

    As an Amazon Associate and member of other affiliate programs, I earn from qualifying purchases.

    • My Favorite Frosting Tips
      My Favorite Frosting Tips
    • Almond Extract
      Almond Extract
    • Rainbow Sprinkles
      Rainbow Sprinkles
    • Parchment Muffin Liners
      Parchment Muffin Liners
    • My Favorite Muffin Tin
      My Favorite Muffin Tin

    Nutrition Information:

    Yield:

    12

    Serving Size:

    1

    Amount Per Serving: Calories: 193Total Fat: 7gSaturated Fat: 4gTrans Fat: 0gUnsaturated Fat: 3gCholesterol: 16mgSodium: 190mgCarbohydrates: 30gFiber: 0gSugar: 19gProtein: 3g

    Did you make this recipe?

    Tag me in your Instagram photo - @fakeginger

    © Amanda Livesay
    Category: cake

    Baked Hushpuppies

    May 21, 2010

    On the rare occasion that we go out for seafood, the hushpuppies are the first thing gone from mine and my husband’s plates. We love them! And what’s not to love about a fried piece of dough with onion and spices?! I’m not one for frying things at home though so I never considered making them until I found a recipe for a baked version.

    These were very good although not really hushpuppy-like. They were more like cornbread muffins but I also have a deep love for cornbread so I’m not complaining. I made them two days in a row if that says anything. ;) They were excellent with fish and are a good alternative to the fried ones.

    📖 Recipe

    0 from 0 votes
    Print

    Baked Hushpuppies

    Ingredients

    • ⅔ cup cornmeal
    • ⅓ cup flour
    • 1 teaspoon baking powder
    • ¾ teaspoon salt
    • ½ teaspoon Old Bay seasoning
    • Pinch black pepper
    • ½ cup green onion finely diced
    • ⅓ cup milk
    • 2 eggs beaten
    • 2 tablespoon butter melted

    Instructions

    1. Preheat the oven to 450 degrees and grease a 24-cup mini muffin pan.
    2. Combine all of the dry ingredients. Separately, combine the green onion, milk, eggs and butter. Fold the milk mixture into the flour mixture until just blended.
    3. Spoon 1 tablespoon of batter into each cup, then bake for 10 minutes or until the hush puppies are set and golden around the edges.

    Whole Wheat Pita Bread

    May 20, 2010

    I have a problem. A hummus problem. I was able to ignore the problem for awhile because who really wants to spend $4 on a tiny container of the stuff. But then my husband got me a membership to Sam’s and now I have access to tubs of hummus the size of my head for 5 bucks!  I put it on everything: sandwiches, salads, veggies, and the obvious pita bread.

    Pita bread is so perfect with hummus. Something about how the bread tears apart makes for the best dipping. Plus you can make pita chips! Normally I go for white pita bread when I make it but I decided to give a whole wheat version a try and it came out perfect. The storebought whole wheat pita bread seems to have a little extra chew that isn’t always pleasant but these didn’t have that at all. They were just the right amount of chewiness.

    📖 Recipe

    0 from 0 votes
    Print

    Whole Wheat Pita Bread

    Ingredients

    • 1 tablespoon sugar
    • 1 package dry yeast about 2 ¼ teaspoons
    • 1 cup plus 2 tablespoons warm water 100° to 110°
    • 10 ounce bread flour about 2 ¼ cups
    • 4.75 ounces white whole-wheat flour about 1 cup, divided
    • 2 tablespoons plain yogurt
    • 1 tablespoon extra-virgin olive oil
    • ¾ teaspoon salt
    • Olive oil cooking spray

    Instructions

    1. Dissolve sugar and yeast in 1 cup plus 2 tablespoons warm water in a large bowl; let stand 5 minutes. Weigh or lightly spoon flours into dry measuring cups; level with a knife. Add bread flour, 3 ounces (about ¾ cup) whole-wheat flour, yogurt, oil, and salt to the yeast mixture; beat with a mixer at medium speed until smooth. Turn the dough out onto a floured surface. Knead dough until smooth and elastic (about 10 minutes); add enough of remaining whole-wheat flour, 1 tablespoon at a time, to prevent dough from sticking to hands (dough will feel sticky). Place dough in a large bowl coated with cooking spray, turning to coat top. Cover and let rise in a warm place (85°), free from drafts, for 45 minutes or until doubled in size.
    2. Position the oven rack on the lowest shelf. Preheat the oven to 500°.
    3. Divide dough into 8 portions. Working with one portion at a time, gently roll each portion into a 5 ½-inch circle. Place 4 dough circles on each of 2 baking sheets heavily coated with cooking spray. Bake, 1 sheet at a time, at 500° for 8 minutes or until puffed and browned. Cool on a wire rack.

    Pecan Brownies

    May 15, 2010

    Brownies. The ultimate, at least in my mind, comfort food. I’m not sure I’ve ever met a brownie I didn’t like. Sure, there are brownies that aren’t amazing but I just don’t think I’ve ever said, “Wow, this brownie is awful”. How could chewy chocolate ever be bad?

    This one is definitely among the best brownies I’ve ever tried. It’s very chewy and the chocolate chips mixed in are a rich surprise. I think it could use more pecans but I’m a huge fan of crunch in brownies. I think this one will become my regular recipe for days when I just need a chocolate fix.

    📖 Recipe

    Yield: 36 brownies

    Pecan Brownies

    Prep Time 15 minutes
    Cook Time 35 minutes
    Total Time 50 minutes

    Ingredients

    • 1 cup butter at room temperature
    • 2 cups sugar
    • 2 teaspoons vanilla
    • 4 eggs slightly beaten
    • 1 cup all-purpose flour
    • ½ cup unsweetened cocoa
    • ½ teaspoon salt
    • 8 ounces semi-sweet chocolate chips
    • 1 cup pecans chopped

    Instructions

      1. Heat oven to 350 degrees F. Grease a 13 by 9-inch pan.
      2. Beat butter until fluffy. Add sugar, vanilla and eggs; blend well.
      3. In a separate bowl, combine flour, cocoa, and salt.
      4. Add flour mixture to butter mixture and stir until just combined.
      5. Gently fold in chocolate chip and pecans.
      6. Pour into prepared pan.
      7. Bake for 30 to 40 minutes or until set.
      8. Cool. Cut into 36 bars.

    Recommended Products

    As an Amazon Associate and member of other affiliate programs, I earn from qualifying purchases.

    • Parchment Paper
      Parchment Paper
    • 9x13 Glass Baking Dish
      9x13 Glass Baking Dish

    Nutrition Information:

    Yield:

    36

    Serving Size:

    1

    Amount Per Serving: Calories: 164Total Fat: 10gSaturated Fat: 5gTrans Fat: 0gUnsaturated Fat: 4gCholesterol: 34mgSodium: 79mgCarbohydrates: 19gFiber: 1gSugar: 15gProtein: 2g

    Did you make this recipe?

    Tag me in your Instagram photo - @fakeginger

    © Amanda Livesay
    Cuisine: American / Category: brownies

    Pink Lemonade Cupcakes

    May 14, 2010

    Pink Lemonade Cupcakes topped with pink lemonade frosting are a must make for lemonade lovers! They start with a cake mix so it’s a really easy recipe.

    I love a cupcake recipe that starts with a box of cake mix. That means that it’s not only going to be super easy to make, but it’s going to be delicious because when has a cake mix ever failed you?

    These are cupcakes flavored with frozen pink lemonade concentrate and then they’re topped with pink lemonade frosting!

    Definitely a must make for lemonade fans!

    Ingredients

    • White cake mix – use your favorite brand of cake mix.
    • Egg whites – using egg whites makes for light, fluffy cupcakes.
    • Frozen pink lemonade concentrate
    • Vegetable oil
    • Pink food coloring – if you are against food coloring, you can leave it out. The pink lemonade concentrate should give them a slight pink tint.
    • Powdered sugar – this is for the frosting. You want to use powdered sugar so that you get a really smooth, creamy frosting.
    • Butter – make sure your butter is soft before you begin making the frosting.
    • Lemon candies – optional but they do make the cupcakes really cute.

    How To Make Pink Lemonade Cupcakes

    • Make batter. Beat cake mix, egg whites, water, ⅓ cup concentrate, oil, and a few drops of food coloring in large bowl with electric mixer at medium speed for 2 minutes.
    • Transfer. Spoon batter evenly into paper lined muffin cups.
    • Bake. Bake at 350F for 18 to 22 minutes or until toothpick inserted into centers comes out clean.
    • Cool. Cool completely on wire rack before frosting.
    • Make frosting. Beat sugar, butter, and remaining ¼ cup concentrate in medium bowl with mixer at medium speed. Beat in a few drops food coloring.
    • Decorate. Frost cupcakes and decorate with lemon candy.

    How Long Are They Good For?

    These cupcakes will be good for up to 5 days. Make sure to store them in an airtight container at room temperature.

    Can You Freeze Them?

    You can freeze the unfrosted cupcakes for up to 3 months. I would wrap them tightly with plastic wrap and then place them in a freezer ziploc bag.

    When you are ready to serve them, let them sit at room temperature for several hours until defrosted. Then frost and serve!

    More Cupcake Recipes

    • Ice Cream Cone Cupcakes
    • Cherry Coke Cupcakes
    • Strawberry Lemonade Cupcakes
    • Carrot Cake Cupcakes with Cream Cheese Frosting
    • Chocolate Bacon Cupcakes with Peanut Butter Frosting

    Make sure you subscribe to my email list to get all my new recipes delivered right to your inbox!

    You can also follow me on Instagram, Facebook, or Pinterest for even more! 

    📖 Recipe

    Yield: 24 cupcakes

    Pink Lemonade Cupcakes

    Pink Lemonade Cupcakes

    Pink Lemonade Cupcakes topped with pink lemonade frosting are a must make for lemonade lovers! They start with a cake mix so it's a really easy recipe.

    Prep Time 20 minutes
    Cook Time 22 minutes
    Total Time 42 minutes

    Ingredients

    • 1 package (18 ounces) white cake mix
    • 3 egg whites
    • 1 cup of water
    • ⅓ cup plus ¼ cup of frozen pink lemonade concentrate, thawed
    • 2 tablespoons vegetable oil
    • pink food coloring
    • 4 cups sifted powdered sugar
    • ⅓ cup butter, softened
    • lemon candies for decoration

    Instructions

      1. Preheat oven to 350F. Line 24 muffin cups with paper baking cups.
      2. Beat cake mix, egg whites, water, ⅓ cup concentrate, oil, and a few drops of food coloring in large bowl with electric mixer at medium speed for 2 minutes. Spoon batter evenly into prepared muffin cups.
      3. Bake for 18 to 22 minutes or until toothpick inserted into centers comes out clean. Cool completely on wire rack before frosting.
      4. To make frosting, beat sugar, butter, and remaining ¼ cup concentrate in medium bowl with mixer at medium speed. Beat in a few drops food coloring. Frost cupcakes and decorate with lemon candy.

    Did you make this recipe?

    Tag me in your Instagram photo - @fakeginger

    © Amanda Livesay
    Cuisine: American / Category: cake


    Chocolate Angel Food Cake

    May 07, 2010

    Chocolate Angel Food Cake is a light and fluffy chocolate cake. Perfect with summer strawberries and fresh whipped cream!

    slice of chocolate angel food cake with strawberries and whipped cream

    As a food blogger I hardly ever make the same thing twice.

    It’s exciting and it’s fun but sometimes I just run out of things to make. When that happens my favorite way to find inspiration is to browse the food photography sites like Foodgawker or Tastespotting.

    I tell you this because I saw a chocolate angel food cake on one of those recently. I saw it and thought, “Eww, why would you mess up angel food cake with chocolate?!”

    Fast forward a week or so – I had a bunch of strawberries and all I could think about was making strawberry shortcakes with that cake!

    The cake was fantastic! The cake was so light and the chocolate, while it was obviously there, was not overpowering at all. I didn’t even make shortcakes because the cake was perfect on it’s own.

    overhead shot of chocolate angel food cake on a white plate with strawberries and whipped cream

    Ingredients

    • Cake flour – you want to use cake flour because it contains less protein than all-purpose flour which means it does not produce as much gluten and will give you a lighter, airy cake.
    • Cocoa powder
    • Powdered sugar
    • Egg whites – the recipe calls for 1 ½ cups of egg whites and that ended up being 11 eggs for me. You may need more or less depending on the size of your eggs.
    • Cream of tartar – this helps to stabilize the egg whites which helps the cake maintain it’s height and fluffy texture.
    • Salt – just a tiny bit to help all the other flavors stand out.
    • Vanilla
    • Sugar

    How To Make Chocolate Angel Food Cake?

    • Prep. Triple-sift cake flour, cocoa, and powdered sugar.
    • Beat egg whites. Combine egg whites, cream of tartar, salt, and vanilla. Beat until foamy. Gradually add sugar beating until meringue holds stiff peaks.
    • Add dry ingredients. Sift flour-sugar mixture over the meringue and fold in gently just until the flour-sugar mixture disappears.
    • Transfer. Place batter into an ungreased tube pan. Gently cut through batter with a knife to break up any air pockets.
    • Bake. Bake at 375F for 30 to 35 minutes.
    • Cool. Invert until cool.

    How Long Is It Good For?

    Chocolate angel food cake will be good for up to 5 days. Make sure to store it in an airtight cake container at room temperature.

    Can You Freeze It?

    You can freeze angel food cake for up to 3 months. I would slice whatever leftover cake you have and wrap them individually in plastic wrap and then place all of them in a freezer ziploc bag. That way you can take out one piece when you just need a little sweet treat.

    When you are ready to enjoy it, let it sit at room temperature for a few hours until defrosted.

    📖 Recipe

    Yield: about 12 servings

    Chocolate Angel Food Cake

    Chocolate Angel Food Cake

    Chocolate Angel Food Cake is a light and fluffy chocolate cake. Perfect with summer strawberries and fresh whipped cream!

    Prep Time 20 minutes
    Cook Time 35 minutes
    Total Time 55 minutes

    Ingredients

    • ¾ cup cake flour
    • ¼ cup cocoa powder
    • 1 ½ cups powdered sugar
    • 1 ½ cups egg whites (I used 11)
    • 1 ½ teaspoons cream of tartar
    • ⅓ teaspoon salt
    • 1 teaspoon vanilla
    • 1 cup sugar

    Instructions

      1. Preheat oven to 375. Set aside a 10 x 4-inch tube cake pan; do not grease.
      2. Triple-sift cake flour, cocoa, and powdered sugar. Set aside.
      3. In a large mixing bowl, combine egg whites, cream of tartar, salt, and vanilla. Beat until foamy. Gradually add sugar beating until meringue holds stiff peaks.
      4. Sift flour-sugar mixture over the meringue and fold in gently just until the flour-sugar mixture disappears.
      5. Place batter into tube pan. Gently cut through batter with a knife to break up any air pockets. Bake for 30 to 35 minutes, or until a toothpick inserted near center comes out clean. Invert until cool.

    Recommended Products

    As an Amazon Associate and member of other affiliate programs, I earn from qualifying purchases.

    • Angel Food Cake Pan
      Angel Food Cake Pan
    • Cake Container
      Cake Container

    Nutrition Information:

    Yield:

    12

    Serving Size:

    1

    Amount Per Serving: Calories: 300Total Fat: 1gSaturated Fat: 0gUnsaturated Fat: 1gSodium: 114mgCarbohydrates: 68gFiber: 1gSugar: 51gProtein: 6g

    Did you make this recipe?

    Tag me in your Instagram photo - @fakeginger

    © Amanda Livesay
    Cuisine: American / Category: cake

    Buckwheat Pancakes

    May 06, 2010

    Looking to change your pancake routine? Buckwheat Pancakes are delicious and hearty pancakes made with buckwheat flour.

    Buckwheat pancakes on a white plate with bananas and syrup on top

    My 3 year old loves pancakes. I mean, he really loves them. He requests them every time he spends the night with my parents and every time he tells me about his SheeShee’s pancakes I feel a little twinge of guilt since I never make them for him. The other day I found myself awake before him for the first time in quite awhile and decided to surprise him with his favorite breakfast treat.

    These buckwheat pancakes have no white flour in them – only whole wheat and buckwheat. Buckwheat is probably my favorite flour. I love the color it gives and it has a great nutty taste.

    The 3 year old loved them! I was worried because they’re heavier than most pancakes but he had them for breakfast and then grabbed the remaining pancakes out of the fridge a few hours later!

    buckwheat pancakes on a white plate with bananas and syrup on top.

    Ingredients

    • Buckwheat flour – this is a flour made from finely ground buckwheat groats. It’s naturally gluten free and full of fiber. I always order it online but you may be able to find it in a store like Whole Foods or Sprouts.
    • Whole wheat flour
    • Baking powder
    • Baking soda
    • Salt
    • Buttermilk – this creates really thick, fluffy pancakes because it reacts with the baking soda and inflates the batter.
    • Milk
    • Honey
    • Eggs
    • Canola oil

    How To Make Buckwheat Pancakes

    • Dry ingredients. Whisk together buckwheat flour, whole wheat flour, baking powder, baking soda, and salt.
    • Wet ingredients. Beat together buttermilk, milk, honey, eggs, and oil.
    • Combine. Stir wet ingredients into dry ingredients.
    • Cook. Use a ¼ cup measure to put batter onto a hot griddle. Cook until bottom is golden brown and bubbles start forming on the top, about 1 ½ minutes. Flip and cook until other side is golden brown, about 1 ½ minutes.
    • Repeat. Repeat with remaining batter.

    How Long Are Buckwheat Pancakes Good For?

    These pancakes will stay good for up to 3 days in the refrigerator. Cover them tightly to ensure freshness.

    Can You Freeze Buckwheat Pancakes?

    Yes, these Buckwheat Pancakes freeze beautifully! I like to freeze them in freezer ziploc bags, making sure to squeeze as much air as possible out of the bag. They will stay good for up to 2 months in the freezer.

    You can defrost them overnight in the fridge or defrost quickly in the microwave if you are in a hurry. Once defrosted, you can continue heating in the microwave or pop them in the toasted to crisp them up a little bit.

    More Pancakes Recipes

    • Pecan Oat Pancakes
    • Blueberry Sour Cream Pancakes
    • Peanut Butter Banana Pancakes
    • Pineapple Cinnamon Pancakes
    • Chocolate Chip Pancakes

    📖 Recipe

    Yield: 8 pancakes

    Buckwheat Pancakes

    Buckwheat Pancakes
    Prep Time 10 minutes
    Cook Time 15 minutes
    Total Time 25 minutes

    Ingredients

    • ¾ cup buckwheat flour
    • ¾ cup whole-wheat flour
    • 1 ½ teaspoons baking powder
    • ½ teaspoon baking soda
    • ¼ teaspoon salt
    • 1 cup buttermilk
    • ¾ cup nonfat milk
    • 1 tablespoon honey
    • 2 large eggs
    • 2 tablespoons canola oil

    Instructions

    1. In a large bowl whisk together the flours, baking powder, baking soda and salt. In another bowl, beat together the buttermilk, non-fat milk, honey, eggs, and oil. Stir the wet ingredients into the dry ingredients, mixing only enough to combine them.
    2. Preheat a large nonstick griddle or skillet over a medium flame. Ladle the batter onto the skillet with a ¼-cup measure. Flip the pancake when it is golden brown on the bottom and bubbles are forming on top, about 1 ½ minutes. Cook the other side until golden brown, about 1 ½ minutes.

    Recommended Products

    As an Amazon Associate and member of other affiliate programs, I earn from qualifying purchases.

    • Cuisinart Griddle
      Cuisinart Griddle
    • Buckwheat Flour
      Buckwheat Flour

    Nutrition Information:

    Yield:

    8

    Serving Size:

    1

    Amount Per Serving: Calories: 153Total Fat: 6gSaturated Fat: 1gTrans Fat: 0gUnsaturated Fat: 4gCholesterol: 48mgSodium: 323mgCarbohydrates: 21gFiber: 2gSugar: 5gProtein: 6g

    Did you make this recipe?

    Tag me in your Instagram photo - @fakeginger

    © Amanda Livesay
    Cuisine: American / Category: breakfast

    Chocolate Chip Cookie Cake

    Apr 23, 2010

    Homemade Chocolate Chip Cookie Cake is the most delicious giant chewy chocolate chip cookie! It tastes even better than the ones at the mall. 

    Homemade Chocolate Chip Cookie Cake - the most delicious giant chewy chocolate chip cookie! It tastes even better than the ones at the mall. 

    My sister-in-law turns 17 today and when it came time to make her cake, her mom suggested a cookie cake.

    It came with my standard warning, “You know I’m not a cake decorator” but it ended up turning out so cute! And who knew that cookie cakes are so simple!

    I used a basic chocolate chip cookie recipe for this, the one from the Nestle Tollhouse chocolate chip bags. I’m not sure if I’ve ever actually made the recipe (as cookies) but I was happy with how it turned out as a cake.

    I had worried that the outside would brown a lot faster than the inside but it all seemed pretty even in the end. Just be careful because the cookie does expand – I would suggest using a pan with a higher rim than I did or you could probably refrigerate the dough in the pan for a little while to stop the spreading.

    My favorite part of the cake was how easy it was to decorate! A few dots here, a few there, and it almost looked like the cookie cakes you buy at the mall!

    I was actually shocked at how much I loved how it looked. And, of course, it was delicious!

    Homemade Chocolate Chip Cookie Cake - just like the ones you get at the mall!

    Ingredients

    • All-purpose flour
    • Baking soda
    • Salt
    • Butter – make sure to bring it to room temperature before beginning.
    • Granulated sugar
    • Brown sugar – this recipe calls for equal amounts of granulated sugar and brown sugar which makes this cookie cake not too chewy and not crunchy.
    • Vanilla
    • Eggs
    • Chocolate chips – I like semisweet chocolate chips in this recipe but feel free to use milk or dark chocolate. Or even white chocolate!

    How To Make Homemade Chocolate Chip Cookie Cake

    • Dry ingredients. Combine flour, baking soda, and salt.
    • Wet ingredients. Beat together butter, granulated sugar, brown sugar, vanilla, and eggs.
    • Combine. Slowly add flour mixture to butter mixture.
    • Add chocolate. Stir in chocolate chips
    • Bake. Bake at 375F for 20 – 25 minutes
    • Cool. Cool completely before frosting

    How Long Are Cookie Cakes Good For?

    Homemade cookie cakes are good for up to 3 – 4 days. They don’t need to be refrigerated but make sure you cover it tightly to keep it fresh for as long as possible. 

    Can You Freeze It?

    You can freeze chocolate chip cookie cakes for up to 3 months. If freezing the entire cake, I would wait to decorate it and wrap it tightly in several layers of plastic wrap.

    If you are freezing individual slices, I would wrap them in plastic wrap and then place in a freezer ziploc bag.

    Let it defrost at room temperature before decorating and serving.

    More Chocolate Chip Cookie Recipes

    • Chocolate Chip Pudding Cookies
    • Chocolate Chip Pizookie
    • Soft and Chew Chocolate Chip Cookies
    • M&Ms Chocolate Chip Pudding Cookies
    • Oreo Chocolate Chip Cookies

    Make sure you subscribe to my email list to get all my new recipes delivered right to your inbox!

    You can also follow me on Instagram, Facebook, or Pinterest for even more! 

    📖 Recipe

    Yield: 12 servings

    Chocolate Chip Cookie Cake

    Chocolate Chip Cookie Cake

    Homemade Chocolate Chip Cookie Cake is the most delicious giant chewy chocolate chip cookie! It tastes even better than the ones at the mall. 

    Prep Time 15 minutes
    Cook Time 25 minutes
    Total Time 40 minutes

    Ingredients

    • 2 ¼ cups all-purpose flour
    • 1 teaspoon baking soda
    • 1 teaspoon salt
    • 1 cup 2 sticks butter, softened
    • ¾ cup granulated sugar
    • ¾ cup packed brown sugar
    • 1 teaspoon vanilla extract
    • 2 large eggs
    • 2 cups chocolate chips

    Instructions

    1. Preheat oven to 375.
    2. flour, baking soda and salt in small bowl. Beat butter, granulated sugar, brown sugar and vanilla extract in large mixer bowl until creamy. Add eggs, one at a time, beating well after each addition. Gradually beat in flour mixture. Stir in chocolate chips.
    3. Grease 15 x 10-inch jelly-roll pan (or pan of choice). Spread into prepared pan. Bake for 20 to 25 minutes or until golden brown. Cool in pan on wire rack.

    Recommended Products

    As an Amazon Associate and member of other affiliate programs, I earn from qualifying purchases.

    • Mixing Bowls with Lids
      Mixing Bowls with Lids
    • 14 inch Pizza Pan
      14 inch Pizza Pan
    • Electric Mixer
      Electric Mixer

    Nutrition Information:

    Yield:

    12

    Serving Size:

    1

    Amount Per Serving: Calories: 461Total Fat: 25gSaturated Fat: 15gTrans Fat: 1gUnsaturated Fat: 8gCholesterol: 71mgSodium: 421mgCarbohydrates: 60gFiber: 2gSugar: 39gProtein: 5g

    Did you make this recipe?

    Tag me in your Instagram photo - @fakeginger

    © Amanda Livesay
    Cuisine: American / Category: cookie


    Healthy Applesauce Granola

    Apr 07, 2010

    Healthy Applesauce Granola is crunchy granola made with applesauce instead of oil. Oats, nuts, seeds, and raisins make the perfect easy breakfast.

    Applesauce Granola - healthy crunchy granola made with no oil! Oats, nuts, seeds, and raisins make the perfect easy breakfast.

    We really, and I mean really, love granola around here.

    But of course, it’s just not that great for you. All the oil that usually goes into a batch of granola makes it a pretty high calorie snack and let’s face it, no one can stop after just a handful of the tasty stuff.

    This Applesauce Granola uses applesauce in place of the usual oil which makes it much lower in calorie and it still gets nice and crunchy! 

    I’ve made granola with applesauce instead of oil in the past but this is by far my favorite version. It’s loaded with nuts (I used walnuts and pecans) and sunflower seeds which makes it not only yummy but also filling. It’s sweet but not too sweet and you can adjust the dried fruit amount to make it even sweeter if it suits you.

    Applesauce Granola - healthy crunchy granola made with no oil! Oats, nuts, seeds, and raisins make the perfect easy breakfast.

    Ingredients

    • Old fashioned oats – make sure it’s old fashioned and not quick cooking or steel cut.
    • Nuts – such as pecans, walnuts, or almonds
    • Sunflower seeds
    • Sesame seeds
    • Brown sugar
    • Cinnamon
    • Salt
    • Unsweetened applesauce – make sure you check the label (or use homemade) to be sure there is no added sugar.
    • Honey – use a local honey if possible.
    • Vegetable oil – you can use any flavorless oil.
    • Raisins – you can use any dried fruit you like, such as dried cranberries or dried blueberries.

    How To Make Applesauce Granola 

    • Prepare. Preheat oven to 300F.
    • Mix dry ingredients. In a large bowl, mix together oats, nuts, sunflower seeds, sesame seeds, brown sugar, cinnamon, and salt. Set aside.
    • Mix wet ingredients. In a small saucepan, warm the applesauce with the honey and oil over low heat.
    • Combine everything. Mix the applesauce mixture into the oat mixture and stir to coat everything. Spread the mixture onto a 9 x 13 baking pan.
    • Bake. Bake for 45 – 50 minutes, stirring every 10 minutes, until the granola is a deep brown.
    • Add raisins and cool. Remove from oven and stir in raisins. Cool completely before enjoying.

    How Long Is It Good For?

    If you store this Applesauce Granola at room temperature in an airtight container, it can keep for up to a month. Although I don’t think you will have any left after a month! 

    Can You Freeze It?

    Yes, you can freeze homemade granola. Put it in a freezer ziploc bag and squeeze as much air out as possible before putting it in the freezer. Let it thaw on the counter overnight before serving. 

    More Homemade Granola Recipes

    • Strawberry Coconut Granola
    • Granola Cookies
    • No Bake Granola Bars
    • Funfetti Granola Bars

    Make sure you subscribe to my email list to get all my new recipes delivered right to your inbox!

    You can also follow me on Instagram, Facebook, or Pinterest for even more! 

    Applesauce Granola - healthy crunchy granola made with no oil! Oats, nuts, seeds, and raisins make the perfect easy breakfast.

    📖 Recipe

    Yield: 8 servings

    Healthy Applesauce Granola

    Healthy Applesauce Granola

    Healthy Applesauce Granola - crunchy granola made with applesauce instead of oil. Oats, nuts, seeds, and raisins make the perfect easy breakfast.

    Prep Time 15 minutes
    Cook Time 50 minutes
    Total Time 1 hour 5 minutes

    Ingredients

    • 2 ½ cups old fashioned oats
    • 1 cup nuts, pecans, walnuts, almonds
    • ½ cup sunflower seeds
    • ¼ cup sesame seeds
    • ¼ cup brown sugar
    • 1 teaspoon cinnamon
    • ½ teaspoon salt
    • ½ cup unsweetened applesauce
    • 1 tablespoon honey
    • 1 tablespoon vegetable oil
    • ⅓ cup raisins

    Instructions

    1. Preheat oven to 300F.
    2. In a large bowl, mix together oats, nuts, sunflower seeds, sesame seeds, brown sugar, cinnamon, and salt. Set aside.
    3. In a small saucepan, warm the applesauce with the honey and oil over low heat.
    4. Mix the applesauce mixture into the oat mixture and stir to coat everything. Spread the mixture onto a 9 x 13 baking pan.
    5. Bake for 45 - 50 minutes, stirring every 10 minutes, until the granola is a deep brown. Remove from oven and stir in raisins. Cool completely before enjoying.

    Recommended Products

    As an Amazon Associate and member of other affiliate programs, I earn from qualifying purchases.

    • Rimmed Baking Sheet
      Rimmed Baking Sheet
    • Parchment Paper
      Parchment Paper

    Nutrition Information:

    Yield:

    8

    Serving Size:

    1

    Amount Per Serving: Calories: 339Total Fat: 19gSaturated Fat: 3gTrans Fat: 0gUnsaturated Fat: 15gCholesterol: 0mgSodium: 664mgCarbohydrates: 38gFiber: 6gSugar: 14gProtein: 9g

    Did you make this recipe?

    Tag me in your Instagram photo - @fakeginger

    © Amanda Livesay
    Cuisine: American / Category: breakfast

    Coconut Cupcakes

    Mar 29, 2010

    Easter’s fast approaching so I wanted to get some fun dessert ideas up for anyone who’s needing them.

    I love, love, love these coconut cupcakes. Toasted coconut is one of my favorite cupcake decorations and to turn it into a nest with Cadbury eggs in it? Perfection. You don’t have to use Cadbury eggs though – the malted milk ball ones are great or even the little egg-shaped gum.

    I went ahead and did a coconut cupcake but I think the toasted coconut tastes great with a plain vanilla cake too. The frosting is coconutless but it’s flavored with almond and vanilla and goes amazingly with the toasted coconut up top.

    📖 Recipe

    0 from 0 votes
    Print

    Coconut Cupcakes

    Ingredients

    For the cupcakes:

    • ¾ pound 3 sticks unsalted butter, room temperature
    • 2 cups sugar
    • 5 extra-large eggs at room temperature
    • 1 ½ teaspoons pure vanilla extract
    • 1 ½ teaspoons pure almond extract
    • 3 cups flour
    • 1 teaspoon baking powder
    • ½ teaspoon baking soda
    • ½ teaspoon kosher salt
    • 1 cup buttermilk
    • 14 ounces sweetened shredded coconut

    For the frosting:

    • 1 pound cream cheese at room temperature
    • ¾ pound 3 sticks unsalted butter, room temperature
    • 1 teaspoon pure vanilla extract
    • ½ teaspoon pure almond extract
    • 1 ½ pounds confectioners’ sugar sifted

    For the toasted coconut:

    • 1 cup sweetened shredded coconut

    Instructions

    1. Preheat the oven to 325 degrees F.
    2. In the bowl of an electric mixer fitted with the paddle attachment, cream the butter and sugar on high speed until light and fluffy, about 5 minutes. With the mixer on low speed, add the eggs, 1 at a time, scraping down the bowl after each addition. Add the vanilla and almond extracts and mix well.
    3. In a separate bowl, sift together the flour, baking powder, baking soda, and salt. In 3 parts, alternately add the dry ingredients and the buttermilk to the batter, beginning and ending with the dry. Mix until just combined. Fold in 7 ounces of coconut.
    4. Line a muffin pan with paper liners. Fill each liner to the top with batter. Bake for 25 to 35 minutes, until the tops are brown and a toothpick comes out clean. Allow to cool in the pan for 15 minutes. Remove to a baking rack and cool completely.
    5. Meanwhile, make the frosting. In the bowl of an electric mixer fitted with the paddle attachment, on low speed, cream together the cream cheese, butter, and vanilla and almond extracts. Add the confectioners’ sugar and mix until smooth.
    6. Frost cupcakes and sprinkle toasted coconut (below) on top. Top with egg-shaped candy of choice.

    To make toasted cupcake:

    1. Preheat oven to 325F. Spread coconut onto a baking sheet in a single layer. Bake for 10 – 15 minutes, stirring every 3 minutes. Towards the end watch carefully because it will go from golden to burnt very quickly.

    Google Recipe View Microformatting by Easy Recipe
    2.1.7


    Blueberry Muffins

    Mar 25, 2010

    Oh blueberry muffins, how I love you.

    You probably won’t be shocked at all to hear that when I decided to make blueberry muffins, the first thing I googled was “starbucks blueberry muffin”. I have a problem with their muffins obviously. I go searching for a copycat recipe every few months and each time I’m shocked that there isn’t one. So I’m working my way through recipes, changing things here and there to see if I can get close to my beloved Starbucks muffin.

    This one was pretty close. The taste was right on but it just wasn’t as light and fluffy. I’m thinking maybe cake flour next time? We loved them though and it gets bonus points for only making 8 muffins. I halve just about every recipe I do so it was nice to not have to do any math.

    📖 Recipe

    0 from 0 votes
    Print

    Blueberry Muffins

    from AllRecipes

    Ingredients

    • 1 ½ cups all-purpose flour
    • ¾ cup white sugar
    • ½ teaspoon salt
    • 2 teaspoons baking powder
    • ⅓ cup vegetable oil
    • 1 egg
    • ⅓ cup milk
    • 1 cup fresh blueberries
    • ½ cup white sugar
    • ⅓ cup all-purpose flour
    • ¼ cup butter cubed
    • 1 ½ teaspoons ground cinnamon

    Instructions

    1. Preheat oven to 400 degrees F (200 degrees C). Grease muffin cups or line with muffin liners.
    2. Combine 1 ½ cups flour, ¾ cup sugar, salt and baking powder. Place vegetable oil into a 1 cup measuring cup; add the egg and enough milk to fill the cup. Mix this with flour mixture. Fold in blueberries. Fill muffin cups right to the top, and sprinkle with crumb topping mixture.
    3. To Make Crumb Topping: Mix together ½ cup sugar, ⅓ cup flour, ¼ cup butter, and 1 ½ teaspoons cinnamon. Mix with fork, and sprinkle over muffins before baking.
    4. Bake for 20 to 25 minutes in the preheated oven, or until done.

    Banana Upside Down Cake

    Mar 24, 2010

    Banana Upside Down Cake – moist vanilla cake baked on top of a layer of caramelized bananas and flipped upside down after baked. It’s delicous with a scoop of vanilla ice cream!

    Banana Upside Down Cake - moist vanilla cake baked on top of a layer of caramelized bananas and flipped upside down after baked. It's delicous with a scoop of vanilla ice cream!

    Bananas are a favorite around here and most of the time I can’t buy enough, but every few weeks we all get burned out on bananas and a bunch or 2 just sits on the counter until I finally turn it into banana bread. That happened this week, only I wasn’t into the whole banana bread idea.

    This cake was one of the best cakes I’ve made. It was almost like banana bread except not as dense as a bread and with caramelized bananas on top. We topped it with homemade vanilla bean ice cream and it was incredible!

    Banana Upside Down Cake - moist vanilla cake baked on top of a layer of caramelized bananas and flipped upside down after baked. It's delicous with a scoop of vanilla ice cream!

    Ingredients

    • Brown sugar – this is going in the “upside down” part of the cake and it will caramelize around the bananas and turn out really delicious.
    • Unsalted butter – you are going to use butter in bother the topping and the cake itself.
    • Maple syrup – just to add a litte more sweetness to the banana topping.
    • Bananas – use ripe bananas for the best flavor.
    • All-purpose flour
    • Baking powder
    • Ground cinnamon – cinnamon goes great with the bananas and brown sugar in this cake.
    • Salt
    • Granulated sugar
    • Egg
    • Vanilla
    • Milk

    How To Make Banana Upside Down Cake

    • Melt butter, brown sugar, and maple syrup together 
    • Pour butter mixture into a 9-inch cake pan
    • Top with sliced bananas; set aside
    • In a mixing bowl, sift flour, baking powder, cinnamon, and salt
    • In a separate bowl, beat sugar and butter until light and fluffy
    • Add egg and vanilla
    • Beat flour mixture into the wet mixture alternating with milk
    • Gently spoon batter over bananas
    • Bake about 55 minutes or until a toothpick inserted into the center comes out clean
    • Cool for about 30 minutes before inverting onto a serving platter
    How Long Is It Good For?

    This Upside Down Banana Cake is a very moist cake so it will be fine at room temperature for 2 – 3 days if stored in an airtight container.

    If you prefer to store it in the refrigerator, it will be fine for up to 4 days. I would bring it to room temperature before serving because nobody likes a cold, hard cake!

    Can You Freeze It?

    I don’t recommend freezing this cake as the bananas on the top will turn black once frozen and that will not be very appetizing once it’s defrosted!

    More Banana Recipes

    • Cream Cheese Banana Bread
    • Banana Cream Pie
    • Banana Pudding
    • Banana Muffins with Nutella Swirl
    • PB&J Banana Bread 

    Make sure you subscribe to my email list to get all my new recipes delivered right to your inbox!

    You can also follow me on Instagram, Facebook, or Pinterest for even more! 

    📖 Recipe

    Yield: 12 servings

    Banana Upside Down Cake

    Banana Upside Down Cake

    Banana Upside Down Cake - moist vanilla cake baked on top of a layer of caramelized bananas and flipped upside down after baked. It's delicous with a scoop of vanilla ice cream!

    Prep Time 20 minutes
    Cook Time 55 minutes
    Total Time 1 hour 15 minutes

    Ingredients

    For the topping:

    • 1 cup packed golden brown sugar
    • ¼ cup (½ stick) unsalted butter
    • 3 tablespoons pure maple syrup
    • 3 large ripe bananas. peeled, cut diagonally into ¼-inch-thick slices

    For the cake:

    • 1 cup all-purpose flour
    • 2 teaspoons baking powder
    • ½ teaspoon ground cinnamon
    • ¼ teaspoon salt
    • ¾ cup granulated sugar
    • 6 tablespoons (¾ stick) unsalted butter, room temperature
    • 1 large egg
    • ½ teaspoon vanilla extract
    • 6 tablespoons milk

    Instructions

    To make the topping:

    1. Preheat oven to 325F. Combine sugar and butter in heavy medium saucepan. Stir over low heat until butter melts and mixture is well blended. Pour into 9-inch-diameter cake pan with 2-inch-high sides. Spread to coat bottom of pan. Pour maple syrup over sugar mixture. Place banana slices in concentric circles, overlapping slightly and covering bottom.

    To make the cake:

    1. Stir flour, baking powder, cinnamon and salt in medium bowl to blend. Beat sugar and butter in another medium bowl until creamy. Add egg and vanilla; beat until light and fluffy. Beat in flour mixture alternately with milk in 3 additions. Spoon batter over bananas. Bake until tester inserted into center of cake comes out clean, about 55 minutes. Transfer cake to rack. Run knife around pan sides. Cool cake on rack 30 minutes. Place plate over pan; invert cake. Let stand 3 minutes, then gently lift off pan. Serve warm with whipped cream.

    Recommended Products

    As an Amazon Associate and member of other affiliate programs, I earn from qualifying purchases.

    • Cooling Racks
      Cooling Racks
    • 9-inch Cake Pan
      9-inch Cake Pan

    Nutrition Information:

    Yield:

    12

    Serving Size:

    1

    Amount Per Serving: Calories: 283Total Fat: 10gSaturated Fat: 6gTrans Fat: 0gUnsaturated Fat: 3gCholesterol: 41mgSodium: 142mgCarbohydrates: 47gFiber: 1gSugar: 34gProtein: 2g

    Did you make this recipe?

    Tag me in your Instagram photo - @fakeginger

    © Amanda Livesay
    Cuisine: American / Category: cake
    « Previous Page
    Next Page »

    Primary Sidebar

    Amanda Livesay
    Hi, I'm Amanda! DFW food blogger, mom of boys, and crazy dog lady.
    Read more
    Privacy Policy
    Privacy Policy

    Footer

    ↑ back to top

    About

    • Privacy Policy
    • About Fake Ginger

    Newsletter

    • Sign Up for weekly emails featuring new recipes!

    As an Amazon Associate I earn from qualifying purchases.

    Copyright © 2024 FakeGinger.com