• Skip to primary navigation
  • Skip to main content
  • Skip to primary sidebar
  • Home
  • About
  • Recipes

Fake Ginger

menu icon
go to homepage
  • Recipe Index
  • About
  • Subscribe
    • Facebook
    • Instagram
    • Pinterest
  • subscribe
    search icon
    Homepage link
    • Recipe Index
    • About
    • Subscribe
    • Facebook
    • Instagram
    • Pinterest
  • ×
    Home » Page 39

    Restaurant-Style Queso Blanco

    Restaurant-Style Queso Blanco

    Aug 28, 2014

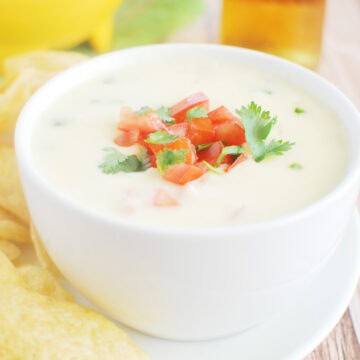
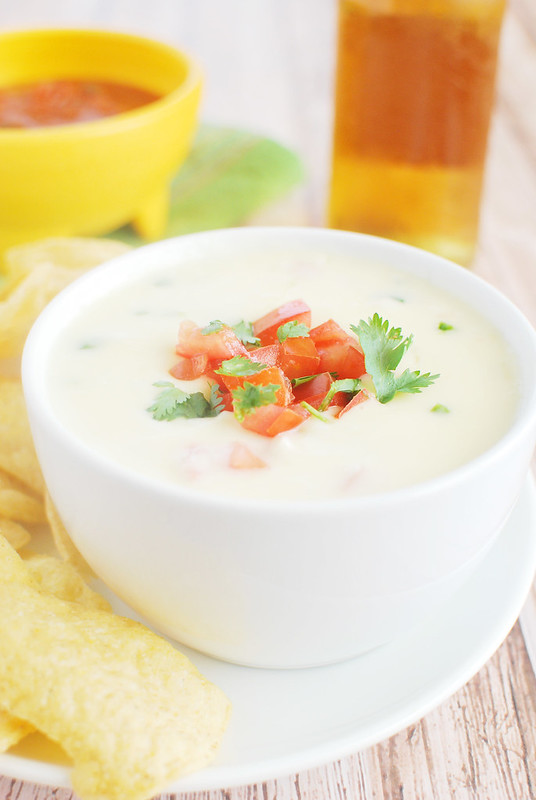
    Restaurant Style Queso Dip is just like your favorite Mexican restaurant! Spicy melted cheese – perfect for dipping tortilla chips or using as a topping for tacos or burritos!

    Restaurant Style Queso Dip - just like your favorite Mexican restaurant! Spicy melted cheese - perfect for dipping tortilla chips or using as a topping for tacos or burritos!

    There are few things I love more than a bowl of hot cheese. But I mean the good stuff from a real Mexican restaurant. Don’t talk to me about Chipotle’s “queso”.

    This queso blanco really does taste like the queso you’d find at your fave Mexican place. And it’s even better because you can adjust the heat to your liking. (And no one is there to judge you if you eat the entire batch by yourself.)

    It uses 2 kinds of cheese that both melt really well so you end up with a smooth, creamy queso. And then it has onion, jalapeno, tomatoes, and cilantro so it’s full of flavor!

    It’s also super simple to make and I imagine you could put it in a small slow cooker on the warm setting to keep it warm all day.

    If you love a meatier queso, my Queso Fundido is killer! 

    ingredients for restaurant style white queso

    Ingredients

    • Onion – you’re going to cook the onion prior to making the queso so you aren’t going to get chunks of raw onion in your dip.
    • Jalapeno – remove the ribs and seeds if you don’t want your queso spicy, leave them in if you like spice. You can also add more jalapeno if you want it super spice.
    • Half and half – you can use milk or heavy cream if you don’t have half and half. You may need to adjust the amounts though because milk will make a thinner queso and heavy cream will make it thicker.
    • White American cheese – you may have to go to the deli of your grocery store to ask for this. And it will probably be in slices but it will melt fine, don’t worry. Don’t use the yellow American or you will end up with yellow queso.
    • Monterey jack cheese – I highly recommend buying a block of monterey jack and shredding it yourself. The pre-shredded stuff is coated in anti-clumping agents and it won’t melt as well.
    • Tomatoes – you can use any variety of tomatoes but slice them in half and squeeze out all the juice and seeds before dicing.
    • Cilantro – I consider cilantro a must for queso but if it tastes like soap to you, you can leave it out.
    how to make white queso like from a mexican restaurant

    How To Make Restaurant Style Queso

    • Cook vegetables. Cook onion and jalapeno in olive oil until softened.
    • Make queso. Add white American cheese, Monterey Jack cheese, and half and half; stir until cheese is mostly melted.
    • Finish. Add fresh tomatoes and cilantro and stir to combine.
    • Adjust. Add more half and half until it reaches desired consistency.

    How Long Is It Good For?

    This white queso will be good for up to 5 days in the fridge. Make sure to store it in an airtight container.

    You can reheat it in the microwave or on the stovetop. You may need to add a splash of half and half or milk to thin it out a bit.

    What To Serve With It

    If you want to do a full Mexican feast for dinner, try Cream Cheese Chicken Enchiladas, Chicken Fajitas, or Slow Cooker Carnitas Street Tacos!

    My Restaurant Style Salsa is the perfect salsa recipe! And if you want to do a trio of dips, add Creamy Jalapeño Dip!

    Restaurant Style Queso Dip - just like your favorite Mexican restaurant! Spicy melted cheese - perfect for dipping tortilla chips or using as a topping for tacos or burritos!

    More Cheesy Dip Recipes

    • Cheesy Sausage Dip
    • Buffalo Chicken Dip
    • Crawfish Dip
    • Hatch Chile Cheese Dip
    • Cheesy Spinach Dip

    Make sure you subscribe to my email list to get all my new recipes delivered right to your inbox!

    You can also follow me on Instagram, Facebook, or Pinterest for even more! 

    📖 Recipe

    Yield: 6 servings

    Restaurant-Style Queso Blanco

    Restaurant-Style Queso Blanco

    Restaurant Style Queso Dip is just like your favorite Mexican restaurant! Spicy melted cheese - perfect for dipping tortilla chips or using as a topping for tacos or burritos!

    Prep Time 10 minutes
    Cook Time 10 minutes
    Total Time 20 minutes

    Ingredients

    • 1 tablespoon olive oil
    • ¼ cup white onion, diced
    • 1 large jalapeño, seeds and stem removed; minced
    • 12 ounces white American cheese, sliced or shredded
    • 4 ounces Monterey Jack cheese, shredded
    • ½ - 1 cup half and half (or milk or cream)
    • 1 cup tomatoes, squeeze out the juice and seeds, diced
    • 1 small bunch cilantro, roughly chopped

    Instructions

    1. Heat the olive oil over medium heat in a large saucepan. Add onion and jalapeño; cook until softened, stirring frequently.
    2. Reduce heat to low; add cheese and ½ cup of half and half. Stir until almost melted.
    3. Stir in tomatoes, cilantro, and additional half and half a little at a time until it reaches your desired consistency.
    4. Serve hot with chips.

    Nutrition Information:

    Yield:

    6

    Serving Size:

    1

    Amount Per Serving: Calories: 346Total Fat: 26gSaturated Fat: 15gTrans Fat: 1gUnsaturated Fat: 10gCholesterol: 78mgSodium: 897mgCarbohydrates: 11gFiber: 0gSugar: 8gProtein: 17g

    Did you make this recipe?

    Tag me in your Instagram photo - @fakeginger

    © Amanda Livesay
    Cuisine: Mexican / Category: appetizer

    PB&J Banana Bread

    Aug 20, 2014

    PB&J Banana Bread is peanut butter banana bread with a drizzle of jam and topped with a streusel topping and chopped peanuts. Everything you love about pb&j in banana bread!

    If you want a more classic banana bread, try my Banana Nut Bread recipe!

    PB&J Banana Bread - peanut butter banana bread with a drizzle of jam and topped with a streusel topping and chopped peanuts. Everything you love about pb&j in banana bread!

    I’m going through this weird sandwich thing right now.

    I don’t eat sandwiches often, I’m just really not a fan. Like, twice a year I’ll crave a Subway Sweet Onion Chicken Teriyaki but that’s basically it. And y’all know I’m addicted to Jimmy John’s but since I get the lettuce wrapped sandwich, I consider that more of a portable salad.

    A portable salad with mayo oozing out the sides but a portable salad nonetheless.

    In the past two weeks, I’ve had Subway, Jimmy John’s with actual bread, and Schlotzsky’s. Because I want ALL THE SANDWICHES. I even plotted out a route for this week’s Pyrex search that takes me right by a Firehouse Subs since we don’t have one in my part of the city.

    PB&J Banana Bread - peanut butter banana bread with a drizzle of jam and topped with a streusel topping and chopped peanuts. Everything you love about pb&j in banana bread!

    How To Make PB&J Banana Bread

    • Dry ingredients. Whisk flour, baking powder, baking soda, cinnamon, and salt.
    • Wet ingredients. Beat together butter, sugar, mashed bananas, eggs, and peanut butter.
    • Combine. Combine dry and wet ingredients and stir until well combined.
    • Add peanuts. Use a rubber spatula to fold in chopped peanuts.
    • Transfer. Transfer batter to a loaf pan.
    • Add jam swirl. Drizzle batter with jam and swirl with a knife.
    • Make streusel. Combine brown sugar and flour; use a pastry cutter to cut butter into the mixture until it resembles coarse crumbs; add peanuts.
    • Top. Sprinkle streusel over batter.
    • Bake. Bake at 350F for 55 – 65 minutes.
    • Cool. Cool in the pan for 10 minutes before removing to a wire rack to cool completely.
    PB&J Banana Bread - peanut butter banana bread with a drizzle of jam and topped with a streusel topping and chopped peanuts. Everything you love about pb&j in banana bread!

    How Long Is Banana Bread Good For?

    Banana bread is fine at room temperature for up to 4 days. Make sure to store it in an airtight container.

    You can get a few more days out of it by storing it in the fridge but it will likely dry out faster that way.

    Can You Freeze Banana Bread?

    Yes, banana bread freezes wonderfully! I like to freeze individual slices so when we want one, we can just pull it out but you can also freeze an entire loaf. I recommend wrapping either individual slices or the entire loaf in plastic wrap and then placing in an airtight container, like a freezer ziploc bag.

    When you are ready to enjoy it, let it sit at room temperature until defrosted.

    More Banana Bread Recipes

    • Pumpkin Banana Bread
    • Chocolate Chip Banana Bread
    • Cream Cheese Banana Bread
    • S’mores Banana Bread

    Make sure you subscribe to my email list to get all my new recipes delivered right to your inbox!

    You can also follow me on Instagram, Facebook, or Pinterest for even more! 

    📖 Recipe

    Yield: 12 servings

    PB&J Banana Bread

    PB&J Banana Bread

    Prep Time 20 minutes
    Cook Time 1 hour
    Total Time 1 hour 20 minutes

    Ingredients

    • 2 cups all-purpose flour
    • 1 ½ teaspoons baking powder
    • ½ teaspoon baking soda
    • ½ teaspoon ground cinnamon
    • ¼ teaspoon salt
    • 2 eggs, lightly beaten
    • 1 ½ cups mashed bananas, 4 to 5 medium
    • 1 cup sugar
    • ½ cup melted butter
    • ¼ cup creamy peanut butter
    • ¼ cup chopped peanuts
    • ⅓ cup jam

    For the streusel topping:

    • 3 tablespoons brown sugar
    • 2 tablespoons all-purpose flour
    • 1 ½ tablespoons butter
    • ¼ cup chopped peanuts

    Instructions

    1. Preheat oven to 350F. Spray a 9x5 loaf pan with baking spray. Set aside.
    2. In a large mixing bowl, whisk together flour, baking powder, baking soda, cinnamon, and salt. Make a well in the center and set aside.
    3. In a separate mixing bowl, beat together eggs, mashed bananas, sugar, butter, and peanut butter. Add egg mixture all at once to the flour mixture and stir until all the flour is just moistened; it should be lumpy. Fold in chopped peanuts.
    4. Spoon the mixture into the prepared pan, spreading evenly. Drizzle with the jam and swirl slightly to marble.
    5. To make the streusel topping, stir together brown sugar and flour. Use a pastry blender to cut in the butter until the mixture resembles coarse crumbs. Stir in peanuts. Sprinkle this over the bread.
    6. Bake about 70 minutes or until a toothpick inserted into the center comes out clean. If it starts to get too dark, tent with foil for the last 15 minutes of baking.
    7. Cool in pan on a wire rack for 10 minutes; remove from pan and let cool completely.

    Recommended Products

    As an Amazon Associate and member of other affiliate programs, I earn from qualifying purchases.

    • Pastry Blender
      Pastry Blender
    • Parchment Paper
      Parchment Paper
    • Loaf pan
      Loaf pan

    Nutrition Information:

    Yield:

    12

    Serving Size:

    1

    Amount Per Serving: Calories: 365Total Fat: 16gSaturated Fat: 7gTrans Fat: 0gUnsaturated Fat: 7gCholesterol: 55mgSodium: 297mgCarbohydrates: 52gFiber: 2gSugar: 28gProtein: 6g

    Did you make this recipe?

    Tag me in your Instagram photo - @fakeginger

    © Amanda Livesay
    Cuisine: American / Category: breads

    Snickers Cake

    Aug 12, 2014

    Snickers Cake is a chocolate poke cake filled with sweetened condensed milk and caramel. It’s topped with whipped cream and chopped Snickers! Plus, peanuts, caramel sauce, and hot fudge on top! 

    Snickers Cake - chocolate poke cake filled with sweetened condensed milk and caramel. It's topped with whipped cream and chopped Snickers! Plus, peanuts, caramel sauce, and hot fudge on top!

    I think it’s so funny how the brain remembers the weirdest things.

    Like, I remember a very specific tweet from probably 3 years ago that wasn’t even directed at me from someone who I’ve spoken to, maybe, 10 times in my Twitter lifetime.

    It said: I mean, do we really need a recipe for a poke cake?

    And I remember thinking that yeah, I totally need a recipe because all I know is you poke holes in it. I don’t know what to put in those holes, I don’t know what cake to use, I don’t know what to put on top.

    I’d never given poke cakes a second thought but that tweet… that tweet made me want to make ALL THE POKE CAKES.

    Since then, they’ve become my go-to “last minute” dessert. You know those nights when your husband walks in from work and says HEYIGOTTABEATAMEETINGINANHOURANDINEEDTOBRINGADESSERT.

    And you’re just like, “Uhh, I’m on my second glass of wine and The Bachelor just started. Now is not the time for jokes.”

    I’ve honestly made this Snickers Cake more than once during commercial breaks on such an occasion.

    Snickers Cake - chocolate poke cake filled with sweetened condensed milk and caramel. It's topped with whipped cream and chopped Snickers! Plus, peanuts, caramel sauce, and hot fudge on top!

    Ingredients

    • Devil’s Food Cake Mix – you need the box mix and all the ingredient the box calls for
    • Sweetened Condensed Milk
    • Caramel sauce – the thick caramel, not a syrup
    • Whipping cream – this is for the topping. You could use Cool Whip if you prefer.
    • Powdered sugar – to sweeten the whipping cream
    • Vanilla
    • Snickers – these go into the whipped cream to make it extra delicious
    • Salted peanuts – for sprinkling on the finished cake
    • Hot fudge – for drizzling over the finished cake

    Instructions

    • Make cake. Bake Devil’s Food cake according to the 9×13-inch box instructions.
    • Poke. Once baked (when still hot), use the end of the wooden spoon to poke holes all over the cake.
    • Make filling. Whisk together sweetened condensed milk and caramel; pour over cake.
    • Cool. Allow to cool before frosting.
    • Make whipped cream. Beat heavy cream until it begins to thicken; add powdered sugar and vanilla and continue beating until soft peaks. Use a rubber spatula to fold in chopped Snickers. Spread whipped cream over the cooled cake.
    • Top. Top with chopped peanuts and drizzle with caramel and hot fudge.

    How Long Is Poke Cake Good For?

    This Snickers Cake is good for up to 5 days in the fridge. Make sure to use an airtight cake container to keep it fresh for as long as possible.

    Can You Freeze It?

    I don’t recommend freezing the finished cake but if you do need to save time, you can bake the cake and freeze it before you poke holes or add anything to it.

    When you’re ready to finish the cake, defrost it overnight on the counter and then start at the instructions to poke holes all over the cake.

    More Chocolate Cake Recipes

    • Chocolate Cream Filled Cake
    • Flourless Chocolate Cake
    • German Chocolate Cake
    • Chocolate Angel Food Cake

    Make sure you subscribe to my email list to get all my new recipes delivered right to your inbox!

    You can also follow me on Instagram, Facebook, or Pinterest for even more! 

    📖 Recipe

    Yield: 16 servings

    Snickers Cake

    Snickers Cake

    Snickers Cake is a chocolate poke cake filled with sweetened condensed milk and caramel. It's topped with whipped cream and chopped Snickers! Plus, peanuts, caramel sauce, and hot fudge on top! 

    Prep Time 15 minutes
    Cook Time 20 minutes
    Total Time 35 minutes

    Ingredients

    • 1 box Devil's Food cake mix, plus all ingredients listed on box to bake it
    • 1 14 ounce can sweetened condensed milk
    • 1 12 ounce jar caramel sauce
    • 2 cups whipping cream
    • ½ cup powdered sugar
    • 1 teaspoon vanilla
    • 3 regular size Snickers, chopped
    • ¼ cup salted peanuts, chopped
    • extra caramel and hot fudge for drizzling

    Instructions

    1. Bake Devil's Food cake according to the 9x13-inch instructions on the box.
    2. Once baked (when still hot), use the end of a wooden spoon or other similar size circular object to poke holes all over the cake.
    3. Whisk together sweetened condensed milk and caramel; pour over cake. Allow to cool before frosting.
    4. Beat heavy cream until it begins to thicken; add powdered sugar and vanilla and continue beating until soft peaks. Use a rubber spatula to fold in chopped Snickers.
    5. Spread whipped cream over the cooled cake. Top with chopped peanuts and drizzle with caramel and hot fudge.

    Recommended Products

    As an Amazon Associate and member of other affiliate programs, I earn from qualifying purchases.

    • 9x13-inch baking pan
      9x13-inch baking pan

    Nutrition Information:

    Yield:

    16

    Serving Size:

    1

    Amount Per Serving: Calories: 471Total Fat: 19gSaturated Fat: 10gTrans Fat: 0gUnsaturated Fat: 6gCholesterol: 46mgSodium: 413mgCarbohydrates: 71gFiber: 1gSugar: 57gProtein: 6g

    Did you make this recipe?

    Tag me in your Instagram photo - @fakeginger

    © Amanda Livesay
    Cuisine: American / Category: cake


    Slow Cooker Apple Kielbasa Bites

    Aug 07, 2014

    Slow Cooker Apple Kielbasa Bites – sliced kielbasa in a delicious sweet and spicy sauce. Only 5 ingredients and cooked in the crockpot! Perfect for a weeknight dinner or an party snack.

    Try our Slow Cooker Steak Bites, too!

    Slow Cooker Apple Kielbasa Bites - sliced kielbasa in a sweet and spicy sauce. Only 5 ingredients and cooked in the crockpot! Perfect for a weeknight dinner or an easy appetizer.

    This recipe originally posted on August 7, 2014. Updated on March 14, 2019.

    It’s that time of year!

    Time to transition from Thursday margarita posts to Thursday football snack posts! Wooo! I know we have a few weeks left before football actually starts but I cannot wait any longer!

    As much as I love the games, my number one favorite thing about football will always be the food. One of my favorite are my Slow Cooker Cranberry Meatballs, which are like those grape jelly meatballs everyone loves but made with cranberry sauce!

    Why is food such an important part of football? Who knows. But for whatever reason, football season gives you an excuse to snack from Thursday night to Monday night.

    And I like any excuse to have snacks for every meal.

    I really like to make things like these Slow Cooker Apple Kielbasa Bites for games because you can just leave them in the slow cooker (on warm) and set some toothpicks next to it. People can eat whenever they want!

    Ingredients

    • Fully cooked polska kielbasa sausage – you can use any smoked sausage, including turkey, if you prefer
    • Brown sugar
    • Unsweetened applesauce – make sure it is unsweetened or the kielbasa will be too sweet
    • Garlic
    • Red pepper flakes – these are going to add the perfect amount of heat to the dish

    How To Make Slow Cooker Apple Kielbasa Bites

    • Combine. Put all ingredients in the slow cooker and give it a good stir.
    • Cook. Cook on low for 6 hours or high for 3 hours. 

    How Long Is It Good For?

    This kielbasa is good for about 3 days in the fridge. Make sure to store it in an airtight container to keep it as fresh as possible – I love these super airtight glass containers for all our leftovers.

    You can reheat on the stovetop or even put it back in the slow cooker if you have about an hour to let it warm up.

    Can You Freeze It?

    You can freeze this kielbasa for up to 3 months. Let it cool down completely and then transfer it to a freezer safe container like a freezer ziploc bag. Squeeze out as much air as you can and then pop it in the freezer.

    When you are ready to serve it, let it defrost overnight in the fridge and then reheat right before serving.

    Slow Cooker Apple Kielbasa Bites - sliced kielbasa in a sweet and spicy sauce. Only 5 ingredients and cooked in the crockpot! Perfect for a weeknight dinner or an easy appetizer.

    What To Serve With It

    Like I mentioned, I mostly just serve these as an appetizer straight from the slow cooker with a pile of toothpicks next to it. 

    However, they make a really great, easy, and inexpensive dinner, too. Put them on top of mashed potatoes or rice and drizzle some of the extra sauce on top. Seriously delicious! 

     More Slow Cooker Recipes

    • Slow Cooker Salsa Chicken
    • Slow Cooker Steak Bites
    • Slow Cooker White Chicken Chili
    • Slow Cooker Salisbury Steak Meatballs
    • Slow Cooker Teriyaki Chicken

    Make sure you subscribe to my email list to get all my new recipes delivered right to your inbox!

    You can also follow me on Instagram, Facebook, or Pinterest for even more! 

    Slow Cooker Apple Kielbasa Bites - sliced kielbasa in a sweet and spicy sauce. Only 5 ingredients and cooked in the crockpot! Perfect for a weeknight dinner or an easy appetizer.

    📖 Recipe

    Yield: 8 servings

    Slow Cooker Apple Kielbasa Bites

    Slow Cooker Apple Kielbasa Bites

    Slow Cooker Apple Kielbasa Bites - sliced kielbasa in a delicious sweet and spicy sauce. Only 5 ingredients and cooked in the crockpot! Perfect for a weeknight dinner or an party snack.

    Prep Time 10 minutes
    Cook Time 6 hours
    Total Time 6 hours 10 minutes

    Ingredients

    • 2 pounds fully cooked polska kielbasa sausage, cut into 1 inch pieces
    • ½ cup brown sugar
    • 1 cup unsweetened applesauce
    • 3 cloves garlic, minced
    • ¼ teaspoon red pepper flakes

    Instructions

    1. Put all ingredients in the slow cooker and give it a good stir. Cook on low for 6 hours or high for 3 hours. 

    Recommended Products

    As an Amazon Associate and member of other affiliate programs, I earn from qualifying purchases.

    • Programmable Slow Cooker
      Programmable Slow Cooker

    Nutrition Information:

    Yield:

    8

    Serving Size:

    1

    Amount Per Serving: Calories: 249Total Fat: 17gSaturated Fat: 6gTrans Fat: 0gUnsaturated Fat: 10gCholesterol: 41mgSodium: 606mgCarbohydrates: 18gFiber: 0gSugar: 15gProtein: 7g

    Did you make this recipe?

    Tag me in your Instagram photo - @fakeginger

    © Amanda Livesay
    Cuisine: American / Category: slow cooker

    Chicken Tikka Masala

    Aug 05, 2014

    I think if you forced me to name my favorite cuisine, it would probably be Indian.  

    Chicken Tikka Masala is one of my favorites Indian dishes – even my kids love it! It is basically chunks of chicken that’s marinated in spicy yogurt and then grilled. Then you mix up a spicy, creamy, delicious sauce and serve it all over rice or with fresh naan bread. It’s so good! 

    More Chicken Recipes

    • PF Chang’s Chicken Lettuce Wraps
    • Cream Cheese Chicken Enchiladas
    • Panda Express Sweet Fire Chicken
    • Chicken Fajitas
    • Chicken Parmesan Sloppy Joes

    Make sure you subscribe to my email list to get all my new recipes delivered right to your inbox!

    You can also follow me on Instagram, Facebook, or Pinterest for even more! 

    📖 Recipe

    Yield: 4 servings

    Chicken Tikka Masala

    Chicken Tikka Masala

    Prep Time 30 minutes
    Cook Time 30 minutes
    Additional Time 1 hour
    Total Time 2 hours

    Ingredients

    For the marinade:

    • 1 cup plain yogurt
    • 1 tablespoons lemon juice
    • 2 teaspoons ground cumin
    • ½ teaspoon cinnamon
    • 1 teaspoon cayenne pepper
    • 2 teaspoons fresh ginger, minced
    • salt and pepper, to taste
    • 1 pound boneless skinless chicken breasts, cut into chunks

    For the Chicken Tikka Masala:

    • 1 tablespoon coconut oil
    • 2 garlic cloves, minced
    • 1 jalapeno, minced (use less if you don’t love spiciness)
    • 1 teaspoon ground coriander
    • 1 teaspoons ground cumin
    • 1 teaspoon paprika
    • 1 teaspoon garam masala
    • 1 8 ounce can tomato sauce
    • 1 cup full-fat coconut milk, from a can in Asian section of supermarket
    • salt and pepper, to taste
    • cilantro, for garnish
    • rice, for serving

    Instructions

    1. If using bamboo skewers, soak them for about 30 minutes. If using metal, no need to do anything!
    2. Whisk together yogurt, lemon juice, cumin, cinnamon, cayenne, ginger, and salt and pepper until smooth. Stir in the chunks of chicken. Cover and refrigerate for at least an hour.
    3. When ready to cook, heat a grill to medium-high heat and lightly oil the grate. Thread the chicken onto the skewers; cook until the juices run clear, turning every 3 or 4 minutes. Set aside.
    4. Heat coconut oil over medium heat in a large skillet. Add garlic and jalapeno and cook until the garlic is fragrant, less than a minute. Add the spices and tomato sauce; stir until combined. Whisk in coconut milk and check to see if it needs salt and pepper. Put the cooked chicken into the sauce, cover, and simmer for about 15 minutes or until the sauce has thickened slightly.
    5. Serve hot, over rice with cilantro to garnish.

    Recommended Products

    As an Amazon Associate and member of other affiliate programs, I earn from qualifying purchases.

    • Metal Skewers
      Metal Skewers

    Nutrition Information:

    Yield:

    4

    Serving Size:

    1

    Amount Per Serving: Calories: 449Total Fat: 21gSaturated Fat: 15gTrans Fat: 0gUnsaturated Fat: 4gCholesterol: 100mgSodium: 575mgCarbohydrates: 23gFiber: 2gSugar: 7gProtein: 42g

    Did you make this recipe?

    Tag me in your Instagram photo - @fakeginger

    © Amanda Livesay
    Cuisine: Indian / Category: chicken

    Thai Pork and Veggie Meatballs

    Aug 04, 2014

    Thai Pork and Veggie Meatballs are full of shredded zucchini and carrots and cooked in a coconut curry sauce. They are so delicious and also good for you!

    Meatballs are one of the few things all 3 of my kids will eat without complaint. And this recipe is proof that I can literally put anything in meatballs and they will eat them.

    As I was shredded the zucchini for these, my 4 year old walked into the kitchen and said “Eww, I don’t like zucchini!”

    Umm… guess who asked for more meatballs not once but twice!

    If we’re being technical here, these aren’t really Thai meatballs. Honestly, I’m not even sure Thai meatballs are a thing. I think Thai-Inspired would be a better title but…

    Yeah.

    So these are pork meatballs with a little ground turkey which I love because I love love love the flavor of pork but not necessarily the fat/calories so I feel like I can eat more if I mix in some super lean ground turkey. The meatballs have lots of shredded zucchini and carrots mixed in with some curry powder, fresh ginger, garlic, all kinds of good stuff. And then you cover them with a peanut sauce before baking!

    Except I don’t eat peanut butter because I do try to eat paleo when I’m not drinking wine and eating my weight in Qdoba 3-cheese nachos so I used almond butter in this “peanut” sauce. You could totally use peanut or even sunbutter if you prefer the taste of those!

    Anyway, the sauce is SO good. I could drink it! Coconut milk, almond butter, and curry powder just make the yummiest combination.

    These are super simple and I anticipate making these often in the coming months.

    More Thai Inspired Recipes

    • Spaghetti Squash Pad Thai
    • Thai Turkey Burgers with Peanut Sauce
    • Thai-style Chicken Flatbread

    Make sure you subscribe to my email list to get all my new recipes delivered right to your inbox!

    You can also follow me on Instagram, Facebook, or Pinterest for even more! 

    📖 Recipe

    Yield: about 8 servings

    Thai Pork and Veggie Meatballs

    Thai Pork and Veggie Meatballs

    Thai Pork and Veggie Meatballs are full of shredded zucchini and carrots and cooked in a coconut curry sauce. They are so delicious and also good for you!

    Cook Time 45 minutes
    Total Time 45 minutes

    Ingredients

    For the meatballs:

    • 1 small zucchini, shredded
    • 2 small carrots, shredded
    • 1 pound ground pork
    • ½ pound ground turkey
    • 1 tablespoon freshly grated ginger
    • 2 tablespoons minced fresh cilantro
    • 2 garlic cloves, minced
    • 1 teaspoon curry powder
    • ½ teaspoon red pepper flakes
    • salt and pepper, to taste

    For the sauce:

    • 1 14 ounce can of coconut milk
    • ¼ cup almond butter
    • 1 tablespoon soy sauce, or coconut aminos
    • 1 tablespoon sriracha
    • 1 teaspoon coconut oil
    • 1 teaspoon honey
    • 2 teaspoons curry powder
    • ½ teaspoon red pepper flakes
    • pinch of salt

    For serving:

    • chopped green onions
    • chopped cilantro

    Instructions

    1. Preheat oven to 350F.
    2. Put shredded zucchini in a fine mesh strainer over a bowl. Press with the bag of a wooden spoon to remove all liquid. (You can also do this in a cheese cloth.)
    3. Place zucchini, carrots, pork, turkey, and the rest of the the meatball ingredients in a bowl and use your hands to combine.
    4. Taking about 2 tablespoons of the meat mixture at a time, shape into meatballs. Set aside on a plate.
    5. In a medium bowl, whisk together all sauce ingredients until completely combine.
    6. Place a large oven safe saucepan over medium heat and add a teaspoon of coconut oil. Once saucepan is hot, add meatballs to the pan and brown on all sides. Pour the sauce over the meatballs.
    7. Place saucepan in oven and bake for 15-20 minutes, or until meatballs are cooked through.
    8. Garnish meatballs with chopped cilantro and green onions.

    Recommended Products

    As an Amazon Associate and member of other affiliate programs, I earn from qualifying purchases.

    • Coconut Milk
      Coconut Milk
    • Grater
      Grater

    Nutrition Information:

    Yield:

    8

    Serving Size:

    1

    Amount Per Serving: Calories: 412Total Fat: 32gSaturated Fat: 16gTrans Fat: 0gUnsaturated Fat: 14gCholesterol: 83mgSodium: 307mgCarbohydrates: 7gFiber: 2gSugar: 2gProtein: 25g

    Did you make this recipe?

    Tag me in your Instagram photo - @fakeginger

    © Amanda Livesay
    Cuisine: Asian / Category: pork

    Guava Margaritas

    Jul 31, 2014

    You guys, the weather.

    It literally rained all day yesterday. While never making it out of the 50s.

    What is this.

    It reminds me of that time last summer when my husband was on 24-hour duty and somehow his humvee got swept away by a flash flood. He came home soaking wet at 1 am and I was all “HOW IS YOUR PHONE?!” and he just stared at me for awhile before saying, “That Private and I almost died!”

    And then I said “No, but really, how’s your phone?”

    Not because I don’t care but because… in what world does a HUMVEE get swept away in a FLASH FLOOD in COLORADO?

    I didn’t full understand what happened until they had to go dig the vehicle out of the mud the next day and sent photos.

    And yeah, we totally had to buy a new phone.

    In honor of Colorado’s weather being stupid and ruining the last full week of summer for us, I made margaritas! Margaritas make everything better!

    These guava margaritas are super delicious – they just taste like summer! My only complaint is that the guava nectar I used wasn’t bright pink, but hey, it still tastes like guava and that’s the important part!

    Make sure you subscribe to my email list to get all my new recipes delivered right to your inbox!

    You can also follow me on Instagram, Facebook, or Pinterest for even more! 


    📖 Recipe

    Yield: 4 servings

    Guava Margaritas

    Guava Margaritas

    from Confections of a Foodie Bride

    Prep Time 15 minutes
    Total Time 15 minutes

    Ingredients

    For the homemade margarita mix:

    • ¼ cup sugar, or the equivalent in your favorite sweetener
    • ½ cup water
    • ½ cup fresh squeezed lime juice

    For the margarita:

    • ½ cup guava nectar
    • ¾ cup silver tequila
    • ⅓ cup orange liqueur
    • Lime wedges, for serving
    • salt, optional

    Instructions

    1. Heat water and sugar in a small saucepan. Stir until the sugar is completely dissolved.
    2. Pour the sugar mixture into a pitcher with lime juice.
    3. Add guava nectar, tequila, and orange liqueur; stir well.
    4. To serve the drinks, run a slice of lime around the rim of 4 glasses and dip in salt. Fill the glasses with ice and divide the margaritas between them.

    Recommended Products

    As an Amazon Associate and member of other affiliate programs, I earn from qualifying purchases.

    • Margarita Salt
      Margarita Salt
    • Stimless Margarita Glasses
      Stimless Margarita Glasses
    • Simple Syrup
      Simple Syrup

    Nutrition Information:

    Yield:

    4

    Serving Size:

    1

    Amount Per Serving: Calories: 215Total Fat: 0gSaturated Fat: 0gTrans Fat: 0gUnsaturated Fat: 0gCholesterol: 0mgSodium: 150mgCarbohydrates: 27gFiber: 1gSugar: 22gProtein: 0g

    Did you make this recipe?

    Tag me in your Instagram photo - @fakeginger

    © Amanda Livesay

    Walking Tacos

    Jul 30, 2014

    Walking Tacos – Fritos, taco meat, beans, cheese, and sour cream layered in the chip bag for an easy dinner idea! Kids love these!

    Walking Tacos - Fritos, taco meat, beans, cheese, and sour cream layered in the chip bag for an easy dinner idea! Kids love these!

    One reason I’m not 100% convinced my children are actually mine is that they don’t like tacos.

    A few weeks ago – you know, when we were 2 hours early for a fair that’s an hour away and were in a town that literally only has a general store so we had to drive 20 minutes to find the nearest restaurant – we went out for Mexican and while I had delicious Tacos Al Pastor, all 3 of them ordered…

    Corndogs.

    Yeah, this is my life.

    So making anything that even slightly resembles a taco is always risky.

    We made these Walking Tacos last week mainly because I required a margarita (coming tomorrow!) for Big Brother and I can’t really have margarita without a taco. My kids LOVED them. They literally walked circles in the living while eating them. Because why sit with your Walking Taco when you can walk circles?

    We ran out of Fritos after the first night so the next day, they put the rest of the taco meat on Cool Ranch Doritos.

    These are super simple and are perfect for feeding a crowd. If you serve them with plastic utensils, you’ll have no clean-up to do!

    Walking Tacos - Fritos, taco meat, beans, cheese, and sour cream layered in the chip bag for an easy dinner idea! Kids love these!

    How To Make Walking Tacos

    • Cook ground beef until no longer pink, breaking it into crumbles as it cooks
    • Add taco seasoning, black pepper, diced tomatoes with green chiles, and beans
    • Simmer mixture until thickened
    • To assemble, add beef mixture over top of Fritos in small bags
    • Add shredded cheese, sour cream, and green onions
    • Enjoy immediately!

    What To Serve With Walking Tacos

    I think Walking Tacos are a meal all their own but my Restaurant-Style Salsa or Queso would be delicious toppings for them.

    If you want a side dish, my Cilantro Lime Cauliflower Rice would be delicious!

    More Taco Recipes

    • Fish Tacos with Guacamole and Cabbage Slaw
    • Slow Cooker Carnitas Street Tacos
    • Sweet Pork Tacos with Cilantro Lime Dressing
    • Buffalo Chicken Tacos
    • Taco Pasta

    Make sure you subscribe to my email list to get all my new recipes delivered right to your inbox!

    You can also follow me on Instagram, Facebook, or Pinterest for even more! 

    📖 Recipe

    Yield: 6 servings

    Walking Tacos

    Walking Tacos

    Walking Tacos - Fritos, taco meat, beans, cheese, and sour cream layered in the chip bag for an easy dinner idea! Kids love these!

    Prep Time 10 minutes
    Cook Time 20 minutes
    Total Time 30 minutes

    Ingredients

    • 1 teaspoon olive oil
    • 1 pound lean ground beef
    • 1 1.25 ounce taco seasoning
    • ¼ teaspoon pepper
    • 1 10 ounce can diced tomatoes with green chilis
    • 1 15 ounce can Ranch Style beans (pinto beans in seasoned tomato sauce)
    • 6 1 ounce packages corn chips
    • shredded cheese, sour cream, sliced green onions, for serving

    Instructions

    1. In a large skillet, heat olive oil over medium heat. Add beef and cook 6 - 8 minutes or until no longer pink, breaking it into crumbles. Drain if necessary. Stir in the taco seasoning mix, pepper, tomatoes, and beans. Bring to a boil; simmer uncovered 20 minutes or until the mixture has thickened, stirring occasionally.
    2. Just before serving, open corn chip bags. Add beef mixture and desired toppings. Serve immediately.

    Nutrition Information:

    Yield:

    6

    Serving Size:

    1

    Amount Per Serving: Calories: 466Total Fat: 22gSaturated Fat: 6gTrans Fat: 0gUnsaturated Fat: 13gCholesterol: 73mgSodium: 1711mgCarbohydrates: 36gFiber: 6gSugar: 5gProtein: 29g

    Did you make this recipe?

    Tag me in your Instagram photo - @fakeginger

    © Amanda Livesay
    Cuisine: Mexican / Category: beef

    Blueberry Crumb Bars

    Jul 29, 2014

    Blueberry Crumb Bars – fresh blueberry bars with a crumb topping. The perfect use for summer blueberries! 

    Blueberry Crumb Bars - fresh blueberry bars with a crumb topping. The perfect use for summer blueberries!

    My kids start school next week, y’all!

    It hit me yesterday and I rushed around trying to get shots for the 4 year old and then get school supplies for the 7 year old. I’m just amazed at how fast summer went.

    But you know what that means!

    SNOW IS COMING!

    I’m super excited about snow. Super, super, super excited. I think if there was a competition to see who in the world loves snow the most, it’d be me. Followed closely by the idiot husky.

    One thing I am going to miss about summer is the berries. This is the first year that I’ve actually liked raspberries – isn’t that weird? Like, I used to think they were seedy and gross (like blackberries – bleh!) but this year, I am all about them. And I’m sad because they’re already at that point where they’re mushy before you even buy them! My raspberries were so leaky this week that I walked around the entire grocery store with a big red streak down my nose before my 7 year old said, “Hey mom, is that makeup on your nose?”

    Thanks kid.

    Blueberry Crumb Bars - fresh blueberry bars with a crumb topping. The perfect use for summer blueberries!

    Blueberry Crumb Bars!

    I bought a big thing of blueberries this week too and thankfully got a lot of use out of them before they started to turn on me. I threw what we had left into these Blueberry Crumb Bars!

    I love anything with a crumb topping, especially anything fruity! These are delicious and really simple to make.

    Blueberry Crumb Bars - fresh blueberry bars with a crumb topping. The perfect use for summer blueberries!

    More Blueberry Recipes

    • Glazed Blueberry Biscuits
    • Peach Blueberry Crisp
    •  Blueberry Muffins

    Make sure you subscribe to my email list to get all my new recipes delivered right to your inbox!

    You can also follow me on Instagram, Facebook, or Pinterest for even more! 

    📖 Recipe

    Yield: 20 bars

    Blueberry Crumb Bars

    Blueberry Crumb Bars

    from Tracey's Culinary Adventures

    Prep Time 30 minutes
    Cook Time 45 minutes
    Total Time 1 hour 15 minutes

    Ingredients

    For the crust/topping:

    • 1 cup granulated sugar
    • zest of one lemon
    • 3 cups all-purpose flour
    • 1 teaspoon baking powder
    • ¼ teaspoon salt
    • 1 cup 2 sticks cold unsalted butter, cut into ¼-inch pieces
    • 1 large egg, lightly beaten

    For the filling:

    • juice of one lemon
    • ½ cup granulated sugar
    • 4 teaspoons cornstarch
    • 4 cups fresh blueberries

    Instructions

    1. Preheat oven to 375F. Line a 9x13-inch pan with parchment paper leaving an overhang on opposite sides to lift the bars out after baking.
    2. In a large bowl, combine the sugar and lemon zest. Rub the zest into the sugar until the sugar is moist and fragrant. Add the flour, baking powder, and salt to the bowl and whisk to combine. Add the butter and egg to the bowl, and use a pastry cutter to cut them in until the pieces of butter are no larger than small peas – the mixture should look like coarse meal. Transfer half of the mixture to the prepared pan and pat into an even layer to form the crust.
    3. In a medium bowl, stir together the lemon juice, sugar, and cornstarch. Add the blueberries, and toss gently to coat them evenly. Pour the blueberry mixture over the crust and spread evenly. Crumble the remaining crust/topping mixture over the blueberries to cover.
    4. Bake for 40-45 minutes, or until topping is golden brown and the filling bubbles around the edges. Remove the pan to a wire rack and allow the bars to cool completely in the pan. Once cool, use the parchment “handles” to lift the bars out and cut into squares (I actually like to refrigerate them for an hour or two before cutting – it makes for neater squares). Store in an airtight container in the refrigerator.

    Recommended Products

    As an Amazon Associate and member of other affiliate programs, I earn from qualifying purchases.

    • Parchment Paper
      Parchment Paper
    • 9x13-inch Pan
      9x13-inch Pan

    Nutrition Information:

    Yield:

    20

    Serving Size:

    1

    Amount Per Serving: Calories: 232Total Fat: 10gSaturated Fat: 6gTrans Fat: 0gUnsaturated Fat: 3gCholesterol: 34mgSodium: 57mgCarbohydrates: 35gFiber: 1gSugar: 18gProtein: 3g

    Did you make this recipe?

    Tag me in your Instagram photo - @fakeginger

    © Amanda Livesay


    Coconut Flour Waffles

    Jul 27, 2014

    As if it hasn’t become really apparent over the years, I get bored really easily. Not like, sitting on the couch flipping channels bored but I get bored of things quickly. Hobbies, books, tv shows, etc, etc, etc.

    So on our epic roadtrip earlier this summer, it’s really no surprise that by hour 4 I was done with my playlist. I hated every song. I never wanted to hear them again. I’m still kind of hating it a month later.

    I’d been saving podcasts, though, because I know myself and knew I’d get tired of music. I started marathoning Dave Ramsey, Elise Gets Crafty, and Balanced Bites.

    My children hated every minute of it.

    I really got into Balanced Bites which is a paleo/overall health podcast and after many, many hours of listening, I got really excited about paleo living. I was all YES! WHEN WE GET HOME, EVERYONE’S GOING PALEO! THE KIDS, THE DOGS, EVERYONE!

    This lasted about 5 minutes once we actually got home but I discovered a really awesome waffle recipe so… I call it a win.

    I dig what coconut flour does for recipes. Especially these waffles. They’re really light and fluffy and the coconut flour adds just a little extra texture and a very slight coconut flavor. Plus coconut flour is high in protein, fiber, and good fats!

    Make sure you subscribe to my email list to get all my new recipes delivered right to your inbox!

    You can also follow me on Instagram, Facebook, or Pinterest for even more! 

    📖 Recipe

    Yield: 6 waffles

    Coconut Flour Waffles

    Coconut Flour Waffles

    from The Unrefined Kitchen

    Cook Time 30 minutes
    Total Time 30 minutes

    Ingredients

    • 4 eggs, separated
    • 2 tablespoons coconut oil, melted
    • 1 teaspoon vanilla
    • ½ teaspoon baking soda
    • ⅛ teaspoon salt
    • ⅛ teaspoon cinnamon
    • ⅓ cup almond milk or coconut milk
    • ¼ cup sifted coconut flour

    Instructions

    1. Put egg whites in a large mixing bowl and beat to stiff peaks. Set aside.
    2. In a separate mixing bowl, stir together egg yolks, melted coconut oil, vanilla, baking soda, salt, cinnamon, almond milk, and sifted coconut flour. Stir until almost all lumps are gone. Gently fold in beaten egg whites.
    3. Cook according to waffle maker's instructions. Mine took about ½ a cup of batter per waffle and I ended up with 3 waffles.

    Recommended Products

    As an Amazon Associate and member of other affiliate programs, I earn from qualifying purchases.

    • Coconut Flour
      Coconut Flour
    • Waffle Maker
      Waffle Maker

    Nutrition Information:

    Yield:

    6

    Serving Size:

    1

    Amount Per Serving: Calories: 193Total Fat: 17gSaturated Fat: 12gTrans Fat: 0gUnsaturated Fat: 3gCholesterol: 124mgSodium: 203mgCarbohydrates: 5gFiber: 1gSugar: 1gProtein: 6g

    Did you make this recipe?

    Tag me in your Instagram photo - @fakeginger

    © Amanda Livesay

    Flourless Double Chocolate Pecan Cookies

    Jul 23, 2014

    Flourless Double Chocolate Cookies are like if crackly brownie tops were a cookie! They are rich, delicious, and need only 6 ingredients. Also naturally gluten free!

    It’s not often I blog about chocolate cookies. Especially chocolate cookies with more chocolate inside.

    I like chocolate, I really do. But for some reason, I’d choose a shortbread cookie or a sugar cookie or even a chocolate chip cookie over a full-out chocolate cookie.

    This cookie though? It’s more like a brownie.

    Like, you know the crackly top of a brownie that’s pretty much the best thing ever? These are like that all the way around and with the soft brownie part inside.

    I realize that made absolutely no sense but trust me, it’s like a brownie!

    I’m kind of obsessed with them.

    They’re gluten-free so they are the perfect treat for someone following a gluten-free diet.

    Ingredients

    • Egg whites
    • Powdered sugar
    • Dutch-process cocoa powder
    • Salt
    • Bittersweet chocolate
    • Pecans

    Instructions

    • Prepare. Preheat oven to 325F. Line two baking sheets with parchment paper.
    • Beat egg whites. Put egg whites in a large mixing bowl. Beat to stiff peaks; set aside.
    • Combine dry ingredients. In another mixing bowl, whisk together powdered sugar, cocoa powder, and salt until no lumps remain.
    • Add remaining ingredients. Stir in chocolate and pecans.
    • Fold in egg whites. Gently fold in the beaten egg whites until completely combined.
    • Bake. Drop ¼ cupfuls onto the prepared baking sheets, 3 inches apart. Bake for 20 – 25 minutes, until the tops are dry and crackled, rotating the baking sheets halfway through.
    • Cool. Transfer the sheets to to a wire rack to cool. Cool completely before serving.

    More Chocolate Cookies

    • Peanut Butter Chocolate Chunk Pudding Cookies
    • Mexican Hot Chocolate Cookies
    • Chewy Chocolate Chip Cookies
    • M&Ms Chocolate Chip Pudding Cookies

    Make sure you subscribe to my email list to get all my new recipes delivered right to your inbox!

    You can also follow me on Instagram, Facebook, or Pinterest for even more! 

    📖 Recipe

    Yield: 12 cookies

    Flourless Double Chocolate Pecan Cookies

    Flourless Double Chocolate Pecan Cookies

    adapted from Martha Stewart

    Prep Time 20 minutes
    Cook Time 25 minutes
    Total Time 45 minutes

    Ingredients

    • 4 egg whites, at room temperature
    • 3 cups powdered sugar
    • ¾ cup Dutch-process cocoa powder
    • ½ teaspoon salt
    • 5 ounces bittersweet chocolate, chopped
    • ½ cups chopped pecans

    Instructions

    1. Preheat oven to 325F. Line two baking sheets with parchment paper.
    2. Put egg whites in a large mixing bowl. Beat to stiff peaks; set aside.
    3. In another mixing bowl, whisk together powdered sugar, cocoa powder, and salt until no lumps remain. Stir in chocolate and pecans.
    4. Gently fold in the beaten egg whites until completely combined.
    5. Drop ¼ cupfuls onto the prepared baking sheets, 3 inches apart.
    6. Bake for 20 - 25 minutes, until the tops are dry and crackled, rotating the baking sheets halfway through. Transfer the sheets to to a wire rack to cool. Cool completely before serving.

    Recommended Products

    As an Amazon Associate and member of other affiliate programs, I earn from qualifying purchases.

    • Parchment Paper
      Parchment Paper
    • Rimmed Baking Sheet
      Rimmed Baking Sheet
    • Electric Mixer
      Electric Mixer

    Nutrition Information:

    Yield:

    12

    Serving Size:

    1

    Amount Per Serving: Calories: 240Total Fat: 10gSaturated Fat: 4gTrans Fat: 0gUnsaturated Fat: 5gCholesterol: 0mgSodium: 110mgCarbohydrates: 35gFiber: 3gSugar: 27gProtein: 4g

    Did you make this recipe?

    Tag me in your Instagram photo - @fakeginger

    © Amanda Livesay
    Category: cookie

    Cilantro-Lime Cauliflower Rice

    Jul 22, 2014

    I don’t know if I’ve ever told you guys but I really don’t like rice. I don’t dislike rice but it’s not something I’d choose to eat. The exception being Mexican restaurant rice and even then, I mix it into the refried beans because… that’s just the way it should be done.

    Oh, and any kind of casserole that includes rice, cream of- soup, and tons of cheese.

    But, like, plain rice? Nope. I don’t even like the cilantro-lime rice at those burrito joints (that this recipe is based on) unless it’s absolutely covered in salsa (and queso if we’re at Qdoba).

    Weirdly enough, I really dig cauliflower rice. It’s the perfect substitute for those of use that either don’t like rice or maybe we’re trying to cut back on calories. But yeah, I eat cauliflower rice with everything. At one point, before my husband deployed, he had to tell me to cool it with the cauliflower rice because he was sick of it.

    So naturally I switched to mashed cauliflower and he was not amused.

    Since I’m currently going through one of my Mexican food phases, this Cilantro-Lime Cauliflower Rice has become a staple in my diet. It’s really good and the perfect side dish for all the stuff I’m currently coating in cumin, dousing in lime juice, and covering in jalapenos.

    Quick warning: if you don’t like cauliflower, you won’t like this. No amount of lime zest and cilantro can hide the taste (and smell) of cauliflower. If you do like cauliflower, you will looove it!

    Make sure you subscribe to my email list to get all my new recipes delivered right to your inbox!

    You can also follow me on Instagram, Facebook, or Pinterest for even more! 

    📖 Recipe

    Yield: 8 servings

    Cilantro-Lime Cauliflower Rice

    Cilantro-Lime Cauliflower Rice

    from Leaf Parade

    Ingredients

    • 1 head cauliflower, cut into florets
    • 1 tablespoons extra virgin olive oil
    • ½ cup red onion, diced
    • salt and pepper
    • zest of 1 lime
    • ½ cup chopped fresh cilantro

    Instructions

    1. Pulse the cauliflower in a food processor until the pieces are about the size of rice. You'll probably have to do multiple batches. (You could also use a grater to do it by hand if you prefer.)
    2. Heat the olive oil over medium heat in a large skillet. Add onion and cook until translucent and softened. Add the riced cauliflower and coat it evenly with the oil. Add the salt, pepper, and lime zest. Cook, stirring frequently, about 5 minutes or until the cauliflower just begins to soften.
    3. Remove from heat and stir in cilantro.

    Recommended Products

    As an Amazon Associate and member of other affiliate programs, I earn from qualifying purchases.

    • My Favorite Food Processor
      My Favorite Food Processor

    Nutrition Information:

    Yield:

    8

    Serving Size:

    1

    Amount Per Serving: Calories: 40Total Fat: 2gSaturated Fat: 0gTrans Fat: 0gUnsaturated Fat: 2gCholesterol: 0mgSodium: 49mgCarbohydrates: 5gFiber: 2gSugar: 2gProtein: 2g

    Did you make this recipe?

    Tag me in your Instagram photo - @fakeginger

    © Amanda Livesay

    Strawberry Watermelon Popsicles

    Jul 21, 2014

    Strawberry Watermelon Popsicles are easy homemade fruit popsicles. It’s just strawberries, watermelon, a little bit of sugar, and lime juice! The perfect refreshing summer treat.

    Homemade popsicles are such a fun project and a delicious sweet treat!

    These Strawberry Watermelon Popsicles are exactly what they sound like. They’re just pureed fresh watermelon and pureed fresh strawberries combined with a little bit of sugar and some lime juice.

    And then it gets poured into popsicle molds and left in the freezer until frozen.

    They’re so easy and really are a great summer treat!

    Ingredients

    • Seedless watermelon – you want to make sure you’re using a seedless watermelon because you are pureeing it.
    • Strawberries – make sure you remove the leaves before pureeing.
    • Granulated sugar – you can adjust the amount based on your taste.
    • Lime juice – fresh lime juice is the best tasting but if you already have a bottle of lime juice, you can definitely use that.

    How To Make Strawberry Watermelon Popsicles

    • Make watermelon puree. Add the watermelon to your blender and pure. Strain the pureed watermelon through a fine-mesh strainer into a large measuring cup.
    • Make strawberry puree. Repeat with the strawberries, straining if the seeds bother you.
    • Combine. Add the sugar and lime juice to the measuring cup and whisk to dissolve the sugar completely.
    • Transfer. Pour into your popsicle molds.
    • Freeze. Freeze for 30 minutes, then insert the popsicle sticks. Freeze completely then serve.

    How Long Are They Good For?

    These homemade popsicles will be good for up to 2 months. Make sure to store them in an airtight container like a freezer ziploc bag.

    Make sure you subscribe to my email list to get all my new recipes delivered right to your inbox!

    You can also follow me on Instagram, Facebook, or Pinterest for even more! 

    📖 Recipe

    Yield: about 8 servings

    Strawberry-Watermelon Popsicles

    Strawberry-Watermelon Popsicles

    Strawberry Watermelon Popsicles are easy homemade fruit popsicles. It's just strawberries, watermelon, a little bit of sugar, and lime juice! The perfect refreshing summer treat.

    Prep Time 30 minutes
    Additional Time 12 hours
    Total Time 12 hours 30 minutes

    Ingredients

    • 1 pound seedless watermelon, cubed
    • 4 ounce strawberries, hulled and halved
    • ¼ cup sugar
    • 1 ½ tablespoons fresh lime juice

    Instructions

    1. Add the watermelon to your blender and puree (you might need to do this in batches). Strain the pureed watermelon through a fine-mesh strainer into a large measuring cup (press on the solids to extract as much liquid as possible. Repeat with the strawberries, straining if the seeds bother you. Add the sugar and lime juice to the measuring cup and whisk to dissolve the sugar completely.
    2. Pour into your popsicle molds. Freeze for 30 minutes, then insert the popsicle sticks. Freeze completely then serve.

    Recommended Products

    As an Amazon Associate and member of other affiliate programs, I earn from qualifying purchases.

    • Popsicle molds
      Popsicle molds
    • Fine Mesh Strainer
      Fine Mesh Strainer

    Nutrition Information:

    Yield:

    8

    Serving Size:

    1

    Amount Per Serving: Calories: 46Total Fat: 0gSaturated Fat: 0gTrans Fat: 0gUnsaturated Fat: 0gCholesterol: 0mgSodium: 1mgCarbohydrates: 12gFiber: 1gSugar: 11gProtein: 0g

    Did you make this recipe?

    Tag me in your Instagram photo - @fakeginger

    © Amanda Livesay
    Cuisine: American / Category: frozen goodies

    Peach Margaritas

    Jul 17, 2014

    A peachy twist on the classic margarita! Peach margaritas made with fresh peaches blended with tequila, orange liqueur, lime juice, and peach nectar. The perfect poolside drink for summer.

    If you love peach drinks, try Peach Cherry Sangria!

    I’m in the midst of a panic.

    So.

    My two oldest boys are going to school this year. One in 2nd grade and the other in pre-k. Number 1 annoying thing is that they’re going to different elementary schools on post. Because the Army is all about efficiency.

    And then, number 2. Neither school has school supply lists on their website yet! Kid #1’s school is… not my favorite. I don’t want to say that the vice-principal and I have had words but, it may have happened. More than once. (FOR THE LOVE OF EVERYTHING GOOD, LADY, TURN THE PAGE OF THE SHOT RECORDS SO I DON’T HAVE TO COME UP HERE EVERY QUARTER AND TELL YOU THAT YOU’RE AN IDIOT.) So I’m not really expecting them to have their supply lists posted anytime before November.

    But then Kid #2’s school has every grade BUT pre-k listed on their supply list.

    Geez people, c’mon.

    I am obsessed with school supplies even though I am old and have no real use for them. I just love them. The highlight of my middle school years was getting a big paper bag of school supplies at the start of each year (because we all had to have the EXACT same supplies and the EXACT same color binder for each class) and obsessively sorting them out on my bedroom floor. Once a day I would unpack that bag and try to decide how many pencils I would put in the math pile and how many would go in German.

    I still use a Lisa Frank notebook to make my grocery lists.

    But anyway, I’m having a crisis because WHAT IF TARGET RUNS OUT OF EVERYTHING AND MY KIDS HAVE TO HAVE PUKE GREEN FOLDERS?!

    Margaritas have come in handy during my obsessive website refresh sessions. These are peach margaritas and they’re my fave. The white peaches are extra good this year and I’m really enjoying eating them fresh or chopping them up for smoothies. And yeah, maybe a margarita every once in a while.

    Ingredients

    • Peaches – make sure they are fresh, very ripe peaches so you get the best peach taste.
    • Orange liqueur – anything orange liqueur that you like.
    • Sugar – this is going to be used to get the peaches to release their juices and also sweeten it.
    • Salt – there’s just a tiny bit of salt in this recipe to help the peaches give off their juices.
    • Silver tequila – you can use gold if you have it but it will slightly change the taste and the color of the margaritas.
    • Fresh lime juice
    • Peach nectar – you can find this in the juice aisle of most large grocery stores and some liquor stores will even have it.

    How To Make Peach Margaritas

    • Peel peaches. Put a bunch of ice in a large mixing bowl. Cover the ice with water. Set aside. Bring a medium pot of water to a boil. Add 1 pound peaches, and cook for 1 minute. Transfer to ice-water bath to cool. Remove peaches from water once you can handle them. Peel and halve peaches, and remove pits.
    • Prepare peaches. Slice peaches into wedges, and transfer to a medium bowl. Toss with orange liqueur, sugar, and salt. Cover, and set in a warm spot until peaches give off juice, about 20 minutes.
    • Puree peach mixture. Puree peach mixture in a blender or a food processor until completely smooth.
    • Make drinks. stir in tequila and lemon juice. Transfer to a pitcher, and stir in peach nectar.
    • Serve. Serve over ice. Garnish with peach slices, if desired.

    Can You Make It Ahead?

    You can peel and prep the peaches ahead of time if you need to because that is the most time intensive part. Keep the mixture refrigerated until you are ready to add the remaining ingredients.

    Once you add the tequila, I wouldn’t leave it for more than 4 hours before serving.

    More Margaritas

    • Melon Margaritas
    • Skinny Kiwi Margaritas
    • Frozen Prickly Pear Margaritas
    • Cantaloupe Coconut Margaritas
    • Honeydew Margaritas

    Make sure you subscribe to my email list to get all my new recipes delivered right to your inbox!

    You can also follow me on Instagram, Facebook, or Pinterest for even more! 

    📖 Recipe

    Yield: 8 servings

    Peach Margaritas

    Peach Margaritas

    A peachy twist on the classic margarita! Peach margaritas made with fresh peaches blended with tequila, orange liqueur, lime juice, and peach nectar. The perfect poolside drink for summer.

    Prep Time 20 minutes
    Cook Time 5 minutes
    Additional Time 20 minutes
    Total Time 45 minutes

    Ingredients

    • 1 pound about 3 ripe peaches, plus more for garnish
    • 3 tablespoons orange liqueur
    • 2 tablespoons sugar
    • ¼ teaspoon salt
    • ¾ cup 6 ounces silver tequila
    • 3 tablespoons fresh lime juice
    • 2 cups bottled peach nectar

    Instructions

    1. Put a bunch of ice in a large mixing bowl. Cover the ice with water. Set aside.
    2. Bring a medium pot of water to a boil. Add 1 pound peaches, and cook for 1 minute. Transfer to ice-water bath to cool. Remove peaches from water once you can handle them.
    3. Peel and halve peaches, and remove pits. Slice peaches into wedges, and transfer to a medium bowl. Toss with orange liqueur, sugar, and salt. Cover, and set in a warm spot until peaches give off juice, about 20 minutes.
    4. Puree peach mixture in a blender or a food processor until completely smooth. Immediately stir in tequila and lime juice. (Peach puree with tequila can be refrigerated, covered, for up to 4 hours.) Transfer to a pitcher, and stir in peach nectar.
    5. Serve over ice. Garnish with peach slices, if desired.

    Recommended Products

    As an Amazon Associate and member of other affiliate programs, I earn from qualifying purchases.

    • My Favorite Blender
      My Favorite Blender
    • Peach Nectar
      Peach Nectar
    • Margarita Salt
      Margarita Salt

    Nutrition Information:

    Yield:

    8

    Serving Size:

    1

    Amount Per Serving: Calories: 137Total Fat: 0gSaturated Fat: 0gTrans Fat: 0gUnsaturated Fat: 0gCholesterol: 0mgSodium: 71mgCarbohydrates: 20gFiber: 1gSugar: 18gProtein: 1g

    Did you make this recipe?

    Tag me in your Instagram photo - @fakeginger

    © Amanda Livesay
    Cuisine: Mexican / Category: drink

    Honey Mustard Glazed Chicken Thighs

    Jul 15, 2014

    Easy baked Honey Mustard Chicken Thighs are ready in less than 30 minutes and need only a few ingredients. You end up with juicy chicken and a crispy skin.

    If you are searching for ways to make boring ol’ chicken a little more fun, these Honey Mustard Chicken Thighs are a great way to do it. They only need a few ingredients and bake up in under 30 minutes.

    You end up with super juicy chicken but really crispy skin that tastes like delicious honey mustard.

    We’re honey mustard lovers in my house so if you are too, you’re definitely going to love this simple recipe!

    Ingredients

    • Skin-on chicken thighs – you can use chicken breasts but may need to adjust the cooking time. The important thing is that you use skin-on chicken so you get that crispy skin.
    • Olive oil or avocado oil – use whatever you prefer. You could also use coconut oil or vegetable oil.
    • Dijon mustard – use your favorite brand.
    • Honey – use your favorite kind of honey.

    How To Make Honey Mustard Chicken

    • Make honey mustard. Whisk together oil, dijon mustard, honey, and salt.
    • Prep chicken. Brush this mixture on all sides of the chicken thighs.
    • Brown chicken. Place the chicken thighs in the pan, fat side down. Cook about 3 minutes or until browned; flip and cook another 3 minutes.
    • Bake. Bake at 375F for 20 – 25 minutes or until cooked through.

    How Long Is It Good For?

    This chicken will be good in the fridge for up to 3 days. Make sure to store it in an airtight container.

    When you are ready to serve it, reheat in the microwave.

    More Chicken Recipes

    • Sweet and Sour Chicken
    • Buffalo Chicken Meatballs
    • Panda Express Sweet Fire Chicken (Copycat)
    • Chicken Fajitas
    • Honey Chipotle Roasted Chicken

    Make sure you subscribe to my email list to get all my new recipes delivered right to your inbox!

    You can also follow me on Instagram, Facebook, or Pinterest for even more! 

    📖 Recipe

    Yield: about 6 servings

    Honey Mustard Glazed Chicken Thighs

    Honey Mustard Glazed Chicken Thighs

    Easy baked Honey Mustard Chicken Thighs are ready in less than 30 minutes and need only a few ingredients. You end up with juicy chicken and a crispy skin.

    Prep Time 10 minutes
    Cook Time 25 minutes
    Total Time 35 minutes

    Ingredients

    • 1 ½ pounds bone-in, skin-on chicken thighs
    • 2 tablespoons olive oil or avocado oil
    • 2 tablespoons dijon mustard
    • 1 tablespoon honey
    • ½ teaspoon salt

    Instructions

    1. Preheat oven to 375F.
    2. Heat a large pan over medium-high heat.
    3. Whisk together oil, dijon mustard, honey, and salt. Brush this mixture on all sides of the chicken thighs.
    4. Place the chicken thighs in the pan, fat side down. Cook about 3 minutes or until browned; flip and cook another 3 minutes or until browned. Remove to a baking sheet. Continue until all chicken thighs are browned.
    5. Bake the chicken thighs in preheated oven 20 - 25 minutes or until cooked through.

    Recommended Products

    As an Amazon Associate and member of other affiliate programs, I earn from qualifying purchases.

    • Rimmed Baking Sheet
      Rimmed Baking Sheet
    • Parchment Paper
      Parchment Paper

    Nutrition Information:

    Yield:

    6

    Serving Size:

    1

    Amount Per Serving: Calories: 233Total Fat: 17gSaturated Fat: 8gTrans Fat: 0gUnsaturated Fat: 8gCholesterol: 102mgSodium: 458mgCarbohydrates: 3gFiber: 0gSugar: 3gProtein: 18g

    Did you make this recipe?

    Tag me in your Instagram photo - @fakeginger

    © Amanda Livesay
    Cuisine: American / Category: chicken
    « Previous Page
    Next Page »

    Primary Sidebar

    Amanda Livesay
    Hi, I'm Amanda! DFW food blogger, mom of boys, and crazy dog lady.
    Read more
    Privacy Policy
    Privacy Policy

    Footer

    ↑ back to top

    About

    • Privacy Policy
    • About Fake Ginger

    Newsletter

    • Sign Up for weekly emails featuring new recipes!

    As an Amazon Associate I earn from qualifying purchases.

    Copyright © 2024 FakeGinger.com