• Skip to primary navigation
  • Skip to main content
  • Skip to primary sidebar
  • Home
  • About
  • Recipes

Fake Ginger

menu icon
go to homepage
  • Recipe Index
  • About
  • Subscribe
    • Facebook
    • Instagram
    • Pinterest
  • subscribe
    search icon
    Homepage link
    • Recipe Index
    • About
    • Subscribe
    • Facebook
    • Instagram
    • Pinterest
  • ×
    Home » Page 45

    Spicy Basil Pork

    Spicy Basil Pork

    May 06, 2013

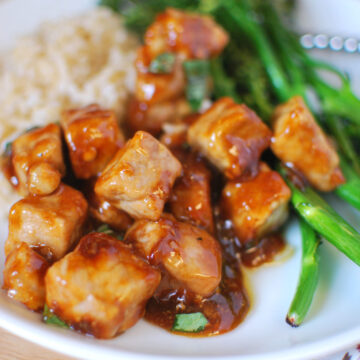
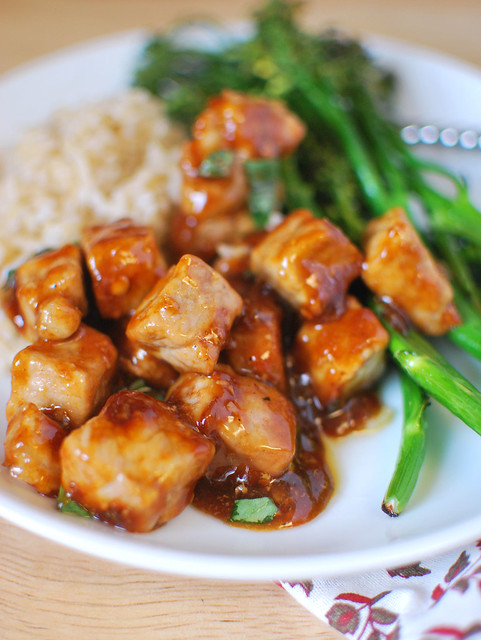
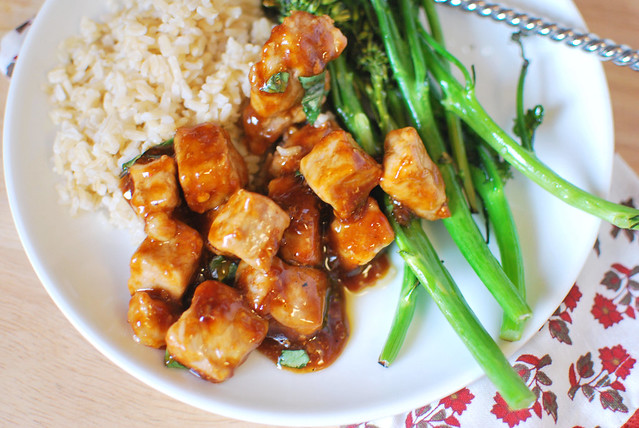
    Spicy Basil Pork is stir-fried pork in a spicy soy sauce-based sauce. It’s an easy and delicious 30 minute dinner.

    I realized recently that 1 pound of meat just isn’t going to work as dinner any longer in this house. Three growing boys plus a husband means this girl has been skipping dinner more often than not just because there isn’t enough! It usually doesn’t bother me but when I make something delicious and barely get a bite before it’s all gone, I get sad. And this meal made me sad.

    You guys, it’s so good. I know the ingredient list looks like nothing special but I’m pretty sure I could’ve eaten this 5 days in a row without complaint. Y’all know I love pork and this pork was just spicy enough and had all my favorite Asian flavors. I’ve been hoarding recipes that call for Thai basil forever now because I’ve never seen in it stores but with my new herb garden I finally have access to Thai basil! Honestly, I’m not sure I could tell a difference between it and regular basil but it was fun to use it.

    This pork is also incredibly quick to cook so it makes a perfect weeknight dinner.

    Ingredients

    • Vegetable oil
    • Shallot – if you don’t have a shallot, red onion will work.
    • Boneless pork chops
    • Garlic
    • Fish sauce
    • Oyster sauce
    • Soy sauce – I recommend using a low sodium soy sauce. You can always add more salt if needed.
    • Chili paste – such as Sambal Oelek.
    • Sugar – just a tiny bit to balance out the spice.
    • Cornstarch – this is used to thicken the sauce so that it really coats the pork.
    • Basil – Thai basil is preferred but regular basil will be fine if you can’t find Thai basil.

    How To Make Spicy Basil Pork

    • Cook pork. Heat oil in a large nonstick skillet over medium-high heat. Add shallots and cook 1 minute. Add pork and garlic to pan. Cook 6-8 minutes, until pork is cooked through.
    • Make sauce. Whisk together the fish sauce, oyster sauce, soy sauce, chili paste, sugar, water, and corn starch.
    • Combine. Add fish sauce mixture to meat and cook 1 minute more or until mixture thickens slightly. Stir to coat entire mixture. Remove from heat and stir in basil.

    How Long Is It Good For?

    Spicy basil pork will be good for up to 3 days if stored in an airtight container in the refrigerator.

    Reheat it in the microwave when you are ready to serve.

    More Pork Recipes

    • Al Pastor Kabobs
    • Pulled Pork Fries
    • Sweet and Sour Pork
    • Honey Mustard Pork Chops
    • Sweet Pork Tacos with Cilantro Ranch Dressing
    • Apricot Pork Chops

    Make sure you subscribe to my email list to get all my new recipes delivered right to your inbox!

    You can also follow me on Instagram, Facebook, or Pinterest for even more! 

    📖 Recipe

    Yield: 4 servings

    Spicy Basil Pork

    Spicy Basil Pork

    Spicy Basil Pork is stir-fried pork in a spicy soy sauce-based sauce. It's an easy and delicious 30 minute dinner.

    Cook Time 20 minutes
    Total Time 20 minutes

    Ingredients

    • 1-2 tablespoons vegetable oil
    • 1 shallot, minced
    • 1 ¼ pound boneless pork chops, cut into 1-in. cubes
    • 4 cloves garlic, minced
    • 1 tablespoon fish sauce
    • 1 tablespoon oyster sauce
    • 2 tablespoons low-sodium soy sauce
    • 1 tablespoons chili paste, like Sambal Oelek
    • 1 tablespoon sugar
    • 2 teaspoon water
    • 1 ½ teaspoons cornstarch
    • ¼ cup sliced basil leaves, preferably Thai
    • white or brown rice, for serving
    • additional soy sauce and/or chili sauce, for serving

    Instructions

    1. Heat oil in a large nonstick skillet over medium-high heat. Add shallots and cook 1 minute. Add pork and garlic to pan. Cook 6-8 minutes, stirring occasionally, or until meat is cooked through.
    2. Meanwhile, whisk the fish sauce, oyster sauce, soy sauce, chili paste, sugar, water, and corn starch together in a small bowl. Add fish sauce mixture to meat and cook 1 minute more or until mixture thickens slightly. Stir to coat entire mixture. Remove from heat and stir in basil. Serve over rice with extra soy sauce and/or chili sauce on the side.

    Recommended Products

    As an Amazon Associate and member of other affiliate programs, I earn from qualifying purchases.

    • Silicone Whisk
      Silicone Whisk
    • My Favorite Skillet
      My Favorite Skillet

    Nutrition Information:

    Yield:

    4

    Serving Size:

    1

    Amount Per Serving: Calories: 467Total Fat: 26gSaturated Fat: 7gTrans Fat: 0gUnsaturated Fat: 18gCholesterol: 106mgSodium: 1351mgCarbohydrates: 18gFiber: 1gSugar: 7gProtein: 40g

    Did you make this recipe?

    Tag me in your Instagram photo - @fakeginger

    © Amanda Livesay
    Cuisine: Asian / Category: pork

    Orange Margaritas

    May 02, 2013

    Classic margaritas with an orange twist! These Orange Margaritas are made with fresh orange juice, lime juice, tequila, and orange liqueur. They’re served over ice with a salt rim.

    As much as I love a classic lime margarita, sometimes you just need to change things up. I love these orange margaritas because they aren’t SO different from the classic but just different enough.

    Ingredients

    • Limes – this recipe calls for the juice from the limes and also wedges of lime to rim the glasses and garnish the margaritas.
    • Orange juice – I highly recommend using freshly squeezed orange juice but I have been known to use the bottled tangerine juice from Trader Joe’s.
    • Tequila – use whatever your favorite brand is. I do recommend a clear one.
    • Orange liqueur – such as Triple Sec.
    • Simple syrup – this is a mixture of equal parts water and sugar simmered until it becomes a syrup. You can make your own or buy it.
    • Salt – you only need this if you plan to rim your glasses with salt.

    How To Make Orange Margaritas

    • Combine. Combine lime juice, orange juice, tequila, orange liqueur, and simple syrup.
    • Rim glasses. Run a lime wedge along the rim of your glasses and then dip in a plate of coarse salt.
    • Serve. Spoon ice in each cup and pour margaritas over top. Garnish with extra lime wedges.

    Make sure you subscribe to my email list to get all my new recipes delivered right to your inbox!

    You can also follow me on Instagram, Facebook, or Pinterest for even more! 

    📖 Recipe

    Yield: about 6 servings

    Fresh Orange Margaritas

    Fresh Orange Margaritas

    Classic margaritas with an orange twist! These Orange Margaritas are made with fresh orange juice, lime juice, tequila, and orange liqueur. They're served over ice with a salt rim.

    Prep Time 15 minutes
    Total Time 15 minutes

    Ingredients

    • 1 cup freshly squeezed lime juice
    • 1 cup freshly squeezed orange juice
    • 1 cup clear tequila
    • ½ cup orange liqueur
    • ½ cup simple syrup
    • limes, for garnish
    • coarse salt
    • ice

    Instructions

    1. In a large pitcher, combine lime juice, orange juice, tequila, orange liqueur, and simple syrup.
    2. To prepare your glasses, run a lime wedge along the rim of your glasses and then dip in a plate of coarse salt. Spoon ice in each cup and pour margaritas over top. Garnish with extra lime wedges.

    Recommended Products

    As an Amazon Associate and member of other affiliate programs, I earn from qualifying purchases.

    • Citrus Juicer
      Citrus Juicer
    • Margarita Salt
      Margarita Salt
    • Stimless Margarita Glasses
      Stimless Margarita Glasses

    Nutrition Information:

    Yield:

    6

    Serving Size:

    1

    Amount Per Serving: Calories: 338Total Fat: 0gSaturated Fat: 0gTrans Fat: 0gUnsaturated Fat: 0gCholesterol: 0mgSodium: 102mgCarbohydrates: 64gFiber: 1gSugar: 59gProtein: 1g

    Did you make this recipe?

    Tag me in your Instagram photo - @fakeginger

    © Amanda Livesay
    Cuisine: Mexican / Category: drink

    No Bake Peanut Butter Pie

    Apr 30, 2013

    Creamy and delicious No Bake Peanut Butter Pie with a graham cracker crust. Only 6 ingredients, so easy, and everyone will be begging for the recipe!

    Obsessed wtih peanut butter like I am? Try Peanut Butter Waffles and Peanut Butter Fruit Dip!

    Peanut Butter Pie topped with whipped cream and chocolate shavings with a forkful missing

    If you could have one dessert for the rest of your life, what would it be? Mine would definitely be something with peanut butter, maybe this easy, no bake peanut butter pie!

    It is the most perfect creamy peanut butter pie on a graham cracker crust. There’s only a few ingredients and it takes just a few minutes to put together. I even use a store-bought graham cracker crust to make it that much easier. 

    If you need a last minute dessert for a summer barbecue or pool party, this is definitely it. 

    I also have a No Bake Cheesecake that’s made with just 4 ingredients and it is so delicious!

    No Bake Peanut Butter Pie - the creamiest peanut butter pie with a graham cracker crust. Only 6 ingredients, so easy, and everyone always begs for the recipe!

    Ingredients

    • Chocolate graham cracker crust – you can use regular graham cracker crust if you prefer
    • Cream cheese – the regular cream cheese in blocks, not the kind in tubs
    • Sugar
    • Creamy peanut butter – make sure it’s creamy so you get a really smooth pie
    • Vanilla
    • Cool Whip – let it thaw overnight in the fridge

    How To Make No Bake Peanut Butter Pie

    • In the bowl of a mixer fitted with a paddle attachment, beat the cream cheese and sugar until well blended.
    • Beat in peanut butter and vanilla.
    • Use a rubber spatula to gently fold in Cool Whip. You want to be very careful not to deflate the Cool Whip too much so your pie is nice and fluffy.
    • Transfer the pie filling to a chocolate graham cracker pie crust.
    • Refrigerate for at least 4 hours before serving.
    • Top with whipped cream before serving, if desired
    Overhead shot of a slice of peanut butter pie with whipped cream and chocolate shavings on top

    Can You Use Homemade Whipped Cream?

    I don’t recommend it because Cool Whip has stabilizers in it that lets it retain it’s fluffiness. And if you look closely at my photos, you’ll notice that the real whipped cream I put on top started to melt as I was talking photos. 

    So using real whipped cream would likely cause your pie to deflate and not be are fluffy and creamy. 

    How Long Is It Good For?

    No Bake Peanut Butter Pie should be good for up to 3 days in the refrigerator. Find a way to cover it pretty tightly to make sure it stays as fresh as possible. 

    You can also freeze it for an extra cold treat on a hot summer day. 

    Can You Make Peanut Butter Pie Ahead?

    Yes! This is the perfect dessert when you need to prep it ahead. I always make it the night before I serve it so that it has plenty of time to set up. 

    Can You Freeze Peanut Butter Pie?

    If you want a super cold summer dessert, you can totally pop this in the freezer! From there, just serve it frozen!

    I wouldn’t recommend freezing and then trying to defrost it to serve it though. I think the whole thing would change texture and not be that creamy, fluffy pie we all know and love!

    No Bake Peanut Butter Pie - the creamiest peanut butter pie with a graham cracker crust. Only 6 ingredients, so easy, and everyone always begs for the recipe!

    More No Bake Desserts

    • Peanut Butter S’mores Dip 
    • Banana Cream Pie 
    • No Bake Trail Mix Bites
    • No Bake Million Dollar Pie Bars
    • Lucky Charms Treats

    Make sure you subscribe to my email list to get all my new recipes delivered right to your inbox!

    You can also follow me on Instagram, Facebook, or Pinterest for even more! 

    📖 Recipe

    Yield: 8 servings

    No-Bake Peanut Butter Pie

    No-Bake Peanut Butter Pie

    Prep Time 20 minutes
    Additional Time 4 hours
    Total Time 4 hours 20 minutes

    Ingredients

    • 1 chocolate graham cracker crust
    • 1 8-ounce block cream cheese, at room temperature
    • ½ cup sugar
    • 1 cup creamy peanut butter
    • 1 teaspoon vanilla
    • 8 ounces frozen whipped topping, thawed in the refrigerator overnight
    • whipped cream, for serving

    Instructions

    1. In the bowl of a mixer fitted with a paddle attachment, beat the cream cheese and sugar until well blended. Beat in peanut butter and vanilla.
    2. Remove the bowl from the mixer and gently fold in whipped topping. Try not to deflate it too much but you want it fully incorporated.
    3. Use a rubber spatula to transfer the pie mixture to the pie crust. Refrigerate for at least 4 hours before serving. Top with whipped cream, if desired. Store in the refrigerator.

    Recommended Products

    As an Amazon Associate and member of other affiliate programs, I earn from qualifying purchases.

    • Electric Mixer
      Electric Mixer

    Nutrition Information:

    Yield:

    8

    Serving Size:

    1

    Amount Per Serving: Calories: 439Total Fat: 33gSaturated Fat: 15gTrans Fat: 0gUnsaturated Fat: 14gCholesterol: 29mgSodium: 261mgCarbohydrates: 30gFiber: 2gSugar: 23gProtein: 9g

    Did you make this recipe?

    Tag me in your Instagram photo - @fakeginger

    © Amanda Livesay

    Chicken with 40 Cloves of Garlic

    Apr 29, 2013

    Years ago I made Chicken with 40 Cloves of Garlic and my husband wasn’t thrilled with it. I remember it being super garlicky which is not at all what the dish is supposed to be. When the whole cloves of garlic are cooked, they really mellow out and get almost sweet. The gravy that this recipe makes is amazing! Fantastically amazing! Like so amazing that when my husband sent me a text saying he wasn’t going to be home until late the night I made this, I put a teeny scoop of mashed potatoes in a bowl and covered it when the rest of the gravy. And then pretended like there was never gravy when he eventually got home. Yup.

    Make sure you subscribe to my email list to get all my new recipes delivered right to your inbox!

    You can also follow me on Instagram, Facebook, or Pinterest for even more! 

    📖 Recipe

    Yield: about 8 servings

    Chicken with 40 Cloves of Garlic

    Chicken with 40 Cloves of Garlic

    Cook Time 1 hour
    Total Time 1 hour

    Ingredients

    • 2 cut-up whole chickens
    • Salt and freshly ground pepper, to taste
    • 3 tablespoons extra-virgin olive oil
    • 40 garlic cloves, peeled
    • 1 tablespoon minced fresh rosemary
    • 1 tablespoon minced fresh thyme
    • Zest of 2 lemons
    • ¼ cup white wine
    • ¾ cup chicken stock
    • 3 tablespoon unsalted butter, at room temperature, cut into pieces

    Instructions

    1. Preheat an oven to 400F.
    2. Season all sides of the chicken pieces with salt and pepper. Heat the olive oil in a wide Dutch oven over medium-high heat. Working in batches, brown the chicken, 2 to 3 minutes per side. Transfer to a plate.
    3. Add the garlic to the pan and cook, stirring, for 1 minute. Remove the pan from the heat. Add the chicken, rosemary, thyme and lemon zest and stir to combine. Cover the pan, transfer to the oven and roast for 20 minutes. Baste the chicken with the accumulated juices. Continue roasting, uncovered, until the chicken is cooked through and the juices run clear when the meat is pierced with a knife, about 30 minutes more.
    4. Transfer the chicken to a platter and cover loosely with foil; leave the garlic in the pan.
    5. Set the pan over medium heat and mash the garlic with the back of a wooden spoon. Add the wine and cook for 3 minutes. Add the stock and cook, stirring occasionally, until slightly thickened, about 5 minutes. Whisk in the butter a few pieces at a time. Season with salt and pepper. Serve the chicken immediately and pass the sauce alongside.

    Nutrition Information:

    Yield:

    8

    Serving Size:

    1

    Amount Per Serving: Calories: 483Total Fat: 30gSaturated Fat: 9gTrans Fat: 0gUnsaturated Fat: 18gCholesterol: 144mgSodium: 196mgCarbohydrates: 8gFiber: 1gSugar: 1gProtein: 43g

    Did you make this recipe?

    Tag me in your Instagram photo - @fakeginger

    © Amanda Livesay
    Cuisine: American

    Cinnamon Twists

    Apr 16, 2013

    Have you ever had the worst craving for a cinnamon roll but been stranded at home because your husband took your car to work because it’s snowing and he refuses to put new windshield wipers on his car? And you obviously can’t make cinnamon rolls from scratch because that would way too long. Plus you would be left with a pan of cream cheese frosting-covered cinnamon rolls and you’re already having trouble buttoning your jeans so yeah. Cinnamon rolls are out.

    But these guys? All the taste of cinnamon rolls (without the frosting, obviously) but they’re a million times easier to make. Hands-on time for this recipe was less than 15 minutes!

    I made these guys for Red Star Yeast and they are so delicious. It’s basically a soft yeast dough that’s sprinkled with pecans and cinnamon sugar before being rolled out and cut into strips. The strips are twisted and then baked.  The cinnamon twists are incredibly simple to make and like I mentioned, took hardly any time. I used Red Star Yeast’s Platinum and they rose beautifully and pretty quick considering how cold it’s been here lately.

    If you’re looking for a quick, easy, comforting after-school snack or breakfast or maybe even dinner, you should definitely give these guys a try.

    …

    Read More

    Smothered Burritos

    Apr 11, 2013

    If you follow me on Instagram, you may have seen that this past weekend my husband went to a work barbecue and ate 10 hamburgers, 2 ribs, and then came home and made the world’s largest strawberry shortcake. Well he had planned on grilling at home that night but for obvious reasons he wasn’t hungry. So I forced him to go get me a ginormous burrito and chips & guac and I did what I always do – I ate the chips & guac for dinner and saved the burrito for breakfast and lunch the next day.

    The next morning he was all “DANGIT! WHY DIDN’T I BUY MYSELF A BURRITO SO I COULD HAVE IT TODAY?!” and proceeded to whine about it all day.

    So I made him some burritos.

    I don’t really like making burritos at home because for some reason they’re always really dry so I figured this would be a good recipe to go with. It’s kind of a mixture of burritos and enchiladas. You make the burritos as normal but then you top them with enchilada sauce (that the meat was cooked in) and lots and lots of cheese.

    My husband was pretty thrilled with them. And bonus: the meat is done is the slow cooker! Yay!

    Make sure you subscribe to my email list to get all my new recipes delivered right to your inbox!

    You can also follow me on Instagram, Facebook, or Pinterest for even more! 

    📖 Recipe

    Yield: 5 - 7 burritos

    Smothered Burritos

    Smothered Burritos

    Prep Time 1 minute
    Cook Time 8 hours
    Total Time 8 hours 1 minute

    Ingredients

    • 2 pounds beef stew meat
    • 1 20 ounce can mild red enchilada sauce
    • 2 beef bouillon cubes
    • 1-2 cups refried beans
    • 5-7 large flour tortillas, warmed
    • 1 ½ cups shredded cheddar cheese

    Instructions

    1. Put beef stew meat, enchilada sauce, and beef bouillon cubes in slow cooker. Cover and cook on low for 7 to 8 hours. Remove meat from sauce with a slotted spoon and shred.
    2. Preheat oven to 375F.
    3. Warm beans in the microwave or on the stove.
    4. Working one at a time, lay a tortilla on a flat surface. Spread a thin layer of beans on the center of the tortilla. Put a large spoonful of the shredded meat on the beans. Top with a small amount of the sauce that remains in the slow cooker. Fold the sides of the burrito in and then roll. Place seam side down in a 9x13-inch pan. Repeat until you run out of meat.
    5. Top the burritos with some of the enchilada sauce and then the cheddar cheese.
    6. Bake about 15 minutes or until the cheese is melted.

    Recommended Products

    As an Amazon Associate and member of other affiliate programs, I earn from qualifying purchases.

    • Programmable Slow Cooker
      Programmable Slow Cooker
    • 9x13-inch pan
      9x13-inch pan

    Nutrition Information:

    Yield:

    5

    Serving Size:

    1

    Amount Per Serving: Calories: 840Total Fat: 31gSaturated Fat: 13gTrans Fat: 1gUnsaturated Fat: 15gCholesterol: 213mgSodium: 2197mgCarbohydrates: 62gFiber: 8gSugar: 8gProtein: 79g

    Did you make this recipe?

    Tag me in your Instagram photo - @fakeginger

    © Amanda Livesay

    Honey Sesame Chicken (Slow Cooker)

    Mar 29, 2013

    Slow Cooker Honey Sesame Chicken – Chinese takeout inspired chicken in a sweet and spicy honey sesame sauce. Cooked in just 4 hours in the slow cooker.

    Slow Cooker Honey Sesame Chicken - Chinese takeout inspired chicken in a sweet and spicy honey sesame sauce. Cooked in just 4 hours in the slow cooker.

    I love fakeout takeout recipes. Chinese takeout is one of my guilty pleasures but it’s obviously not something I need to be doing all the time. 

    My ultimate favorite is my stovetop Sesame Chicken recipe but sometimes I don’t have time for that so I love this slow cooker option. You just put all the ingredients in the slow cooker and let it cook.

    No pan frying, no fussy ingredients, and my entire family loves it! Even my picky kid!

    …

    Read More

    Brownie Pudding

    Feb 14, 2013

    Brownie Pudding tastes like brownie batter with a crackly brownie top. The richest, most decadent dessert!

    Brownie Pudding tastes like brownie batter with a crackly brownie top. The richest, most decadent dessert!

    Who has big plans for today?!

    I have… nothing planned.

    If I was going to cook though, I would be making this brownie pudding for dessert.

    Because obviously you need extreme amounts of chocolate on Valentine’s Day.

    It’s so ridiculously good.

    I don’t even like pudding.

    At all.

    But this.

    This isn’t like regular pudding. It tastes just like brownie batter and the top part forms a nice crunchy crust. It’s just irresistible. Especially if you serve it warm with vanilla ice cream on top!

    Brownie Pudding tastes like brownie batter with a crackly brownie top. The richest, most decadent dessert!

    How To Make Brownie Pudding

    • Butter
    • Eggs
    • Sugar
    • Cocoa powder
    • All-purpose flour
    • Vanilla

    How To Make Brownie Pudding

    • Prep. Melt butter; set aside to cool.
    • Wet ingredients. Beat the eggs and sugar on medium-high speed for 5 to 10 minutes, or until very thick and pale yellow in color (the batter will form ribbons off the paddle if you lift it).
    • Dry ingredients. Sift the cocoa powder and flour together into a separate bowl.
    • Combine. When the egg and sugar mixture is ready, add the vanilla and flour mixture and beat until combined. Pour in the melted and cooled butter and continue beating just until combined.
    • Transfer. Spread the brownie mixture into the prepared dish. Place it inside a large roasting pan and add enough really hot tap water to the roasting pan to come about halfway up the sides of the baking dish.
    • Bake. Bake at 325F for 50-60 minutes.
    • Cool. Transfer the baking dish to a wire rack and let cool.

    How Long Is It Good For?

    Brownie pudding is good for up to 3 days. Make sure to store it in an airtight container in the fridge.

    You could serve it straight from the fridge but I think it’s best warmed up in the microwave for a bit.

    More Chocolate Recipes

    • Double Chocolate Chip Cookies
    • Chocolate Loaf Cake
    • Chocolate Truffle Pie
    • Chocolate Margaritas

    Make sure you subscribe to my email list to get all my new recipes delivered right to your inbox!

    You can also follow me on Instagram, Facebook, or Pinterest for even more! 

    📖 Recipe

    Yield: 8 servings

    Brownie Pudding

    Brownie Pudding

    Brownie Pudding tastes like brownie batter with a crackly brownie top. The richest, most decadent dessert!

    Prep Time 20 minutes
    Cook Time 1 hour
    Total Time 1 hour 20 minutes

    Ingredients

    • 1 cup (2 sticks) unsalted butter
    • 4 large eggs, at room temperature
    • 2 cups sugar
    • ¾ cup cocoa powder
    • ½ cup all-purpose flour
    • 1 teaspoon vanilla extract

    Instructions

    1. Preheat oven to 325F. Spray a 2-quart baking dish with cooking spray.
    2. Melt butter; set aside to cool.
    3. Use an electric mixer to beat the eggs and sugar on medium-high speed for 5 to 10 minutes, or until very thick and pale yellow in color.
    4. Meanwhile, sift the cocoa powder and flour together into a separate bowl.
    5. When the egg and sugar mixture is ready add the vanilla extract and cocoa/flour mixture, beating only until just combined. Pour in the melted and cooled butter and continue beating just until combined.
    6. Spread the brownie mixture into the prepared dish. Place it inside a large roasting pan and add enough really hot tap water to the roasting pan to come about halfway up the sides of the baking dish. Bake for 50-60 minutes, or until a toothpick inserted about 2 inches from the edge comes out partially clean. (The center is going to look under-baked, the dessert is supposed to be gooey.)
    7. Transfer the baking dish to a wire rack and let cool. Serve warm with ice cream or whipped cream!

    Recommended Products

    As an Amazon Associate and member of other affiliate programs, I earn from qualifying purchases.

    • Mixing Bowls with Lids
      Mixing Bowls with Lids
    • Electric Mixer
      Electric Mixer
    • 2 Quart Baking Dish
      2 Quart Baking Dish

    Nutrition Information:

    Yield:

    8

    Serving Size:

    1

    Amount Per Serving: Calories: 658Total Fat: 30gSaturated Fat: 17gUnsaturated Fat: 14gCholesterol: 161mgSodium: 39mgCarbohydrates: 88gFiber: 5gSugar: 63gProtein: 10g

    Did you make this recipe?

    Tag me in your Instagram photo - @fakeginger

    © Amanda Livesay
    Cuisine: American / Category: brownies


    Iced Oatmeal Cookies

    Feb 06, 2013

    Iced Oatmeal Cookies are the classic crispy oatmeal cookies a thin layer of icing on top. These are going to be your new favorite cookie!

    Iced oatmeal cookies remind me of high school. Every class party we ever had, at least 3 people would show up with iced oatmeal cookies. And no matter how many packages of cookies there were, there would be none leftover.

    They were the best cookies. Crispy but not super crispy, with just a thin layer of icing on top. They were perfect.

    And these cookies? Are exactly like those. But obviously better since you don’t have to leave your house.

    Ingredients

    • Old fashioned oats – make sure they are old fashioned and not quick cooking
    • All-purpose flour
    • Baking powder
    • Baking soda
    • Cinnamon
    • Ground nutmeg
    • Unsalted butter – soften it to room temperature before beginning
    • Granulated sugar
    • Light brown sugar – the light brown sugar makes sure the cookies have a nice moistness
    • Eggs
    • Powdered sugar – for the glaze on top of the cookies
    • Milk – this is going to be the liquid part of the glaze

    How To Make Iced Oatmeal Cookies

    • Combine dry ingredients. Stir together the oats, flour, baking powder, baking soda, cinnamon, nutmeg and salt.
    • Combine wet ingredients. Beat together the melted butter, sugar and brown sugar until light and fluffy. Add eggs.
    • Combine everything. Mix in the dry oat mixture into the wet mixture.
    • Transfer. Drop dough by rounded tablespoons onto prepared cookie sheets and flatten slightly with the bottom of a glass or something similar.
    • Bake. Bake for 14-16 minutes until browned.
    • Cool completely. Let cookies cool before glazing.
    • Make the glaze. Whisk together the powdered sugar and milk until no lumps remain. Glaze each cookie and allow to harden before serving.

    How Long Are Oatmeal Cookies Good For?

    These Iced Oatmeal Cookies will be fine at room temperature for up to a week. Make sure to store them in an airtight container.

    You can prolong that by storing them in the refrigerator. You should also use an airtight container for fridge storage. I like to let them come back to room temperature before serving.

    Can You Freeze Them?

    You can freeze these cookies, glazed or unglazed, for up to 3 months. Let them cool completely and then store them in freezer ziploc bags.

    Let them defrost at room temperature for several hours before serving.

    More Oatmeal Cookie Recipes

    • Oatmeal Toffee Cookies
    • Kitchen Sink Oatmeal Cookies
    • Chocolate Oatmeal Pecan Cookies
    • Peanut Butter Oatmeal Sandwich Cookies
    • Oatmeal Cream Pie

    Make sure you subscribe to my email list to get all my new recipes delivered right to your inbox!

    You can also follow me on Instagram, Facebook, or Pinterest for even more! 

    📖 Recipe

    Yield: about 36 cookies

    Iced Oatmeal Cookies

    Iced Oatmeal Cookies

    Iced Oatmeal Cookies are the classic crispy oatmeal cookies a thin layer of icing on top. These are going to be your new favorite cookie!

    Prep Time 20 minutes
    Cook Time 16 minutes
    Total Time 36 minutes

    Ingredients

    For the cookies:

    • 2 cups old fashioned oats
    • 2 cups all purpose flour
    • 1 tablespoon baking powder
    • 1 teaspoon baking soda
    • 2 teaspoons cinnamon
    • 1 teaspoon freshly ground nutmeg
    • 1 teaspoon salt
    • 1 cup 2 sticks unsalted butter, melted
    • 1 cup granulated sugar
    • ½ cup packed light brown sugar
    • 2 large eggs

    For the icing:

    • 2 cups powdered sugar
    • 5 tablespoons milk

    Instructions

    1. Preheat oven to 350F and line 2 cookie sheets with parchment paper.
    2. Stir together the oats, flour, baking powder, baking soda, cinnamon, nutmeg and salt. Set aside.
    3. In the bowl of a stand mixer fitted with a paddle attachment, beat together the melted butter, sugar and brown sugar until light and fluffy.. Add eggs, one at a time, mixing until combined. Mix in the dry oat mixture. mixing until just combined.
    4. Drop dough by (heaping) rounded tablespoons onto prepared cookie sheets and flatten slightly with the bottom of a glass or something similar. Bake for 14-16 minutes, rotating halfway through, until browned. Let cookies cool on the baking sheets for 5 minutes before moving to a wire rack to cool completely.
    5. To make the glaze, whisk together the powdered sugar and milk until no lumps remain. Glaze each cookie and allow to harden before serving.

    Recommended Products

    As an Amazon Associate and member of other affiliate programs, I earn from qualifying purchases.

    • Mixing Bowls with Lids
      Mixing Bowls with Lids
    • Electric Mixer
      Electric Mixer
    • Rimmed Baking Sheet
      Rimmed Baking Sheet
    • Parchment Paper
      Parchment Paper

    Nutrition Information:

    Yield:

    36

    Serving Size:

    1

    Amount Per Serving: Calories: 148Total Fat: 6gSaturated Fat: 3gTrans Fat: 0gUnsaturated Fat: 2gCholesterol: 24mgSodium: 141mgCarbohydrates: 23gFiber: 1gSugar: 14gProtein: 2g

    Did you make this recipe?

    Tag me in your Instagram photo - @fakeginger

    © Amanda Livesay
    Cuisine: American / Category: cookie

    Cupid’s Crunch

    Feb 04, 2013

    Cupid’s Crunch is the cutest Valentine’s Day treat! Chex cereal coated in white chocolate and peanut butter and tossed in powdered sugar. With Valentine’s Day M&Ms and heart sprinkles!

    Need more Valentine’s Day recipes? Try Pink Velvet Funfetti Cupcakes and Valentine’s Day Pudding Cookies!

    Cupid's Crunch - the cutest Valentine's Day treat! Chex cereal coated in white chocolate and peanut butter and tossed in powdered sugar. With Valentine's Day M&Ms and heart sprinkles!

    I’m sure I tell y’all this every year but Valentine’s Day is my favorite holiday.

    I love any excuse to put hearts up in every room of my house. And this year is even more exciting for me because I finally have a kid in school which means I finally have an excuse to buy those cute little cards.

    I also love any excuse to use heart sprinkles and this Cupid’s Crunch is perfect for that!

    It’s like your classic muddy buddies but uses white chocolate to coat the Chex instead of milk chocolate. There’s also peanut butter mixed into the white chocolate because, duh.

    Cupid's Crunch - the cutest Valentine's Day treat! Chex cereal coated in white chocolate and peanut butter and tossed in powdered sugar. With Valentine's Day M&Ms and heart sprinkles!

    Ingredients

    • Chex cereal – rice or corn Chex work best here
    • White chocolate chips – you can use white almond bark or white candy melts if you prefer.
    • Peanut butter
    • Butter
    • Powdered sugar
    • Valentine’s Day M&Ms – whatever variety of M&Ms that you like best!
    • Valentine’s Day sprinkles – optional but sprinkles make everything more fun!

    How To Make Cupid’s Crunch

    • Prepare. Place cereal in medium bowl.
    • Melt. In small microwavable bowl, microwave vanilla chips, peanut butter and butter uncovered on High 1 minute to 1 minute 30 seconds, stirring every 30 seconds, until melted and smooth.
    • Combine. Pour peanut butter mixture over cereal, stirring until evenly coated.
    • Add powdered sugar. Place ½ of the cereal mixture in 1-gallon food-storage plastic bag. Add powdered sugar. Seal bag; shake until well coated.
    • Cool. Spread on waxed paper or foil; cool about 15 minutes.
    • Add candy! Meanwhile, stir candies and sprinkles into remaining cereal mixture.
    • Cool. Spread on waxed paper or foil; cool about 15 minutes. In serving bowl, mix both cereal mixtures. Store in airtight container.

    How Long Is It Good For?

    Cupid’s Crunch will be good for about a week in an airtight container.

    More Valentine’s Day Ideas!

    • Red Velvet Brownies with Cream Cheese Frosting
    • White Chocolate Mousse with Raspberry Sauce
    • Chocolate Chip Croissant Bread Pudding
    • Flourless Chocolate Cake

    Make sure you subscribe to my email list to get all my new recipes delivered right to your inbox!

    You can also follow me on Instagram, Facebook, or Pinterest for even more! 

    📖 Recipe

    Yield: 12 servings

    Cupid's Crunch

    Cupid's Crunch

    Cupid's Crunch is the cutest Valentine's Day treat! Chex cereal coated in white chocolate and peanut butter and tossed in powdered sugar. With Valentine's Day M&Ms and heart sprinkles!

    Prep Time 5 minutes
    Cook Time 2 minutes
    Additional Time 15 minutes
    Total Time 22 minutes

    Ingredients

    • 4 ½ Chex cereal
    • ½ cup white chocolate chips
    • ¼ cup peanut butter
    • 2 tablespoons butter
    • ⅓ cup powdered sugar
    • ¼ cup Valentine's Day M&Ms
    • 2 tablespoons Valentine's Day sprinkles

    Instructions

    1. Place cereal in medium bowl. In small microwavable bowl, microwave vanilla chips, peanut butter and butter uncovered on High 1 minute to 1 minute 30 seconds, stirring every 30 seconds, until melted and smooth. Pour peanut butter mixture over cereal, stirring until evenly coated.
    2. Place ½ of the cereal mixture in 1-gallon food-storage plastic bag. Add powdered sugar. Seal bag; shake until well coated. Spread on waxed paper or foil; cool about 15 minutes.
    3. Meanwhile, stir candies and sprinkles into remaining cereal mixture. Spread on waxed paper or foil; cool about 15 minutes.
    4. In serving bowl, mix both cereal mixtures. Store in airtight container.

    Recommended Products

    As an Amazon Associate and member of other affiliate programs, I earn from qualifying purchases.

    • Wilton Valentine's Sprinkles
      Wilton Valentine's Sprinkles

    Nutrition Information:

    Yield:

    12

    Serving Size:

    1

    Amount Per Serving: Calories: 173Total Fat: 9gSaturated Fat: 4gTrans Fat: 0gUnsaturated Fat: 4gCholesterol: 7mgSodium: 133mgCarbohydrates: 23gFiber: 1gSugar: 12gProtein: 3g

    Did you make this recipe?

    Tag me in your Instagram photo - @fakeginger

    © Amanda Livesay
    Cuisine: American / Category: holiday

    Texas Cheese Fries

    Jan 31, 2013

    Texas Cheese Fries are the perfect party snack! Seasoned fries topped with cheddar cheese, crispy bacon, green onions, and jalapenos! Served with a side of ranch!

    If you love loaded fries, try Cheeseburger Fries!

    Texas Cheese Fries - seasoned fries topped with cheddar cheese, crispy bacon, green onions, and jalapenos! With a side of ranch! These are perfect for a party or a football game.

    So I guess the Superbowl is this weekend?

    I stopped caring about the NFL when it became apparent that my teams weren’t going all the way.

    But I do care about Superbowl food!

    I care a lot about Superbowl food.

    The amount of time I spend planning my Superbowl menu every year is insane. The amount of money I spend buying ingredients for my Superbowl menu is even more insane.

    But anyway, I’ve got a super easy idea to feed a crowd at your Superbowl party!

    Texas Cheese Fries - seasoned fries topped with cheddar cheese, crispy bacon, green onions, and jalapenos! With a side of ranch! These are perfect for a party or a football game.

    What Are Texas Cheese Fries?

    Texas Cheese Fries are served as an appetizer in restaurants like Chili’s and Cheddar’s. They are crispy fries topped with melted cheddar cheese, bacon, green onions, and jalapenos. 

    Ingredients

    • Frozen seasoned French fries – you can use the unseasoned kind if you prefer
    • Sharp cheddar cheese – you can use a mild cheddar or a white cheddar if you prefer.
    • Bacon – use your favorite kind of bacon. You can use turkey bacon if you don’t eat pork or just want to make it a little bit lighter.
    • Green onions – these are going on the top and optional but they do add a nice brightness to the fries.
    • Pickled jalapenos – if I’m serving this to young children, I’ll buy the tamed (not so spicy) jalapenos. They still give the jalapeno flavor without adding a ton of heat.
    • Ranch

    How To Make Texas Cheese Fries

    • Cook fries. Cook the fries according to package directions. Once crispy, turn the broiler on and move an oven rack closer to the top
    • Top fries and broil. Sprinkle the shredded cheddar and bacon on top of the fries. Broil just until cheese in melted, less than 5 minutes
    • Add toppings. Sprinkle with green onions and jalapeno

    How Long Are They Good For?

    These will be fine to eat for 2 – 3 days after making them but keep in mind, the fries will get soggy as they sit.

    I would reheat them in the oven or toaster oven to try to get them crispy again.

    Can You Make It Ahead?

    No, I don’t recommend making these ahead of time as you want the fries to be nice and crispy.

    However, you can do parts of the prep ahead of time. Like, you can shred the cheese and fry the bacon so that’s a couple less steps you have to do when you are ready to bake the fries. 

    More Cheesy Appetizer Recipes

    • 7 Layer Chili Dog Dip
    • Cheesy Sausage and Spinach Dip
    • Maple Pecan Baked Brie
    • Crawfish Dip
    • Potato Skins
    • Ranch Pizza Rolls 

    Make sure you subscribe to my email list to get all my new recipes delivered right to your inbox!

    You can also follow me on Instagram, Facebook, or Pinterest for even more! 

    📖 Recipe

    Yield: 8 servings

    Texas Cheese Fries

    Texas Cheese Fries

    Texas Cheese Fries are the perfect party snack! Seasoned fries topped with cheddar cheese, crispy bacon, green onions, and jalapenos! Served with a side of ranch!

    Prep Time 10 minutes
    Cook Time 30 minutes
    Total Time 40 minutes

    Ingredients

    • 1 bag frozen seasoned french fries
    • 2 cups shredded sharp cheddar cheese
    • 4 slices bacon, cooked and crumbled
    • 2 green onions, sliced thinly
    • pickled jalapenos, optional
    • ranch, for dipping

    Instructions

    1. Cook the fries according to package directions.
    2. Once crispy, turn the broiler on and move an oven rack closer to the top.
    3. Sprinkle the shredded cheddar and bacon on top of the fries. Broil just until cheese in melted, less than 5 minutes.
    4. Sprinkle with green onions and jalapenos if desired.

    Recommended Products

    As an Amazon Associate and member of other affiliate programs, I earn from qualifying purchases.

    • Parchment Paper
      Parchment Paper
    • Rimmed Baking Sheet
      Rimmed Baking Sheet

    Nutrition Information:

    Yield:

    8

    Serving Size:

    1

    Amount Per Serving: Calories: 323Total Fat: 25gSaturated Fat: 12gTrans Fat: 1gUnsaturated Fat: 10gCholesterol: 63mgSodium: 573mgCarbohydrates: 8gFiber: 1gSugar: 1gProtein: 16g

    Did you make this recipe?

    Tag me in your Instagram photo - @fakeginger

    © Amanda Livesay
    Cuisine: American / Category: appetizer


    Birthday Cake Marshmallows

    Jan 17, 2013

    Y’all know that one of my favorite things in the entire world is cake batter goodies. The other night we went out for froyo and my husband made fun of me because I filled my cup with birthday cake, red velvet cake, and cheesecake (with pistachio thrown in for good measure). What?! I just love anything cake flavored!

    Well, tomorrow is Nicole’s birthday! So we decided that a birthday cake Thursday theme was in order! I’ve had these Birthday Cake Marshmallows on my “must make” list forever now so this was the perfect opportunity.

    I’m really not a marshmallow person – s’mores being the exception, of course – but I really love the process of making marshmallows. It’s just fun to take something as basic as gelatin and sugar and turn them into marshmallows. Plus it’s one of those things that seems really impressive to other people because holy cow! You made marshmallows! But really, it took me less than 30 minutes to whip these up.

    Be sure to stop by Nicole’s to wish her a happy birthday and check out her birthday cake shot!

    …

    Read More

    Oatmeal Toffee Cookies

    Dec 18, 2012

    I can’t believe Christmas is a week away! The holidays definitely snuck up on me. I had my tree up a month ago but I’ve managed to accomplish nothing else that I had planned. I’m so unprepared that I had to run to Walmart last night for tape. And in case you weren’t aware, Walmart is not a place you want to be this close to Christmas.

    Anyway, way back in the summer I made a list of 15 cookies and candies I wanted to make this month but this is the first one I’ve actually had time for! I’m such a sucker for those little toffee bits so I’m happy I was able to get this one made and posted before Christmas. The boys in my house love oatmeal cookies so of course they were a hit with all of them! If you’re looking for a no-fuss cookie to add to your holiday baking list, this is a great one!

    Make sure you subscribe to my email list to get all my new recipes delivered right to your inbox!

    You can also follow me on Instagram, Facebook, or Pinterest for even more! 

    📖 Recipe

    Yield: 24 cookies

    Oatmeal Toffee Cookies

    Oatmeal Toffee Cookies

    from MyRecipes

    Ingredients

    • ¾ cup flour
    • 1 cup old-fashioned rolled oats
    • ½ teaspoon baking soda
    • ¼ teaspoon salt
    • ¾ cup packed brown sugar
    • ¼ cup butter, softened
    • 1 teaspoon vanilla
    • 1 large egg
    • ⅓ cup toffee bits

    Instructions

    1. Preheat oven to 350F. Line 2 baking sheets with parchment paper.
    2. Whisk together flour, oats, baking soda, and salt to remove any clumps. Set aside.
    3. In the bowl of a stand mixer fitted with a paddle attachment, cream together the brown sugar and butter until light and fluffy. Beat in vanilla and egg. Add in the flour mixture and beat until just combined. Use a rubber spatula to fold in the toffee bits.
    4. Drop dough by tablespoonfuls onto the prepared baking sheets. Bake for 11 minutes. Let cool on sheet for a minute or 2 before transferring to a wire rack to cool completely.

    Recommended Products

    As an Amazon Associate and member of other affiliate programs, I earn from qualifying purchases.

    • Parchment Paper
      Parchment Paper
    • Rimmed Baking Sheet
      Rimmed Baking Sheet
    • Heath Bits O' Brickle Baking Chips, Toffee Bits, 8 oz
      Heath Bits O' Brickle Baking Chips, Toffee Bits, 8 oz

    Nutrition Information:

    Yield:

    24

    Serving Size:

    1

    Amount Per Serving: Calories: 88Total Fat: 3gSaturated Fat: 2gTrans Fat: 0gUnsaturated Fat: 1gCholesterol: 16mgSodium: 73mgCarbohydrates: 13gFiber: 0gSugar: 8gProtein: 1g

    Did you make this recipe?

    Tag me in your Instagram photo - @fakeginger

    © Amanda Livesay

    Peppermint White Hot Chocolate

    Dec 13, 2012

    You know the only thing better than peppermint white hot chocolate? Pink peppermint white hot chocolate!

    This time of year my Starbucks drink of choice is the peppermint white mocha which is pretty much the best thing ever but when I’m not feeling coffee, I go for the peppermint white hot chocolate but their version has nothing on this pretty pink one!

    Before Nicole and I started this Thirsty Thursday thing I had no idea hot chocolate was so easy to make from scratch but seriously, if you haven’t done it, you need to. I’m always so disappointed in the white hot chocolate mixes but this homemade version makes up for it.

    Nicole made Peppermint Hot Chocolate Truffle Balls which would go perfectly with this hot chocolate!

    Make sure you subscribe to my email list to get all my new recipes delivered right to your inbox!

    You can also follow me on Instagram, Facebook, or Pinterest for even more! 

    📖 Recipe

    Yield: 1 serving

    Peppermint White Hot Chocolate

    Peppermint White Hot Chocolate

    from My Recipes

    Ingredients

    • 2 cups milk
    • 1 candy cane, crushed
    • ¼ cup white chocolate chips
    • ¼ teaspoon pure peppermint extract
    • 1 teaspoon light corn syrup

    Instructions

    1. Set aside about 1 tablespoon of crushed candy cane.
    2. Heat milk over medium heat until warm (do not boil). Stir in candy cane until dissolved. Removed from heat; stir in white chocolate and continue stirring until it's completely dissolved.
    3. Coat the rim of your mug with the corn syrup and dip in the crushed candy canes you set aside.
    4. Pour hot chocolate into your glass. Serve hot.

    Nutrition Information:

    Yield:

    1

    Serving Size:

    1

    Amount Per Serving: Calories: 555Total Fat: 23gSaturated Fat: 14gTrans Fat: 0gUnsaturated Fat: 7gCholesterol: 48mgSodium: 303mgCarbohydrates: 69gFiber: 0gSugar: 39gProtein: 20g

    Did you make this recipe?

    Tag me in your Instagram photo - @fakeginger

    © Amanda Livesay

    Frozen Hot Chocolate

    Dec 06, 2012

    Rich and delicious Frozen Hot Chocolate is a chocolate milkshake made from hot chocolate mix and topped with whipped cream and chocolate shavings.

    Love hot chocolate? Try Hot Cocoa Dip!

    Frozen hot chocolate has always confused me. I thought it was just a chocolate milkshake with a fancy name and I couldn’t figure out why everyone went crazy over them. So when Nicole and I decided on a chocolate theme for this week, I knew I had to make one.

    Ingredients

    • Milk – you can use dairy, nondairy, whatever milk you usually use!
    • Hot chocolate mix – I used a classic milk chocolate hot chocolate mix for this recipe but you can use a fun flavored hot chocolate mix if you prefer.
    • Ice
    • Whipped cream
    • Chocolate shavings

    Instructions

    • Put ½ cup milk, hot chocolate mix, and ice in a blender
    • Blend until pretty smooth, adding more milk as needed
    • Pour into a glass. Top with whipped cream and use a microplane to shake some chocolate on top
    • Serve immediately

    What Hot Chocolate Mix Do I Use?

    Whatever you want! Regular hot chocolate, white hot chocolate, I used a salted caramel hot chocolate mix. Use whatever you like! It would be really refreshing with a mint chocolate hot chocolate mix!

    Can It Be Made Ahead?

    Frozen hot chocolate is best enjoyed right after making it but if you need to store leftovers, freeze it in an airtight container and then give it a good blend when you’re ready to eat it.

    More Frozen Chocolate Treats

    • Chocolate Ganache Ice Cream
    • Reese’s Pieces Milkshake
    • S’mores Frozen Hot Chocolate

    Make sure you subscribe to my email list to get all my new recipes delivered right to your inbox!

    You can also follow me on Instagram, Facebook, or Pinterest for even more! 

    📖 Recipe

    Yield: 1 serving

    Frozen Hot Chocolate

    Frozen Hot Chocolate

    Prep Time 10 minutes
    Total Time 10 minutes

    Ingredients

    • ½ - ¾ cup milk
    • 1 packet hot chocolate mix
    • 1 cup ice
    • whipped cream
    • chocolate, for shaving on top

    Instructions

    1. Put ½ milk, hot chocolate mix, and ice in a blender. Blend until pretty smooth, adding more milk as needed. Pour into a glass. Top with whipped cream and use a microplane to shave some chocolate on top. Serve immediately.

    Recommended Products

    As an Amazon Associate and member of other affiliate programs, I earn from qualifying purchases.

    • Hot Chocolate Mix
      Hot Chocolate Mix
    • My Favorite Blender
      My Favorite Blender

    Nutrition Information:

    Yield:

    1

    Serving Size:

    1

    Amount Per Serving: Calories: 211Total Fat: 6gSaturated Fat: 4gTrans Fat: 0gUnsaturated Fat: 2gCholesterol: 14mgSodium: 197mgCarbohydrates: 33gFiber: 1gSugar: 22gProtein: 6g

    Did you make this recipe?

    Tag me in your Instagram photo - @fakeginger

    © Amanda Livesay
    Category: frozen goodies
    « Previous Page
    Next Page »

    Primary Sidebar

    Amanda Livesay
    Hi, I'm Amanda! DFW food blogger, mom of boys, and crazy dog lady.
    Read more
    Privacy Policy
    Privacy Policy

    Footer

    ↑ back to top

    About

    • Privacy Policy
    • About Fake Ginger

    Newsletter

    • Sign Up for weekly emails featuring new recipes!

    As an Amazon Associate I earn from qualifying purchases.

    Copyright © 2024 FakeGinger.com