• Skip to primary navigation
  • Skip to main content
  • Skip to primary sidebar
  • Home
  • About
  • Recipes

Fake Ginger

menu icon
go to homepage
  • Recipe Index
  • About
  • Subscribe
    • Facebook
    • Instagram
    • Pinterest
  • subscribe
    search icon
    Homepage link
    • Recipe Index
    • About
    • Subscribe
    • Facebook
    • Instagram
    • Pinterest
  • ×
    Home » Page 41

    Strawberry Cream Cheese Coffee Cake

    Strawberry Cream Cheese Coffee Cake

    May 20, 2014

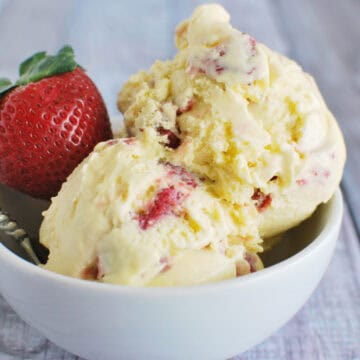
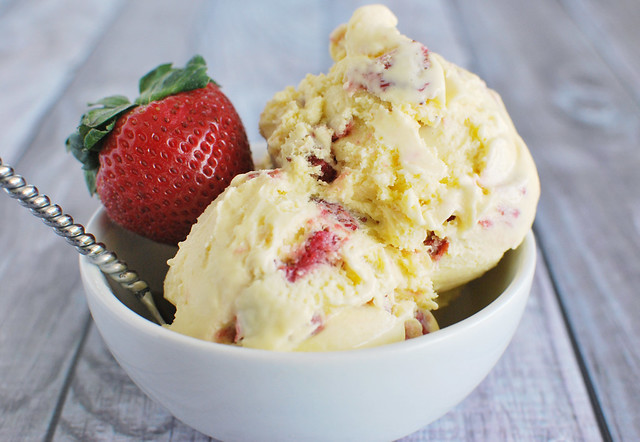
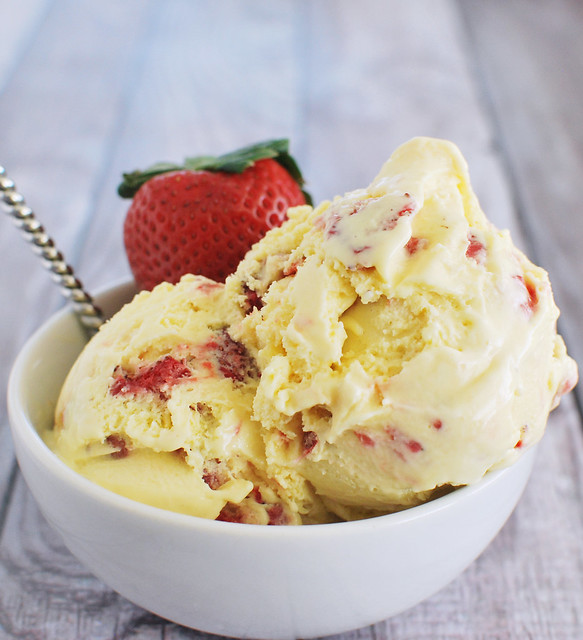
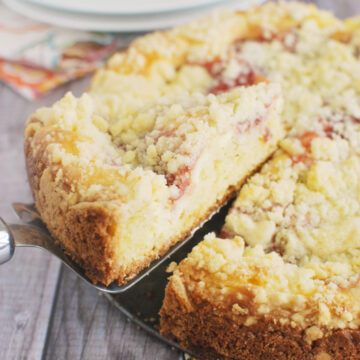
    What’s better than cake for breakfast?! Strawberry Cream Cheese Coffee Cake has a layer of cheesecake-y filling and a crumb topping.

    If you love strawberries, try Strawberry Lemonade Cupcakes and Homemade Strawberry Sherbet!

    What's better than cake for breakfast?! Strawberry Cream Cheese Coffee Cake has a layer of cheesecake-y filling and a crumb topping.

    I’m breaking all my rules with this one.

    Normally, fruit in my favorite cake would be a big no no in my house. I like my coffee cake to be just cake with a ton of crumbly topping. And then I just eat the crumbly topping off and leave the rest in the pan.

    But I love this cake.

    It’s got the cake and the crumbles that I love but it also has a layer of cheesecake-y filling and a layer of sweetened strawberries.

    What's better than cake for breakfast?! Strawberry Cream Cheese Coffee Cake has a layer of cheesecake-y filling and a crumb topping.

    Ingredients

    • All purpose flour – this is going to be used for the bottom layer and the top crumb layer.
    • Sugar – this is going in the crust, cream cheese filling, and strawberry layer.
    • Butter – this recipe starts with cold butter that you cut into the dry ingredients to make a crumb-like mixture.
    • Baking soda
    • Baking powder
    • Salt
    • Sour cream – this is to keep the cake moist, it won’t make the cake taste like sour cream.
    • Egg – egg is going in the cake mixture and the cream cheese filling.
    • Vanilla
    • Cream cheese – this is going in the filling. It makes it taste like cheesecake!
    • Fresh strawberries
    • Cornstarch – this is used to thicken the strawberry layer so that you don’t end up with a soggy cake.

    Instructions

    1. Make slurry. Combine the cornstarch and water to make a slurry in a bowl.
    2. Make strawberry filling. Heat strawberries and sugar over low heat for about 5 minutes or until the strawberries have released their juices.
    3. Combine. Stir in cornstarch slurry; continue stirring until it has thickened slightly.
    4. Cool. Remove from heat and allow to cool while you work on the rest of the cake.
    5. Make cream cheese filling. Beat the cream cheese until smooth. Add sugar and egg and continue beating until everything is smooth. Set aside.
    6. Make cake. Combine the flour and sugar together in a bowl. Using a pastry cutter or just 2 forks, cut in the butter until the mixture resembles coarse crumbs. Measure ¾ cup of the mixture and set aside. Add the baking soda, baking powder and salt and mix well.
    7. Dry ingredients. In another bowl, beat the sour cream, egg and vanilla extract until well blended. Using a hand whisk or a spoon, stir gently into the flour mixture until just incorporated.
    8. Transfer. Spread the batter into an 8-inch springform pan sprayed with baking spray. Pour the cream cheese mixture over the batter. Spread the strawberry filling on top of the cream cheese filling. Sprinkle the remaining ¾ cup crumbs over the strawberry filling.
    9. Bake. Bake for 50-55 minutes.
    10. Cool. Cool in the pan on a wire rack for 20 minutes before removing the cake.
    Slice of coffee cake with a cream cheese layer, strawberry layer, and crumble topping on a white plate

    How Long Is Coffee Cake Good For?

    This cake is fine at room temperature for about 2 days. Make sure to store it in an airtight container to keep it fresh for as long as possible.

    If you want to keep the cake longer, it will be fine in the fridge for up to 5 days. Again, make sure to use an airtight container. And keep in mind that the fridge will suck some of the moisture out of the cake so it will get drier as the days go on.

    Can You Freeze Coffee Cake?

    You can freeze coffee cake for up to 3 months. I recommend wrapping individual slices tightly in plastic wrap and then placing it in a freezer ziploc bag.

    You can also freeze the cake whole if you have a large enough airtight freezer-safe container.

    More Coffee Cake Recipes

    • Blueberry Orange Coffee Cake
    • NY Style Coffee Cake
    • Sour Cream Coffee Cake
    • Lemon-Raspberry Coffee Cake

    📖 Recipe

    Yield: 8 servings

    Strawberry Cream Cheese Coffee Cake

    Strawberry Cream Cheese Coffee Cake

    What's better than cake for breakfast?! Strawberry Cream Cheese Coffee Cake has a layer of cheesecake-y filling and a crumb topping.

    Prep Time 30 minutes
    Cook Time 55 minutes
    Additional Time 20 minutes
    Total Time 1 hour 45 minutes

    Ingredients

    For the cake and crumb topping:

    • 2 cups all purpose flour
    • ¾ cup sugar
    • ½ cup butter, cold and cut into chunks
    • ½ teaspoon baking soda
    • ½ teaspoon baking powder
    • ¼ teaspoon salt
    • ¾ cup sour cream
    • 1 large egg
    • 1 teaspoon vanilla extract

    For the cream cheese filling:

    • 1 8 ounce cream cheese, room temperature
    • ¼ cup sugar
    • 1 large egg

    For the strawberry filling:

    • 1 ½ cup fresh strawberries, cut into pieces
    • 3 tablespoons sugar
    • 3 teaspoons water
    • 1 ½ teaspoons cornstarch

    Instructions

    1. Preheat the oven to 350F. Spray an 8-inch springform pan with baking spray.

    To make the strawberry filling:

    1. Combine the cornstarch and water to make a slurry in a bowl.
    2. Mix the strawberries and sugar in a pan and heat over low heat for about 5 minutes or until the strawberries have released their juices. Stir in cornstarch slurry; continue stirring until it has thickened slightly. Remove from heat and allow to cool while you work on the rest of the cake.

    To make the cream cheese filling:

    1. Beat the cream cheese until smooth. Add sugar and egg and continue beating until everything is smooth. Set aside.

    To make the cake:

    1. Combine the flour and sugar together in a bowl. Using a pastry cutter or just 2 forks, cut in the butter until the mixture resembles coarse crumbs. Measure ¾ cup of the mixture and set aside. Add the baking soda, baking powder and salt and mix well.
    2. In another bowl, beat the sour cream, egg and vanilla extract until well blended. Using a hand whisk or a spoon, stir gently into the flour mixture until just incorporated. Batter may be a bit lumpy. Set aside.
    3. Spread the batter into the bottom of the prepared pan. Pour the cream cheese mixture over the batter. Spread the strawberry filling on top of the cream cheese filling. Sprinkle the remaining ¾ cup crumbs over the strawberry filling.
    4. Bake for 50-55 minutes. Cool in the pan on a wire rack for 20 minutes before removing the cake.

    Recommended Products

    As an Amazon Associate and member of other affiliate programs, I earn from qualifying purchases.

    • Electric Mixer
      Electric Mixer
    • Springform Pan
      Springform Pan

    Nutrition Information:

    Yield:

    8

    Serving Size:

    1

    Amount Per Serving: Calories: 504Total Fat: 27gSaturated Fat: 16gTrans Fat: 1gUnsaturated Fat: 8gCholesterol: 118mgSodium: 388mgCarbohydrates: 59gFiber: 1gSugar: 33gProtein: 7g

    Did you make this recipe?

    Tag me in your Instagram photo - @fakeginger

    © Amanda Livesay
    Cuisine: American / Category: cake


    Ranch Goldfish Snack Mix

    May 19, 2014

    Ranch Goldfish Snack Mix has 3 kinds of Goldfish and pecans baked in a buttery, savory ranch mixture. Perfect for a party snack!

    Ranch Goldfish Snack Mix has 3 kinds of Goldfish and pecans baked in a buttery, savory ranch mixture. Perfect for a party snack!

    Last week of school! Last week of school! LAST WEEK OF SCHOOL!

    Can you sense my excitement? I have so many fun things planned for the summer but mostly I’m just excited to sleep in.

    You know what doesn’t excite me? Getting a “low balance” alert on the kid’s lunch account a week before school lets out.

    Yep.

    And I know, I can pack him a lunch in 10 minutes. But… my husband is deployed and I have 3 kids and an idiot husky and sometimes I just want to take the easy way out. Whine, whine, whine.

    I’m refusing the pay the $3 fee to fund his account for 5 days of lunches and I’d already gone to the grocery store for the week so… it’s time to get creative!

    I think Goldfish are quite possibly the worst snack in the world and every time my kids beg for those little cartons of fish at the checkout lane in Target I’m like “WHYYY?!”

    I would pretty much choose anything over Goldfish.

    But as it turns out, if you coat Goldfish in butter and ranch dressing mix, I’m a fan.

    Ranch Goldfish Snack Mix has 3 kinds of Goldfish and pecans baked in a buttery, savory ranch mixture. Perfect for a party snack!

    Ingredients

    • Cheddar Goldfish crackers – I highly recommend the “flavor blasted” kind because more cheddar flavor is always better than less.
    • Parmesan Goldfish crackers
    • Pretzel Goldfish crackers
    • Pecans – you could substitute another nut if you prefer.
    • Unsalted butter – the ranch mix we’re using has plenty of salt so I do recommend using unsalted butter.
    • Ranch dressing mix – the powdered ranch mix, not the liquid dressing. It can be found in the dressing aisle in little packets.
    • Worcestershire sauce – this adds a delicious deep savory flavor to the snack mix.

    How To Make Goldfish Snack Mix

    • Combine. Pour all 4 bags of Goldfish and the pecans into a large mixing bowl.
    • Make sauce. In a smaller bowl, whisk together melted butter, ranch dressing mix, and Worcestershire sauce.
    • Combine. Pour this over the Goldfish and toss gently to combine.
    • Transfer. Transfer the Goldfish to a baking sheet lined with parchment paper and use a rubber spatula to spread them out.
    • Bake. Bake at 250F for for 1 hour, stirring every 15 minutes.
    • Cool. Cool completely before serving.

    How Long Is It Good For?

    Goldfish snack mix will be good for up to 2 weeks. Make sure to store it in an airtight container at room temperature.

    More Snack Mix Recipes

    • Cheesy Taco Chex Mix
    • Dill Pickle Chex Mix
    • Funfetti Muddy Buddies
    • Cheesy Ranch Chex Mix
    • S’mores Chex Mix

    Make sure you subscribe to my email list to get all my new recipes delivered right to your inbox!

    You can also follow me on Instagram, Facebook, or Pinterest for even more! 

    📖 Recipe

    Yield: 16 servings

    Ranch Goldfish Snack Mix

    Ranch Goldfish Snack Mix

    Ranch Goldfish Snack Mix has 3 kinds of Goldfish and pecans baked in a buttery, savory ranch mixture. Perfect for a party snack!

    Prep Time 15 minutes
    Cook Time 1 hour
    Total Time 1 hour 15 minutes

    Ingredients

    • 2 bags cheddar Goldfish crackers
    • 1 bag Parmesan Goldfish crackers
    • 1 bag pretzel Goldfish crackers
    • 1 cup chopped pecans
    • ½ cup 1 stick unsalted butter, melted
    • 1 ounce packet ranch dressing mix
    • 1 tablespoon worcestershire sauce

    Instructions

    1. Preheat oven to 250F. Line a large, rimmed baking sheet with parchment paper.
    2. Pour all 4 bags of Goldfish and the pecans into a large mixing bowl.
    3. In a smaller bowl, whisk together melted butter, ranch dressing mix, and worcestershire sauce. Pour this over the Goldfish and toss gently to combine.
    4. Transfer the Goldfish to the prepared baking sheet and use a rubber spatula to spread them out.
    5. Bake for for 1 hour, stirring every 15 minutes.
    6. Cool completely before serving.

    Recommended Products

    As an Amazon Associate and member of other affiliate programs, I earn from qualifying purchases.

    • Parchment Paper
      Parchment Paper
    • Rimmed Baking Sheet
      Rimmed Baking Sheet

    Nutrition Information:

    Yield:

    16

    Serving Size:

    1

    Amount Per Serving: Calories: 129Total Fat: 11gSaturated Fat: 4gTrans Fat: 0gUnsaturated Fat: 6gCholesterol: 16mgSodium: 209mgCarbohydrates: 6gFiber: 1gSugar: 1gProtein: 2g

    Did you make this recipe?

    Tag me in your Instagram photo - @fakeginger

    © Amanda Livesay
    Cuisine: American / Category: snack

    Slow Cooker Hawaiian Meatballs

    May 15, 2014

    Slow Cooker Hawaiian Meatballs are delicious meatballs in a sweet and sour pineapple sauce. A kid favorite and so simple! Just a few ingredients and a few minutes of prep and you will come home to a yummy dinner!

    I love making meatballs in the slow cooker for parties. Some of my other favorites are Slow Cooker Cranberry Meatballs and Slow Cooker BBQ Meatballs!

    Slow Cooker Hawaiian Meatballs - easy weeknight dinner recipe! Meatballs in a sweet and sour pineapple sauce. Kid-friendly and made in the crockpot!

    My kids have been obsessed with meatballs lately.

    I guess I should say more obsessed because meatballs have always been a favorite. But lately, they can’t get enough. I made spaghetti the other night and all the meatballs were gone well before the noodles were!

    Since a couple of my boys are currently going through weird picky stages, I’ve decided we’re having meatballs for every meal!

    Okay maybe not, but I figured I could make them more often and switch it up from the usual spaghetti. 

    My kids ate the entire batch of these Slow Cooker Hawaiian Meatballs!

    In one sitting.

    The sauce is sweet and sour but it isn’t the usual red sweet and sour sauce like the one I use in my sweet and sour chicken – this one is made from pineapple juice, brown sugar, vinegar, and soy sauce.

    Slow Cooker Hawaiian Meatballs - easy weeknight dinner recipe! Meatballs in a sweet and sour pineapple sauce. Kid-friendly and made in the crockpot!

    Ingredients

    • Frozen meatballs – whatever your favorite brand is. I buy frozen turkey meatballs most of the time to keep it a little lighter.
    • Can pineapple chunks – if you don’t want big chunks, you can use the tidbits.
    • Brown sugar – you have to have sweetness for the sweet and sour sauce!
    • Cornstarch – this thickens the sauce so that it coats the meatballs nicely
    • White vinegar – the sour part of the sauce
    • Soy sauce – this adds some saltiness and deepness to the dish
    • Cayenne – you can leave this out if you don’t want any spice

    What To Serve with Hawaiian Meatballs

    You can serve these Hawaiian Meatballs as a party snack, right from your slow cooker. Just set the slow cooker to warm and put some toothpicks next to it.

    If you want to make it an easy weeknight dinner, I usually serve it over rice to soak up all that sauce. And then I’ll add roasted broccoli or green beans on the side.

    Slow Cooker Hawaiian Meatballs - easy weeknight dinner recipe! Meatballs in a sweet and sour pineapple sauce. Kid-friendly and made in the crockpot!

    Can You Make Slow Cooker Hawaiian Meatballs Ahead?

    Yes, you prep these meatballs ahead of time! 

    Since the recipe calls for frozen meatballs, you really just have to make the sauce. So if you are super short on time, go ahead and make the sauce and store it in your fridge overnight so that all you have to do is put the meatballs and pineapple in and then pour the already mixed sauce on top. 

    Can You Freeze Hawaiian Meatballs?

    Yes, these Slow Cooker Hawaiian Meatballs freeze beautifully! 

    I’ve done the ziploc bag method where you just put all the ingredients (meatballs, pineapple, and sauce) in a ziploc freezer bag so that all you have to do is dump the entire bag into the slow cooker and it makes preparing this dinner even easier!

    You can also freeze them after cooking. Just make sure to use an airtight, freezer-safe container (ziploc freezer bags work here, too!) and consume within 3 months. You can defrost them overnight in the fridge and reheat on the stove or put them frozen into the slow cooker to cook all day. 

    More Slow Cooker Recipes

    • Slow Cooker White Chicken Chili
    • Slow Cooker Beer and Brown Sugar Kielbasa
    • Slow Cooker Cheesy Potato Broccoli Soup
    • Crockpot Cheeseburgers
    • Slow Cooker Teriyaki Chicken

    Make sure you subscribe to my email list to get all my new recipes delivered right to your inbox!

    You can also follow me on Instagram, Facebook, or Pinterest for even more! 

    📖 Recipe

    Yield: 12 servings

    Slow Cooker Hawaiian Meatballs

    Slow Cooker Hawaiian Meatballs

    Slow Cooker Hawaiian Meatballs are delicious meatballs in a sweet and sour pineapple sauce. A kid favorite and so simple! Just a few ingredients and a few minutes of prep and you will come home to a yummy dinner!

    Prep Time 10 minutes
    Cook Time 4 hours
    Total Time 4 hours 10 minutes

    Ingredients

    • 3 pound package frozen meatballs
    • 20 ounce can pineapple chunks, drained BUT save the juice!
    • 1 cup brown sugar
    • 3 tablespoons cornstarch
    • ⅔ cup white vinegar
    • 2 tablespoons soy sauce
    • ¼ teaspoon cayenne, optional

    Instructions

    1. Put meatballs and pineapple chunks in slow cooker.
    2. In a large bowl, stir together pineapple juice, brown sugar, cornstarch, white vinegar, soy sauce, and cayenne (if using). Pour over the meatballs.
    3. Cook on low for 3 - 4 hours.

    Recommended Products

    As an Amazon Associate and member of other affiliate programs, I earn from qualifying purchases.

    • Programmable Slow Cooker
      Programmable Slow Cooker

    Nutrition Information:

    Yield:

    12

    Serving Size:

    1

    Amount Per Serving: Calories: 433Total Fat: 25gSaturated Fat: 9gTrans Fat: 1gUnsaturated Fat: 14gCholesterol: 75mgSodium: 918mgCarbohydrates: 36gFiber: 3gSugar: 28gProtein: 17g

    Did you make this recipe?

    Tag me in your Instagram photo - @fakeginger

    © Amanda Livesay
    Cuisine: American / Category: slow cooker

    Cauliflower Pizza Crust

    May 12, 2014

    Cauliflower Pizza Crust - a healthy and low carb way to enjoy pizza! This is so delicious!

    I have been hesitant to jump on the cauliflower pizza crust train for a number of reasons.

    Number one: Cauliflower? Pizza? No.

    Number two: Most of the time, the crust of the pizza is more important than the toppings to me. Why would I want to give up my favorite part of the pizza?!

    But my kids were begging for pizza Friday night and knowing that Mother’s Day was only days away and I consider eating lots of carbs essential on Mother’s Day, I needed to find a way to have pizza night with the kids without overdoing it.

    So I tried the cauliflower crust.

    Aaaaand… I loved it.

    I’ve kind of heard mixed reviews. It seems like for every person that’s talking about how amazing it is, there’s someone saying that it’s mushy and you can’t slice it.

    But I thought it worked perfectly.

    Did it taste like pizza crust? No, of course not. And if someone tells you that it does, they are filthy liars.

    It tastes like cauliflower but I feel like cauliflower kind of tastes like nothing so… it worked. I’m planning on making it again this weekend!

    Cauliflower Pizza Crust - a healthy and low carb way to enjoy pizza! This is so delicious!

    📖 Recipe

    Yield: about 2 servings

    Cauliflower Pizza Crust

    Cauliflower Pizza Crust

    from The Iron You

    Prep Time 20 minutes
    Cook Time 25 minutes
    Total Time 45 minutes

    Ingredients

    • 1 head of cauliflower, cut into florets
    • 1 egg
    • ½ cup shredded mozzarella
    • ½ teaspoon salt
    • ½ teaspoon Italian seasoning
    • ¼ teaspoon black pepper

    Instructions

    1. Preheat oven to 450F. Line a baking sheet with parchment paper.
    2. In a food processor, process the cauliflower until it is finely chopped but not mushy. Place in a microwave-safe dish and microwave for about 8 minutes, or until cooked.
    3. Place the cooked cauliflower into a tea towel and squeeze all the water out of it. You'll get quite a lot of water out.
    4. Transfer the cauliflower to a mixing bowl and stir in egg, mozzarella, salt, Italian seasoning, and black pepper. Mix until combined.
    5. Use your hands to transfer mixture to the prepared baking sheet and flatten it out into a large, thin circle.
    6. Bake 15 minutes or until lightly golden. Remove from oven and top with toppings of your choice. Return to oven and bake another 10 minutes to melt any cheese, if using.

    Recommended Products

    As an Amazon Associate and member of other affiliate programs, I earn from qualifying purchases.

    • Rimmed Baking Sheet
      Rimmed Baking Sheet
    • Parchment Paper
      Parchment Paper
    • My Favorite Food Processor
      My Favorite Food Processor

    Nutrition Information:

    Yield:

    2

    Serving Size:

    1

    Amount Per Serving: Calories: 167Total Fat: 8gSaturated Fat: 3gTrans Fat: 0gUnsaturated Fat: 3gCholesterol: 107mgSodium: 753mgCarbohydrates: 14gFiber: 7gSugar: 6gProtein: 13g

    Did you make this recipe?

    Tag me in your Instagram photo - @fakeginger

    © Amanda Livesay

    Cauliflower Pizza Crust - a healthy and low carb way to enjoy pizza! This is so delicious!

    Cauliflower Pizza Crust - a healthy and low carb way to enjoy pizza! This is so delicious!

    Chocolate Chia Pudding

    May 06, 2014

    Chocolate Chia Pudding is an easy 2 ingredient healthy breakfast option. You just need chocolate milk and chia seeds!

    I’ve gotten into a bad habit lately.

    Mug cakes.

    Every night.

    They’re kind of spongy and gross but they’ll do at the end of the night when you’ve been eating salads and almonds all day and all you can think about is cake.

    I’ve been topping them with whipped cream and sprinkles but I ran out of whipped cream and was so desperate that I actually scraped the icing off some cookies.

    I’m sure I looked like an absolute maniac.

    So I’ve been trying to come up with other things I can have at night to kill my sweet tooth and this chocolate chia pudding seems to do the trick. I’m not a pudding person but the chia seeds add loads of texture. I’ve been topping it with bananas and a spoonful of maple almond butter – ugh, so good.

    This calls for only 3 ingredients and it couldn’t be easier. I usually make some in the morning and then the chia seeds work their magic all day so that by evening, it’s thickened up and pudding-like.

    Ingredients

    • Chocolate milk – use dairy or non-dairy, depending on what you prefer. I like almond milk but any will work.
    • Chia seeds – you can find these at most large grocery stores. They’re in the baking aisle in my stores but you may also find them in the “healthy foods” sections.
    • Honey or brown sugar – this is optional. If you want it a bit sweeter, use these. If you think chocolate milk is sweet enough, skip it.

    How To Make Chocolate Chia Pudding

    • Combine. Stir together all ingredients until well combined.
    • Chill. Chill for at least a few hours before serving.

    How Long Is It Good For?

    Chocolate chia pudding is good for up to 5 days. Make sure to store it in the refrigerator. I like to prep these for the week and store them in mason jars so that when I need one, I can just put some fruit on top and take it with me.

    More Overnight Breakfast Ideas

    • Blueberry Overnight Oats
    • Overnight Ham Breakfast Casserole
    • PB&J Overnight Oats
    • Strawberry Overnight Oats

    Make sure you subscribe to my email list to get all my new recipes delivered right to your inbox!

    You can also follow me on Instagram, Facebook, or Pinterest for even more! 

    📖 Recipe

    Yield: 1 serving

    Chocolate Chia Pudding

    Chocolate Chia Pudding

    Chocolate chia pudding is an easy 2 ingredient healthy breakfast option. You just need chocolate milk and chia seeds!

    Prep Time 5 minutes
    Additional Time 30 minutes
    Total Time 35 minutes

    Ingredients

    • ½ cup chocolate milk (dairy or non-dairy)
    • 2 tablespoons chia seeds
    • ½ teaspoon honey or brown sugar (optional, if you want it sweeter)

    Instructions

    1. Whisk all ingredients together in a small bowl.
    2. Cover and refrigerate overnight.

    Recommended Products

    As an Amazon Associate and member of other affiliate programs, I earn from qualifying purchases.

    • Meal Prep Jars
      Meal Prep Jars
    • Chia Seeds
      Chia Seeds

    Nutrition Information:

    Yield:

    1

    Serving Size:

    1

    Amount Per Serving: Calories: 183Total Fat: 9gSaturated Fat: 1gTrans Fat: 0gUnsaturated Fat: 7gCholesterol: 0mgSodium: 89mgCarbohydrates: 22gFiber: 9gSugar: 11gProtein: 5g

    Did you make this recipe?

    Tag me in your Instagram photo - @fakeginger

    © Amanda Livesay
    Cuisine: American / Category: breakfast

    Spaghetti Squash Pad Thai

    Apr 28, 2014

    I’m going through this phase where I’m obsessed with sweet potatoes and spaghetti squash. And I make them both the same way, multiple times a day. Because when your husband deployed and your kids want hot dogs for every meal, you can eat spaghetti squash all day long and no one complains!

    I normally just cook up a couple pieces of chopped up bacon, cook the spaghetti squash (or shredded sweet potatoes) in the yummy bacon fat, and then top it all with a runny-yolk egg.

    But this weekend I went back to an old favorite: Spaghetti Squash Pad Thai!

    And I realize there is absolutely nothing authentic about this Pad Thai but when you’re doing the paleo thing, this feels like a takeout cheat meal. But it’s still paleo! And delicious!

    It’s really easy to customize to suit your needs/likes too. I add all sorts of veggies to it typically and have use ground beef, chicken breasts, even ground pork.

    Make sure you subscribe to my email list to get all my new recipes delivered right to your inbox!

    You can also follow me on Instagram, Facebook, or Pinterest for even more! 

    📖 Recipe

    Yield: about 4 servings

    Spaghetti Squash Pad Thai

    Spaghetti Squash Pad Thai

    adapted from The Clothes Make the Girl

    Cook Time 30 minutes
    Total Time 30 minutes

    Ingredients

    For the sauce:

    • 2 tablespoons lime juice
    • 1 clove garlic, minced (about 1 teaspoon)
    • ½ teaspoon crushed red pepper flakes
    • 1 tablespoon coconut aminos, or soy sauce
    • ¼ teaspoon powdered ginger
    • ½ teaspoon rice vinegar
    • ¼ cup sunflower seed butter or almond butter
    • ¼ cup coconut milk

    To make the Pad Thai:

    • 2 large eggs
    • 2 teaspoons coconut aminos, or soy sauce
    • 2 teaspoons coconut oil, divided
    • ½ pound ground turkey, or any meat, really
    • ½ medium onion, thinly sliced
    • 1 cup snap peas, thinly sliced lengthwise
    • 2 cups cooked spaghetti squash

    Instructions

    To make the sauce:

    1. Combine all sauce ingredients in a blender or food processor. Blend until smooth. Set aside.

    To make the Pad Thai:

    1. Whisk the eggs with the coconut aminos (or soy sauce).
    2. Heat 1 teaspoon of coconut oil over medium heat in a medium-sized pan until melted. Add egg mixture and scramble until cooked through. Set aside.
    3. In a separate large pan, heat remaining teaspoon of coconut oil over medium heat. Add turkey and cook, breaking up, until no pink remained. Drain if necessary. Add onion and snap peas and stir until vegetables have softened, about 2 minutes.
    4. Stir in spaghetti squash and sauce. Stir to coat everything with the sauce. Heat until everything is hot.
    5. Garnish with raw, sliced snap peas, green onions, and cashews or almonds.

    Recommended Products

    As an Amazon Associate and member of other affiliate programs, I earn from qualifying purchases.

    • Coconut Aminos
      Coconut Aminos
    • My Favorite Food Processor
      My Favorite Food Processor

    Nutrition Information:

    Yield:

    4

    Serving Size:

    1

    Amount Per Serving: Calories: 473Total Fat: 32gSaturated Fat: 10gTrans Fat: 0gUnsaturated Fat: 19gCholesterol: 179mgSodium: 726mgCarbohydrates: 17gFiber: 4gSugar: 8gProtein: 32g

    Did you make this recipe?

    Tag me in your Instagram photo - @fakeginger

    © Amanda Livesay
    Cuisine: Asian / Category: paleo

    Strawberry Sour Cream Ice Cream

    Apr 21, 2014

    If you love strawberry ice cream, you have to make Strawberry Sour Cream Ice Cream! The sour cream adds the perfect tartness to the sweet treat.

    If you love strawberry ice cream, try Strawberry Cheesecake Ice Cream!

    It’s not too early for ice cream, right?

    One of my BFFs tweeted me about the new Dairy Queen confetti cake blizzard a few weeks back and I haven’t been able to stop thinking about ice cream since then.

    Weirdly enough, I’ve been craving fruity ice cream – and if you know me at all, you know that I am strictly pistachio or Ben & Jerry’s Chubby Hubby when it comes to ice cream. But yeah, lately I’ve been craving the fruity ice creams. Especially strawberry. Especially with an tart base like this one.

    I don’t know why sour cream and strawberries work so well together in ice cream but they do. I didn’t even tell my kids that I made this ice cream because I had no intention of sharing. It’s probably my favorite ice cream I’ve ever made.

    Ingredients

    • Sugar
    • Egg yolks – using yolks creates a really thick and creamy custard. It’s my preferred way to make homemade ice cream.
    • Heavy cream
    • Milk
    • Sour cream – this doesn’t make the ice cream taste like sour cream. It just adds the perfect tang to counteract all the sweetness we’re adding.
    • Vanilla
    • Salt – just a tiny bit to bring out all the other flavors.
    • Strawberries
    • Brown sugar – the strawberries are going to get cooked in brown sugar so that they release all their juices.

    How To Make Strawberry Sour Cream Ice Cream

    • Prep. Whisk together egg yolks and ½ cup of sugar.
    • Heat. Heat ½ cup sugar, heavy cream, and milk over medium low heat, whisking, until the mixture just reaches a simmer.
    • Temper eggs. Slowly pour about 1 cup of the hot cream into the eggs in a thin stream, whisking the eggs vigorously.
    • Combine. Pour yolk mixture back into saucepan with rest of cream, still whisking. Heat the custard over low heat, whisking constantly, until the mixture thickens enough to coat the back of a spoon.
    • Strain. Strain custard through a sieve into a large bowl.
    • Cool. Allow to cool for about 5 minutes.
    • Add. Whisk in sour cream, vanilla extract, and salt.
    • Chill. Cover custard tightly with plastic wrap and refrigerate for at least 3 hours, or overnight.
    • Prepare strawberries. About 1 hour prior to churning the ice cream, place chopped strawberries and the brown sugar in a large pan and stir. Let sit for 15 minutes to allow the strawberry juices to release. Heat over medium-low heat, stirring, and cook for 10-15 minutes, until berries are soft, and juices have evaporated enough to become syrupy. Remove from heat. Transfer berries and syrup to a bowl and freeze for 20-30 minutes, until chilled but not frozen.
    • Churn. Churn the ice cream in an ice cream maker according to directions.
    • Add. When the ice cream has reached a soft serve consistency, turn off the machine and fold in the chilled strawberry mixture so that there are streaks of berries. Freeze to further solidify.

    More Strawberry Recipes

    • Strawberry Lemonade Cupcakes
    • Homemade Strawberry Milk
    • Chocolate-Covered Strawberry Pie
    • Strawberry, Blueberry, Peach Cobbler
    • Strawberry Chocolate Chip Muffins
    • Strawberry Cheesecake Poke Cake
    • Strawberry Pretzel Salad

    Make sure you subscribe to my email list to get all my new recipes delivered right to your inbox!

    You can also follow me on Instagram, Facebook, or Pinterest for even more! 

    📖 Recipe

    Yield: 8 servings

    Strawberry Sour Cream Ice Cream

    Strawberry Sour Cream Ice Cream

    If you love strawberry ice cream, you have to make Strawberry Sour Cream Ice Cream! The sour cream adds the perfect tartness to the sweet treat.

    Prep Time 30 minutes
    Cook Time 30 minutes
    Additional Time 12 hours
    Total Time 13 hours

    Ingredients

    • 1 cup sugar
    • 9 egg yolks
    • 1 cup heavy cream
    • ½ cup milk
    • 1 ½ cup sour cream
    • 2 teaspoon vanilla extract
    • pinch salt
    • 1 pound fresh strawberries, hulled and diced into ¼ inch pieces
    • 3 tablespoons brown sugar

    Instructions

    1. In a large heat-proof bowl, whisk together egg yolks and ½ cup of sugar until smooth. Set aside.
    2. In a medium sized saucepan, whisk together remaining ½ cup sugar, heavy cream, and milk. Heat over medium low heat, whisking, until the mixture just reaches a simmer. Remove from heat.
    3. Slowly pour about 1 cup of the hot cream into the eggs in a thin stream, whisking the vigorously the entire time. Pour yolk mixture back into saucepan with rest of cream, still whisking.
    4. Heat the custard over low heat, whisking constantly, until the mixture thickens enough to coat the back of a spoon. This will take 7-10 minutes.
    5. Strain custard through a sieve into a large bowl, pushing through sieve with a spatula. Allow to cool for about 5 minutes.
    6. Whisk in sour cream, vanilla extract, and salt. Cover custard tightly with plastic wrap and refrigerate for at least 3 hours, or overnight.
    7. About 1 hour prior to churning the ice cream, prepare the strawberries: Place chopped strawberries and brown sugar in a large pan and stir. Let sit for 15 minutes to allow the strawberry juices to release.
    8. Heat strawberry mixture over medium-low heat, stirring, and cook for 10-15 minutes, until berries are soft, and juices have evaporated enough to become syrupy. Remove from heat. Transfer berries and syrup to a bowl and freeze for 20-30 minutes, until chilled but not frozen.
    9. Churn the ice cream in an ice cream maker according to directions. When the ice cream has reached a soft serve consistency, turn off the machine and fold in the chilled strawberry mixture so that there are streaks of berries. Freeze to further solidify.

    Recommended Products

    As an Amazon Associate and member of other affiliate programs, I earn from qualifying purchases.

    • Ice Cream Maker
      Ice Cream Maker
    • Ice Cream Container
      Ice Cream Container

    Nutrition Information:

    Yield:

    8

    Serving Size:

    1

    Amount Per Serving: Calories: 390Total Fat: 25gSaturated Fat: 13gTrans Fat: 1gUnsaturated Fat: 9gCholesterol: 268mgSodium: 57mgCarbohydrates: 38gFiber: 1gSugar: 34gProtein: 6g

    Did you make this recipe?

    Tag me in your Instagram photo - @fakeginger

    © Amanda Livesay
    Cuisine: American / Category: frozen goodies

    Easter Marshmallow Bark

    Apr 16, 2014

    Easter Marshmallow Bark is the cutest Easter treat! Pastel marshmallows coated in white chocolate and topped with sprinkles. No bake and takes about 10 minutes to make! 

    Easter Marshmallow Bark - the cutest Easter treat! Pastel marshmallows coated in white chocolate and topped with sprinkles. No bake and takes about 10 minutes to make!

    My kids are obsessed with marshmallows.

    Obsessed.

    And they’re in the baking aisle of the grocery store so I can’t even buy flour without hearing “MOM! LOOK! NEW MARSHMALLOWS! PINK MARSHMALLOWS! MARSHMALLOWS SHAPED LIKE COWS! LOOK!”

    You can imagine how thrilled they were with bars that are literally just marshmallows covered in white chocolate.

    You guys. They went nuts.

    They’re pastel and I topped them with bunny sprinkles so they’re perfect for Easter! And no baking required so they are great for tiny helpers in the kitchen. 

    Easter Marshmallow Bark - the cutest Easter treat! Pastel marshmallows coated in white chocolate and topped with sprinkles. No bake and takes about 10 minutes to make!

    Ingredients

    • White chocolate chips
    • Shortening – this helps the white chocolate melt smoothly and also makes it shiny.
    • Rainbow marshmallows – these are available year round with the other marshmallows. They’re also flavored like orange, strawberry, lemon, and lime so it’s not just white chocolate and marshmallow flavor.
    • Easter or Spring sprinkles – optional but it does make them extra cute!

    How To Make Easter Marshmallow Bark

    • Melt. Microwave white chocolate chips and shortening in microwave in 30 second increments until melted and smooth.
    • Combine. Add marshmallows and quickly stir to coat all the marshmallows.
    • Transfer. Pour into a parchment paper-lined pan and spread to the sides. 
    • Decorate. Top with Easter sprinkles.
    • Chill. Refrigerate until set, at least a couple hours
    • Serve. Cut into squares and serve at room temperature.

    How Long Is Marshmallow Bark Good For?

    Marshmallow Bark is good for up to 2 weeks in an airtight container. If you want it to last the full 2 weeks, store it in the fridge just to be on the safe side. 

    More Easter Treats

    • Peeps Dirt Cups
    • Peeps Dirt Cups
    • Easter White Chocolate Covered Oreos
    • Easter Rice Krispies Nests with Nutella
    • Easter Chicks Cupcakes

    Make sure you subscribe to my email list to get all my new recipes delivered right to your inbox!

    You can also follow me on Instagram, Facebook, or Pinterest for even more! 

    📖 Recipe

    Yield: 12 servings

    Easter Marshmallow Bark

    Easter Marshmallow Bark

    Easter Marshmallow Bark is the cutest Easter treat! Pastel marshmallows coated in white chocolate and topped with sprinkles. No bake and takes about 10 minutes to make! 

    Prep Time 15 minutes
    Total Time 15 minutes

    Ingredients

    • 1 12 ounce bag white chocolate chips
    • 1 tablespoon shortening
    • 3 cups mini rainbow marshmallows
    • Easter or Spring sprinkles

    Instructions

    1. Line an 8x11-inch baking dish with parchment paper.
    2. Put white chocolate chips and shortening in a microwave-safe bowl. Microwave for 1 minutes and then give it a good stir. Microwave in 30 second increments, stirring after each one, until completely melted.
    3. Add marshmallows and stir to coat all the marshmallows. Work quickly or the marshmallows will start to melt!
    4. Pour the marshmallows into your prepared pan and use a rubber spatula to extend the marshmallows to all sides. Sprinkles on any sprinkles you want to use.
    5. Refrigerate until completely set, at least a couple hours. Cut into squares and bring to room temperature before serving.

    Recommended Products

    As an Amazon Associate and member of other affiliate programs, I earn from qualifying purchases.

    • Easter Sprinkles
      Easter Sprinkles
    • 8 x 11 baking dish
      8 x 11 baking dish

    Nutrition Information:

    Yield:

    12

    Serving Size:

    1

    Amount Per Serving: Calories: 204Total Fat: 10gSaturated Fat: 6gTrans Fat: 0gUnsaturated Fat: 4gCholesterol: 7mgSodium: 36mgCarbohydrates: 27gFiber: 0gSugar: 24gProtein: 2g

    Did you make this recipe?

    Tag me in your Instagram photo - @fakeginger

    © Amanda Livesay
    Cuisine: American / Category: candy

    Carrot Cake Whoopie Pies

    Apr 15, 2014

    Carrot Cake Whoopie Pies are soft carrot cake cookies with cream cheese filling.

    Do you guys leave anything for the Easter Bunny?

    I don’t remember leaving anything as a kid (maybe I did?) but my husband insists that he likes carrots and my oldest insists that he also likes hard-boiled eggs.

    I’m hoping that maybe he’ll leave me a basket this year if I switch things up and leave these Carrot Cake Whoopie Pies for him instead of boring carrots and eggs.

    If you are a carrot cake fan, you will love these whoopie pies. It’s basically just a rearranged carrot cake cupcake! They’re really good and for some reason, even though I know that it’s technically two tiny cakes stuffed with cream cheese frosting, I still feel like it’s just an innocent cookie and I don’t feel guilty eating more than one.

    Make sure you subscribe to my email list to get all my new recipes delivered right to your inbox!

    You can also follow me on Instagram, Facebook, or Pinterest for even more! 

    📖 Recipe

    Yield: 12 cookies

    Carrot Cake Whoopie Pies

    Carrot Cake Whoopie Pies

    Carrot Cake Whoopie Pies are soft carrot cake cookies with cream cheese filling.

    Prep Time 30 minutes
    Cook Time 15 minutes
    Total Time 45 minutes

    Ingredients

    • 2 cups shredded carrot
    • ⅔ cup brown sugar, divided
    • ¼ cup butter, divided
    • 2 tablespoons canola oil
    • 1 teaspoon orange zest
    • ¾ teaspoon vanilla, divided
    • 1 egg
    • 1 cup flour
    • 1 teaspoon cinnamon
    • ¼ teaspoon salt, plus a pinch, divided
    • ¼ teaspoon baking soda
    • 4 ounces cream cheese
    • 1 cup powdered sugar
    • 1 tablespoon milk

    Instructions

    1. Preheat oven to 350F. Line 2 baking sheets with parchment paper.
    2. Combine shredded carrots and 3 tablespoons brown sugar in a bowl; toss to coat. Place carrot mixture in a fine mesh sieve; let stand for 10 minutes. Discard liquid.
    3. Microwave 2 tablespoons butter in a medium microwave-safe bowl until melted, about 45 seconds. Add oil, orange zest, ½ teaspoon vanilla, and egg. Whisk until well combined.
    4. In a separate large bowl, combined flour, remaining brown sugar (about ½ cup), cinnamon, salt, and baking soda; whisk together. Add carrot mixture and butter mixture; stir until everything is incorporated.
    5. Drop dough by tablespoonfuls 2 inches apart onto prepared baking sheets. You should get 28 cookies. Gently pat dough down to form 2-inch circles.
    6. Bake for 11 - 13 minutes or until cookies are set. Let cool completely on wire rack.
    7. Combine cream cheese, remaining 2 tablespoons butter, remaining ¼ teaspoon vanilla, and a pinch of salt in a medium bowl. Beat with a mixer at medium speed until fluffy. Add powdered sugar and milk; beat at a very low speed until combined.
    8. Spread about 1 tablespoon on flat side of 1 cookie, top with another cookie, flat side down. Repeat with remaining cookies and filling.

    Recommended Products

    As an Amazon Associate and member of other affiliate programs, I earn from qualifying purchases.

    • Stand Mixer
      Stand Mixer
    • Rimmed Baking Sheet
      Rimmed Baking Sheet
    • Icing Spatula
      Icing Spatula
    • Parchment Paper
      Parchment Paper
    • Fine Mesh Strainer
      Fine Mesh Strainer

    Nutrition Information:

    Yield:

    12

    Serving Size:

    1

    Amount Per Serving: Calories: 215Total Fat: 10gSaturated Fat: 5gTrans Fat: 0gUnsaturated Fat: 5gCholesterol: 35mgSodium: 153mgCarbohydrates: 30gFiber: 1gSugar: 20gProtein: 2g

    Did you make this recipe?

    Tag me in your Instagram photo - @fakeginger

    © Amanda Livesay
    Cuisine: American / Category: cookie

    Dirt and Worms Chex Mix

    Apr 14, 2014

    Dirt and Worms Chex Mix is chocolate Chex cereal coated with chocolate pudding mix and tossed with chopped Oreo cookies and gummy worms. So easy and so cute!

    Dirt and Worms Chex Mix - chocolate Chex cereal coated with chocolate pudding mix and tossed with chopped Oreo cookies and gummy worms. So easy and so cute!

    How was your weekend?

    We had the best of both worlds. On Saturday we were eating watermelon in the backyard while wearing shorts and then Sunday we watched snow fall all day long!

    Gotta love Colorado!

    I’m assuming most of your had nice Spring weather so I wanted to share this Spring treat! I think it’s my favorite thing I’ve made in months.

    I know it looks like it’s for the kids but I won’t lie, it hit all my weird cravings on Saturday night – sweet and crunchy, chocolate, sour, chewy. I mean, everything I could ever want all in one cute little bucket!

    And my kids went nuts for it, of course! They’re boys so they like anything gross and eating bugs and dirt was pretty exciting for them.

    It would be super cute at a kids birthday party served in mini buckets with tiny shovels.

    Dirt and Worms Chex Mix - chocolate Chex cereal coated with chocolate pudding mix and tossed with chopped Oreo cookies and gummy worms. So easy and so cute!

    Ingredients for Dirt and Worms Chex Mix

    • Chocolate Chex cereal
    • Butter
    • Chocolate pudding mix
    • Oreo cookies
    • Gummy worms – you can use sour or not sour, whatever your preference is!

    Instructions for Dirt and Worms Chex Mix

    • Melt butter and stir in pudding mix; stir until dissolved
    • In a large mixing bowl, combine Chocolate Chex and butter mixture, making sure all the cereal is coated
    • Transfer to a rimmed baking sheet
    • Bake at 300F for 30 minutes, stirring halfway through
    • Stir in chopped Oreos and gummy worms
    • Transfer to wax paper to cool completely before storing and serving

    How Long Is Homemade Chex Mix Good For

    This Dirt and Worms Chex Mix will stay good for several weeks (I usually say 2 weeks to be safe) if stored properly.

    Make sure to store it in a super airtight container to keep it good as long as possible.

    Dirt and Worms Chex Mix - chocolate Chex cereal coated with chocolate pudding mix and tossed with chopped Oreo cookies and gummy worms. So easy and so cute!

    More Snack Mix Recipes

    • White Chocolate Peppermint Chex
    • Cheesy Taco Chex Mix
    • Dill Pickle Chex Mix
    • Cheesy Ranch Chex Mix
    • Peanut Butter Lovers Snack Mix

    Make sure you subscribe to my email list to get all my new recipes delivered right to your inbox!

    You can also follow me on Instagram, Facebook, or Pinterest for even more! 

    📖 Recipe

    Yield: 12 servings

    Dirt and Worms Chex Mix

    Dirt and Worms Chex Mix

    Dirt and Worms Chex Mix is chocolate Chex cereal coated with chocolate pudding mix and tossed with chopped Oreo cookies and gummy worms. So easy and so cute!

    Prep Time 15 minutes
    Cook Time 15 minutes
    Total Time 30 minutes

    Ingredients

    • 4 cups Chocolate Chex
    • ¼ cup butter
    • 2 tablespoons chocolate pudding and filling mix
    • 1 cup coarsely chopped Oreos
    • 2 cups gummy worms

    Instructions

    1. Preheat oven to 300F. Line a large, rimmed baking sheet with parchment paper or spray with oil.
    2. Place cereal in a large mixing bowl. Set aside.
    3. Melt butter on very low heat (or in the microwave). Remove from heat and stir in pudding mix until pudding has dissolved. Pour over cereal and toss gently, making sure each piece of cereal is coated. Pour onto prepared baking sheet.
    4. Bake 15 minutes, stirring halfway through.
    5. Stir in Oreos and gummy worms. Spread mixture onto wax paper to cool completely before serving.

    Recommended Products

    As an Amazon Associate and member of other affiliate programs, I earn from qualifying purchases.

    • Sour Gummy Worms
      Sour Gummy Worms
    • Parchment Paper
      Parchment Paper
    • Rimmed Baking Sheet
      Rimmed Baking Sheet

    Nutrition Information:

    Yield:

    12

    Serving Size:

    1

    Amount Per Serving: Calories: 304Total Fat: 9gSaturated Fat: 4gTrans Fat: 0gUnsaturated Fat: 5gCholesterol: 10mgSodium: 210mgCarbohydrates: 55gFiber: 1gSugar: 30gProtein: 2g

    Did you make this recipe?

    Tag me in your Instagram photo - @fakeginger

    © Amanda Livesay
    Cuisine: American / Category: snack

    Peeps Nests

    Apr 09, 2014

    Peeps Nests is the cutest Easter treat! White chocolate covered pretzels with Peeps and candy eggs on top. No bake and perfect for school Easter parties! 

    Peeps Nests - the cutest Easter treat! White chocolate covered pretzels with Peeps and candy eggs on top. No bake and perfect for school Easter parties!

    I am in full-on Easter mode right now.

    I wasn’t.

    Then this past weekend the Army post we live on had their Easter event and I mainly showed up because they promised an ice skating rink (and lied!) but after holding ALL THE CUTE BUNNIES at the petting zoo, I’m pretty excited to have the Easter Bunny visit us.

    Plus, can we all agree that Easter has the best holiday candy? Cadbury eggs, Cadbury mini eggs, Cadbury white mini eggs…

    Omg.

    Peeps Nests - the cutest Easter treat! White chocolate covered pretzels with Peeps and candy eggs on top. No bake and perfect for school Easter parties!

    Peeps Nests Recipe!

    Anyway, this is the treat I was planning on sharing on Monday but someone destroyed the bag of pretzels and the eggs.

    And yes, it was the husky. She is the worst.

    Better late than never though, right?

    I love these Peeps Nests so much.

    They are basically white chocolate-covered pretzels with a Peeps chick on top and then you can put your favorite egg-shaped candy on the nest. They’re so easy, no baking required, and even the kiddos can help out with them!

    I mean, how cute are they?!

    Want more easy and cute Easter treats?

    • Easter White Chocolate Covered Oreos
    • Easter Rice Krispies Nests with Nutella
    • Easter Trifle
    • Easter Popcorn
    • Easter Sugar Cookie Cups

    Make sure you subscribe to my email list to get all my new recipes delivered right to your inbox!

    You can also follow me on Instagram, Facebook, or Pinterest for even more! 

    📖 Recipe

    Yield: 25 servings

    Peeps Nests

    Peeps Nests

    Prep Time 30 minutes
    Total Time 30 minutes

    Ingredients

    • 1 24- ounce package white almond bark
    • 1 10- ounce bag pretzel sticks
    • 25 Peeps chicks
    • 1 package egg-shaped candy

    Instructions

    1. In a large microwave-safe bowl, melt white chips; stir until smooth. Set aside ½ cup for decorating.
    2. Add pretzel sticks to remaining chips; stir until coated. Scoop a small amount of mixture onto waxed paper; shape into a nest using two forks. Repeat, forming 25 nests. Dip bottom of Peep into reserved white chips; place in a nest. Add eggs to nests, securing with white chips. Repeat. Let stand until set.

    Recommended Products

    As an Amazon Associate and member of other affiliate programs, I earn from qualifying purchases.

    • Parchment Paper
      Parchment Paper
    • White Almond Bark
      White Almond Bark

    Nutrition Information:

    Yield:

    25

    Serving Size:

    1

    Amount Per Serving: Calories: 237Total Fat: 15gSaturated Fat: 1gTrans Fat: 0gUnsaturated Fat: 13gCholesterol: 7mgSodium: 286mgCarbohydrates: 22gFiber: 3gSugar: 7gProtein: 7g

    Did you make this recipe?

    Tag me in your Instagram photo - @fakeginger

    © Amanda Livesay
    Category: holiday

    No-Bake Chewy Peanut Butter Chocolate Chip Granola Bars

    Apr 02, 2014

    My kids are obsessed with granola bars. It’s bad. Like, so bad that I have to hide them or they will all be eaten before I know it.

    And I don’t blame them. I’m sure I’ve told you guys before that I have granola bar problems. I cannot just have one granola bar. If I have one, I’m eating the whole box. Right then.

    I’ve tried to make my own granola bars in the past and had okay results. I just want something simple that doesn’t require a special trip to the grocery store.

    This one is perfect! It’s no-bake so I threw them together in less than 10 minutes. I have all the ingredients on hand at all times.

    My kids love them and I don’t have to worry about hiding them since I can just make another batch if we run out!

    Make sure you subscribe to my email list to get all my new recipes delivered right to your inbox!

    You can also follow me on Instagram, Facebook, or Pinterest for even more! 

    📖 Recipe

    Yield: about 14 bars

    No-Bake Chewy Peanut Butter Chocolate Chip Granola Bars

    No-Bake Chewy Peanut Butter Chocolate Chip Granola Bars

    Prep Time 30 minutes
    Additional Time 20 minutes
    Total Time 50 minutes

    Ingredients

    • 2 cups quick cooking oats, or pulse whole oats in a food processor a bit
    • 1 cup crisp rice cereal
    • ¼ cup shredded coconut
    • ¼ cup coconut oil
    • 3 tablespoons peanut butter
    • ½ cup honey
    • ½ teaspoon salt
    • ½ teaspoon vanilla
    • ½ cup mini chocolate chips, plus more for topping

    Instructions

    1. Line a 9x13-inch pan with aluminum foil or parchment paper.
    2. In a large mixing bowl, stir together oats, crisp rice cereal, and coconut.
    3. In a small saucepan, melt together coconut oil, peanut butter, and honey. Add salt and bring to a boil. Once boiling, allow to boil for 2 minutes. Remove from heat and stir in vanilla.
    4. Pour the coconut oil mixture over the oats mixture and use a rubber spatula to stir everything together - make sure everything is coated. Let cool for a few minutes and then stir in chocolate chips (if you don't allow to cool, all your chocolate chips will melt).
    5. Press mixture into the prepared pan and press additional mini chocolate chips on top. Let set in fridge for about 20 minutes before slicing into bars. Wrap tightly in aluminum foil for storage.

    Recommended Products

    As an Amazon Associate and member of other affiliate programs, I earn from qualifying purchases.

    • My Favorite Food Processor
      My Favorite Food Processor
    • Parchment Paper
      Parchment Paper

    Nutrition Information:

    Yield:

    14

    Serving Size:

    1

    Amount Per Serving: Calories: 213Total Fat: 10gSaturated Fat: 5gTrans Fat: 0gUnsaturated Fat: 4gCholesterol: 0mgSodium: 130mgCarbohydrates: 29gFiber: 2gSugar: 14gProtein: 3g

    Did you make this recipe?

    Tag me in your Instagram photo - @fakeginger

    © Amanda Livesay
    Cuisine: American / Category: brownies

    Buffalo Chicken Egg Muffins

    Apr 01, 2014

    Buffalo Chicken Egg Muffins – protein-rich breakfast idea! Eggs, chicken, hot sauce, and green onions are baked until set. Perfect for meal prepping!

    Buffalo Chicken Egg Muffins - protein-rich breakfast idea! Eggs, chicken, hot sauce, and green onions are baked until set. Perfect for meal prepping!

    I’m not sure how common this is but I find that it is so much easier to stick to healthy eating when my husband is gone. Without someone saying “We should just get pizza/burritos/cashew chicken,” it’s really easy for me to just stick with the good stuff. Plus, I’ve told you guys before that when he’s gone, I’m very willing to sacrifice some of my food budget for clothes or makeup.

    It is what it is.

    So since he’s deployed, I’ve been sticking to pretty much paleo. I mean, besides the McDonald’s chicken nuggets I had for dinner last night. And the hot & spicy chicken sandwich I had for my pre-sleeping snack. But besides that, I’ve been doing the paleo thing.

    I really love paleo. I find that I feel best when I’m doing it. But  – and this is a big but – it is so hard to come off paleo. I want to EAT ALL THE THINGS and DRINK ALL THE WINE and GO TO ALL THE RESTAURANTS. It’s bad. So I’m trying to do mostly paleo with some normal (McDonald’s) mixed in.

    …

    Read More

    Slow Cooker Sweet and Sour Kielbasa

    Mar 26, 2014

    Slow Cooker Sweet and Sour Kielbasa is sliced kielbasa cooked in the crockpot in a delicious sweet and sour sauce. This is perfect over rice for an easy weeknight dinner or served by itself for a party snack!

    Slow Cooker Sweet and Sour Kielbasa - sliced kielbasa cooked in the crockpot in a delicious sweet and sour sauce. This is perfect over rice for an easy weeknight dinner or served by itself for a party snack!

    Hi guys, I have the easiest recipe ever for you today.

    My kids absolutely love this Sweet and Sour Chicken recipe and would happily eat it every night but I just haven’t been up to frying lately.

    I was watching a vlog the other day and whoever I was watching mentioned Sweet and Sour Kielbasa and clearly I couldn’t stop thinking about it.

    The great thing about this recipe is that, even though it’s a slow cooker recipe, it’s ready in 2 hours!

    Slow Cooker Sweet and Sour Kielbasa - sliced kielbasa cooked in the crockpot in a delicious sweet and sour sauce. This is perfect over rice for an easy weeknight dinner or served by itself for a party snack!

    So if you’re an amazing procrastinator like me, you can still have dinner ready in time if you’re too lazy/tired/busy on Pinterest to put it in the slow cooker first thing in the morning. I actually put it in the slow cooker right before we left for soccer practice and by the time we got home, it was ready to go.

    My boys went nuts over it. They ate all of it.

    The entire recipe. 

    My two older boys were actually arguing over who was going to eat what was left on the baby’s plate (there was none).

    This is such an easy recipe! You can have it in your slow cooker in literally minutes. 

    Ingredients

    • Ketchup – I know this is a controversial ingredient but this is what creates the red base of the sauce. It also adds sweetness and a bit of sourness to the entire dish.
    • Brown sugar – this is the sweet part of the sweet and sour.
    • Worcestershire sauce – this adds a nice depth of flavor to the sauce.
    • Butter – you have to have butter!
    • Onion – use a yellow or white onion.
    • White vinegar – this is the sour part of the sauce.
    • Salt and pepper
    • Kielbasa – I like to use a turkey kielbasa but you can use whatever kind of kielbasa you have.

    How To Make Sweet and Sour Kielbasa

    • Make sauce. Stir together ketchup, brown sugar, butter, onion, white vinegar, water, and salt and pepper in the bottom of the slow cooker
    • Add kielbasa. Slice Kielbasa into bite-sized pieces and stir into sauce.
    • Cook. Cook on low for 2 hours or high for 1 hour.
    • Serve. Serve over rice and potatoes with extra sauce drizzled on top.

    What Size Slow Cooker

    I used my 6 quart slow cooker but I think this would also be fine in an 8 quart slow cooker. I don’t recommend going much smaller than 6.
    I also like to use a programmable slow cooker for this one so that I can have it set to warm if I’m serving them at a party.

    How Long Is It Good For?

    Sweet and sour kielbasa is good for up 3 days. Make sure to store leftovers in an airtight container in the fridge.

    When you are ready to reheat, the microwave will be just fine.

    What To Serve With It?

    I like to serve this kielbasa with buttery white rice or Mashed Potatoes. That way you have something to soak up all that delicious sauce.

    More Slow Cooker Recipes

    • Slow Cooker Orange Chicken
    • Slow Cooker Huli Huli Chicken
    • Slow Cooker Pork and Butternut Squash Stew
    • Slow Cooker Apple Kielbasa Bites
    • Slow Cooker Hawaiian Meatballs

    Make sure you subscribe to my email list to get all my new recipes delivered right to your inbox!

    You can also follow me on Instagram, Facebook, or Pinterest for even more! 

    📖 Recipe

    Yield: 6 servings

    Sweet and Sour Kielbasa

    Sweet and Sour Kielbasa

    Slow Cooker Sweet and Sour Kielbasa - sliced kielbasa cooked in the crockpot in a delicious sweet and sour sauce. This is perfect over rice for an easy weeknight dinner or served by itself for a party snack!

    Prep Time 10 minutes
    Cook Time 2 hours
    Total Time 2 hours 10 minutes

    Ingredients

    • 2 cups ketchup
    • ½ cup brown sugar
    • 2 tablespoons worcestershire sauce
    • 2 tablespoons butter
    • ½ cup onion, diced
    • 4 tablespoons white vinegar
    • ½ cup water
    • salt and pepper to taste
    • 1 pound kielbasa

    Instructions

    1. Put ketchup, brown sugar, butter, onion, white vinegar, water, and salt and pepper in the bottom of a slow cooker. Stir until combined.
    2. Slice kielbasa into bite-sized pieces. Put in slow cooker and stir to coat with sauce.
    3. Cook on low for 2 hours or high for 1 hour.
    4. Serve hot, over rice if desired.

    Recommended Products

    As an Amazon Associate and member of other affiliate programs, I earn from qualifying purchases.

    • Programmable Slow Cooker
      Programmable Slow Cooker

    Nutrition Information:

    Yield:

    6

    Serving Size:

    1

    Amount Per Serving: Calories: 442Total Fat: 26gSaturated Fat: 10gTrans Fat: 0gUnsaturated Fat: 15gCholesterol: 65mgSodium: 1670mgCarbohydrates: 44gFiber: 1gSugar: 35gProtein: 11g

    Did you make this recipe?

    Tag me in your Instagram photo - @fakeginger

    © Amanda Livesay
    Cuisine: American / Category: slow cooker

    Mini Sausage Pancake Muffins

    Mar 25, 2014

    Mini Sausage Pancake Muffins is a delicious 3 ingredient breakfast recipe your family is going to love! Pancake muffins with breakfast sausage and maple syrup inside. They taste like a McDonald’s McGriddle!

    Mini Sausage Pancake Muffins - easy, make-ahead breakfast idea. Only 3 ingredients! Sweet and savory and delicious!

    I loathe making pancakes. I would rather make anything else in the world. But my kids are always asking for them. I have found my solution!

    Pancake muffins! And they have sausage in them! They taste like a McGriddle which if you didn’t know, is my go-to McDonald’s breakfast item.

    These muffins start with a box of pancake mix – use whichever one you prefer and prefer it according to the instructions on the box. You stir in cooked breakfast sausage and maple syrup to the prepared mix and then bake then in mini muffin cups for about 12 minutes. 

    Breakfast is done! 

    I got about 30 mini muffins out of the recipe so it’s perfect for a breakfast gathering or just making on a Sunday so you’ve got breakfasts for the week!

    Mini Sausage Pancake Muffins - easy, make-ahead breakfast idea. Only 3 ingredients! Sweet and savory and delicious!

    Ingredients

    • Pancake mix – you will also need any ingredients that your pancake mix calls for. I buy one that only needs water and it makes things really simple!
    • Maple sausage – if your store doesn’t have maple breakfast sausage, you can use regular breakfast sausage.
    • Maple syrup – you can use real maple syrup or pancake syrup. You will put some in the muffins and then I like to serve syrup on the side for dipping.

    How To Make Sausage Pancake Muffins

    • Prep. Cook maple sausage in a large skillet over medium heat, breaking it up, until no pink remains. Drain well.
    • Make batter. Prepare one batch of pancake mix according to package instructions. Stir in sausage crumbles and maple syrup.
    • Transfer. Spray a mini muffin tin with baking spray. Fill each muffin cup about ⅔ full.
    • Bake. Bake at 350F for 12 – 15 minutes.
    • Serve. Serve with maple syrup on the side.

    How Long Are They Good For?

    These muffins will be fine for 3 days in the fridge. Make sure to store them in an airtight container.

    I like to warm them up in the microwave or toaster oven before serving.

    Can You Freeze Them?

    Pancake muffins will be good in the freezer for up to 3 months. Let them cool completely and place them in an freezer-safe airtight container.

    When you are ready to serve them, defrost overnight in the fridge and reheat in the microwave or toaster oven.

    Tips for Making Pancake Muffins

    • To make them in a regular sized muffin, follow all the instructions in the recipe but bake them for 20 – 23 minutes instead. 
    • If you have a favorite homemade pancake recipe, just prepare the batter as usual but right before you cook it, stir in the cooked sausage and maple syrup. 
    • You can freeze these pancake muffins for really easy and fast breakfasts! Either defrost them on the counter overnight or defrost quickly in the microwave. 
    Mini Sausage Pancake Muffins - easy, make-ahead breakfast idea. Only 3 ingredients! Sweet and savory and delicious!

    More Pancake Recipes

    • Chocolate Chip Pancakes
    • Blueberry Sour Cream Pancakes
    • Pecan Oat Pancakes
    • Peanut Butter Banana Pancakes

    More Muffin Recipes

    • Strawberry Chocolate Chip Muffins
    • Blueberry Bran Muffins
    • Pineapple Upside Down Muffins
    • Banana Muffins with Nutella Swirl

    Make sure you subscribe to my email list to get all my new recipes delivered right to your inbox!

    You can also follow me on Instagram, Facebook, or Pinterest for even more! 

    📖 Recipe

    Yield: 24 mini muffins

    Mini Sausage Pancake Muffins

    Mini Sausage Pancake Muffins

    Mini Sausage Pancake Muffins is a delicious 3 ingredient breakfast recipe your family is going to love! Pancake muffins with breakfast sausage and maple syrup inside. They taste like a McDonald's McGriddle!

    Prep Time 15 minutes
    Cook Time 15 minutes
    Total Time 30 minutes

    Ingredients

    • pancake mix and all ingredients it calls for
    • 1 pound maple sausage
    • 2 tablespoons maple syrup, plus more for dipping

    Instructions

    1. Preheat oven to 350F.
    2. Cook maple sausage in a large skillet over medium heat, breaking it up, until no pink remains. Drain well and set aside to cool slightly.
    3. Prepare one batch of pancake mix according to package instructions. Stir in sausage crumbles and maple syrup.
    4. Spray a mini muffin tin with baking spray. Fill each muffin cup about ⅔ full. Bake 12 - 15 minutes or until a toothpick inserted into the center of one comes out clean. Cool slightly on a wire rack before serving. Serve with maple syrup on the side.

    Recommended Products

    As an Amazon Associate and member of other affiliate programs, I earn from qualifying purchases.

    • Mini Muffin Liners
      Mini Muffin Liners
    • Mini Muffin & Cupcake Pan
      Mini Muffin & Cupcake Pan

    Nutrition Information:

    Yield:

    24

    Serving Size:

    1

    Amount Per Serving: Calories: 71Total Fat: 5gSaturated Fat: 2gTrans Fat: 0gUnsaturated Fat: 3gCholesterol: 12mgSodium: 180mgCarbohydrates: 3gFiber: 0gSugar: 2gProtein: 2g

    Did you make this recipe?

    Tag me in your Instagram photo - @fakeginger

    © Amanda Livesay
    Cuisine: American / Category: breakfast
    « Previous Page
    Next Page »

    Primary Sidebar

    Amanda Livesay
    Hi, I'm Amanda! DFW food blogger, mom of boys, and crazy dog lady.
    Read more
    Privacy Policy
    Privacy Policy

    Footer

    ↑ back to top

    About

    • Privacy Policy
    • About Fake Ginger

    Newsletter

    • Sign Up for weekly emails featuring new recipes!

    As an Amazon Associate I earn from qualifying purchases.

    Copyright © 2024 FakeGinger.com