• Skip to primary navigation
  • Skip to main content
  • Skip to primary sidebar
  • Home
  • About
  • Recipes

Fake Ginger

menu icon
go to homepage
  • Recipe Index
  • About
  • Subscribe
    • Facebook
    • Instagram
    • Pinterest
  • subscribe
    search icon
    Homepage link
    • Recipe Index
    • About
    • Subscribe
    • Facebook
    • Instagram
    • Pinterest
  • ×
    Home » Page 20

    Homemade Strawberry Sherbet

    Homemade Strawberry Sherbet

    Jul 17, 2019

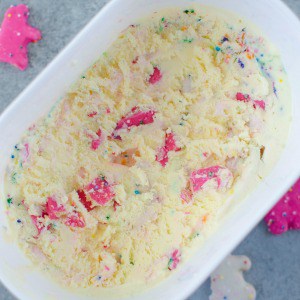
    Homemade Strawberry Sherbet – you will never buy store-bought sherbet after trying this recipe! Sweet, creamy, and the perfect summer treat. So easy and only 4 ingredients! 

    If you love summery strawberry desserts, try Strawberry Pretzel Salad!

    Homemade Strawberry Sherbet - you will never buy store-bought sherbet after trying this recipe! Sweet, creamy, and the perfect summer treat. So easy and only 4 ingredients!

    One of my most popular (and personal favorite!) recipes on my blog is my Homemade Orange Sherbet. It tastes just like those Flintstones push pops that I loved so much as a kid. Plus it is super easy and uses all ingredients you probably already have! 

    I remade it a few weeks ago and we went through it in a day so then the next day I made this strawberry version because it would be a shame to go a night without sherbet in the summer! 

    It’s cold and creamy with just the right amount of sweetness. And only 4 ingredients! You are seriously going to love this one.  

    …

    Read More

    No Bake Million Dollar Pie Bars

    Jul 12, 2019

    No Bake Million Dollar Pie Bars – sweet creamy bars filled with pineapple, maraschino cherries, coconut and pecans. They are so simple and taste like a million bucks! 

    Love cool, creamy desserts in the summer? You have to try Strawberry Pretzel Salad!

    No Bake Million Dollar Pie Bars - sweet creamy bars filled with pineapple, maraschino cherries, coconut and pecans! They are so delicious and so easy!

    My last recipe for #SummerDessertWeek!

    If you haven’t seen my other posts (Circus Animal Cookie Ice Cream and Lemon Bar Cheesecake), it’s a yearly event organized by Angie of Big Bear’s Wife where bloggers post literally hundreds of our favorite summer treat recipes!

    My recipe for today are these Million Dollar Pie Bars which are so good you’d be willing to pay a million dollars for one! It’s my twist on the classic Million Dollar Pie and it’s completely no bake and so delicious.

    No Bake Million Dollar Pie Bars - sweet creamy bars filled with pineapple, maraschino cherries, coconut and pecans! They are so delicious and so easy!

    How To Make Million Dollar Pie Bars

    If you search the internet, you will find so many different Million Dollar Pie recipes. Or sometimes it’s called a Millionare Pie. My mom makes one with mandarin oranges and it was my FAVORITE growing up. 

    The thing that all Million Dollar Pies have in common is that they have a base made with sweetened condensed milk and Cool Whip. 

    But first you make a really easy graham cracker crust and press it into a baking pan. No baking of the crust required!

    The sweetened condensed milk gets mixed with lime juice, crushed pineapple, chopped maraschino cherries, coconut, and pecans. Then the Cool Whip gets folded in really gently because you want it to keep that classic Cool Whip texture we all know and love. 

    The bars get refrigerated until they are set (at least 4 hours but I like to chill them overnight) and then you top them with whipped cream and another cherry before you serve them. 

    No Bake Million Dollar Pie Bars - sweet creamy bars filled with pineapple, maraschino cherries, coconut and pecans! They are so delicious and so easy!

    Can You Use Homemade Whipped Cream?

    I don’t recommend using homemade whipped cream in place of the Cool Whip. It is the texture of the Cool Whip that causes these bars to set up so nicely and hold their bar shape when cut. 

    How long Are Million Dollar Pie Bars Good For?

    You can store Million Dollar Pie Bars in an airtight container for up to 5 to days. Don’t top with whipped cream until you are ready to serve them. 

    I serve them right out of the fridge. If they are left out at room temperature for too long, they may start to melt.

    No Bake Million Dollar Pie Bars - sweet creamy bars filled with pineapple, maraschino cherries, coconut and pecans! They are so delicious and so easy!

    More No Bake Treats

    • No Bake Banana Split Pie
    • No Bake Cookie Butter Pie
    • No Bake Trail Mix Energy Bites
    • No Bake Peanut Butter Pie
    • No Bake Snickers Pie

    Make sure you subscribe to my email list to get all my new recipes delivered right to your inbox!

    You can also follow me on Instagram, Facebook, or Pinterest for even more! 

    📖 Recipe

    Yield: 12 servings

    No Bake Million Dollar Pie Bars

    No Bake Million Dollar Pie Bars

    No Bake Million Dollar Pie Bars - sweet creamy bars filled with pineapple, maraschino cherries, coconut and pecans. They are so simple and taste like a million bucks! 

    Prep Time 20 minutes
    Total Time 20 minutes

    Ingredients

    For the graham cracker crust:

    • 3 cups graham cracker crumbs
    • 2 tablespoon granulated sugar
    • 6 tablespoon butter, melted

    For the bars:

    • 1 14 ounce can sweetened condensed milk
    • 2 tablespoon lime juice
    • 1 20 ounce can crushed pineapples
    • 1 cup maraschino cherries, roughly chopped
    • 1 cup sweetened shredded coconut
    • ½ cup pecans, roughly chopped
    • 1 8 ounce container Cool Whip
    • whipped cream, for serving
    • maraschino cherries, for serving

    Instructions

    1. Line a 9x13-inch baking dish with aluminum foil, with ends of foil extending over the side. 
    2. In a mixing bowl, combined graham crumbs, sugar, and butter until all crumbs are moistened. Press into the bottom of the prepared pan, making sure to go all the way to the edge. 
    3. To make the filled, stir together sweetened condensed milk, crushed pineapple, cherries, coconut, and pecans until combined. Gently fold in Cool Whip, trying not to deflate it too much. 
    4. Spoon the mixture into the graham cracker crust and spread to smooth the top. 
    5. Refrigerate for at least 4 hours (overnight is best) until it is set. Slice and serve with whipped cream and a cherry on top.

    Recommended Products

    As an Amazon Associate and member of other affiliate programs, I earn from qualifying purchases.

    • 9x13-inch pan
      9x13-inch pan

    Nutrition Information:

    Yield:

    12

    Serving Size:

    1

    Amount Per Serving: Calories: 638Total Fat: 22gSaturated Fat: 13gTrans Fat: 0gUnsaturated Fat: 8gCholesterol: 31mgSodium: 228mgCarbohydrates: 109gFiber: 8gSugar: 83gProtein: 8g

    Did you make this recipe?

    Tag me in your Instagram photo - @fakeginger

    © Amanda Livesay
    Cuisine: American / Category: bars

    Summer Drinks:

    • Mermaid Pineapple RumDum from Big Bear’s Wife

    Ice Cream & Frozen Desserts:

    • Cotton Candy Cupcakes from Daily Dish Recipes
    • Drumstick Layered Dessert from Cheese Curd In Paradise
    • Mermaid Milkshakes from Hezzi-D’s Books and Cooks
    • Mojito Popsicles from The Spiffy Cookie
    • Fried Ice Cream Cake from Cookaholic Wife
    • Unicorn Milkshake from For The Love of Food

    Sweet Summertime Cakes and Cupcakes:

    • Mojito Cupcakes from Jen Around the World
    • Pina Colada Cupcakes from The Beard and The Baker
    • Lemonade Cupcakes from The Domestic Kitchen
    • Summer Sangria Cake from A Blender Mom
    • Lemon Meringue Cheesecake Cupcakes from Doughmesstic
    • Sunflower Cupcakes from Home Sweet Homestead
    • Easy Pina Colada Poke Cake from Love and Confections
    • Classic Vanilla Cupcakes + Summer Cupcake Decorating from Books n’ Cooks
    • Almond Cupcakes with Almond Buttercream Frosting from The Food Hunter’s Guide to Cuisine
    • Peach Upside Down Cake from Home Sweet Homestead
    • Jam Breakfast Cake with Streusel from Shockingly Delicious
    • Summer Berry Cupcakes with Lemon Icing from Nancie’s Table

    No Bake Treats:

    • Million Dollar Bar Pies from Fake Ginger
    • Blackberry Cream Cheese Dessert from Eat Move Make
    • No Bake Lemon Cheesecake from Cooking With Carlee

    Baked Desserts:

    • S’mores Cheesecake from Kudos Kitchen by Renee
    • Strawberry Cheesecake Shortbread Bars from The Bitter Side of Sweet
    • Drumstick Babka from Sweet ReciPEAs
    • Raspberry Lemon Brownies from Sweet Beginnings
    • Peach Streusel Crumb Bars from Blogghetti
    • White Tea Peach Panna Cotta from Palatable Pastime

    Candies:

    • Homemade Strawberry Swirl Marshmallow from My Sweet Zepol
    • Blueberry Lemonade Lollipops from Our Good Life

    Lemon Bar Cheesecake

    Jul 10, 2019

    Lemon Bar Cheesecake is two of the best desserts in one! Creamy cheesecake with lemon curd swirls inside and topped with more lemon curd and whipped cream. 

    I also have a Lemon Bars recipe!

    Lemon Bar Cheesecake - two of the best desserts in one! Creamy cheesecake with lemon curd swirls inside and topped with more lemon curd and whipped cream.

    Hiiii guys! I made a real cheesecake with no cracks!

    So this Lemon Bar Cheesecake!

    It combines 2 of my favorite summer desserts: cheesecake and lemon bars! Plus a graham cracker crust which makes every dessert better. It’s so good with the creamy sweet vanilla cheesecake and the tart lemon curd! 

    Cheesecake with a graham cracker crust and lemon curd

    How To Make Graham Cracker Crust

    The cheesecake starts with a graham cracker crust. I buy graham cracker crumbs but if you want to make your own, you’ll need about 12 or 13 graham crackers for the 2 cups of crumb that this recipe requires. Run them through a food processor until they are crumbs. 

    The crumbs get combined with sugar, a pinch of salt, and melted butter. Once everything is combined, you just press it into the springform pan, pressing it up the sides. This cheesecake fills up at entire 9-inch springform – like, to the top – so you want your graham cracker crust to go up pretty high. 

    I like to use a glass with straight sides to press the graham cracker crumbs up the side. It just makes it so much easier. 

    A slice of cheesecake with lemon curd and whipped cream on top with a forkful removed.

    Ingredients

    • Graham cracker crumbs – I buy boxes of graham cracker crumbs but if you want to make your own, you will need 12 – 13 graham crackers.
    • Granulated sugar – this is going in the crust and the cheesecake filling.
    • Salt
    • Butter – this is what holds the graham cracker crust together.
    • Cream cheese – the base of every cheesecake.
    • Eggs
    • Vanilla
    • Lemon curd – you can buy a jar of lemon curd or make your own.
    • Whipped cream – this is optional but makes for really pretty slices of cheesecake.

    How To Make a Graham Cracker Crust

    • Mix ingredients. Combine graham cracker crumbs, sugar, salt, and melted butter until everything is moistened.
    • Transfer to pan. Press into a greased springform pan, going up the sides. Set aside.

    How To Make Lemon Bar Cheesecake

    • Make cheesecake mixture. Beat softened cream cheese with the whisk attachment of a stand mixer until smooth. Add sugar and beat until combined. Add eggs and vanilla. Beat until well combined and smooth. 
    • Layer. Pour half of the cheesecake batter into the graham cracker crust.
    • Add lemon curd. Take ¾ cup of the lemon curd and drop spoonfuls over the cheesecake batter. Use a knife to create swirls of lemon curd.
    • Finish layers. Top with remaining batter. 
    • Bake. Bake at 325F for 45 – 50 minutes or until the cheesecake is set.
    • Cool. Cool to room temperature before refrigerating overnight. 
    • Garnish and serve. Before slicing, spread the remaining ¾ cup of lemon curd over top of cheesecake. Top with whipped cream, if desired, right before serving. 

    How Long is Cheesecake Good?

    You can refrigerate the cheesecake in an airtight container for up to 5 days. 

    I serve mine straight from the refrigerator but you can let it sit out for 5 – 10 minutes to take the chill off if you prefer it that way.

    A slice of cheesecake filled with a lemon curd layer and topped with more lemon curd and a swirl of whipped cream.

    More Cheesecake Recipes

    • Pineapple Cheesecake Bars
    • No Bake Cheesecake
    • S’mores Cheesecake Bars
    • Mini Lemon Cheesecakes
    • Banana Cream Cheesecake

    Make sure you subscribe to my email list to get all my new recipes delivered right to your inbox!

    You can also follow me on Instagram, Facebook, or Pinterest for even more! 

    📖 Recipe

    Yield: 10 servings

    Lemon Bar Cheesecake

    Lemon Bar Cheesecake

    Lemon Bar Cheesecake is two of the best desserts in one! Creamy cheesecake with lemon curd swirls inside and topped with more lemon curd and whipped cream. 

    Prep Time 20 minutes
    Cook Time 50 minutes
    Total Time 1 hour 10 minutes

    Ingredients

    Graham Cracker Crust

    • 2 cups graham cracker crumbs
    • 3 tablespoon granulated sugar
    • pinch of salt
    • 6 tablespoon butter, melted

    Lemon Bar Cheese

    • 4 8-ounce packages cream cheese, softened
    • 1 cup granulated sugar
    • 4 large eggs
    • 2 teaspoon vanilla
    • 1 ½ cups lemon curd, homemade or storebought, divided
    • whipped cream, for serving

    Instructions

    1. Preheat oven to 325F. Lightly spray a 9-inch springform pan with oil. 
    2. To make the crust, combine graham cracker crumbs, sugar, salt, and melted butter until everything is moistened. Press into the prepared pan, going up the sides. (Using a straight sided glass it helpful for pressing it up the sides.) Set aside.
    3. To make the cheesecake, beat softened cream cheese with the whisk attachment of a stand mixer until smooth. Add sugar and beat until combined. Add eggs, one at a time, and vanilla. Beat until well combined and smooth. 
    4. Pour half of the cheesecake batter into the graham cracker crust. Take ¾ cup of the lemon curd and drop spoonfuls over the cheesecake batter. Use a knife to create swirls of lemon curd. Top with remaining batter. 
    5. Bake 45 - 50 minutes or until the cheesecake is set. The very center should still be a bit jiggly but mostly set. Cool to room temperature before refrigerating overnight. 
    6. Before slicing, spread the remaining ¾ cup of lemon curd over top of cheesecake. Top with whipped cream, if desired, right before serving. 

    Recommended Products

    As an Amazon Associate and member of other affiliate programs, I earn from qualifying purchases.

    • Lemon Curd
      Lemon Curd
    • Springform Pan
      Springform Pan

    Nutrition Information:

    Yield:

    10

    Serving Size:

    1

    Amount Per Serving: Calories: 690Total Fat: 48gSaturated Fat: 27gTrans Fat: 0gUnsaturated Fat: 16gCholesterol: 234mgSodium: 526mgCarbohydrates: 58gFiber: 1gSugar: 47gProtein: 11g

    Did you make this recipe?

    Tag me in your Instagram photo - @fakeginger

    © Amanda Livesay
    Cuisine: American / Category: cake

    Circus Animal Cookie Ice Cream

    Jul 08, 2019

    This post and recipe was created for #SummerDessertWeek! I was sent samples by some of the sponsor companies but as always opinions are 100% mine.

    Circus Animal Cookie Ice Cream – homemade vanilla ice cream with frosting swirls, circus animal cookies, and sprinkles. Such a fun treat for summer!

    Circus Animal Cookie Ice Cream - homemade vanilla ice cream with frosting swirls, chopped circus animal cookies, and sprinkles. Such a fun treat for summer!

    Hi guys!

    I’ve got 3 summer treat recipes coming for you this week and I’m so excited about all of them. The lovely and talented Angie of Big Bear’s Wife organizes #SummerDessertWeek every year and I’m always so excited when I have time to participate.

    There will be a list of all the recipes from other bloggers below and a giveaway for some really great prizes right under the recipe. 

    We’re kicking off #SummerDessertWeek with this Circus Animal Cookie Ice Cream! It is my new obsession. It’s a vanilla ice cream with pink frosting swirls, my favorite circus animal cookies, and sprinkles! Literally everything I’ve ever wanted in an ice cream. You have to make it before summer is over!

    …

    Read More

    Pineapple Baked Beans

    Jun 27, 2019

    Pineapple Baked Beans is a favorite side dish for barbecues! Beans with bacon, crushed pineapple, and brown sugar are baked until the sauce is thick and delicious.

    Pineapple Baked Beans - a favorite side dish for BBQs! Beans with bacon, crushed pineapple, and brown sugar are baked until the sauce is thick and delicious.

    Hi guys! Can you believe June is almost over? Summer is flying by and I’m not happy about it. I just want it to stay summer forever!

    Like, I’m already signing kids up for fall sports and getting back to school emails and ugh, I’m not ready to be thinking about fall.

    But we still have a lot of summer left and I have a great barbecue side dish for you today. If you love bacon and pineapple and baked beans, you are going to love these! 

    Pineapple Baked Beans - a favorite side dish for BBQs! Beans with bacon, crushed pineapple, and brown sugar are baked until the sauce is thick and delicious.

    How To Make Pineapple Baked Beans

    These Pineapple Baked Beans start out a lot like my Root Beer Baked Beans – with cans of pork and beans! I just think they are more flavorful than a can of plain ol’ baked beans.

    The pork and beans are mixed with cooked bacon, sautéed onion, and crushed pineapple. You don’t need to drain the pineapple but the more pineapple juice you get in there, the more saucy your beans will be in the end. 

    And the rest is all super simple! Ketchup, mustard, brown sugar, salt, pepper, and hot sauce. Mix it all together and bake for about 45 minutes until the sauce is super thick and delicious!

    It’s a great no fuss side dish and it’s also a pretty cheap side dish so it is perfect if you are feeding a crowd. But you may need to double it because it will go fast! 

    Pineapple Baked Beans - a favorite side dish for BBQs! Beans with bacon, crushed pineapple, and brown sugar are baked until the sauce is thick and delicious.

    What To Serve with Pineapple Baked Beans

    • Hawaiian BBQ Ribs 
    • Bacon Cheeseburger Sliders 
    • Beer and Brown Sugar Kielbasa

    More Barbecue Side Dish Recipes

    • Caesar Deviled Eggs 
    • Cranberry Almond Broccoli Salad 
    • Southwest Orzo Salad with Cilantro Lime Vinaigrette 
    • Pepperoni Pizza Pasta Salad
    • Ramen Noodle Salad

    Make sure you subscribe to my email list to get all my new recipes delivered right to your inbox!

    You can also follow me on Instagram, Facebook, or Pinterest for even more! 

    📖 Recipe

    Yield: 6 servings

    Pineapple Baked Beans

    Pineapple Baked Beans

    Pineapple Baked Beans is a favorite side dish for barbecues! Beans with bacon, crushed pineapple, and brown sugar are baked until the sauce is thick and delicious.

    Prep Time 10 minutes
    Cook Time 45 minutes
    Total Time 55 minutes

    Ingredients

    • 3 bacon slices, diced
    • 1 small white onion, diced
    • 2 15 ounce cans pork and beans
    • ½ cup crushed pineapple
    • ¼ cup ketchup
    • 2 tablespoon brown sugar
    • 1 teaspoon yellow mustard
    • ½ teaspoon salt
    • ¼ teaspoon black pepper
    • ⅛ teaspoon hot sauce

    Instructions

    1. Preheat oven to 400F. Spray a 1-quart baking dish with oil. Set aside. 
    2. Cook bacon in a skillet over medium heat until crisp; remove with a slotted spoon drain on paper towels. Remove all but about 1 tablespoon of the bacon fat from the pan. 
    3. Saute diced onion in bacon fat until softened, about 5 minutes. 
    4. Stir together all ingredients until well combined. Pour into prepared pan. 
    5. Bake, uncovered, for 45 minutes or until sauce has thickened. 

    Nutrition Information:

    Yield:

    6

    Serving Size:

    1

    Amount Per Serving: Calories: 219Total Fat: 4gSaturated Fat: 2gTrans Fat: 0gUnsaturated Fat: 3gCholesterol: 16mgSodium: 979mgCarbohydrates: 39gFiber: 8gSugar: 9gProtein: 10g

    Did you make this recipe?

    Tag me in your Instagram photo - @fakeginger

    © amanda
    Cuisine: American / Category: Sides

    Apple Peanut Butter Dog Ice Cream

    Jun 24, 2019

    Apple Peanut Butter Dog Ice Cream – easy and healthy 4 ingredient homemade dog treat! A great way to keep your pup cool all summer.

    Apple Peanut Butter Dog Ice Cream - easy and healthy 4 ingredient homemade dog treat! A great way to keep your pup cool all summer.

    It’s Clementine’s 8 year adoptiversary, you guys!

    I got her literally days after we moved to Colorado when we were still living in the Army hotel on Fort Carson. We hadn’t even found a house yet but I’d found a dog. She’s been through so much with me and since I don’t know her actual birthday, we’ll just celebrate today!

    (Also, I gave her an at home haircut a few weeks ago because our groomer is back by our old house and that’s 45 minutes away and I am too busy for that right now. Sorry she looks a little homeless.)

    With Apple Peanut Butter Dog Ice Cream! I have a plain Peanut Butter Dog Ice Cream, too, if apple isn’t your thing!

    …

    Read More

    Mini Turkey Meatloaves

    Jun 20, 2019

    Mini Turkey Meatloaves are an easy, healthy, kid-friendly dinner recipe! Turkey meatloaf baked in muffin tins and topped with a tangy ketchup topping. They cook in about 20 minutes so they’re great for a weeknight meal.

    Turkey meatloaf muffins on a white plate with macaroni and cheese and broccoli.

    Is everyone loving summer like I am? I’m so happy that it’s hot outside that I could cry. I’m moving somewhere that has summer weather all year round. Who’s with me?!

    I’m having to drag my children home from the pool hours after dinnertime every day and it just makes me so happy that they’re so happy outside and in the water.

    It’s making cooking dinner a little more difficult though, so today I’ve got a really easy 30 minute dinner idea that your kids won’t even know are good for them. My 7 year old took his first bite and shouted “THESE ARE DELICIOUS!”

    These Mini Turkey Meatloaves are so easy and are perfect when you don’t feel like cooking a whole meatloaf for an hour or more!

    Ingredients for mini turkey meatloaves

    Ingredients

    • Ground turkey – you could use ground chicken if you prefer.
    • Onion – I like to grate the onion for this recipe so that you get the onion flavor without the onion chunks. You could also really finely dice them.
    • Panko breadcrumbs – I like to use panko because regular breadcrumbs creates a tighter, denser meatloaf. I prefer a lighter texture in my meatloaf.
    • Italian seasoning – if you don’t have it, use any mixture of basil, oregano, rosemary, thyme, and marjoram.
    • Worcestershire sauce – adds a deep flavor to the meatloaf.
    • Egg – this is to bind everything together.
    • Ketchup – this is for the glaze on top.
    • Brown sugar – this adds a slight sweetness to the glaze on top.
    • Dijon mustard – this adds a tang to the glaze.
    How to make turkey meatloaf muffins

    How To Make Mini Turkey Meatloaves

    • Prepare. Spray 9 cups of a muffin tin with oil and set aside. 
    • Combine. Combine ground turkey, onion, panko breadcrumbs, Italian seasoning, worcestershire sauce, salt, black pepper, and egg.
    • Transfer. Use a ⅓ cup measure to scoop the meat mixture out and put in the prepared muffin tin. Repeat with all of the meat mixture. 
    • Make glaze. Stir together ketchup, brown sugar, and dijon mustard.
    • Glaze. Brush or spoon on top of each meatloaf muffin. 
    • Bake. Bake at 375F for 20 – 25 minutes, or until a meat thermometer reads 165F.

    How Long Are They Good For?

    Mini turkey meatloaves will be fine for up to 3 days. Make sure to store them in an airtight container and store them in the fridge.

    The best way to reheat them is in the microwave.

    Can You Freeze Them?

    You can freeze these mini meatloaves for up to 3 months. I would wrap them individually in plastic wrap and then place them in a freezer ziploc bag.

    When you are ready to serve them, let them defrost overnight and then reheat in the microwave or oven.

    Turkey meatloaf muffins on a white plate with macaroni and cheese and broccoli in separate bowls

    More Ground Turkey Recipes

    • Turkey Bolognese
    • Turkey Goulash
    • Turkey Teriyaki Meatballs
    • Turkey Shepherd’s Pie

    Make sure you subscribe to my email list to get all my new recipes delivered right to your inbox!

    You can also follow me on Instagram, Facebook, or Pinterest for even more! 

    📖 Recipe

    Yield: 9 muffins

    Mini Turkey Meatloaves

    Mini Turkey Meatloaves

    Mini Turkey Meatloaves are an easy, healthy, kid-friendly dinner recipe! Turkey meatloaf baked in muffin tins and topped with a tangy ketchup topping. They cook in about 20 minutes so they're great for a weeknight meal.

    Prep Time 10 minutes
    Cook Time 25 minutes
    Total Time 35 minutes

    Ingredients

    • 1 pound ground turkey
    • ½ small onion, grated (or finely diced)
    • ⅓ cup panko breadcrumbs
    • 1 teaspoon Italian seasoning
    • 1 teaspoon worcestershire sauce
    • ½ teaspoon salt
    • ¼ teaspoon black pepper
    • 1 egg
    • ⅓ cup ketchup
    • 2 teaspoon brown sugar
    • ½ teaspoon dijon mustard

    Instructions

    1. Preheat oven to 375F. Spray 9 cups of a muffin tin with oil and set aside. 
    2. In a large mixing bowl, combine ground turkey, onion, panko breadcrumbs, Italian seasoning, worcestershire sauce, salt, black pepper, and egg. Mix thoroughly but make sure not to overwork the meat. 
    3. Once fully combined, use a ⅓ cup measure to scoop the meat mixture out and put in the prepared muffin tin. Repeat with all of the meat mixture. 
    4. In a separate small bowl, stir together ketchup, brown sugar, and dijon mustard. Brush or spoon on top of each meatloaf muffin. 
    5. Bake 20 - 25 minutes, or until a meat thermometer reads 165F. Serve hot.

    Recommended Products

    As an Amazon Associate and member of other affiliate programs, I earn from qualifying purchases.

    • Mixing bowls
      Mixing bowls
    • Anolon Muffin Tin
      Anolon Muffin Tin

    Nutrition Information:

    Yield:

    9

    Serving Size:

    1

    Amount Per Serving: Calories: 168Total Fat: 10gSaturated Fat: 3gTrans Fat: 0gUnsaturated Fat: 6gCholesterol: 74mgSodium: 303mgCarbohydrates: 7gFiber: 0gSugar: 3gProtein: 14g

    Did you make this recipe?

    Tag me in your Instagram photo - @fakeginger

    © Amanda Livesay
    Cuisine: American / Category: chicken

    Grilled Tequila Steak Pizza

    Jun 19, 2019

    Grilled Tequila Steak Pizza – steak marinated in tequila, lime juice, and chipotle peppers and grilled to perfection. Layered on a grilled flour tortilla with cheese and a delicious corn and tomato topping. Easy and quick enough for a weeknight dinner!

    Grilled Tequila Steak Pizza - steak marinated in tequila, lime juice, and chipotle peppers and grilled to perfection. Layered on a grilled flour tortilla with cheese and a delicious corn and tomato topping. Easy and quick enough for a weeknight dinner!

    I’ve never really called myself a Texan. I mean, I just moved here 4 years ago, I don’t own boots, and I’m definitely not a Cowboys fan.

    But a couple weeks ago I recognized someone’s truck because of the cowboy hat on the dash.

    Pretty sure that was the moment I became a Texan.

    And one thing I’ve learned over the last 4 years is that Texans love beef.

    …

    Read More

    Hawaiian BBQ Ribs – Oven Baked Ribs

    Jun 17, 2019

    Hawaiian BBQ Ribs – oven baked ribs with a sweet and spicy Hawaiian-inspired sauce made with hoisin sauce, soy sauce, pineapple juice, fresh ginger, and sriracha. They are so tender and delicious!

    Hawaiian BBQ Ribs - oven baked ribs with a sweet and spicy Hawaiian-inspired sauce made with hoisin sauce, soy sauce, pineapple juice, fresh ginger, and sriracha. They are so tender and delicious!

    Hi guys, how was your weekend?

    We went to the lake, of course, and now I am quite sunburnt but it was worth it. And then I made ribs! And that’s always exciting. 

    I’ve realized just how much I love ribs recently. I never loved ribs covered in thick globs of barbecue sauce and now that I’m making my own and saucing them how I want, I’m really loving them. The taste of fresh pork alone is so delicious – it doesn’t always need all that gloopy barbecue sauce. 

    Hawaiian BBQ Ribs - oven baked ribs with a sweet and spicy Hawaiian-inspired sauce made with hoisin sauce, soy sauce, pineapple juice, fresh ginger, and sriracha. They are so tender and delicious!

    Okay, yeah, I know, I called these Hawaiian BBQ Ribs but it’s not your typical barbecue sauce! The pork is still the star here. 

    I know normally when you think ribs, you think outdoor grilling. Especially this time of year.

    But I’m still not 100% confident in my grilling ability so I’m a big fan of doing ribs in the oven. It’s such a simple way to prepare ribs and they turn out perfect every single time. Seriously foolproof.

    Hawaiian BBQ Ribs - oven baked ribs with a sweet and spicy Hawaiian-inspired sauce made with hoisin sauce, soy sauce, pineapple juice, fresh ginger, and sriracha. They are so tender and delicious!

    How To Make Hawaiian BBQ Ribs in the Oven

    These are so, so, so simple. If you have been intimidated by ribs, try making them in the oven. 

    The ribs are cooked at a low temperature for a long time to make sure they stay super tender and delicious. So you are going to preheat the oven to 275℉ and then put your ribs in a rimmed baking dish. I used a 9×13-inch casserole dish and had to cut my rack of ribs into 2 sections to make it fit.

    Then you make the sauce which just involves whisking all of the ingredients together. Nothing fussy. Half of the sauce gets poured over the ribs and then they go in the oven for about 90 minutes, depending on how well done you want them.

    Hawaiian BBQ Ribs

    While they are in the oven, you’re going to put the rest of the sauce on low heat on the stove and cook it until it’s slightly thickened.

    When the ribs have reached the desired doneness, the rest of the sauce gets brushed on the ribs and then they go under the broiler just for another minute or 2, until the sauce caramelizes a bit.

    Then you can slice them and sprinkle them with sliced green onions and sesame seeds!

    Hawaiian BBQ Ribs - oven baked ribs with a sweet and spicy Hawaiian-inspired sauce made with hoisin sauce, soy sauce, pineapple juice, fresh ginger, and sriracha. They are so tender and delicious!

    I love these ribs. I’ve been really into hoisin sauce lately (weird, I know) so I’m obsessed with the sauce. It is sweet and spicy but it doesn’t overpower the delicious taste of the pork. 

    Hawaiian BBQ Ribs - oven baked ribs with a sweet and spicy Hawaiian-inspired sauce made with hoisin sauce, soy sauce, pineapple juice, fresh ginger, and sriracha. They are so tender and delicious!

    What To Serve with Hawaiian BBQ Ribs

    • Cole Slaw Pasta Salad
    • Pineapple Baked Beans
    • Cranberry Almond Broccoli Salad
    • Tropical Marshmallow Fruit Salad
    • 7Up Biscuits

    More Hawaiian Inspired Recipes

    • Slow Cooker Hawaiian Meatballs
    • Slow Cooker Huli Huli Chicken
    • Hawaiian Sloppy Joes
    • Sweet and Sour Pork

    Make sure you subscribe to my email list to get all my new recipes delivered right to your inbox!

    You can also follow me on Instagram, Facebook, or Pinterest for even more! 

    📖 Recipe

    Yield: 4 servings

    Hawaiian BBQ Ribs

    Hawaiian BBQ Ribs
    Prep Time 10 minutes
    Cook Time 1 hour 30 minutes
    Total Time 1 hour 40 minutes

    Ingredients

    • 1 rack baby back pork ribs
    • ½ cup soy sauce
    • ¼ cup hoisin sauce
    • ¼ cup pineapple juice
    • 2 cloves garlic, minced
    • 1 teaspoon fresh ginger, grated
    • 1 - 2 teaspoon sriracha sauce
    • green onions and sesame seeds, for serving

    Instructions

    1. Preheat oven to 275F. 
    2. Cut ribs into 2 - 3 sections and place in a rimmed baking dish. 
    3. In a small mixing bowl, whisk together soy sauce, hoisin sauce, pineapple juice, garlic, ginger, and sriracha. Drizzle half of the sauce over the ribs, reserving the rest. 
    4. Bake ribs in preheated oven for 45 minutes. Cover with aluminum foil and bake until ribs reach 145F in the meatiest part, about another 45 minutes. 
    5. While the ribs are cooking, put the reserved sauce in a small saucepan over low heat and cook until it thickens slightly, about 5 minutes. Set aside. 
    6. Once the ribs reach 145F, turn the oven off and the broiler on. Brush the ribs with the thickened sauce and place until broiler for just a minute or 2, until the sauce gets slightly caramelized. 
    7. Let rest for 3 minutes. Cut ribs as desired and sprinkle with sliced green onions and sesame seeds. 

    Nutrition Information:

    Yield:

    4

    Serving Size:

    1

    Amount Per Serving: Calories: 217Total Fat: 11gSaturated Fat: 3gTrans Fat: 0gUnsaturated Fat: 7gCholesterol: 33mgSodium: 2174mgCarbohydrates: 16gFiber: 2gSugar: 7gProtein: 14g

    Did you make this recipe?

    Tag me in your Instagram photo - @fakeginger

    © Amanda Livesay

    Melon Ball Sangria

    Jun 14, 2019

    Melon Ball Sangria – the perfect summer cocktail! Watermelon, honeydew, and cantaloupe balls with fresh mint, white wine, vodka, and ginger ale. So refreshing, so simple, and great for a party!

    Melon Ball Sangria - the perfect summer cocktail! Watermelon, honeydew, and cantaloupe balls with fresh mint, white wine, vodka, and ginger ale. So refreshing, so simple, and great for a party!

    Hi guys, I haven’t shared a cocktail in forever! (Seriously, it’s been over a year! Who am I?!)

    I bought these melon balls months ago with the intention of making this sangria with them and then almost immediately lost them in my freezer. But my children have eaten through our stash of Hot Pockets and the melon balls have been found! 

    I just love sangria, especially if I’m making drinks for more than a couple people. It’s a great way to stretch a bottle of wine and also not be making drinks one at a time all night long. 

    This Melon Ball Sangria is one of my favorites for summer. You have to try it! 

    Melon Ball Sangria - the perfect summer cocktail! Watermelon, honeydew, and cantaloupe balls with fresh mint, white wine, vodka, and ginger ale. So refreshing, so simple, and great for a party!

    How To Make Melon Ball Sangria

    This sangria recipe is so simple! Especially if you live near an HEB because I found bags of mixed melon balls (in the picture below!) in the frozen fruit section and I’m sure other grocery stores have them but HEB was the first place I saw them. They have already balled watermelon, honeydew, and cantaloupe.

    But if you can’t find frozen melon balls at your grocery store, you can buy fresh watermelon, honeydew, and cantaloupe and use a melon baller to make them yourself. Still easy!

    The melon balls go into a pitcher and then you add an entire bottle of dry white wine (I like to use a Sauvignon Blanc) and some vodka. And then a handful of fresh mint! Let that sit in the refrigerator until you are ready to serve it and then top it with ginger ale right before your party starts! 

    This sangria is so delicious and I’m not even a huge melon person, but I love this sangria. Sweet but not super sweet and the fresh mint and the bubbles from the ginger ale make it feel really light and refreshing. 

    Melon Ball Sangria - the perfect summer cocktail! Watermelon, honeydew, and cantaloupe balls with fresh mint, white wine, vodka, and ginger ale. So refreshing, so simple, and great for a party!

    Can Sangria Be Made Ahead?

    Yes! You actually want to make sangria ahead of time so that the fruit can soak in the wine and really flavor it. The longer is sits, the better!

    The recipe says to make it at least an hour ahead of time but you can do it up to overnight. The melon flavor will get more intense the longer it sits. 

    Just put all of the ingredients except the ginger ale in a pitcher and pop it in the refrigerator. Don’t add the ginger ale until you are ready to serve so that it’s still bubbly and refreshing. 

    Can I Use Diet Soda in Sangria?

    Yes! I definitely did!

    I try to keep my cocktails as low calorie as possible so I did use a diet ginger ale. You could also diet Sprite or diet 7Up and get pretty much the same effect. 

    Or if you don’t want to use a soda at all, you can use a lemon or lime flavored sparkling water. The sangria just won’t be as sweet as it is with the soda. 

    Melon Ball Sangria - the perfect summer cocktail! Watermelon, honeydew, and cantaloupe balls with fresh mint, white wine, vodka, and ginger ale. So refreshing, so simple, and great for a party!

    More Sangria Recipes

    • Pineapple Lemonade Sangria 
    • Peach Cherry Sangria
    • Very Berry Sangria 
    • Pear Pomegranate Sangria
    • Tropical Sangria

    Make sure you subscribe to my email list to get all my new recipes delivered right to your inbox!

    You can also follow me on Instagram, Facebook, or Pinterest for even more! 

    Melon Ball Sangria - the perfect summer cocktail! Watermelon, honeydew, and cantaloupe balls with fresh mint, white wine, vodka, and ginger ale. So refreshing, so simple, and great for a party!

    📖 Recipe

    Yield: 8 servings

    Melon Ball Sangria

    Melon Ball Sangria

    Lemon Chicken and Rice Soup – quick cooking chicken soup with rice, vegetables, and a light lemony broth. It’s my favorite winter soup and great for when you’re feeling a little under the weather!

    Prep Time 5 minutes
    Total Time 5 minutes

    Ingredients

    • 3 cups mixed melon balls (watermelon, honeydew, cantaloupe)
    • ½ cup fresh mint leaves
    • 1 750 ml bottle Sauvignon Blanc (or other dry white wine)
    • ½ cup vodka
    • 4 cups ginger ale

    Instructions

    1. In a large pitcher, combine melon balls, mint leaves, wine, and vodka. Refrigerate for at least 1 hour (up to overnight). 
    2. Right before serving, add ginger ale. Serve over ice, if desired. 

    Recommended Products

    As an Amazon Associate and member of other affiliate programs, I earn from qualifying purchases.

    • OXO Good Grips Double-Sided Melon Baller
      OXO Good Grips Double-Sided Melon Baller

    Nutrition Information:

    Yield:

    8

    Serving Size:

    1

    Amount Per Serving: Calories: 171Total Fat: 0gSaturated Fat: 0gTrans Fat: 0gUnsaturated Fat: 0gCholesterol: 0mgSodium: 19mgCarbohydrates: 18gFiber: 1gSugar: 16gProtein: 1g

    Did you make this recipe?

    Tag me in your Instagram photo - @fakeginger

    © Amanda Livesay
    Category: drink

    Sloppy Joe Sliders

    Jun 11, 2019

    Sloppy Joe Sliders are baked sliders with sloppy joe meat and cheese on Hawaiian rolls and covered in the most delicious glaze. They are great as a weeknight dinner or a party snack!

    If you love Hawaiian roll sliders like these, you’re going to love my Bacon Cheeseburger Sliders and Chicken Parmesan Sliders!

    Sloppy Joe Sliders are baked sliders with sloppy joe meat and cheese on Hawaiian rolls and covered in the most delicious glaze. 

    Hi guys! 

    We had our first lake weekend this past weekend. I can’t believe it took us almost 2 weeks into June but it’s been weirdly cold and it’s rainy and cloudy and just not lake weather. But we finally got out there and it was great, as always. 

    We did had to leave early after one of my children sliced their leg open and in an absolute panic, I couldn’t remember the name of my insurance company to figure out which urgent care near the lake accepted it. So I drove alllll the way back to the one by our house because I know they take it (thanks to a head injury a few months ago) and by the time we got there, it had basically stopped bleeding. But ugh, it was gross. 

    You guys, I am not cut out to have boys. When I tell you I panicked, I mean I panicked hard. 

    Anyway. I have these Sloppy Joe Sliders for you today because who doesn’t love a Hawaiian roll slider?! I love that they can be an easy weeknight meal or you can totally serve them at a party! 

    Sloppy Joe Sliders - an easy way to serve sloppy joes to a crowd! Sloppy joe meat and cheese on Hawaiian rolls and covered in the most delicious glaze. Great for a weeknight dinner, a party, or tailgating!

    Ingredients

    • Hawaiian rolls – you are going to slice these down the center without separating the rolls.
    • Cheddar cheese
    • Olive oil
    • Ground beef – you can use ground turkey or chicken if you don’t eat beef.
    • White onion
    • Garlic
    • Ketchup
    • Brown sugar
    • Worcestershire sauce
    • Chili powder
    • Butter – this is for the saue that is going on top of the the sliders before they bake.
    • Dijon mustard – also for the sauce that gets poured over the sliders before they go in the oven.
    • Sesame seeds – if you don’t like sesame seeds on your buns, you can leave these off.

    Instructions

    • Prep. Without separating the rolls, cut the entire loaf horizontally and place the bottoms in a 9×13-inch pan.
    • Add cheese. Sprinkle with half of the cheese.
    • Make sloppy joe meat. Cook ground beef and diced onion. Add garlic, ketchup, brown sugar, worcestershire sauce, chili powder, and salt and pepper. Let cook until thickened, about 4 – 5 minutes. 
    • Assemble. Spoon the meat mixture over the bottom halves of the rolls. Sprinkle with the remaining cheese. 
    • Make glaze. Stir together butter, brown sugar, worcestershire sauce, dijon mustard, and sesame seeds. Pour glaze over the sliders.
    • Bake. Bake at 350F for about 20 minutes.
    Sloppy Joe Sliders - an easy way to serve sloppy joes to a crowd! Sloppy joe meat and cheese on Hawaiian rolls and covered in the most delicious glaze. Great for a weeknight dinner, a party, or tailgating!

    Can You Make Hawaiian Roll Sliders Ahead of Time?

    If you need to make these Sloppy Joe Sliders ahead of time, I would make ONLY the meat mixture ahead of time and store it in the refrigerator until you are ready to serve the sliders. The Hawaiian buns will get too wet and fall apart if you try to assemble the sandwiches ahead of time.

    I also don’t recommend baking them before you plan on serving them. They need to be served fresh from the oven to be their tastiest and not soggy.

    Can You Freeze Hawaiian Roll Sliders?

    I don’t recommend trying to freeze these. I think the buns would end up too soggy and start to fall apart when you try to thaw them.

    You can absolutely make the meat mixture ahead of time and freeze it. Just thaw it, warm it back up (maybe with a little extra water), and assemble the sliders right before you are ready to serve.

    Overhead shot of sloppy joe sliders

    More Sloppy Joe Recipes

    • Sloppy Joe Tater Tot Casserole 
    • Hawaiian Sloppy Joes 
    • Sloppy Joe Fries

    Make sure you subscribe to my email list to get all my new recipes delivered right to your inbox!

    You can also follow me on Instagram, Facebook, or Pinterest for even more! 

    📖 Recipe

    Yield: 12 sliders

    Sloppy Joe Sliders

    Sloppy Joe Sliders

    Sloppy Joe Sliders are baked sliders with sloppy joe meat and cheese on Hawaiian rolls and covered in the most delicious glaze. 

    Prep Time 15 minutes
    Cook Time 20 minutes
    Total Time 35 minutes

    Ingredients

    • 1 12-count package Hawaiian rolls
    • 2 cups shredded cheddar cheese
    • 1 tablespoon olive oil
    • 1 pound lean ground beef
    • 1 small white onion, diced
    • 2 cloves garlic, minced
    • ¾ cup ketchup
    • 1 tablespoon brown sugar
    • 2 teaspoon worcestershire sauce
    • 1 teaspoon chili powder
    • salt and pepper, to taste
    • 1 cup water

    For the Glaze

    • ¼ cup butter
    • 1 tablespoon brown sugar
    • 1 teaspoon worcestershire sauce
    • 1 teaspoon dijon mustard
    • 1 teaspoon sesame seeds

    Instructions

    1. Preheat oven to 350F. 
    2. Without separating the rolls, cut the entire loaf horizontally and place the bottoms in a 9x13-inch pan. Sprinkle with half of the cheese. Set aside. 
    3. To make the sloppy joe meat, heat olive oil over medium-high heat. Cook ground beef and diced onion until the beef is cooked through and the onion has softened. Drain off excess fat. Add garlic and cook until fragrant, just 30 seconds. 
    4. While the beef is cooking, stir together ketchup, brown sugar, worcestershire sauce, chili powder, and salt and pepper. 
    5. Once the fat has been drained from the meat, lower the heat and add ketchup mixture and water. Let cook until thickened and sloppy joe consistency, 4 - 5 minutes. 
    6. Spoon the meat mixture over the bottom halves of the rolls. Sprinkle with the remaining cheese. 
    7. To make the glaze, melt butter completely. Stir in brown sugar, worcestershire sauce, dijon mustard, and sesame seeds. Pour over the sliders, making sure each sliders gets coated. 
    8. Bake, uncovered, for 18 - 22 minutes or until the sliders are golden brown. 

    Recommended Products

    As an Amazon Associate and member of other affiliate programs, I earn from qualifying purchases.

    • Pastry Brush
      Pastry Brush
    • 9x13-inch pan
      9x13-inch pan

    Did you make this recipe?

    Tag me in your Instagram photo - @fakeginger

    © Amanda Livesay
    Cuisine: American / Category: sandwich

    Key Lime Cheesecake Bars

    Jun 06, 2019

     Key Lime Cheesecake Bars – creamy cheesecake bars filled with key lime juice and fresh lime zest on a graham cracker crust. Top them with whipped cream and a lime slice for the perfect summer dessert. 

    Key Lime Cheesecake Bars - creamy cheesecake bars filled with key lime juice and fresh lime zest on a graham cracker crust.

    Hi guys! 

    I am having a week and it’s only Thursday. My week started with having to buy a new tire because my Jeep has been flashing “low tire” for literally ever and I was worried I wouldn’t pass inspection with it flashing. And I was already 3 days late on renewing my car registration because hashtag single mom. 

    My 7 year old went to the gym with me first thing in the morning (he likes the snacks they have) and I was all excited to get the tire done right after and get inspected and get the Jeep legal again. I was gonna get it all done before 9 am (!!) and have a super productive start to the week!!!

    Did not go as planned. 

    We walked around [insert big box store that has tires] for an hour after being quoted a price for the tire and told they’d have it done right away. And then they call my name and tell me that… they don’t have the tire size I need. 

    Oh. But…wait. I walked around the toy aisles FOR AN HOUR with a 7 year old boy and there’s no tire?!

    Anyway. I got a tire. It took most the day, cost twice as much as the original store had quoted me, and required a trip to a subpar Mexican restaurant because it was the only thing within walking distance of the tire shop.  

    That was my Monday. It’s fine. At least I have cheesecake bars. 

    How to Make Key Lime Cheesecake Bars

    I just love cheescake bars so much. I say it every time I share a recipe for them but, omg, they are a million times easier than making an actual cheesecake and they never, ever crack on me. I haven’t made a real cheesecake in at least 5 years because they crack every single time for me. 

    These Key Lime Cheesecake Bars start with a graham cracker crust which is just graham cracker crumbs, sugar, and melted butter mixed together and pressed into the bottom of a baking dish. 

    The cheesecake batter is made with cream cheese, lime zest, key lime juice, sweetened condensed milk, and an egg. Everything gets beaten together until it’s perfectly smooth. Then the cheesecake batter gets poured over the graham cracker crust and it gets baked for 25 – 30 minutes, or until it’s just barely jiggly in the center. 

    Refrigerate the key lime cheesecake bars until they are completely set and then you can slice them into bars and top them with whipped cream and a lime slice. Thes would be really cute with maraschino cherries on top, too. 

    Can I Use Bottled Key Lime Juice?

    I don’t (and I cannot stress this enough) recommend squeezing your own key lime juice by hand.

    Made that mistake once and I swear it took 17 pounds of key limes to get enough for my key lime pie ice cream recipe. The bottled stuff is actually really good and I have no problem using it in all my key lime recipes now. 

    Tips for Making Key Lime Cheesecake Bars

    • If you forget to pull your cream cheese out of the refrigerator ahead of time, you can soften it in the microwave on low for a few seconds. I usually do 20 – 30 seconds and it gets it soft enough without heating it up too much. 
    • Cheesecake bars are a pain to cut while they are in the pan so I always line the pan with aluminum foil (you could also use parchment paper) with a little bit hanging over the edge of the pan. That way you can use that to pull the entire pan out before you attempt cutting them into bars. 
    • If you are making your own graham cracker crumbs, you will probably need about 20 graham crackers to get the amount needed for this recipe. Just pulse them in a food processor until they are crumbs. 
    • I refrigerate cheesecake bars overnight because they tend to slice prettier when they are really well set. But at least give them a couple hours in the refrigerator before removing from the pan and slicing. 
    • To store the key lime cheesecake bars, keep them in an airtight container in the refrigerator for up to 5 days. Don’t top them with the whipped cream until ready to serve. 
    Key Lime Cheesecake Bars - creamy cheesecake bars filled with key lime juice and fresh lime zest on a graham cracker crust.

    More Cheesecake Recipes

    • Pineapple Cheesecake Bars
    • S’mores Cheesecake Bars
    • Banana Cream Cheesecake
    • Lemon Bar Cheesecake
    • Mocha-Chip Cheesecake Bars

    Make sure you subscribe to my email list to get all my new recipes delivered right to your inbox!

    You can also follow me on Instagram, Facebook, or Pinterest for even more! 

    📖 Recipe

    Yield: 12 servings

    Key Lime Pie Cheesecake Bars

    Key Lime Pie Cheesecake Bars

    Prep Time 20 minutes
    Cook Time 25 minutes
    Total Time 45 minutes

    Ingredients

    • 3 cups graham cracker crumbs
    • 2 tablespoon granulated sugar
    • 6 tablespoon butter, melted
    • 4 8 ounce packages cream cheese, softened
    • 2 teaspoon lime zest
    • dash salt
    • 1 14 ounce can sweetened condensed milk
    • ½ cup key lime juice
    • 1 egg
    • whipped cream and lime slices, for serving

    Instructions

    1. Preheat oven to 350F. Line a 9x13-inch baking dish with aluminum foil, with ends of foil extending over the side. 
    2. In a mixing bowl, combine graham cracker crumbs, sugar, and butter until all crumbs are moistened. Press into the bottom of the prepared pan. 
    3. In a stand mixer fitted with the whisk attachment, beat cream cheese until smooth. Add lime zest, salt, sweetened condensed milk, key lime juice, and egg. Beat until well combined. 
    4. Pour cheesecake over the crust, using a spatula to smooth the top. 
    5. Bake 25 - 30 minutes, until the cheesecake is set. It will jiggle just a little bit. Let cool on a wire rack until room temp. Refrigerate several hours before trying to cut. 
    6. Serve with whipped cream and lime slices. 

    Recommended Products

    As an Amazon Associate and member of other affiliate programs, I earn from qualifying purchases.

    • Electric Mixer
      Electric Mixer
    • Key Lime Juice
      Key Lime Juice
    • 9x13-inch pan
      9x13-inch pan

    Nutrition Information:

    Yield:

    12

    Serving Size:

    1

    Amount Per Serving: Calories: 569Total Fat: 38gSaturated Fat: 22gTrans Fat: 0gUnsaturated Fat: 13gCholesterol: 123mgSodium: 455mgCarbohydrates: 48gFiber: 1gSugar: 35gProtein: 10g

    Did you make this recipe?

    Tag me in your Instagram photo - @fakeginger

    © Amanda Livesay
    Category: bars

    Pepperoni Pizza Pasta Salad

    Jun 03, 2019

    Pepperoni Pizza Pasta Salad is the perfect side dish for all your summer barbecues! Pasta tossed with mini pepperoni, black olives, green bell pepper, tomatoes, mozzarella cheese, and Italian dressing. 

    If you are looking for more pasta salads to serve at your next barbecue, how about Broccoli Grape Pasta Salad, Cole Slaw Pasta Salad, or Caesar Pasta Salad.

    Pepperoni Pizza Pasta Salad - the perfect side dish for all your summer barbecues! Pasta tossed with mini pepperoni, black olives, green bell pepper, tomatoes, mozzarella cheese, and Italian dressing.

    This is our first full week of summer break and after a crazy last month of soccer, 7-on-7, exams, giant projects, and school events that required me to put actual clothes on… I’m so happy it’s summer. 

    My children have finally listened to my request to make friends with someone with a pool so we’ve been there every day for the last week. We’ve ordered pizza more times than I want to admit. I don’t remember the last time I got in my car.

    I love summer. 

    I also love this Pepperoni Pizza Pasta Salad that I’m sharing today! It’s everything you love about pepperoni pizza in a cold pasta salad and it’s perfect for all your summer barbecues or parties or just making and keeping in the fridge on days when you don’t feel like standing over a stove. 

    Pepperoni Pizza Pasta Salad - the perfect side dish for all your summer barbecues! Pasta tossed with mini pepperoni, black olives, green bell pepper, tomatoes, mozzarella cheese, and Italian dressing.

    Ingredients

    • Pasta – I used farfalle but you can also use penne, wagon wheels, or whatever small pasta shape you like
    • Mini pepperoni slices – if you can’t find mini sliders, cut the big pepperoni slices into quarters
    • Sliced black olives
    • Grape tomatoes – you can use any tomato but if you use a big one, I would squeeze a lot of the juice and seeds out before chopping
    • Green bell pepper – use any color bell pepper that you enjoy, the green just looks really pretty in the salad
    • Mozzarella cheese
    • Italian dressing – use your favorite store-bought or homemade recipe. I used a bottled dressing.
    • Black pepper

    Instructions

    • Cook pasta. Cook pasta according to package instructions. Drain and rinse with cold water to cool down. 
    • Combine. Combine cooled pasta, pepperoni, black olives, tomatoes, green bell pepper, mozzarella cheese, and Italian dressing.
    • Chill. Refrigerate until ready to serve. 
    • Top. Sprinkle with fresh cracked black pepper. 
    Pepperoni Pizza Pasta Salad - the perfect side dish for all your summer barbecues! Pasta tossed with mini pepperoni, black olives, green bell pepper, tomatoes, mozzarella cheese, and Italian dressing.

    Can Pasta Salad Be Made Ahead?

    Yes! It’s actually best if you can make it a couple hours ahead so that the pasta has time to cool completely! So if you have a lot of party prep to do, this can definitely be made ahead of time.

    Just store it in the refrigerator until you are ready to serve. And make sure to keep it in an airtight container.

    How Long Will Pasta Salad Last?

    Since this pasta salad doesn’t have a mayo-based dressing, it will be fine in the fridge for 3 – 4 days. But because it does have the fresh tomatoes and green bell pepper in it, I think it tastes best within the first couple of days. 

    Be sure to store it in an airtight container to keep it fresh for as long as possible.

    Pepperoni Pizza Pasta Salad - the perfect side dish for all your summer barbecues! Pasta tossed with mini pepperoni, black olives, green bell pepper, tomatoes, mozzarella cheese, and Italian dressing.

    What To Serve With Pasta Salad

    • Bacon Cheeseburger Sliders
    • Chicken Parmesan Sliders
    • Hawaiian BBQ Ribs
    • Sloppy Joe Sliders
    • Pimento Cheese Burgers

    Make sure you subscribe to my email list to get all my new recipes delivered right to your inbox!

    You can also follow me on Instagram, Facebook, or Pinterest for even more! 

    📖 Recipe

    Yield: 8 servings

    Pepperoni Pizza Pasta Salad

    Pepperoni Pizza Pasta Salad

    Pepperoni Pizza Pasta Salad is the perfect side dish for all your summer barbecues! Pasta tossed with mini pepperoni, black olives, green bell pepper, tomatoes, mozzarella cheese, and Italian dressing. 

    Prep Time 10 minutes
    Cook Time 10 minutes
    Total Time 20 minutes

    Ingredients

    • 8 oz small pasta, such as bowties
    • 5 oz mini pepperoni slices
    • ½ cup can sliced black olives
    • 1 cup grape tomatos, halved
    • 1 cup green bell pepper, diced
    • 4 oz mozzarella cheese, diced
    • ½ cup Italian dressing
    • fresh cracked black pepper, for serving

    Instructions

    1. Cook pasta according to package instructions. Drain and rinse with cold water to cool down. 
    2. Once the pasta is cool, transfer it to a large mixing bowl. Add pepperoni, black olives, tomatoes, green bell pepper, mozzarella cheese, and Italian dressing. Toss to combine. Refrigerate until ready to serve. 
    3. Before serving, give it a good toss to make sure the dressing is coating everything. Sprinkle with fresh cracked black pepper. 

    Recommended Products

    As an Amazon Associate and member of other affiliate programs, I earn from qualifying purchases.

    • Mixing Bowls
      Mixing Bowls
    • Clip On Pasta Strainer
      Clip On Pasta Strainer

    Nutrition Information:

    Yield:

    8

    Serving Size:

    1

    Amount Per Serving: Calories: 230Total Fat: 16gSaturated Fat: 6gTrans Fat: 0gUnsaturated Fat: 9gCholesterol: 28mgSodium: 577mgCarbohydrates: 14gFiber: 1gSugar: 3gProtein: 9g

    Did you make this recipe?

    Tag me in your Instagram photo - @fakeginger

    © Amanda Livesay
    Cuisine: American / Category: Sides

    Sweet and Salty Pudding Cookies

    May 16, 2019

    Sweet and Salty Pudding Cookies are soft cookies filled with coconut, pretzels, and M&Ms! The pudding mix keeps them soft for days. 

    We also have Peanut Butter Pretzel Brownies if you can’t get enough sweet and salty treats!

    Sweet and Salty Pudding Cookies - soft cookies filled with coconut, pretzels, and M&Ms! The pudding mix keeps them soft for days.

    I am so, so, so ready for summer.

    We’ve reached the point of the school year where we have standardized tests and giant projects due and award ceremonies every other day.

    Which means summer is right around the corner.

    We’re even pretty much done with soccer and the other parents are all, “You wanna get together and practice this summer?”

    NOPE.

    Anyway. I made cookies!

    Sweet and Salty Pudding Cookies - soft cookies filled with coconut, pretzels, and M&Ms! The pudding mix keeps them soft for days.

    Ingredients

    • Butter – make sure to soften it before beginning the recipe.
    • Brown sugar – this recipe calls for more brown and granulated sugar because brown cookies keeps them soft.
    • Sugar
    • Instant vanilla pudding mix – this is the secret ingredient that is going to keep the cookies soft for a long time.. You don’t actually make the pudding, just add it to the cookie dough.
    • Eggs
    • Vanilla
    • All-purpose flour
    • Baking soda – this is the leavening agent for these cookies. It helps them get nice and puffy.
    • Sweetened shredded coconut – if you don’t like coconut, you can leave it out.
    • Pretzels – you can use any shape but the twists make the cookies really pretty.
    • M&Ms – I like to use plain M&Ms because the other varieties tend to be larger in size.

    How To Make Sweet and Salty Pudding Cookies

    • Wet ingredients. Cream together butter and sugars until light and fluffy. Add in pudding mix and beat until well blended. Add eggs and vanilla. 
    • Add ingredients. Stir together flour and baking powder to remove lumps.
    • Combine. Add the flour mixture to the wet mixture and beat until well incorporated.
    • Add-ins. Use a rubber spatula to fold in coconut, pretzels, and M&Ms. 
    • Transfer. Take heaping tablespoonfuls of dough, roll into balls, and place on baking sheets.
    • Bake. Bake at 350F for 8 – 12 minutes.
    • Cool. Let cool on baking sheet for about 3 minutes before transferring to a wire rack to cool completely.

    Tips & Tricks

    • You can use a different flavor pudding mix if you want to change things up! You can also use your favorite kind of M&Ms!
    • If your cookies seem to be spreading too much, put the cookie dough in the fridge for about 30 minutes before baking.
    • To make my cookies extra pretty, I always save some of the mix-ins (the pretzels and M&Ms) to place on top of the cookie dough after I roll them into balls.

    How Long Are Pudding Cookies Good For

    Store at room temperature in an airtight container. They are tastiest when consumed within 3 days but will be fine for up to a week.

    Sweet and Salty Pudding Cookies - soft cookies filled with coconut, pretzels, and M&Ms! The pudding mix keeps them soft for days.

    More Pudding Cookies Recipes

    • Pumpkin Pudding Snickerdoodles
    • Peanut Butter Chocolate Chunk Pudding Cookies
    • Butterscotch Pudding Cookies
    • Chocolate Chip Pudding Cookies

    Make sure you subscribe to my email list to get all my new recipes delivered right to your inbox!

    You can also follow me on Instagram, Facebook, or Pinterest for even more! 

    📖 Recipe

    Yield: 48 cookies

    Sweet and Salty Pudding Cookies

    Sweet and Salty Pudding Cookies

    Sweet and Salty Pudding Cookies are soft cookies filled with coconut, pretzels, and M&Ms! The pudding mix keeps them soft for days. 

    Prep Time 15 minutes
    Cook Time 12 minutes
    Total Time 27 minutes

    Ingredients

    • ¾ cups (1 ½ sticks) butter, softened
    • ¾ cup brown sugar
    • ¼ cup sugar
    • 1 3.4 oz package instant vanilla pudding mix
    • 2 eggs
    • 1 teaspoon vanilla
    • 2 ¼ cups all-purpose flour
    • 1 teaspoon baking soda
    • 1 ½ cups sweetened shredded coconut
    • 2 cups pretzels, broken into small pieces
    • ½ cups M&Ms

    Instructions

    1. Preheat oven to 350F. Line 2 baking sheets with parchment paper. 
    2. In the bowl of a stand mixer fitted with a paddle attachment, cream together butter and sugars until light and fluffy. Add in pudding mix and beat until well blended. Add eggs and vanilla. 
    3. In a separate bowl, stir together flour and baking powder to remove lumps. Add the flour mixture to the wet mixture and beat until well incororated. Use a rubber spatula to fold in coconut, pretzels, and M&Ms. 
    4. Take heaping tablespoonfuls of dough, roll into balls, and place on prepared baking sheets, leaving about 2 inches space between each one. 
    5. Bake for 8 - 12 minutes, rotating sheets halfway through, until light golden brown. Let cool on baking sheet for about 3 minutes before transferring to a wire rack to cool completely. Repeat with remaining dough. 

    Recommended Products

    As an Amazon Associate and member of other affiliate programs, I earn from qualifying purchases.

    • Electric Mixer
      Electric Mixer
    • Instant Vanilla Pudding
      Instant Vanilla Pudding

    Nutrition Information:

    Yield:

    48

    Serving Size:

    1

    Amount Per Serving: Calories: 80Total Fat: 2gSaturated Fat: 1gTrans Fat: 0gUnsaturated Fat: 0gCholesterol: 8mgSodium: 102mgCarbohydrates: 15gFiber: 1gSugar: 9gProtein: 1g

    Did you make this recipe?

    Tag me in your Instagram photo - @fakeginger

    © Amanda Livesay
    Cuisine: American / Category: cookie


    Blackened Shrimp Lettuce Wraps with Mango Salsa

    May 13, 2019

    Blackened Shrimp Lettuce Wraps with Mango Salsa is a delicious, healthy 15 minute dinner! Spicy shrimp in crisp lettuce wraps with mango salsa on top! 

    Blackened Shrimp Lettuce Wraps with Mango Salsa - delicious, healthy 15 minute dinner! Spicy shrimp in crisp lettuce wraps with mango salsa on top! #paleo #lowcarb

    I have been wishing for summer since last summer.

    All winter long, I missed summer weather, summer activities, and most important, summer food.

    As usual, the windows never even went on my Jeep.

    I feel like putting them on would be inviting winter to stick around a little longer. Okay, so maybe I had to wear 8 layers of clothing a couple days, but it’s okay because it’s finally almost summer!

    These Blackened Shrimp Lettuce Wraps with Mango Salsa taste just like summer. And they are so easy!

    The homemade mango salsa is just fresh mango, jalapeño, red onion, cilantro, and lime juice. You just toss all of it together and it’s done.

    It also keeps great in the fridge so you can make a batch once and enjoy it on these lettuce wraps or tacos or whatever all week long.

    I know the list of spices and herbs for the blackened seasoning is long but I bet almost every home cook has all of them already in their spice cabinet.

    The shrimp gets tossed in the seasoning and sauteed quickly in a little avocado oil. The shrimp takes just 2 minutes per side so you can definitely put this together on a weeknight.

    Especially if you made the salsa ahead of time.

    Blackened Shrimp Lettuce Wraps with Mango Salsa - delicious, healthy 15 minute dinner! Spicy shrimp in crisp lettuce wraps with mango salsa on top! #paleo #lowcarb

    Ingredients

    • Mango – make sure it’s ripe before cutting into it.
    • Jalapeno – adjust the amount of jalapeno based on how much spice you like.
    • Red onion – red onion isn’t as sharp as other onions so it’s perfect for using in a raw dish.
    • Cilantro – leave it out if you aren’t a cilantro fan.
    • Lime – freshly squeezed lime juice will have the most flavor but the bottled juice will work in a pinch.
    • Paprika, cayenne, onion powder, thyme, basil, oregano – this is all going in the marinade. All together, they create the blackened seasoning that goes on the shrimp. If you don’t want to buy all the spices, you can just buy a premade blackened seasoning.
    • Avocado oil – I like avocado oil because you can cook at high heat and it won’t burn.
    • Shrimp – tails off, deveined shrimp, preferably.
    • Lettuce leaves – I recommend leafy lettuce for lettuce wraps and not something like iceberg lettuce.
    Blackened Shrimp Lettuce Wraps with Mango Salsa - delicious, healthy 15 minute dinner! Spicy shrimp in crisp lettuce wraps with mango salsa on top! #paleo #lowcarb

    How To Make Blackened Shrimp Lettuce Wraps

    • Make salsa. Combine all ingredients in a bowl and toss to combine. Refrigerate until ready to serve.
    • Season shrimp. Combine all herbs and spices in a large mixing bowl. Dry shrimp with a paper towel and add to the spice mixture. Toss to coat shrimp.
    • Cook shrimp. Heat avocado oil over medium-high heat. Add shrimp in a single layer and cook 2 minutes, flip, and cook another 2 minutes, until the shrimp is cooked though
    • Serve. Add a scoop of shrimp to a lettuce leaf and top with the mango salsa.

    How Long Is It Good For?

    The shrimp will stay good for up to 3 days. Make sure to store it in an airtight container in the refrigerator.

    The mango salsa will be good for up to 5 days. Store it in the fridge in an airtight container.

    When you are ready to serve, microwave the shrimp and the salsa can be served straight from the fridge.

    Blackened Shrimp Lettuce Wraps with Mango Salsa - delicious, healthy 15 minute dinner! Spicy shrimp in crisp lettuce wraps with mango salsa on top! #paleo #lowcarb

    More Lettuce Wraps Recipes

    • PF Chang’s Chicken Lettuce Wraps
    • Cashew Chicken Lettuce Wraps
    • Crockpot Carnitas Lettuce Wraps
    • Honey Beef Lettuce Wraps

    Make sure you subscribe to my email list to get all my new recipes delivered right to your inbox!

    You can also follow me on Instagram, Facebook, or Pinterest for even more! 

    📖 Recipe

    Yield: 4 servings

    Blackened Shrimp Lettuce Wraps with Mango Salsa

    Blackened Shrimp Lettuce Wraps with Mango Salsa

    Blackened Shrimp Lettuce Wraps with Mango Salsa are a delicious, healthy 15 minute dinner! Spicy shrimp in crisp lettuce wraps with mango salsa on top! 

    Prep Time 20 minutes
    Cook Time 10 minutes
    Total Time 30 minutes

    Ingredients

    • 1 large Mango, diced (about 1 ½ cups)
    • 1 small Jalapeño, minced (or more or less, to taste)
    • ¼ cup Red Onion, finely diced
    • ¼ cup Fresh Cilantro, chopped
    • juice from one Lime
    • For the Shrimp:
    • 1 tablespoon Paprika
    • 1 ½ teaspoons Ground Cayenne Pepper
    • 1 teaspoon Onion Powder
    • 1 teaspoon Salt
    • ½ teaspoon Freshly Ground Black Pepper
    • ¼ teaspoon Dried Thyme
    • ¼ teaspoon Dried Basil
    • ¼ teaspoon Dried Oregano
    • 1-2 tablespoons Avocado Oil
    • 1 pound Shrimp, peeled and deveined
    • Lettuce Leaves, for serving

    Instructions

      1. To make the salsa, combine all ingredients in a bowl and toss to combine. Refrigerate until ready to serve.
      2. To make the shrimp, combine all herbs and spices in a large mixing bowl.
      3. Dry shrimp with a paper towel and add to the spice mixture. Toss to coat shrimp.
      4. Heat avocado oil over medium-high heat. Add shrimp in a single layer and cook 2 minutes, flip, and cook another 2 minutes, until the shrimp is cooked though (they will be pink and will curl up).
      5. To serve, add a scoop of shrimp to a lettuce leaf and top with the mango salsa.

    Nutrition Information:

    Yield:

    4

    Serving Size:

    1

    Amount Per Serving: Calories: 266Total Fat: 10gSaturated Fat: 2gTrans Fat: 0gUnsaturated Fat: 7gCholesterol: 239mgSodium: 1607mgCarbohydrates: 19gFiber: 3gSugar: 13gProtein: 27g

    Did you make this recipe?

    Tag me in your Instagram photo - @fakeginger

    © Amanda Livesay
    Cuisine: American / Category: seafood
    « Previous Page
    Next Page »

    Primary Sidebar

    Amanda Livesay
    Hi, I'm Amanda! DFW food blogger, mom of boys, and crazy dog lady.
    Read more
    Privacy Policy
    Privacy Policy

    Footer

    ↑ back to top

    About

    • Privacy Policy
    • About Fake Ginger

    Newsletter

    • Sign Up for weekly emails featuring new recipes!

    As an Amazon Associate I earn from qualifying purchases.

    Copyright © 2024 FakeGinger.com