• Skip to primary navigation
  • Skip to main content
  • Skip to primary sidebar
  • Home
  • About
  • Recipes

Fake Ginger

menu icon
go to homepage
  • Recipe Index
  • About
  • Subscribe
    • Facebook
    • Instagram
    • Pinterest
  • subscribe
    search icon
    Homepage link
    • Recipe Index
    • About
    • Subscribe
    • Facebook
    • Instagram
    • Pinterest
  • ×
    Home » Page 26

    Greek Stuffed Peppers

    Greek Stuffed Peppers

    Jun 07, 2017

    This post has been sponsored by The Coca-Cola Company. All thoughts and opinions are my own.

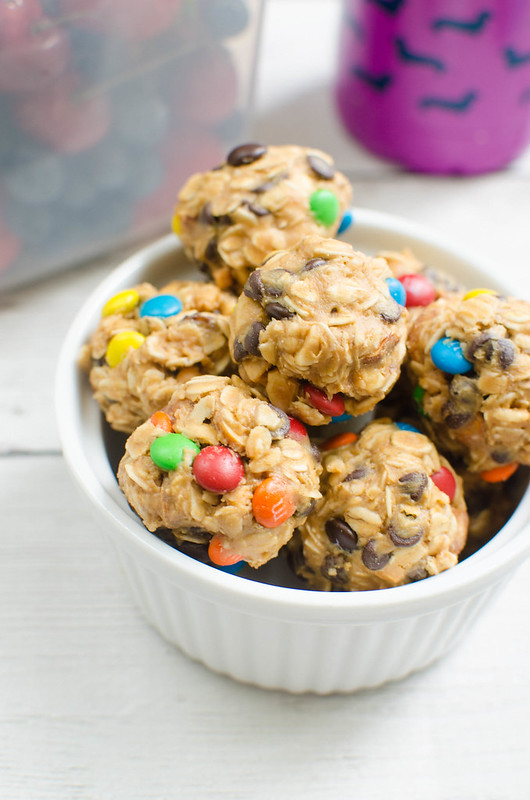
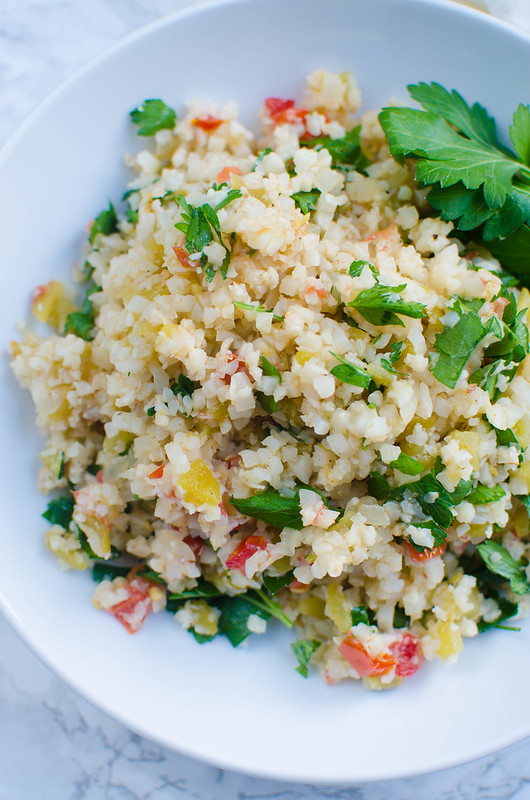
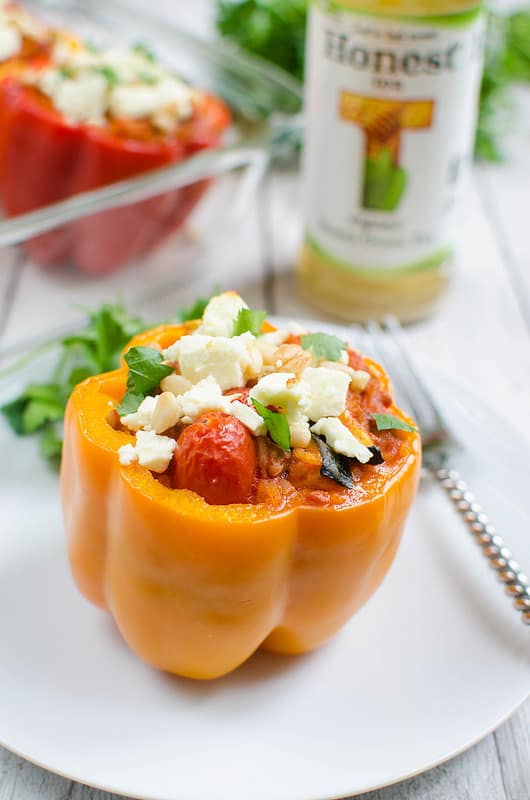
    Greek Stuffed Peppers – peppers filled with rice, ground turkey, vegetables, tomatoes sauce, and topped with feta and pine nuts!

    Greek Stuffed Peppers - easy, healthy, and delicious! Peppers filled with turkey, rice, zucchini, tomatoes, and topped with feta cheese!

    Heeeeey guys, are you loving summer?!

    I, as I am every summer, am in love.

    I know everyone is complaining about how hot it is but this is what I live for.

    I have the top off the Jeep, I’ve been hiking several times a week, my tan is looking amazing.

    Why can’t it be summer all the time?

    Just kidding, I live in central Texas. It IS summer all the time.

    Except that one month last year when the Jeep’s window zipper was broken. That month was cold.

    Very cold.

    …

    Read More

    No Bake Trail Mix Energy Bites

    Jun 06, 2017

    No-Bake Trail Mix Energy Bites are filled with raisins, peanuts, chocolate chips, and M&MS! The perfect quick snack for hiking, beach trips, or school lunches! 

    No-Bake Trail Mix Energy Bites - filled with raisins, peanuts, chocolate chips, and M&MS! The perfect quick snack for hiking, beach trips, or school lunches!

    Hi guys!

    How’s the week going? What’d ya do last weekend?

    We went out to the lake and had the best time. I’m obsessed with all things outdoors right now and thankfully, the tiny people I live with don’t seem to mind. We’ve hiked every trail in the area, swam in every lake, and I’m forever looking for new places to explore.

    I’m already excited to spend every weekend for the rest of summer down at the lake.

    Since I knew we’d be out there most of the day, I packed a small bag with lots of water, fresh fruit, and these No-Bake Trail Mix Energy Bites.

    My boys love these bites!

    They’re oats and peanut butter (sweetened with a bit of honey) and then you mix in raisins, peanuts, mini chocolate chips, and mini candy coated chocolate candies. So they’re delicious and great for when you need an energy boost.

    Also, since they’re no bake, they’re super easy and can be tossed together in literally minutes. They’re great for any kind of hiking or beaching or even just as a work or school snack.

    Hiking with husky

    Ingredients

    • Old fashioned oats
    • Raisins – you could use dried cranberries or cherries if you prefer.
    • Peanuts – I like to use salted peanuts so you get that delicious sweet and salty thing.
    • Chocolate chips – I used milk chocolate but you could use semisweet or bittersweet.
    • Mini M&Ms
    • Peanut butter – I used smooth because we already have crunchy peanuts in the bites.
    • Honey – this sweetens and helps the bites stick together.

    How To Make No Bake Trail Mix Bites

    • Dry ingredients. Stir together oats, raisins, peanuts, chocolate chips, and M&Ms.
    • Wet ingredients. In a small saucepan over low heat, stir together ½ cup peanut butter and honey until melted. Let cool slightly.
    • Combine. Pour over the trail mix and stir to combine.
    • Roll. Roll into 1-inch balls and refrigerate until ready to serve.

    How Long Are They Good For?

    These trail mix bites will be good for up to a week. Make sure to store in an airtight container in the refrigerator.

    More Kid Friendly Snack Ideas

    • Ranch Goldfish Snack Mix
    • Dirt and Worms Chex Mix
    • Texas Toast Pizza
    • No Bake Cheerios Bars
    • Ranch Oyster Crackers

    Make sure you subscribe to my email list to get all my new recipes delivered right to your inbox!

    You can also follow me on Instagram, Facebook, or Pinterest for even more! 

    📖 Recipe

    Yield: 20 servings

    No Bake Trail Mix Energy Bites

    No Bake Trail Mix Energy Bites

    No-Bake Trail Mix Energy Bites are filled with raisins, peanuts, chocolate chips, and M&MS! The perfect quick snack for hiking, beach trips, or school lunches! 

    Prep Time 20 minutes
    Total Time 20 minutes

    Ingredients

    • 1 cup old fashioned oats
    • ¼ cup raisins
    • ¼ cup chopped peanuts
    • ¼ cup mini chocolate chips
    • ¼ cup mini M&Ms
    • ½ to ¾ cup cup peanut butter
    • 3 tablespoons honey

    Instructions

    1. In a mixing bowl, stir together oats, raisins, peanuts, chocolate chips, and M&Ms.
    2. In a small saucepan over low heat, stir together ½ cup peanut butter and honey until melted. Let cool slightly so chocolate doesn't met. Pour over the trail mix and stir to combine. If you can't roll into balls, melt the other ¼ cup peanut butter and add that.
    3. Roll into 1-inch balls and refrigerate until ready to serve.

    Recommended Products

    As an Amazon Associate and member of other affiliate programs, I earn from qualifying purchases.

    • Mini M&Ms
      Mini M&Ms
    • Mixing Bowls
      Mixing Bowls

    Nutrition Information:

    Yield:

    20

    Serving Size:

    1

    Amount Per Serving: Calories: 93Total Fat: 5gSaturated Fat: 1gTrans Fat: 0gUnsaturated Fat: 3gCholesterol: 0mgSodium: 33mgCarbohydrates: 12gFiber: 1gSugar: 7gProtein: 2g

    Did you make this recipe?

    Tag me in your Instagram photo - @fakeginger

    © Amanda Livesay
    Cuisine: American / Category: snack


    BBQ Pulled Pork Pizza

    May 30, 2017

    Delicious sweet and spicy BBQ Pulled Pork Pizza. Layers of barbecue sauce, pulled pork, jalapenos, pineapple, and lots of cheese!

    BBQ Pulled Pork Pizza recipe - delicious sweet and spicy pizza. Layers of barbecue sauce, pulled pork, jalapenos, pineapple, and lots of cheese!

    Heeeey guys, how was the long weekend?! What’d you grill?

    I grilled nothing. Let’s be real, I still don’t know how to work either of the 2 grills on my back porch. All those posts about grilled stuff? Someone had to come help me.

    What kind of food blogger am I?

    So I ended up hiking with the husky, as I do most weekends I don’t have the kids. I’ve got some heavy stuff going on right now and it helps to be totally alone in the woods with nothing to do but sort things out in my head.

    Plus, the husky loves it.

    Y’all. If you had told me a year ago that I’d fall in love with central Texas… there’s no way in you-know-what I would have believed you.

    But I’m really into it.

    I kinda don’t want to leave.

    Anyway, I did make this BBQ Pulled Pork Pizza over the weekend!

    I don’t know why or how I got this idea stuck in my head but for, like, the last 2 weeks all I could think about was this pizza.

    And I knoooow, pineapple on pizza is gross to at least half of you but trust me on this one. You need a bit of sweetness with the spicy jalapeno.

    BBQ Pulled Pork Pizza recipe - delicious sweet and spicy pizza. Layers of barbecue sauce, pulled pork, jalapenos, pineapple, and lots of cheese!

    Ingredients

    • Pizza crust – homemade or, if you’re like me, the ball of pizza dough from Trader Joe’s
    • Barbecue sauce – use your favorite store-bought or homemade bbq sauce
    • Sharp cheddar cheese
    • Monterey jack cheese
    • Pulled pork – you can make it yourself or use leftovers from your favorite bbq spot!
    • Red onion – you could use any color onion but I like the color contrast of the red onion.
    • Fresh jalapeno
    • Fresh pineapple
    • Cilantro – this is optional but adds a lot of brightnes and flavor to the finished pizza.

    How To Make BBQ Pulled Pork Pizza

    • Prep. Stretch pizza dough to desired thickness and place on baking sheet.
    • Top. Spread barbecue sauce over dough. Sprinkle half the cheese over the sauce.
    • More toppings. Layer pulled pork, red onion, jalapeno, and pineapple. Sprinkle with remaining cheese.
    • Bake. Bake 10 – 12 minutes until crust is browned and crisp.
    • Garnish. Sprinkle with fresh cilantro.
    BBQ Pulled Pork Pizza recipe - delicious sweet and spicy pizza. Layers of barbecue sauce, pulled pork, jalapenos, pineapple, and lots of cheese!

    How Long Is It Good For?

    Homemade pizza will be good for up to 3 – 4 days. Keep it in an airtight container (or covered tightly) in the refrigerator.

    I like to reheat my pizza in the oven so the crust gets crispy again. I just do it at 300F until it’s warmed through, usually only a few minutes

    More Pizza Recipes

    • Bacon Alfredo Pizza
    • Pizza Bread
    • Grilled Tequila Steak Pizza
    • Barbecue Chicken Pizza
    • White Clam Pizza

    Make sure you subscribe to my email list to get all my new recipes delivered right to your inbox!

    You can also follow me on Instagram, Facebook, or Pinterest for even more! 

    📖 Recipe

    Yield: 8 slices

    BBQ Pulled Pork Pizza

    BBQ Pulled Pork Pizza

    Delicious sweet and spicy BBQ Pulled Pork Pizza. Layers of barbecue sauce, pulled pork, jalapenos, pineapple, and lots of cheese!

    Prep Time 20 minutes
    Cook Time 12 minutes
    Total Time 32 minutes

    Ingredients

    • 1 pizza crust
    • ½ cup barbecue sauce, plus more for drizzling
    • 1 cup sharp cheddar cheese, shredded
    • 1 cup monterey jack cheese, shredded
    • 1 cup pulled pork
    • ¼ cup red onion, thinly sliced
    • 1 small jalapeno, thinly sliced
    • ¼ cup fresh pineapple, diced
    • fresh cilantro, if desired

    Instructions

    1. Preheat oven to 450F. Line a baking sheet with parchment paper.
    2. Stretch pizza dough to desired thickness and place on prepared baking sheet. Spread barbecue sauce over dough, leaving about an inch around. Sprinkle half the cheese on top and then layer with pulled pork, red onion, jalapeno, and pineapple. Sprinkle with remaining cheese.
    3. Bake 10 - 12 minutes, until crust is browned and crisp. Sprinkle with fresh cilantro before serving.

    Recommended Products

    As an Amazon Associate and member of other affiliate programs, I earn from qualifying purchases.

    • Parchment Paper
      Parchment Paper
    • Pizza Stone
      Pizza Stone

    Nutrition Information:

    Yield:

    8

    Serving Size:

    1

    Amount Per Serving: Calories: 434Total Fat: 19gSaturated Fat: 9gTrans Fat: 0gUnsaturated Fat: 8gCholesterol: 52mgSodium: 954mgCarbohydrates: 46gFiber: 2gSugar: 12gProtein: 19g

    Did you make this recipe?

    Tag me in your Instagram photo - @fakeginger

    © Amanda Livesay
    Cuisine: American / Category: pork


    Strawberry Basil Bourbon Smash

    May 19, 2017

    Strawberry Basil Bourbon Smash has juicy strawberries and fresh basil for the perfect refreshing summer cocktail.

    Strawberry Basil Bourbon Smash - juicy strawberries and fresh basil are the perfect pair in this bourbon cocktail recipe!

    This week flew by. The month flew by actually. How is May almost over?!

    My kids’ last day of school is next week and I’m gonna be real honest with you, I have no clue where they’re going to school next year. Like, I don’t even know what state they’re to go to school in. That’s where my life is right now.

    So the end of the school year is exciting because you know I love summer and all the fun that comes along with it but it’s also super stressful because… I really just need someone to figure out my entire life for me so I don’t have to make any more decisions.

    That’d be great.

    What Is a Smash?

    Honestly? I have no idea why a smash is called a smash. All you really need to know about smashes is that they’re always going on have a spirit (usually bourbon but sometimes whiskey, gin, brandy, or even rum), sugar, an herb, and seasonal fruit. 

    Oh, and ice. I’ve seen a lot of definitions say that a smash must have “small ice” or even shaved ice.

    Smashes are great way to celebrate seasonal foods because you really can use whatever fruits and herbs are in season. Just muddle it all together with some sugar and top it with your spirit of choice and maybe a splash of seltzer. That’s all you need for a smash!

    Cocktail made with strawberries, basil, and bourbon

    Ingredients

    • Strawberries – you want fresh strawberries but they don’t necessarily have to be super sweet summer berries because we are adding sweetness to the drink. So if you end up with a sour container of strawberries, this could be a really good way to use them!
    • Simple syrup – this is the sweetener for the drink. It’s equal parts water and sugar, simmered until it becomes syrup-y. You can make your own or order it online.
    • Fresh basil – you could also use mint if you have it on hand.
    • Lemon juice – this adds the perfect amount of sour citrus that the drink needs.
    • Bourbon – use your favorite brand. I don’t think you need to spend a ton of money on Bourbon for this drink.
    • Ice
    • Sparkling water – I like plain sparkling water but if you want extra strawberry flavor, go for a strawberry sparkling water!

    How To Make Strawberry Basil Bourbon Smash!

    • Muddle. Using a muddler, mash strawberries, simple syrup, fresh basil, and lemon juice in a cocktail glass until the strawberries release most of their juice.
    • Combine. Add bourbon and ice; stir to combine
    • Top. Top with sparkling water

    Can You Double The Recipe?

    Since the fruit has to be muddled in the bottom of each glass, you can’t really double this recipe. It’s easiest just to make them one by one to ensure that each glass gets the perfect amount of strawberries, basil, lemon juice, and simple syrup. 

    Can You Make It Ahead?

    No, this is one cocktail recipe that needs to be made fresh. 

    What Kind of Bourbon Should I Use?

    Whatever kind you want! Bulleit is our go to bourbon because it’s a decent price and still really great quality. 

    You can even use whiskey if you already have some in your house. It will just be a Whiskey Smash instead of a Bourbon Smash!

    More Bourbon Cocktail Recipes

    • Raspberry Bourbon Smash
    • Grapefruit-Ginger Bourbon Sour
    • Bourbon Apple Sidecar
    • Lemonade Spritzer

    Make sure you subscribe to my email list to get all my new recipes delivered right to your inbox!

    You can also follow me on Instagram, Facebook, or Pinterest for even more! 

    📖 Recipe

    Yield: 1 serving

    Strawberry Basil Bourbon Smash

    Strawberry Basil Bourbon Smash

    Strawberry Basil Bourbon Smash has juicy strawberries and fresh basil for the perfect refreshing summer cocktail.

    Prep Time 10 minutes
    Total Time 10 minutes

    Ingredients

    • ¼ cup fresh strawberries, cut into chunks
    • 1 - 2 teaspoons simple syrup, to taste
    • 4 - 5 fresh basil leaves
    • juice of half a lemon
    • 2 ounces Bourbon
    • ice
    • sparkling water

    Instructions

    1. Muddle strawberries, simple syrup, basil, and lemon juice together in a cocktail glass, until everything is smashed together and fragrant. Add Bourbon and ice; stir to combine. Top with sparkling water.

    Recommended Products

    As an Amazon Associate and member of other affiliate programs, I earn from qualifying purchases.

    • Muddler
      Muddler
    • Simple Syrup
      Simple Syrup

    Nutrition Information:

    Yield:

    1

    Serving Size:

    1

    Amount Per Serving: Calories: 307Total Fat: 0gSaturated Fat: 0gTrans Fat: 0gUnsaturated Fat: 0gCholesterol: 0mgSodium: 149mgCarbohydrates: 45gFiber: 2gSugar: 38gProtein: 1g

    Did you make this recipe?

    Tag me in your Instagram photo - @fakeginger

    © Amanda Livesay
    Cuisine: American / Category: drink

    Cajun Shrimp and Grits

    May 12, 2017

    Cajun Shrimp and Grits is perfect for brunch or a date night in. Spicy shrimp on top of cheesy grits with a little bacon thrown in – and it’s all ready in less than 30 minutes! 

    Cajun Shrimp and Grits - spicy shrimp with cheesy grits! Super simple recipe that feels very decadent. Perfect for brunch or a date night in!

    Can you believe it’s already Mother’s Day weekend?!

    My kids are with their dad this weekend and I love them dearly but a weekend alone is exactly what I want for Mother’s Day.

    If you’re cooking brunch for your mom this weekend, let me recommend this Cajun Shrimp and Grits!

    Shrimp and grits is my favorite meal ever. Like, if it’s on a menu, I’m ordering it. And I always forget how easy it is to make at home. But seriously, less than 30 minutes from start to finish. The spicy shrimp on the creamy, cheesy grits with the crispy bacon is just perfection.

    And if you’re new to cooking, shrimp is one of the easiest proteins to cook. About a minute on each side and it’s done. So this is a perfect recipe for, maybe, the inexperienced cook to make for mom for Mother’s Day.

    (PS. It would also be great for any other brunch or a date night in!)

    Cajun Shrimp and Grits - spicy shrimp with cheesy grits! Super simple recipe that feels very decadent. Perfect for brunch or a date night in!

    Ingredients

    • Shrimp – make sure they are peeled and deveined. If you are using frozen shrimp, be sure to let them defrost overnight in the fridge.
    • Cajun seasoning – use your favorite brand.
    • Bacon – you can use pork bacon or turkey bacon. If you use turkey bacon, though, you will need to add oil to cook the onion as the turkey bacon doesn’t render any fat.
    • Onion
    • Garlic
    • Butter
    • Milk – this is for the grits.
    • Quick-cooking grits – I like quick-cooking because it makes the dish come together so quickly.
    • Cheddar cheese
    • Green onions

    How To Make Cajun Shrimp and Grits

    • Prep shrimp. Pat shrimp dry and place in a large mixing bowl. Sprinkle cajun seasoning on top and toss to coat.
    • Cook veggies. In a large skillet, cook bacon until almost cooked. Add onion and cook 2 minutes. Add garlic and cook just until fragrant.
    • Cook shrimp. Add shrimp and cook for about 1 minutes on each side. Add butter and toss to coat. Remove from heat.
    • Make grits. Bring milk, water, and salt to a boil over medium-high heat. Reduce to a simmer and add grits. Cook until thick, about 5 minutes.
    • Add cheese. Remove from heat and stir in cheese until melted.
    • Serve. Serve the shrimp mixture on top of the grits with green onions on top.

    How Long Is It Good For?

    Shrimp and grits will be fine in the fridge for up to 3 days. Make sure to store it in an airtight container.

    When you are ready to serve the leftovers, you can reheat them in the microwave. If the grits have thickened too much, add a splash of milk before reheating.

    Cajun Shrimp and Grits - spicy shrimp with cheesy grits! Super simple recipe that feels very decadent. Perfect for brunch or a date night in!

    More Shrimp Recipes

    • Shrimp Tacos with Pineapple Slaw
    • Blackened Shrimp Lettuce Wraps with Mango Salsa
    • Spicy Orange Shrimp
    • Spicy Shrimp Nachos
    • Shrimp Scampi

    Make sure you subscribe to my email list to get all my new recipes delivered right to your inbox!

    You can also follow me on Instagram, Facebook, or Pinterest for even more! 

    📖 Recipe

    Yield: 4 servings

    Cajun Shrimp and Grits

    Cajun Shrimp and Grits

    Cajun Shrimp and Grits is perfect for brunch or a date night in. Spicy shrimp on top of cheesy grits with a little bacon thrown in - and it's all ready in less than 30 minutes! 

    Prep Time 10 minutes
    Cook Time 20 minutes
    Total Time 30 minutes

    Ingredients

    • 1 pound shrimp, peeled and deveined
    • 1 ½ teaspoons cajun seasoning
    • 4 slices bacon, diced
    • 1 small onion, diced
    • 2 cloves garlic, minced
    • 1 tablespoon butter

    For the grits:

    • 1 cup milk
    • 2 cups water
    • ¼ teaspoon salt
    • ¾ cup quick-cooking grits
    • 4 ounces cheddar cheese, shredded
    • ½ cup green onions, sliced

    Instructions

    1. Pat shrimp dry and place in a large mixing bowl. Sprinkle cajun seasoning on top and toss to coat. Set aside.
    2. In a large skillet over medium-high heat, cook bacon until almost cooked. Add onion and cook 2 minutes, stirring frequently. Add garlic and cook just until fragrant, about 30 seconds. Add shrimp and cook for about 1 minutes on each side, until no longer pink and slightly golden. Add butter and toss to coat. Remove from heat, cover, and keep warm while you prepare the grits.
    3. Bring milk, water, and salt to a boil over medium-high heat. Reduce to a simmer and add grits. Cook until thick, stirring frequently, about 5 minutes. Remove from heat and stir in cheese until melted.
    4. Serve the shrimp mixture on top of the grits with green onions on top.

    Recommended Products

    As an Amazon Associate and member of other affiliate programs, I earn from qualifying purchases.

    • Dutch Oven
      Dutch Oven
    • Cajun Seasoning
      Cajun Seasoning

    Nutrition Information:

    Yield:

    4

    Serving Size:

    1

    Amount Per Serving: Calories: 403Total Fat: 20gSaturated Fat: 10gTrans Fat: 0gUnsaturated Fat: 8gCholesterol: 291mgSodium: 2054mgCarbohydrates: 15gFiber: 1gSugar: 1gProtein: 40g

    Did you make this recipe?

    Tag me in your Instagram photo - @fakeginger

    © Amanda Livesay
    Cuisine: American / Category: seafood

    Peach Blueberry Crisp

    May 01, 2017

    Peach Blueberry Crisp is the perfect dessert for showing off summer fruits. Juicy peaches and blueberries are topped with a buttery oat topping that gets crunchy and delicious when baked.

    Peach Blueberry Crisp - quick and easy summer dessert! Fresh peaches and blueberries with a crunchy topping!

    Hiiii guys, happy Monday!

    How was the weekend? Mine was fantastic. The boys were gone with their dad and I had every intention of working all weekend and taking the husky for a forever long hike buuuuut that didn’t work out. I did, however, have this Peach Blueberry Crisp to pick at while I caught up on everything last night so it wasn’t too bad.

    Overhead shot of peach blueberry crisp in a pan with a serving scooped out

    Ingredients

    • Fresh peaches – you have to make this recipe during peach season when the peaches are so delicious.
    • Fresh blueberries
    • Lemon – you are just using the juice of the lemon.
    • Granulated sugar
    • Cinnamon
    • Cornstarch – this is used to thicken the fruit mixture.
    • Quick oats – you can also used rolled oats if that’s what you have. But don’t try to use steel cut.
    • All-purpose flour
    • Salt
    • Brown sugar
    • Unsalted butter – leave the salt out of the recipe if you are using salted butter.
    • Vanilla ice cream or whipped cream – optional for serving but melted ice cream or whipped cream is so good on warm crisps.

    How To Make Peach Blueberry Crisp

    • Make fruit filling. In a large mixing bowl, toss together peaches, blueberries, lemon juice, sugar, cinnamon, and cornstarch until all the fruit is coated. Transfer to a 9×13-inch pan.
    • Make crisp topping. In a separate mixing bowl, stir together oats, flour, salt, and brown sugar. Use a pastry cutter to cut the butter into the flour mixture.
    • Add topping. Sprinkle over the fruit.
    • Bake. Bake at 375F for 40 – 45 minutes, until the fruit is bubbly and the topping is browned.
    • Serve. Serve warm with ice cream or whipped cream on top.

    How Long Is It Good For?

    Peach Blueberry Crisp is good for up to 3 – 4 days. Make sure to cover it tightly and store it in the refrigerator.

    I like mine warmed up but you can serve yours straight from the fridge or pop it into the microwave before serving.

    Fresh peaches and blueberries topped with a crunchy oat topping and a scoop of vanilla ice cream

    More Summer Fruit Recipes

    • Blueberry Lemon Bread
    • Peach Cherry Sangria
    • Blueberry Orange Coffee Cake
    • Strawberry Crumble Bars
    • Blueberry Sour Cream Pancakes

    Make sure you subscribe to my email list to get all my new recipes delivered right to your inbox!

    You can also follow me on Instagram, Facebook, or Pinterest for even more! 

    📖 Recipe

    Yield: about 12 servings

    Peach Blueberry Crisp

    Peach Blueberry Crisp

    Peach Blueberry Crisp is the perfect dessert for showing off summer fruits. Juicy peaches and blueberries are topped with a buttery oat topping that gets crunchy and delicious when baked.

    Prep Time 20 minutes
    Cook Time 45 minutes
    Total Time 1 hour 5 minutes

    Ingredients

    • 3 pounds fresh peaches, thinly sliced
    • 2 cups fresh blueberries
    • juice of 1 lemon
    • ½ cup granulated sugar
    • ½ teaspoon cinnamon
    • 1 tablespoon cornstarch

    For the topping:

    • 1 cup quick oats
    • ¾ cup all-purpose flour
    • ¼ teaspoon salt
    • 1 cup packed brown sugar
    • ½ cup 1 stick unsalted butter, cut into small cubed

    For serving:

    • vanilla ice cream or whipped cream

    Instructions

    1. Preheat oven to 375F. Spray a 9x13-inch pan with oil.
    2. In a large mixing bowl, toss together peaches, blueberries, lemon juice, sugar, cinnamon, and cornstarch until all the fruit is coated. Transfer to the prepared pan. Set aside.
    3. In a separate mixing bowl, stir together oats, flour, salt, and brown sugar. Use a pastry cutter (or your fingers) to the pieces are about the size of peas. Sprinkle over the fruit.
    4. Bake 40 - 45 minutes, until the fruit is bubbly and the topping is browned.
    5. Serve warm with ice cream or whipped cream on top.

    Recommended Products

    As an Amazon Associate and member of other affiliate programs, I earn from qualifying purchases.

    • Mixing Bowls with Lids
      Mixing Bowls with Lids
    • 9x13-inch pan
      9x13-inch pan
    • Pastry Blender
      Pastry Blender

    Nutrition Information:

    Yield:

    12

    Serving Size:

    1

    Amount Per Serving: Calories: 293Total Fat: 10gSaturated Fat: 6gTrans Fat: 0gUnsaturated Fat: 3gCholesterol: 25mgSodium: 74mgCarbohydrates: 51gFiber: 3gSugar: 38gProtein: 3g

    Did you make this recipe?

    Tag me in your Instagram photo - @fakeginger

    © Amanda Livesay
    Cuisine: American / Category: pie

    Lemon Poppy Seed Scones

    Apr 19, 2017

    Delicious Lemon Poppy Seed Scones with a lemon glaze. These are the perfect spring breakfast!

    Lemon Poppy Seed Scones - tender scones with a delicious lemon glaze! They make the perfect breakfast!

    Guys.

    Guuuuuuuys.

    My kid has pinkeye.

    And, like, I knew it was coming when he came home from school on Monday and said, “So-and-so has a pink eye!” Because once one 5 year old has pinkeye, all the 5 year olds are going to have pinkeye.

    BUT STILL. Pinkeye is the worst.

    And, of course, as soon as I realized he had it, my eye started itching and then I sneezed and realized that it’s just because I had all the windows open and am allergic to everything outside. #blessed

    So, yeah,  I’ve banned him from going anywhere near his brothers so that maybe we can avoid spreading it to everyone.

    Also? Nothing is more frustrating than trying to put drops in a 5 year old’s eyes.

    Y’all. Just don’t send your kids to school when they have pinkeye.

    Lemon Poppy Seed Scones - tender scones with a delicious lemon glaze! They make the perfect breakfast!

    ANYWAY.

    Lemon Poppy Seed Scones!

    I was scrolling through Twitter over the weekend and saw someone talking about lemon poppy seed scones and have been thinking about them since.

    On Sunday night I tore apart my baking cabinet looking for poppy seeds and then on Monday morning I was at HEB at 7:05 am purchasing poppy seeds because all I could think about was scones.

    So yeah.

    They turned out so beautiful and perfect. They’re crumbly, but in a good way. I like to brush my scones with milk before baking so that they turn out shiny and then sprinkle them with a tiny bit of raw sugar for a crunch and then what’s a scone without a glaze? Ugh, they’re just so good.

    PS. Your mom would love these for Mother’s Day.

    Lemon Poppy Seed Scones - tender scones with a delicious lemon glaze! They make the perfect breakfast!

    More Lemon Recipes

    • Lemon Poppy Seed Cake with Raspberry Curd Filling
    • Creamy Lemon Crumb Bars
    • Sarasota Lemonade
    • Lemon Poppy Seed Cookies

    Make sure you subscribe to my email list to get all my new recipes delivered right to your inbox!

    You can also follow me on Instagram, Facebook, or Pinterest for even more! 

    📖 Recipe

    Yield: 8 scones

    Lemon Poppyseed Scones

    Lemon Poppyseed Scones
    Prep Time 20 minutes
    Cook Time 25 minutes
    Total Time 45 minutes

    Ingredients

    • 3 cups all-purpose flour
    • 1 cup granulated sugar
    • 3 tablespoons poppy seeds
    • 1 tablespoon baking powder
    • 1 teaspoon kosher salt
    • 2 teaspoons lemon zest
    • 10 tablespoons chilled unsalted butter, cut into small cubes
    • 1 large egg
    • 2 tablespoons fresh lemon juice
    • 1 teaspoon vanilla
    • 1 ⁄3 cup whole milk, plus more for brushing
    • 1 tablespoon raw sugar, for sprinkling

    For the glaze:

    • 2 tablespoons fresh lemon juice
    • ¾ - 1 cup powdered sugar

    Instructions

    1. Preheat oven to 375F. Line a baking sheet with parchment paper.
    2. In a large mixing bowl, whisk together flour, sugar, poppy seeds, baking powder, salt, and lemon zest. Use a pastry cutter to cut in the butter cubes until the mixture resembles coarse meal.
    3. In a small bowl, whisk together egg, lemon juice, vanilla, and milk. Pour over the flour mixture and use a rubber spatula to mix until just combined.
    4. On a lightly floured surface, gently press into an 8-inch circle. Cut into 8 equal pieces and transfer to the prepared baking sheet. Brush with milk and sprinkle with raw sugar. Bake 23 - 25 minutes or until golden brown. Cool completely on a wire rack before glazing.
    5. To make the glaze, whisk together lemon juice and powdered sugar until no lumps remain. Drizzle over the cooled scones.

    Recommended Products

    As an Amazon Associate and member of other affiliate programs, I earn from qualifying purchases.

    • Pastry Blender
      Pastry Blender
    • Parchment Paper
      Parchment Paper

    Nutrition Information:

    Yield:

    8

    Serving Size:

    1

    Amount Per Serving: Calories: 526Total Fat: 20gSaturated Fat: 11gTrans Fat: 0gUnsaturated Fat: 7gCholesterol: 71mgSodium: 500mgCarbohydrates: 79gFiber: 2gSugar: 42gProtein: 9g

    Did you make this recipe?

    Tag me in your Instagram photo - @fakeginger

    © Amanda Livesay


    Homemade Orange Sherbet

    Apr 18, 2017

    You will never want store-bought Orange Sherbet again after trying this easy and delicious homemade recipe! Only 5 ingredients. 

    Try our Homemade Strawberry Sherbet and Homemade Watermelon Sherbet, too!

    Homemade Orange Sherbet - you will never want store-bought orange sherbet again after trying this recipe! So simple and so delicious! Only 5 ingredients.

    Do you guys remember the Flintstones Push Pops?

    I just had to google them to make sure I didn’t make them up. But I have these weird memories that only kind of make sense of staying with my kindergarten teacher in the summers (she had a pool!) and we’d walk to the gas station close to her house for a treat on Fridays and I’d always go for the Flintstones Push Pops.

    Or candy cigarettes. The 90’s were weird, man.

    Do you have memories like that? Where you wonder if you made it all up? I was so young but I have all sorts of fuzzy memories like sitting in her kitchen and listening to the rain on their tin roof while she made fried chicken.

    This Orange Sherbet made me think of those Flintstones Push Pops.

    Homemade Orange Sherbet - you will never want store-bought orange sherbet again after trying this recipe! So simple and so delicious! Only 5 ingredients.

    Ingredients

    • Granulated sugar
    • Oranges – you are going to use the zest and the juice of the oranges. And you’re going to need a lot. I think I went through an entire bag of oranges but it will be worth it, I promise.
    • Salt – just a little bit to bring out all the flavor.
    • Vanilla – don’t skip the vanilla! It gives it that less bit extra.
    • Whole milk – the milk makes it creamy and delicious but not as heavy as an ice craem made with heavy cream or eggs.

    How To Make Orange Sherbet

    • Combine all ingredients. Whisk together sugar, orange zest, salt, orange juice, and vanilla until sugar is dissolved. Whisk in milk.
    • Chill. Cover and chill for 1 hour.
    • Freeze. Freeze in ice cream maker according to manufacturer’s instructions.
    Homemade Orange Sherbet - you will never want store-bought orange sherbet again after trying this recipe! So simple and so delicious! Only 5 ingredients.

    How Long Is It Good For?

    Homemade sherbet is best if eaten within a week of freezing. It will stay fine to eat for longer but it may become freezer burnt if let too long in the freezer.

    Storage

    Make sure to store it in the freezer in an airtight, freezer-safe container. It should be served right from the freezer while still well frozen.

    Difference between sherbet and sorbet

    Have you ever gotten sherbet and sorbet confused? They’re both delicious frozen fruity treats and I’ve gotten confused many times!

    The biggest difference is that sherbet is made with dairy products such as milk and cream (or a non-dairy equivalent) and sorbet has no dairy. That means that sherbet has more of a creamy, ice cream-like quality whereas sorbet is more icy and the fruit flavor tends to stand out more.

    They’re both delicious and you can’t go wrong with either one!

    More Homemade Ice Cream Recipes

    • Pistachio Ice Cream with Chocolate Chunks 
    • Banana Pudding Ice Cream 
    • Coffee Ice Cream 
    • Chocolate Ganache Ice Cream
    • Birthday Cake Ice Cream
    • Vanilla Bean Ice Cream

    Make sure you subscribe to my email list to get all my new recipes delivered right to your inbox!

    You can also follow me on Instagram, Facebook, or Pinterest for even more! 

    📖 Recipe

    Yield: 6 servings

    Homemade Orange Sherbet

    Homemade Orange Sherbet

    You will never want store-bought Orange Sherbet again after trying this easy and delicious homemade recipe! Only 5 ingredients. 

    Prep Time 20 minutes
    Additional Time 1 hour
    Total Time 1 hour 20 minutes

    Ingredients

    • 1 cup granulated sugar
    • 1 ½ tablespoons orange zest
    • ¼ teaspoon salt
    • 2 cups fresh squeezed orange juice
    • 1 teaspoon vanilla
    • 1 ½ cups whole milk

    Instructions

    1. In a large mixing bowl, whisk together sugar, orange zest, salt, orange juice, and vanilla until sugar is dissolved. Whisk in milk. Cover and chill for 1 hour.
    2. Freeze in ice cream maker according to manufacturer's instructions.

    Recommended Products

    As an Amazon Associate and member of other affiliate programs, I earn from qualifying purchases.

    • Ice Cream Container
      Ice Cream Container
    • Ice Cream Maker
      Ice Cream Maker
    • Zester
      Zester

    Nutrition Information:

    Yield:

    6

    Serving Size:

    1

    Amount Per Serving: Calories: 207Total Fat: 2gSaturated Fat: 1gTrans Fat: 0gUnsaturated Fat: 1gCholesterol: 6mgSodium: 116mgCarbohydrates: 45gFiber: 0gSugar: 43gProtein: 3g

    Did you make this recipe?

    Tag me in your Instagram photo - @fakeginger

    © Amanda Livesay
    Cuisine: American / Category: frozen goodies

    Raspberry Beermosas

    Apr 14, 2017

    Raspberry Beermosas are the perfect brunch cocktail for beer lovers! Fresh raspberries, orange juice, and your fave beer make the most delicious beer cocktail!

    Raspberry Beermosas - the perfect brunch cocktail for beer lovers! Fresh raspberries, orange juice, and your fave beer make the most delicious beer cocktail!

    Heeeeey guys, happy Friday!

    Is everyone as excited as I am that the week is over? The kids are out of school today so I probably won’t leave my house at all. I may not leave my bedroom.

    I may watch The Great British Baking Show in bed all day.

    I have had a week.

    A. Week.

    I would like to never think about this week again, mmkay?

    So I made cocktails. A beer cocktail! How weird, right?

    I’ve maintained that I hate beer for all 29 years of my life (no one fact check that number thanks) but I’m, like, really obsessed right now. Sorry to all the guys I’ve dated that I made fun of for “being really into craft beer”. I get it now, guys. I get it.

    …

    Read More

    Peanut Butter Pretzel Brownies

    Apr 13, 2017

    Peanut Butter Pretzel Brownies are perfect for all of your sweet and salty cravings! Rich brownies with crunchy peanut butter and chopped pretzels on top!

    Peanut Butter Pretzel Brownies - chewy brownies filled with peanut butter and topped with pretzels. The perfect sweet and salty treat!

    Can I complain about the weather?

    I know, totally shocking that I’m not satisfied with the weather in Texas, right?

    But y’all, all of Fort Hood has been flooded this week and it’s ruining my life. It took me an hour to find my way home the other night because all the roads to my neighborhood had rivers flowing over them or were already blocked by cops. And it was midnight and my poor babysitter was stuck at my house and all I wanted to do was eat nachos in bed while rewatching last week’s Survivor.

    About these Peanut Butter Pretzel Brownies!

    You guys know that if sweet and salty is an option, I’m going for it so these are probably my most favorite brownies ever.

    So why do boring brownies when you can fill them with crunchy peanut butter and top them with crushed pretzels?

    Peanut Butter Pretzel Brownies - chewy brownies filled with peanut butter and topped with pretzels. The perfect sweet and salty treat!

    Ingredients

    • Unsalted butter – if you need to use salted butter, you can lessen the amount of salt you add to the brownies.
    • Bittersweet chocolate
    • Granulated sugar
    • Brown sugar
    • Eggs
    • Vanilla
    • Crunchy peanut butter – the crunchy bits of peanuts give the brownies the best crunch.
    • All-purpose flour
    • Salt
    • Pretzels – I think the classic pretzel twists work best in this recipe

    Instructions

    • Melt chocolate. Melt butter over medium heat, remove from heat, and stir in chocolate. Stir until everything is melted and smooth. Set aside to cool.
    • Combine wet ingredients. In a large mixing bowl, stir together granulated sugar, brown sugar, eggs, vanilla, and peanut butter. Stir in cooled chocolate mixture.
    • Add dry ingredients. Add flour and salt and stir until just combined.
    • Transfer. Pour batter into prepared pan and sprinkle with chopped pretzels.
    • Bake and cool. Bake 55 – 60 minutes or until a toothpick inserted into the center comes out mostly clean. Cool on a wire rack before slicing.

    How Long Are They Good For?

    Brownies are good for up to 4 days. Make sure to store them in an airtight container.

    I like to keep them at room temperature but you can store them in the fridge if you prefer.

    Can You Freeze Them?

    You can freeze them but I don’t think the pretzels would still be crunchy after being frozen and defrosted.

    If you do want to freeze them, wrap them tightly in plastic wrap and then place them in a ziploc freezer bag.

    They will be fine in the freezer for up to 3 months. Let them sit at room temperature for several hours before serving.

    More Brownie Recipes

    • Peanut Butter Cup Brownies
    • Caramel-Filled Brownies
    • Raspberry Cheesecake Brownies
    • Nutella Brownies
    • Cosmic Brownies

    Make sure you subscribe to my email list to get all my new recipes delivered right to your inbox!

    You can also follow me on Instagram, Facebook, or Pinterest for even more! 

    📖 Recipe

    Yield: 12 servings

    Peanut Butter Pretzel Brownies

    Peanut Butter Pretzel Brownies

    Peanut Butter Pretzel Brownies are perfect for all of your sweet and salty cravings! Rich brownies with crunchy peanut butter and chopped pretzels on top!

    Prep Time 15 minutes
    Cook Time 1 hour
    Total Time 1 hour 15 minutes

    Ingredients

    • ½ cup 1 stick unsalted butter
    • 6 ounces bittersweet chocolate, roughly chopped
    • ¾ cup granulated sugar
    • ¾ cup brown sugar
    • 3 eggs
    • 1 teaspoon vanilla
    • ½ cup crunchy peanut butter
    • ¾ cup all-purpose flour
    • ½ teaspoon salt
    • ½ cup pretzels, roughly chopped

    Instructions

    1. Preheat oven to 350F. Line an 8x8-inch baking pan with parchment paper.
    2. Melt butter over medium heat, remove from heat, and stir in chocolate. Stir until everything is melted and smooth. Set aside to cool.
    3. In a large mixing bowl, stir together granulated sugar, brown sugar, eggs, vanilla, and peanut butter. Stir in cooled chocolate mixture. Add flour and salt and stir until just combined. Pour batter into prepared pan and sprinkle with chopped pretzels.
    4. Bake 55 - 60 minutes or until a toothpick inserted into the center comes out mostly clean.
    5. Cool on a wire rack before slicing.

    Recommended Products

    As an Amazon Associate and member of other affiliate programs, I earn from qualifying purchases.

    • Parchment Paper
      Parchment Paper
    • Electric Mixer
      Electric Mixer
    • 8-inch Cake Pan
      8-inch Cake Pan

    Nutrition Information:

    Yield:

    12

    Serving Size:

    1

    Amount Per Serving: Calories: 369Total Fat: 22gSaturated Fat: 11gTrans Fat: 0gUnsaturated Fat: 10gCholesterol: 67mgSodium: 192mgCarbohydrates: 38gFiber: 3gSugar: 25gProtein: 7g

    Did you make this recipe?

    Tag me in your Instagram photo - @fakeginger

    © Amanda Livesay
    Cuisine: American / Category: brownies


    Pistachio Ice Cream with Chocolate Chunks

    Apr 07, 2017

    Homemade Pistachio Ice Cream with Chocolate Chunks is the perfect sweet treat on a hot day. It’s smooth and creamy with chopped pistachios and chocolate chunks mixed in.

    Pistachio Ice Cream with Chocolate Chunks - the most delicious pistachio ice cream!

    Pistachio ice cream is, by far, my favorite ice cream. This was my first time ever making it, though, and I’m not sure I can go back to the store-bought ice cream.

    This homemade pistachio ice cream is made with a paste of ground up pistachios so you get real pistachio taste AND texture. And then add chocolate chunks?! It’s everything I love in ice cream.

    It’s a very creamy ice cream base with the ground up pistachios mixed in and then as you’re freezing it, you add the chopped chocolate.

    Pistachio Ice Cream with Chocolate Chunks - the most delicious pistachio ice cream!

    Ingredients

    • Pistachios – look for unsalted pistachios or you’ll end up with a super salty ice cream!
    • Whole milk – don’t be tempted to use lower fat milk. The whole milk makes a really creamy ice cream.
    • Heavy cream
    • Egg yolks – this is a custard based ice cream so the eggs get cooked when you make the custard. They make sure the ice cream base is really thick and creamy.
    • Sugar
    • Salt – just a tiny bit to bring out the flavors of the other ingredients.
    • Chocolate – I used bittersweet but use what you like.

    How To Make Pistachio Ice Cream with Chocolate Chunks

    • Prep pistachios. Pulse pistachios in a food processor until roughly chopped. Drizzle in the 6 tablespoons milk and continue processing until a creamy paste forms, about 1 minute.
    • Heat milk.. Combine 1 ½ cups of milk and the cream and warm until just at the point of simmering.
    • Temper eggs. Whisk together the egg yolks, sugar and salt until thickened and pale yellow. Slowly drizzle in a ladleful of the hot milk mixture, whisking constantly to prevent the eggs from cooking. Whisk in another ladleful of the hot milk mixture, then slowly whisk the egg mixture back into the saucepan.
    • Make custard. Place over medium-low heat and cook, stirring constantly with a wooden spoon, until the mixture coats the back of the spoon. Strain the hot custard through a fine-mesh sieve into a heatproof bowl and whisk in the pistachio paste.
    • Chill. Place a sheet of plastic wrap directly on the surface. Refrigerate for at least 4 hours and up to overnight.
    • Freeze. Freeze the custard in an ice-cream machine according to the manufacturer’s instructions.
    • Add chocolate. When the custard has thickened in the machine, add the chocolate and continue to mix just until well blended.

    How Long Is It Good For?

    Homemade pistachio ice cream will be good for up to 1 month in the freezer. I like to store it in reusable ice cream containers.

    Pistachio Ice Cream with Chocolate Chunks - the most delicious pistachio ice cream!

    More Ice Cream Recipes

    • Birthday Cake Ice Cream
    • Circus Animal Cookie Ice Cream
    • Caramel Corn Ice Cream
    • Key Lime Pie Ice Cream
    • Mexican Hot Chocolate Ice Cream

    Make sure you subscribe to my email list to get all my new recipes delivered right to your inbox!

    You can also follow me on Instagram, Facebook, or Pinterest for even more! 

    📖 Recipe

    Yield: about 8 servings

    Pistachio Ice Cream with Chocolate Chunks

    Pistachio Ice Cream with Chocolate Chunks

    Homemade Pistachio Ice Cream with Chocolate Chunks is the perfect sweet treat on a hot day. It's smooth and creamy with chopped pistachios and chocolate chunks mixed in.

    Prep Time 15 minutes
    Cook Time 10 minutes
    Additional Time 4 hours
    Total Time 4 hours 25 minutes

    Ingredients

    • ¾ cup unsalted roasted pistachio nuts
    • 6 tablespoons whole milk, plus 1 ½ cups
    • 1 ½ cups heavy cream
    • 4 large egg yolks
    • 1 cup sugar
    • pinch of sea salt
    • 3 ounces bittersweet chocolate, roughly chopped

    Instructions

    1. Pulse pistachios in a food processor until roughly chopped.. With the motor running, drizzle in the 6 tablespoons milk and continue processing until a creamy paste forms, about 1 minute. Transfer to a bowl.
    2. In a saucepan over medium heat, combine the 1 ½ cups of milk and the cream and warm until just at the point of simmering. Remove from the heat.
    3. In a mixing bowl, whisk together the egg yolks, sugar and salt until thickened and pale yellow. Slowly drizzle in a ladleful of the hot milk mixture, whisking constantly to prevent the eggs from cooking. Whisk in another ladleful of the hot milk mixture, then slowly whisk the egg mixture back into the saucepan. Place over medium-low heat and cook, stirring constantly with a wooden spoon, until the mixture coats the back of the spoon.
    4. Strain the hot custard through a fine-mesh sieve into a heatproof bowl and whisk in the pistachio paste. Place a sheet of plastic wrap directly on the surface of the custard to prevent a skin from forming. Refrigerate for at least 4 hours and up to overnight. Freeze the custard in an ice-cream machine according to the manufacturer’s instructions. When the custard has thickened in the machine, add the chocolate and continue to mix just until well blended. Freeze for at least 4 hours before serving.

    Recommended Products

    As an Amazon Associate and member of other affiliate programs, I earn from qualifying purchases.

    • Ice Cream Container
      Ice Cream Container
    • Ice Cream Maker
      Ice Cream Maker

    Nutrition Information:

    Yield:

    8

    Serving Size:

    1

    Amount Per Serving: Calories: 453Total Fat: 31gSaturated Fat: 16gTrans Fat: 1gUnsaturated Fat: 13gCholesterol: 171mgSodium: 137mgCarbohydrates: 35gFiber: 3gSugar: 30gProtein: 10g

    Did you make this recipe?

    Tag me in your Instagram photo - @fakeginger

    © Amanda Livesay
    Cuisine: American / Category: frozen goodies


    Mexican Cauliflower Rice

    Mar 15, 2017

    Mexican Cauliflower Rice is delicious low carb and paleo side dish! Cauliflower rice cooked with green chiles, tomatoes, cilantro, and spices!

    Mexican Cauliflower Rice - delicious low carb and paleo side dish! Cauliflower rice cooked with green chiles, tomatoes, cilantro, and spices!

    You guys.

    I’m obsessed with cauliflower again.

    I’ve had it everyday for, like, a month straight.

    For breakfast.

    I know. 

    I swear it’s amazing though! I do some riced cauliflower with some riced sweet potato with diced turkey bacon and a fried egg. And then just a tiny bit of maple syrup and a giant drizzle of sriracha on top. Sounds weird, but just trust me.

    Mexican Cauliflower Rice - delicious low carb and paleo side dish! Cauliflower rice cooked with green chiles, tomatoes, cilantro, and spices!

    I’m also really enjoying cauliflower rice variations. I shared that Dirty Cauliflower Rice a few weeks back and have been trying out new ideas ever since.

    For this Mexican Cauliflower Rice, I took the Mexican rice I usually make and just swapped out the rice for riced cauliflower (I buy it frozen – super easy!). Not only is it lower calorie than my usual Mexican rice but it also takes about half the time to cook. So. I’m into it.

    Still can’t get my kids to eat it but that’s fine. More for me.

    And yes, it is Paleo!

    More Side Dish Recipes

    • Cranberry Almond Broccoli Salad
    • Root Beer Baked Beans
    • Creamy Dill Cole Slaw
    • Root Beer Baked Beans

    Make sure you subscribe to my email list to get all my new recipes delivered right to your inbox!

    You can also follow me on Instagram, Facebook, or Pinterest for even more! 

    📖 Recipe

    Yield: about 4 servings

    Mexican Cauliflower Rice

    Mexican Cauliflower Rice
    Prep Time 10 minutes
    Cook Time 10 minutes
    Total Time 20 minutes

    Ingredients

    • 1 teaspoon olive oil
    • 1 small white onion, diced
    • 2 cloves garlic, minced
    • 1 7 ounce can diced green chiles, drained
    • 3 cups riced cauliflower, fresh or frozen
    • 1 small tomato, seeded and diced
    • 1 teaspoon cumin
    • juice of 1 lime
    • salt and pepper
    • ¼ cup chopped cilantro

    Instructions

    1. Heat oil over medium-high heat in a large skillet. Add onion and saute until soft and translucent. Add garlic and cook until just fragrant, about 30 seconds. Add green chiles and cauliflower rice. Cook, stirring frequently, until cauliflower has softened, about 5 minutes (longer if frozen). Stir in tomato, cumin, lime juice, and salt and pepper, and cilantro. Serve hot.

    Recommended Products

    As an Amazon Associate and member of other affiliate programs, I earn from qualifying purchases.

    • My Favorite Food Processor
      My Favorite Food Processor

    Nutrition Information:

    Yield:

    4

    Serving Size:

    1

    Amount Per Serving: Calories: 66Total Fat: 2gSaturated Fat: 0gTrans Fat: 0gUnsaturated Fat: 1gCholesterol: 0mgSodium: 103mgCarbohydrates: 12gFiber: 3gSugar: 5gProtein: 3g

    Did you make this recipe?

    Tag me in your Instagram photo - @fakeginger

    © Amanda Livesay
    Category: paleo

    Gluten Free Peanut Butter Chocolate Chip Cookies

    Mar 07, 2017

    Gluten Free Peanut Butter Chocolate Chip Cookies are the most delicious gluten free cookies! They practically melt in your mouth.

    Hi guys!

    We’re officially back from New Orleans and back to school and work and all that. Bleh, real life.

    But we had the best time! My boys are already talking about going back next year and I’m so excited they love it (and New Orleans) as much as I do.

    ANYWAY.

    Naturally, everybody was sick when we got home. You ever done an 8 hour car ride with sick kids? I don’t recommend it. Normally I’m the one to come home with the plague but thankfully I somehow avoided it this time.

    The best way to deal with a cold is cookies, right?

    Right?!

    That’s how I always deal with them, at least.

    I’m so into these cookies right now. They’re totally flourless so it’s basically just sugar and peanut butter baked together.

    They absolutely melt in your mouth.

    Also, super easy to make. My 7 year old can whip up the dough in about 5 minutes.

    Sidenote: can we talk about how awesome it is when kids learn to read and can FOLLOW RECIPES?! Like, life-changing.

    Make them. Share them.

    Or don’t share them.

    I’m not going to judge you. This last batch didn’t last 6 hours in my house.

    Ingredients

    • Egg white
    • Salt
    • Granulated sugar
    • Brown sugar
    • Crunchy peanut butter
    • Vanilla
    • Semisweet chocolate chips

    Instructions

    • Preheat oven to 375F. Line a baking sheet with parchment paper
    • Beat egg whit and salt until frothy
    • Beat in ⅓ cup sugar, brown sugar, peanut butter, and vanilla
    • Stir in chocolate chips
    • Roll tablespoonfuls of dough into balls and place on baking sheet
    • Use a fork dipped in remaining sugar to gently press them down, creating a criss cross pattern
    • Bake about 10 minutes, until browned
    • Cool completely before serving

    More Gluten Free Cookies Recipes

    • Gluten Free Iced Orange Cookies
    • Gluten Free Snickerdoodles
    • Paleo Chocolate Chip Coconut Cookies

    Make sure you subscribe to my email list to get all my new recipes delivered right to your inbox!

    You can also follow me on Instagram, Facebook, or Pinterest for even more! 

    📖 Recipe

    Yield: 24 cookies

    Gluten Free Peanut Butter Chocolate Chip Cookies

    Gluten Free Peanut Butter Chocolate Chip Cookies

    Gluten Free Peanut Butter Chocolate Chip Cookies are the most delicious gluten free cookies! They practically melt in your mouth.

    Prep Time 15 minutes
    Cook Time 10 minutes
    Total Time 25 minutes

    Ingredients

    • 1 large egg white
    • ¼ teaspoon salt
    • ⅓ cup sugar, plus 2 tablespoons for pressing the cookies
    • ¼ cup brown sugar
    • 1 cup crunchy peanut butter
    • 1 teaspoon vanilla
    • ½ cup semisweet chocolate chips

    Instructions

    1. Preheat oven to 375F. Line a baking sheet with parchment paper.
    2. Beat egg white and salt in a large mixing bowl until frothy. Beat in ⅓ cup sugar, brown sugar, peanut butter, and vanilla. Stir in chocolate chips.
    3. Taking a tablespoon at a time, roll into balls and place 2 inches apart on prepared baking sheet. Use a fork dipped the remaining sugar to gently press them down, creating a criss cross pattern.
    4. Bake about 10 minutes, or until browned.
    5. Cool completely before serving.

    Recommended Products

    As an Amazon Associate and member of other affiliate programs, I earn from qualifying purchases.

    • Electric Mixer
      Electric Mixer
    • Parchment Paper
      Parchment Paper
    • Rimmed Baking Sheet
      Rimmed Baking Sheet

    Nutrition Information:

    Yield:

    24

    Serving Size:

    1

    Amount Per Serving: Calories: 105Total Fat: 7gSaturated Fat: 2gTrans Fat: 0gUnsaturated Fat: 5gCholesterol: 8mgSodium: 80mgCarbohydrates: 10gFiber: 1gSugar: 8gProtein: 3g

    Did you make this recipe?

    Tag me in your Instagram photo - @fakeginger

    © Amanda Livesay
    Cuisine: American / Category: cookie

    Sweet Pork Tacos with Cilantro Ranch Dressing

    Feb 27, 2017

    Slow Cooker Sweet Pork Tacos with Cilantro Ranch Dressing – crockpot shredded pork cooked in a sweet and spicy sauce. Use it to make tacos or burrito bowls and top with easy and delicious homemade cilantro ranch dressing!

    Slow Cooker Sweet Pork Tacos with Cilantro Ranch Dressing - crockpot shredded pork cooked in a sweet and spicy sauce. Use it to make tacos or burrito bowls and top with homemade Cilantro Ranch Dressing!

    (This post originally published in 2014. Photos updated on February 18, 2017.)

    Can we talk TV for a minute? I have to get this off my chest.

    We finished Breaking Bad last week. I have heard so much about it over the past few years so I just knew we were going to love it. We kind of hated it. Well, we hated the first 3 seasons. It took us 3 months to get through them. I finally got really into it in the last episode of the 4th season. Like, really into it. Like, WE HAVE TO WATCH ALL THE EPISODES RIGHT NOW into it. And then when we finally made it to the very last episode? That everyone said was perfect? That everyone said they cried over?

    It was stupid. And I hated it. And I wish I’d never even started the show.

    Ugh. It was like LOST Part 2 for me. Super frustrating ending where nothing was really wrapped up.

    I’ve given up on TV. Except I’m currently marathoning The White Queen (again) because I’ve been sucked into The Cousins’ War book series by Phillippa Gregory (again).

    Slow Cooker Sweet Pork Tacos with Cilantro Ranch Dressing - crockpot shredded pork cooked in a sweet and spicy sauce. Use it to make tacos or burrito bowls and top with homemade Cilantro Ranch Dressing!

    Ingredients

    Keep scrolling for ingredient amounts!

    • Pork roast
    • Coca Cola
    • Brown sugar
    • Garlic
    • Diced green chilies
    • Tomato sauce
    • Taco seasoning
    • Salsa verde
    • Ranch dressing mix
    • Cilantro
    • Mayonnaise
    • Sour cream
    • Salt
    • Lime juice
    • Cumin
    • Sugar
    • corn tortillas
    • shredded cheese

    Instructions

    • Slow cook pork. Place pork in the slow cooker. In a mixing bowl, whisk together Coke, brown sugar, garlic, diced green chiles, tomato sauce, and taco seasoning. Pour over pork. Cook on low for about 8 hours or until the meat is easily shredded.
    • Shred pork. Shred and place in a large bowl. Pour about ⅓ of a cup of the cooking liquid over the shredded pork and stir.
    • Make dressing. To make the dressing, put all ingredients in a food processor and process until the cilantro is well chopped and distributed.
    • Serve. Serve in tortillas with cheese.

    More Slow Cooker Pork Recipes

    • Mu Shu Pork Lettuce Wraps 
    • Pulled Pork Nachos with Pineapple Salsa 
    • Slow Cooker Pork Carnitas 
    • Slow Cooker Apple Cider Braised Pork
    • Slow Cooker Pork and Butternut Squash Stew

    Make sure you subscribe to my email list to get all my new recipes delivered right to your inbox!

    You can also follow me on Instagram, Facebook, or Pinterest for even more! 

    Slow Cooker Sweet Pork Tacos with Cilantro Ranch Dressing - crockpot shredded pork cooked in a sweet and spicy sauce. Use it to make tacos or burrito bowls and top with homemade Cilantro Ranch Dressing!

    📖 Recipe

    Yield: 12 servings

    Sweet Pork Tacos with Cilantro Ranch Dressing

    Sweet Pork Tacos with Cilantro Ranch Dressing

    Prep Time 20 minutes
    Cook Time 8 hours
    Total Time 8 hours 20 minutes

    Ingredients

    For the pork:

    • 2 to 3 pound pork roast
    • 3 cups Coke
    • 1 cup brown sugar
    • 2 cloves garlic
    • 1 4- ounce can diced green chilies
    • 1 15- ounce can tomato sauce
    • 1 packet taco seasoning

    For the dressing:

    • 1 cup salsa verde
    • 1 packet ranch dressing mix
    • ⅓ cup cilantro
    • ⅓ cup mayonnaise
    • ⅓ cup sour cream
    • 1 clove minced garlic
    • ½ teaspoon salt
    • 1 tablespoon fresh lime juice
    • ¼ teaspoon cumin
    • ¼ cup sugar

    For serving:

    • corn tortillas
    • shredded cheese

    Instructions

    1. Place pork in the slow cooker. In a mixing bowl, whisk together Coke, brown sugar, garlic, diced green chiles, tomato sauce, and taco seasoning. Pour over pork. Cook on low for about 8 hours or until the meat is easily shredded. Shred and place in a large bowl. Pour about ⅓ of a cup of the cooking liquid over the shredded pork and stir.
    2. To make the dressing, put all ingredients in a food processor and process until the cilantro is well chopped and distributed.
    3. Serve in tortillas with cheese.

    Recommended Products

    As an Amazon Associate and member of other affiliate programs, I earn from qualifying purchases.

    • Programmable Slow Cooker
      Programmable Slow Cooker
    • Ranch Dressing Mix
      Ranch Dressing Mix

    Nutrition Information:

    Yield:

    12

    Serving Size:

    1

    Amount Per Serving: Calories: 535Total Fat: 31gSaturated Fat: 11gTrans Fat: 0gUnsaturated Fat: 18gCholesterol: 111mgSodium: 885mgCarbohydrates: 34gFiber: 2gSugar: 29gProtein: 29g

    Did you make this recipe?

    Tag me in your Instagram photo - @fakeginger

    © Amanda Livesay
    Category: slow cooker

    Chocolate Chip Croissant Bread Pudding

    Feb 16, 2017

    Chocolate Chip Croissant Bread Pudding is the most decadent breakfast (or dessert)! Sliced croissants in sweet custard with chocolate chips sprinkled in!

    I love rich chocolate desserts for special occasions. If you need other ideas, try Flourless Chocolate Cake or Brownie Pudding!

    Chocolate Chip Croissant Bread Pudding - the most decadent breakfast (or dessert)! Sliced croissants in sweet custard with chocolate chips sprinkled in!

    It’s been gross and rainy here in Texas and I’m so over it. I had fully switched over to my spring wardrobe and now I’m back in jackets. Not okay.

    But that does mean I have an excuse to eat comfort food and what’s better than buttery croissants baked in a sweet custard with chocolate chips?!

    Chocolate Chip Croissant Bread Pudding - the most decadent breakfast (or dessert)! Sliced croissants in sweet custard with chocolate chips sprinkled in!

    Ingredients for Chocolate Chip Croissant Bread Pudding

    • Croissants – the big bakery kind, cut into thin slices
    • Unsalted butter
    • Eggs
    • Milk
    • Heavy Cream
    • Sugar
    • Vanilla
    • Salt
    • Milk chocolate chips – you can use your favorite chocolate bar too, just cut it into chunks

    How To Make Chocolate Chip Croissant Bread Pudding

    • Arrange croissant slices on a parchment paper-lined baking sheet
    • Drizzle croissant slices with melted butter
    • Back at 350F for 10 minutes
    • While croissants are baking, whisk together eggs, milk, heavy cream, sugar, vanilla and salt in a mixing bowl
    • Transfer half the toasted croissant slices in a 2-quart baking dish
    • Sprinkle with ⅔ of the chocolate chips
    • Top with remaining toasted croissant slices
    • Pour the egg mixture over the croissants, pressing the croissants down gently to make sure everything is covered
    • Cover with aluminum foil and bake at 350F for 30 minutes
    • Uncover and sprinkle with remaining chocolate chips
    • Bake until golden brown, another 15 minutes or so
    • Let sit for 15 minutes before serving
    Chocolate Chip Croissant Bread Pudding - the most decadent breakfast (or dessert)! Sliced croissants in sweet custard with chocolate chips sprinkled in!

    Can You Make Croissant Bread Pudding Ahead

    You can make this Chocolate Chip Croissant Bread Pudding the night before. Make sure it’s cool and then cover it tightly and pop it in the fridge overnight. 

    When you’re ready to bake it, just follow the baking instructions but it may need a few extra minutes. Check to make sure the custard is set by gently shaking the dish. If it’s still liquid, it needs more time. 

    More Chocolate Recipes

    • Flourless Chocolate Cake
    • Nutella Brownies
    • Chocolate Ganache Ice Cream
    • Chocolate Pudding Pie

    Make sure you subscribe to my email list to get all my new recipes delivered right to your inbox!

    You can also follow me on Instagram, Facebook, or Pinterest for even more! 

    📖 Recipe

    Yield: 6 - 8 servings

    Chocolate Chip Croissant Bread Pudding

    Chocolate Chip Croissant Bread Pudding
    Prep Time 20 minutes
    Cook Time 50 minutes
    Additional Time 15 minutes
    Total Time 1 hour 25 minutes

    Ingredients

    • 6 croissants, sliced into 1-inch thick slices
    • 2 tablespoons unsalted butter, melted
    • 3 large eggs
    • 1 cup milk
    • 1 cup heavy cream
    • ¼ cup sugar
    • 1 teaspoon vanilla
    • ¼ teaspoon salt
    • 1 ½ cups milk chocolate chips

    Instructions

    1. Preheat oven to 350F. Line a baking sheet with parchment.
    2. Arrange the croissant slices on the baking sheet and drizzle with melted butter. Bake for about 10 minutes, until they are toasted.
    3. Meanwhile, whisk together eggs, milk, heavy cream, sugar, vanilla, and salt.
    4. Once the croissants are toasted, place half in a 2-quart baking dish. Sprinkle about ⅔ of the chocolate chips over them and then top with remaining croissant slices. Pour the egg mixture over everything, pressing down gently to make sure everything is covered.
    5. Cover with aluminum foil and bake for 30 minutes. Uncover, sprinkle the remaining chocolate chips on top and bake until golden brown, 15 - 20 minutes more.
    6. Let sit for 15 minutes before serving.

    Recommended Products

    As an Amazon Associate and member of other affiliate programs, I earn from qualifying purchases.

    • 2 Quart Baking Dish
      2 Quart Baking Dish
    • Parchment Paper
      Parchment Paper

    Nutrition Information:

    Yield:

    6

    Serving Size:

    1

    Amount Per Serving: Calories: 756Total Fat: 48gSaturated Fat: 28gTrans Fat: 1gUnsaturated Fat: 15gCholesterol: 206mgSodium: 502mgCarbohydrates: 67gFiber: 3gSugar: 39gProtein: 14g

    Did you make this recipe?

    Tag me in your Instagram photo - @fakeginger

    © Amanda Livesay
    Category: pie


    « Previous Page
    Next Page »

    Primary Sidebar

    Amanda Livesay
    Hi, I'm Amanda! DFW food blogger, mom of boys, and crazy dog lady.
    Read more
    Privacy Policy
    Privacy Policy

    Footer

    ↑ back to top

    About

    • Privacy Policy
    • About Fake Ginger

    Newsletter

    • Sign Up for weekly emails featuring new recipes!

    As an Amazon Associate I earn from qualifying purchases.

    Copyright © 2024 FakeGinger.com