• Skip to primary navigation
  • Skip to main content
  • Skip to primary sidebar
  • Home
  • About
  • Recipes

Fake Ginger

menu icon
go to homepage
  • Recipe Index
  • About
  • Subscribe
    • Facebook
    • Instagram
    • Pinterest
  • subscribe
    search icon
    Homepage link
    • Recipe Index
    • About
    • Subscribe
    • Facebook
    • Instagram
    • Pinterest
  • ×
    Home » Page 28

    Bacon Cranberry Baked Brie

    Bacon Cranberry Baked Brie

    Nov 14, 2016

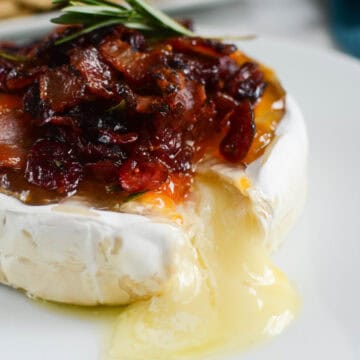
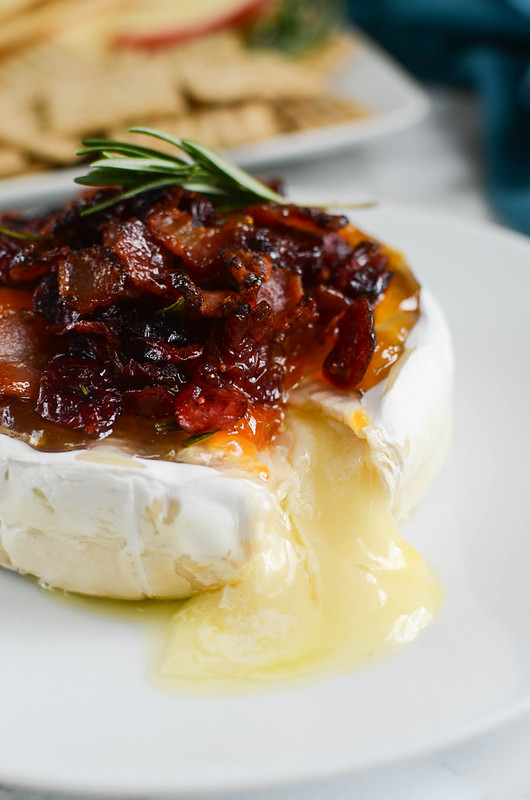
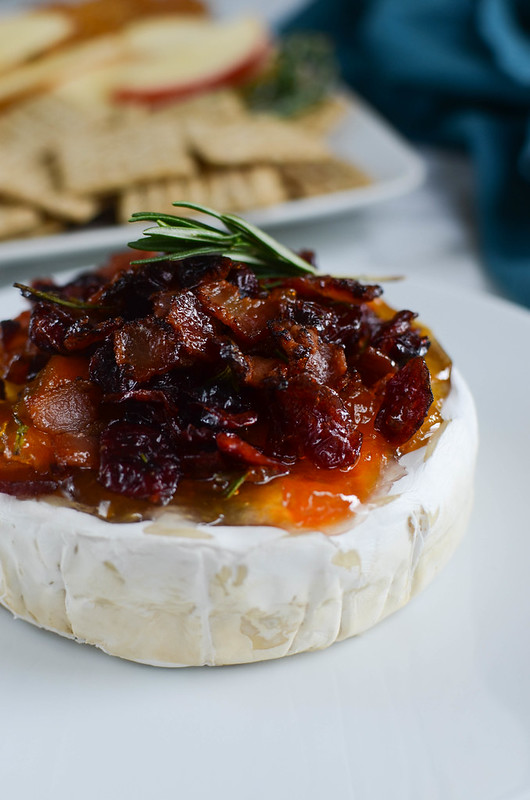
    Bacon Cranberry Baked Brie is the perfect holiday appetizer! Brie topped with bacon, dried cranberries, apricot preserves, fresh rosemary and then baked until melty and delicious. 

    I also have a Maple Pecan Baked Brie recipe that is incredible and the star of every party I’ve made it for. 

    Bacon Cranberry Baked Brie - the perfect holiday appetizer! The sweet and salty combo is so delicious!

    Do you do appetizers at your holiday meals?

    You know I’m a big fan of an appetizer and look for any excuse to have one. I’ve been known to be too full for a holiday dinner because I hovered over the cheese board all afternoon.

    I feel like a baked brie is the most perfect holiday appetizer. It’s easy, takes just a few minutes in the oven, and who doesn’t love melty cheese with deliciousness on top?

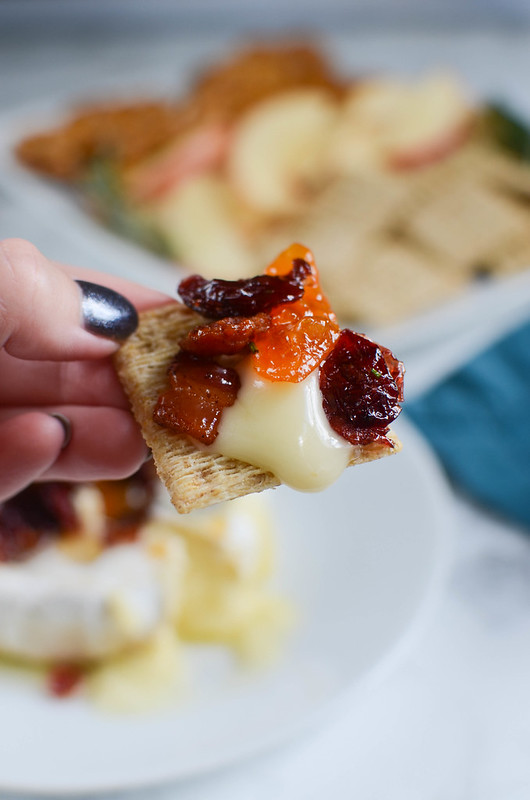
    This may be my most favorite baked brie ever. I wanted something sweet and salty and bacon makes everything better, right? Plus, the creamy melted cheese with the crispy bacon and the chewy dried cranberries was everything I look for in a baked brie. I could’ve stood over this, smearing it on top of crackers, until it was gone.

    Bacon Cranberry Baked Brie - the perfect holiday appetizer! Brie topped with bacon, dried cranberries, apricot preserves, fresh rosemary and then baked until melty and delicious.

    Ingredients

    • Brie cheese
    • Apricot preserves
    • Bacon
    • Dried cranberries
    • Fresh rosemary
    • Assorted crackers and fruit slices

    Instructions

    • Prepare. Preheat oven to 350F. Line a baking sheet with parchment paper.
    • Add toppings to brie. Place brie on the baking sheet. Spread ½ of the apricot preserves on top of the brie. In a small bowl, stir together the remaining apricot preserves, bacon, dried cranberries, and fresh rosemary. Spoon this mixture on top of the brie.
    • Bake until gooey. Bake in preheated oven for 10 minutes; carefully transfer to serving platter while still hot.
    • Serve. Serve by slicing into the piping hot cheese.
    Bacon Cranberry Baked Brie - the perfect holiday appetizer! Brie topped with bacon, dried cranberries, apricot preserves, fresh rosemary and then baked until melty and delicious! Serve with crackers or apple slices at your next holiday party!

    Tips and Tricks

    • Make sure to use a serving platter with a bit of a lip to catch all the ooey gooey cheese
    • You can use another dried fruit if you don’t love cranberries. Dried cherries would be delicious!

    What To Serve with Baked Brie

    Any sort of cracker, sliced fruit, pretzels, cookies, the sky is the limit! 

    I tend to like sweeter dippers for brie and graham crackers are my absolute favorite. Something about the sweetness of the crackers and the earthy brie is just so perfect.

    You can also make it the center of a cheese board filled with other cheeses, cured meats, nuts, and fresh fruit. It’s very versatile and perfect for entertaining. 

    Can You Make Baked Brie Ahead?

    No, don’t try making this ahead of time! The brie needs to be served right out of the oven to get that ooey gooey flowing cheese. 

    More Appetizer Recipes

    • Avocado Feta Salsa
    • Slow Cooker Apple Kielbasa Bites
    • Caesar Deviled Eggs
    • Cowboy Caviar

    Make sure you subscribe to my email list to get all my new recipes delivered right to your inbox!

    You can also follow me on Instagram, Facebook, or Pinterest for even more! 

    📖 Recipe

    Yield: 8 servings

    Bacon Cranberry Baked Brie

    Bacon Cranberry Baked Brie
    Prep Time 10 minutes
    Cook Time 10 minutes
    Total Time 20 minutes

    Ingredients

    • 1 round brie cheese
    • ¼ cup apricot preserves
    • 4 slices bacon, cooked and crumbled
    • ¼ cup dried cranberries
    • 1 tablespoon chopped fresh rosemary
    • assorted crackers and fruit slices, for serving

    Instructions

    1. Preheat oven to 350F.
    2. Line a baking sheet with parchment paper. Place brie on the baking sheet. Spread ½ of the apricot preserves on top of the brie.
    3. In a small bowl, stir together the remaining apricot preserves, bacon, dried cranberries, and fresh rosemary. Spoon this mixture on top of the brie.
    4. Bake in preheated oven for 10 minutes; carefully transfer to serving platter while still hot.
    5. Serve with crackers and fruit.

    Recommended Products

    As an Amazon Associate and member of other affiliate programs, I earn from qualifying purchases.

    • Rimmed Baking Sheet
      Rimmed Baking Sheet
    • Parchment Paper
      Parchment Paper

    Nutrition Information:

    Yield:

    8

    Serving Size:

    1

    Amount Per Serving: Calories: 204Total Fat: 6gSaturated Fat: 2gTrans Fat: 0gUnsaturated Fat: 4gCholesterol: 9mgSodium: 176mgCarbohydrates: 34gFiber: 4gSugar: 10gProtein: 7g

    Did you make this recipe?

    Tag me in your Instagram photo - @fakeginger

    © Amanda Livesay
    Category: appetizer

    Cranberry Almond Broccoli Salad

    Nov 14, 2016

    Cranberry Almond Broccoli Salad is a lightened up version of the classic! Broccoli, crumbled bacon, almonds, red onion, and dried cranberries in a creamy, tangy dressing. Perfect side dish for a summer party or a holiday dinner!

    Cranberry Almond Broccoli Salad - a lightened up version of the classic! Broccoli, crumbled bacon, almonds, red onion, and dried cranberries in a creamy, tangy dressing. Perfect side dish for a summer party or a holiday dinner!

    For this fun twist on the classic broccoli salad, I did a mixture of mayo and Greek yogurt to lighten it up. And then it’s also tossed with diced red onion, crumbled bacon, slivered almonds, and dried cranberries.

    This is one of those recipes that gets better as it sits in the fridge so prep it a few hours ahead to make your life a little easier. I usually wait to add the almonds until I’m ready to serve it, though, so they stay nice and crunchy.

    Cranberry Almond Broccoli Salad - a lightened up version of the classic! Broccoli, crumbled bacon, almonds, red onion, and dried cranberries in a creamy, tangy dressing. Perfect side dish for a summer party or a holiday dinner!

    Ingredients

    • Mayo
    • Greek yogurt – the Greek yogurt lightens up the traditional broccoli salad dressing without taking away any flavor or creaminess.
    • Apple cider vinegar
    • Sugar
    • Red onion
    • Broccoli
    • Slivered almonds
    • Dried cranberries – you could also use dried cherries!
    • Bacon

    How To Make Cranberry Almond Broccoli Salad

    • Make dressing. Whisk together mayonnaise, Greek yogurt, apple cider vinegar, sugar, salt and pepper.
    • Combine. Add remaining ingredients and toss together.
    • Chill. Cover and refrigerate at least 1 hour.

    How Long Is It Good For?

    Broccoli salad is good for up to 3 days. Make sure to store it in an airtight container in the fridge.

    Keep in mind that all the ingredients will soften the longer they sit in the fridge.

    More Side Dish Recipes

    • Bacon Ranch Pasta Salad
    • Red Skin Mashed Potatoes
    • Pepperoni Pizza Pasta Salad
    • Crockpot Cheesy Potatoes
    • Honey Roasted Carrots

    Make sure you subscribe to my email list to get all my new recipes delivered right to your inbox!

    You can also follow me on Instagram, Facebook, or Pinterest for even more! 

    📖 Recipe

    Yield: 8 servings

    Cranberry Almond Broccoli Salad

    Cranberry Almond Broccoli Salad

    Cranberry Almond Broccoli Salad is a lightened up version of the classic! Broccoli, crumbled bacon, almonds, red onion, and dried cranberries in a creamy, tangy dressing. Perfect side dish for a summer party or a holiday dinner!

    Prep Time 15 minutes
    Additional Time 1 hour
    Total Time 1 hour 15 minutes

    Ingredients

    • ¼ cup mayonnaise
    • ¼ cup plain Greek yogurt
    • 1 tablespoon apple cider vinegar
    • 1 tablespoon sugar
    • ¼ teaspoon salt
    • ¼ teaspoon pepper
    • ¼ cup finely diced red onion
    • 4 cups fresh broccoli florets
    • ¼ cup slivered almonds
    • ¼ cup dried cranberries
    • 6 slices bacon, cooked and crumbled

    Instructions

    1. In a large bowl, whisk together mayonnaise, Greek yogurt, apple cider vinegar, sugar, salt and pepper until smooth. Add remaining ingredients and toss to make sure everything is coated. Cover and refrigerate at least 1 hour before serving.

    Nutrition Information:

    Yield:

    8

    Serving Size:

    1

    Amount Per Serving: Calories: 161Total Fat: 10gSaturated Fat: 2gTrans Fat: 0gUnsaturated Fat: 8gCholesterol: 12mgSodium: 290mgCarbohydrates: 13gFiber: 3gSugar: 7gProtein: 6g

    Did you make this recipe?

    Tag me in your Instagram photo - @fakeginger

    © Amanda Livesay
    Cuisine: American / Category: Sides

    Maple Bacon Fudge

    Nov 03, 2016

    Maple Bacon Fudge – the perfect sweet and salty treat! Maple fudge with crispy bacon and pecans. These are great in Christmas cookie tins and at holiday parties. 

    Maple Bacon Fudge - the perfect sweet and salty treat! Maple fudge with crispy bacon and pecans. These are great in Christmas cookie tins and at holiday parties. 

    Hey guys, happy almost weekend!

    I haven’t talked to you since Halloween so how was trick-or-treating? We’re really lucky that literally everyone in our large neighborhood has kids so Halloween is always a fun night around here.

    But I guess now it’s time to move onto the holidays. Even though it still feels a little early.

    Normally I’m that psycho putting out lights the day after Halloween but I just can’t handle it happening so early this year.

    Plus, it’s still stupid hot in Texas.

    I won’t lie, though, I was in Austin yesterday and may have run into Trader Joe’s for some of their holiday goodies. Christmas trees, I can skip for now. Buttercream truffles? GIMME.

    Maple Bacon Fudge - the perfect sweet and salty treat! Maple fudge with crispy bacon and pecans. These are great in Christmas cookie tins and at holiday parties. 

    Ingredients

    • Light brown sugar
    • Evaporated milk
    • Unsalted butter – use unsalted because the bacon is going to add plenty of salt to the fudge.
    • Powdered sugar
    • Maple syrup – use a real maple syrup and not a pancake syrup.
    • Pecans – you can use walnuts if you prefer.
    • Bacon – use your favorite bacon. I don’t recommend using anything too thick as the texture of thick bacon can feel a little weird in the fudge.

    Instructions

    • Line an 8×8-inch pan with parchment paper or aluminum foil.
    • Combine the sugar, evaporated milk and butter in a medium saucepan. Bring to a full over medium-high heat and let bubble until it reaches 235F.
    • Remove from the heat and let cool for about 5 minutes.
    • Transfer to a stand mixer and add powdered sugar and maple syrup. Beat until thick and glossy, about 3 minutes.
    • Fold in the pecans and bacon.
    • Pour the mixture into the prepared pan.
    • Chill overnight before trying to slice and serve.
    How Long Is It Good For?

    Homemade fudge will be fine for several weeks in an airtight container in the fridge. I recommend these super airtight glass containers – they will keep your fudge fresh for as long as possible.

    Can You Freeze It?

    You can freeze this fudge for up to 3 months. I would wrap the fudge tightly with plastic wrap and then put it in a freezer ziploc bag.

    More Fudge Recipes

    • Eggnog Fudge
    • Cookies and Cream Fudge
    • White Chocolate Peppermint Fudge
    • Bourbon Praline Fudge
    • Candy Corn Fudge
    • Buckeye Fudge

    Make sure you subscribe to my email list to get all my new recipes delivered right to your inbox!

    You can also follow me on Instagram, Facebook, or Pinterest for even more! 

    📖 Recipe

    Yield: 36 pieces

    Maple Bacon Fudge

    Maple Bacon Fudge

    Maple Bacon Fudge - the perfect sweet and salty treat! Maple fudge with crispy bacon and pecans. These are great in Christmas cookie tins and at holiday parties. 

    Prep Time 20 minutes
    Cook Time 20 minutes
    Total Time 40 minutes

    Ingredients

    • 2 cups light brown sugar
    • 1 5-ounce can evaporated milk
    • 1 cup 2 sticks unsalted butter
    • 2 cups powdered sugar
    • 1 tablespoon maple syrup
    • 1 cup coarsely chopped pecans
    • 4 slices bacon, cooked and crumble

    Instructions

    1. Line an 8x8-inch pan with parchment paper or aluminum foil.
    2. Combine the sugar, evaporated milk and butter in a medium saucepan. Bring to a full over medium-high heat and let bubble until it reaches 235F.
    3. Remove from the heat and let cool for about 5 minutes.
    4. Transfer to a stand mixer and add powdered sugar and maple syrup. Beat until thick and glossy, about 3 minutes. Fold in the pecans and bacon. Pour the mixture into the prepared pan.
    5. Chill overnight before trying to slice and serve.

    Recommended Products

    As an Amazon Associate and member of other affiliate programs, I earn from qualifying purchases.

    • Candy Thermometer
      Candy Thermometer
    • 8x8 Inch Casserole with Lid
      8x8 Inch Casserole with Lid
    • Stand Mixer
      Stand Mixer

    Nutrition Information:

    Yield:

    36

    Serving Size:

    1

    Amount Per Serving: Calories: 142Total Fat: 8gSaturated Fat: 4gTrans Fat: 0gUnsaturated Fat: 4gCholesterol: 16mgSodium: 30mgCarbohydrates: 17gFiber: 0gSugar: 17gProtein: 1g

    Did you make this recipe?

    Tag me in your Instagram photo - @fakeginger

    © Amanda Livesay
    Cuisine: American / Category: candy

    Pear Cider Sangria

    Oct 31, 2016

    Pear Cider Sangria - the perfect fall drink! Just 4 ingredients and so delicious!

    Happy Halloween!

    Are you dressing up today? Tell me you are and tell me how cute you’re going to be.

    I, as you know, still haven’t put out my Halloween decorations so you know I didn’t get a costume. I will put cat ears on and call it a done. But first I have to go searching through my shed to find the bin that contains the cat ears.

    I’m so unprepared for the holidays. At 11 pm last night I was digging through my kids’ backpacks to see if there were notes about Halloween parties and if I needed to send anything.

    I did buy lots of candy though. And I thought I was being smart by not buying any bags with Almond Joys because you know I can’t control myself around them.

    But then I ate all the Baby Ruths.

    Help me.

    …

    Read More

    Slow Cooker Butternut Squash and Turkey Chili

    Oct 27, 2016

    Butternut Squash and Turkey Chili is serious comfort food! Turkey chili filled with butternut squash, black beans, tomatoes, and lots of spices.

    Is everyone obsessed with squash right now or is it just me?

    I feel like every post I’ve put up this month has been squash.

    I have 5 varieties in my pantry right now. And as soon as I cook one, I run to the store to replace it. Just in case I have an emergency and need a sweet dumpling squash right now.

    I can’t get enough.

    Ingredients

    • Olive oil
    • Ground Turkey – you can use ground chicken or ground beef if you prefer.
    • Onion
    • Green bell pepper
    • Jalapeno – adjust the amount of jalapeno to your spice preference.
    • Garlic
    • Black beans – make sure you drain and rinse them before adding to the chili.
    • Fire-roasted diced tomatoes – regular diced tomatoes will work as well. The fire-roasted ones just add a hint of smokiness.
    • Chili powder
    • Cumin
    • Salt and black pepper
    • Butternut squash
    • Low-sodium chicken broth – I recommend low sodium so that you can control the amount of salt in the chili.
    • Masa harina – you can find this in the Mexican food aisle in any large grocery store. If you can’t find it, it’s fine to leave it out. It’s just used to thicken the chili slightly.

    Instructions

    • Cook turkey. Heat avocado oil over medium-high heat. Add ground turkey and cook, breaking it up, until no pink remains. Transfer to slow cooker.
    • Add vegetables and spices. Add onion, green pepper, jalapeno, garlic, black beans, tomatoes, chili powder, cumin, salt, pepper, butternut squash, and chicken broth to slow cooker; stir to combine.
    • Slow cook. Cook on low 8 hours or high for 4 hours.
    • Thicken chili. 30 minutes before serving, stir in 1 tablespoon of masa harina. If after 30 minutes, it still needs to be thicker, stir in the other tablespoon.
    • Serve. Serve with shredded cheese and green onions, if desired.

    How Long Is It Good For?

    This chili is good for up to 3 days in the fridge. Make sure to store it in an airtight container – these glass airtight containers are my favorite for leftovers.

    When you are ready to serve the leftovers, reheat in the microwave or on the stove. If it has thickened a lot in the fridge, a splash of chicken broth will help to get it back to it’s original consistency.

    More Butternut Squash Recipes

    • Butternut Squash and Black Bean Enchiladas
    • Slow Cooker Pork and Butternut Squash Stew
    • Butternut Squash Mac and Cheese
    • Butternut Squash and Apple Soup
    • Roasted Butternut Squash and Goat Cheese Dip

    Make sure you subscribe to my email list to get all my new recipes delivered right to your inbox!

    You can also follow me on Instagram, Facebook, or Pinterest for even more! 

    📖 Recipe

    Yield: 6 - 8 servings

    Slow Cooker Butternut Squash and Turkey Chili

    Slow Cooker Butternut Squash and Turkey Chili

    Butternut Squash and Turkey Chili is serious comfort food! Turkey chili filled with butternut squash, black beans, tomatoes, and lots of spices.

    Prep Time 15 minutes
    Cook Time 4 hours
    Total Time 4 hours 15 minutes

    Ingredients

    • 1 teaspoon avocado oil or olive oil
    • 1 pound ground turkey
    • 1 onion, diced
    • 1 green pepper, diced
    • 1 jalapeno, seeded and minced
    • 2 cloves garlic, minced
    • 1 15 ounce can black beans, rinsed
    • 1 14.5 ounce can fire-roasted diced tomatoes
    • 2 tablespoons chili powder
    • 1 tablespoon cumin
    • ½ teaspoon salt
    • ¼ teaspoon black pepper
    • 3 cups diced butternut squash
    • 2 cups low-sodium chicken broth
    • 1 - 2 tablespoons masa harina
    • shredded cheese and green onions, for serving

    Instructions

    1. Heat avocado oil over medium-high heat. Add ground turkey and cook, breaking it up, until no pink remains. Transfer to slow cooker.
    2. Add onion, green pepper, jalapeno, garlic, black beans, tomatoes, chili powder, cumin, salt, pepper, butternut squash, and chicken broth to slow cooker; stir to combine. Cook on low 8 hours or high for 4 hours. 30 minutes before serving, stir in 1 tablespoon of masa harina. If after 30 minutes, it still needs to be thicker, stir in the other tablespoon.
    3. Serve with shredded cheese and green onions, if desired.

    Recommended Products

    As an Amazon Associate and member of other affiliate programs, I earn from qualifying purchases.

    • Programmable Slow Cooker
      Programmable Slow Cooker
    • Masa Harina
      Masa Harina

    Nutrition Information:

    Yield:

    6

    Serving Size:

    1

    Amount Per Serving: Calories: 211Total Fat: 6gSaturated Fat: 2gTrans Fat: 0gUnsaturated Fat: 4gCholesterol: 5mgSodium: 672mgCarbohydrates: 33gFiber: 11gSugar: 6gProtein: 10g

    Did you make this recipe?

    Tag me in your Instagram photo - @fakeginger

    © Amanda Livesay
    Cuisine: American / Category: slow cooker

    Pumpkin Pie Fudge

    Oct 17, 2016

    Pumpkin Pie Fudge – the taste of pumpkin pie in delicious fudgy bites! Pumpkin, white chocolate, marshmallows, and walnuts for a bit of crunch! Perfect for cookie tins at the holidays!

    Pumpkin Pie Fudge - the taste of pumpkin pie in delicious fudgy bites! Pumpkin, white chocolate, marshmallows, and walnuts for a bit of crunch! Perfect for cookie tins at the holidays!

    This post originally published on November 27, 2008. Wait. Have I really been blogging that long?! Anyway, I’ve updated the photos, the words, everything. Enjoy! 

    Happy Monday!

    How was your weekend? Mine was fabulous. Didn’t leave my house at all.

    Okay, well, I ended up at In-n-Out once but besides that, I only left for dog walks.

    I spent Saturday binging on crime documentaries. You guys. Have you seen There’s Something Wrong with Aunt Diane? It’s a must watch but be warned: I sobbed through the last 20 minutes.

    In between depressing documentaries, I made lots of fudge. I have a bunch of delicious recipes coming up for the holidays but I wanted to share this Pumpkin Pie Fudge now since we’re kind of in peak pumpkin season.

    I’ve seriously been making this recipe for almost 10 years. I always make it for Thanksgiving and then usually again at Christmas.

    It’s not overwhelmingly pumpkin so even the pumpkin haters in my life enjoy it. Plus, it’s a change from the usual mountains of chocolate and peanut butter fudge that I do every year. And it’s perfect in little tins as teacher gifts or whatever.

    Pumpkin Pie Fudge - the taste of pumpkin pie in delicious fudgy bites! Pumpkin, white chocolate, marshmallows, and walnuts for a bit of crunch! Perfect for cookie tins at the holidays!

    How To Make Pumpkin Pie Fudge

    Okay, the bad news is that this fudge requires a candy thermometer. But I promise it’s so worth it. 

    The first step is to boil sugar, butter, evaporated milk, pumpkin puree, corn syrup, and pumpkin pie spice until it reaches 234F, the soft ball stage of candy making. This part takes awhile but you have to get it to 234F in order to get that fudgy texture. 

    Once it reaches that point, remove it from the heat quickly so it doesn’t keep heating and stir in white chocolate, marshmallow cream, walnuts, and vanilla. 

    Then you just pour the fudge into an aluminum-foil lined an (to make removed it from the pan easier) and wait for it to set up. The recipe says 2 hours minimum but I usually let is set overnight just to be safe. 

    How Long Is Fudge Good For?

    Pumpkin Pie Fudge will be good at room temperature for up to 2 weeks. Make sure to store it in an airtight container – these are my favorite glass containers for pretty much everything.

    If you store your fudge in the fridge, it should last for about 1 month. But make sure your container is airtight!

    Can You Freeze Fudge?

    Yes, you can freeze fudge for up to 3 months. I recommend wrapping it tightly in plastic wrap and then placing it in a freezer bag.

    To defrost it, just let it sit on the counter overnight.

    Pumpkin Pie Fudge - the taste of pumpkin pie in delicious fudgy bites! Pumpkin, white chocolate, marshmallows, and walnuts for a bit of crunch! Perfect for cookie tins at the holidays!

    More Fudge Recipes

    • Eggnog Fudge
    • Maple Bacon Fudge
    • Cookies and Cream Fudge
    • Candy Corn Fudge
    • Peppermint Fudge

    More Pumpkin Recipes

    • Pumpkin Roll Bars
    • Pumpkin White Chocolate Blondies
    • Pumpkin Spice Cupcakes
    • Pumpkin Cheesecake Bars
    • Pumpkin Pie Milkshake

    Make sure you subscribe to my email list to get all my new recipes delivered right to your inbox!

    You can also follow me on Instagram, Facebook, or Pinterest for even more! 

    📖 Recipe

    Yield: 36 servings

    Pumpkin Pie Fudge

    Pumpkin Pie Fudge
    Prep Time 10 minutes
    Cook Time 15 minutes
    Additional Time 2 hours
    Total Time 2 hours 25 minutes

    Ingredients

    • 3 cups sugar
    • ¾ cup unsalted butter, melted
    • ⅔ cup evaporated milk
    • 1 cup canned pumpkin puree
    • 2 tbsp. corn syrup
    • 2 ½ tsp. pumpkin pie spice
    • 9 oz. white chocolate, chopped
    • 7 oz. jar marshmallow creme
    • 1 cup walnuts, chopped and toasted
    • 1 tsp. vanilla extract

    Instructions

    1. Stir together first six ingredients in a 3 quart saucepan over medium-high heat and cook, stirring constantly, until mixture comes to a boil. Continue cooking, stirring constantly, until a candy thermometer registers 234F (soft-ball stage).
    2. Remove pan from heat; stir in remaining ingredients until well blended. Pour into a greased aluminum foil-lined 8-inch square pan. Let stand 2 hours or until completely cool; cut fudge into squares.

    Recommended Products

    As an Amazon Associate and member of other affiliate programs, I earn from qualifying purchases.

    • Pumpkin Puree
      Pumpkin Puree
    • Candy Thermometer
      Candy Thermometer
    • Dutch Oven
      Dutch Oven

    Nutrition Information:

    Yield:

    36

    Serving Size:

    1

    Amount Per Serving: Calories: 189Total Fat: 9gSaturated Fat: 4gTrans Fat: 0gUnsaturated Fat: 4gCholesterol: 13mgSodium: 18mgCarbohydrates: 28gFiber: 0gSugar: 26gProtein: 1g

    Did you make this recipe?

    Tag me in your Instagram photo - @fakeginger

    © amanda
    Category: candy


    Slow Cooker Pork and Butternut Squash Stew

    Oct 13, 2016

    Slow Cooker Pork and Butternut Squash Stew is comfort in a bowl! It’s made in the slow cooker so it is perfect for a weeknight dinner during the chilly months.

    Slow Cooker Pork and Butternut Squash Stew - a bowl of comfort! Quickly brown the pork and then toss everything in the slow cooker!

    This is one of my favorite dinners during the cold months. Chunks of pork, butternut squash, a little sweetness from apple juice, and a little heat from red pepper flakes.

    It just tastes like fall in a bowl.

    And it’s all made in the slow cooker so it’s super easy! AND the cut of pork I used for this recipe is always on sale so it’s a fairly inexpensive dinner.

    I like to serve it with rice so the rice can soak up all the soupy goodness but it’s also delicious on it’s own.

    Slow Cooker Pork and Butternut Squash Stew - a bowl of comfort! Quickly brown the pork and then toss everything in the slow cooker!

    Ingredients

    • Pork shoulder roast
    • Flour
    • Salt and pepper
    • Olive oil
    • White onion
    • Butternut squash
    • Apple juice – this adds just a tiniest hint of sweetness and really makes it taste like fall.
    • Low-sodium chicken broth
    • Italian seasoning
    • Crushed red pepper flakes
    • Fresh parsley

    Instructions

    • Brown pork. In a large bowl, toss the pork shoulder chunks, flour, salt, and pepper together until the pork is well coated. Heat the olive oil over medium-high heat in a large skillet. Add the pork and brown on all sides. Transfer to slow cooker.
    • Add ingredients to slow cooker. Add onion, butternut squash, apple juice, chicken broth, Italian seasoning, and red pepper flakes.
    • Slow cook. Cook on low 8 hours or high 4 hours.
    • Serve. Serve with cooked rice if desired. Sprinkle with parsley.

    How Long Is It Good For?

    This stew will be good for 3 days in the fridge. Make sure to store it in an airtight container to keep it fresh for as long as possible.

    I recommend reheating it on the stovetop when you are ready to serve.

    Can You Freeze It?

    You can freeze this pork and butternut squash stew for up to 3 months. Let it cool completely and then transfer to an airtight soup container.

    When you are ready to serve it, let it defrost overnight in the fridge and then reheat on the stove or even in the slow cooker. If it seems to have thickened too much in the freezer, add more broth or water to get it back to it’s original consistency.

    Slow Cooker Pork and Butternut Squash Stew - a bowl of comfort! Quickly brown the pork and then toss everything in the slow cooker!

    More Slow Cooker Recipes

    • Slow Cooker Salisbury Steak Meatballs
    • Slow Cooker Beer and Brown Sugar Kielbasa
    • Slow Cooker Steak Bites
    • Slow Cooker Apple Kielbasa Bites
    • Crockpot Cheeseburgers
    • Crockpot Spicy Italian Drip Beef Sandwiches

    Make sure you subscribe to my email list to get all my new recipes delivered right to your inbox!

    You can also follow me on Instagram, Facebook, or Pinterest for even more! 

    📖 Recipe

    Yield: about 8 servings

    Slow Cooker Pork and Butternut Squash Stew

    Slow Cooker Pork and Butternut Squash Stew

    Slow Cooker Pork and Butternut Squash Stew is comfort in a bowl! It's made in the slow cooker so it is perfect for a weeknight dinner during the chilly months.

    Prep Time 15 minutes
    Cook Time 8 hours
    Total Time 8 hours 15 minutes

    Ingredients

    • 2 ½ pound pork shoulder roast, cut into bite-size chunks
    • ⅓ cup flour
    • ½ teaspoon salt
    • ¼ teaspoon pepper
    • 2 teaspoons olive oil
    • 1 small white onion, diced
    • 2 cups diced butternut squash
    • 1 cup apple juice
    • 1 cup low-sodium chicken broth
    • 1 teaspoon Italian seasoning
    • pinch crushed red pepper flakes
    • cooked rice, for serving (optional)
    • fresh parsley, for serving (optional)

    Instructions

    1. In a large bowl, toss the chunks of Smithfield All Natural Fresh Shoulder Roast, flour, salt, and pepper together until the pork is well coated.
    2. Heat the olive oil over medium-high heat in a large skillet. Add the pork and brown on all sides.
    3. Transfer to slow cooker. Add onion, butternut squash, apple juice, chicken broth, Italian seasoning, and red pepper flakes.
    4. Cook on low 8 hours or high 4 hours.
    5. Serve with cooked rice if desired. Sprinkle with parsley.

    Recommended Products

    As an Amazon Associate and member of other affiliate programs, I earn from qualifying purchases.

    • Programmable Slow Cooker
      Programmable Slow Cooker

    Nutrition Information:

    Yield:

    8

    Serving Size:

    1

    Amount Per Serving: Calories: 269Total Fat: 12gSaturated Fat: 5gTrans Fat: 0gUnsaturated Fat: 6gCholesterol: 68mgSodium: 174mgCarbohydrates: 20gFiber: 2gSugar: 4gProtein: 19g

    Did you make this recipe?

    Tag me in your Instagram photo - @fakeginger

    © Amanda Livesay
    Cuisine: American / Category: slow cooker

    Mummy Oreo Truffles

    Oct 12, 2016

    Mummy Oreo Truffles is a spooky twist on the classic Oreo Truffles. Use crushed Oreos and white almond bark to create these little mummies! These are the cutest treats to bring to Halloween parties!

    Mummy Oreo Truffles - a spooky twist on the classic Oreo Truffles. Use Pumpkin Spice Oreos and white almond bark to create these little mummies! These are the cutest treats to bring to Halloween parties!

    Heeeeey guys! Happy Wednesday!

    Can you believe how close we are to Halloween? I haven’t even put out decorations.

    Well.

    I got them out. And put them all on a table in my living room. Weeks ago.

    And they are still on that table.

    These Mummy Oreo Truffles are the classic Oreo Truffles you know and love with a pumpkin makeover. I mean, you don’t have to use the Pumpkin Spice Oreos but isn’t it just more fun that way? You crush up the Oreos and then mix them with a bit of cream cheese.

    Then they are dressed up to look like mummies!

    I love them and I’ll probably be making them for school Halloween parties this year because not only are they super easy, they’re also something everyone loves. I mean, have you ever met someone who doesn’t love Oreo Truffles?

    I also have Mummified Oreos if you just want to make whole Oreos into cute little mummies!

    Mummy Oreo Truffles - a spooky twist on the classic Oreo Truffles. Use Pumpkin Spice Oreos and white almond bark to create these little mummies! These are the cutest treats to bring to Halloween parties!

    Ingredients

    • Oreos – you can use whatever Oreo flavor you like! I used pumpkin spice Oreos for this recipe because they are just so festive.
    • Cream cheese
    • White almond bark – you should be able to find this chocolate candy coating in the baking aisle of any grocery store.
    • Red frosting

    Instructions

    • Crush the Oreos by either putting them in a zip top bag and using a rolling pin or processing them in a food processor.
    • Transfer the crumbs to the bowl of a stand mixer fitted with the paddle attachment. Beat in softened cream cheese.
    • Refrigerate for about 30 minutes (to make it easier to work with).
    • Shape into 1 inch balls and place on a wax paper lined baking sheet.
    • Once all the balls have been rolled, put the baking sheet in the freezer for about 10 minutes.
    • Melt all but 2 ounces (1 square) of your almond bark by microwaving at 30 second intervals and stirring in between.
    • Once completely melted, quickly dip the Oreo balls into the almond bark, covering completely. Transfer back to the wax paper-lined baking sheet. Repeat with remaining Oreo balls and let dry completely before turning them into mummies.
    • To make the mummies, melt remaining square of almond bark in the microwave. Transfer to a pastry bag with a very small tip (or a zip top bag – just cut a corner off) and pipe the chocolate onto the Oreo balls. Let dry.
    • Put two red dots for the eyes.

    How Long Are Oreo Balls Good For?

    These oreo balls are good for up to 3 weeks in the refrigerator. Make sure to store them in an airtight container so they stay fresh for as long as possible.

    Can You Freeze Oreo Truffles?

    Yes, you can freeze these for up to 3 months.

    If you don’t think you’ll go through the entire batch, don’t mummify half of the Oreo truffles, freeze them, and then decorate them with something cute for Christmas!

    I would wrap them tightly in plastic wrap and then put them in a freezer ziploc bag.

    To defrost, just let them sit in the fridge overnight.

    Inside of oreo ball made with pumpkin spice oreos and coated in white chocolate

    More Halloween Recipes

    • Candy Corn Fudge
    • Jack-O-Lantern Layer Dip
    • Pumpkin Cheese Ball
    • Candy Corn Cookies
    • Halloween Sugar Cookie Bars
    • Graveyard Cake

    Make sure you subscribe to my email list to get all my new recipes delivered right to your inbox!

    You can also follow me on Instagram, Facebook, or Pinterest for even more! 

    📖 Recipe

    Mummy Oreo Truffles

    Mummy Oreo Truffles

    Ingredients

    • 1 10.7 ounce package Oreos
    • 3 ounces cream cheese, softened
    • 12 ounces white almond bark, divided
    • red frosting

    Instructions

    1. Crush the Oreos by either putting them in a zip top bag and using a rolling pin or processing them in a food processor. Transfer the crumbs to the bowl of a stand mixer fitted
    2. with the paddle attachment. Beat in softened cream cheese. Refrigerate for about 30 minutes (to make it easier to work with).
    3. Shape into 1 inch balls and place on a wax paper lined baking sheet. Once all the balls have
    4. been rolled, put the baking sheet in the freezer for about 10 minutes.
    5. Melt all but 2 ounces (1 square) of your almond bark by microwaving at 30 second intervals and
    6. stirring in between. Once completely melted, quickly dip the Oreo balls into the almond bark,
    7. covering completely. Transfer back to the wax paper-lined baking sheet. Repeat with remaining
    8. Oreo balls and let dry completely before turning them into mummies.
    9. To make the mummies, melt remaining square of almond bark in the microwave. Transfer to a
    10. pastry bag with a very small tip (or a zip top bag – just cut a corner off) and pipe the chocolate
    11. onto the Oreo balls. Let dry. Put two red dots for the eyes.

    Recommended Products

    As an Amazon Associate and member of other affiliate programs, I earn from qualifying purchases.

    • White Almond Bark
      White Almond Bark
    • Stand Mixer
      Stand Mixer

    Did you make this recipe?

    Tag me in your Instagram photo - @fakeginger

    © Amanda Livesay

    Bacon Cheddar Mashed Potatoes

    Oct 11, 2016

    Bacon Cheddar Mashed Potatoes is the perfect side dish for every meal! These potatoes are loaded with sour cream, cheddar cheese, bacon, and green onions!

    So if you follow me anywhere, you know I was in Austin at BlogHer Food all weekend. It’s a conference for food bloggers where we all talk about what annoys us about our job and then we eat everything in the city.

    And, in case you’ve ever wondered, I am horrible at conferences. (Very good at the eating part though.)

    I showed up for 3 things the entire conference. And only stayed the full time for 1 of those.

    Sitting still is hard for me, y’all.

    Also, I sat down with a group of girls I didn’t know for the closing keynote and they asked if I had a business card.

    And I didn’t.

    I mean, do I seem like the kind of girl that carries business cards?

    Anyway, one of the girls said, “Aww, you must be a new blogger!”

    So that was kind of how the conference went for me.

    I did get to hang out with friends that I’ve only ever known over the internet which was honestly the only reason I went to begin with so that totally made up for the conference being… ahem… lame.

    How To Make Bacon Cheddar Mashed Potatoes

    Bacon Cheddar Mashed Potatoes are a great option for a holiday meal or with an every day dinner. 

    It starts by boiling peeled and diced russet potatoes until they are fork tender. From there, I always put them in the stand mixer with the whisk attachment but you can mash them by hand if you prefer.

    Melted butter, sour cream, milk, shredded cheddar cheese, salt, and pepper get mixed in until the cheese has melted and the potatoes reach your desired consistency. Then, fold in cooked bacon and chopped green onions, reserving some to put on top if desired. 

    Can You Make Bacon Cheddar Mashed Potatoes Ahead?

    Yes! That’s what makes them perfect for holidays. You can make them a few hours ahead or even overnight!

    Make them ahead and store them in an airtight container in the fridge. To reheat, put them in a pot on the stove over low heat or even in a slow cooker.  You may need to add more milk because they will thicken up.

    Can You Freeze Bacon Cheddar Mashed Potatoes?

    Yes! You can freeze mashed potatoes for up to 3 months. Make sure to use an airtight, freezer-safe container. If using a plastic bag, squeeze as much air out as possible.

    To defrost, allow to sit overnight in the fridge. From there, you can heat on the stove top or in a slow cooker.

    More Side Dish Recipes

    • Red Skin Mashed Potatoes
    • Deviled Egg Pasta Salad
    • Broccoli Salad
    • Crockpot Cheesy Potatoes

    Make sure you subscribe to my email list to get all my new recipes delivered right to your inbox!

    You can also follow me on Instagram, Facebook, or Pinterest for even more! 

    📖 Recipe

    Yield: 6 - 8 servings

    Bacon and Cheddar Mashed Potatoes

    Bacon and Cheddar Mashed Potatoes

    Bacon Cheddar Mashed Potatoes is the perfect side dish for every meal! These potatoes are loaded with sour cream, cheddar cheese, bacon, and green onions!

    Prep Time 15 minutes
    Cook Time 20 minutes
    Total Time 35 minutes

    Ingredients

    • 2 pounds Russet potatoes, peeled and diced
    • 4 tablespoons salted butter, melted
    • ½ cup sour cream
    • ¼ - ½ cup milk
    • ½ cup sharp cheddar cheese, shredded
    • ½ teaspoon salt
    • ¼ teaspoon black pepper
    • ⅓ cup sliced green onions
    • 4 slices bacon, cooked and crumbled

    Instructions

    1. Put diced potatoes in a large pot. Cover with water and bring to a boil over high heat. Reduce heat and simmer until potatoes are fork tender, about 15 minutes. Drain and transfer to a stand mixer fitted with a whisk attachment. Add in melted butter and beat slowly until mostly mashed. Add in sour cream, ¼ cup milk, cheese, salt, and black pepper. Continue beating until it reaches desired consistency, adding remaining ¼ cup of milk if necessary. Use a rubber spatula to stir in half of the green onions and bacon.
    2. Transfer to a serving dish and sprinkle remaining green onions and bacon on top.

    Recommended Products

    As an Amazon Associate and member of other affiliate programs, I earn from qualifying purchases.

    • Clip On Pasta Strainer
      Clip On Pasta Strainer

    Nutrition Information:

    Yield:

    8

    Serving Size:

    1

    Amount Per Serving: Calories: 248Total Fat: 13gSaturated Fat: 7gTrans Fat: 0gUnsaturated Fat: 5gCholesterol: 37mgSodium: 344mgCarbohydrates: 26gFiber: 3gSugar: 2gProtein: 7g

    Did you make this recipe?

    Tag me in your Instagram photo - @fakeginger

    © Amanda Livesay
    Cuisine: American / Category: Sides


    Autumn Squash Soup (Panera Copycat)

    Oct 05, 2016

    Autumn Squash Soup is the best fall soup and so easy! Vegetarian and full of butternut squash and pumpkin!

    One of my other favorite Panera soups is the Chicken and Wild Rice Soup!

    Autumn Squash Soup (Panera Copycat) - this is the best fall soup and so easy! Vegetarian and full of butternut squash and pumpkin!

    I had the best barbecue over the weekend at Black’s BBQ down in Austin.

    I was down there on Friday morning for a work thing and then when it was time to come home and get the kids, I realized I wasn’t ready to be back in Fort Hood so I grabbed them and we drove back to Austin and had barbecue and ice cream and stayed out way past bedtime.

    The brisket was seriously spectacular. And the mac & cheese? Absolutely incredible.

    And then the ice cream was from Spun Ice Cream which I’ve been dying to visit for months. They do the liquid nitrogen thing and I think it is the coolest thing ever. Plus, they use local dairy and only the best ingredients.

    I had the horchata ice cream (I’m obsessed with horchata right now) with peanut brittle. So good. And they gave me a punch card which means I now have to stop every time I’m down in Austin.

    Right?

    Autumn Squash Soup (Panera Copycat) - this is the best fall soup and so easy! Vegetarian and full of butternut squash and pumpkin!

    Keeping with the restaurant theme, my alltime favorite soup is Panera’s Autumn Squash Soup. I think I went there 3 times a week last fall for a cup. It’s an addiction.

    But I finally got the recipe just right! It tastes exactly like Panera’s soup.

    I went through this batch in 2 days.

    By myself.

    Gonna make it again tomorrow.

    Ingredients

    • Avocado oil – I prefer avocado oil but you can use olive oil or coconut oil
    • Onion
    • Garlic
    • Butternut squash – I like to buy the pre-peeled and cubed butternut squash to make preparing this soup really easy. You can also use frozen!
    • Pumpkin puree – pure pumpkin, not the pumpkin pie filling!
    • Vegetable broth – you can use chicken broth if you aren’t worried about it being vegetarian
    • Apple juice – this adds a wonderful apple flavor and just a hint of sweetness
    • Honey
    • Curry powder – just a tiny bit to give it the best flavor
    • Cinnamon
    • Heavy whipping cream – this makes the soup so creamy and luxurious
    • Pumpkin seeds – get the kind out of the shell

    How To Make Autumn Squash Soup

    • Cook aromatics. Saute onion in olive oil until softened. Add garlic.
    • Add remaining ingredients. Add cubed butternut squash, pumpkin puree, vegetable broth, apple juice, honey, curry powder, cinnamon, and salt and pepper.
    • Simmer. Simmer for 15 minutes.
    • Blend. Use an immersion blender and blend until smooth.
    • Add cream. Stir in heavy cream and heat through.
    • Serve. Garnish with pumpkin seeds before serving.

    Can You Freeze Autumn Squash Soup?

    Yes, you can freeze Autumn Squash Soup. Make sure you put the soup in an airtight, freezer-safe container and consume within 3 months. These soup containers are my favorite.  

    To defrost, you can leave it in the fridge overnight and reheat on the stove or slow cooker. 

    Autumn Squash Soup (Panera Copycat) - this is the best fall soup and so easy! Vegetarian and full of butternut squash and pumpkin!

    How Long Is Autumn Squash Soup Good For?

    Autumn Squash Soup will be good in the refrigerator for up to a week. Make sure to store it in an airtight container like these soup containers.

    I don’t recommend adding pumpkin seeds added of time though. They will soften as they sit in the soup and you’ll lose that great crunch!

    To reheat, just put on medium heat in a soup pot and let simmer for about 5 minutes.

    More Comforting Soup Recipes

    • Pasta Fagioli
    • Broccoli Cheddar Soup
    • Dill Pickle Soup
    • Sausage Tortellini Soup
    • Chicken and Wild Rice Soup

    Make sure you subscribe to my email list to get all my new recipes delivered right to your inbox!

    You can also follow me on Instagram, Facebook, or Pinterest for even more! 

    📖 Recipe

    Yield: 6 servings

    Autumn Squash Soup (Panera Copycat)

    Autumn Squash Soup (Panera Copycat)

    Autumn Squash Soup is the best fall soup and so easy! Vegetarian and full of butternut squash and pumpkin!

    Prep Time 15 minutes
    Cook Time 20 minutes
    Total Time 35 minutes

    Ingredients

    • 1 teaspoon avocado oil (or cooking oil of choice)
    • 1 onion, diced
    • 2 cloves garlic, minced
    • 6 cups cubed butternut squash
    • 1 cup pumpkin puree
    • 3 cups vegetable broth
    • 1 cup apple juice
    • 1 tablespoon honey
    • ½ teaspoon curry powder
    • ¼ teaspoon cinnamon
    • salt and pepper
    • ½ cup heavy whipping cream
    • pumpkin seeds, for serving

    Instructions

    1. In a large soup pot, heat oil over medium-high heat. Add onion and cook, stirring occasionally, until onion is soft and translucent. Add garlic and cook until fragrant, about 30 seconds.
    2. Add butternut squash, pumpkin puree, vegetarian broth, apple juice, honey, curry powder, cinnamon, and salt and pepper. Bring to a boil, cover and lower to a simmer. Cook about 15 minutes, until the butternut squash is fork tender. Use an immersion blender or a regular blender to blend until smooth. Stir in heavy cream. Heat through.
    3. Garnish with pumpkin seeds before serving.

    Recommended Products

    As an Amazon Associate and member of other affiliate programs, I earn from qualifying purchases.

    • Dutch Oven
      Dutch Oven
    • Pumpkin Seeds
      Pumpkin Seeds
    • Immersion Blender
      Immersion Blender

    Nutrition Information:

    Yield:

    6

    Serving Size:

    1

    Amount Per Serving: Calories: 263Total Fat: 10gSaturated Fat: 6gTrans Fat: 0gUnsaturated Fat: 4gCholesterol: 22mgSodium: 403mgCarbohydrates: 42gFiber: 10gSugar: 14gProtein: 5g

    Did you make this recipe?

    Tag me in your Instagram photo - @fakeginger

    © Amanda Livesay
    Cuisine: American / Category: soup


    Caramel Apple Cinnamon Rolls

    Sep 08, 2016

    Caramel Apple Cinnamon Rolls will be your new favorite breakfast! Cinnamon rolls filled with caramelized apples and topped with a caramel cheese cheese icing!

    Caramel Apple Cinnamon Rolls - my favorite breakfast! Cinnamon rolls filled with caramelized apples and topped with a caramel cheese cheese icing!

    Hey guys! Happy almost Friday!

    This is a recipe that I originally posted in, like, 2011 or some ridiculous long time ago but I reshot it a couple weeks ago mostly so that I had an excuse to eat them again. So if it sounds familiar, that’s why.

    Anyway, I wanted to tell you about a fun Char-Broil event I attended down in Austin last week. I very rarely get to attend events like this so I was pretty excited when it worked out and I got to sneak out of the house for a few hours to hang out with friends and eat lots of food.

    Char-Broil, Jacobys, Austin TX

    It was at Jacoby’s  and unfortunately, I didn’t get a photo but their patio overlooks the Colorado River and it was gorgeous, especially after the sun went down and they turned on all the fairy lights.

    Of course, the food was the most important part.

    They had brisket and baked beans and kabobs and street corn and pizza.

    The beans, guys!

    They’d smoked the beans underneath the brisket so all the drippings fell into the beans.

    So good.

    Char-broil, Jacobys, Austin TX

    Plus, grilled watermelon and a s’mores bar!

    You know I love a s’mores bar.

    Plus, it was fun to learn all about the grills that Char-Broil has and now I want to buy ALL THE GRILLS.

    (Reminder: I still don’t know how to turn my grill on.)

    Char-Broil, Jacobys, Austin TX

    And it’s always excited to hang out with blog friends! I got a chance to hang out with Kita again and meet Megan from Stetted finally.

    We made the photographer turn the flash off because we were SO SWEATY. You guys, Texas is so hot right now. Even at 8 pm.

    Caramel Apple Cinnamon Rolls!

    So they are your typical cinnamon rolls but with caramelized apples in the center and a caramel cream cheese icing.

    I’m obsessed with them. I had every intention of sending them to my kids’ teachers. I EVEN PACKAGED THEM CUTELY which is so unlike me.

    Ask me how many went to school.

    No, actually, don’t.

    Ingredients

    • Sugar
    • Salt
    • Cinnamon
    • Nutmeg
    • Butter
    • Egg
    • Lemon zest
    • Bread flour
    • Instant yeast
    • Milk
    • Granny Smith apples
    • Cornstarch
    • Vanilla
    • Cream cheese
    • Caramel sauce
    • Powdered sugar

    Instructions

    • Make dough. Cream together sugar, salt, nutmeg, and butter until smooth; add egg and lemon zest and beat until incorporated. Mix in flour, yeast, and milk until a dough forms; switch to dough hook and knead on low about 8 minutes
    • Let dough rise. Place dough in a lightly oiled bowl; cover with plastic wrap and let rise at room temperature until doubled in size, about 2 minutes
    • Make filling. Make the filling by melting butter in a skillet over medium-high heat Add apple slices, sugar, cornstarch, cinnamon, nutmeg, and salt; cook about 18 minutes, stirring occasionally. Remove from heat and stir in vanilla; set aside to cool
    • Make cinnamon sugar. In a small bowl, whisk together sugar and cinnamon
    • Assemble. Roll dough out into a large rectangle. Sprinkle cinnamon sugar mixture over the surface of the dough. Spread the caramelized apples over the top of the dough
    • Shape. Roll the dough up into a log and pinch the seams shut. Slice the log into rolls and transfer to a baking sheet lined with parchment paper
    • Let rise. Cover loosely with plastic wrap and let rise at room temperature 75 – 90 minutes, until doubled in size
    • Bake. Bake at 350F for 20 – 25 minutes, until golden brown
    • Make glaze. Cream together cream cheese and butter until smooth. Mix in caramel sauce, milk, and vanilla. Beat in powdered sugar until smooth
    • Top. Swirl the glaze over the top of the cinnamon rolls
    Caramel Apple Cinnamon Rolls - my favorite breakfast! Cinnamon rolls filled with caramelized apples and topped with a caramel cheese cheese icing!

    More Sweet Breakfast Recipes

    • Maple Twists
    • Blueberry Lemon Sweet Rolls
    • Cinnamon Rolls with Cream Cheese Frosting
    • Maple Bacon Cinnamon Rolls
    • Pineapple Upside Down Muffins

    Make sure you subscribe to my email list to get all my new recipes delivered right to your inbox!

    You can also follow me on Instagram, Facebook, or Pinterest for even more! 

    📖 Recipe

    Yield: 12

    Caramel Apple Cinnamon Rolls

    Caramel Apple Cinnamon Rolls

    Caramel Apple Cinnamon Rolls will be your new favorite breakfast! Cinnamon rolls filled with caramelized apples and topped with a caramel cheese cheese icing!

    Prep Time 2 hours 30 minutes
    Cook Time 30 minutes
    Total Time 3 hours

    Ingredients

    For the cinnamon rolls:

    • 6 tablespoons sugar
    • 1 teaspoon salt
    • 1 teaspoon ground cinnamon
    • pinch ground nutmeg
    • 5 ½ tablespoons unsalted butter, at room temperature
    • 1 large egg, slightly beaten
    • 1 tsp. lemon zest
    • 3 ½ cups bread flour
    • 2 teaspoon instant, rapid rise yeast
    • 1 cup plus 2-4 tablespoon whole milk or buttermilk, at room temperature

    For the filling:

    • 1 tablespoon unsalted butter
    • 3 Granny Smith apples, peeled, cored and cut into ¼-inch slices
    • ¼ cup sugar
    • ½ teaspoon cornstarch
    • ¼ teaspoon ground cinnamon
    • pinch ground nutmeg
    • pinch salt
    • 1 teaspoon vanilla extract
    • 3 tablespoon plus 1 teaspoon sugar
    • ¾ teaspoon ground cinnamon

    For the glaze:

    • 4 ounces cream cheese, softened
    • 1 tablespoon unsalted butter, softened
    • 3 tablespoon caramel sauce
    • 1 tablespoon milk
    • ½ teaspoon vanilla extract
    • 1 cup confectioners’ sugar

    Instructions

    1. In the bowl of an electric mixer, cream together the sugar, salt, cinnamon, nutmeg and butter on medium-high speed until smooth. Mix in the egg and lemon zest until incorporated. Mix in the flour, yeast and milk until a dough forms. Switch to the dough hook and knead on low speed, about 8 minutes until the dough is silky and supple, tacky but not sticky. (You may need to add a little extra flour or liquid to achieve this texture.) Lightly oil a large bowl and transfer the dough to the bowl, turning once to coat. Cover with plastic wrap and let rise at room temperature for about 2 hours, or until doubled in size.
    2. Meanwhile, make the filling. To make the caramelized apples, melt the butter in a skillet over medium-high heat. Add the apple slices, sugar, cornstarch, cinnamon, nutmeg and salt. Mix until the apples are evenly coated. Cook about 18 minutes, stirring occasionally. Remove from the heat and stir in the vanilla. Set aside to cool. In a small bowl, whisk together the sugar and cinnamon to blend; set aside.
    3. Mist a work surface with spray oil. Roll it out into a rectangle with a rolling pin, lightly dusting the dough with flour if needed to keep it from sticking (about 12 x 14 inches for larger rolls or 9 x 18 inches for smaller rolls). Combine the sugar and cinnamon in a small bowl and mix to blend. Sprinkle the cinnamon sugar mixture over the surface of the dough. Evenly distribute the caramelized apples over the top of the dough. Starting with the wide edge, roll up the dough into a cigar-shaped log, creating a cinnamon sugar spiral as you roll. Pinch the seam shut, and with the seam side down, slice the log into your desired number of rolls. Transfer them to a baking sheet lined with parchment paper or a silicone baking mat, placing the rolls about ½-1 inch apart.
    4. Cover loosely with plastic wrap and let rise at room temperature 75-90 minutes, until the rolls have grown into each other and have nearly doubled in size. At this point, the rolls can also be covered and retarded in the refrigerator for up to 2 days. Pull the pan out of the refrigerator 3-4 hours before baking to let the dough proof.
    5. Preheat the oven to 350F. Bake for 20-30 minutes, or until golden brown. Let cool in the baking about 10 minutes, then transfer to a wire rack.
    6. To make the glaze, cream together the cream cheese and butter until smooth. Mix in the caramel sauce, milk and vanilla extract. Add confectioners’ sugar until smooth. Swirl the glaze over the top of the cinnamon rolls. Let cool at least 15-20 minutes before serving.

    Recommended Products

    As an Amazon Associate and member of other affiliate programs, I earn from qualifying purchases.

    • My Favorite Yeast
      My Favorite Yeast
    • Parchment Paper
      Parchment Paper
    • Stand Mixer
      Stand Mixer

    Nutrition Information:

    Yield:

    12

    Serving Size:

    1

    Amount Per Serving: Calories: 396Total Fat: 12gSaturated Fat: 7gTrans Fat: 0gUnsaturated Fat: 4gCholesterol: 46mgSodium: 285mgCarbohydrates: 66gFiber: 2gSugar: 35gProtein: 7g

    Did you make this recipe?

    Tag me in your Instagram photo - @fakeginger

    © Amanda Livesay
    Cuisine: American / Category: breakfast

    Maple Bacon Rice Krispies Treats

    Aug 29, 2016

    The best sweet and salty treat! Maple Bacon Rice Krispies Treats are just like the classic but with maple syrup and crispy bacon.

    Love sweet and salty treats? Try Maple Bacon Fudge and Sweet and Salty Pudding Cookies!

    Maple Bacon Rice Krispies Treats - the classic Rice Krispies Treats with a sweet and salty twist! These are so yummy!

    I spent my weekend watching a part 5 documentary of the OJ Simpson trial which was infuriating and I shouldn’t have allowed myself to watch it. But it was also very interesting and I’m probably gonna start another OJ documentary later today.

    I also nibbled on these Maple Bacon Rice Krispies Treats.

    I had the most amazing Apple Crumble Chicken and Waffles a few weeks ago and ever since then, I can’t stop thinking about maple syrup with savory foods.

    Bacon is good with everything but it turns out that bacon is especially good with marshmallows and maple syrup and Rice Krispies. Even my kids liked them and they usually balk at me putting bacon in sweets.

    Maple Bacon Rice Krispies Treats - the classic Rice Krispies Treats with a sweet and salty twist! These are so yummy!

    Ingredients for Maple Bacon Rice Krispies Treats

    • Butter – you can use a nondairy butter if you want
    • Mini marshmallows
    • Maple syrup
    • Bacon – you want to cook the bacon until crispy so it stays nice and crunchy in the rice krispies treats. You could also do turkey bacon or even a plant-based bacon if you prefer!
    • Rice Krispies cereal

    Instructions

    • Prepare. Line a 9×13-inch pan with parchment paper.
    • Make marshmallow mixture. Melt butter and marshmallows over medium heat. Once melted and smooth, remove from heat and stir in maple syrup and half of the bacon.
    • Add cereal. Add cereal and stir to combine.
    • Let set. Transfer the mixture to the prepared pan and spread to the sides. Sprinkle with remaining bacon. Let cool completely before slicing and serving.

    Storage Tips

    I recommend storing these rice krispies treats in the refrigerator before of the bacon. They will be good for about 3 days.

    Make sure to store them in an airtight container so they retain as much moisture as possible.

    Maple Bacon Rice Krispies Treats - the classic Rice Krispies Treats with a sweet and salty twist! These are so yummy!

    More Marshmallow Recipes

    • Marshmallow Fruit Salad
    • S’mores Fluff
    • Avalanche Bars
    • Pistachio Marshmallow Salad
    • Red, White, and Blue Rice Krispies Treats
    • Lucky Charms Treats
    • Banana Split Fluff

    Make sure you subscribe to my email list to get all my new recipes delivered right to your inbox!

    You can also follow me on Instagram, Facebook, or Pinterest for even more! 

    📖 Recipe

    Yield: about 15 servings

    Maple Bacon Rice Krispies Treats

    Maple Bacon Rice Krispies Treats

    The best sweet and salty treat! Maple Bacon Rice Krispies Treats are just like the classic but with maple syrup and crispy bacon.

    Prep Time 20 minutes
    Total Time 20 minutes

    Ingredients

    • 2 tablespoons butter
    • 10 ounces mini marshmallows
    • 3 tablespoons maple syrup
    • 6 slices cooked and crumbled bacon, divided
    • 6 cups Rice Krispies cereal

    Instructions

    1. Line a 9x13-inch pan with parchment paper. Set aside.
    2. Melt butter and marshmallows over medium heat. Once melted and smooth, remove from heat and stir in maple syrup and half of the bacon. Add cereal and stir to combine. Transfer the mixture to the prepared pan and spread to the sides. Sprinkle with remaining bacon.
    3. Let cool completely before slicing and serving.

    Recommended Products

    As an Amazon Associate and member of other affiliate programs, I earn from qualifying purchases.

    • Parchment Paper
      Parchment Paper
    • 9x13-inch pan
      9x13-inch pan

    Nutrition Information:

    Yield:

    15

    Serving Size:

    1

    Amount Per Serving: Calories: 130Total Fat: 2gSaturated Fat: 1gTrans Fat: 0gUnsaturated Fat: 1gCholesterol: 5mgSodium: 99mgCarbohydrates: 27gFiber: 0gSugar: 14gProtein: 1g

    Did you make this recipe?

    Tag me in your Instagram photo - @fakeginger

    © Amanda Livesay
    Cuisine: American / Category: bars

    DIY Tennis Ball Dog Toy

    Aug 23, 2016

    DIY Tennis Ball Dog Toy - keep your dog from destroying all her tennis balls with this easy DIY toy tutorial!

    Hi, my name is Amanda and I’m the kind of person that stays home on a Friday night and makes DIY dog toys.

    You’re okay with that, right?

    I’m also already contemplating Halloween costumes for all my dogs. Their Halloween picture from last year is still one of my favorites I’ve ever taken and this year’s needs to be even better. I’m thinking about a theme this year. Any ideas?

    The easiest toy you can make! Find a couple shirts (or just 1 if you want it to be all one color) that you don’t wear anymore. Cut 2 wide strips (I’d say 8 to 10 inches – large enough to wrap around the tennis ball) and place the tennis ball in the center of both strips. Wrap them around the ball and secure with a thin piece from one of the shirts.

    Once the ball is secure, you can leave it as is or cut the strips into 3 small strips and braid them.

    My husky is the worst about destroying tennis balls (and all other toys!) so I’m hoping having a ball inside this t-shirt toy will keep that from happening. Plus, I’ve made t-shirt toys before for her and they are pretty indestructible. Much better than most toys you find at the store.

    M&Ms Brownie Batter Dip

    Aug 19, 2016

    M&Ms Brownie Batter Dip is a rich and delicious dessert dip! It starts with boxed brownie mix so it’s quick and easy. Dip fresh fruit or graham crackers!

    If you love dessert dips as much as I do, try Hot Cocoa Dip or Creamy Caramel Apple Dip!

    M&Ms Brownie Batter Dip - rich and delicious dessert dip! It starts with boxed brownie mix so it's quick and easy. Dip fresh fruit or graham crackers!

    You know I love a sweet dip. This is perfect for dipping apple slices or banana slices or strawberry are really delicious in it! Or, graham crackers and vanilla wafers! So many options.

    It’s actually really easy to make, too. You just beat together some softened cream cheese and butter and then mix in a bit of boxed brownie mix. Drizzle in some milk until it reaches the desired consistency and then stir in chopped M&Ms.

    The M&Ms provide the perfect crunch in an otherwise very smooth and creamy dip.

    Seriously easy and a real winner with the kids! (And with the adults!)

    M&Ms Brownie Batter Dip - rich and delicious dessert dip! It starts with boxed brownie mix so it's quick and easy. Dip fresh fruit or graham crackers!

    Ingredients

    • Butter – make sure to bring to room temperature before beginning.
    • Cream cheese – bring it to room temperature before beginning.
    • Brownie mix – just the plain brownie mix with no added nuts or chocolate chunks.
    • Milk – dairy or non-dairy, whatever you have in your fridge.
    • M&Ms – if you want to make this for Christmas or Easter or any other holiday, grab a bag of the seasonal M&Ms!

    Instructions

    • Mix ingredients. In the bowl of a stand mixer fitted with a paddle attachment, beat butter and cream cheese together until smooth. With the mixer on low, slowly add in brownie mix. Add milk until it reaches the desired consistency.
    • Add M&Ms. Use a rubber spatula to stir in the chopped M&Ms.
    • Top and serve! Transfer to the serving bowl and sprinkle with more M&Ms.
    M&Ms Brownie Batter Dip - rich and delicious dessert dip! It starts with boxed brownie mix so it's quick and easy. Dip fresh fruit or graham crackers!

    What To Serve With Brownie Batter Dip?

    • Graham crackers
    • Apple slices
    • Fresh strawberries
    • Pretzels
    • Vanilla wafers
    • Sliced bananas

    How Long Is It Good For?

    Brownie batter dip will be good for up to 5 days in the refrigerator. Make sure to store it in an airtight container.

    It will firm up in the refrigerator so I recommend letting the dip sit at room temperature for about 10 – 15 minutes before serving it.

    M&Ms Brownie Batter Dip - rich and delicious dessert dip! It starts with boxed brownie mix so it's quick and easy. Dip fresh fruit or graham crackers!

    More Recipes with M&Ms

    • M&Ms Chocolate Chip Pudding Cookies
    • Chocolate M&Ms Cake Mix Cookies

    Make sure you subscribe to my email list to get all my new recipes delivered right to your inbox!

    You can also follow me on Instagram, Facebook, or Pinterest for even more! 

    📖 Recipe

    Yield: 15 servings

    M&Ms Brownie Batter Dip

    M&Ms Brownie Batter Dip

    M&Ms Brownie Batter Dip is a rich and delicious dessert dip! It starts with boxed brownie mix so it's quick and easy. Dip fresh fruit or graham crackers!

    Prep Time 10 minutes
    Total Time 10 minutes

    Ingredients

    • ½ cup 1 stick butter, at room temperature
    • 1 8 ounce block cream cheese, at room temperature
    • 1 ½ cups brownie mix
    • 2 - 3 tablespoons milk
    • ½ cup chopped M&Ms, plus more for the top

    Instructions

    1. In the bowl of a stand mixer fitted with a paddle attachment, beat butter and cream cheese together until smooth. With the mixer on low, slowly add in brownie mix. Add milk until it reaches the desired consistency. Use a rubber spatula to stir in the chopped M&Ms. Transfer to the serving bowl and sprinkle with more M&Ms.

    Recommended Products

    As an Amazon Associate and member of other affiliate programs, I earn from qualifying purchases.

    • Electric Mixer
      Electric Mixer

    Nutrition Information:

    Yield:

    15

    Serving Size:

    1

    Amount Per Serving: Calories: 241Total Fat: 16gSaturated Fat: 8gTrans Fat: 0gUnsaturated Fat: 6gCholesterol: 33mgSodium: 170mgCarbohydrates: 23gFiber: 0gSugar: 5gProtein: 2g

    Did you make this recipe?

    Tag me in your Instagram photo - @fakeginger

    © Amanda Livesay
    Cuisine: American / Category: snack

    Homemade Sprinkle Marshmallows

    Aug 11, 2016

    Homemade Sprinkle Marshmallows are vanilla flavored marshmallows with rainbow sprinkles. Only 6 ingredients and so fun for s’mores or hot chocolate!

    Homemade Sprinkle Marshmallows - easy homemade marshmallow recipe. Only 6 ingredients and so fun for s'mores or hot chocolate!

    Homemade marshmallows are one of my favorite things to make. It’s just so satisfying to turn sugar, water, gelatin, and an egg white into marshmallows.

    Seriously though, what genius decided to mix all that together and create the delicious glue that holds all s’mores together?

    I would like to suggest a holiday in that person’s honor.

    If you are intimidated by homemade marshmallows, don’t be. They’re actually very easy, just require patience and a candy thermometer.

    Homemade Sprinkle Marshmallows - easy homemade marshmallow recipe. Only 6 ingredients and so fun for s'mores or hot chocolate!

    Ingredients

    • Unflavored gelatin – you can find this with the boxes of Jello mix in the grocery store. Make sure you get the unflavored kind. You can also order it online.
    • Granulated sugar
    • Egg white – we’re only using the egg whites because they get whipped up and make for really light, fluffy marshmallows.
    • Vanilla
    • Rainbow sprinkles – you don’t have to use rainbow sprinkles but they are more fun than just one color of sprinkles.
    • Butter – this is for greasing the pan to keep the marshmallows from sticking.
    • Powdered sugar – this is to dust the pan to make sure the marshmallows don’t stick.

    How to Make Homemade Marshmallows

    • Soften gelatin. Sprinkle unflavored gelatin over water and set aside to soften.
    • Dissolve sugar. In a saucepan, heat remaining water and sugar over low heat until sugar is dissolved.
    • Heat sugar syrup. Let bubble until the mixture reaches 250F on a candy thermometer.
    • Add gelatin. Remove from heat and whisk in gelatin mixture.
    • Beat egg white. Use an electric mixer to beat egg white to stiff peaks.
    • Combine. Slowly stream the hot syrup into the beaten egg white and beat until mixture is thick and has tripled in size.
    • Add. Fold in vanilla and half the sprinkles.
    • Transfer. Pour mixture into a rimmed baking sheet dusted with powdered sugar.
    • Top. Sprinkle remaining marshmallows over top.
    • Let sit. Let them sit overnight before cutting and serve.
    Homemade Sprinkle Marshmallows - easy homemade marshmallow recipe. Only 6 ingredients and so fun for s'mores or hot chocolate!

    How Long Are Homemade Marshmallows Good For?

    These marshmallows will be good for up to a week. Make sure to store them in an airtight container and they may need to be refrigerated if your house is really warm. 

    Homemade Sprinkle Marshmallows - easy homemade marshmallow recipe. Only 6 ingredients and so fun for s'mores or hot chocolate!

    More Recipes with Sprinkles

    • Birthday Cake Pudding Pops 
    • Cake Batter Blondie Bars 
    • Funfetti Cake Mix Cookies
    • Birthday Cake Ice Cream 
    • Confetti Cookies
    • Birthday Cake Milkshake
    • Homemade Funfetti Cupcakes
    • Funfetti Dip

    Make sure you subscribe to my email list to get all my new recipes delivered right to your inbox!

    You can also follow me on Instagram, Facebook, or Pinterest for even more! 

    📖 Recipe

    Yield: 20 marshmallows

    Homemade Sprinkle Marshmallows

    Homemade Sprinkle Marshmallows

    Homemade Sprinkle Marshmallows are vanilla flavored marshmallows with rainbow sprinkles. Only 6 ingredients and so fun for s'mores or hot chocolate!

    Prep Time 10 minutes
    Cook Time 15 minutes
    Total Time 25 minutes

    Ingredients

    • 1 tablespoon unflavored gelatin
    • ⅔ cup water, divided
    • 1 ¼ cup sugar
    • 1 egg white
    • 1 teaspoon vanilla
    • ½ cup rainbow sprinkles
    • butter and powdered sugar, for greasing the pan

    Instructions

    1. Butter a 9x13-inch pan generously and dust bottom and sides with powdered sugar.
    2. Put ⅓ cup water in a small bowl and sprinkle gelatin over top; set aside to soften.
    3. In a heavy saucepan, heat remaining ⅓ cup water and sugar over low heat, stirring until sugar is dissolved. Increase heat to medium and let bubble, without stirring, until the mixture reaches 250F. Be patient, it can take 10+ minutes. Remove from heat and whisk in the gelatin mixture.
    4. Put the egg white in the bowl of a stand mixer fitted with a whisk and beat to stiff peaks. Lower the mixer to low and slowly stream in the hot syrup. Beat until the mixture is thick and white and has tripled in size. Fold in vanilla and half of the sprinkles.
    5. Pour mixture into the prepared pan and use a spoon to smooth the top. Sprinkle with remaining marshmallows.
    6. Chill overnight.
    7. To remove, run a knife around the sides of the pan and invert onto a powdered sugar covered cutting board. The easiest way to cut the marshmallows is with a pizza cutter. Toss them in powdered sugar after you cut them to make sure they don't stick to each other.
    8. Keep in an airtight container for up to a week.

    Recommended Products

    As an Amazon Associate and member of other affiliate programs, I earn from qualifying purchases.

    • Unflavored Gelatin
      Unflavored Gelatin
    • Candy Thermometer
      Candy Thermometer
    • Rainbow Sprinkles
      Rainbow Sprinkles

    Nutrition Information:

    Yield:

    20

    Serving Size:

    1

    Amount Per Serving: Calories: 103Total Fat: 2gSaturated Fat: 0gTrans Fat: 0gUnsaturated Fat: 1gCholesterol: 2mgSodium: 9mgCarbohydrates: 22gFiber: 0gSugar: 21gProtein: 0g

    Did you make this recipe?

    Tag me in your Instagram photo - @fakeginger

    © Amanda Livesay
    Cuisine: American / Category: candy
    « Previous Page
    Next Page »

    Primary Sidebar

    Amanda Livesay
    Hi, I'm Amanda! DFW food blogger, mom of boys, and crazy dog lady.
    Read more
    Privacy Policy
    Privacy Policy

    Footer

    ↑ back to top

    About

    • Privacy Policy
    • About Fake Ginger

    Newsletter

    • Sign Up for weekly emails featuring new recipes!

    As an Amazon Associate I earn from qualifying purchases.

    Copyright © 2024 FakeGinger.com