• Skip to primary navigation
  • Skip to main content
  • Skip to primary sidebar
  • Home
  • About
  • Recipes

Fake Ginger

menu icon
go to homepage
  • Recipe Index
  • About
  • Subscribe
    • Facebook
    • Instagram
    • Pinterest
  • subscribe
    search icon
    Homepage link
    • Recipe Index
    • About
    • Subscribe
    • Facebook
    • Instagram
    • Pinterest
  • ×
    Home » Page 31

    Crawfish Dip

    Crawfish Dip

    Mar 25, 2016

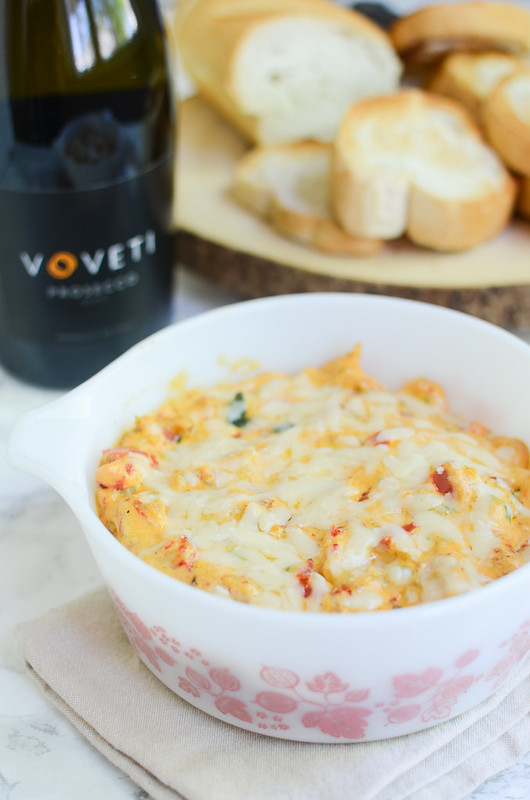
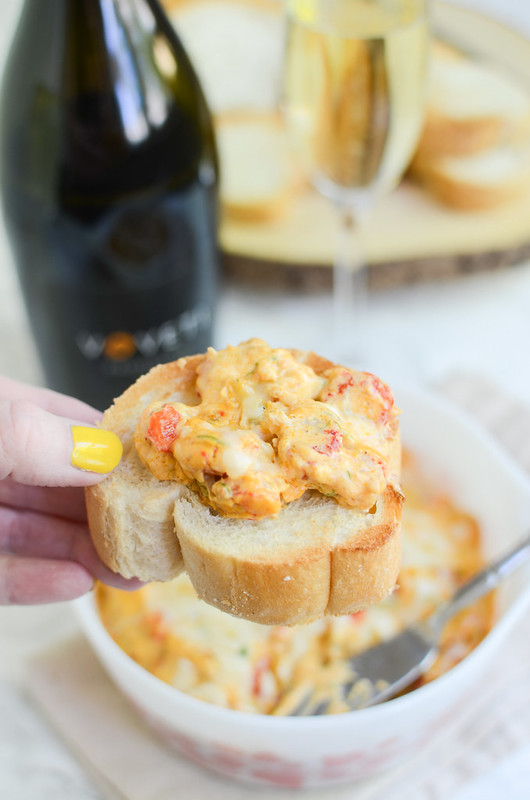
    Crawfish Dip is a creamy, cheesy crawfish dip with a little spice! Serve this on sliced baguettes at your next party or for a delicious date night at home!

    Crawfish Dip - creamy, cheesy crawfish dip with a little spice! Serve this on sliced baguettes at your next party or for a delicious date night at home!

    The grocery store by my house has officially put out the fresh crawfish.

    It’s spring, guys!

    It’s time to get out the cute sundresses and start getting excited about beach trips!

    I had to get some crawfish to make this dip to celebrate! It’s creamy, cheesy, and delicious. It has just enough spice without being too spicy. It’s perfect for a party or New Years Eve!

    Crawfish Dip - creamy, cheesy crawfish dip with a little spice! Serve this on sliced baguettes at your next party or for a delicious date night at home!

    Ingredients

    • Butter
    • Green onions
    • Red bell pepper – you can use any color bell pepper if you don’t like red.
    • Garlic
    • Cooked crawfish tails – you can find crawfish tails in the frozen seafood section of most large grocery stores
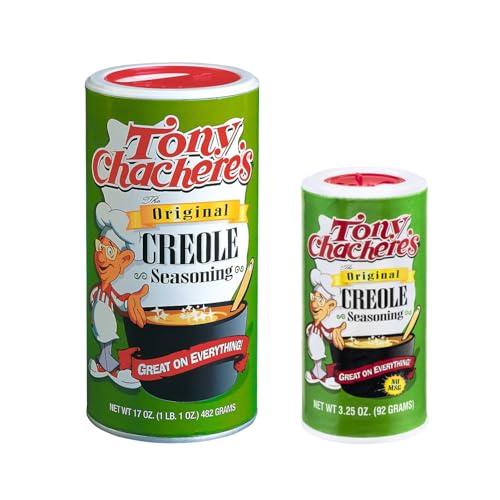
    • Creole seasoning – use your favorite one.
    • Cream cheese
    • Parmesan cheese
    • Sliced baguette – this is for serving. You can toast them or leave them untoasted. You can also use your favorite cracker or even plain potato chips.

    Instructions

    • Cook veggies. Melt butter over medium heat in a large skillet. Add green onions and red bell pepper. Cook, stirring occasionally, until peppers are tender. Add garlic and cook about 30 seconds.
    • Add crawfish. Add crawfish tails and cook about 5 minutes.
    • Combine everything. Lower heat to low and add creole seasoning, cream cheese, and half of the Parmesan cheese; stir until cheeses are melted.
    • Bake. Transfer to a casserole dish and top with remaining cheese. Bake about 15 minutes, or until bubbly. Serve hot.

    How Long Is It Good For?

    Crawfish Dip will be good in the fridge for up to 3 days. Make sure to store it in an airtight container.

    You can reheat in the microwave or oven when you are ready to serve.

    What To Serve with Crawfish Dip

    • Fresh sliced baguette – you can toast the baguette slices or leave them untoasted.
    • Crackers – I like to use triscuits. I think any heartier cracker is delicious with this dip. I don’t recommend a buttery cracker (like Ritz) because the dip itself is already pretty buttery and rich.
    • Plain potato chips – I suggest either the kettle cooked chips or ruffles since they are sturdier than regular potato chips.
    • Fresh vegetables – such as baby carrots, celery sticks, or sliced cucumbers.
    Crawfish Dip - creamy, cheesy crawfish dip with a little spice! Serve this on sliced baguettes at your next party or for a delicious date night at home!

    More Dip Recipes

    • Jalapeno Popper Dip
    • Chicken Burrito Dip
    • Instant Pot Buffalo Chicken Dip
    • Hatch Chile Cheese Dip
    • Cheesy Sausage and Spinach Dip

    Make sure you subscribe to my email list to get all my new recipes delivered right to your inbox!

    You can also follow me on Instagram, Facebook, or Pinterest for even more! 

    📖 Recipe

    Yield: about 8 servings

    Crawfish Dip

    Crawfish Dip

    Crawfish Dip is a creamy, cheesy crawfish dip with a little spice! Serve this on sliced baguettes or crunchy crackers.

    Prep Time 15 minutes
    Cook Time 15 minutes
    Total Time 30 minutes

    Ingredients

    • 2 tablespoons butter
    • 6 green onions, sliced
    • 1 red bell pepper, diced
    • 2 cloves garlic, minced
    • 1 pound cooked crawfish tails
    • 2 teaspoons creole seasoning
    • 1 8-ounce block cream cheese
    • ½ cup Parmesan cheese, divided
    • sliced baguette, for serving

    Instructions

    1. Preheat oven to 350F.
    2. Melt butter over medium heat in a large skillet. Add green onions and red bell pepper. Cook, stirring occasionally, until peppers are tender. Add garlic and crawfish tails and cook about 5 minutes. Lower heat to low and add creole seasoning, cream cheese, and half of the Parmesan cheese; stir until cheeses are melted.
    3. Transfer to a casserole dish and top with remaining cheese.
    4. Bake about 15 minutes, or until bubbly. Serve hot.

    Recommended Products

    As an Amazon Associate and member of other affiliate programs, I earn from qualifying purchases.

    • Cajun Seasoning
      Cajun Seasoning

    Nutrition Information:

    Yield:

    8

    Serving Size:

    1

    Amount Per Serving: Calories: 314Total Fat: 16gSaturated Fat: 9gTrans Fat: 0gUnsaturated Fat: 5gCholesterol: 106mgSodium: 774mgCarbohydrates: 26gFiber: 1gSugar: 4gProtein: 17g

    Did you make this recipe?

    Tag me in your Instagram photo - @fakeginger

    © Amanda Livesay
    Cuisine: American / Category: appetizer

    Birthday Cake for Dogs

    Mar 21, 2016

    Birthday Cake for Dogs – homemade chicken cake for your pup’s birthday! With sweet potato frosting! 

    Birthday Cake for Dogs - homemade chicken cake for your pup's birthday! With sweet potato frosting!

    My favorite child turned 5 recently.

    So I made her a cake of chicken and hot dogs!

    That’s normal, right?

    You guys get me.

    So yeah, we had a party complete with hats for all the dogs and humans. And then all the dogs had cake and all the humans refused to eat the cake.

    Fun times.

    …

    Read More

    Meyer Lemon Strawberry Shortcakes

    Mar 20, 2016

    Meyer lemon season is my favorite time of year! If you can get your hands on some, make these Meyer Lemon Strawberry Shortcakes. Buttery shortcakes with meyer lemon zest, topped with sugared strawberries, and fresh whipped cream.

    Meyer Lemon Strawberry Shortcakes - the perfect spring dessert!

    I know some of you are covered in snow right now (and I’m jealous, trust me) but I have to tell you that it so feels like spring in Texas!

    They weather is amazing, the bluebonnets are popping up, and the berries are already so delicious!

    I am buying pounds and pounds of fresh berries every time I go to the grocery store and I’m putting them in everything I eat. I can’t get enough. I just want to bake ALL THE THINGS with berries.

    If you haven’t baked with meyer lemons yet, you’re definitely missing out! They’re a bit sweeter than regular lemons, a little bit like an orange. I actually caught my 4 year old eating one the other day and couldn’t convince him that it wasn’t an orange!

    So the shortcakes themselves have the meyer lemon zest inside and then they are topped with sweetened strawberries! And then you put a big dollop of meyer lemon whipped cream on top to make them extra delicious!

    Meyer Lemon Strawberry Shortcakes - the perfect spring dessert!

    How Long Are They Good For?

    The shortcakes themselves will be good for 2 – 3 days. I store them in an airtight container at room temperature.

    The strawberries will be good for 1 – 2 days in the refrigerator. Make sure to store them in an airtight container and give them a good stir before serving.

    The whipped cream is best when freshly made.

    Make sure you subscribe to my email list to get all my new recipes delivered right to your inbox!

    You can also follow me on Instagram, Facebook, or Pinterest for even more! 

    📖 Recipe

    Yield: 9 servings

    Meyer Lemon Strawberry Shortcakes

    Meyer Lemon Strawberry Shortcakes

    Meyer lemon season is my favorite time of year! If you can get your hands on some, make these Meyer Lemon Strawberry Shortcakes. Buttery shortcakes with meyer lemon zest, topped with sugared strawberries, and fresh whipped cream.

    Prep Time 20 minutes
    Cook Time 14 minutes
    Total Time 34 minutes

    Ingredients

    • 2 cups all-purpose flour
    • 2 tablespoons sugar
    • 1 tablespoon baking powder
    • ½ teaspoon salt
    • ¼ cup cold butter, cut into cubes
    • 1 tablespoon meyer lemon zest
    • 1 cup milk

    For the strawberries:

    • 3 cups sliced strawberries
    • 1 tablespoon sugar

    For the whipped cream:

    • 1 cup heavy whipping cream
    • 2 tablespoons powdered sugar
    • 1 teaspoon meyer lemon zest

    Instructions

    1. Preheat oven to 425F. Line a baking sheet with parchment paper.
    2. In a large mixing bowl, whisk together flour, sugar, baking powder, and salt. Use a pastry cutter to cut in the butter until the mixture resembles coarse crumbs. Stir in meyer lemon zest and milk until just incorporated - do not overwork!
    3. Drop by heaping tablespoons onto the prepared baking sheet.
    4. Bake 12 - 14 minutes or until golden brown on top. Cool before serving.
    5. Prepare the strawberries while the shortcakes are baking by combining the sliced strawberries and sugar in a bowl. Toss to make sure all the strawberries are coated and refrigerate until ready to serve.
    6. To make the whipped cream, beat the heavy whipping cream to soft peaks. Beat in powdered sugar and meyer lemon zest and beat to desired consistency.
    7. To assemble the shortcakes, split each shortcake in half. Add a spoonful of strawberries and whipped cream to the bottom of the shortcake. Place the top of the shortcake on top.

    Recommended Products

    As an Amazon Associate and member of other affiliate programs, I earn from qualifying purchases.

    • Zester
      Zester
    • Parchment Paper
      Parchment Paper
    • Electric Mixer
      Electric Mixer

    Nutrition Information:

    Yield:

    9

    Serving Size:

    1

    Amount Per Serving: Calories: 293Total Fat: 16gSaturated Fat: 10gTrans Fat: 1gUnsaturated Fat: 5gCholesterol: 46mgSodium: 343mgCarbohydrates: 34gFiber: 2gSugar: 9gProtein: 5g

    Did you make this recipe?

    Tag me in your Instagram photo - @fakeginger

    © Amanda Livesay
    Cuisine: American / Category: cake

    Easter Nest Cupcakes

    Mar 16, 2016

    Easter Nest Cupcakes – cupcakes topped with a sprinkle nest and egg candies! How cute are these for Easter?! You can use any cake mix and frosting you want. 

    Easter Nest Cupcakes - cupcakes topped with a sprinkle nest and egg candies! How cute are these for Easter?! You can use any cake mix and frosting you want. 

    Guys.

    Easter is next weekend.

    NEXT WEEKEND.

    Are you ready?

    I am SO not and I start panicking and then I remember how last Easter we were living in an Army hotel with all 5 of us plus 2 dogs in one room and that we somehow managed to still pull of an awesome Easter. And I feel a little better about being totally not prepared.

    One thing, though, that you can always count on me for is desserts. I am fully prepared to make ALL THE EASTER DESSERTS.

    …

    Read More

    Cajun Tortellini Alfredo

    Mar 15, 2016

    Cajun Tortellini Alfredo is a delicious 20 minute weeknight dinner recipe. Tortellini and smoked sausage in a creamy cajun alfredo sauce!

    I love using tortellini to make quick dinners. Some of my family’s other favorites are Bacon Tortellini Bake and Creamy Tomato Tortellini Soup.

    Cajun Tortellini Alfredo - delicious 20 minute weeknight dinner recipe. Tortellini and smoked sausage in a creamy cajun alfredo sauce!

    Heeeey guys! Today I have a recipe that includes all my favorite things.

    Smoked sausage, cheese, and more cheese!

    It is so easy and will take around 20 minutes from start to finish! Cheese filled tortillini with sliced smoked sausage in a a creamy cajun alfredo sauce. It’s just a little bit spicy and easily adjustable to fit your desired spice level.

    Cajun Tortellini Alfredo - delicious 20 minute weeknight dinner recipe. Tortellini and smoked sausage in a creamy cajun alfredo sauce!

    Ingredients

    • Olive oil
    • Onion
    • Smoked sausage – use whatever kind of smoked sausage you like. You can use a spicy one to make the dish extra spicy!
    • Garlic
    • Cajun seasoning – use your favorite Cajun seasoning. I like Slap Ya Mama.
    • Heavy cream
    • Parmesan cheese
    • Cheese tortellini – you can use fresh or frozen cheese tortellini. The frozen tortellini will take a couple extra minutes to cook.
    • Green onions

    Instructions

    • In a large skillet, heat olive oil over medium-high heat.
    • Add onion and cooked until softened. Add smoked sausage and cook, stirring occasionally, until browned on all sides. Add garlic and cook until fragrant, about 30 seconds. Add cajun seasoning; stir to combine. Stir in heavy cream and bring to a bubble. Lower to a simmer and stir in Parmesan cheese until melted. Add tortellini and toss until everything is combined.
    • Top with green onions and more Parmesan cheese before serving.

    How Long is Tortellini Good For?

    This Cajun Tortellini Alfredo will last for about 3 days in the fridge. Make sure to store it in an airtight container.

    Reheat in the microwave or on the stove top. If the alfredo sauce is too thick, a splash of chicken broth, milk, or even water will help to loosen it up and make it saucy again. 

    Can You Freeze Tortellini?

    Yes! This tortellini can be frozen for up to 3 months. Let it cool completely and then transfer it to an airtight freezer-safe container or freezer ziploc bag.

    I recommend defrosting overnight in the fridge and then reheating in the microwave or stove top. 

    What To Serve with Cajun Tortellini Alfredo?

    I like to serve a nice fluffy roll to soak up the extra sauce. My Oatmeal Rolls are a personal favorite.

    I also love a green veggie on the side, like Roasted Broccolini or Green Beans Almondine. A nice simple side salad also works wonderfully.

    Cajun Tortellini Alfredo - delicious 20 minute weeknight dinner recipe. Tortellini and smoked sausage in a creamy cajun alfredo sauce!

    More Tortellini Recipes

    • Chicken Tortellini Soup
    • Slow Cooker Cheesy Tortellini
    • Cheesy Ham and Tortellini Bake
    • Cheesy Chicken Broccoli Tortellini
    • Sausage Tortellini Soup

    Make sure you subscribe to my email list to get all my new recipes delivered right to your inbox!

    You can also follow me on Instagram, Facebook, or Pinterest for even more! 

    📖 Recipe

    Yield: 6 servings

    Cajun Tortellini Alfredo

    Cajun Tortellini Alfredo
    Prep Time 10 minutes
    Cook Time 15 minutes
    Total Time 25 minutes

    Ingredients

    • 1 teaspoon olive oil
    • 1 small onion, diced
    • 1 12-ounce package smoked sausage, cut into bite size pieces
    • 3 cloves garlic, minced
    • 1 tablespoon cajun seasoning
    • 1 cup heavy cream
    • 1 cup Parmesan cheese, plus more for serving
    • 1 20-ounce package cheese tortellini, cooked according to package instructions
    • 2 green onions, diced

    Instructions

    1. In a large skillet, heat olive oil over medium-high heat.
    2. Add onion and cooked until softened. Add smoked sausage and cook, stirring occasionally, until browned on all sides. Add garlic and cook until fragrant, about 30 seconds. Add cajun seasoning; stir to combine. Stir in heavy cream and bring to a bubble. Lower to a simmer and stir in Parmesan cheese until melted. Add tortellini and toss until everything is combined.
    3. Top with green onions and more Parmesan cheese before serving.

    Recommended Products

    As an Amazon Associate and member of other affiliate programs, I earn from qualifying purchases.

    • Slap Ya Mama Cajun Seasoning
      Slap Ya Mama Cajun Seasoning
    • Dutch Oven
      Dutch Oven

    Nutrition Information:

    Yield:

    6

    Serving Size:

    1

    Amount Per Serving: Calories: 588Total Fat: 33gSaturated Fat: 18gTrans Fat: 1gUnsaturated Fat: 11gCholesterol: 118mgSodium: 1341mgCarbohydrates: 50gFiber: 2gSugar: 3gProtein: 24g

    Did you make this recipe?

    Tag me in your Instagram photo - @fakeginger

    © Amanda Livesay
    Cuisine: American / Category: pasta

    Peanut Butter Banana Pancakes

    Mar 14, 2016

    Peanut Butter Banana Pancakes are fluffy pancakes filled with creamy peanut butter and diced banana. Perfect for a relaxing weekend morning or prepping ahead for easy breakfasts all week!

    Peanut Butter Banana Pancakes - fluffy pancakes filled with creamy peanut butter and diced banana. Perfect for a relaxing weekend morning or prepping ahead for easy breakfasts all week!

    Happy Monday!

    How’s the time change treating you?

    Won’t lie, I slept until 9:42 yesterday morning.

    It was also really nice to have daylight for so long! It was almost 8 by the time the sun finally faded. You know what that means?

    Food bloggers are no longer cooking dinner at 2 pm! Yay sunlight!

    Peanut Butter Banana Pancakes - fluffy pancakes filled with creamy peanut butter and diced banana. Perfect for a relaxing weekend morning or prepping ahead for easy breakfasts all week!

    Ingredients for Peanut Butter Banana Pancakes

    • All-purpose flour
    • Baking powder
    • Salt
    • Granulated sugar
    • Butter
    • Creamy peanut butter
    • Milk
    • Eggs
    • Vanilla
    • Banana

    Instructions

    • Combine dry ingredients (flour, baking powder, salt, sugar, etc)
    • Melt together butter, peanut butter, and milk until smooth
    • Pour butter mixture over dry ingredients and combine
    • Add eggs and vanilla and stir until combined
    • Add in diced banana 
    • Cook in a nonstick skillet
    • Repeat with the remaining pancake batter
    Peanut Butter Banana Pancakes - fluffy pancakes filled with creamy peanut butter and diced banana. Perfect for a relaxing weekend morning or prepping ahead for easy breakfasts all week!

    Can You Freeze Panakes?

    Yes! Pancakes freeze wonderfully. 

    Let the pancakes cool completely before packing them for freezing. You want to freeze them individually so they don’t freeze together. Do this by laying pancakes flat and not touching on a baking sheet. Pop in the freezer for about 30 minutes or until frozen. From there you can package the pancakes in ziploc bags, making sure to squeeze out as much air as possible. 

    To reheat, let the pancakes thaw overnight in the fridge and crisp up in the toaster. If you don’t have time to thaw overnight, just put them in the microwave for about 30 seconds or until thawed. You can crisp them in the toaster once thawed, if desired. 

    Pancakes will be fine in the freezer for up to 3 months. 

    More Pancake Recipes

    • Blueberry Sour Cream Pancakes
    • Pecan Oat Pancakes 
    • Pineapple Cinnamon Pancakes 
    • Buckwheat Pancakes
    • Pumpkin Pancakes

    Make sure you subscribe to my email list to get all my new recipes delivered right to your inbox!

    You can also follow me on Instagram, Facebook, or Pinterest for even more! 

    📖 Recipe

    Yield: 6 servings

    Peanut Butter Banana Pancakes

    Peanut Butter Banana Pancakes
    Prep Time 10 minutes
    Cook Time 15 minutes
    Total Time 25 minutes

    Ingredients

    • 1 ½ cups all-purpose flour
    • 2 tablespoons baking powder
    • ¼ teaspoon salt
    • ⅓ cup sugar
    • 1 tablespoon butter
    • ¼ cup creamy peanut butter
    • 1 ¼ cups milk
    • 2 eggs
    • 1 teaspoon vanilla
    • 1 small banana, diced

    Instructions

    1. In a mixing bowl, whisk together flour, baking powder, salt, and sugar to remove any lumps.
    2. In a small saucepan, heat butter, peanut butter, and milk over low heat, stirring until butter has melted and mixture is smooth. Pour into the flour mixture and stir until just combined. Add eggs and vanilla and stir until incorporated. Fold in banana.
    3. Pour about ¼ cup of the batter onto nonstick skillet over medium heat. Cook until bubbles and edges look browned, about 2 - 3 minutes. Flip and cook another 2 - 3 minutes. Repeat with remaining batter.

    Recommended Products

    As an Amazon Associate and member of other affiliate programs, I earn from qualifying purchases.

    • Cuisinart Griddle
      Cuisinart Griddle

    Nutrition Information:

    Yield:

    6

    Serving Size:

    1

    Amount Per Serving: Calories: 306Total Fat: 10gSaturated Fat: 3gTrans Fat: 0gUnsaturated Fat: 5gCholesterol: 71mgSodium: 693mgCarbohydrates: 45gFiber: 2gSugar: 14gProtein: 10g

    Did you make this recipe?

    Tag me in your Instagram photo - @fakeginger

    © Amanda Livesay
    Cuisine: American / Category: breakfast


    Skinny Coconut Mojito

    Mar 07, 2016

    Skinny Coconut Mojito is the ultimate summer drink recipe! Coconut water, rum, limes, and mint! It’s low calorie but still so delicious.

    Skinny Coconut Mojito - the ultimate summer drink recipe! Coconut water, rum, limes, and mint! It's low calorie but still so delicious.

    Happy new week, guys!

    I hope your weekend was great. The boys and I rode over to Temple for the food truck festival and had an absolute blast. They tried so many things they wouldn’t usually try – I mean, who knew they liked kimchi fries?! And the best part is that I found so many food trucks that I’ll now be stalking on Instagram.

    We also saw bluebonnets on the way home! This is the best time of year in Texas (I say this as if I haven’t only lived here 11 months) and I cannot even wait for all the pretty flowers to take over.

    =The weather was also perfect and got me looking forward to summer cocktails. I love this Skinny Coconut Mojito because no matter what time of year it is, I can make one and pretend it’s summer. It’s really simple, low calorie, but still so delicious!

    Skinny Coconut Mojito - the ultimate summer drink recipe! Coconut water, rum, limes, and mint! It's low calorie but still so delicious. Skinny Coconut Mojito - the ultimate summer drink recipe! Coconut water, rum, limes, and mint! This is low calorie and so delicious!

    Ingredients

    • Fresh mint
    • Lime
    • simple syrup
    • White rum
    • Coconut water
    • Ice
    • Sparkling water

    Instructions

    • Muddle fresh mint and lime wedges in the bottom of a shaker
    • Add simple syrup, white rum, and coconut water
    • Fill with ice and shake until chilled
    • Strain over 2 glasses filled with ice
    • Top with sparkling water
    • Serve immediately

    Where To Get The Tiny Cube Ice Trays?

    This is the most common question I get on ALL my cocktail posts. I use these tiny cube ice trays and they make the most perfect ice! 

    Skinny Coconut Mojito - the ultimate summer drink recipe! Coconut water, rum, limes, and mint! It's low calorie but still so delicious.

    More Skinny Cocktails

    • Skinny Frozen Pina Colada
    • Skinny Kiwi Margaritas
    • Skinny Tequila Sunrise Margaritas
    • Skinny Blood Orange Margaritas

    More Coconut Cocktails

    • Cantaloupe Coconut Margaritas
    • Sparkling Pineapple Coconut Margaritas

    Make sure you subscribe to my email list to get all my new recipes delivered right to your inbox!

    You can also follow me on Instagram, Facebook, or Pinterest for even more! 

    📖 Recipe

    Yield: 2 servings

    Skinny Coconut Mojito

    Skinny Coconut Mojito

    Skinny Coconut Mojito - the ultimate summer drink recipe! Coconut water, rum, limes, and mint! It's low calorie but still so delicious.

    Prep Time 10 minutes
    Total Time 10 minutes

    Ingredients

    • ½ cup fresh mint
    • 1 lime, cut into wedged
    • 2 tablespoons simple syrup
    • ¼ cup white rum
    • 1 cup coconut water
    • ice
    • sparkling water

    Instructions

    1. In the bottom of a shaker, muddle fresh mint and lime wedges. Add simple syrup, white rum, and coconut water. Fill with ice and shake until chilled.
    2. Strain over two glasses filled with ice and top with sparkling water.

    Recommended Products

    As an Amazon Associate and member of other affiliate programs, I earn from qualifying purchases.

    • Ice Cube Trays
      Ice Cube Trays
    • Cocktail Shaker
      Cocktail Shaker
    • Simple Syrup
      Simple Syrup

    Nutrition Information:

    Yield:

    2

    Serving Size:

    1

    Amount Per Serving: Calories: 122Total Fat: 0gSaturated Fat: 0gTrans Fat: 0gUnsaturated Fat: 0gCholesterol: 0mgSodium: 130mgCarbohydrates: 18gFiber: 3gSugar: 13gProtein: 1g

    Did you make this recipe?

    Tag me in your Instagram photo - @fakeginger

    © Amanda Livesay
    Category: drink


    Spicy Orange Shrimp

    Mar 03, 2016

    Spicy Orange Shrimp is sauteed shrimp in a spicy Chinese takeout-inspired orange sauce! It is so delicious and ready in just 20 minutes.

    We also have a Instant Pot Orange Chicken recipe if you prefer chicken!

    Spicy Orange Shrimp - light and healthy dinner recipe! Shrimp in a spicy Asian-inspired sauce. Ready in about 20 minutes so it's a perfect weeknight meal!

    I’m going through this weird shrimp thing right now.

    A couple weeks ago, I couldn’t stop thinking about coconut shrimp. I called every restaurant in the area to see if they had coconut shrimp.

    Every. Restaurant.

    No one had it. So I’ve officially gone through 5 boxes of frozen coconut shrimp since then.

    I’m having shrimp for breakfast, lunch, and dinner.

    What is happening.

    Spicy Orange Shrimp - light and healthy dinner recipe! Shrimp in a spicy Asian-inspired sauce. Ready in about 20 minutes so it's a perfect weeknight meal!

    Ingredients

    • Shrimp – I live in the middle of Texas so I buy my shrimp frozen and just let it defrost overnight in the fridge.
    • Cornstarch – this is going to coat the shrimp to make them crispy and to thicken the sauce slightly.
    • Orange juice – fresh squeezed orange juice is tastiest but you can use bottled juice if that’s what you have.
    • Soy sauce – I suggest low-sodium so you can add the amount of salt that you prefer.
    • Honey – this adds just a hit of sweetness to an overall spicy sauce.
    • Rice wine vinegar
    • Chile paste with garlic – I use sambal oelek
    • Avocado oil – I use avocado oil because it has a high smoke point but you can use olive oil or vegetable oil if you prefer.
    • Fresh ginger
    • Garlic cloves
    • Green onions
    • Cooked rice – for serving. You could do plain white rice or even a fried rice!

    How To Make Spicy Orange Shrimp

    • Prep shrimp. Sprinkle shrimp with cornstarch and toss to coat.
    • Combine sauce ingredients. Whisk together fresh orange juice, soy sauce, honey, rice wine vinegar, and chile paste
    • Cook. Cook ginger and garlic over medium-high heat.
    • Add shrimp .Add shrimp and stir-fry for about 3 minutes
    • Add sauce. Add sauce and sliced green onions and cook until sauce thickens and shrimp is cooked through, about 2 – 3 more minutes.
    • Serve. Serve over cooked rice
    Spicy Orange Shrimp - light and healthy dinner recipe! Shrimp in a spicy Asian-inspired sauce. Ready in about 20 minutes so it's a perfect weeknight meal!

    How Long Is Orange Shrimp Good For?

    This spicy orange shrimp will stay good for up to 3 days when stored in an airtight container in the refrigerator.

    Be careful when reheating shrimp because if they’re cooked too long, they will definitely become rubbery.

    What To Serve with Spicy Orange Shrimp?

    I always serve this shrimp over cooked rice or cauliflower rice, depending on my mood. You could even do fried rice if you’re looking for a takeout feel.

    These are delicious with Roasted Broccolini or Spicy Honey Roasted Brussels Sprouts!

    You could also put them in lettuce wraps with or without cooked rice. 

    More Shrimp Recipes

    • Blackened Shrimp Lettuce Wraps with Mango Salsa
    • Cajun Shrimp and Grits
    • Spicy Shrimp Nachos
    • Shrimp Scampi
    • Blackened Shrimp Alfredo

    Make sure you subscribe to my email list to get all my new recipes delivered right to your inbox!

    You can also follow me on Instagram, Facebook, or Pinterest for even more! 

    📖 Recipe

    Yield: 4 servings

    Spicy Orange Shrimp

    Spicy Orange Shrimp

    Spicy Orange Shrimp is sauteed shrimp in a spicy Chinese takeout-inspired orange sauce! It is so delicious and ready in just 20 minutes.

    Prep Time 10 minutes
    Cook Time 10 minutes
    Total Time 20 minutes

    Ingredients

    • 1 pound peeled and deveined shrimp
    • ½ tablespoon cornstarch
    • ¼ cup fresh orange juice
    • 2 tablespoons soy sauce
    • 2 tablespoons honey
    • 1 tablespoon rice wine vinegar
    • 1 tablespoon chile paste with garlic, like sambal oelek
    • 1 teaspoon avocado oil (or olive oil)
    • ½ tablespoon minced fresh ginger
    • 2 garlic cloves, minced
    • ⅓ cup chopped green onions

    Instructions

    1. Place shrimp in mixing bowl. Sprinkle cornstarch on top and toss to coat. Set aside.
    2. In a small bowl, whisk together fresh orange juice, soy sauce, honey, rice wine vinegar, and chile paste. Set aside.
    3. Heat oil in a large skillet over medium-high heat. Add ginger and garlic and cook until fragrant, about 30 seconds. Add shrimp and stir-fry for 3 minutes. Add sauce and green onions to the pan and cook until sauce thickens and shrimp are cooked, about 2-3 more minutes. Serve hot.

    Recommended Products

    As an Amazon Associate and member of other affiliate programs, I earn from qualifying purchases.

    • Sambal Oelek Chile Paste
      Sambal Oelek Chile Paste
    • Citrus Juicer
      Citrus Juicer

    Nutrition Information:

    Yield:

    4

    Serving Size:

    1

    Amount Per Serving: Calories: 201Total Fat: 3gSaturated Fat: 2gTrans Fat: 0gUnsaturated Fat: 1gCholesterol: 239mgSodium: 1540mgCarbohydrates: 15gFiber: 0gSugar: 10gProtein: 27g

    Did you make this recipe?

    Tag me in your Instagram photo - @fakeginger

    © Amanda Livesay
    Cuisine: Asian / Category: seafood


    Irish Soda Bread

    Mar 01, 2016

    Classic Irish Soda Bread recipe is an easy quick bread studded with raisins. This bread will become a St. Patrick’s Day tradition!

    This post originally published on March 14, 2011. Photos updated on March 1, 2016. 

    I avoid the Irish soda bread trend every Saint Patrick’s Day. Partly because I’m a party pooper and only do themed posts for the bigger but mostly because every other food blogger has a post about soda bread going up about this time. Plus I really didn’t think I’d like it!

    As I mentioned in my recent post about pasta with raisins, I’m trying to be more open-minded with food and even though I was convinced this was going to come out as a hard disk filled with sugary-sweet raisins, I forged ahead.

    I cannot tell you how shocked I am! This bread reminds me of something, maybe a biscuit? It’s soft and fluffy inside with little pockets of sweetness from the raisins and richness from the butter. I’m not sure you could make a better bread, to be completely honest. And I threw it all together in about 15 minutes! Seriously.

    The BEST Irish Soda Bread recipe! So easy and so delicious!

    More St. Patrick’s Day Recipes

    • Homemade Shamrock Shake
    • Corned Beef Pizza Rolls
    • Corned Beef and Irish Cheddar Sliders
    • Lucky Charms Treats

    Make sure you subscribe to my email list to get all my new recipes delivered right to your inbox!

    You can also follow me on Instagram, Facebook, or Pinterest for even more! 

    📖 Recipe

    Yield: about 12 servings

    Irish Soda Bread

    Irish Soda Bread
    Prep Time 20 minutes
    Cook Time 40 minutes
    Total Time 1 hour

    Ingredients

    • 4 cups unbleached all-purpose flour, plus more for kneading
    • 1 teaspoon salt
    • 3 teaspoons baking powder
    • 1 teaspoon baking soda
    • ¼ cup granulated sugar
    • 4 tablespoons unsalted butter, cold
    • 1 cup currants or raisins
    • 1 egg, slightly beaten
    • 1-¾ cup buttermilk
    • 1 tablespoon milk
    • granulated sugar for sprinkling

    Instructions

    1. Preheat oven to 375F. Combine flour, salt, baking powder, soda, and sugar. Add butter and cut in until crumbly. Stir in the raisins.
    2. Combine egg and buttermilk and add to dry ingredients. Stir until blended.
    3. Turn the dough out onto a wooden board sprinkled with flour. Knead the dough for a minute, no longer. If the dough is a little sticky, dust with some extra flour. Take care not to overwork the dough, or the bread will be tough.
    4. Divide dough in half and shape each into a round loaf. Place each loaf into an 8-inch round cake pan or on a large baking sheet. Cut a cross on top of each loaf, about ½-inch deep. Then brush each with milk and sprinkle sugar on the top.
    5. Bake 35-40 minutes until golden. Remove from pans and cool on a wire rack. Slice to serve.

    Recommended Products

    As an Amazon Associate and member of other affiliate programs, I earn from qualifying purchases.

    • 8-inch Round Cake Pan
      8-inch Round Cake Pan

    Nutrition Information:

    Yield:

    12

    Serving Size:

    1

    Amount Per Serving: Calories: 353Total Fat: 7gSaturated Fat: 4gTrans Fat: 0gUnsaturated Fat: 2gCholesterol: 36mgSodium: 878mgCarbohydrates: 60gFiber: 2gSugar: 26gProtein: 14g

    Did you make this recipe?

    Tag me in your Instagram photo - @fakeginger

    © Amanda Livesay


    Cinnamon Rolls with Cream Cheese Frosting

    Feb 16, 2016

    Delicious homemade Cinnamon Rolls with Cream Cheese Frosting are the perfect weekend breakfast. Fluffy yeast dough filled with cinnamon sugar and topped with a sweet glaze.

    Cinnamon Rolls with Cream Cheese Icing - soft and fluffy cinnamon rolls with the most delicious icing!

    Happy Tuesday guys!

    I hope you had a fabulous long weekend (if you were lucky enough to get one)! The kids and I took advantage of the $1 hot dogs at Sonic and may or may not have indulged in slushies as well. And then I spent the rest of the day cleaning out the fridge and my closet and watching a Vanderpump Rules marathon.

    It was fantastic.

    I also went nuts in the kitchen and made cookies, muffins, and these cinnamon rolls with cream cheese frosting.

    I can’t remember the last time I made cinnamon rolls. Probably not since we lived in Colorado!

    But cinnamon rolls are one of my favorite things to make. I love the process. The making of dough, rising, filling and rolling, another rise, baking, frosting. I love how long it takes. It makes it that much more exciting when they’re finally done and frosted with amazingly delicious cream cheese frosting!

    I am obsessed with these. They are so fluffy and perfect. Warm them up for, like, 20 seconds just so the frosting gets melty… perfection.

    Cinnamon Rolls with Cream Cheese Icing - soft and fluffy cinnamon rolls with the most delicious icing!

    Ingredients

    • Active dry yeast
    • Granulated sugar – you will need sugar for the dough and the filling.
    • Warm water – this is to bloom the yeast. You want it between 100F – 110F. Any high and you risk killing the yeast.
    • Milk – you will be using milk in the dough and the cream cheese frosting.
    • Instant vanilla pudding mix – this adds a delicious vanilla flavor and also keeps the cinnamon rolls nice and soft.
    • Egg
    • Butter – you will need butter for the dough, the filling, and the cream cheese frosting.
    • Cinnamon – this is for the filling.
    • Cream cheese – make sure to bring it to room temperature before beginning the recipe.
    • Vanilla
    • Powdered sugar – you want to use powdered sugar in a frosting because it dissolves more easily than granulated sugar.

    How To Make Cinnamon Rolls

    • Bloom yeast. In a small bowl, dissolve yeast and sugar in warm water. Let sit until bubbly, about 5 minutes.
    • Make dough. Using an electric mixer, beat milk and pudding mix together; let stand 1 minute. Beat in egg, melted butter, salt, and yeast mixture. Add flour, ½ cup at a time, beating well after each addition. Switch to the dough hook or knead by hand for about 6 minutes.
    • Rise. Transfer to a greased bowl, cover, and let rise until doubled, about 1 hour.
    • Make filling. Stir together sugar and cinnamon.
    • Make cinnamon rolls. Divide the dough into two sections and roll out into large rectangles. Brush each with butter and sprinkle with the cinnamon sugar mixture. Roll up and pinch seam to seal. Slice into rolls and place in a greased 9×13-inch baking pan.
    • Ride. Cover and let rise until doubled, about 45 minutes.
    • Bake. Bake at 350F for 20 – 25 minutes or until golden brown.
    • Make cream cheese frosting. Beat together cream cheese and butter until creamy. Add vanilla and beat until combined. Slowly add in powdered sugar until no lumps remain. Drizzle in milk until it reaches the desired consistency.
    • Frost. Spread cream cheese frosting over the warm cinnamon rolls.
    Cinnamon Rolls with Cream Cheese Icing - soft and fluffy cinnamon rolls with the most delicious icing!

    How Long Are They Good For?

    These cinnamon rolls will be good for up to 5 days. Because of the cream cheese, they need to be stored in the refrigerated. Make sure to use an airtight container.

    You can serve them straight from the fridge or warm them up for a few seconds in the microwave.

    More Breakfast Recipes

    • Blueberry Overnight Oats
    • Overnight Ham Breakfast Casserole
    • Chocolate Chip Pancakes
    • Pineapple Upside Down Muffins
    • Biscuits and Gravy Casserole

    Make sure you subscribe to my email list to get all my new recipes delivered right to your inbox!

    You can also follow me on Instagram, Facebook, or Pinterest for even more! 

    📖 Recipe

    Yield: 24 rolls

    Cinnamon Rolls with Cream Cheese Frosting

    Cinnamon Rolls with Cream Cheese Frosting

    Delicious homemade Cinnamon Rolls with Cream Cheese Frosting are the perfect weekend breakfast. Fluffy yeast dough filled with cinnamon sugar and topped with a sweet glaze.

    Prep Time 20 minutes
    Cook Time 25 minutes
    Additional Time 2 hours
    Total Time 2 hours 45 minutes

    Ingredients

    • 1 ¼ ounce package active dry yeast
    • 1 tablespoon granulated sugar
    • ¼ cup warm water (between 100F - 110F)
    • 1 cup milk
    • ⅓ cup instant vanilla pudding mix
    • 1 egg
    • ¼ cup butter, melted
    • 1 teaspoon salt
    • 3 - 3 ½ cups flour

    For the filling:

    • ¾ cup sugar
    • 1 tablespoon cinnamon
    • ¼ cup butter, melted

    For the cream cheese frosting:

    • 4 ounces cream cheese, softened
    • 2 tablespoons butter, softened
    • 1 teaspoon vanilla
    • 1 ½ cups powdered sugar
    • 1 - 2 tablespoons milk

    Instructions

    1. In a small bowl, dissolve yeast and sugar in warm water. Let sit until bubbly, about 5 minutes.
    2. Using an electric mixer, beat milk and pudding mix together; let stand 1 minute. Beat in egg, melted butter, salt, and yeast mixture. Add flour, ½ cup at a time, beating well after each addition. Switch to the dough hook or knead by hand for about 6 minutes.
    3. Transfer to a greased bowl, cover, and let rise until doubled, about 1 hour.
    4. For the filling, stir together sugar and cinnamon.
    5. Divide the dough into two sections and roll out into large rectangles. Brush each with butter and sprinkle with the cinnamon sugar mixture. Roll up and pinch seam to seal. Slice into rolls and place in a greased 9x13-inch baking pan. Cover and let rise until doubled, about 45 minutes.
    6. Preheat oven to 350F.
    7. Bake 20 - 25 minutes or until golden brown. Frost with cream cheese frosting.

    To make the frosting:

    1. Beat together cream cheese and butter until creamy. Add vanilla bean paste and beat until combined. Slowly add in powdered sugar until no lumps remain. Drizzle in milk until it reaches the desired consistency.

    Recommended Products

    As an Amazon Associate and member of other affiliate programs, I earn from qualifying purchases.

    • Rubber Spatulas
      Rubber Spatulas
    • Parchment Paper
      Parchment Paper
    • Electric Mixer
      Electric Mixer
    • 9x13-inch pan
      9x13-inch pan

    Nutrition Information:

    Yield:

    24

    Serving Size:

    1

    Amount Per Serving: Calories: 238Total Fat: 8gSaturated Fat: 5gUnsaturated Fat: 3gCholesterol: 28mgSodium: 166mgCarbohydrates: 39gFiber: 1gSugar: 24gProtein: 4g

    Did you make this recipe?

    Tag me in your Instagram photo - @fakeginger

    © Amanda Livesay
    Cuisine: American / Category: breakfast


    Fluffy Cheesecake – No Bake Cheesecake

    Feb 12, 2016

    No Bake Cheesecake is a creamy cheesecake in a graham cracker crust. No bake and it turns out perfect every time! Only 4 ingredients!

    No Bake Cheesecake - creamy cheesecake in a graham cracker crust. No bake and it turns out perfect every time! Only 4 ingredients!

    Okay.

    You have to choose a favorite dessert. Have to.

    What do you choose?

    I 100% go for cheesecake. Plain cheesecake. Not too sweet, but sweet enough cheesecake.

    Nothing beats it.

    Except maybe my Lemon Bar Cheesecake which is a plain cheesecake with a ribbon of lemon curd running through it! 

    The problem with cheesecake is that it’s kind of a pain to make. There’s a lot of beating and mixing to get it nice and smooth. Then there’s a lot of crossing your fingers that it won’t crack. Or that your springform pan won’t leak. Or that the center won’t still be jiggly when you cut into it.

    But this Fluffy Cheesecake recipe is definitely no fuss. It’s no-bake, the ingredient list is short, and it takes only minutes to prepare. The only hard part about the recipe is waiting 3 hours for it to chill in the fridge.

    No Bake Cheesecake - creamy cheesecake in a graham cracker crust. No bake and it turns out perfect every time! Only 4 ingredients!

    Ingredients

    • Cream cheese – make sure to bring the cream cheese to room temperature before beginning.
    • Sugar
    • Cool Whip – you are going to fold this in, trying not to deflate it too much so the cheesecake stays nice and fluffy.
    • Graham cracker crumb crust – homemade or store-bought

    How To Make No Bake Cheesecake

    • Make cheesecake. Beat cream cheese and sugar together until well combined. Gently fold in Cool Whip.
    • Transfer. Spoon the mixture into the graham cracker crust.
    • Chill. Refrigerate for at least 3 hours.
    No Bake Cheesecake - creamy cheesecake in a graham cracker crust. No bake and it turns out perfect every time! Only 4 ingredients!

    No Bake Cheesecake - creamy cheesecake in a graham cracker crust. No bake and it turns out perfect every time! Only 4 ingredients!

    How Long Is It Good For?

    This no bake cheesecake will be good for up to 4 days. Make sure to store it in an airtight container in the fridge.

    You can serve it straight from the fridge.

    Can You Make It Ahead?

    This cheesecake needs to chill for at least 3 hours before cutting into it but you can make it as far as 12 hours early. Make sure to store it in an airtight container in the fridge until you are ready to serve it.

    Toppings

    This cheesecake is so delicious that it doesn’t really need toppings but you could top it with any kind of fruit (I used cherry pie filling in the photos) or drizzle it with chocolate sauce or caramel.

    No Bake Cheesecake - creamy cheesecake in a graham cracker crust. No bake and it turns out perfect every time! Only 4 ingredients!

    More No Bake Dessert Recipes

    • No Bake Snickers Pie
    • No Bake Banana Split Pie
    • No Bake Cookie Butter Pie
    • No Bake Million Dollar Pie Bars
    • No Bake Chocolate Candy Cane Pie

    Make sure you subscribe to my email list to get all my new recipes delivered right to your inbox!

    You can also follow me on Instagram, Facebook, or Pinterest for even more! 

    📖 Recipe

    Yield: 8 servings

    Fluffy Cheesecake

    Fluffy Cheesecake

    No Bake Cheesecake is a creamy cheesecake in a graham cracker crust. No bake and it turns out perfect every time! Only 4 ingredients!

    Prep Time 15 minutes
    Additional Time 3 hours
    Total Time 3 hours 15 minutes

    Ingredients

    • 8 ounces cream cheese, softened
    • ⅓ cup sugar
    • 1 (8 ounce) tub frozen whipped topping, thawed
    • 1 ready-to-use graham cracker crumb crust, 6 oz.

    Instructions

    1. Beat cream cheese and sugar together until well combined.
    2. Gently fold in Cool Whip.
    3. Spoon the mixture into the graham cracker crust.
    4. Refrigerate for at least 3 hours.

    Recommended Products

    As an Amazon Associate and member of other affiliate programs, I earn from qualifying purchases.

    • Rubber Spatulas
      Rubber Spatulas
    • Mixing bowls
      Mixing bowls
    • Electric Mixer
      Electric Mixer

    Nutrition Information:

    Yield:

    8

    Serving Size:

    1

    Amount Per Serving: Calories: 148Total Fat: 10gSaturated Fat: 6gUnsaturated Fat: 4gCholesterol: 28mgSodium: 97mgCarbohydrates: 14gFiber: 0gSugar: 12gProtein: 2g

    Did you make this recipe?

    Tag me in your Instagram photo - @fakeginger

    © Amanda Livesay
    Cuisine: American / Category: cake

    Raspberry Cheesecake Brownies

    Feb 11, 2016

    Raspberry Cheesecake Brownies are fudgy brownie topped with a layer of cheesecake with raspberry jam swirls. They start with a boxed brownie mix so they are so easy to make!

    Raspberry Cheesecake Brownies - easy brownies topped with raspberry swirled cheesecake!

    Okay, we’re only days away from Valentine’s Day.

    I’ve bought myself more stuffed animals holding hearts than I’d like to admit.

    I’ve forced my kids to sit down and scribble their name on 20 cartoon-themed cards.

    I’ve made my Valentine’s Day date with some takeout sushi and my DVR.

    I am ready.

    I even made brownies. Topped with cheesecake because cheesecake is perfect for a romantic dinner for two or if you’re all alone.

    I mean, cheesecake solves every problem. Right?

    But then I swirled some raspberry jam into the cheesecake to make it extra festive.

    Ingredients

    • Brownie mix – use your favorite brownie mix (or even homemade recipe). And you will also need any ingredients that the box calls for, such as oil, eggs, and water.
    • Cream cheese – make sure to soften the cream cheese before beginning the recipe.
    • Sweetened condensed milk – this is what is sweetening the cheesecake mixture since we aren’t adding sugar.
    • Eggs
    • Vanilla
    • Raspberry jam – you can, of course, use a different flavor of jam if you prefer.

    How To Make Raspberry Cheesecake Bars

    • Make brownies. Combine brownie mix and all ingredients it calls for. Beat until combined.
    • Transfer. Pour into the prepared pan and bake at 350F for 20 minutes.
    • Make cheesecake mixture. While the brownies are baking, beat cream cheese with an electric mixture until no lumps remain, scraping down the sides as needed. Beat in sweetened condensed milk, eggs, and vanilla until well combined.
    • Top brownies. When the brownies are out of the oven, pour the cheesecake over top and use a rubber spatula to spread to all sides.
    • Add jam. Dollop the raspberry jam on top of the cheesecake and use the tip of a knife to create swirls.
    • Bake. Bake for another 40 minutes or until the cheesecake is set.
    • Cool. Cool completely before slicing and serving.
    Raspberry Cheesecake Brownies - easy brownies topped with raspberry swirled cheesecake!

    How Long Is It Good For?

    Raspberry cheesecake brownies will be good for up to 4 days. Because of the cheesecake layer, they do need to be stored in the fridge. And keep them in an airtight container to keep them fresh for as long as possible.

    You can serve them straight from the fridge or let them sit at room temperature for a few minutes to take the chill off.

    Can You Freeze Them?

    You can freeze these brownies for up to 3 months. I would slice them and wrap them individually in plastic wrap and then place them in a freezer ziploc bag.

    When you are ready to serve them, let them sit in the fridge until defrosted.

    More Brownies Recipes

    • Rocky Road Brownies
    • Peanut Butter Swirl Brownies
    • Cosmic Brownies
    • Peanut Butter Cup Brownies
    • York Peppermint Patty Brownies

    Make sure you subscribe to my email list to get all my new recipes delivered right to your inbox!

    You can also follow me on Instagram, Facebook, or Pinterest for even more! 

    📖 Recipe

    Yield: about 15 servings

    Raspberry Cheesecake Brownies

    Raspberry Cheesecake Brownies

    Raspberry Cheesecake Brownies are fudgy brownie topped with a layer of cheesecake with raspberry jam swirls. They start with a boxed brownie mix so they are so easy to make!

    Prep Time 20 minutes
    Cook Time 1 hour
    Total Time 1 hour 20 minutes

    Ingredients

    For the brownies:

    • 1 box brownie mix (and all ingredients the box calls for)

    For the cheesecake:

    • 2 8 ounce blocks cream cheese, softened
    • 1 14 ounce can sweetened condensed milk
    • 2 eggs
    • 1 teaspoon vanilla
    • ½ cup raspberry jam

    Instructions

    1. Preheat oven to 350F. Line a 9x13-inch pan with parchment paper and spray with oil.
    2. In a large mixing bowl, combine brownie mix and all ingredients it calls for. Beat until combined.
    3. Pour into the prepared pan and bake for 20 minutes.
    4. While the brownies are baking, beat cream cheese with an electric mixture until no lumps remain, scraping down the sides as needed. Beat in sweetened condensed milk, eggs, and vanilla until well combined.
    5. When the brownies are out of the oven, pour the cheesecake over top and use a rubber spatula to spread to all sides. Dollop the raspberry jam on top of the cheesecake and use the tip of a knife to create swirls.
    6. Bake for another 40 minutes or until the cheesecake is set.
    7. Cool completely before slicing and serving.

    Recommended Products

    As an Amazon Associate and member of other affiliate programs, I earn from qualifying purchases.

    • Mixing Bowls with Lids
      Mixing Bowls with Lids
    • Parchment Paper
      Parchment Paper
    • Rubber Spatulas
      Rubber Spatulas
    • 9x13-inch pan
      9x13-inch pan
    • Electric Mixer
      Electric Mixer

    Nutrition Information:

    Yield:

    15

    Serving Size:

    1

    Amount Per Serving: Calories: 376Total Fat: 26gSaturated Fat: 10gTrans Fat: 0gUnsaturated Fat: 14gCholesterol: 95mgSodium: 175mgCarbohydrates: 31gFiber: 0gSugar: 27gProtein: 7g

    Did you make this recipe?

    Tag me in your Instagram photo - @fakeginger

    © Amanda Livesay
    Cuisine: American / Category: brownies

    Raspberry Bourbon Smash

    Feb 10, 2016

    Raspberry Bourbon Smash is your new favorite cocktail! Raspberry jam, orange juice, bourbon, and orange liqueur shaken together and served over ice. 

    If you love bourbon drinks, try Strawberry Basil Bourbon Smash and Grapefruit-Ginger Bourbon Sour!

    Raspberry Bourbon Smash - your new favorite cocktail! Raspberry jam, orange juice, bourbon, and orange liqueur smashed together and served over ice. 

    Let me tell you about my new favorite cocktail.

    I bought a bottle of bourbon months ago for a recipe and have been trying to get rid of it ever since. Which explains why I’ve only had bourbon cocktails on the blog this year (margaritas coming soon, I promise!) but omg, it’s the neverending bottle of bourbon.

    Okay, so, this Raspberry Bourbon Smash recipe may look weird because it starts with jam.

    Yeah, jam.

    But I promise it works!

    I was worried it would be super sweet but it really wasn’t. And the jam didn’t give it a weird texture or anything. I really enjoyed it and would totally make it again. I think this would be the perfect poolside drink!

    Raspberry Bourbon Smash - your new favorite cocktail! Raspberry jam, orange juice, bourbon, and orange liqueur smashed together and served over ice. 

    Ingredients

    • Raspberry jam – it’s okay if it has seeds because you will be straining it into the glasses.
    • Orange juice – you can use fresh squeezed orange juice or the bottled stuff. I like to use the Trop50 to keep this a lower calorie cocktail
    • Bourbon – use your favorite bourbon. I like Bulleit for all my bourbon mixed drinks. You can also use whiskey and make it a whiskey smash instead!
    • Orange liqueur
    • Sparkling water
    • Orange slices

    How To Make Raspberry Bourbon Smash

    • Shake ingredients. In a shaker, combine raspberry jam, orange juice, bourbon, and triple sec with ice. Shake vigorously for 15 seconds.
    • Serve. Strain into 2 glasses and top with sparkling water and an orange slice.
    Overhead shot of raspberry cocktails with orange slices on top.

    More Raspberry Cocktails

    • Raspberry Beermosas
    • Raspberry Margaritas
    • Raspberry Lime Rickey

    Make sure you subscribe to my email list to get all my new recipes delivered right to your inbox!

    You can also follow me on Instagram, Facebook, or Pinterest for even more! 

    📖 Recipe

    Yield: 2 servings

    Raspberry Bourbon Smash

    Raspberry Bourbon Smash

    Raspberry Bourbon Smash is your new favorite cocktail! Raspberry jam, orange juice, bourbon, and orange liqueur shaken together and served over ice. 

    Prep Time 15 minutes
    Total Time 15 minutes

    Ingredients

    • ¼ cup raspberry jam
    • ½ cup orange juice
    • ¼ cup bourbon
    • 2 tablespoons orange liqueur
    • sparkling water, for serving
    • orange slices, for serving

    Instructions

    1. In a shaker, combine raspberry jam, orange juice, bourbon, and triple sec with ice. Shake vigorously for 15 seconds.
    2. Strain into 2 glasses and top with sparkling water and an orange slice.

    Recommended Products

    As an Amazon Associate and member of other affiliate programs, I earn from qualifying purchases.

    • Fine Mesh Strainer for Cocktails
      Fine Mesh Strainer for Cocktails
    • Ice Cube Trays
      Ice Cube Trays
    • Cocktail Shaker
      Cocktail Shaker

    Nutrition Information:

    Yield:

    2

    Serving Size:

    1

    Amount Per Serving: Calories: 228Total Fat: 0gSaturated Fat: 0gTrans Fat: 0gUnsaturated Fat: 0gCholesterol: 0mgSodium: 15mgCarbohydrates: 39gFiber: 1gSugar: 29gProtein: 1g

    Did you make this recipe?

    Tag me in your Instagram photo - @fakeginger

    © Amanda Livesay
    Cuisine: American / Category: drink


    Chicken and Wild Rice Soup (Panera Copycat)

    Feb 09, 2016

    This Chicken and Wild Rice Soup tastes just like Panera’s but you don’t have to leave your house! Creamy soup with wild rice, chicken, and veggies. The whole family will love this one! 

    Craving chicken soup? Try our Chicken Tortellini Soup and Lemon Chicken and Rice Soup!

    Chicken and Wild Rice Soup - Panera copycat recipe! Creamy soup with wild rice, chicken, and veggies. The whole family will love this recipe and it's so easy!

    Meet my current favorite soup.

    I’ve made it twice in the last few weeks.

    This is THE EASIEST soup you will ever make. And I make it even easier by grabbing a rotisserie chicken from the grocery store and just shredding it.

    So good. So easy. I’ll probably make it again next week. And the week after that. And probably every time it gets cold because it is the ultimate comfort food. Especially with some fresh bread on the side.

    Definitely double it if you are feeding more than a few people or want some leftovers. I’m even going to consider tripling it if I can find a pot big enough. It reheats really well so it would be perfect for making a big batch on the weekend and taking it for lunch all week long.

    Chicken and Wild Rice Soup - Panera copycat recipe! Creamy soup with wild rice, chicken, and veggies. The whole family will love this recipe and it's so easy!

    Ingredients

    • Olive oil
    • Red onion – you can use whatever color onion you like, the red onions are just more mild and i like the hint of color they add to the finished soup.
    • Carrots
    • Dried marjoram
    • Flour – this is to thicken the soup
    • Near East Long Grain & Wild Rice with Flavor Packet (if you can’t find that one, you can use the Uncle Ben’s version)
    • Low sodium chicken broth – if you use regular chicken broth, make sure to taste it before you season with salt
    • Heavy cream – just a little bit of heavy cream is going to make the soup so rich and creamy!
    • Milk
    • Cooked chicken – I always buy a rotisserie chicken to make prepping this soup even easier!

    Instructions

    • Cook veggies. Cook onion and carrot in oil until softened.
    • Add flour and seasonings.. Add dried marjoram, flour, and seasoning packet from the rice; stir to combine.
    • Add remaining ingredients. Add rice, chicken broth, and water; bring to a boil.
    • Simmer. Cover, lower to a simmer, and let cook for 15 minutes.
    • Add milk. Stir heavy cream and milk into the soup.
    • Add chicken. Stir in the shredded chicken.
    • Simmer. Cook about 30 minutes or until the rice is cooked.
    • Season and serve! Season with salt and pepper to taste.
    Chicken and Wild Rice Soup - Panera copycat recipe! Creamy soup with wild rice, chicken, and veggies. The whole family will love this recipe and it's so easy!

    How Long Is It Good For?

    This soup is good for about 3 days in an airtight container in the refrigerator.

    When you are ready to serve it, you can reheat on the stovetop or microwave. If the soup has thickened too much, use a splash of chicken broth or water to get it back to it’s original consistency.

    Can You Freeze Chicken Wild Rice Soup?

    You can freeze this soup for up to 3 months. Make sure to cool it completely before transferring to a freezer-safe soup container and putting it in the freezer.

    The night before you plan to serve it, let it defrost overnight in the fridge and then you can reheat on the stovetop. If it’s thickened, a little bit of chicken broth or water will help to get it back to it’s original consistency.

    Chicken and Wild Rice Soup - Panera copycat recipe! Creamy soup with wild rice, chicken, and veggies. The whole family will love this recipe and it's so easy!

    Can You Make Chicken Wild Rice Soup Ahead?

    This soup is fine to make the morning of or even the night before you plan to serve it. Just store it in an airtight container in the fridge until you are ready to serve it – and if it’s too thick, add water or chicken broth until it reaches the desired consitency.

    What Goes with Chicken and Wild Rice Soup?

    I like to serve it with a bread. I really like my 7Up Biscuits which are soft and fluffy and total comfort food. I also have a homemade crescent roll recipe that would be delicious. 

    If you are looking for something a little heartier, my Oatmeal Rolls are a great option. 

    A simple side salad is always a great option when serving soup, as well.

    More Soup Recipes

    • Autumn Squash Soup  
    • Creamy Tomato Tortellini Soup 
    • Slow Cooker Cheesy Potato Broccoli Soup
    • Broccoli Cheddar Soup 
    • Dill Pickle Soup

    Make sure you subscribe to my email list to get all my new recipes delivered right to your inbox!

    You can also follow me on Instagram, Facebook, or Pinterest for even more! 

    📖 Recipe

    Yield: 4 servings

    Chicken and Wild Rice Soup (Panera Copycat)

    Chicken and Wild Rice Soup (Panera Copycat)

    This Chicken and Wild Rice Soup tastes just like Panera's but you don't have to leave your house! Creamy soup with wild rice, chicken, and veggies. The whole family will love this one! 

    Prep Time 15 minutes
    Cook Time 45 minutes
    Total Time 1 hour

    Ingredients

    • 1 teaspoon olive oil
    • ¼ cup red onion, diced
    • ½ cup carrots, diced
    • 1 teaspoon dried marjoram
    • 2 tablespoons flour
    • 1 package Near East Long Grain & Wild Rice with Flavor Packet
    • 4 cups low sodium chicken broth
    • 3 cups water
    • ¾ cup heavy cream
    • ¼ cup milk
    • 1 cup cooked and shredded chicken
    • salt, to taste
    • ¼ teaspoon black pepper

    Instructions

    1. Heat olive oil in a heavy bottom soup bottom over medium heat. Add onion and carrots and cook until softened. Add dried marjoram, flour, and seasoning packet from the rice; stir to combine.
    2. Add rice, chicken broth, and water; bring to a boil. Cover, lower to a simmer, and let cook for 15 minutes.
    3. Heat heavy cream and milk in a small saucepan over low heat. Stir into the soup. Stir in the shredded chicken.
    4. Cook about 30 minutes or until the rice is cooked. Season with salt and pepper to taste.

    Recommended Products

    As an Amazon Associate and member of other affiliate programs, I earn from qualifying purchases.

    • Rubber Spatulas
      Rubber Spatulas
    • Silicone Freezer Molds
      Silicone Freezer Molds
    • Dutch Oven
      Dutch Oven
    • Original Long Grain & Wild Rice
      Original Long Grain & Wild Rice

    Nutrition Information:

    Yield:

    4

    Serving Size:

    1

    Amount Per Serving: Calories: 418Total Fat: 25gSaturated Fat: 13gUnsaturated Fat: 12gCholesterol: 100mgSodium: 168mgCarbohydrates: 25gFiber: 3gSugar: 4gProtein: 25g

    Did you make this recipe?

    Tag me in your Instagram photo - @fakeginger

    © Amanda Livesay
    Cuisine: American / Category: soup

    Paleo Chocolate Chip Cookies

    Feb 02, 2016

    Paleo Chocolate Chip Cookies – paleo and gluten free cookies filled with chocolate chips! Easy and delicious, the perfect paleo treat!

    Paleo Chocolate Chip Cookies - paleo and gluten free cookies filled with chocolate chips! Easy and delicious, the perfect paleo treat!

    Still hanging in there with the New Years resolution? Finished with that Whole 30 but still trying to eat a cleaner, maybe paleo diet?  I have the perfect sweet treat recipe for you!

    Earlier in the year, I got into a bad habit of buying pre-made paleo goodies. Which are super tasty but also super expensive. Especially when you go through a bag of paleo cookie dough macaroons in, like, 10 minutes.

    It is definitely a problem.

    So I have gone back to making our sweets in an effort to save some cash and we are back to loving having the homemade treats around! We love this Paleo Chocolate Chip Coconut Cookies recipe too!

    …

    Read More

    « Previous Page
    Next Page »

    Primary Sidebar

    Amanda Livesay
    Hi, I'm Amanda! DFW food blogger, mom of boys, and crazy dog lady.
    Read more
    Privacy Policy
    Privacy Policy

    Footer

    ↑ back to top

    About

    • Privacy Policy
    • About Fake Ginger

    Newsletter

    • Sign Up for weekly emails featuring new recipes!

    As an Amazon Associate I earn from qualifying purchases.

    Copyright © 2024 FakeGinger.com