• Skip to primary navigation
  • Skip to main content
  • Skip to primary sidebar
  • Home
  • About
  • Recipes

Fake Ginger

menu icon
go to homepage
  • Recipe Index
  • About
  • Subscribe
    • Facebook
    • Instagram
    • Pinterest
  • subscribe
    search icon
    Homepage link
    • Recipe Index
    • About
    • Subscribe
    • Facebook
    • Instagram
    • Pinterest
  • ×
    Home » Page 8

    Easter Rice Krispies Nests with Nutella

    Easter Rice Krispies Nests with Nutella

    Mar 20, 2023

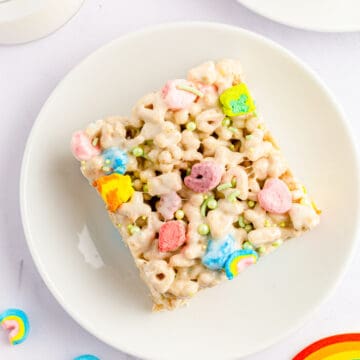
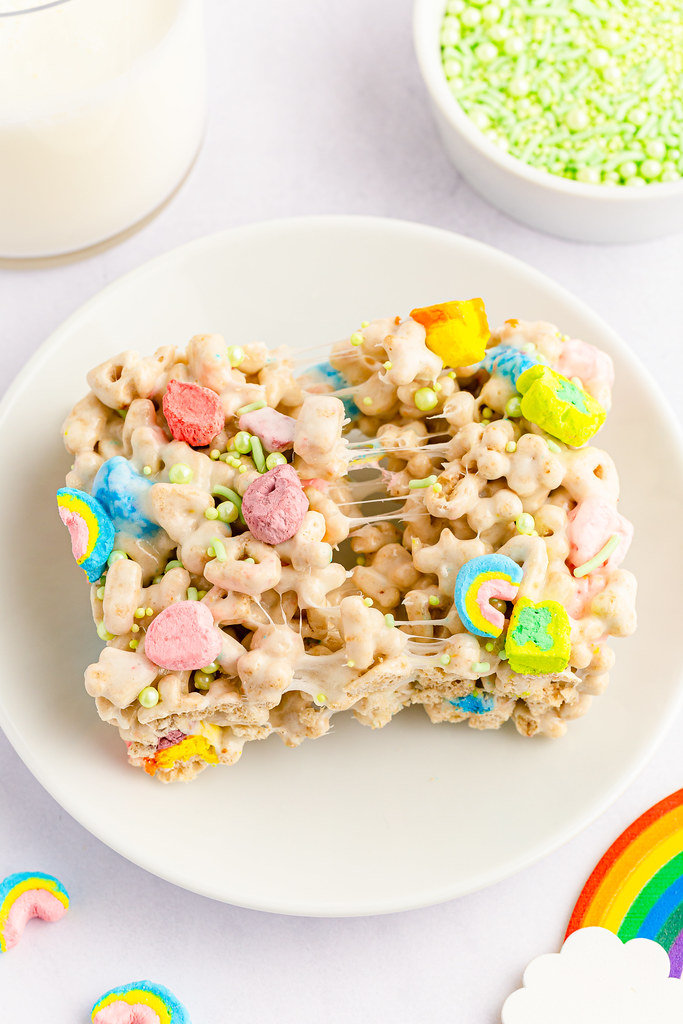
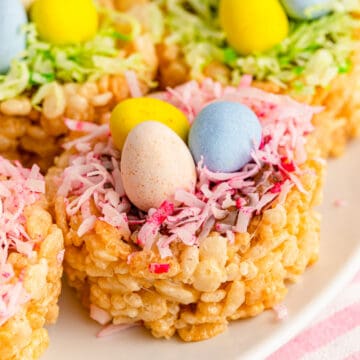
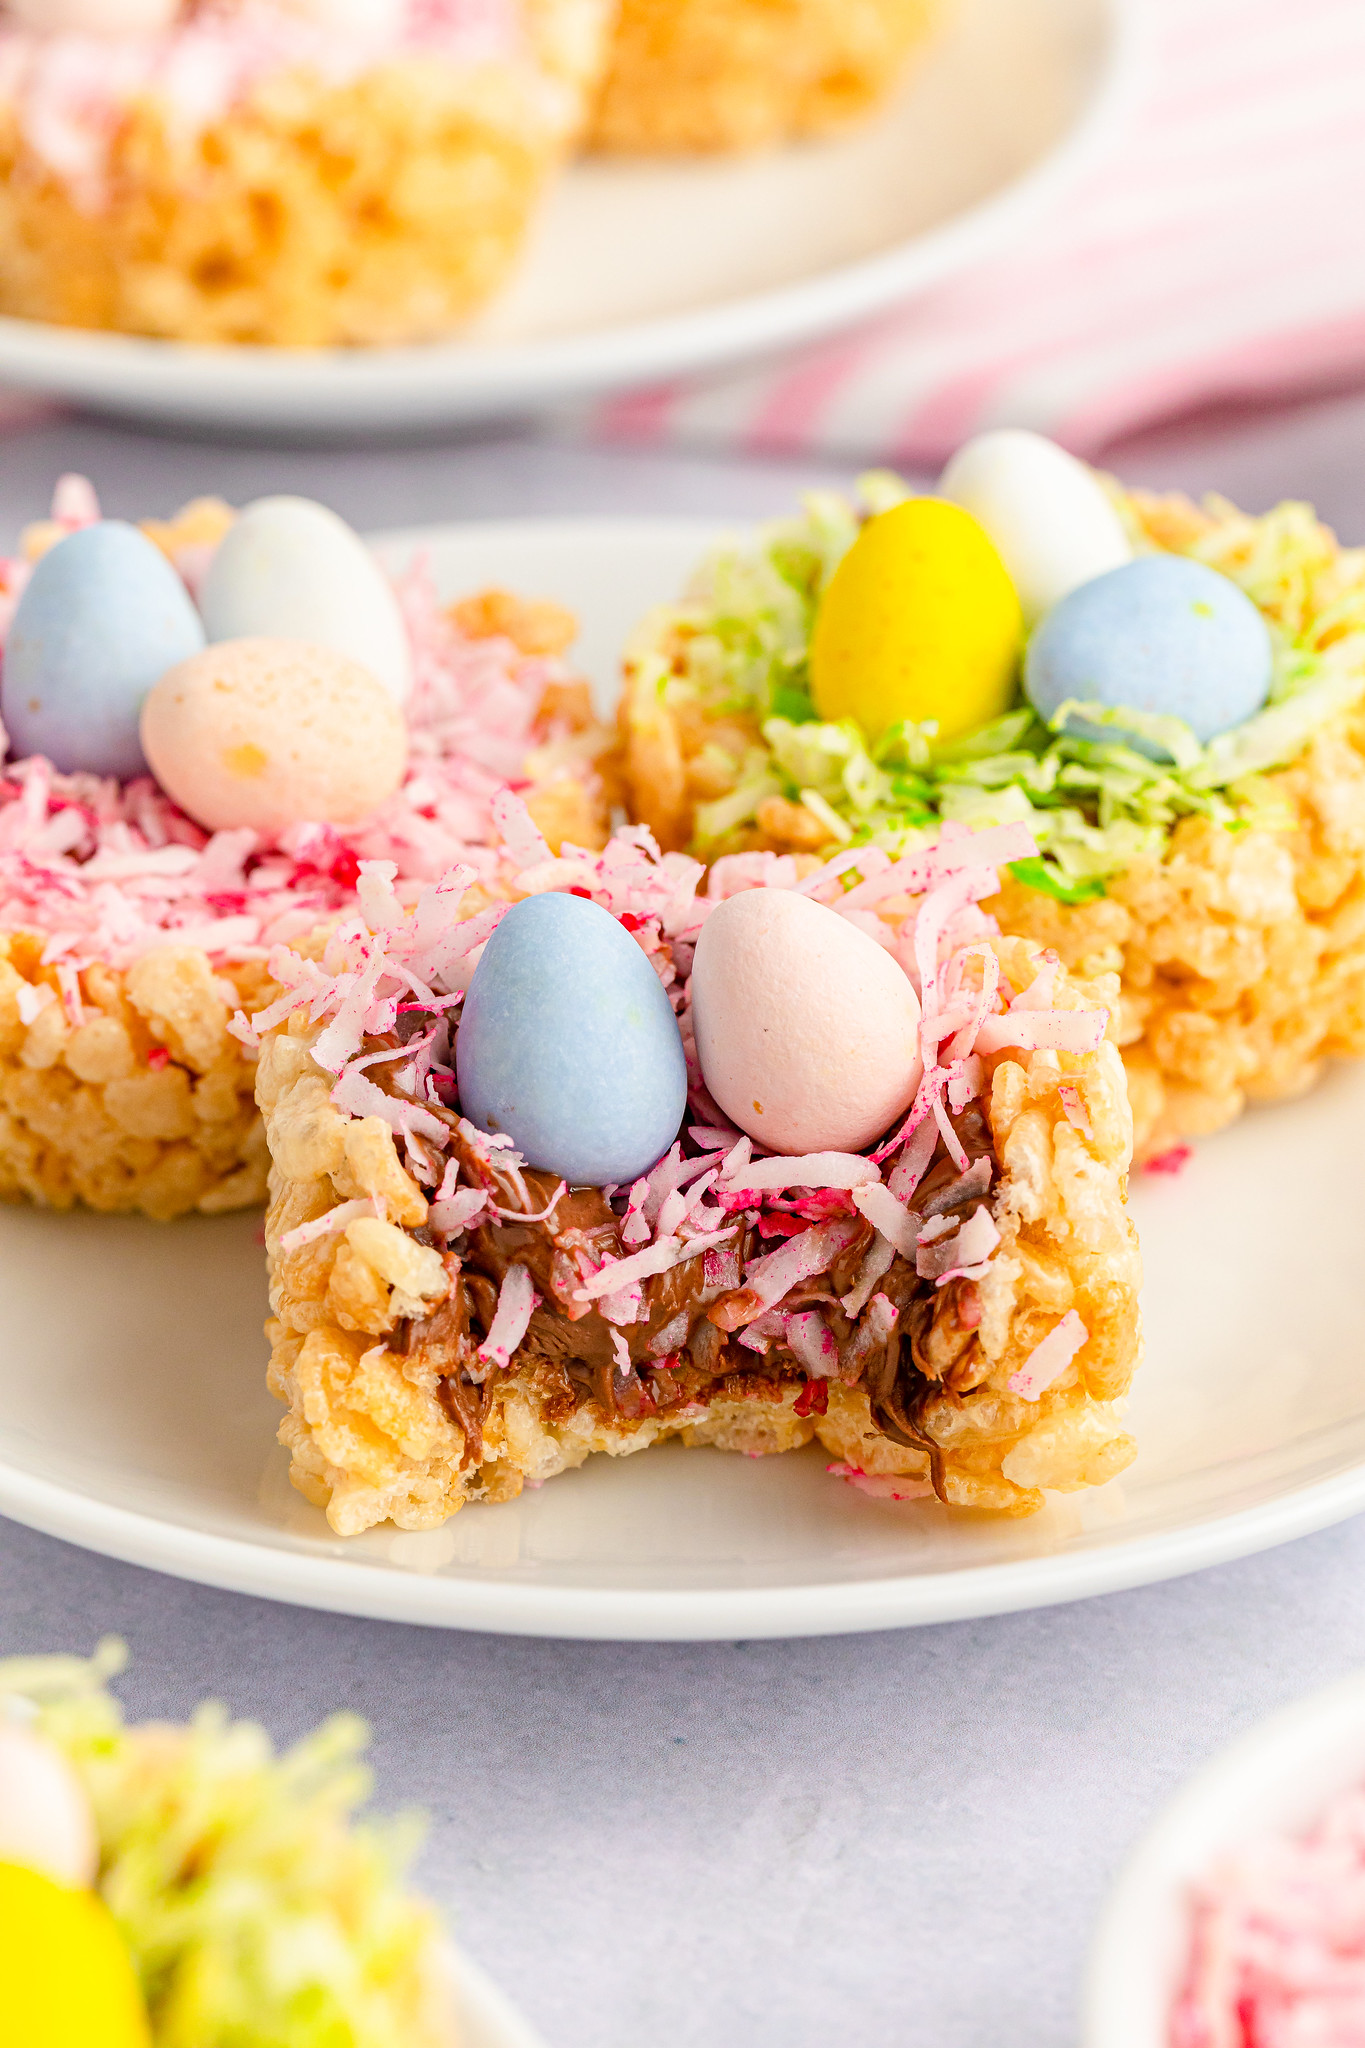
    The cutest Easter dessert! Rice Krispies Nests with Nutella are the classic Rice Krispies treats shaped like a nest, filled with a spoonful of nutella, and topped with shredded coconut and candy eggs. They are no bake and so easy to make!

    I also have an Easter Sugar Cookie Cups recipe if you prefer cookies over rice krispies treats!

    How cute are these?! I love finding fun ways to turn a Rice Krispies treat into a holiday dessert and these might by my favorite yet!

    It is your standard buttery, gooey Rice Krispies treats but you shape them into little nests and fill them with Nutella. And then you use food coloring to make coconut look like Easter basket grass and top it all with candy eggs.

    Why You’re Going To Love This Recipe

    • It’s a completely NO BAKE dessert! It’s going to be easy, quick, and something the kiddos can help make.
    • They are so cute! I mean, tell me that’s not one of the cutest Easter treats you’ve ever seen.
    • You can’t go wrong with Rice Krispies Treats! They are my alltime favorite dessert so of course I love making themed versions for the holidays.

    Ingredients

    • Unsalted butter – you can use salted butter but skip adding the salt that this recipe calls for.
    • Salt
    • Mini marshmallows
    • Vanilla extract
    • Rice Krispies cereal
    • Sweetened shredded coconut – you can use unsweetened but it’s definitely tastier with the sweetened stuff.
    • Gel food coloring – use any color you want. For these I used neon pink and neon green.
    • Nutella – you can use any chocolate spread you like or even cookie butter if you prefer
    • Candy eggs – I used Cadbury eggs for these but you can use Robin’s Eggs or any other candy Easter eggs.

    How To Make Easter Rice Krispies Nests

    • Prepare. Lightly grease two 12-cup muffin tins.
    • Melt butter. Melt the butter over low heat and stir in salt.
    • Add marshmallows. Stir in mini marshmallow until melted.
    • Add vanilla. Remove the pot from the heat and stir in vanilla extract.
    • Add Rice Krispies. Gently fold Rice Krispies into the marshmallow mixture.
    • Transfer mixture. Scoop 3-4 tablespoons of the Rice Krispies mixture into each muffin cup.
    • Shape nests. Use your hands to press them down and mold them into the shape of the tin. Leave a small dip in the center to fill with Nutella.
    • Let sit. Allow it to set at room temperature for 30 minutes.
    • Dye coconut. Add the shredded coconut into a zip top bag along with 1-3 drops of food coloring.
    • Close the bag and massage the contents together until the coconut is a uniform color. Set aside.
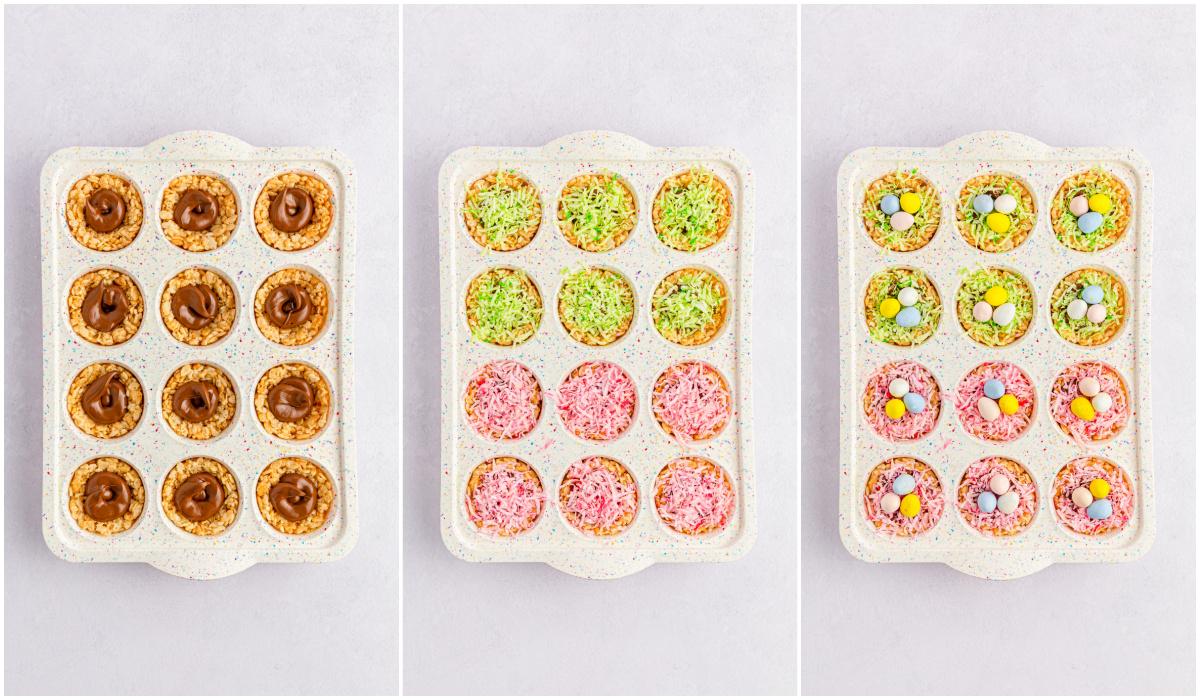
    • Add Nutella. Place a spoonful of Nutella on top of each Rice Krispies nest.
    • Decorate. Sprinkle the colored coconut over the Nutella and top each one with candy eggs.
    • Serve. Gently remove each nest from the muffin tin and transfer to serving platter.

    How Long Are They Good For?

    These Rice Krispies Nests are tastiest on the day they are made but they will stay good for up to 3 days. Make sure you store them in an airtight container at room temperature.

    Can You Freeze Them?

    I don’t recommend trying to freeze these treats.

    More Easter Treats

    • Easter Popcorn
    • Peeps Dirt Cups
    • Easter Trifle
    • Easter Chicks Cupcakes
    • Peeps Nests
    • Easter White Chocolate Covered Oreos

    Make sure you subscribe to my email list to get all my new recipes delivered right to your inbox!

    You can also follow me on Instagram, Facebook, or Pinterest for even more! 

    📖 Recipe

    Yield: 18 nests

    Easter Rice Krispies Nests with Nutella

    Easter Rice Krispies Nests with Nutella
    Prep Time 20 minutes
    Total Time 20 minutes

    Ingredients

    • 4 tablespoons unsalted butter
    • ⅛ teaspoon salt
    • 4 cups mini marshmallows
    • 1 teaspoon vanilla extract
    • 5 cups Rice Krispies cereal
    • 1 ½ cups sweetened shredded coconut
    • Gel food coloring in colors of choice
    • 1 cup Nutella
    • 1 cup Cadbury chocolate eggs or other egg candies

    Instructions

    1. Lightly grease two 12-cup muffin tins and set it aside.
    1. In a large pot over low heat, melt the butter and stir in salt.
    2. Add the mini marshmallows and continue to stir over low heat until melted.
    3. Remove the pot from the heat and stir in vanilla extract.
    4. Add the Rice Krispies cereal and gently fold together until the cereal is evenly coated with the marshmallow mixture.
    5. Scoop 3-4 tablespoons of the Rice Krispies mixture into each muffin cup.
    6. Use your hands to press them down and mold them into the shape of the tin. Leave a small dip in the center to fill with Nutella. Allow it to set at room temperature for 30 minutes.
    7. As the Rice Krispies nests set, prepare the coconut shreds. Add the shredded coconut into a zip top bag along with 1-3 drops of food coloring. If using more than one color, split the amount of coconut shreds into two separate bags, one for each color.
    8. Close the bag and massage the contents together until the coconut is a uniform color. Set aside.
    9. Once the Rice Krispies nests have set, place a spoonful of Nutella on top of each Rice Krispies nest.
    10. Sprinkle the colored coconut over the Nutella and top each one with 2 - 3 candy eggs.
    11. Use a butter knife or skewer to remove each nest from the muffin tin and transfer to serving platter.

    Recommended Products

    As an Amazon Associate and member of other affiliate programs, I earn from qualifying purchases.

    • Sprinkle Muffin Tin
      Sprinkle Muffin Tin
    • Gel Food Coloring
      Gel Food Coloring
    • Large Pot
      Large Pot

    Nutrition Information:

    Yield:

    18

    Serving Size:

    1

    Amount Per Serving: Calories: 248Total Fat: 12gSaturated Fat: 9gTrans Fat: 0gUnsaturated Fat: 2gCholesterol: 30mgSodium: 105mgCarbohydrates: 33gFiber: 2gSugar: 22gProtein: 3g

    Did you make this recipe?

    Tag me in your Instagram photo - @fakeginger

    © Amanda Livesay
    Cuisine: American / Category: holiday

    Chicken Fajitas

    Mar 18, 2023

    Chicken Fajitas are the perfect easy, weeknight dinner! Strips of chicken, bell peppers, and onions cooked with fajita seasoning and fresh lime juice. Serve the fajitas with tortilla, sour cream, salsa, or whatever toppings you like!

    Skillet filled with chicken fajitas. Strips of chicken, sliced bell peppers, and onions coated in fajita seasoning and lime juice.

    We took our kids to Monster Jam a couple weekends ago and ended up stopping for dinner at a place that served fajitas. Two of my kids ordered fajitas and then tried to tell me that I’d never made fajitas and this was the first time ever they’d had fajitas.

    Which was 100% false but I still felt like I needed to make chicken fajitas for them.

    I love fajitas for a fast dinner. Everything cooks so fast. Everyone can assemble their fajitas with only ingredients they enjoy. It’s kind of the perfect meal.

    Chicken fajitas in flour tortillas

    Why You’re Going To Love This Recipe

    • These chicken fajitas are ready in less than 30 minutes! You just chop everything up and throw it in a pan with some seasonings.
    • So many textures and flavors! I love the crunch of the peppers with the soft flour tortilla and a little creamy sour cream on top.
    • This recipe is so customizable! If you have someone that doesn’t like peppers, it’s easy to pick around them and just go for chicken and onions.
    How to fajita chicken

    Ingredients

    • Chili powder – this is going in the easy homemade fajita seasoning
    • Paprika – this is also for the fajita seasoning. It adds great color and flavor
    • Granulated sugar – you leave leave this out of the fajita seasoning if you prefer
    • Cumin – this adds so much flavor to the fajita seasoning
    • Dried oregano – if you have Mexican oregano, use that. But regular oregano is fine as well.
    • Garlic power – garlic powder is essntial for fajita seasoning!
    • Onion powder – also essential!
    • Salt
    • Black pepper
    • Cayenne powder – you can leave this out if you don’t want a lot of heat
    • Chicken breasts – you can use thighs if you prefer
    • Limes – lots of lime juice is crucial for fajitas
    • Red bell pepper – I’ve listed 4 different bell peppers because they make the dish beautiful and all taste a little different but use 4 reds or 4 greens or whatever you have.
    • Yellow bell pepper
    • Green bell pepper
    • Orange bell pepper
    • Red onion – red onion makes the dish pretty but you can use a white or yellow onion
    • Olive oil – for cooking everything
    • Flour tortillas – warm them up before serving
    • Salsa, sour cream, guacamole, cheese, green onions and cilantro – optional, for serving
    How to make the vegetables for fajitas

    How To Make Chicken Fajitas

    • Make fajita seasoning. Combine chili powder, paprika, sugar, cumin, oregano, garlic powder, onion powder, salt, pepper, and cayenne powder.
    • Prepare chicken. Cut the chicken into strips and place in a mixing bowl. Sprinkle half of the seasoning on top of chicken; set remaining seasoning aside. Squeeze juice of half a lime over top of seasoning and chicken; stir to make sure chicken is coated.
    • Prepare veggies. Place sliced bell peppers and onion in a separate mixing bowl. Sprinkle remaining seasoning on top and squeeze half a lime over top. Toss to coat.
    • Cook chicken. Cook chicken in olive oil over medium-high heat until chicken is browned on all sides. Add vegetables and continue cooking until chicken is cooked through and vegetables are fork tender.
    • Serve. Serve hot with remaining sliced limes and toppings of choice.
    close up shot of chicken fajitas in a pan

    How Long Are They Good For?

    Chicken fajitas are good for up to 3 days. Store them in an airtight container in the fridge to keep them fresh for as long as possible.

    You can reheat fajitas in the microwave or a skillet.

    Can You Freeze It?

    You can freeze these fajitas for up to 3 months. Don’t try to freeze the tortillas or any toppings with them though.

    I would wrap them tightly in aluminum foil and then place them in a freezer ziploc bag.

    When you are ready to serve the chicken fajitas, let them defrost overnight in the fridge and then reheat on the stovetop.

    More Chicken Recipes

    • Slow Cooker Huli Huli Chicken
    • Cashew Chicken Lettuce Wraps
    • Apple Mustard Chicken Tenders
    • Black Pepper Chicken

    Make sure you subscribe to my email list to get all my new recipes delivered right to your inbox!

    You can also follow me on Instagram, Facebook, or Pinterest for even more! 

    Chicken fajitas in flor tortillas

    📖 Recipe

    Yield: 6 servings

    Chicken Fajitas

    Chicken Fajitas
    Prep Time 15 minutes
    Cook Time 15 minutes
    Total Time 30 minutes

    Ingredients

    For the fajita seasoning

    • 4 teaspoons chili powder
    • 2 teaspoons paprika
    • 2 teaspoons granulated sugar
    • 1 teaspoon cumin
    • 1 teaspoon dried oregano
    • 1 teaspoon garlic power
    • 1 teaspoon onion powder
    • 1 teaspoon salt
    • ½ teaspoon black pepper
    • ¼ - ½ teaspoon cayenne powder, depending on taste

    For the fajitas

    • 1 (1.5-2 pounds) package of chicken breasts
    • 2 limes
    • 1 large red bell pepper, thinly sliced
    • 1 large yellow bell pepper, thinly sliced
    • 1 large green bell pepper, thinly sliced
    • 1 large orange bell pepper, thinly sliced
    • 1 large red onion, thinly sliced
    • 2 Tablespoons olive oil

    For serving, optional

    • Flour tortillas
    • Salsa
    • Sour cream
    • Guacamole
    • Shredded cheese
    • Chopped green onions
    • Chopped cilantro

    Instructions

    1. To make fajita seasoning, combine chili powder, paprika, sugar, cumin, oregano, garlic powder, onion powder, salt, pepper, and cayenne powder.
    2. Cut the chicken into strips and place in a mixing bowl. Sprinkle half of the seasoning on top of chicken; set remaining seasoning aside.
    3. Squeeze juice of half a lime over top of seasoning and chicken; stir to make sure chicken is coated.
    4. Place sliced bell peppers and onion in a separate mixing bowl. Sprinkle remaining seasoning on top and squeeze half a lime over top. Toss to coat.
    5. Heat olive oil in a large skillet over medium-high heat.
    6. Add chicken to pan and stir fry until chicken is browned on all sides.
    7. Add vegetables and continue stir frying until chicken is cooked through and vegetables are fork tender.
    8. Serve hot with remaining sliced limes and toppings of choice.

    Recommended Products

    As an Amazon Associate and member of other affiliate programs, I earn from qualifying purchases.

    • My favorite pan
      My favorite pan

    Nutrition Information:

    Yield:

    6

    Serving Size:

    1

    Amount Per Serving: Calories: 194Total Fat: 8gSaturated Fat: 2gTrans Fat: 0gUnsaturated Fat: 5gCholesterol: 27mgSodium: 271mgCarbohydrates: 19gFiber: 2gSugar: 2gProtein: 11g

    Did you make this recipe?

    Tag me in your Instagram photo - @fakeginger

    © Amanda Livesay
    Cuisine: Mexican / Category: chicken

    Lucky Charms Treats

    Mar 04, 2023

    Looking for a delicious and easy-to-make dessert that will satisfy your sweet tooth? Look no further than these no bake Lucky Charms Treats! Made with crispy Lucky Charms cereal, marshmallows, and butter, these treats are perfect for any occasion.

    I also have a Maple Bacon Rice Krispies Treats if you are more of a sweet and savory kind of person!

    Lucky Charm Treat being pulled apart to show the gooey marshmallow

    Rice Krispies treats are my favorite dessert ever. I like them homemade, I like the ones in the shiny blue wrappers, I love the 7/11 ones. I will never turn down a Rice Krispies Treats.

    And the only way to improve on Rice Krispies treats is to turn them into Lucky Charms Treats!

    overhead shot of rice krispies treats made with lucky charms and topped with extra lucky charms marshmallows and sprinkles

    Why You’re Going To Love This Recipe

    • They are so delicious! You really can’t go wrong with Lucky Charms coated in buttery melt marshmallows with more Lucky Charms marshmallows on top.
    • These treats are no bake and only take about 15 minutes to put together! After that, you just have to wait for them to cool so you can slice them.
    • So many textures! The Lucky Charms marshmallows add fun a fun texture to the otherwise crunchy bar.
    ingredients for no bake lucky charms treats

    Ingredients

    • Unsalted Butter – if you decide to use salted, just leave the salt out of this recipe.
    • Salt – don’t skip the salt! The Lucky Charms and marshmallows are super sweet so you need a little bit of salt. If you use salted butter though, you can leave it out.
    • Mini marshmallows – I like to melt the marshmallows until they are just almost melted so you still get some gooey chunks of marshmallow in your treats.
    • Lucky Charms – the classic Lucky Charms cereal!
    • Lucky Charms Marshmallows – these are totally optional but extra Lucky Charms marshmallows on top makes these treats extra cute.
    • Sprinkles – also optional but they make these treats so fun!
    How to make lucky charms treats

    How To Make Lucky Charms Treats

    • Prepare. Lightly grease or line a 9×13-inch pan.
    • Melt butter. Melt butter in a large pot over low heat and stir in the salt.
    • Melt marshmallows. Add the marshmallows and stir over low heat until it melts.
    • Add cereal. Once the marshmallows have melted, remove the pot from the heat and add the cereal.
    Lucky charms stirred into marshmallows in a pot
    • Combine. Fold cereal into the marshmallow mixture, being careful not to crush the cereal.
    • Transfer to pan. Spread the mixture into the prepared pan in an even layer.
    • Add toppings. Top with extra Lucky Charms marshmallows and sprinkles if desired.
    • Cool and slice! Cool completely at room temperture for 30 minutes to 1 hour before slicing into bars.
    12 lucky charms treats on a wooden cutting board and parchment paper

    How Long Are They Good For?

    Lucky Charms Treats are best enjoyed the day they are made but will stay good for up to 2 days. Make sure to store them in an airtight container at room temperature.

    Can You Freeze Them?

    I don’t recommend freezing them.

    A stack of lucky charms treats on a white plate

    Make sure you subscribe to my email list to get all my new recipes delivered right to your inbox!

    You can also follow me on Instagram, Facebook, or Pinterest for even more! 

    More No Bake Treats

    • No Bake Trail Mix Energy Bites
    • Almond Bark Drop Cookies
    • No Bake Cheerios Bars
    • Snickers Rice Krispies Treats
    • Hot Chocolate Rice Krispies Treats

    📖 Recipe

    Yield: 12 bars

    Lucky Charms Treats

    Lucky Charms Treats
    Prep Time 15 minutes
    Total Time 15 minutes

    Ingredients

    • 1 stick unsalted butter
    • ¼ teaspoon salt
    • 1 (10 ounce) bag mini marshmallows
    • 10 cups Lucky Charms cereal
    • ½ cup Lucky Charms marshmallows for topping (optional)
    • Rainbow sprinkles (optional)

    Instructions

    1. Lightly grease the bottom of a 9x13 baking pan with cooking spray or line with parchment paper. Set aside.
    2. Melt butter in a large pot over low heat and stir in the salt.
    3. Add the marshmallows and stir constantly over low heat until the marshmallows are mostly melted. Remove from heat.
    4. Add cereal and fold it into the marshmallow mixture, being careful not to crush the cereal.
    5. Spread the mixture into the prepared pan in an even layer.
    6. Top with extra Lucky Charms marshmallows and sprinkles if desired.
    7. Cool completely at room temperture for 30 minutes to 1 hour before slicing into bars.

    Recommended Products

    As an Amazon Associate and member of other affiliate programs, I earn from qualifying purchases.

    • Lucky Charms Marshmallows
      Lucky Charms Marshmallows
    • Large Pot
      Large Pot
    • 9x13-inch pan
      9x13-inch pan

    Nutrition Information:

    Yield:

    12

    Serving Size:

    1

    Amount Per Serving: Calories: 193Total Fat: 9gSaturated Fat: 5gTrans Fat: 0gUnsaturated Fat: 4gCholesterol: 20mgSodium: 250mgCarbohydrates: 27gFiber: 2gSugar: 12gProtein: 3g

    Did you make this recipe?

    Tag me in your Instagram photo - @fakeginger

    © Amanda Livesay
    Cuisine: American / Category: snack

    Banana Split Fluff

    Mar 02, 2023

    Banana Split Fluff is a delicious and indulgent dessert that combines the classic flavors of banana split with the light and fluffy texture of marshmallows. It’s the perfect no bake treat for summer!

    We also have a Pineapple Fluff Salad and Cherry Fluff!

    Banana Split Fluff is a delicious and indulgent dessert that combines the classic flavors of banana split with the light and fluffy texture of marshmallows. It's the perfect no bake treat for summer!

    How do you feel about banana splits?

    It’s never something I’m going to order but if you put one in front of me? I’ll immediately become obsessed and think of nothing but banana splits for a month.

    This Banana Split Fluff has all those classic flavors of a banana split tossed with marshmallows and banana pudding. It is so delicious with so many different flavors and textures!

    Overhead shot of banana split marshmallow fluff topped with whipped cream, sprinkles, and a cherry

    Why You’re Going To Love This Recipes

    • It has all the flavors of a banana split plus marshmallows! How can you go wrong?!
    • This banana split fluff is completely no bake and no cook! You just have to stir everything together and let it chill in the refrigerator.
    • I love taking this kind of dessert to BBQs in the summer because it’s a chilled dessert but you don’t have to worry about it melting like you would ice cream. It’s super refreshing in the heat of summer.
    Ingredients for banana split fluff

    Ingredients For Banana Split Fluff

    • Instant Banana Pudding Mix – make sure it’s instant and not the cook and serve kind. You can use the sugar free kind if you prefer. You can also use vanilla, coconut, or cheesecake flavored instant pudding mix!
    • Crushed Pineapple in Juice – don’t drain the juice, it’s going to be the liquid that creates the pudding. If you are worried that it’s too much pineapple flavor, you can drain the juice and replace it with 1 cup of cold milk.
    • Cool Whip – thaw it overnight in the fridge before you plan to make it. You can use the lite Cool Whip.
    • Bananas – don’t use a super ripe banana or it will fall apart when you stir everything together.
    • Strawberries – these add the prettiest pop of red in this salad!
    • Mini Marshmallows
    • Maraschino Cherries – make sure to drain and remove the stems. I even like to rinse these so the juice doesn’t turn the dressing red. Also, save some for topping the dish!
    • Semisweet Chocolate Chips – you can use dark or milk chocolate chips if you prefer.
    • Peanuts or Pecans – peanuts are the traditional nut for banana splits but use whatever you want!
    • Whipped Cream – totally optional but swirls of whipped cream on top of the finished salad makes it really look like a banana split
    • Sprinkles – also optional but sprinkles make it so much more fun!
    How to make banana split fluff

    How To Make Banana Split Fluff Salad

    • Make pudding: Combine together the instant banana pudding mix powder with the crushed pineapple in juice.
    • Add Cool Whip. Fold in the Cool Whip with a rubber spatula.
    All the ingredients of banana split fluff before being stirred together and after
    • Add mixins: Add the bananas, strawberries, marshmallows, cherries, semisweet chocolate chips, and nuts. Fold to combine until everything is evenly coated in the banana pudding cream mix.
    • Chill: Chill in the refrigerator for 2-4 hours.
    • Garnish and serve! When ready to serve, top with more nuts, chocolate chips, and maraschino cherries. Top with whipped cream and sprinkles if desired.
    Marshmallows, strawberries, bananas, cherries, chocolate chips, and peanuts in a glass bowl

    How Long Is It Good For?

    Banana Split Fluff is good for up to 3 days. After that, everything will start to lose it’s texture and become mushy.

    Make sure you store it in an airtight container in the refrigerator. And give it a good stir before serving.

    Can You Freeze It?

    I don’t recommend trying to freeze this marshmallow salad.

    bowl full of marshmallow fruit salad with chocolate chips, strawberries, cherries, and pineapple. topped with whipped cream, sprinkles, and cherries

    More Fruit Salad Recipes

    • Marshmallow Fruit Salad
    • Tropical Marshmallow Fruit Salad
    • Pistachio Marshmallow Salad
    • Grape Salad
    • Snickers Apple Salad

    Make sure you subscribe to my email list to get all my new recipes delivered right to your inbox!

    You can also follow me on Instagram, Facebook, or Pinterest for even more! 

    📖 Recipe

    Yield: 12 cups

    Banana Split Fluff

    Banana Split Fluff
    Prep Time 15 minutes
    Additional Time 2 hours
    Total Time 2 hours 15 minutes

    Ingredients

    • 1 (3.4 ounce) box instant banana pudding
    • 1 (40 ounce) can crushed pineapple in juice
    • 1 (8 ounce) tub Cool Whip, thawed
    • 3 large ripe bananas, sliced
    • 16 ounce fresh strawberries, hulled and chopped
    • 4 cups mini marshmallows (about ⅔ of a 10 ounce bag)
    • 1 (10 ounce) jar maraschino cherries, drained well and stems removed (reserve some for topping)
    • ½ cup semisweet chocolate chips, plus more for topping
    • ½ cup chopped peanuts OR walnuts, plus more for topping
    • whipped cream, for topping
    • sprinkles, for topping

    Instructions

    1. In a large mixing bowl, combine together the instant banana pudding mix powder with the crushed pineapple in juice. Mix until the powder fully dissolves and the pudding thickens.
    2. Fold in the Cool Whip with a rubber spatula.
    3. Add the bananas, strawberries, marshmallows, cherries, semisweet chocolate chips, and nuts. Fold to combine until everything is evenly coated in the banana pudding cream mix.
    4. Chill in the refrigerator for 2-4 hours.
    5. When ready to serve, top with more nuts, chocolate chips, and maraschino cherries. Top with whipped cream and sprinkles if desired. Enjoy!

    Recommended Products

    As an Amazon Associate and member of other affiliate programs, I earn from qualifying purchases.

    • Mixing Bowls
      Mixing Bowls
    • Rubber Spatulas
      Rubber Spatulas
    • Rainbow Sprinkles
      Rainbow Sprinkles

    Nutrition Information:

    Yield:

    12

    Serving Size:

    1

    Amount Per Serving: Calories: 220Total Fat: 7gSaturated Fat: 3gTrans Fat: 0gUnsaturated Fat: 4gCholesterol: 1mgSodium: 85mgCarbohydrates: 41gFiber: 3gSugar: 29gProtein: 3g

    Did you make this recipe?

    Tag me in your Instagram photo - @fakeginger

    © Amanda Livesay
    Cuisine: American / Category: salad

    Southern Potato Salad

    Mar 01, 2023

    Looking for a delicious side dish that’s perfect for picnics and BBQs? Try this classic Southern Potato Salad recipe! Made with potatoes, hard-boiled eggs, onion, pickles, and celery with a creamy dressing. This dish is sure to become a crowd-pleaser at any gathering.

    Classic southern potato salad in a white bowl

    Classic southern potato salad is my alltime favorite summer side dish. It goes with practically everything you cook during summer: burgers, ribs, hot dogs, etc.

    Plus, I love a side dish with lots of different textures! With potato salad you get the soft potatoes and eggs with the crunchy veggies and then the creamy dressing – so many textures!

    Everyone likes their potato salad a little different so feel free to use this recipe as a jumping off point and add or remove ingredients as you please!

    Potato salad in a bowl with a serving spoon scooping out a portion

    Why You’re Going To Love This Recipe

    • This is the perfect summer side dish! Not only is it delicious but it’s served chilled so it’s perfect for taking to a barbecue or potluck.
    • It’s made with all simple ingredients. All things you probably have in your house already.
    • Potato salad is a quick and easy side dish! If you can boil potatoes and chop veggies, you can make this dish. And it will be ready in less than 30 minutes.

    What Is Southern Potato Salad?

    There are so many different variations on potato salad but classic Southern potato salad is my favorite. It’s a mustard based potato salad and along with the potatoes, it includes hard boiled eggs, chopped pickles, celery, and red onion.

    It’s the perfect side dish for any southern bbq!

    ingredients for potato salad with pickles

    Ingredients

    • Russet potatoes – the star of the show! Russet potatoes hold up best for potato salad because they hold their shape better than other potato varieties. You can use gold potatoes but it will be a softer potato salad.
    • Hard boiled eggs – listen, they’re controversial but they really add a lot to potato salad. You can leave them out if you prefer.
    • Red onion – the red onion adds color and crispness to the dish. You can use a white onion if you want.
    • Celery
    • Dill pickles – these add a nice crunch and tangy pickled flavor that is really nice with the creamy potatoes. If you aren’t a pickle person, leave them out.
    • Dill pickle juice – you can substitute apple cider vinegar if you don’t want the pickle flavor.
    • Mayo – you can use the light version if you prefer.
    • Yellow mustard – just the classic yellow mustard.
    • Salt and pepper
    • Paprika or green onions – you can either garnish the potato salad with paprika or green onions. You can do both but it may be too much for some people.
    How to make southern potato salad

    How To Make Southern Potato Salad

    • Cook potatoes. In a large pot, cover potatoes with water and bring to a boil. Allow potatoes to cook until a knife goes in easily (about 10-12 mins). Drain potatoes and set aside.
    • Make dressing.Whisk together the mayo, mustard, pickle juice and salt and pepper. 
    • Combine everything. To a bowl, add the potatoes, hard-boiled eggs, onion, celery, pickles and potatoes. Pour in the dressing and toss the salad until it is evenly coated with dressing.
    • Garnish and chill. Sprinkle paprika or green onions on top and chill in the refrigerator for at least 2 hours before serving.
    Overhead shot of classic potato salad topped with paprtika and red onion

    How Long Is It Good For?

    Potato salad is good for up to 4 days when stored in an airtight container in the refrigerator. It can be served straight from the fridge or let it sit at room temperature for a few minutes to take the chill off.

    Can You Freeze Potato Salad?

    I don’t recommend freezing potato salad. A lot of the ingredients will change textures when frozen and defrosted.

    More BBQ Side Dishes

    • Broccoli Grape Pasta Salad
    • Fritos Corn Salad
    • Root Beer Baked Beans
    • Caesar Pasta Salad
    • Hawaiian Macaroni Salad

    Make sure you subscribe to my email list to get all my new recipes delivered right to your inbox!

    You can also follow me on Instagram, Facebook, or Pinterest for even more! 

    📖 Recipe

    Yield: 8 - 10 servings

    Southern Potato Salad

    Southern Potato Salad
    Prep Time 20 minutes
    Cook Time 10 minutes
    Total Time 30 minutes

    Ingredients

    • 8 cups (3 lbs.) russet potatoes, peeled and cut into 1-inch cubes
    • 1 cup hard boiled eggs, peeled and chopped
    • 1 cup red onion, finely chopped
    • 1 cup celery, finely chopped
    • 1 cup kosher dill pickles, finely chopped
    • ¼ cup dill pickle juice
    • ½ cup mayonnaise
    • ¼ cup yellow mustard
    • ½ teaspoon salt
    • ½ teaspoon black pepper
    • ½ teaspoon paprika OR green onions for garnish

    Instructions

    1. In a large pot, cover potatoes with water and bring to a boil. Allow potatoes to cook until a knife goes in easily (about 10-12 mins). Drain potatoes and set aside.
    2. To make the dressing, whisk together the mayo, mustard, pickle juice and salt and pepper. 
    3. In a large mixing bowl, add the potatoes, hard-boiled eggs, onion, celery, pickles and potatoes. Pour in the dressing and toss the salad until it is evenly coated with dressing.
    4. Sprinkle paprika or green onions on top and chill in the refrigerator for at least 2 hours before serving.

    Recommended Products

    As an Amazon Associate and member of other affiliate programs, I earn from qualifying purchases.

    • OXO Mixing Bowls
      OXO Mixing Bowls
    • Large Pot
      Large Pot

    Nutrition Information:

    Yield:

    8

    Serving Size:

    1

    Amount Per Serving: Calories: 310Total Fat: 13gSaturated Fat: 2gTrans Fat: 0gUnsaturated Fat: 10gCholesterol: 69mgSodium: 725mgCarbohydrates: 43gFiber: 5gSugar: 6gProtein: 8g

    Did you make this recipe?

    Tag me in your Instagram photo - @fakeginger

    © Amanda Livesay
    Cuisine: American / Category: Sides

    Air Fryer Honey Garlic Chicken Wings

    Mar 01, 2023

    Skip the deep frying and make Air Fryer Honey Garlic Chicken Wings! These crispy wings are coated in a delicious sticky honey garlic glaze. Perfect as an appetizer or party snack!

    Air fryer honey garlic chicken wings with green onion and sesame seeds on top

    If there’s one thing that’s certain about me, it’s that I’m not deep frying anything.

    Maybe once year I decide I’m going to make beignets or fried pickles or some other random deep fried food and that one time a year is enough frying for me.

    I hate the smell, I hate the mess. It’s just not worth it when you can make pretty much anything in an air fryer!

    Once you try air fryer chicken wings, you’ll never go back to deep frying! And these honey garlic wings are coated in a sticky glaze that’s perfect for when you want wings but you don’t want spicy wings, you know?

    Chicken drumstick in a sticky glaze with green onions and sesame seeds on top

    Why You’re Going To Love This Recipe

    • Crispy wings without frying in oil! If you’re like me and hate frying anything in oil, you’re going to love this air fryer method. They turn out so crispy!
    • The sticky sweet and savory sauce is so delicious on the crispy wings. It’s made with soy sauce, honey, and fresh garlic so it’s super flavorful.
    • These honey garlic wings are ready in just 30 minutes! You can’t get takeout wings that fast.
    ingredients for air fryer honey garlic chicken wings

    Ingredients

    • Chicken wings – separate them into drums and flats if they didn’t come that way. You can also buy only drumsticks or only flats if you prefer one over the other.
    • Cornstarch – this is for coating the chicken wings and for thickening the sauce.
    • Garlic powder – make sure you season the chicken!
    • Salt and pepper
    • Honey – it adds the best sweetness to an otherwise savory sauce.
    • Soy sauce – the savory part of the sauce.
    • Butter – just a little bit for the sauce.
    • Fresh garlic – I definitely recommend using a fresh garlic instead of garlic powder for the sauce. You want that fresh garlic flavor.
    • Fresh ginger – you can substitute powdered ground ginger if that’s what you have.
    • Water – just a tiny bit to make a cornstarch slurry to thicken the sauce.
    how to make air fryer chicken wings

    How To Make Air Fryer Honey Garlic Chicken Wings

    • Prepare. Rinse wings in cold water and pay them dry. Preheat the air fryer to 400 degrees F.
    • Coat wings. Whisk together the cornstarch, garlic powder, salt, and pepper in a small bowl. Add the chicken wings to a large Ziploc bag and sprinkle the cornstarch mixture over the top. Seal the bag and shake to coat the wings.
    • Cook wings. Add a single layer of wings to the air fryer and cook for 16-20 minutes or until golden brown and crispy, turning halfway through.
    how to make honey garlic chicken wings
    • Make glaze. Combine the honey, soy sauce, butter, garlic, ginger, and black pepper in a small saucepan over medium heat. Stir continuously until the butter and honey melt, and the mixture comes to a gentle boil.
    • Thicken glaze. Combine the cornstarch and water in a small bowl and add to the honey mixture. Reduce the heat to a simmer and cook for 8-10 minutes or until the mixture thickens, stirring occasionally. 
    • Glaze wings. Once the wings are cooked, add them to a large bowl and pour the glaze over the top. Toss the wings in the glaze to coat them evenly.
    • Serve and enjoy! Garnish with toasted sesame seeds or thinly sliced green onions if desired. Enjoy immediately while the wings are still hot.
    Crispy air fryer chicken wings

    How Long Are They Good For?

    You can store these chicken wings for up to 2 days in an airtight container in the refrigerator.

    When you are ready to reheat, put them in an oven or air fryer heated to 325F for 8 – 12 minutes.

    Tips and Tricks

    • Make sure the wings are very dry before you coat them in the cornstarch so the cornstarch sticks all over. That ensures that the wings turn out nice and crispy.
    • If you have leftover sauce, it will likely thicken in the fridge when stored. A splash or water will help to get it back to it’s original consistency.
    • You can double or even triple this recipe but are probably going to have to do multiple rounds of air frying. You want the chicken wings in a single layer so there’s good airflow in the air fryer.
    Honey garlic chicken wings topped with green onions and sesame seeds

    More Chicken Wings Recipes

    • Honey Mustard Chicken Wings
    • Sweet and Spicy Wings
    • Garlic Parmesan Wings

    Make sure you subscribe to my email list to get all my new recipes delivered right to your inbox!

    You can also follow me on Instagram, Facebook, or Pinterest for even more! 

    📖 Recipe

    Yield: 2 servings

    Air Fryer Honey Garlic Chicken Wings

    Air Fryer Honey Garlic Chicken Wings
    Prep Time 10 minutes
    Cook Time 20 minutes
    Total Time 30 minutes

    Ingredients

    Wings

    • 1 pound (separated into flats and drummettes)
    • 1 tablespoon cornstarch
    • ½ teaspoon garlic powder
    • ¼ teaspoon kosher salt
    • ¼ teaspoon black pepper

    Glaze

    • ¼ cup honey
    • 2 tablespoons soy sauce
    • 1 tablespoon unsalted butter
    • ½ tablespoon fresh minced garlic
    • ½ teaspoon fresh minced ginger
    • ⅛ teaspoon cracked black pepper
    • 1 teaspoon cornstarch
    • 1 tablespoon water

    Instructions

      1. To make the wings, rinse wings in cold water, pat them dry with a paper towel, and set aside. 
      2. Preheat the air fryer to 400 degrees F.
      3. Whisk together the cornstarch, garlic powder, salt, and pepper in a small bowl. Add the chicken wings to a large Ziploc bag and sprinkle the cornstarch mixture over the top. Seal the bag and shake to coat the wings.
      4. Add a single layer of wings to the air fryer and cook for 16-20 minutes or until golden brown and crispy, turning halfway through.
      5. To make the glaze, combine the honey, soy sauce, butter, garlic, ginger, and black pepper in a small saucepan over medium heat. Stir continuously until the butter and honey melt, and the mixture comes to a gentle boil.
      6. Combine the cornstarch and water in a small bowl and add to the honey mixture. Reduce the heat to a simmer and cook for 8-10 minutes or until the mixture thickens, stirring occasionally. 
      7. Once the wings are cooked, add them to a large bowl and pour the glaze over the top. Toss the wings in the glaze to coat them evenly.
      8. Garnish with toasted sesame seeds or thinly sliced green onions if desired. Enjoy immediately while the wings are still hot.

    Recommended Products

    As an Amazon Associate and member of other affiliate programs, I earn from qualifying purchases.

    • Air Fryer
      Air Fryer

    Nutrition Information:

    Yield:

    2

    Serving Size:

    1

    Amount Per Serving: Calories: 108Total Fat: 3gSaturated Fat: 2gTrans Fat: 0gUnsaturated Fat: 1gCholesterol: 8mgSodium: 519mgCarbohydrates: 21gFiber: 0gSugar: 17gProtein: 1g

    Did you make this recipe?

    Tag me in your Instagram photo - @fakeginger

    © Amanda Livesay
    Cuisine: American / Category: Air Fryer

    Mint Chocolate Ice Cream Sandwich Cake

    Feb 22, 2023

    The perfect easy summer treat! Mint Chocolate Ice Cream Sandwich Cake has layers of ice cream sandwiches, mint whipped cream, chocolate chips, and chocolate syrup. It takes about 15 minutes to prep and is the easiest way to make an ice cream cake!

    A slice of mint chocolate ice cream sandwich cake on a stack of white plates

    I always say I am not an ice cream person. And when I say that, I mean I don’t ever want a bowl of plain, smooth ice cream. I need stuff in my ice cream. Sauces, crunchy things, salty things, nuts, you know.

    Last summer I become obsessed with ice cream sandwich cakes because they have all the things I love in an ice cream dessert. And last summer was HOT. Ice cream was required.

    This mint chocolate chip ice cream sandwich cake has layers of ice cream sandwiches (so you get the chocolate cookies and the creamy vanilla ice cream), layers of mint flavored whipped cream, and mini chocolate chips and chocolate sauce.

    I can’t ask for more in an ice cream treat!

    Plus, it’s really, really easy to make!

    Layers of ice cream sandwiches, mint whipped cream, chocolate chips, and chocolate sauce

    Why You’re Going To Love This Recipe

    • This is a semi-homemade recipe that tastes incredible! You are going to be able to put this together in less than 15 minutes, freeze it for a few hours, and I promise everyone is going to be so impressed!
    • Who doesn’t love mint chocolate chip?! It’s one of those flavors that just feels like summer to me.
    Mint chocolate ice cream sandwich cake

    Ingredients for Mint Chocolate Ice Cream Sandwich Cake

    • Ice cream sandwiches – just the regular vanilla ice cream and chocolate sandwich cookie ice cream sandwiches from any grocery store.
    • Cool Whip – you can use lite or regular Cool Whip for this recipe.
    • Green gel food coloring – I recommend gel over liquid food coloring so the green layer doesn’t get too thin. If liquid is all you can find, just add a couple drops.
    • Peppermint extract – make sure it’s peppermint extract and not mint extract which has more of a spearmint flavor.
    • Mini chocolate chips – I like how the mini chips look on it, but feel free to use regular chocolate chips if you already have them.
    • Chocolate sauce – like the kind you use to make chocolate milk or drizzle over ice cream. You can use a jar of hot fudge but you may need to warm it slightly to get it to a drizzly consistency.
    how to make mint chocolate chip ice cream sandwich cake

    Instructions

    • Ice cream sandwich layer. Unwrap 12 of the sandwiches and lay them in a single layer in a 9×13-inch pan. Cut to fit if necessary.
    • Make mint layer. Fold together Cool Whip, and green food coloring, and peppermint extract until you reach the desired shade of mint green.
    Layers of ice cream sandwiches and mit whipped cream with chocolate chips on top
    • Layer. Spread half of the Cool Whip mixture on top of the ice cream sandwich layer.Sprinkle with half of the mini chocolate chips.
    • Repeat. Repeat with remaining ice cream sandwiches, Cool Whip mixture, and mini chocolate chips.
    • Freeze. Cover and freeze for 4 hours.
    • Serve! Before serving, drizzle with chocolate sauce. Cut into squares and serve!
    A bite of mint chocolate ice cream cake on a spoon with the rest of the cake in the background

    How Long Is It Good For?

    If you have leftovers, this ice cream sandwich cake will stay good for up to a week in the freezer.

    I would tightly press plastic wrap onto the top to keep as much air as possible out.

    Tips and Tricks

    • You can use an equal amount of homemade whipped cream if you don’t want to use Cool Whip. However, homemade whipped cream isn’t going to freeze as well as Cool Whip so if you think you’ll have a lot of leftovers, I wouldn’t recommend going the homemade route.
    • If you are against food coloring, leave it out! Just warn your guests that it’s mint chocolate chip so they aren’t surpised.
    Overhead shot of mint chip ice cream sandwich cake

    More Frozen Treats

    • Circus Animal Cookie Ice Cream
    • Pistachio Ice Cream with Chocolate Chunks
    • Homemade Orange Sherbet
    • Reese’s Pieces Milkshake
    • Frozen Lemonade Pie

    Make sure you subscribe to my email list to get all my new recipes delivered right to your inbox!

    You can also follow me on Instagram, Facebook, or Pinterest for even more! 

    📖 Recipe

    Yield: 20 servings

    Mint Chocolate Ice Cream Sandwich Cake

    Mint Chocolate Ice Cream Sandwich Cake
    Prep Time 15 minutes
    Additional Time 4 hours
    Total Time 4 hours 15 minutes

    Ingredients

    • 24 ice cream sandwiches
    • 1 (16 ounce) container Cool Whip, thawed
    • green gel food coloring
    • 1 teaspoon peppermint extract
    • ½ cup mini chocolate chips
    • ¼ cup chocolate sauce (either the kind you'd use to make hot chocolate or jarred hot fudge)

    Instructions

    1. Unwrap 12 of the sandwiches and lay them in a single layer in a 9x13-inch pan. You may need to slice 1 or 2 of the sandwiches to make them fit.
    2. In a large mixing bowl, fold together Cool Whip, and green food coloring, and peppermint extract until you reach the desired shade of mint green.
    3. Spread half of the Cool Whip mixture on top of the ice cream sandwich layer.
    4. Sprinkle with half of the mini chocolate chips.
    5. Repeat with remaining ice cream sandwiches, Cool Whip mixture, and mini chocolate chips.
    6. Cover and freeze for 4 hours.
    7. Before serving, drizzle with chocolate sauce. Cut into squares and serve!

    Recommended Products

    As an Amazon Associate and member of other affiliate programs, I earn from qualifying purchases.

    • Peppermint Extract
      Peppermint Extract
    • 9x13-inch pan
      9x13-inch pan

    Nutrition Information:

    Yield:

    20

    Serving Size:

    1

    Amount Per Serving: Calories: 232Total Fat: 9gSaturated Fat: 3gTrans Fat: 0gUnsaturated Fat: 5gCholesterol: 18mgSodium: 112mgCarbohydrates: 37gFiber: 0gSugar: 20gProtein: 4g

    Did you make this recipe?

    Tag me in your Instagram photo - @fakeginger

    © Amanda Livesay
    Cuisine: American / Category: frozen goodies

    Lemon Cool Whip Cookies

    Feb 20, 2023

    You are going to love these Lemon Cool Whip Cookies! These crinkle cookies are made with only 4 ingredients and turn out so soft, chewy, and delicious.

    Lemon cake mix cool whip cookies on a white plate

    If you are looking for a quick, easy, but still delicious dessert, this cookies are it! Plus, bonus points because I’m SO READY for spring and anything citrus reminds me of spring.

    These lemon cool whip cookies will take you about 20 minutes, uses only 1 mixing bowl, and starts with a cake mix!

    6 lemon crinkle cookies on a baking sheet

    Why You’re Going To Love This Recipe

    • Only 4 ingredients! For this recipe, you really just mix up 3 ingredients and then they get rolled in powdered sugar.
    • They are soft and chewy lemon crinkle cookies! You get the pretty crinkles from rolling the cookies in powdered sugar before baking.
    • Did I mention they start with cake mix? Cake mix cookies are so easy to make and always turn out delicious.
    Ingredients for lemon cool whip cookies

    Ingredients for Cool Whip Cookies

    • Lemon cake mix – just a regular boxed cake mix! This also works well with strawberry, vanilla, red velvet, and chocolate cake mixes!
    • Cool Whip – you can use regular or lite Cool Whip for this recipe.
    • Egg – this is going to hold everything together.
    • Powdered sugar – the cookies get rolled in this before baking. It adds to the texture of the cookies and gives them that fun crackly look.
    How to make lemon cool whip cookies

    How To Make Cool Whip Cookies

    • Prepare. Preheat the oven to 350F. Line three cookie sheets with parchment paper and set aside.  
    • Make cookie dough. Mix the cake mix, cool whip, and the egg until well combined.
    • Shape cookies. Scoop the dough into 1 ½ tablespoon balls.
    Rolling lemon cake mix cookies in powdered sugar
    • Roll in powdered sugar. Place ½ cup of powdered sugar in a shallow bowl. Roll half of the dough balls in the powdered sugar. Repeat with remaining powdered sugar and dough balls.
    • Transfer to baking sheets. Place the sugar-covered dough balls on the parchment-lined cookie sheets leaving at least 1 ½” between each cookie.
    • Bake. Bake for 8-10 minutes or until the edges start to turn lightly golden.
    • Cool completely. Allow the cookies to rest on the baking sheet for 10 minutes before transferring them to a wire rack to finish cooling.
    5 lemon cookies stacked on top of each other on a white plate. The top cookie has a bite taken out.

    Tips and Tricks

    • Don’t try using regular whipped cream in these cool whip cookies. The cool whip isn’t dairy based and has certain stabilizers in it that helps to create these cookies.
    • You can try different flavors by switching up the cake mix flavors. I recommend strawberry or red velvet!

    How Long Are They Good For?

    Cool whip cake mix cookies are good for up to 4 days. Make sure to store them in an airtight container at room temperature.

    Can You Freeze Them?

    You can freeze these lemon cool whip cookies for up to 3 months. I recommend wrapping them tightly in plastic wrap and then placing them in a freezer ziploc bag.

    Let them defrost at room temperature for several hours before serving.

    Lemon crinkle cookie on a wooden spatula with more cookies in the background

    More Cookie Recipes

    • Banana Oatmeal Chocolate Chip Cookies
    • Peanut Butter Chocolate Chunk Pudding Cookies
    • Italian Sugar Cookies
    • Peanut Butter Krispie Cookies
    • Trail Mix Cookies

    Make sure you subscribe to my email list to get all my new recipes delivered right to your inbox!

    You can also follow me on Instagram, Facebook, or Pinterest for even more! 

    📖 Recipe

    Yield: 25 cookies

    Lemon Cool Whip Cookies

    Lemon Cool Whip Cookies
    Prep Time 10 minutes
    Cook Time 10 minutes
    Total Time 20 minutes

    Ingredients

    • 1 (15.25 ounce) box of lemon cake mix
    • 1 (8-ounce) tub of cool whip, thawed
    • 1 large egg
    • 1 cup powdered sugar

    Instructions

    1. Preheat the oven to 350 degrees F. Line three cookie sheets with parchment paper and set aside.  
    2. In a large bowl mix the cake mix, cool whip, and the egg until well combined and no streaks of cake mix remain.
    3. Scoop the dough into 1 ½ tablespoon balls. 
    4. Place ½ cup of powdered sugar in a shallow bowl. Roll half of the dough balls in the powdered sugar. Repeat with remaining powdered sugar and dough balls.
    5. Place the sugar-covered dough balls on the parchment-lined cookie sheets leaving at least 1 ½” between each cookie.
    6. Bake for 8-10 minutes or until the edges start to turn lightly golden.
    7. Allow the cookies to rest on the baking sheet for 10 minutes before transferring them to a wire rack to finish cooling.

    Recommended Products

    As an Amazon Associate and member of other affiliate programs, I earn from qualifying purchases.

    • Wire Rack
      Wire Rack
    • Parchment Paper
      Parchment Paper
    • Rimmed Baking Sheet
      Rimmed Baking Sheet

    Nutrition Information:

    Yield:

    25

    Serving Size:

    1

    Amount Per Serving: Calories: 99Total Fat: 1gSaturated Fat: 0gTrans Fat: 0gUnsaturated Fat: 0gCholesterol: 7mgSodium: 156mgCarbohydrates: 22gFiber: 0gSugar: 13gProtein: 1g

    Did you make this recipe?

    Tag me in your Instagram photo - @fakeginger

    © Amanda Livesay
    Cuisine: American / Category: cookie

    Chocolate Loaf Cake

    Feb 16, 2023

    Chocolate Loaf Cake is the richest, most delicious chocolate loaf cake! Topped with chocolate ganache and chocolate chips. A must make for chocolate lovers!

    I definitely don’t consider myself a chocolate lover. I will choose pretty much anything over chocolate. Vanilla, fruit flavored, anything but chocolate.

    But once or twice a year all I can think about is a rich homemade chocolate cake covered in chocolate ganache.

    And this is the cake I make when I’m in that mood.

    Why You Should Make Chocolate Loaf Cake

    • It’s moist, rich, and so delicious! If you love chocolate on top of chocolate with more chocolate, you must make it!
    • Loaf cakes are so much easier than regular cakes! Need a sweet treat that you can throw together in no time? Go for a loaf cake! No fussing with layers or any of that.

    Ingredients

    • All-purpose flour
    • Baking powder
    • Baking soda
    • Salt
    • Cocoa powder – I used Hershey’s Natural Unsweetened Cocoa Powder
    • Instant espresso powder – this brings a richness to the chocolate. You can substitute instant coffee if that’s what you have
    • Canola or vegetable oil
    • Granulated sugar
    • Eggs – make sure they are at room temperature to get the best results
    • Vanilla extract
    • Milk – I used 2% for this recipe but whole milk will work as well
    • Semi-sweet chocolate bar – you are going to cut this into chunks and melt it for the ganache. I used Baker’s semisweet baking chocolate bar for this recipe.
    • Heavy whipping cream – the heavy cream is what makes the ganache so rich and delicious
    • Semi-sweet or milk chocolate chips – these are for sprinkling on top

    How To Make Chocolate Loaf Cake

    1. Prepare. Preheat the oven to 350° and grease a loaf pan.
    2. Mix dry ingredients. Combine the flour, baking powder, baking soda, salt, cocoa powder, and instant espresso powder in a small or medium bowl and whisk.
    3. Mix wet ingredients. In a separate large bowl, whisk together the oil and sugar. 
    4. Beat in eggs and vanilla. Add the eggs and vanilla extract, and continue whisking until the eggs have been beaten.
    1. Combine all ingredients. Mix in the milk and dry ingredients with a wooden spoon or spatula until just combined.
    2. Transfer to pan. Pour the cake batter into the greased pan, and bake for 45-50 minutes. Cool until set.

    How To Make Chocolate Ganache

    1. Prepare. Pour the chopped chocolate bar into a small, heat-proof bowl.
    2. Heat cream. Heat the heavy whipping cream in a small saucepan over medium-low heat until the cream starts to sizzle around the edges of the pan.
    3. Pour over chocolate. Remove the cream from the heat, and pour over the chopped chocolate. Let the mixture rest for 2-3 minutes, then stir with a small spoon or spatula until smooth.
    4. Glaze and sprinkle. Pour the chocolate ganache on top of the cake. Sprinkle with chocolate chips.

    How Long Is It Good For?

    This chocolate cake will be good at room temperature for up to 3 days. If you store it in the fridge, it will be good for up to 7 days. I would bring it to room temperature before serving.

    Make sure to keep it in an airtight container.

    Can You Freeze It?

    You can freeze this chocolate loaf cake for up to 3 months. Wrap tightly in plastic wrap or aluminum foil and then place in an airtight freezer bag.

    Let defrost at room temperature before serving.

    More Chocolate Cake Recipes

    • Flourless Chocolate Cake
    • Peanut Butter Cupcakes with Chocolate Buttercream
    • Chocolate Cream-Filled Cake
    • Snickers Cake
    • German Chocolate Cake

    Make sure you subscribe to my email list to get all my new recipes delivered right to your inbox!

    You can also follow me on Instagram, Facebook, or Pinterest for even more! 

    📖 Recipe

    Yield: 1 loaf

    Chocolate Loaf Cake

    Chocolate Loaf Cake
    Prep Time 20 minutes
    Cook Time 50 minutes
    Total Time 1 hour 10 minutes

    Ingredients

    For the cake

    • 1 ½ cups all-purpose flour
    • 2 teaspoons baking powder
    • 1 teaspoon baking soda
    • ¼ teaspoon salt
    • ½ cup cocoa powder
    • 1 tablespoon instant espresso powder
    • ½ cup canola or vegetable oil
    • 1 cup granulated sugar
    • 2 large eggs, at room temperature
    • 2 teaspoons vanilla extract
    • ½ cup milk

    For the chocolate ganache

    • 1 (4-ounce) semi-sweet chocolate bar, chopped
    • ½ cup heavy whipping cream
    • 2 tablespoons semi-sweet or milk chocolate chips

    Instructions

    1. Preheat the oven to 350° and grease an 8.5x4 or 9x5 loaf pan with shortening or butter. Set aside.
    2. Start by making the cake. Combine the flour, baking powder, baking soda, salt, cocoa powder, and instant espresso powder in a small or medium bowl and whisk.
    3. In a separate large bowl, whisk together the oil and sugar.
    4. Add the eggs and vanilla extract, and continue whisking until the eggs have been beaten.
    5. Mix in the milk and dry ingredients with a wooden spoon or spatula until just combined. Some small lumps of flour are fine, you don’t want to over-mix the batter.
    6. Pour the cake batter into the greased pan, and bake for 45-50 minutes, or until the center of the cake is set and a small knife inserted into the center of the cake comes out clean. Set on a cooling rack to rest.
    7. While the cake is resting, make the chocolate ganache topping. Pour the chopped chocolate bar into a small, heat-proof bowl.
    8. Heat the heavy whipping cream in a small saucepan over medium-low heat until the cream starts to sizzle around the edges of the pan. Do not let the cream boil. 
    9. Remove the cream from the heat, and pour over the chopped chocolate. Let the mixture rest for 2-3 minutes, then stir with a small spoon or spatula until smooth.
    10. Transfer the cake to a platter or plate, and pour the chocolate ganache on top. Sprinkle with chocolate chips, and slice into 8 pieces. Serve with the extra chocolate ganache.

    Recommended Products

    As an Amazon Associate and member of other affiliate programs, I earn from qualifying purchases.

    • Instant Espresso Powder
      Instant Espresso Powder
    • Loaf Pan
      Loaf Pan

    Nutrition Information:

    Yield:

    8

    Serving Size:

    1

    Amount Per Serving: Calories: 439Total Fat: 23gSaturated Fat: 6gTrans Fat: 1gUnsaturated Fat: 15gCholesterol: 66mgSodium: 381mgCarbohydrates: 52gFiber: 2gSugar: 30gProtein: 6g

    Did you make this recipe?

    Tag me in your Instagram photo - @fakeginger

    © Amanda Livesay
    Cuisine: American / Category: cake

    Lemon Drop Shots

    Feb 13, 2023

    Lemon Drop Shots are the perfect sweet and tart boozy shot for your next party. Fresh lemon juice, simple syrup, vodka, and a lemon sugar rim.

    My experience with lemon drop anything up until this point was that season of Real Housewives of Orange County when Lydia ordered a Lemon Drop cocktail everywhere they went.

    It always sounded like a too sweet cocktail that I wouldn’t like so I’ve never tried a lemon drop.

    But a lemon drop in shot form? It’s perfectly tart and sweet and the perfect shot for spring and summer

    Why You’re Going to Love These Lemon Drop Shots

    • These shots are perfect for entertaining! You can mix up a batch of 8 of these shots in minutes. All simple ingredients, too!
    • It tastes like lemon pie! You know that slightly mouth puckering but still sweet flavor a lemon pie has? These have that and it’s so delicious!

    Ingredients

    • Ice – you are going to shake the shots with ice so they are icy cold when you serve them.
    • Vodka – use your favorite kind. It’s doesn’t have to be super expensive but I wouldn’t use something really cheap since it is a shot.
    • Simple syrup – you can buy the bottled stuff or make your own by heating 1 cup of water and 1 cup of granulated sugar over low heat until all the sugar melts. That can be stored in the fridge for up to a month.
    • Lemon juice – Fresh squeezed lemon juice is best but if you happen to have a bottle of lemon juice already, go for it.
    • Lemon zest – This is going to be used to rim the glasses. It makes it so pretty and extra tasty.
    • Granulated sugar – Also going to be used for the rim. Some extra sweetness!

    How To Make Lemon Drop Shots

    • Shake shots. Shake ice, vodka, simple syrup, and all but 1 tablespoon of the lemon juice.
    • Make sugar rim. On a plate, use a fork to mix sugar and lemon zest together.
    • Prepare shots. Rim each shot glass with a bit of lemon juice then dip the glasses in the lemon zest sugar mixture.
    • Strain and enjoy! Strain the drink into shot glasses and serve immediately.

    Can You Make Lemon Drop Shots Ahead?

    You can prep certain things ahead of time if you want to serve them at a party. You can combine the vodka and simple syrup and set it aside for several hours. When it’s time to prepare the shots, add the ice and lemon juice and shake it all together.

    You can also zest your lemon and squeeze your lemon juice ahead of time to save some time.

    Tips and Tricks

    • Lemon Shot Drops are traditionally made with vodka but you can change things up and try silver tequila or white rum!
    • Garnish the shots with lemon slices or fresh herbs if desired.

    More Cocktail Recipes

    • Blood Orange Margaritas
    • Rum Punch Jello Shots
    • Pineapple Blackberry Mojitos
    • Blue Margaritas
    • Birthday Cake Shots

    Make sure you subscribe to my email list to get all my new recipes delivered right to your inbox!

    You can also follow me on Instagram, Facebook, or Pinterest for even more! 

    📖 Recipe

    Yield: 16 ounces (about 8 shots)

    Lemon Drop Shots

    Lemon Drop Shots
    Prep Time 15 minutes
    Total Time 15 minutes

    Ingredients

    • 1 cup ice
    • 6 ounces vodka
    • 5 ounces simple syrup
    • 5 ounces freshly squeezed lemon juice, divided
    • zest of 1 lemon
    • ¼ cup granulated sugar

    Instructions

    1. In a cocktail shaker, combine ice, vodka, simple syrup, and all but 1 tablespoon of the lemon juice. Close and shake vigorously for 30 seconds. Set aside.
    1. On a plate, use a fork to mix sugar and lemon zest together. Kind of mash them together so the zest releases all it's flavors and scents.
    2. Rim each shot glass with a bit of lemon juice then dip the glasses in the lemon zest sugar mixture.
    3. Strain the drink into shot glasses and serve immediately.

    Recommended Products

    As an Amazon Associate and member of other affiliate programs, I earn from qualifying purchases.

    • Tall Shot Glasses
      Tall Shot Glasses
    • Zester
      Zester
    • Cocktail Shaker
      Cocktail Shaker

    Nutrition Information:

    Yield:

    8

    Serving Size:

    1

    Amount Per Serving: Calories: 110Total Fat: 0gSaturated Fat: 0gTrans Fat: 0gUnsaturated Fat: 0gCholesterol: 0mgSodium: 6mgCarbohydrates: 16gFiber: 0gSugar: 15gProtein: 0g

    Did you make this recipe?

    Tag me in your Instagram photo - @fakeginger

    © Amanda Livesay
    Cuisine: American / Category: drink

    Pineapple Fluff Salad

    Feb 09, 2023

    Summer in a bowl! Pineapple Fluff Salad has pineapple, marshmallows, coconut, and pecans in a creamy vanilla dressing. This is so delicious, no bake, and so easy!

    If you love fruit salads as much as I do, you have to try Pistachio Marshmallow Salad!

    Pineapple fluff salad in a white bowl topped with pineapple, marshmallows, and chopped pecans

    Last week we had a really nasty ice storm here in Texas. The kids were out of school for 4 days, we couldn’t even walk outside without slipping, it was bad.

    And that was enough winter for me. I’m done with winter.

    I’m ready for salads and fresh fruit and s’mores by the fire.

    This Pineapple Fluff screams summer. Name all the summery tropical flavors and they are all in here! Plus, it’s so easy!

    Two bowls of pineapple marshmallow salad in white bowls with paper umbrellas sticking out. Topped with pineapple, fresh mint, marshmallows, and chopped pecans

    Why You Should Make Pineapple Fluff

    • It’s cool, creamy, and delicious! How can you go wrong with pineapple, coconut, and pecans all tossed in a sweet vanilla dressing?!
    • Everyone loves a no bake dessert! And this one is great because you need to prep it at least 2 hours ahead so it’s great for a get together.
    Ingredients for pineapple fluff salad

    Ingredients

    • Instant vanilla pudding – make sure it’s the instant kind! You could change up the flavor if you want, like maybe coconut or banana!
    • Crushed pineapple in juice – do NOT drain the liquid! You need the juice to create the pudding. Be sure the pineapple is in juice and not syrup – syrup will make the salad too sweet and very heavy.
    • Cool Whip – you can use lite or sugar free Cool Whip if you want.
    • Mini Marshmallows – marshmallows add the best texture to fruit salad!
    • Shredded coconut – I know coconut is a texture problem for some people so if you don’t like it, just leave it out. You can use coconut pudding instead of vanilla if you still want that tropical flavor.
    • Pecans – you have to have a good crunch in a fruit salad!
    How to make pineapple fluff salad

    How To Make Pineapple Fluff

    • In a large mixing bowl, mix together the pudding mix with the pineapple and the juice until no streaks remain.
    • Gently fold in the Cool Whip until completely incorporated, being careful not to deflate the Cool Whip.
    How to make pineapple marshmallow salad
    • Add the mini marshmallows, shredded coconut, and chopped pecans to the bowl and fold to combine.
    • Let chill in the refrigerator for 2-4 hours.
    • Right before serving, top with more pineapple, pecans, marshmallows, and coconut if desired.
    Overhead shot of pineapple fluff topped with a fresh pineapple on the side

    Can It Be Made Ahead?

    This fruit salad needs to be made at least 2 hours in advance to give everything time to thicken and mingle. You can make it farther in advance but I don’t recommend making it more than 6 hours in advance.

    How Long Is It Good For?

    Pineapple Fluff is best served the day it’s made but it will be fine in the fridge for up to 3 days. Make sure to store it in an airtight container.

    Pineapple marshmallow fruit salad in a white bowl topped with pineapple, chopped pecans, marshmallows, and fresh mint

    More Fruit Salad Recipes

    • Marshmallow Fruit Salad
    • Tropical Marshmallow Fruit Salad
    • Grape Salad
    • Fruit Salad with Honey Lime Dressing

    Make sure you subscribe to my email list to get all my new recipes delivered right to your inbox!

    You can also follow me on Instagram, Facebook, or Pinterest for even more! 

    📖 Recipe

    Yield: 8 cups

    Pineapple Fluff

    Pineapple Fluff
    Prep Time 15 minutes
    Additional Time 2 hours
    Total Time 2 hours 15 minutes

    Ingredients

    • 2 3.4 ounce box instant vanilla pudding mix
    • 2 20 ounce cans crushed pineapple in juice (do NOT drain the juice)
    • 8 ounce tub Cool Whip
    • 10 ounce bag mini marshmallows
    • 1 ½ cups shredded coconut
    • 1 cup chopped pecans, plus more for topping

    Instructions

      1. In a large mixing bowl, mix together the pudding mix with the pineapple and the juice until no streaks remain.
      2. Gently fold in the Cool Whip until completely incorporated, being careful not to deflate the Cool Whip.
      3. Add the mini marshmallows, shredded coconut, and chopped pecans to the bowl and fold to combine.
      4. Let chill in the refrigerator for 2-4 hours.
      5. Right before serving, top with more pineapple, pecans, marshmallows, and coconut if desired.

    Recommended Products

    As an Amazon Associate and member of other affiliate programs, I earn from qualifying purchases.

    • OXO Mixing Bowls
      OXO Mixing Bowls

    Nutrition Information:

    Yield:

    16

    Serving Size:

    1

    Amount Per Serving: Calories: 271Total Fat: 11gSaturated Fat: 6gTrans Fat: 0gUnsaturated Fat: 5gCholesterol: 0mgSodium: 188mgCarbohydrates: 45gFiber: 2gSugar: 38gProtein: 2g

    Did you make this recipe?

    Tag me in your Instagram photo - @fakeginger

    © Amanda Livesay
    Cuisine: American / Category: pie

    Cheesy Sausage Dip

    Feb 05, 2023

    A must make party appetizer! Cheesy Sausage Dip is creamy, cheesy, a little spicy, and oh-so-delicious. Only 4 ingredients!

    Cheesy Sausage Dip topped with fresh tomatoes and cilantro with tortilla chips.

    Who else has been planning their Super Bowl menu for the last month? I am SO EXCITED for this weekend. And I don’t care about either team this year.

    This dip is at the top of my Super Bowl snack list. It’s a cheesy salsa dip made with sausage – it’s creamy, a little spicy, and so delicious!

    Plus it’s so easy! Only 4 ingredients and ready in minutes. I’ve also included crockpot instructions down below in case you want to make it even easier.

    Everyone invited to the Super Bowl party is going to love this dip!

    Velveeta sausage dip in a white bowl with tortilla chips

    Ingredients for Velveeta Cheese Dip with Sausage

    • Breakfast sausage – you can use mild or hot breakfast sausage, depending on how spicy you want the dip to be.
    • Velveeta cheese – this is the best cheese for dips because it melts so well
    • Cream cheese – the cream cheese adds an extra creaminess and tiny bit of tang to the dip
    • Salsa – use your favorite salsa, as spicy as you want. I do recommend using a thinner salsa to help thin out the dip a little bit.
    • Tortilla chips – for serving

    Instructions

    • Cook sausage. Cook sausage over medium-high heat in a large skillet. Drain and return to skillet.
    • Add remaining ingredients. Lower heat and add Velveeta, cream cheese, and salsa. Heat, until cheese and cream cheese is completely melted.
    • Serve. Serve immediately with tortilla chips.
    White pot full of cheesy salsa dip with fresh tomatoes and cilantro on top

    How Long Is It Good For?

    This sausage cheese dip is good for up to 3 days when stored in the fridge. Make sure to store it in an airtight container.

    When you go to reheat it, it will probably need to be thinned out. You can use some liquid from the salsa container, milk, chicken broth, or even water. I like to reheat dips like this in a small crockpot and just serve straight from there!

    Can You Freeze It?

    I don’t recommend freezing this dip.

    Cheesy sausage dip in a white bowl with tortilla chips on the side

    Make It In a Slow Cooker

    This dip is really simple to change to a slow cooker dip, which makes it perfect for serving at a party or event.

    To do that, cook the sausage according to recipe instructions. Once drained, transfer it to a slow cooker. Add the Velveeta, cream cheese, and salsa and give it a good stir. Put the slow cooker on low and just let everything melt together. Within an hour or so the cheeses should be melted and you should be able to stir to combine.

    You can lower the heat to warm and just serve straight from the slow cooker!

    (I recommend doing this in a 6 quart slow cooker.)

    Velveeta cheese dip with sausage in a white bowl with tortilla chips on the side

    More Dip Recipes

    • Chuy’s Creamy Jalapeño Dip
    • Buffalo Chicken Dip
    • Jalapeno Popper Dip
    • Dill Pickle Dip
    • Chicken Burrito Dip

    Make sure you subscribe to my email list to get all my new recipes delivered right to your inbox!

    You can also follow me on Instagram, Facebook, or Pinterest for even more! 

    Velveeta sausage dip in a large pot with tortilla chips dipped in

    📖 Recipe

    Yield: about 6 servings

    Cheesy Sausage Dip

    Cheesy Sausage Dip
    Prep Time 5 minutes
    Cook Time 15 minutes
    Total Time 20 minutes

    Ingredients

    • 1 (16-ounce) package hot or mild breakfast sausage
    • 1 (16-ounce) container Velveeta cheese
    • 1 (8-ounce) block cream cheese
    • 1 cup salsa
    • tortilla chips, for serving

    Instructions

    1. Heat a large skillet over medium-high heat. Cook sausage, breaking it up as it cooks, until cooked through. Drain and return to skillet.
    2. Lower heat and add Velveeta, cream cheese, and salsa. Heat, stirring frequently, until cheese and cream cheese is completely melted.
    3. Serve immediately with tortilla chips.

    Recommended Products

    As an Amazon Associate and member of other affiliate programs, I earn from qualifying purchases.

    • 8-inch Cast Iron Skillet
      8-inch Cast Iron Skillet

    Nutrition Information:

    Yield:

    6

    Serving Size:

    1

    Amount Per Serving: Calories: 71Total Fat: 5gSaturated Fat: 2gTrans Fat: 0gUnsaturated Fat: 2gCholesterol: 15mgSodium: 457mgCarbohydrates: 4gFiber: 1gSugar: 2gProtein: 3g

    Did you make this recipe?

    Tag me in your Instagram photo - @fakeginger

    © Amanda Livesay
    Cuisine: American / Category: appetizer

    Broccoli Cheddar Soup

    Nov 06, 2022

    Broccoli Cheddar Soup is an easy kid-friendly soup! Creamy soup with broccoli, carrots, and cheddar cheese!

    Some of my family’s other favorite soups are Dill Pickle Soup and Creamy Tomato Tortellini Soup.

    Originally published October 18, 2017. Photos updated November 6, 2022.

    Soup season is my favorite. There is nothing better than a big bowl of creamy soup on a chilly day.

    This Broccoli Cheddar Soup is a favorite in my house. It’s creamy and cheesy and full of vegetables! Even my picky kid loves it.

    And it’s also really easy and quick to make! Serve it with some bread for dipping and dinner is ready in about 30 minutes!

    Ingredients

    • Butter
    • White onion
    • Garlic
    • All-purpose flour – this is how the soup is thickened
    • Milk – you can use dairy milk or non-dairy. If you use a non-dairy milk, make sure it is unflavored and unsweetened.
    • Low-sodium chicken broth – you can use vegetable broth if you want to make it vegetarian
    • Broccoli – you can use fresh or frozen broccoli but frozen will require longer cooking time. If you are using frozen broccoli, make sure you get the bag with only florets
    • Carrots – these get finely grated and become super soft when cooked
    • Cheddar cheese – use sharp or mild cheddar cheese, whichever you prefer!

    Instructions

    • Cook onion and garlic. In a large pot, heat butter over medium heat. Add onion and cook, stirring frequently, until translucent, about 5 minutes. Add garlic and cook until fragrant, about 30 seconds.
    • Make thickening paste. Add remaining 4 tablespoons of butter and flour. Whisk to combine the butter and flour into a paste and cook for 1 minute.
    • Add liquid. Slowly add milk, whisking the entire time. Add chicken broth.
    • Simmer. Bring to a boil, cover, and low to a simmer. Simmer for about 10 minutes or until thickened.
    • Add vegetables. Add broccoli and carrots and continue simmering until veggies have softened, about 15 minutes.
    • Add cheese. Remove from heat and stir in cheese until melted.
    • Season to taste. Taste for seasoning and add salt and pepper as needed.

    How Long Is It Good For?

    Broccoli Cheddar Soup is good for about 3 – 4 days in the fridge. Make sure to store it in an airtight container like these soup containers.

    I recommend reheating the soup on the stove. If it’s thickened up a lot in the fridge, add a little more broth or water to get it back to it’s original consistency.

    Can You Freeze It?

    You can freeze cheesy broccoli soup for up to 3 months. Make sure to use an airtight, freezer-safe soup container.

    When you are ready to serve it, let it defrost overnight in the fridge and then reheat on the stove. If may have thickened as it set so just add more broth or water as needed.

    More Soup Recipes

    • Slow Cooker Cheesy Potato Broccoli Soup
    • Chicken Tortellini Soup
    • Autumn Squash Soup
    • Pasta Fagioli
    • Dill Pickle Soup
    • Crockpot Chicken Tortilla Soup

    Make sure you subscribe to my email list to get all my new recipes delivered right to your inbox!

    You can also follow me on Instagram, Facebook, or Pinterest for even more! 

    📖 Recipe

    Yield: 4 servings

    Broccoli Cheddar Soup

    Broccoli Cheddar Soup

    Broccoli Cheddar Soup - easy kid-friendly soup! A creamy soup with broccoli, carrots, and cheddar cheese!

    Prep Time 15 minutes
    Cook Time 30 minutes
    Total Time 45 minutes

    Ingredients

    • 5 tablespoons butter, divided
    • 1 small white onion, diced
    • 2 cloves garlic, minced
    • ¼ cup flour
    • 2 cups milk
    • 2 cups low-sodium chicken broth
    • 2 cups chopped fresh broccoli or frozen broccoli florets
    • 1 cup thinly sliced carrots
    • 1 ½ cups cheddar cheese, shredded
    • salt and pepper, to taste

    Instructions

    1. In a large pot, heat 1 tablespoon butter over medium heat. Add onion and cook, stirring frequently, until translucent, about 5 minutes. Add garlic and cook until fragrant, about 30 seconds. Add remaining 4 tablespoons of butter and flour. Whisk to combine the butter and flour into a paste and cook for 1 minute. Slowly add milk, whisking the entire time. Add chicken broth. Bring to a boil, cover, and low to a simmer. Simmer for about 10 minutes or until thickened. Add broccoli and carrots and continue simmering until veggies have softened, about 15 minutes. Remove from heat and stir in cheese until melted. Taste for seasoning and add salt and pepper as needed.

    Recommended Products

    As an Amazon Associate and member of other affiliate programs, I earn from qualifying purchases.

    • Dutch Oven
      Dutch Oven

    Nutrition Information:

    Yield:

    4

    Serving Size:

    1

    Amount Per Serving: Calories: 459Total Fat: 32gSaturated Fat: 19gTrans Fat: 1gUnsaturated Fat: 10gCholesterol: 90mgSodium: 620mgCarbohydrates: 26gFiber: 4gSugar: 4gProtein: 20g

    Did you make this recipe?

    Tag me in your Instagram photo - @fakeginger

    © Amanda Livesay
    Cuisine: American / Category: soup

    Cherry Coke Cupcakes

    Jul 17, 2022

    A must make for cherry Coke lovers! Chocolate cupcakes with cherry juice, Coca Cola, and a cherry in the center. These Cherry Coke Cupcakes start with a cake mix so they are really quick and easy!

    Chocolate cherry coke cupcakes with pink cherry frosting, chocolate shavings, and a cherry on top

    Why You’re Going To Love This Recipe

    • If you love a cherry Coke as much as I do, these are a must make. There is truly nothing better than a icy Sonic Coke with cherry syrup in it. And then a maraschino cherry to top it all off.
    • These Cherry Coke Cupcakes have the flavors of cherry coke but also have chocolate added! So they are extra amazing.
    • They start with a chocolate cake mix so they are quick and easy but still so delicious!
    half of a chocolate cupcake with a cherry in the center and pink frosting.

    Ingredients

    • Devil’s food cake mix – you can use any chocolate cake mix that you prefer, Devil’s food is just my favorite
    • Maraschino cherries – this recipe uses the cherries and the cherry juice. Cherries and cherry juice both go into the cupcakes and more cherry juice goes into the frosting. Plus, the cupcakes get topped with a cherry!
    • Coca Cola – you can use any cola flavored soda that you like. The soda adds flavor and acts as a leavening agent in the cupcakes to make them light and fluffy.
    • Vegetable oil – these cupcakes call for vegetable oil which makes a fluffier cupcake than butter.
    • Eggs – make sure they are at room temperature before you bake.
    • Butter – this is going in the cherry frosting.
    • Powdered sugar
    • Sprinkles or chocolate shavings – optional but they make for pretty cupcakes! I used a microplane to shave chocolate over these but you can use chocolate sprinkles if you want!
    how to make cherry coke cupcakes

    How To Make Cherry Coke Cupcakes

    • Prepare. Preheat oven to 350 degrees Fahrenheit. Line two muffin pans with cupcake liners.
    • Make cupcakes batter. In a large bowl, beat together the food cake mix, cola, ¼ cup reserved cherry liquid, oil, and eggs until just combined with a whisk.
    • Fill. Fill liners ⅔ full and add 1 maraschino cherry to the middle of each.
    • Bake. Bake for 20-22 minutes, or until a toothpick inserted in the center of one cupcake comes out clean. Cool completely.
    • Make frosting. Use an electric mixer to cream the butter. Slowly add powdered sugar and beat until combined. Add the remaining reserved cherry juice slowly, until the frosting is light and fluffy.
    • Decorate. Frost each cupcake. Top cupcakes with sprinkles or chocolate shavings. Add a cherry and serve!
    Overhead shot of a cupcake with pink frosting, chocolate shavings, and a cherry on top.

    How Long Are They Good For?

    Cupcakes are good for up to 3 days at room temperature. Make sure to store them in an airtight container.

    They will be fine for up to 5 days in the refrigerator but storing them in the fridge will suck some of the moisture out.

    Can You Freeze Them?

    You can freeze the unfrosted cupcakes for up to 3 months. I recommend wrapping them tightly in plastic wrap and then placing in a freezer ziploc bag.

    Let them defrost at room temperature for several hours before frosting and serving.

    3 chocolate cherry coke cupcakes. The one in the center is cut in half to show a cherry in the center of the cupcake.

    More Cupcake Recipes

    • Strawberry Lemonade Cupcakes
    • Carrot Cake Cupcakes with Cream Cheese Frosting
    • Pink Velvet Funfetti Cupcakes
    • Peanut Butter Cupcakes with Chocolate Buttercream
    • Apple Spice Cupcakes

    Make sure you subscribe to my email list to get all my new recipes delivered right to your inbox!

    You can also follow me on Instagram, Facebook, or Pinterest for even more! 

    📖 Recipe

    Yield: 24 cupcakes

    Cherry Coke Cupcakes

    Cherry Coke Cupcakes

    A must make for cherry Coke lovers! Chocolate cupcakes with cherry juice, Coca Cola, and a cherry in the center. These Cherry Coke Cupcakes start with a cake mix so they are really quick and easy!

    Prep Time 30 minutes
    Cook Time 22 minutes
    Total Time 52 minutes

    Ingredients

    • 1 box Devil’s food cake mix
    • 10 ounce jar maraschino cherries, drained, ½ cup liquid reserved
    • 1 cup Coca Cola
    • ½ cup vegetable oil
    • 3 eggs, at room temperature

    For the cherry frosting:

    • 1 cup butter, softened
    • 3 cups powdered sugar
    • ¼ cup reserved cherry juice
    • 24 maraschino cherries with stems, well drained
    • Sprinkles or chocolate shavings, if desired

    Instructions

      1. Preheat oven to 350 degrees Fahrenheit. Line two muffin pans with cupcake liners. Set aside.
      2. In a large bowl, beat together the food cake mix, cola, ¼ cup reserved cherry liquid, oil, and eggs until just combined with a whisk.
      3. Fill liners ⅔ full and add 1 maraschino cherry to the middle of each.
      4. Bake for 20-22 minutes, or until a toothpick inserted in the center of one cupcake comes out clean. Cool completely.
      5. To make the frosting, use an electric mixer to cream the butter. Slowly add powdered sugar and beat until combined.
      6. Add the remaining reserved cherry juice slowly, until the frosting is light and fluffy.
      7. Frost each cupcake.
      8. Top cupcakes with sprinkles or chocolate shavings. Add a cherry and serve!

    Recommended Products

    As an Amazon Associate and member of other affiliate programs, I earn from qualifying purchases.

    • Electric Mixer
      Electric Mixer
    • Parchment Muffin Liners
      Parchment Muffin Liners
    • My Favorite Muffin Tin
      My Favorite Muffin Tin

    Nutrition Information:

    Yield:

    24

    Serving Size:

    1

    Amount Per Serving: Calories: 274Total Fat: 14gSaturated Fat: 6gTrans Fat: 0gUnsaturated Fat: 7gCholesterol: 44mgSodium: 231mgCarbohydrates: 37gFiber: 1gSugar: 28gProtein: 2g

    Did you make this recipe?

    Tag me in your Instagram photo - @fakeginger

    © Amanda Livesay
    Cuisine: American / Category: cake

    Air Fryer Garlic Parmesan Fries

    May 18, 2022

    Air Fryer Garlic Parmesan Fries are crispy, salty, and absolutely delicious. They are healthier than traditional french fries and ready in 30 minutes!

    If you love all things garlic parmesan, try Garlic Parmesan Cheese Ball!

    Crispy air fryer garlic parmesan fries sprinkled with parsley on a wooden plate with a white dipping sauce

    I will admit that the only reason I bought an air fryer was to make frozen fries. My kids and I love to make frozen fries as a late night snack on the weekends and the air fryer works perfectly for that.

    I had the air fryer for probably a year and a half before I attempted any real recipe with it. And now I’m obsessed with it and use it pretty much daily.

    These air fryer garlic parmesan fries are my current favorite snack. I’m anxiously awaiting the return of summer truffle ketchup at Trader Joe’s because it’s going to pair perfectly with these fries.

    Crispy garlic parm fries wrapped in parchment paper

    Why You’re Going To Love This Recipe

    • These air fryer homemade fries are quick and easy! No need to heat up a big pot of oil or bake in the oven forever. These take about 20 minutes in the air fryer! So they’re great as a weeknight side dish or a quick snack.

    • Air fryer fries get super crispy just like your favorite fast food fries.

    • You’re only using a tablespoon of oil for these french fries in the air fryer so they’re better for you than deep fried fries.
    Ingredients for garlic parmesan fries air fryer

    Ingredients

    • Russet potatoes – use medium or large size russet potatoes. And you are going to leave the skin on because the skin gets nice and crispy.
    • Olive oil
    • Garlic powder – you can use 1 clove of fresh garlic if you prefer a fresher garlic taste.
    • Onion powder
    • Salt and pepper
    • Parmesan cheese – you can grate your own or get a good quality grated Parmesan from the store.
    • Fresh parsley
    How to make french fries in air fryer

    How To Make Air Fryer Garlic Parmesan Fries

    • Prepare. Preheat air fryer to 400 F.
    • Prep potatoes. Wash and dry the potatoes. Cut them in ¼ inch wide strips and then each strip into ¼ inch wide strips.
    • Soak potatoes. In a large bowl soak the potato strips in room temperature water for 15-30 minutes. Wash the potatoes again and dry them thoroughly.
    • Season potatoes. In a mixing bowl combine fries, oil, garlic powder, onion powder, salt, and pepper. Toss to make sure fries are coated.
    • Air fry. Transfer the fries into the basket and air fry for 20-25 minutes, shaking the basket several times throughout to make sure all the fries get fried evenly. Sprinkle hot fries with Parmesan and fresh parsley before serving.
    Crispy french fries tossed in grated parmesan cheese in a glass bowl

    Which Air Fryer To Use

    I use this Cosori Air Fryer for all my air fryer cooking.

    Using Fresh Garlic

    If you want to use fresh garlic instead of garlic powder, use 1 clove of garlic and finely mince it. Add it to the oil mixture that you coat the fries with.

    How Long Are They Good For?

    These fries will be good in the refrigerator for up to 3 days. Make sure to store them in an airtight container.

    I recommend reheating these fries in the air fryer to get them crispy again. Reheat them for 3 – 5 minutes at 400F, until they are heated through and crispy.

    What To Serve With Them

    You can serve these fries alone or with a sauce on the side. I like to make a quick sauce of mayo, truffle oil, and salt with these fries. You could also serve them with ketchup, ranch dressing, honey mustard, whatever you like!

    Garlic parmesan fries with a white dipping sauce

    More Fries Recipes

    • Pulled Pork Fries
    • Sloppy Joe Fries
    • Texas Cheese Fries
    • Peanut Butter Crusted Sweet Potato Fries
    • Reuben Fries
    • Cheeseburger Fries

    Make sure you subscribe to my email list to get all my new recipes delivered right to your inbox!

    You can also follow me on Instagram, Facebook, or Pinterest for even more! 

    📖 Recipe

    Yield: 2 - 3 servings

    Air Fryer Garlic Parmesan Fries

    Air Fryer Garlic Parmesan Fries
    Prep Time 10 minutes
    Cook Time 20 minutes
    Total Time 30 minutes

    Ingredients

    • 2 russet potatoes
    • 1 tablespoon olive oil
    • 1 teaspoon garlic powder
    • 1 teaspoon onion powder
    • ½ teaspoon salt
    • ¼ teaspoon pepper
    • ¼ cup Parmesan cheese
    • fresh parsley, for serving

    Instructions

      1. Preheat air fryer to 400 F according to manufacturer instructions.
      2. Wash and dry the potatoes. Cut them in ¼ inch wide strips and then each strip into ¼ inch wide strips.
      3. In a large bowl soak the potato strips in room temperature water for 15-30 minutes.
      4. Wash the potatoes again and dry them thoroughly.
      5. In a mixing bowl combine fries, oil, garlic powder, onion powder, salt, and pepper. Toss to make sure fries are coated.
      6. Once the air fryer is preheated, transfer the fries into the basket and air fry for 20-25 minutes, shaking the basket several times throughout to make sure all the fries get fried evenly.
      7. Sprinkle hot fries with Parmesan and fresh parsley before serving.

    Recommended Products

    As an Amazon Associate and member of other affiliate programs, I earn from qualifying purchases.

    • Air Fryer
      Air Fryer
    • Microplane
      Microplane

    Nutrition Information:

    Yield:

    2

    Serving Size:

    1

    Amount Per Serving: Calories: 262Total Fat: 9gSaturated Fat: 2gTrans Fat: 0gUnsaturated Fat: 6gCholesterol: 5mgSodium: 129mgCarbohydrates: 40gFiber: 4gSugar: 2gProtein: 7g

    Did you make this recipe?

    Tag me in your Instagram photo - @fakeginger

    © Amanda Livesay
    Cuisine: American / Category: Sides
    « Previous Page
    Next Page »

    Primary Sidebar

    Amanda Livesay
    Hi, I'm Amanda! DFW food blogger, mom of boys, and crazy dog lady.
    Read more
    Privacy Policy
    Privacy Policy

    Footer

    ↑ back to top

    About

    • Privacy Policy
    • About Fake Ginger

    Newsletter

    • Sign Up for weekly emails featuring new recipes!

    As an Amazon Associate I earn from qualifying purchases.

    Copyright © 2024 FakeGinger.com