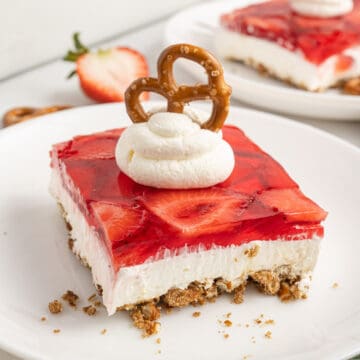
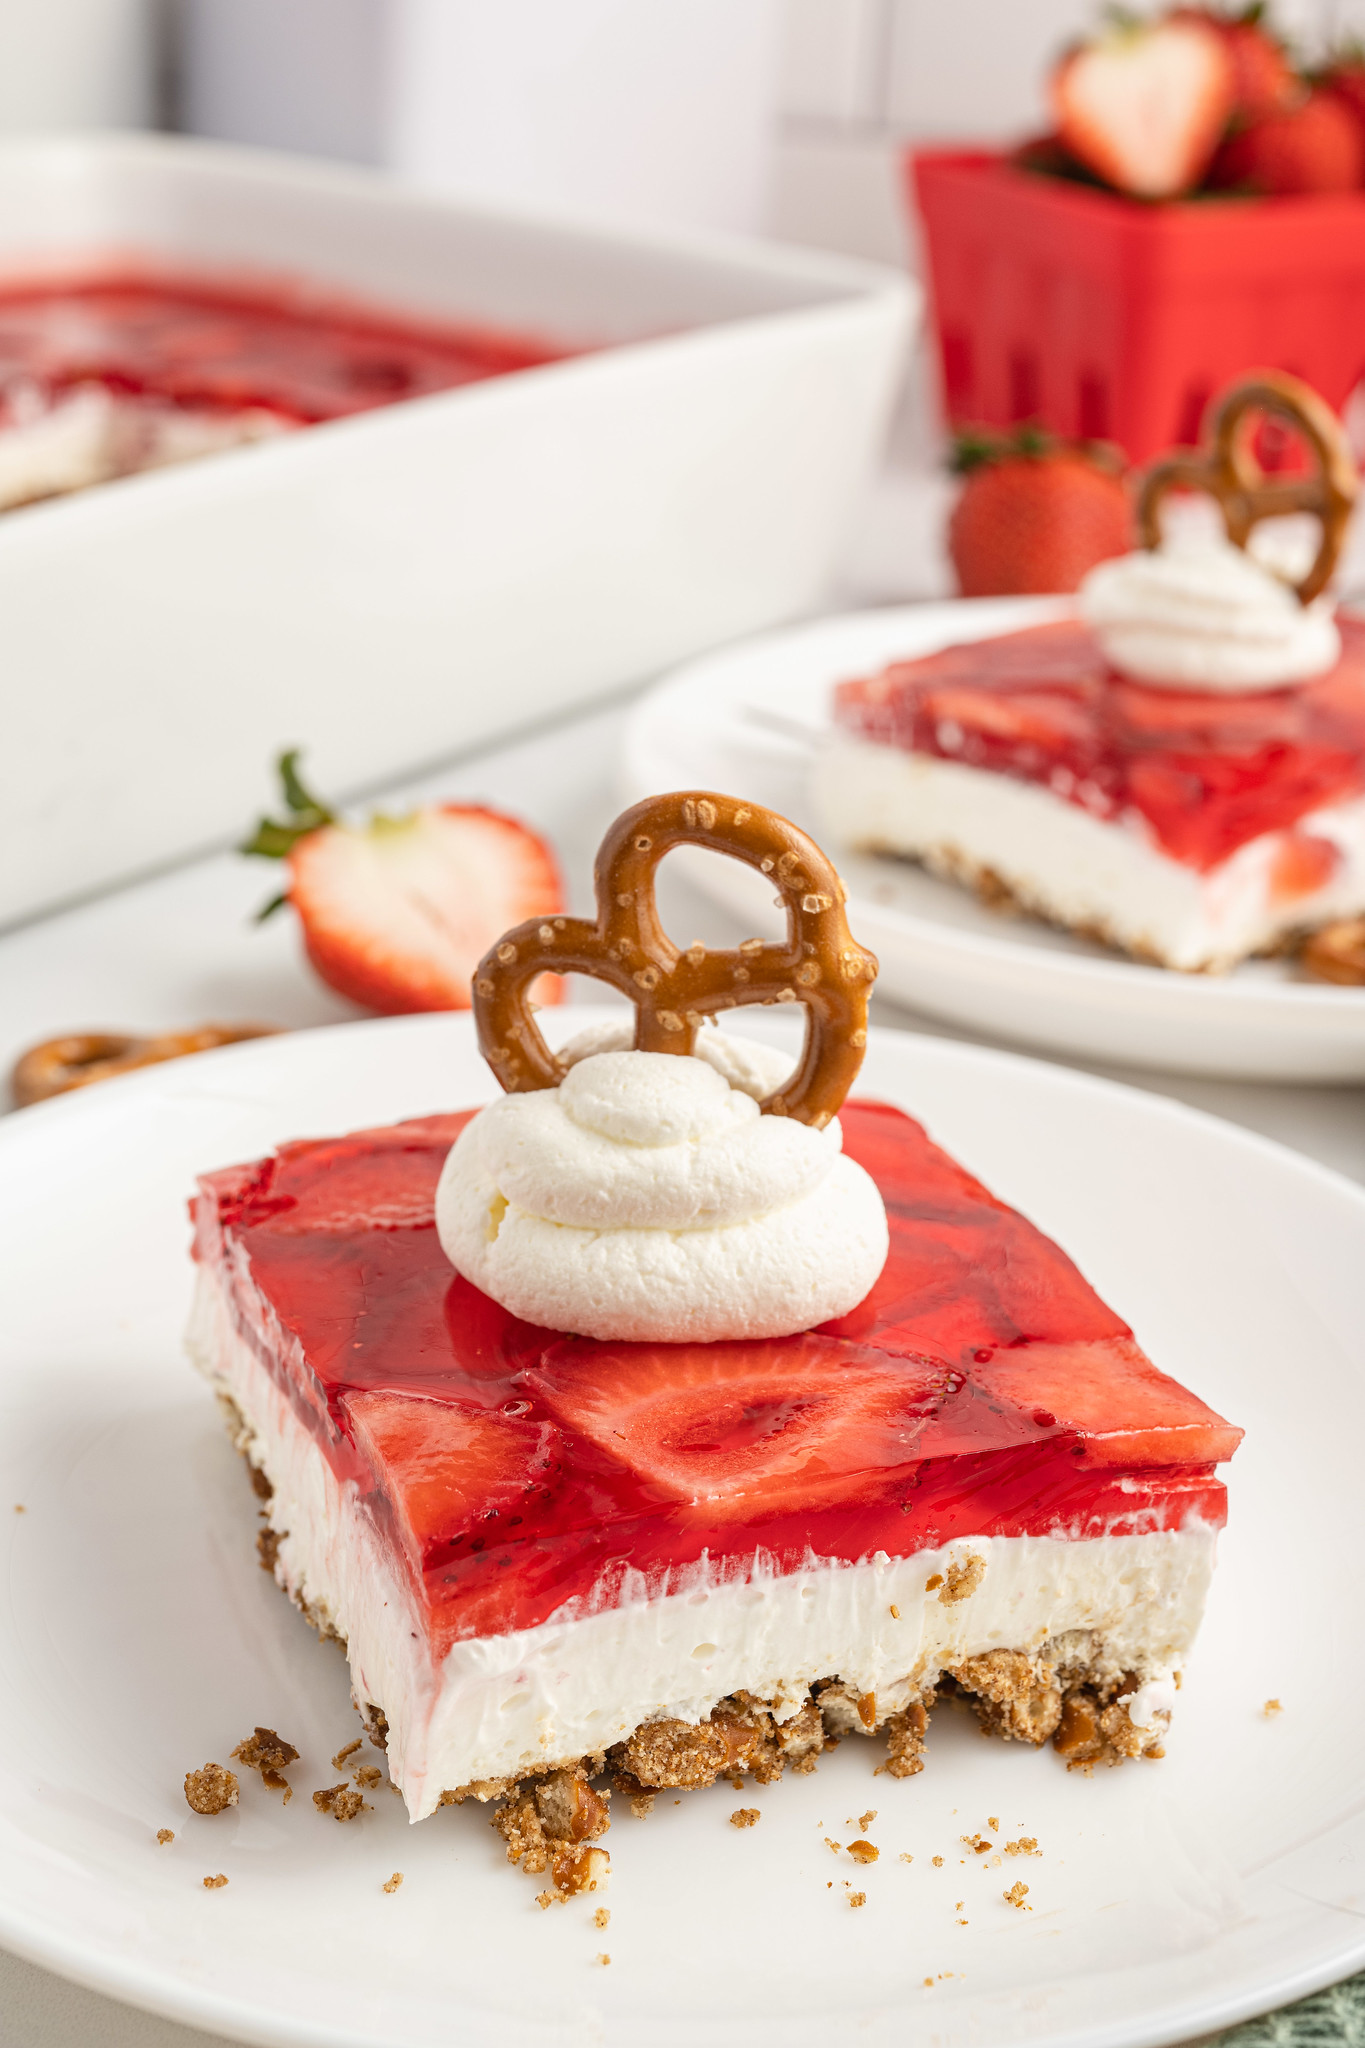
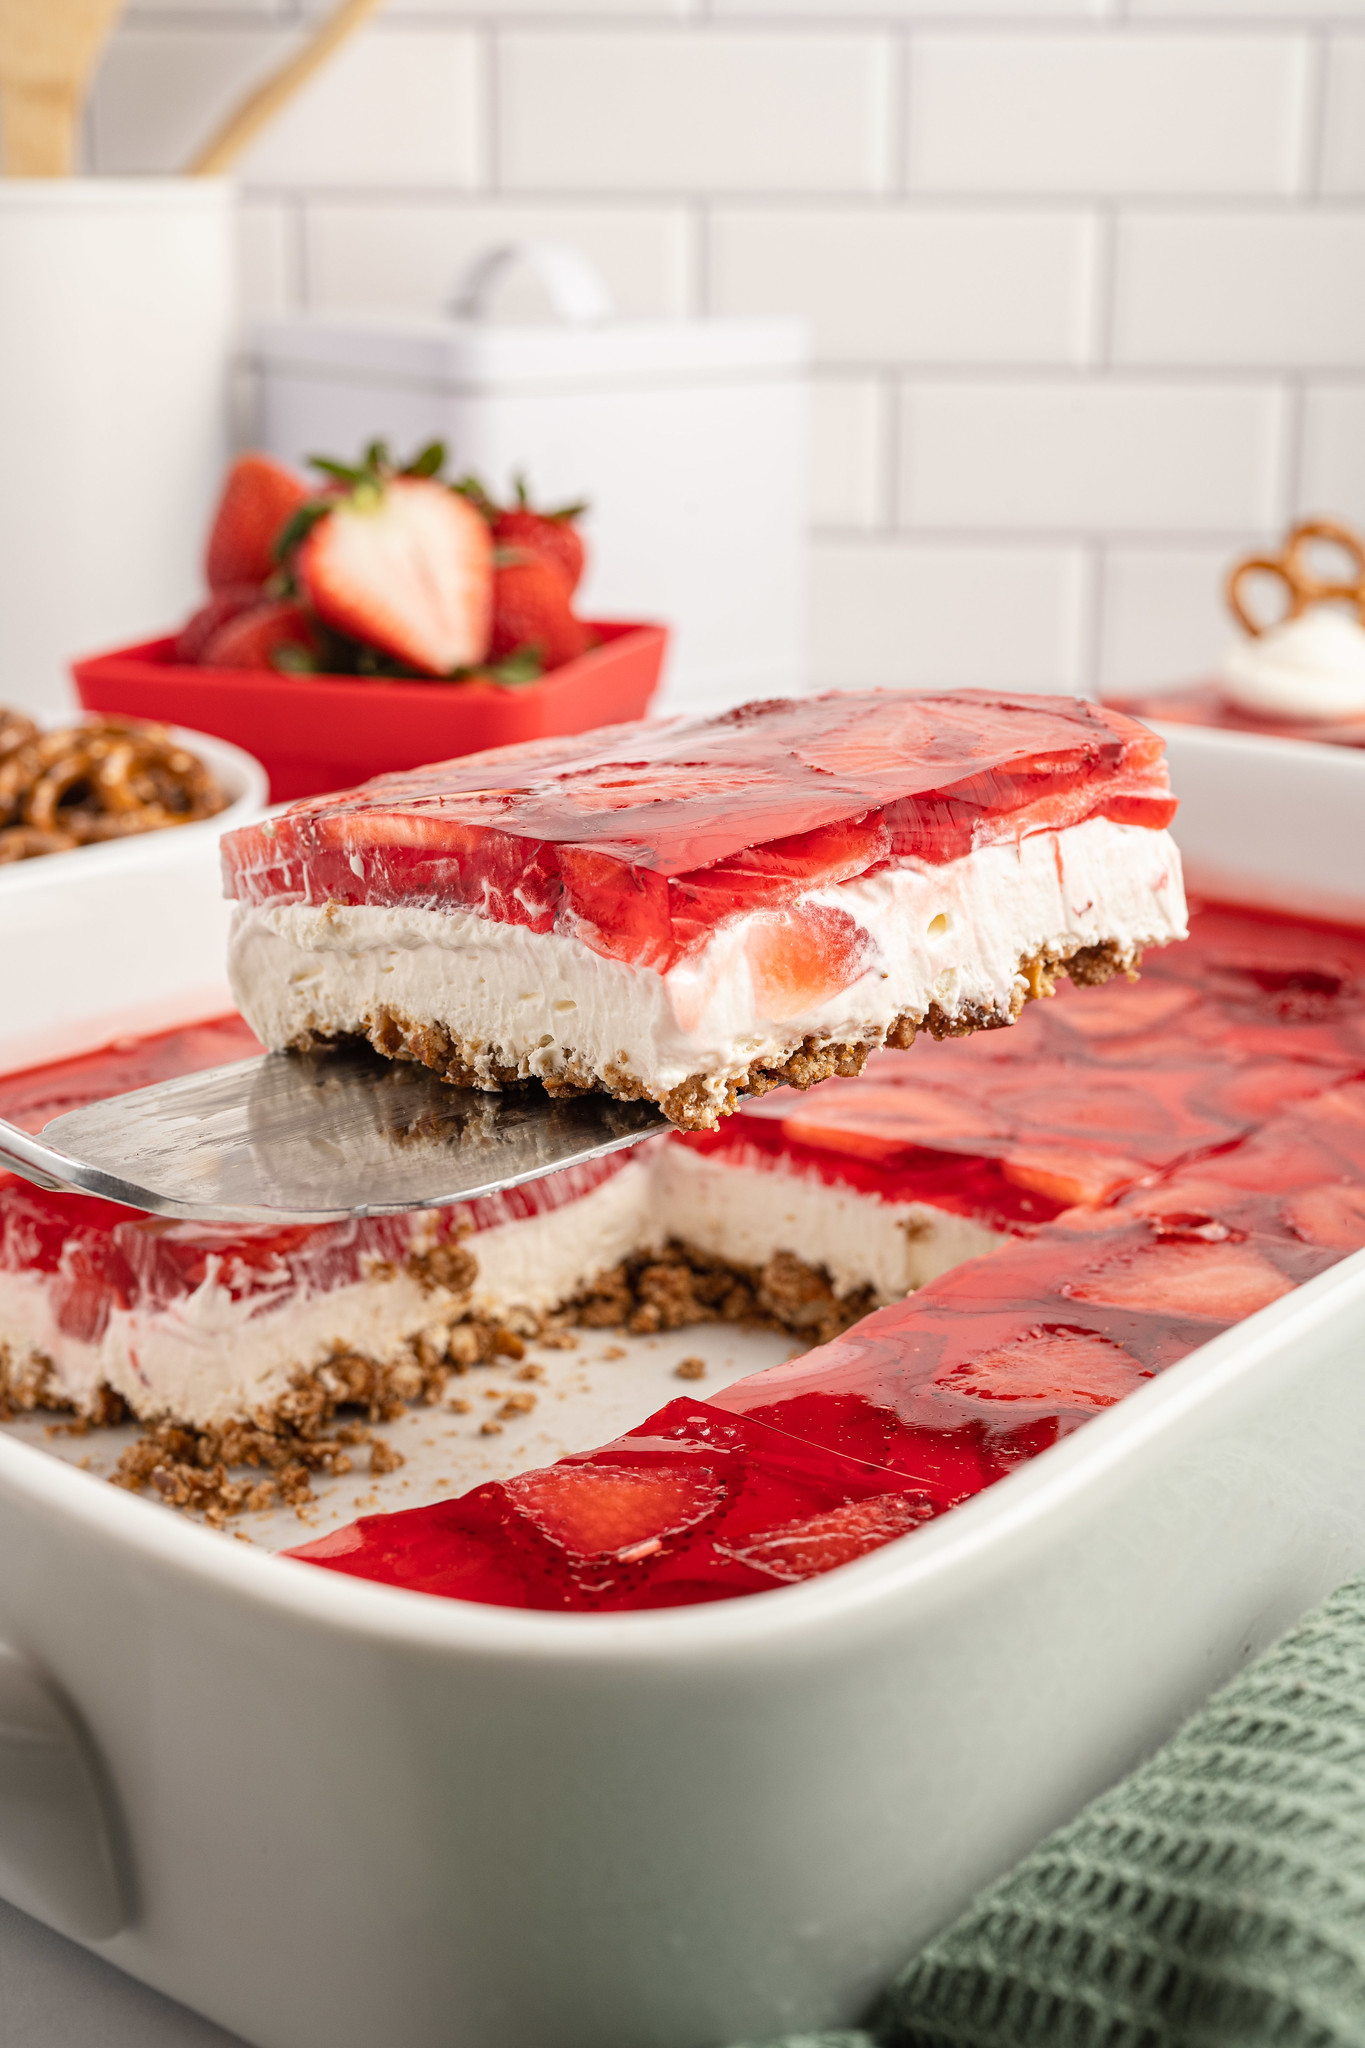
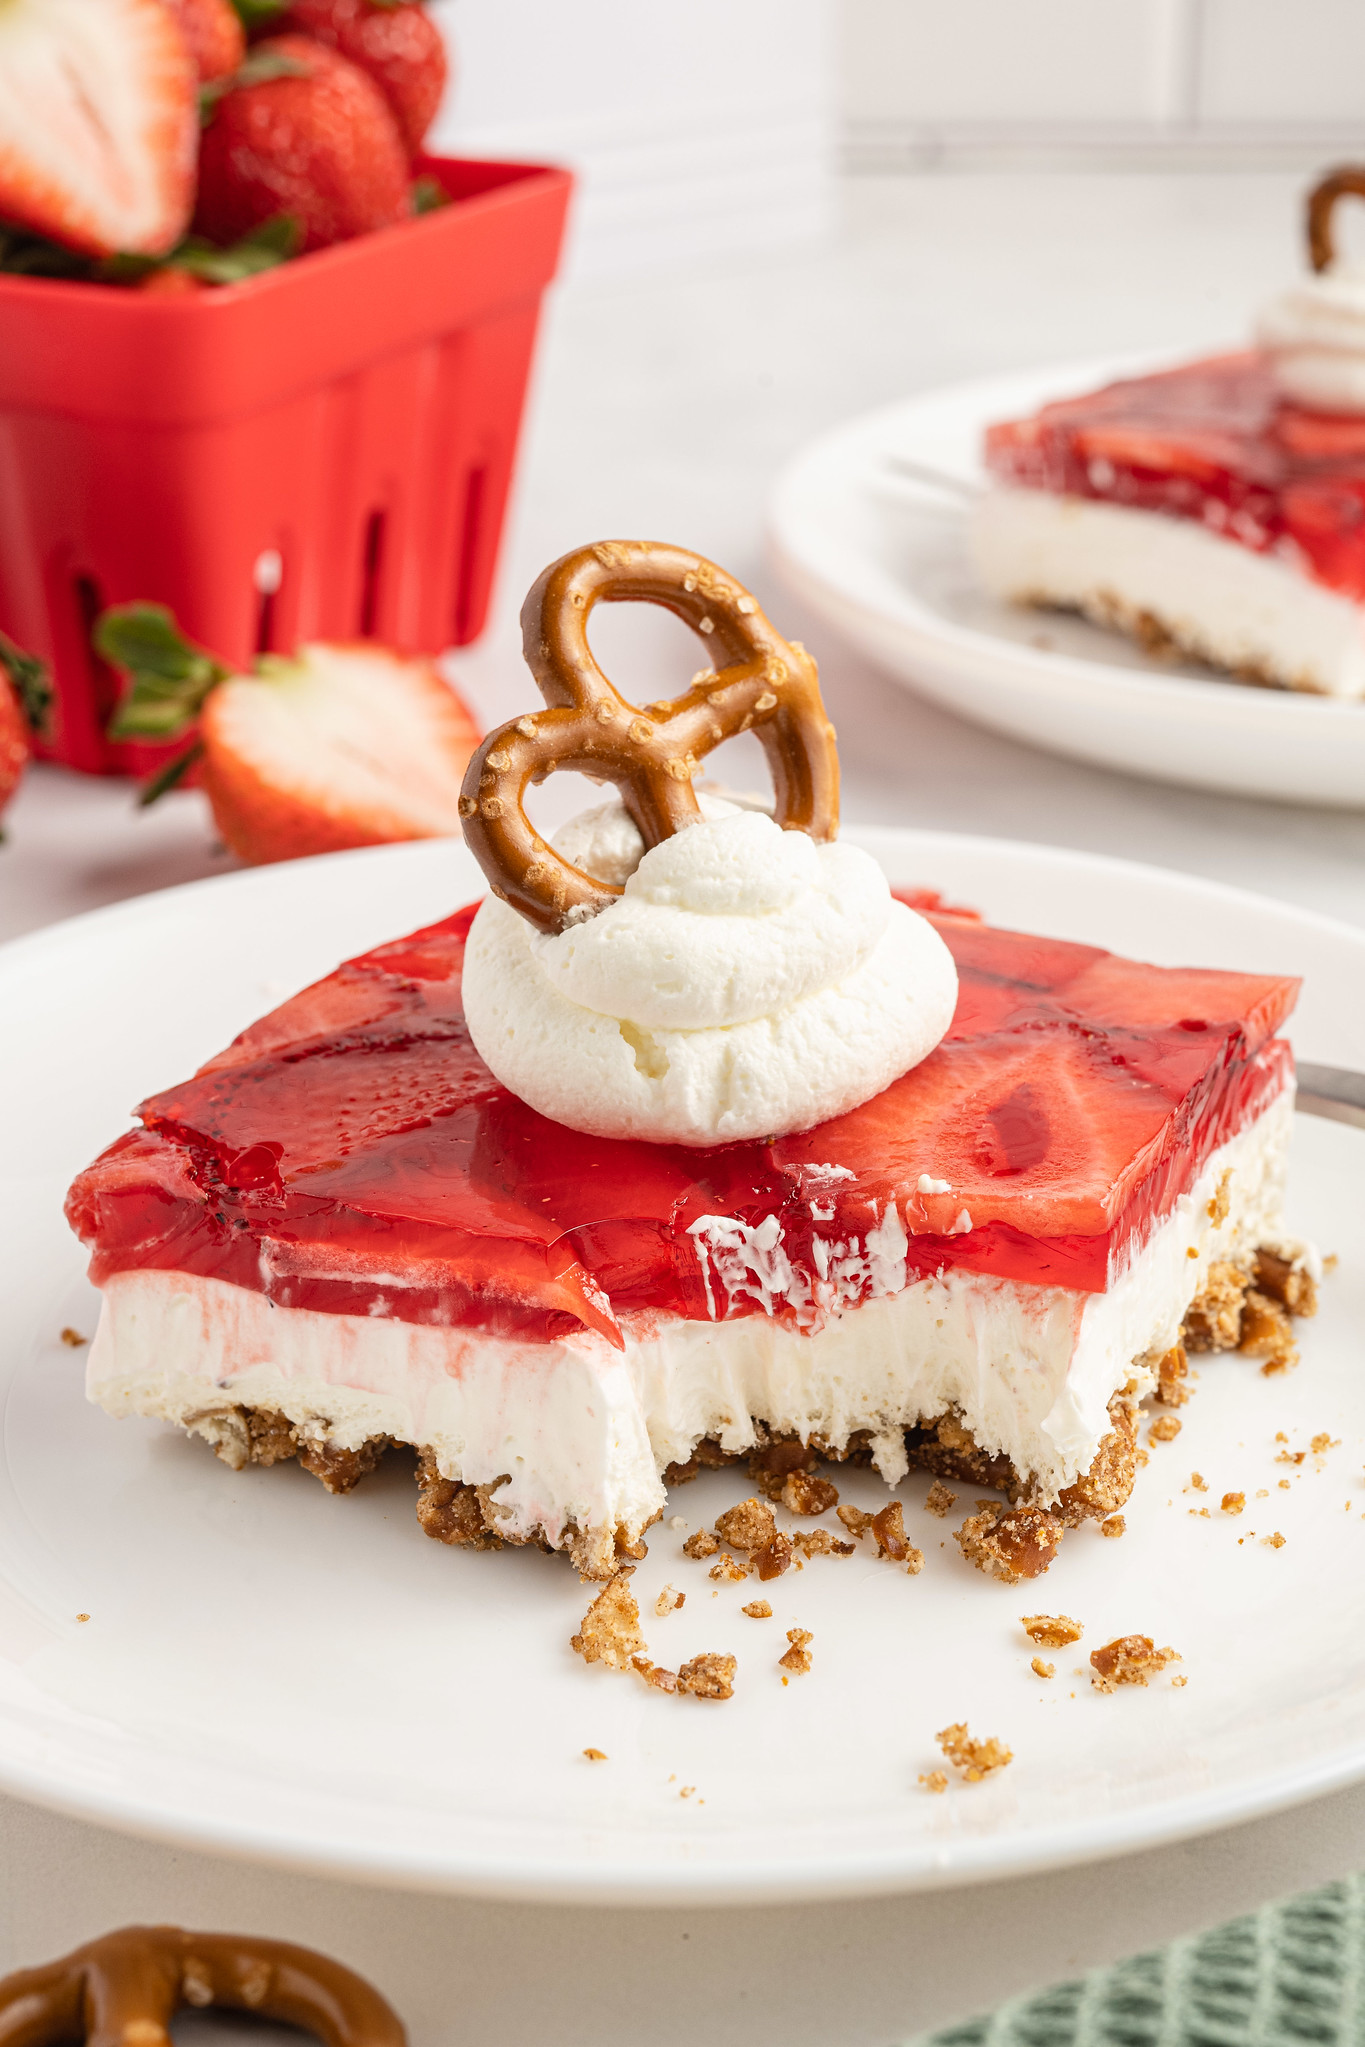
Strawberry Pretzel Salad is the most delicious sweet and salty dessert. It has a pretzel crust, cream cheese filling, and a layer of strawberry jello with fresh strawberries. It’s going to be the star of all your summer barbecues!
Summer strawberries make the best desserts! Try Strawberry Upside Down Cake and Homemade Strawberry Sherbet, too!
Strawberry Pretzel Salad is one of my favorite classic desserts. It’s one dessert that I know I can take to any party and everyone will love it.
If you’ve never had this salad that’s not actually a salad, it probably looks and sounds really strange. But I promise, it is the perfect sweet and salty dessert. The crunch of the pretzels with the creamy filling and jello on top just all works together so well.
It tastes like summer to me because I make it so many times every summer.

Why You’re Going To Love This Recipe
- The sweet and salty combination is so delicious! I get asked for the recipe every single time I make it.
- You can make it ahead which makes it perfect for a party! Dessert is out of the way so you can focus on everything else.
- The only part you have to bake is the crust and that only takes 10 minutes. After that, it’s just assembling the layers.

Ingredients
- Strawberry jello mix – you could play around with flavors of jello but strawberry is the classic
- Boiling water – this is going to be used to dissolve the jello mix
- Fresh strawberries – you’re going to remove stems and leaves and thinly slice the strawberries
- Pretzels – use either mini twist pretzels or pretzel sticks for this recipe
- Brown sugar – dark or light brown sugar works here
- Cinnamon
- Unsalted butter – make sure it’s unsalted or it may end up too salty
- Cream cheese – soften it to room temperature to make sure that your filling is nice and smooth
- Powdered sugar
- Plain yogurt – nonfat or full fat, whatever you have in your fridge
- Cool Whip – make sure you remove it from the freezer and let thaw in the refrigerator the night before you plan to make this recipe

How To Make Strawberry Pretzel Salad
- Prepare. Preheat the oven to 350°. Grease a 13×9 baking dish or cake pan with butter or shortening.
- Dissolve jello. Pour the strawberry jello mix into a medium bowl. Add the boiling water, and whisk until the jello powder has dissolved. Set aside to cool to room temperature.
- Make the crust. Add the pretzels, brown sugar, and cinnamon to a food processor, and blend on high until the pretzels are roughly chopped. Slowly pour in the melted butter into the food processor with it running on low speed.
- Transfer to pan. Press the pretzel crumbs evenly into the bottom of the 13×9 baking dish, and bake in the preheated oven for 10 minutes. Let the crust cool to room temperature before assembling.

- Make filling. Beat together the cream cheese and powdered sugar with an electric mixer on medium speed until smooth. Add the yogurt, and beat on low until combined.
- Fold in Cool Whip. Fold in the thawed whipped topping until just mixed, being careful not to completely deflate the Cool Whip.
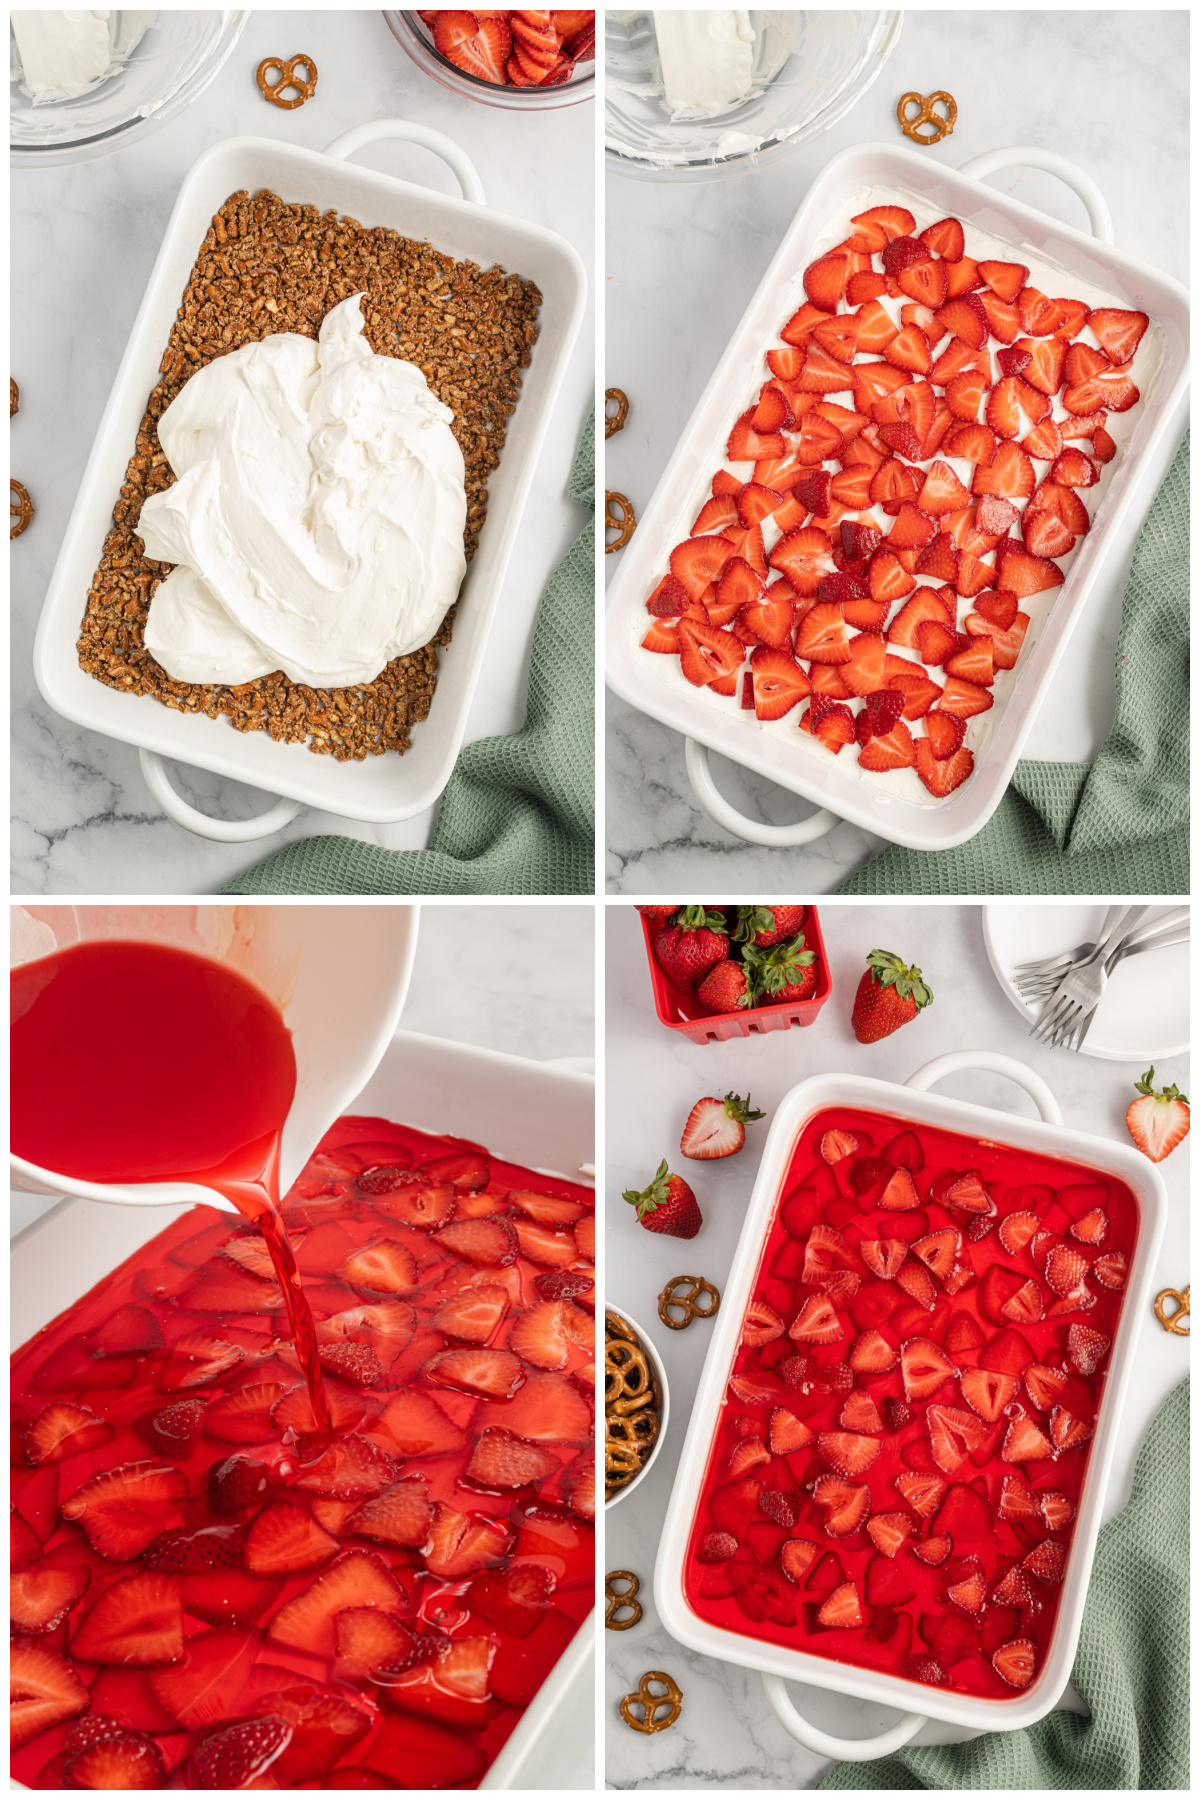
- Add filling to crust. Spoon the cream cheese mixture over the cooled pretzel crust, and spread it evenly over the crust with a spatula.
- Add strawberries. Place the sliced strawberries over the cream cheese layer.
- Chill. Let chill in refrigerator for 30 minutes.
- Add jello. Slowly pour the cooled jello mixture over the strawberries and cream cheese.
- Chill again. Cover tightly with plastic wrap, and chill in the refrigerator for at least 3 hours, or until the jello layer has set.
- Serve! Garnish with whipped cream, pretzels, or fresh strawberries.
Can You Make It Ahead?
This strawberry pretzel salad needs to be made several hours ahead so that the jello has time to set. You can even make it the night before if you need to.
How Long Is It Good For?
Strawberry Pretzel Salad is good for up to 4 days. Make sure to cover it tightly and store it in the refrigerator.
It can be served right from the fridge.
Can You Freeze It?
You can freeze strawberry pretzel salad for up to 2 months. Wrap it tightly in foil and thaw before serving.
More Summer Desserts
- No Bake Peanut Butter Pie
- No Bake Million Dollar Pie Bars
- Pineapple Cheesecake Bars
- Banana Cream Cheesecake
- Grasshopper Pie
- Frozen Lemonade Pie
- No Bake Snickers Pie
Make sure you subscribe to my email list to get all my new recipes delivered right to your inbox!
You can also follow me on Instagram, Facebook, or Pinterest for even more!
📖 Recipe
Strawberry Pretzel Salad

Strawberry Pretzel Salad is the most delicious sweet and salty dessert. It has a pretzel crust, cream cheese filling, and a layer of strawberry jello with fresh strawberries. It's going to be the star of all your summer barbecues!
Ingredients
For the strawberry layer
- 1 (6 ounce) package strawberry jello mix
- 2 cups boiling water
- 2 cups fresh strawberries, thinly sliced
For the crust
- 3 cups mini pretzels or pretzel sticks
- 2 tablespoons brown sugar
- 1 teaspoon cinnamon
- ½ cup (1 stick) unsalted butter, melted
For the cream Cheese Layer
- 1 (8 ounce) package cream cheese, softened
- ½ cup powdered sugar
- ¼ cup plain yogurt
- 1 (8 ounce) container Cool Whip, thawed
Instructions
- Preheat the oven to 350°. Grease a 13x9 baking dish or cake pan with butter or shortening. Set aside.
- Pour the strawberry jello mix into a medium bowl. Add the boiling water, and whisk until the jello powder has dissolved. Set aside to cool to room temperature.
- To make the crust, add the pretzels, brown sugar, and cinnamon to a food processor, and blend on high until the pretzels are roughly chopped.
- Slowly pour in the melted butter into the food processor with it running on low speed.
- Press the pretzel crumbs evenly into the bottom of the 13x9 baking dish, and bake in the preheated oven for 10 minutes. Let the crust cool to room temperature before assembling.
- Once crust is cool, beat together the cream cheese and powdered sugar with an electric mixer on medium speed until smooth.
- Add the yogurt, and beat on low until combined.
- Fold in the thawed whipped topping until just mixed, being careful not to completely deflate the Cool Whip.
- Spoon the cream cheese mixture over the cooled pretzel crust, and spread it evenly over the crust with a spatula.
- Place the sliced strawberries over the cream cheese layer.
- Let chill in refrigerator for 30 minutes.
- Slowly pour the cooled jello mixture over the strawberries and cream cheese.
- Cover tightly with plastic wrap, and chill in the refrigerator for at least 3 hours, or until the jello layer has set.
- Garnish with whipped cream, pretzels, or fresh strawberries.
Notes
Store covered in the refrigerator for up to 4 days
Recommended Products
As an Amazon Associate and member of other affiliate programs, I earn from qualifying purchases.


Nutrition Information:
Yield:
12Serving Size:
1Amount Per Serving: Calories: 136Total Fat: 2gSaturated Fat: 1gTrans Fat: 0gUnsaturated Fat: 1gCholesterol: 4mgSodium: 235mgCarbohydrates: 28gFiber: 1gSugar: 15gProtein: 3g