• Skip to primary navigation
  • Skip to main content
  • Skip to primary sidebar
  • Home
  • About
  • Recipes

Fake Ginger

menu icon
go to homepage
  • Recipe Index
  • About
  • Subscribe
    • Facebook
    • Instagram
    • Pinterest
  • subscribe
    search icon
    Homepage link
    • Recipe Index
    • About
    • Subscribe
    • Facebook
    • Instagram
    • Pinterest
  • ×
    Home » Page 24

    Bacon Cheeseburger Gnocchi

    Bacon Cheeseburger Gnocchi

    Jan 17, 2018

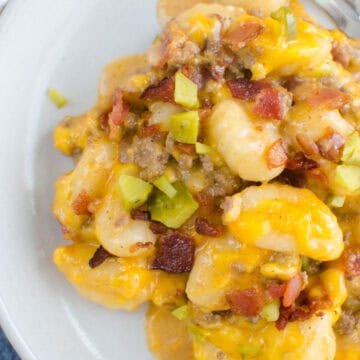
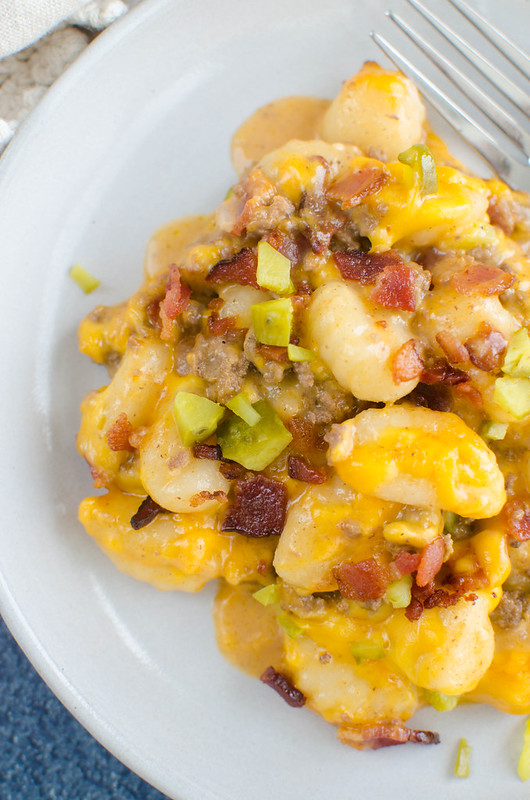
    Bacon Cheeseburger Gnocchi is everything you love about cheeseburgers in a gnocchi dish! Cheesy gnocchi tossed with a homemade burger sauce, ground beef, and topped with crispy bacon and chopped pickles.

    Bacon Cheeseburger Gnocchi - easy 30 minute meal! Gnocchi with everything you love about a bacon cheeseburger! Definitely a kid favorite!

    Hi guys.

    I’ve put pickles on something you’re not supposed to put pickles on again.

    I’m sorry.

    But listen, I’m having this thing with burgers right now. I took my kids to In-n-Out for our Christmas Eve dinner – did I tell you guys that? We definitely had animal fries and double doubles in between making cookies for Santa.

    And I’ve been thinking about burgers since then but, you know, New Years resolutions or whatever. So going into this long weekend I told myself I’d get In-n-Out by myself on Tuesday if I was good the entire weekend and then you know what happened yesterday?

    Snow day.

    A. SNOW. DAY.

    In central Texas.

    It didn’t snow. It was 19 degrees and I’m happy I didn’t have to go anywhere but I either needed snow or a burger in my life.

    Maybe today if it warms up enough for me to leave the house.

    I never make gnocchi and I don’t know why. It’s fairly cheap (especially if you buy it in the pasta aisle instead of the refrigerated section), it cooks in literally 2 minutes, and it’s really freakin’ delicious.

    This was like little potato pillows covered in bacon cheeseburger goodness.

    Bacon Cheeseburger Gnocchi - easy 30 minute meal! Gnocchi with everything you love about a bacon cheeseburger! Definitely a kid favorite!

    Ingredients

    • Gnocchi – you can use the fresh gnocchi from the refrigerated section or the dried gnocchi that you find in the pasta section.
    • Olive oil
    • Ground beef – you can use ground turkey or chicken if you prefer.
    • White onion
    • Garlic
    • Ketchup – this is part of the homemade burger sauce.
    • Yellow mustard – this is also part of the homemade burger sauce.
    • Salt and black pepper
    • Heavy cream – just a little bit to add some creaminess to the finished dish.
    • Cheddar cheese
    • Bacon – you are going to mix bacon into the gnocchi and then sprinkle some on top to make sure you get some crispy bits.
    • Pickles – these are getting diced up and sprinkled on top of the finished gnocchi. It’s really makes the whole dish taste like a cheeseburger!

    Instructions

    • Cook gnocchi. Cook gnocchi according to package instructions.
    • Cook meat mixture. Cook ground beef and onion. Add garlic and cook 30 seconds. Stir in ketchup, mustard, salt, pepper, water, and heavy cream.
    • Simmer. Bring to a simmer and let cook until thickened.
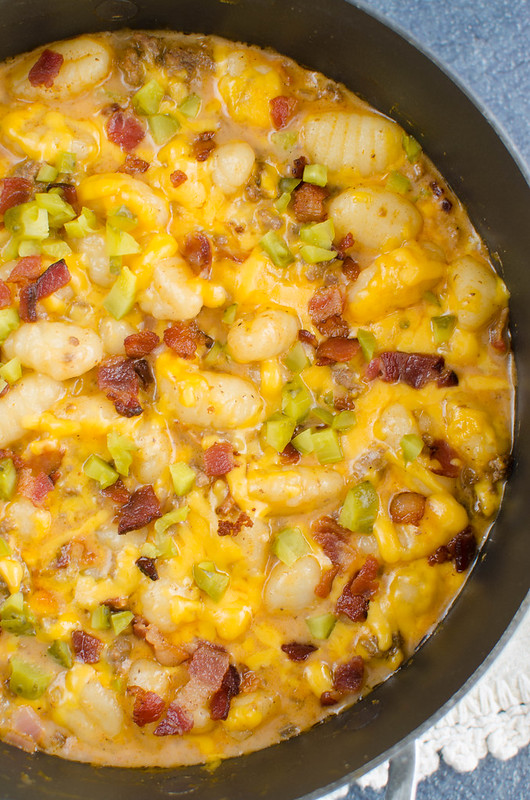
    • Combine. Remove from heat and stir in cooked gnocchi, 1 cup cheese and half of the bacon.
    • Top. Sprinkle the rest of the cheese on top.
    • Broil. Broil until cheese is melted, just a minute or 2.
    • Add toppings. Sprinkle with the rest of the bacon and the pickles before serving.

    How Long Is Gnocchi Good For?

    This Bacon Cheeseburger Gnocchi is good in the fridge for up to 3 days. Make sure to store it in an airtight container to keep it fresh for as long as possible –

    I would reheat in the microwave when you are ready to serve it.

    Can You Freeze Gnocchi?

    Yes, you can freeze this gnocchi for up to 3 months.. Let it cool completely and then transfer it to a freezer-safe airtight container.

    When you are ready to serve it, let it defrost overnight in the fridge and then reheat in the microwave or stovetop.

    More Easy Weeknight Meals

    • Cajun Tortellini Alfredo
    • One Pot Cheeseburger Mac
    • Cheesy Chicken Broccoli Stuffed Shells
    • Sweet and Sour Kielbasa
    • Chicken and Noodles
    • Parmesan Pasta with Bacon and Peas
    • Cheesy Chicken Noodle Casserole

    Make sure you subscribe to my email list to get all my new recipes delivered right to your inbox!

    You can also follow me on Instagram, Facebook, or Pinterest for even more! 

    📖 Recipe

    Yield: 6 servings

    Bacon Cheeseburger Gnocchi

    Bacon Cheeseburger Gnocchi
    Prep Time 15 minutes
    Cook Time 15 minutes
    Total Time 30 minutes

    Ingredients

    • 1 16 ounce package gnocchi
    • 2 teaspoons olive oil
    • 1 pound lean ground beef
    • 1 small white onion, finely diced
    • 2 cloves garlic, minced
    • 1 tablespoon ketchup
    • 1 teaspoon yellow mustard
    • ¼ teaspoon salt
    • ¼ teaspoon black pepper
    • ½ cup water
    • ½ cup heavy cream
    • 1 ½ cups cheddar cheese, shredded, divided
    • 6 slices bacon, cooked and crumbled, divided
    • 2 tablespoons pickles, diced

    Instructions

    1. Preheat broiler.
    2. Cook gnocchi according to package instructions.
    3. In a separate oven-proof skillet, heat olive oil over medium-high heat. Add ground beef and onion and cook, breaking up the beef, until onion is translucent and beef is cooked through. Add garlic and cook until fragrant, about 30 seconds. Stir in ketchup, mustard, salt, pepper, water, and heavy cream. Bring to a simmer and let cook until thickened. Remove from heat and stir in cooked gnocchi, 1 cup cheese and half of the bacon. Sprinkle the rest of the cheese on top.
    4. Broil until cheese is melted, just a minute or 2. Sprinkle with the rest of the bacon and the pickles before serving.

    Recommended Products

    As an Amazon Associate and member of other affiliate programs, I earn from qualifying purchases.

    • Gnocchi
      Gnocchi
    • Oven Safe Skillet
      Oven Safe Skillet

    Nutrition Information:

    Yield:

    6

    Serving Size:

    1

    Amount Per Serving: Calories: 584Total Fat: 32gSaturated Fat: 15gTrans Fat: 1gUnsaturated Fat: 14gCholesterol: 151mgSodium: 608mgCarbohydrates: 35gFiber: 2gSugar: 2gProtein: 37g

    Did you make this recipe?

    Tag me in your Instagram photo - @fakeginger

    © Amanda Livesay
    Cuisine: American / Category: beef


    Fig, Burrata, and Prosciutto Pizza

    Jan 14, 2018

    Fig, Burrata, and Prosciutto Pizza - sweet fig jam, salty prosciutto, and creamy burrata! Topped with fresh arugula and crushed red pepper flakes.

    Hi guys, happy Sunday!

    It’s pizza day.

    I used some suggestions from you guys this week, spent a stupid amount of time watching pizza videos on Youtube, and stopped into Trader Joe’s for their crust. Oops.

    Really though, you just can’t beat their crust. Its fresh, it’s less than 2 bucks, and it works perfectly every time.

    Oh, can we talk about this Trader Joe’s I went to? I usually go to the one by the Arboretum because it’s the closest to my house (still an hour away, y’all) but we happened to be further south and ended up at one that involved a parking garage and an escalator.

    And y’all, I expect that sort of thing from Whole Foods but Trader Joe’s? That seems extreme.

    Anyway, about this week!

    I started the week by bawling in the back row of the 2nd grade award ceremony and then ate my feelings at my favorite local food truck, Korean Kravings. They’re usually on Fort Hood during the week but if you’re local and don’t have access to Fort Hood, watch their FB page – they do a lot of weekend events. The bulgogi fries are everything and they are nicest people.

    Best thing that happened to me all week was running into this dog at Walmart. And yes, if you have your dog looking all cute in the grocery store, I’m probably going to take a picture and send it to everyone I know.

    If you recognize her, tell her that I’ve thought about her every day this week.

    South First Tots - Phoebe's Diner, Austin TX

    That day we stopped into that weird Trader Joe’s? We were down that way because everyone I know has been talking about Phoebe’s Diner.

    It’s a newish brunch place attached to a gas station and the only sign says “diner” but they have a menu of pretty classic items made a bit more trendy. Like shrimp and grits but made with goat cheese grits. And deep fried sourdough french toast. Stuff like that.

    I, of course, went for the South First Tots because I am a child and if tater tots covered in anything is on your menu, I’m going for it. These had red-eye gravy, swiss cheese, a couple eggs, guacamole, and jalapenos.

    Fig, Burrata, and Prosciutto Pizza - sweet fig jam, salty prosciutto, and creamy burrata! Topped with fresh arugula and crushed red pepper flakes.

    Anyway.

    Fig, Burrata, and Prosciutto Pizza!

    I love this combination for pizza.  The sweet and the salty and then a little bit of crushed red pepper on top for some heat? So good.

    I spent yesterday morning driving to each grocery story in this city looking for fresh figs because I love figs on pizza and aren’t they in season right now? But no luck so I ended up just using some fig jam which totally worked but don’t go too heavy with it or it will get super sweet.

    If you can’t find burrata, just use thinly sliced fresh mozzarella.

    So I preheated my oven to 500F like last week and let the pizza stone sit in there a stupid long time and then baked the pizza for about 12 minutes. But it still wasnt getting super brown (I think it’s my oven) so I turned the broiler on just for a minute or 2.

    Fig, Burrata, and Prosciutto Pizza - sweet fig jam, salty prosciutto, and creamy burrata! Topped with fresh arugula and crushed red pepper flakes.

    📖 Recipe

    Yield: 8 slices

    Fig, Burrata, and Prosciutto Pizza

    Fig, Burrata, and Prosciutto Pizza
    Prep Time 15 minutes
    Cook Time 12 minutes
    Additional Time 30 minutes
    Total Time 57 minutes

    Ingredients

    • 1 pizza dough
    • 4 - 6 tablespoons fig jam
    • 8 ounces burrata
    • 3 ounces proscuitto, sliced
    • 1 teaspoon olive oil
    • ¼ - ½ teaspoon crushed red pepper flakes
    • 2 cups fresh arugula

    Instructions

    1. Place pizza stone in oven and preheat to 500F. Once preheated, let the stone warm for another 15 - 30 minutes.
    2. When ready to bake pizza, stretch pizza dough to desired size and place on a pizza peel or other tool. Spread a thin layer of fig jam onto the dough, leaving about an inch of outside crust. Place dollops of the burrata all over and scatter sliced prosciutto on top. Use a pastry brush to brush the olive oil on the outside crust. Bake in preheated oven for 10 - 12 minutes, until bottom is browned and crisp.
    3. Not necessary but makes a pretty pizza: put under your broiler just until the cheese and crust starts to brown deeply, a minute or 2.
    4. Carefully remove from oven and sprinkle with crushed red pepper flakes and arugula. Slice and serve hot.

    Recommended Products

    As an Amazon Associate and member of other affiliate programs, I earn from qualifying purchases.

    • Fig Jam
      Fig Jam
    • Pizza Stone
      Pizza Stone
    • Pizza Cutter
      Pizza Cutter

    Nutrition Information:

    Yield:

    8

    Serving Size:

    1

    Amount Per Serving: Calories: 163Total Fat: 8gSaturated Fat: 4gTrans Fat: 0gUnsaturated Fat: 3gCholesterol: 30mgSodium: 483mgCarbohydrates: 13gFiber: 0gSugar: 8gProtein: 10g

    Did you make this recipe?

    Tag me in your Instagram photo - @fakeginger

    © Amanda Livesay
    Cuisine: italian / Category: pork

    Pineapple Upside Down Muffins

    Jan 11, 2018

    Pineapple Upside Down Muffins – easy, kid-approved breakfast recipe! Delicious muffins filled with crushed pineapple and topped with a sprinkle of brown sugar and a maraschino cherry!

    Pineapple Upside Down Muffins - easy, kid-approved breakfast recipe! Delicious muffins filled with crushed pineapple and topped with a sprinkle of brown sugar and a maraschino cherry!

    I’m doing that thing again where I refuse to buy cereal because we’ve had this giant Sam’s Club sized box of instant oatmeal in the pantry for, like, 3 months now and I. Want. It. Gone.

    I’m told that there are people in this world that enjoy oatmeal and happily eat it but my children and I are not those people.

    Why’d you buy 52 packs of oatmeal, Amanda, if you guys don’t eat oatmeal?

    I don’t know, y’all. I black out in Sam’s the second I start thinking about getting a slice of pizza and I don’t even realize I have the oatmeal until I’m already out the door and flinging boxes into the Jeep.

    No, this isn’t the first time we’ve ended up with the oatmeal.

    Pineapple Upside Down Muffins - easy, kid-approved breakfast recipe! Delicious muffins filled with crushed pineapple and topped with a sprinkle of brown sugar and a maraschino cherry!

    How to Make Pineapple Upside Down Muffins

    • Mix together pineapple juice, 2 eggs, vanilla yogurt, and vegetable oil until combined
    • In a separate bowl, whisk together the dry ingredients (flour, sugar, baking powder, and salt)
    • Add the dry mixture to the wet mixture and stir to combine
    • Stir in crushed pineapple
    • Divide the batter among mini muffin cups sprayed with oil 
    • Sprinkle each muffin with brown sugar and gently press a cherry into the top
    • Bake 9 – 12 minutes 

    Can I Use a Regular Muffin Tins?

    Yes, but cook time will probably be around 20 minutes. When a toothpick inserted into the center of one of the muffins comes out clean, you know they are done. 

    Pineapple Upside Down Muffins - easy, kid-approved breakfast recipe! Delicious muffins filled with crushed pineapple and topped with a sprinkle of brown sugar and a maraschino cherry!

    Can You Freeze Pineapple Upside Down Muffins?

    Yes! Pineapple Upside Down Muffins freeze beautifully. 

    Just pop them into a freezer storage bag and make sure to squeeze as much as out of the bag as possible. They will be fine in the freezer for up to 3 months. Defrost them overnight at room temperature before serving. 

    More Muffin Recipes

    • Banana Muffins with Nutella Swirl
    • Mini Sausage Pancake Muffins
    • Blueberry Muffins
    • Pumpkin Banana Muffins
    • Strawberry Chocolate Chip Muffins

    Make sure you subscribe to my email list to get all my new recipes delivered right to your inbox!

    You can also follow me on Instagram, Facebook, or Pinterest for even more! 

    📖 Recipe

    Yield: 28 mini muffins

    Pineapple Upside Down Muffins

    Pineapple Upside Down Muffins
    Prep Time 15 minutes
    Cook Time 12 minutes
    Total Time 27 minutes

    Ingredients

    • 1 8-ounce can crushed pineapple, drained, juice reserved
    • 2 eggs
    • ½ cup vanilla yogurt
    • ¼ cup vegetable oil
    • 1 ½ cups flour
    • ¾ cup sugar
    • 2 teaspoons baking powder
    • ¼ teaspoon salt
    • 2 teaspoons brown sugar
    • 28 - 32 maraschino cherries

    Instructions

    1. Preheat oven to 400F. Spray 2 mini muffin tins with baking spray.
    2. In a mixing bowl, stir together 1 tablespoon reserved pineapple juice, eggs, vanilla yogurt, and vegetable oil until combined.
    3. In a separate bowl, whisk together flour, sugar, baking powder, and salt until no lumps remain. Add to the wet mixture and stir until just combined. Stir in crushed pineapple.
    4. Fill the muffin cups two-thirds (you should have about 30 muffins). Sprinkle each with a small amount of brown sugar and gently press a cherry into the top.
    5. Bake 9 - 12 minutes or until golden brown and a toothpick inserted into the center comes out clean.

    Recommended Products

    As an Amazon Associate and member of other affiliate programs, I earn from qualifying purchases.

    • Parchment Muffin Liners
      Parchment Muffin Liners
    • My Favorite Muffin Tin
      My Favorite Muffin Tin

    Nutrition Information:

    Yield:

    28

    Serving Size:

    1

    Amount Per Serving: Calories: 91Total Fat: 2gSaturated Fat: 2gTrans Fat: 0gUnsaturated Fat: 0gCholesterol: 13mgSodium: 67mgCarbohydrates: 16gFiber: 0gSugar: 11gProtein: 1g

    Did you make this recipe?

    Tag me in your Instagram photo - @fakeginger

    © Amanda Livesay
    Category: breakfast

    Cheesy Sausage and Spinach Dip

    Jan 10, 2018

    Cheesy Sausage and Spinach Dip is a gooey cheese dip with sausage, Rotel, and spinach! It’s always a party favorite!

    I love a hot, cheesy dip at parties or holiday gatherings. Some of my other favorites are Crawfish Dip and Jalapeno Popper Dip!

    This post originally published January 2017. Updated January 2018 and I still hate the pictures so maybe we’ll just try again every January until I like them. 

    Hi guys, how’s the week?

    You guys, my 2nd grader had his 1st semester award ceremony on Monday and I balled like a baby.

    Like, I get it, honor roll is a big deal and I know every parent in the room was proud as could be but I was the only one full on sobbing in the back row.

    I drowned my feelings in melted cheese and tortilla chips because what else would I do?

    I have been making this Cheesy Sausage and Spinach Dip for several years now and it is one of my favorite dips for parties. It used to be my go to when we hosted people for football because I could prep it ahead of time and pop it in the oven when everyone got here.

    It’s a little bit spicy and it’s gooey and delicious and the makes it just different enough from the standard sausage dip.

    Plus? No velveeta!

    I know it’s not very pretty but I swear it’s delicious.

    Ingredients

    • Olive oil
    • Mild Italian sausage – you can use hot Italian sausage if you want a lot of spice in your dip
    • White onion
    • Garlic
    • Cream cheese – this is going to make it so creamy and delicious!
    • Rotel – I used the original Rotel but you can use the mild if you want it less spicy or the spicy if you want more spicy.
    • Frozen chopped spinach – using frozen spinach is so much easier than fresh, just make sure you squeeze out as much liquid as possible.
    • Monterey jack cheese – you can also use cheddar if you prefer the taste of cheddar cheese.
    • Tortilla chips

    How To Make Cheesy Sausage Spinach Dip

    • Cook. Cook Italian sausage and diced onion in a large skillet. Cook, breaking up Drain and return to pan.
    • Add garlic. Add garlic and cook for 30 seconds.
    • Combine. Add cream cheese, diced tomatoes with green chiles, and chopped spinach. Stir until cream cheese is melted.
    • Add cheese. Remove from heat and stir in about half of the shredded monterey jack.
    • Transfer. Transfer mixture to an 8×8-inch pan and sprinkle with remaining cheese.
    • Bake. Bake at 350F for about 15 minutes, until bubbly.
    • Serve. Serve hot with tortilla chips.

    How Long Is It Good For?

    This dip will be fine in the fridge for 3 – 4 days. Make sure to store it in an airtight container (these glass containers are my favorite for all leftovers) to keep it good for as long as possible.

    I recommend reheating in the microwave but you could also use the oven or even put it on warm in a slow cooker.

    Can You Freeze It?

    You can freeze this dip for up to 3 months. Let it cool completely and then put it in an airtight freezer-safe container.

    When you are ready to serve it, let it defrost overnight in the fridge and then reheat in the microwave.

    More Dip Recipes

    • Creamy Jalapeño Dip
    • Cheesy Spinach Dip
    • Buffalo Chicken Dip
    • Layered Ranch Taco Dip
    • Chicken Burrito Dip

    Make sure you subscribe to my email list to get all my new recipes delivered right to your inbox!

    You can also follow me on Instagram, Facebook, or Pinterest for even more! 

    📖 Recipe

    Yield: 8 servings

    Cheesy Sausage and Spinach Dip

    Cheesy Sausage and Spinach Dip

    Cheesy Sausage and Spinach Dip - gooey cheese dip with sausage, Rotel, and spinach! It's always a party favorite!

    Prep Time 10 minutes
    Cook Time 25 minutes
    Total Time 35 minutes

    Ingredients

    • 1 teaspoon olive oil
    • 1 pound mild Italian sausage
    • 1 small white onion, diced
    • 2 cloves garlic, minced
    • 4 ounces cream cheese
    • 1 10 ounce can diced tomatoes with green chiles
    • 1 cup frozen chopped spinach, defrosted and drained well
    • 1 cup monterey jack cheese, shredded
    • tortilla chips, for serving

    Instructions

    1. Preheat oven to 350F.
    2. In a large skillet, heat olive oil over medium-high heat. Add mild Italian sausage and diced onion. Cook, breaking up the sausage, until the onion is translucent and the sausage is cooked through. Drain and return to pan. Add garlic and cook just until fragrant, about 30 seconds. Add cream cheese, diced tomatoes with green chiles, and chopped spinach. Stir until cream cheese is melted. Remove from heat and stir in about half of the shredded monterey jack.
    3. Transfer mixture to an 8x8-inch pan and sprinkle with remaining cheese.
    4. Bake for about 15 minutes, until bubbly. Serve hot with tortilla chips.

    Recommended Products

    As an Amazon Associate and member of other affiliate programs, I earn from qualifying purchases.

    • Dutch Oven
      Dutch Oven
    • 8-inch Cake Pan
      8-inch Cake Pan

    Nutrition Information:

    Yield:

    8

    Serving Size:

    1

    Amount Per Serving: Calories: 319Total Fat: 25gSaturated Fat: 11gTrans Fat: 0gUnsaturated Fat: 15gCholesterol: 59mgSodium: 710mgCarbohydrates: 7gFiber: 1gSugar: 2gProtein: 16g

    Did you make this recipe?

    Tag me in your Instagram photo - @fakeginger

    © Amanda Livesay
    Cuisine: American / Category: appetizer

    Chipotle Shrimp Jicama Tacos with Pineapple Salsa

    Jan 09, 2018

    Chipotle Shrimp Jicama Tacos with Pineapple Salsa are low carb shrimp tacos that will get rid of any shrimp taco craving! Only 8 calories in the jicama tortilla! Paleo and delicious!

    Chipotle Shrimp Jicama Tacos with Pineapple Salsa - low carb shrimp tacos that will get rid of any shrimp taco craving! Only 8 calories in the jicama tortilla!

    Happy Taco Tuesday!

    I’m having a major moment with these tacos right now.

    My BFF Nicole blogged this recipe forever ago and I never really paid them any attention because jicama?

    No.

    Or so I thought.

    I was scheduling some shares the other day and asked her for some paleo/whole 30 recipes to share and she sent me this one and I couldn’t stop thinking about them.

    I’ve been really into putting thinly sliced pickled daikon radish in my lettuce wraps and the jicama reminded me of that so I literally went to the grocery store at 7 am the next morning for ingredients.

    Chipotle Shrimp Jicama Tacos with Pineapple Salsa - low carb shrimp tacos that will get rid of any shrimp taco craving! Only 8 calories in the jicama tortilla!

    If you are lucky enough to live near an HEB, they have already thinly sliced jicama “tortillas” in the produce section. This was my first time buying them and I think they are genius.

    Okay, so maybe don’t go make a super meaty taco covered in sour cream and cheese and wrap it in a jicama tortilla. I don’t think that would be that great. Or maybe it would and I’m wrong. But for something light and fresh like shrimp with a pineapple salsa? It was perfect!

    They’re crisp and hardly taste like anything and the best part is that they’re 8 calories each.

    We’re not gonna talk about how many of these I had.

    It’s like when I make lettuce wraps and can justify eating the entire batch because the lettuce doesn’t actually count. Nevermind the fact that I use almost an entire pound of chicken thighs.

    If you don’t have an HEB or other grocery store that sells sliced jicama, just get a big one (check an Asian market if you can’t find any) and slice it as thin as possible. Maybe with a mandoline if you’ve got one.

    Chipotle Shrimp Jicama Tacos with Pineapple Salsa - low carb shrimp tacos that will get rid of any shrimp taco craving! Only 8 calories in the jicama tortilla!

    Chipotle Shrimp Jicama Tacos!

    Shrimp is one of my favorite, healthy proteins because it cooks up so fast. Unfortunately, most of the shrimp is frozen in central Texas so it’s not always the prettiest but still delicious.

    I got the shrimp marinating and then by the time I was done making the salsa and chopping up the avocado, it was ready to be cooked up. It cooks for 2 minutes on each side and then you’re ready to make tacos.

    This was probably my favorite thing I’ve made so far this year and I’ll deifnitely be making it again and even trying out some other shrimp marinades. It really satisfied that shrimp taco craving without making me feel bad about eating 7 shrimp tacos.

    Let me know if you’ve tried jicama as “tortillas” or if your local grocery store sells them!

    Chipotle Shrimp Jicama Tacos with Pineapple Salsa - low carb shrimp tacos that will get rid of any shrimp taco craving! Only 8 calories in the jicama tortilla!

    More Low Carb Recipes

    • Blackened Shrimp Lettuce Wraps with Mango Salsa
    • Paleo Korean Beef Bowls
    • Cashew Chicken Lettuce Wraps

    Make sure you subscribe to my email list to get all my new recipes delivered right to your inbox!

    You can also follow me on Instagram, Facebook, or Pinterest for even more! 

    📖 Recipe

    Yield: about 4 servings

    Chipotle Shrimp Jicama Tacos with Pineapple Salsa

    Chipotle Shrimp Jicama Tacos with Pineapple Salsa
    Prep Time 20 minutes
    Cook Time 5 minutes
    Additional Time 30 minutes
    Total Time 55 minutes

    Ingredients

    For the pineapple salsa:

    • 1 cup finely diced pineapple
    • ¼ cup finely diced red onion
    • ¼ cup finely chopped cilantro
    • 1 jalapeno, stem and seeds removed, finely minced
    • 1 tablespoon of lime juice
    • salt, to taste

    For the tacos:

    • jicama tortillas, or peel and thinly slice jicama yourself
    • 1 pound of peeled, de-veined shrimp, tails removed
    • 2 chipotles in adobo, minced + 1 - 2 tablespoons abodo sauce
    • 2 tablespoons pineapple juice
    • 1 tablespoon lime juice
    • 1 teaspoon cumin
    • 1 teaspoon salt
    • ½ teaspoon black pepper
    • 1 tablespoon olive oil
    • 1 avocado, diced
    • chopped cilantro for garnish

    Instructions

    1. To make the pineapple salsa, stir together all ingredients and store in the fridge until ready to serve.
    2. In a mixing bowl, whisk together minced adobo, adobo sauce, pineapple juice, lime juice, cumin, salt, and pepper. Add shrimp and toss to coat. Refrierate for 30 minutes.
    3. Heat oil over medium-high heat. Add shrimp, shaking off excess marinade, to the hot pan and cook about 2 minutes on each side, until pink and curled and cooked through.
    4. To assemble the tacos, layer shrimp, pineapple salsa, avocado, and cilantro on the jicama tortillas. Serve immediately.

    Notes

    from I am a Honeybee

    Recommended Products

    As an Amazon Associate and member of other affiliate programs, I earn from qualifying purchases.

    • Chipotle in Adobo
      Chipotle in Adobo
    • Mandoline Veggie Slicer
      Mandoline Veggie Slicer

    Nutrition Information:

    Yield:

    4

    Serving Size:

    1

    Amount Per Serving: Calories: 347Total Fat: 14gSaturated Fat: 2gTrans Fat: 0gUnsaturated Fat: 11gCholesterol: 240mgSodium: 1886mgCarbohydrates: 26gFiber: 7gSugar: 7gProtein: 29g

    Did you make this recipe?

    Tag me in your Instagram photo - @fakeginger

    © Amanda Livesay
    Cuisine: Mexican / Category: seafood


    Cashew Chicken Lettuce Wraps

    Jan 03, 2018

    Cashew Chicken Lettuce Wraps is a delicious healthy dinner! Lettuce wraps filled with chicken and veggies in a savory sauce and topped with crunchy cashews.

    Want more lettuce wraps recipes? Try Blackened Shrimp Lettuce Wraps with Mango Salsa or Crockpot Carnitas Lettuce Wraps!

    Cashew Chicken Lettuce Wraps - delicious healthy dinner recipe! Lettuce Wraps filled with chicken and veggies in a delicious sauce and topped with crunchy cashews. Perfect for healthy meal prep!

    This post originally published in 2013. Updated on January 3, 2018 because the photos made me want to cry. 

    Cashew chicken used to be my faaaaavorite Chinese takeout order when we were in Colorado. The place by our house did it so well and then we moved to Texas and I can’t find good cashew chicken to save my life. So I switched my order to Mu Shu Pork but anyway.

    That’s not what this post is about.

    I’ve been making these Cashew Chicken Lettuce Wraps for years. They are my go to healthy meal prep because they’re so easy and so delicious.

    Cashew Chicken Lettuce Wraps - delicious healthy dinner recipe! Lettuce Wraps filled with chicken and veggies in a delicious sauce and topped with crunchy cashews. Perfect for healthy meal prep!

    Ingredients

    • Soy sauce
    • Hoisin sauce
    • Seasoned rice vinegar
    • Honey – just to add a hint of sweetness
    • Garlic
    • Fresh ginger
    • Sesame oil
    • Crushed red pepper flakes – leave this out if you don’t want any spice.
    • Olive oil
    • Boneless skinless chicken thighs – you can use chicken breasts if you prefer
    • White onion
    • Green bell pepper
    • Water chestnuts – these add the best crunch to your chicken mixture.
    • Cashews – I usually just use salted cashews but sometimes I’ll use chili lime cashews to give it a little extra spice
    • Green onions
    • Lettuce – any variety you like! I prefer boston bibb or butter lettuce for lettuce wraps
    Cashew Chicken Lettuce Wraps - delicious healthy dinner recipe! Lettuce Wraps filled with chicken and veggies in a delicious sauce and topped with crunchy cashews. Perfect for healthy meal prep!

    How To Make Cashew Chicken Lettuce Wraps

    • Make sauce. Whisk together soy sauce, hoisin sauce, seasoned rice vinegar, honey, minced garlic, minced fresh ginger, sesame oil, and crushed red pepper flakes
    • Cook chicken. Stir fry diced chicken in olive oil until cooked through.
    • Add vegetables. Add diced onion and green bell pepper
    • Combine everything. Add water chestnuts, sauce, and cashews
    • Simmer. Cover skillet and simmer over low heat for about 5 minutes until sauce has thickened slightly
    • Serve. Spoon chicken into lettuce leaves and sprinkle with green onions and more cashews

    How Long Is Cashew Chicken Good For?

    The cashew chicken mixture will stay good in the fridge for up to 3 – 4 days. Make sure to store it in an airtight container to keep it fresh.

    Keep your lettuce separate from the chicken mixture so it stays nice and crisp. Don’t try to assemble the lettuce wraps ahead of time. 

    More Chinese Takeout Recipes

    • Sesame Chicken
    • Honey Chicken
    • Sweet and Sour Chicken
    • Orange Beef and Broccoli
    • Black Pepper Chicken
    • Sweet and Sour Pork

    Make sure you subscribe to my email list to get all my new recipes delivered right to your inbox!

    You can also follow me on Instagram, Facebook, or Pinterest for even more! 

    📖 Recipe

    Yield: 4 servings

    Cashew Chicken Lettuce Wraps

    Cashew Chicken Lettuce Wraps

    Cashew Chicken Lettuce Wraps is a delicious healthy dinner recipe! Lettuce Wraps filled with chicken and veggies in a savory sauce and topped with crunchy cashews.

    Prep Time 10 minutes
    Cook Time 15 minutes
    Total Time 25 minutes

    Ingredients

    For the sauce:

    • ⅓ cup soy sauce
    • 1 tablespoon hoisin sauce
    • 3 tablespoons seasoned rice vinegar
    • 2 tablespoons honey
    • 2 cloves garlic, minced
    • 1 tablespoon fresh ginger, minced
    • 1 teaspoon sesame oil
    • ¼ - ½ teaspoon crushed red pepper flakes, optional

    For the wraps:

    • 1 tablespoon olive oil
    • 1 pound boneless skinless chicken thighs, diced
    • salt and pepper
    • 1 small white onion, diced
    • 1 green bell pepper, diced
    • ½ cup water chestnuts, diced
    • ½ cup cashews, plus more for serving
    • green onions, diced
    • lettuce, separated and hard stems removed

    Instructions

    For the sauce:

    1. Whisk all ingredients until combined. Set aside.

    For the chicken:

    1. Heat coconut oil in pan over medium heat. Season diced chicken with salt and pepper. Add to hot pan and stir fry until browned. Add onions and green pepper and cook until the onion is translucent and the chicken is cooked through. Add water chesnuts, sauce, and cashews. Cover and let simmer over low heat for about 5 minutes until sauce has reduced and cashews have softened slightly.
    2. To serve, spoon chicken mixture into lettuce leaves and sprinkle with green onions and more cashews.

    Recommended Products

    As an Amazon Associate and member of other affiliate programs, I earn from qualifying purchases.

    • Rubber Spatulas
      Rubber Spatulas
    • My Favorite Skillet
      My Favorite Skillet

    Nutrition Information:

    Yield:

    4

    Serving Size:

    1

    Amount Per Serving: Calories: 449Total Fat: 25gSaturated Fat: 8gTrans Fat: 0gUnsaturated Fat: 17gCholesterol: 138mgSodium: 1037mgCarbohydrates: 28gFiber: 2gSugar: 17gProtein: 32g

    Did you make this recipe?

    Tag me in your Instagram photo - @fakeginger

    © Amanda Livesay
    Cuisine: Asian / Category: chicken


    Boozy Cinnamon White Hot Chocolate

    Dec 22, 2017

    Boozy Cinnamon White Hot Chocolate – the perfect way to warm up on chilly days! Easy homemade white hot chocolate with Fireball Whiskey and marshmallows on top!

    Nothing warms you up like a cocktail! Some of my other winter favorites are Honeycrisp Apple Sangria and Cranberry Margaritas.

    Boozy Cinnamon White Hot Chocolate - the perfect way to warm up on chilly days! Easy homemade white hot chocolate with Fireball Whiskey and marshmallows on top!

    Heeeey guys, one last post before Christmas!

    I couldn’t leave you without something delicious and boozy.

    Because, as I tell you every year, I’m not doing my Christmas Eve all night wrapping session without Elf on in the background and some kind of delicious beverage next to me.

    Before we get to that though, I wanna say thank you for coming back, for all the emails, for checking on me if I don’t post for a few days, for stopping me in Target and saying hi, for everything this blog has given me. These last couple years have been a real rollercoaster for me and having this little space on the internet full of people who share the same interest as me has been one of the only constants in my life. I appreciate it all more than I can express.

    This may be my last post of the year (other than my yearly favorite recipes – that’s still happening) so I hope you have a fabulous Christmas and a safe and happy New Year!

    …

    Read More

    Grapefruit Rosemary Sparkler

    Dec 11, 2017

    Thank you VOVETI for sponsoring this post. Elevate your entertaining this season with VOVETI Prosecco

    Grapefruit Rosemary Sparkler – the perfect holiday or New Years Eve cocktail! Fresh grapefruit juice, easy homemade rosemary simple syrup, and prosecco. 

    Grapefruit Rosemary Sparkler - the perfect holiday or New Years Eve cocktail! Fresh grapefruit juice, easy homemade rosemary simple syrup, and prosecco. 

    Okay, I know I swore that I’d never be obsessed with cheeseboards but it’s happened. I’m obsessed.

    I used to never keep crackers and cheese and weird jams and all that on hand but now? What if we need a cheeseboard and some yummy drinks on a Sunday night to go with our 5th viewing of Home Alone 2?

    I’ve made at least 3 already this month. They’re just the perfect easy dinner or so fun to throw together if you decide to have a last minute get together.

    …

    Read More

    Cranberry Brie Bites

    Nov 06, 2017

    Cranberry Brie Bites are a quick and easy holiday appetizer! Melted brie and cranberry sauce in crisp phyllo cups with candied walnuts on top!

    Cranberry Brie Bites - a quick and easy holiday appetizer! Melted brie and cranberry sauce in crisp phyllo cups with candied walnuts on top!

    I can’t even believe we are weeks away Thanksgiving. You guys, how did this happen?!

    I feel like I’m behind on planning everything – have you figured out your menu yet?

    I forever have that problem where I have so many recipes I want to try but I also want to make all the holiday classics and there’s just not enough room on my table for everything and it’s just me and my 3 boys so it’s not like we need a ton of food.

    I do have desserts figured out which, you know, is the most important part.

    And I will definitely be making these Cranberry Brie Bites! They are the perfect little appetizer or they would be so cute on a cheese board! Plus, they are really simple and always a favorite at my holiday parties. 

    Cranberry Brie Bites - a quick and easy holiday appetizer! Melted brie and cranberry sauce in crisp phyllo cups with candied walnuts on top!

    Ingredients

    • Butter
    • Brown Sugar
    • Cinnamon
    • Walnuts – you are going to candy the walnuts for a little sweetness
    • Frozen phyllo cups – find these in the freezer section of any large grocery store. They will be with the frozen pie crusts.
    • Brie cheese
    • Whole Berry Cranberry Sauce – make sure it is the whole berry kind and not the jellied one

    How To Make Candied Walnuts

    • Melt butter, brown sugar, and cinnamon together over low heat until sugar is dissolved
    • Stir in walnuts and stir to coat
    • Pour onto wax paper to cool completely

    How To Make Cranberry Brie Bites

    • Place phyllo cups on a baking sheet
    • Place a piece of brie into each cut
    • Bake at 350F for 5 – 7 minutes until brie has softened
    • Top with cranberry sauce and candied walnuts

    Can You Make Them Ahead?

    No, I don’t recommend making these Cranberry Brie Bites ahead. They are best when the cheese is still warm and gooey and the phyllo dough is crispy. 

    Cranberry Brie Bites - a quick and easy holiday appetizer! Melted brie and cranberry sauce in crisp phyllo cups with candied walnuts on top!

    More Holiday Appetizer Recipes

    • Maple Pecan Baked Brie
    • Caesar Deviled Eggs
    • Fancy Pigs in a Blanket
    • Bacon Cranberry Baked Brie
    • Slow Cooker Apple Kielbasa Bites
    • Cranberry Meatballs

    Make sure you subscribe to my email list to get all my new recipes delivered right to your inbox!

    You can also follow me on Instagram, Facebook, or Pinterest for even more! 


    📖 Recipe

    Yield: 12 cups

    Cranberry Brie Bites

    Cranberry Brie Bites

    Cranberry Brie Bites are a quick and easy holiday appetizer! Melted brie and cranberry sauce in crisp phyllo cups with candied walnuts on top!

    Prep Time 15 minutes
    Cook Time 15 minutes
    Total Time 30 minutes

    Ingredients

    For the candied walnuts:

    • 1 tablespoon butter
    • 2 tablespoons brown sugar
    • ¼ teaspoon cinnamon
    • ½ cup chopped walnuts

    For the Cranberry Brie Bites:

    • 12 frozen phyllo cups, defrosting for 10 minutes
    • 3 ounces brie, cut in 12 pieces
    • ¼ cup whole berry cranberry sauce

    Instructions

    1. To make the walnuts, melt butter, brown sugar, and cinnamon together in a small saucepan over low heat until sugar is completely dissolved. Stir in walnuts, making sure to coat all of them. Pour onto wax paper to cool completely.
    2. Preheat oven to 350F.
    3. Place phyllo cups on a lined baking sheet. Place a piece of brie into each cup. Bake for 5 - 8 minutes, until brie has softened but not melted completely. Divide cranberry sauce between the cups. Sprinkle with candied walnuts.

    Recommended Products

    As an Amazon Associate and member of other affiliate programs, I earn from qualifying purchases.

    • Whole Berry Cranberry Sauce
      Whole Berry Cranberry Sauce
    • Rimmed Baking Sheet
      Rimmed Baking Sheet

    Nutrition Information:

    Yield:

    12

    Serving Size:

    1

    Amount Per Serving: Calories: 189Total Fat: 13gSaturated Fat: 6gTrans Fat: 0gUnsaturated Fat: 6gCholesterol: 25mgSodium: 146mgCarbohydrates: 17gFiber: 1gSugar: 9gProtein: 3g

    Did you make this recipe?

    Tag me in your Instagram photo - @fakeginger

    © Amanda Livesay
    Cuisine: American / Category: appetizer


    Paleo Apple Pie Ice Cream

    Oct 26, 2017

    Paleo Apple Pie Ice Cream – the best dairy free fall ice cream! It tastes like frozen apple pie!

    Paleo Apple Pie Ice Cream - the best dairy free fall ice cream! It tastes like frozen apple pie!

    Does everyone look forward to apple season as much as I do?

    I really don’t care about apples all year long but as soon as fall rolls around, I’m checking my grocery store every day to see if the honeycrisps are under 5 bucks a pound. So far this year I’ve made an upside down apple cake, a grilled cheese, and I’ve currently got 4 different varieties of apples in my fridge.

    You know, just in case I need a gala apple instead of a pink lady.

    As if I can really tell the difference.

    …

    Read More

    Candied Bacon Chocolate Chip Cookies

    Oct 23, 2017

    Candied Bacon Chocolate Chip Cookies are the perfect sweet and salty cookie! Bacon is quickly candied in the oven and then added to the best chocolate chip cookies recipe!

    Candied Bacon Chocolate Chip Cookies - the perfect sweet and salty cookie! Bacon is quickly candied in the oven and then added to the best chocolate chip cookies recipe!

    This post originally published on September 30, 2011 and was updated October 23, 2017. It’s one of my oldest and favorite recipes. 

    The first time I ever made these Candied Bacon Chocolate Chip Cookies – over 6 years ago – was the first time I realized what a food blogger weirdo I was.

    Food bloggers love bacon.

    Okay, yeah, everyone loves bacon but food bloggers love to put bacon in places where bacon usually doesn’t belong.

    Cookies, ice cream, rice krispies treats, pretty much everything.

    I mean, I have a bacon egg and cheese sandwich on a glazed doughnut pretty much every Saturday morning of my life.

    And you can think that’s weird but I have made everyone in my life try them and no one’s complained yet.

    Candied Bacon Chocolate Chip Cookies - the perfect sweet and salty cookie! Bacon is quickly candied in the oven and then added to the best chocolate chip cookies recipe!

    So the first time I made these chocolate chip cookies with bacon was back when we were in Colorado and we hosted all our friends every Saturday to watch football.

    We had people in and out all day and every time someone new showed up, they would say “Oooh cookies!” and I would warn them that they had bacon and then they would say, with disgust on their face, “Bacon?! In cookies?! You try them first” and they would push whoever they came with towards the cookies.

    But guess how many cookies I had left at the end of the day.

    Zero.

    All 5 dozen cookies were gone.

    One of the guys Facebook messaged me years later asking for the recipe.

    So yes, I am a food blogger weirdo that puts bacon in everything she eats but hey, just trust me.

    Candied Bacon Chocolate Chip Cookies - the perfect sweet and salty cookie! Bacon is quickly candied in the oven and then added to the best chocolate chip cookies recipe!

    More Cookie Recipes

    • Double Chocolate Chip Cookies
    • Lemon Cool Whip Cookies
    • Peanut Butter Chocolate Chunk Pudding Cookies
    • Peanut Butter Krispie Cookies
    • Trail Mix Cookies

    Make sure you subscribe to my email list to get all my new recipes delivered right to your inbox!

    You can also follow me on Instagram, Facebook, or Pinterest for even more! 

    📖 Recipe

    Yield: 36 cookies

    Candied Bacon Chocolate Chip Cookies

    Candied Bacon Chocolate Chip Cookies

    Easy homemade candied bacon added to my favorite chocolate chip cookies recipe!

    Prep Time 40 minutes
    Cook Time 1 hour
    Total Time 1 hour 40 minutes

    Ingredients

    For the candied bacon:

    • 6 slices thick-cut bacon
    • ½ cup brown sugar

    For the cookies:

    • 2 ¼ cups flour
    • ½ teaspoon baking soda
    • ¾ cup butter, melted
    • ½ cup white sugar
    • 1 cup brown sugar
    • 1 Tablespoon pure vanilla extract
    • 1 whole egg
    • 1 egg yolk
    • 2 cups semi-sweet, or dark chocolate chips

    Instructions

    1. Preheat oven to 350 degrees.
    2. Place bacon in a single layer on a foil lined sheet.
    3. Sprinkle brown sugar on top of bacon strips. Bake for 18-25 minutes or until crispy, making sure to turn bacon over after 10 minutes.
    4. Remove from oven and place on a wire rack for cooling. Once bacon has cooled chop it finely.
    5. Reduce oven temperature to 325 degrees.
    6. Sift flour and baking soda.
    7. In a medium bowl, cream butter with the white and brown sugar.
    8. Add vanilla, egg, and egg yolk to the bowl and beat until light and creamy.
    9. Add flour mixture and mix well.
    10. Add diced candied bacon and chocolate chips and stir until just combined.
    11. Place tablespoon sized balls of dough on a parchment lined cookie sheet and bake for 13-15 minutes or until edges are brown. Remove from oven and let cookies sit on the pan for a couple of minutes before placing on a wire rack.

    Recommended Products

    As an Amazon Associate and member of other affiliate programs, I earn from qualifying purchases.

    • Rimmed Baking Sheet
      Rimmed Baking Sheet
    • Silicone Baking Mat
      Silicone Baking Mat

    Nutrition Information:

    Yield:

    36

    Serving Size:

    1

    Amount Per Serving: Calories: 167Total Fat: 8gSaturated Fat: 5gTrans Fat: 0gUnsaturated Fat: 3gCholesterol: 23mgSodium: 88mgCarbohydrates: 22gFiber: 1gSugar: 15gProtein: 2g

    Did you make this recipe?

    Tag me in your Instagram photo - @fakeginger

    © Amanda Livesay
    Cuisine: American / Category: cookie


    Pumpkin Banana Muffins

    Oct 10, 2017

    Pumpkin Banana Muffins – the best fall breakfast! Delicious cinnamon-spiced muffins with pumpkin, banana, and walnuts. Make a batch and have breakfast all week!

    Who doesn’t love pumpkin muffins in the fall?! Some of our other favorites are Pumpkin Chocolate Chip Muffins and Pumpkin Walnut Muffins.

    Pumpkin Banana Muffins - the best fall breakfast! Delicious cinnamon-spiced muffins with pumpkin, banana, and walnuts. Make a batch and have breakfast all week!

    Hey guys, how was the long weekend?

    I did nothing all weekend. And by nothing I mean that I decided to rewatch Jane the Virgin and somehow made it through 2 ½ season in 3 days.

    Granted, I tend to just leave it on and walk away for hours at a time but still.

    I always go back to that show when I’m super stressed because it’s funny and ridiculous and I just love it.

    I did escape to my favorite trail with the husky (Good Water Loop in Georgetown) because I just really needed it to not see another human for a few hours.

    I listened to a couple of my favorite podcasts, fell in the mud twice, and then stood under the waterfall before doing the 3 miles back to the car in wet shoes.

    It was exactly what I needed.

    Pumpkin Banana Muffins - the best fall breakfast! Delicious cinnamon-spiced muffins with pumpkin, banana, and walnuts. Make a batch and have breakfast all week!

    Ingredients

    • Unsalted butter
    • Granulated sugar
    • Eggs
    • Bananas
    • Pumpkin puree – make sure it it pumpkin puree and not pumpkin pie filling
    • All-purpose flour
    • Baking powder
    • Baking soda
    • Cinnamon
    • Salt
    • Walnuts – you can use pecans or even chocolate chips if you prefer

    Instructions

    • Preheat oven to 350F. Line 2 12-cup muffin tins with liners.
    • In the bowl of a stand mixer fitted with a paddle attachment, cream butter and sugar together.
    • Add eggs, one at a time, and banana and beat until mostly smooth.
    • In a separate bowl, whish together flour, baking powder, baking soda, cinnamon, and salt to remove any lumps. Add this to the butter mixture and beat until just combined.
    • Use a rubber spatula to fold in the walnuts.
    • Divide the batter among the 24 muffin cups.
    • Bake 22 – 24 minutes or until a toothpick inserted into the center comes out clean.
    • Transfer to a wire rack to cool completely.

    How Long Are Pumpkin Muffins Good For?

    These muffins should be fine at room temperature for up to 3 days. Make sure to cover them tightly – I always use this muffin tin with a lid because once the muffins cool, I can just pop the lid on. No need to dirty a storage container!

    If you want a few more days out of them, you can keep them in the fridge for up to 5 days but they will start to dry out in the fridge.

    Can You Freeze Muffins?

    Yes, you can freeze these muffins for up to 3 months! I would wrap them in plastic wrap and then put them in a freezer ziploc bag.

    To defrost, just let them sit at room temperature overnight. You can warm them in the microwave or oven to get the chill off.

    More Pumpkin Recipes

    • Pumpkin Cinnamon Rolls with Butterscotch Glaze
    • Pumpkin Scones
    • Pumpkin Roll Bars
    • Pumpkin Waffles
    • Pumpkin Pie Milkshakes

    Make sure you subscribe to my email list to get all my new recipes delivered right to your inbox!

    You can also follow me on Instagram, Facebook, or Pinterest for even more! 

    📖 Recipe

    Yield: 24 muffins

    Pumpkin Banana Muffins

    Pumpkin Banana Muffins
    Prep Time 15 minutes
    Cook Time 22 minutes
    Total Time 37 minutes

    Ingredients

    • ½ cup unsalted butter, at room temperature
    • 1 ½ cups sugar
    • 2 large eggs
    • 2 ripe medium-sized bananas, mashed
    • ¾ cup pumpkin puree
    • 1 ¾ cups all-purpose flour
    • 1 ½ teaspoon baking powder
    • ¾ teaspoon baking soda
    • ½ teaspoon cinnamon
    • ½ teaspoon salt
    • ½ cup walnuts, roughly chopped

    Instructions

    1. Preheat oven to 350F. Line 2 12-cup muffin tins with liners.
    2. In the bowl of a stand mixer fitted with a paddle attachment, cream butter and sugar together. Add eggs, one at a time, banana, and pumpkin. Beat until mostly smooth.
    3. In a separate bowl, whish together flour, baking powder, baking soda, cinnamon, and salt to remove any lumps. Add this to the butter mixture and beat until just combined. Use a rubber spatula to fold in the walnuts.
    4. Divide the batter among the 24 muffin cups. Bake 22 - 24 minutes or until a toothpick inserted into the center comes out clean. Transfer to a wire reack to cool completely.

    Recommended Products

    As an Amazon Associate and member of other affiliate programs, I earn from qualifying purchases.

    • Parchment Muffin Liners
      Parchment Muffin Liners
    • Stand Mixer
      Stand Mixer
    • My Favorite Muffin Tin
      My Favorite Muffin Tin
    • Pumpkin Puree
      Pumpkin Puree

    Nutrition Information:

    Yield:

    24

    Serving Size:

    1

    Amount Per Serving: Calories: 147Total Fat: 6gSaturated Fat: 3gTrans Fat: 0gUnsaturated Fat: 3gCholesterol: 26mgSodium: 121mgCarbohydrates: 23gFiber: 1gSugar: 14gProtein: 2g

    Did you make this recipe?

    Tag me in your Instagram photo - @fakeginger

    © Amanda Livesay


    Chicken Thighs with Creamy Rosemary Mushrooms

    Oct 02, 2017

    Chicken Thighs with Creamy Rosemary Mushrooms are crispy chicken thighs topped with mushrooms in a creamy sauce! Low carb, delicious, and ready in about 30 minutes!

    Chicken Thighs with Creamy Rosemary Mushrooms - crispy chicken thighs topped with mushrooms in a creamy sauce! Low carb, delicious, and ready in about 30 minutes!

    This chicken was amazing.

    As a rule, chicken thighs are the only part of the chicken I’ll eat.

    I don’t know, it’s just what I do.

    So yeah, the thighs are just seasoned with salt and pepper and then seared until browned and amazing and then you just put them in the oven for about 15 minutes.

    While that’s going, you cook some mushrooms and then throw in some rosemary and some cream (you can totally do canned full fat coconut milk if you’re doing paleo) and that’s it.

    One of my favorite things about low carb/gluten free/paleo/keto/whatever is how simple everything is. Meat, veggies, a splash of cream and you’re done.

    Super quick and super delicious. I made some mashed cauliflower to serve with it and put some of the mushrooms and sauce on top and I highly recommend that you do the same.

    Chicken Thighs with Creamy Rosemary Mushrooms - crispy chicken thighs topped with mushrooms in a creamy sauce! Low carb, delicious, and ready in about 30 minutes!

    How Long Is It Good For?

    This chicken is good for up to 3 days. Make sure to store it in the fridge in an airtight container.

    You can reheat in the microwave. If the sauce it too thick, some water or chicken broth will help to get it back to it’s original consistency.

    More Healthy Chicken Recipes

    • Chicken Fajitas
    • Chicken Lettuce Wraps

    Make sure you subscribe to my email list to get all my new recipes delivered right to your inbox!

    You can also follow me on Instagram, Facebook, or Pinterest for even more! 

    📖 Recipe

    Yield: 4 servings

    Chicken Thighs with Creamy Rosemary Mushrooms

    Chicken Thighs with Creamy Rosemary Mushrooms

    Chicken Thighs with Creamy Rosemary Mushrooms - crispy chicken thighs topped with mushrooms in a creamy sauce! Low carb, delicious, and ready in about 30 minutes!

    Prep Time 10 minutes
    Cook Time 30 minutes
    Total Time 40 minutes

    Ingredients

    • 4 bone-in, skin-on chicken thighs
    • salt and pepper
    • 2 tablespoons avocado oil

    For the creamy mushrooms:

    • 2 tablespoons salted butter
    • 8 ounces cremini or button mushrooms, sliced
    • 2 tablespoons chopped fresh rosemary
    • 2 cloves garlic, minced
    • ½ teaspoon salt
    • ½ teaspoon black pepper
    • ¼ cup heavy cream

    Instructions

    1. Preheat oven to 375F. Pay the chicken dry and season liberally with salt and pepper.
    2. In a large skillet over medium heat, heat the oil until shimmering. Add the chicken, skin side down. Cook undisturbed for 5 to 7 minutes, until the skin is golden and crisp. Flip over and cook for anohter 4 minutes.
    3. Transfer the chicken to a baking dish and place in the oven. Bake for 15 minutes or until the internal temperature reaches 165F.
    4. While the chicken is baking, prepare the mushrooms. Melt the butter in the hot skillet. Add the mushrooms and saute until golden brown, about 5 minutes. Add the rosemary, garlic, salt, and pepper and cook for 1 more minute. Stir in the cream and simmer until thickened.
    5. Add the chicken and any accumulated juices back to the pan. Spoon the mushrooms and sauce over the thighs as you serve them.

    Recommended Products

    As an Amazon Associate and member of other affiliate programs, I earn from qualifying purchases.

    • 8-inch Cast Iron Skillet
      8-inch Cast Iron Skillet

    Nutrition Information:

    Yield:

    4

    Serving Size:

    1

    Amount Per Serving: Calories: 252Total Fat: 23gSaturated Fat: 9gTrans Fat: 0gUnsaturated Fat: 12gCholesterol: 74mgSodium: 446mgCarbohydrates: 4gFiber: 2gSugar: 2gProtein: 10g

    Did you make this recipe?

    Tag me in your Instagram photo - @fakeginger

    © Amanda Livesay
    Cuisine: American / Category: chicken


    Apple and Brie Grilled Cheese

    Sep 26, 2017

    Apple and Brie Grilled Cheese is the perfect fall sandwich recipe! Turkey, brie, and fresh apple slices. Plus, a honey drizzle for a bit of sweetness.

    Apple and Brie Grilled Cheese - the perfect fall sandwich recipe! Turkey, brie, and fresh apple slices. Plus, a honey drizzle!

    Have I told you guys that I’m obsessed with sandwiches lately?

    I’ve never in my life been a sandwich person. I don’t ever just make a sandwich for lunch or go to a sandwich shop.

    But one day a few weeks ago, I was in a mood so I took the husky for a hike and spent the entire hike thinking about sandwiches.

    Like, 3 hours of thinking about sandwiches.

    When my phone had service, I was on Yelp looking up sandwich places in the area.

    I got a sandwich on the way home and haven’t stopped ever since.

    So to say that this Apple and Brie Grilled Cheese is my favorite thing I’ve made in a while is the understatement of the year.

    I also have a Raspberry, Basil, and Brie Grilled Cheese if you are looking for more brie grilled cheese recipes!

    Apple and Brie Grilled Cheese - the perfect fall sandwich recipe! Turkey, brie, and fresh apple slices. Plus, a honey drizzle!

    Ingredients

    • Bread – I like to use a thick, fluffy bread for this sandwich
    • Fresh thyme – you can use dried thyme if you prefer
    • Salted butter
    • Honey
    • Brie – cut off the rind and only use the soft insides of the cheese
    • Apple – I like green apple because it’s a nice tart contrast to the sweetness of the honey but a honeycrisp would also be delicious!
    • Ham or turkey

    Instructions

    • Make herb butter. Mix fresh thyme with softened butter.
    • Assemble. Drizzle 2 slices of bread with honey. Layer brie and apples on one side. Top with other slice of bread.
    • Spread butter. Smear thyme butter onto both exteriors of the sandwich.
    • Grill. Grill the sandwich until the bread is golden brown and the Brie has melted.
    Apple and Brie Grilled Cheese - the perfect fall sandwich recipe! Turkey, brie, and fresh apple slices. Plus, a honey drizzle!

    More Sandwich Recipes

    • Fried Green Tomato BLT
    • Chicken Parmesan Sliders
    • The Ultimate Chicken Sandwich
    • Sloppy Joe Sliders
    • Baked Ham and Cheese Croissants

    📖 Recipe

    Yield: 1 serving

    Apple and Brie Grilled Cheese

    Apple and Brie Grilled Cheese

    Apple and Brie Grilled Cheese is the perfect fall sandwich recipe! Turkey, brie, and fresh apple slices. Plus, a honey drizzle for a bit of sweetness.

    Prep Time 5 minutes
    Cook Time 10 minutes
    Total Time 15 minutes

    Ingredients

    • 2 slices hearty bread
    • 1 teaspoon fresh thyme leaves
    • 2 pats salted butter, room temperature
    • 1 tablespoon honey
    • 6 thin slices Brie
    • ¼ apple, sliced thin
    • 3 slices ham or turkey

    Instructions

    1. Begin by mixing the fresh thyme with the room temperature butter and set aside.
    2. Place two slices of bread on a cutting board and drizzle each slice with honey. Add half of the Brie to one slice followed by the sliced apples and the smoked ham. Add the remaining Brie on top and cover with the remaining slice of bread, honey side down. Evenly smear the thyme butter onto both exteriors of the sandwich and set aside.
    3. Grill the sandwich in a cast iron skillet until the bread is golden brown and the Brie has melted (approximately 5-10 minutes). Remove from heat and let sit for 1 minute before slicing in half.

    Recommended Products

    As an Amazon Associate and member of other affiliate programs, I earn from qualifying purchases.

    • 8-inch Cast Iron Skillet
      8-inch Cast Iron Skillet

    Nutrition Information:

    Yield:

    1

    Serving Size:

    1

    Amount Per Serving: Calories: 1105Total Fat: 75gSaturated Fat: 45gTrans Fat: 1gUnsaturated Fat: 24gCholesterol: 281mgSodium: 2847mgCarbohydrates: 49gFiber: 3gSugar: 27gProtein: 62g

    Did you make this recipe?

    Tag me in your Instagram photo - @fakeginger

    © Amanda Livesay
    Cuisine: American / Category: sandwich

    Homemade Pumpkin Carrot Dog Treats

    Sep 25, 2017

    Pumpkin Carrot Dog Treats are homemade dog treats made with pumpkin puree and shredded carrots. Your pup is going to love these!

    Pumpkin Carrot Dog Treats - homemade dog treats made with pumpkin puree and shredded carrots. Your pup is going to love these!

    I’m all in on pumpkin.

    Oh! I haven’t had my first official PSL yet though. Have you? I got one from McDonald’s a couple weeks ago because I like theirs so much more than Starbucks but I feel like I need to go to Starbucks just for an Instagram picture.

    Oh my gosh, y’all. The below photo? I had the treats I wasn’t using for photos propped up on the arm of the couch and I look over and Clementine was leaned up against the pillow, just staring at the treats just like my kids do when I’m photographing something they want to eat.

    I don’t know how she knew they were hers but she did.

    These are super simple – just canned pumpkin, shredded carrots, peanut butter, an egg, flour, and a tiny bit of cinnamon.

    I have no idea how they taste but my dogs seem to like them. My six year old ate one and asked for another.

    So yeah. I guess they’re not terrible.

    Pumpkin Carrot Dog Treats - homemade dog treats made with pumpkin puree and shredded carrots. Your pup is going to love these!

    Ingredients

    • Pumpkin puree – make sure the only ingredient is pumpkin puree.
    • Carrots – these are going to get shredded before going into the batter.
    • Natural peanut butter – I like to get peanut butter with only peanuts in the ingredients. Crazy Richard’s 100% Peanuts is what I use for all my homemade dog treats.
    • Cinnamon – just for a little flavor.
    • Egg – this is going to help the treats stick together and add a bit of protein.
    • Flour

    How To Make Pumpkin Carrot Dog Treats

    • Prepare. Preheat oven to 350F. Line a baking sheet with parchment paper.
    • Combine. Combine all ingredients in a mixing bowl and beat until combined.
    • Shape. Transfer to a surface dusted with flour and roll out to about ½″ thick. Use cookie cutters to cut out treats and transfer to prepared baking sheet.
    • Bake. Bake for 12 – 14 minutes or until they are slightly golden.

    How Long Are They Good For?

    Homemade dog treats are fine for about a week in the fridge. Make sure to store them in an airtight container like a ziploc bag.

    Pumpkin Carrot Dog Treats - homemade dog treats made with pumpkin puree and shredded carrots. Your pup is going to love these!

    More Homemade Dog Treats Recipes

    • Beef Jerky for Dogs
    • Bacon Cheddar Dog Treats
    • Apple Peanut Butter Dog Ice Cream
    • Carrot, Peanut Butter, and Oats Dog Treats
    • Peanut

    Make sure you subscribe to my email list to get all my new recipes delivered right to your inbox!

    You can also follow me on Instagram, Facebook, or Pinterest for even more! 

    📖 Recipe

    Yield: about 24 treats

    Homemade Pumpkin Carrot Dog Treats

    Homemade Pumpkin Carrot Dog Treats

    Pumpkin Carrot Dog Treats are homemade dog treats made with pumpkin puree and shredded carrots. Your pup is going to love these!

    Prep Time 20 minutes
    Cook Time 14 minutes
    Total Time 34 minutes

    Ingredients

    • ¾ cup pumpkin puree
    • ¼ cup shredded carrots
    • ⅓ cup natural creamy peanut butter
    • ¼ teaspoon cinnamon
    • 1 egg, beaten
    • 2 cups flour, plus more for rolling

    Instructions

    1. Preheat oven to 350F. Line a baking sheet with parchment paper.
    2. Combine all ingredients in a mixing bowl and beat until combined. Transfer to a surface dusted with flour and roll out to about ½" thick. Use cookie cutters to cut out treats and transfer to prepared baking sheet.
    3. Bake for 12 - 14 minutes or until they are slightly golden.

    Recommended Products

    As an Amazon Associate and member of other affiliate programs, I earn from qualifying purchases.

    • Crazy Richard's 100% Peanuts Peanut Butter
      Crazy Richard's 100% Peanuts Peanut Butter
    • Bone Cookie Cutters
      Bone Cookie Cutters
    • Rolling Pin
      Rolling Pin

    Nutrition Information:

    Yield:

    24

    Serving Size:

    1

    Amount Per Serving: Calories: 65Total Fat: 2gSaturated Fat: 0gTrans Fat: 0gUnsaturated Fat: 1gCholesterol: 8mgSodium: 21mgCarbohydrates: 10gFiber: 1gSugar: 1gProtein: 2g

    Did you make this recipe?

    Tag me in your Instagram photo - @fakeginger

    © Amanda Livesay
    Cuisine: American / Category: dog-friendly


    « Previous Page
    Next Page »

    Primary Sidebar

    Amanda Livesay
    Hi, I'm Amanda! DFW food blogger, mom of boys, and crazy dog lady.
    Read more
    Privacy Policy
    Privacy Policy

    Footer

    ↑ back to top

    About

    • Privacy Policy
    • About Fake Ginger

    Newsletter

    • Sign Up for weekly emails featuring new recipes!

    As an Amazon Associate I earn from qualifying purchases.

    Copyright © 2024 FakeGinger.com