• Skip to primary navigation
  • Skip to main content
  • Skip to primary sidebar
  • Home
  • About
  • Recipes

Fake Ginger

menu icon
go to homepage
  • Recipe Index
  • About
  • Subscribe
    • Facebook
    • Instagram
    • Pinterest
  • subscribe
    search icon
    Homepage link
    • Recipe Index
    • About
    • Subscribe
    • Facebook
    • Instagram
    • Pinterest
  • ×
    Home » Page 10

    Banana Oatmeal Chocolate Chip Cookies

    Banana Oatmeal Chocolate Chip Cookies

    Feb 16, 2022

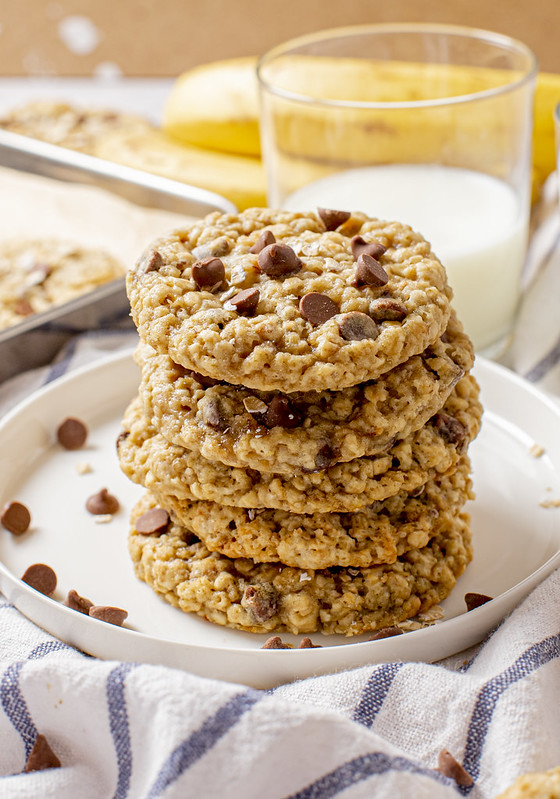
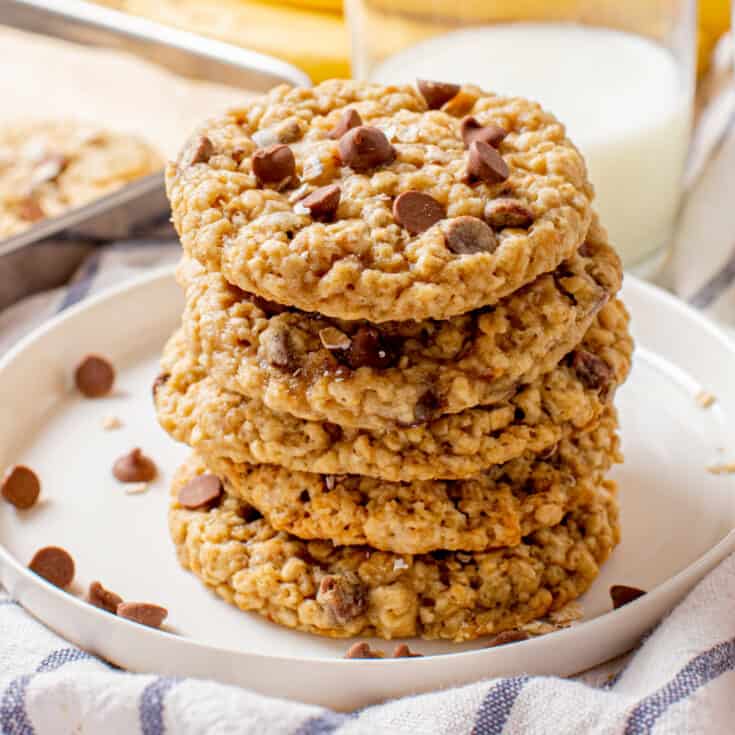
    The most delicious way to use ripe bananas! Banana Oatmeal Chocolate Chip Cookies are soft cookies filled with banana, oats, and chocolate chips.

    Love banana and chocolate?! Try Banana Chocolate Chip Muffins and Chocolate Chip Banana Bread!

    Five banana oatmeal chocolate chip cookies on a plate

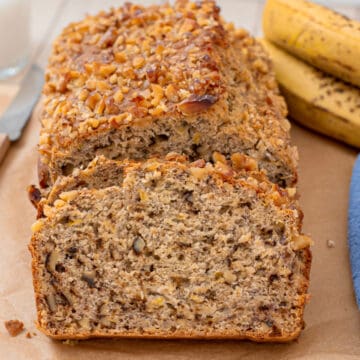
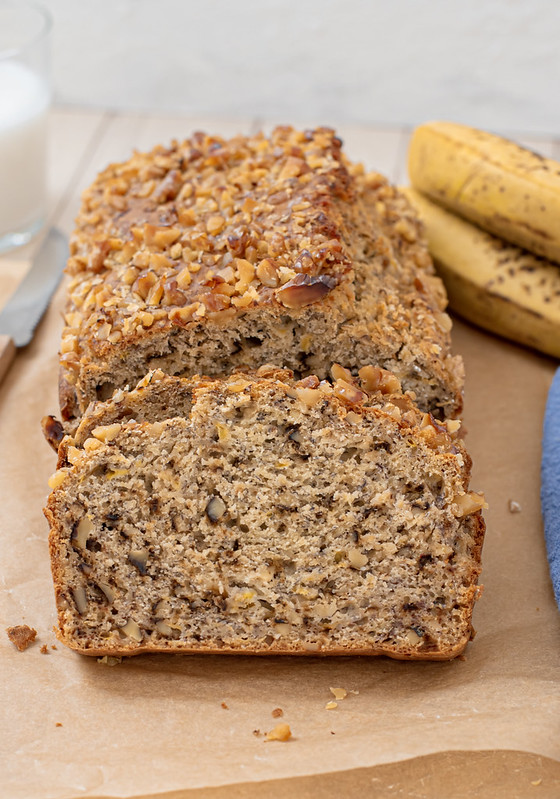
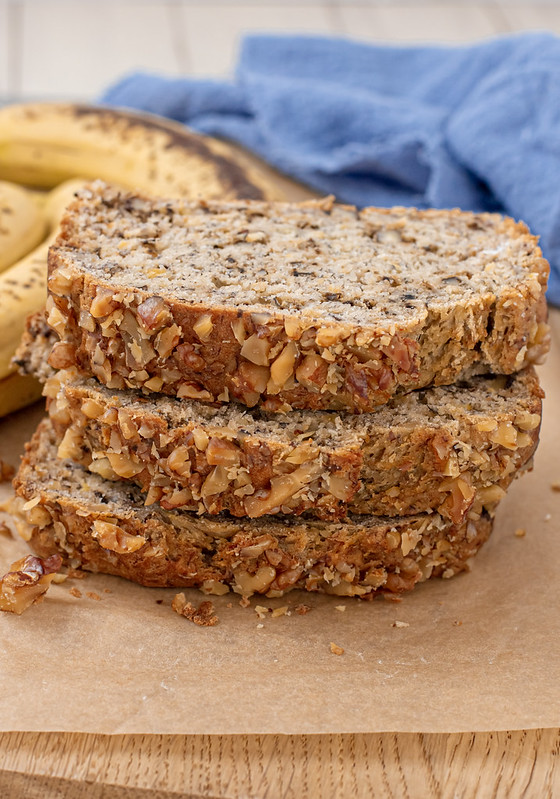
    Everyone’s go to ripe banana recipe is Banana Nut Bread, but you have tried banana cookies?!

    These cookies are super soft and they’re loaded with oats, chocolate chips, and those ripe bananas that we all have sitting on our counter right now.

    If you love cookies with a lot of different textures, these are a must make!

    Overhead shot of banana oatmeal chocolate chip cookies on a plate

    Ingredients

    • Ripe bananas – you want them super ripe with brown spots all over the peels
    • Unsalted butter
    • Brown sugar – this recipe calls for a mixture of brown sugar and granulated sugar because the brown sugar keeps them soft
    • Granulated sugar
    • Vanilla
    • Egg
    • All-purpose flour
    • Old fashioned oats
    • Baking soda
    • Baking powder
    • Salt
    • Semisweet chocolate chips – you can use dark chocolate chips if you prefer
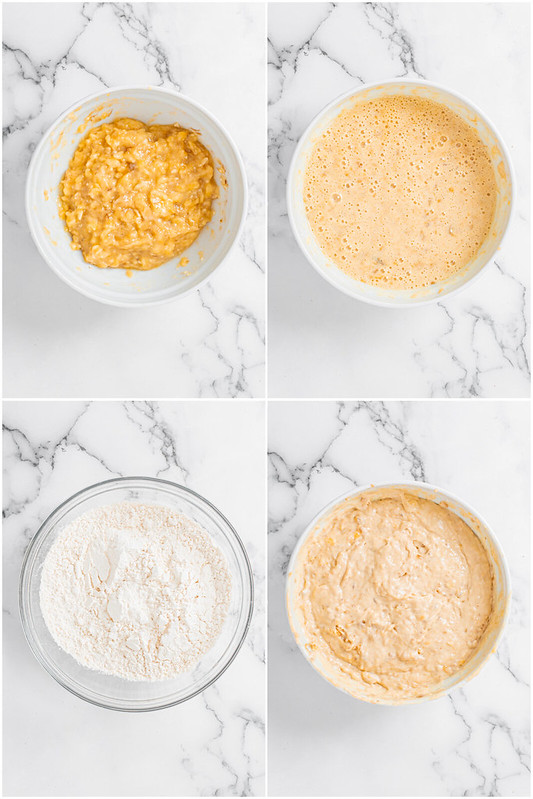
    How to make banana oatmeal chocolate chip cookies

    Instructions

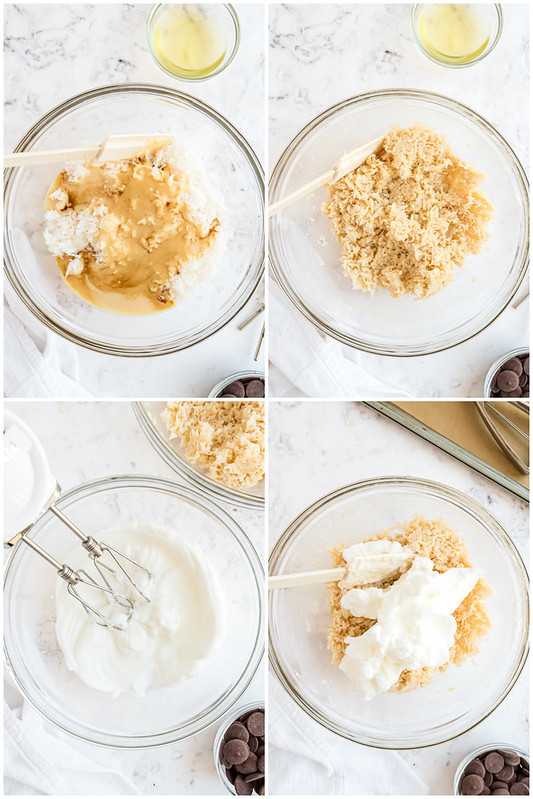
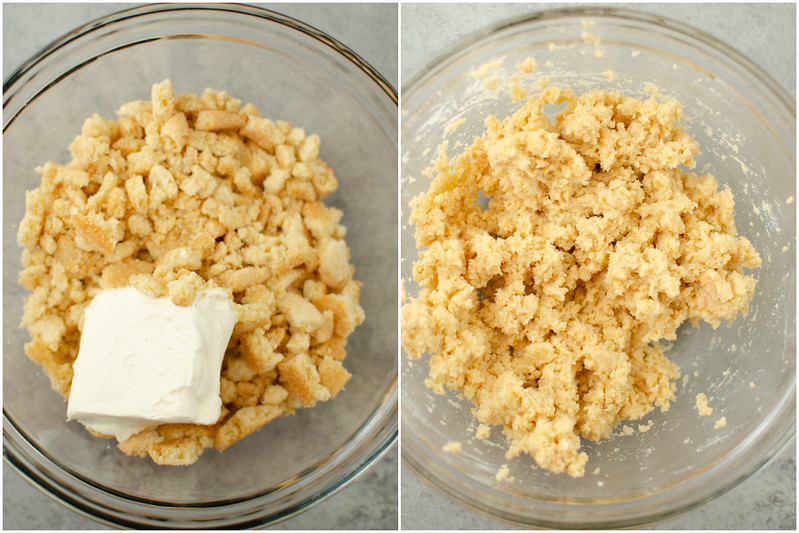
    • Combine wet ingredients. In a large bowl combine mashed bananas, butter, sugars, egg, and vanilla.
    • Combine dry ingredients. Stir together flour, baking soda, baking powder, salt, and oats.
    • Combine everything. Add to wet ingredients gradually. Beat on low until combined.
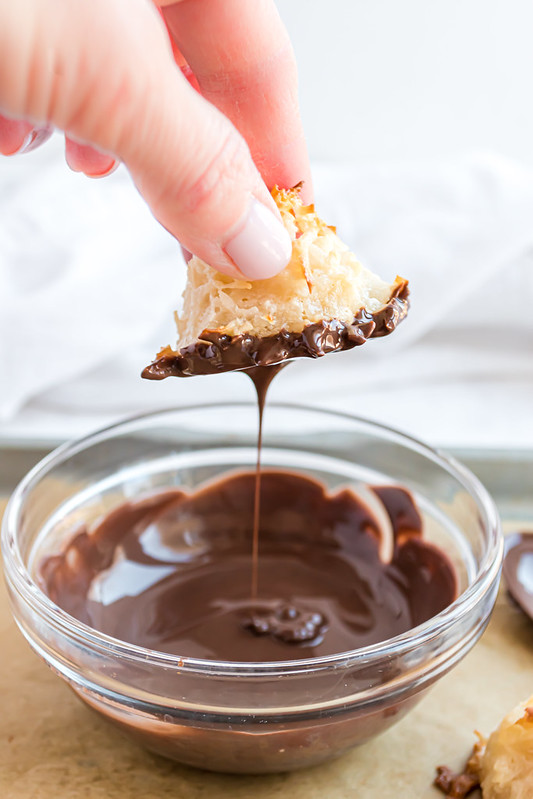
    • Add chocolate. Fold in chocolate chips.
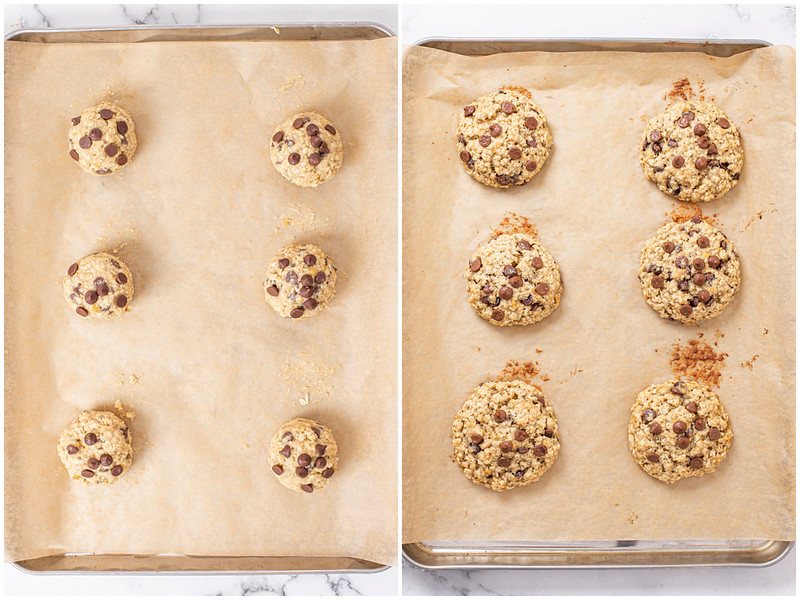
    • Shape. Scoop 2 tablespoonfuls of dough and roll into balls. Arrange the cookie balls on a baking sheet.
    • Bake. Bake at 350F for 11-13 minutes or until golden brown.
    • Cool. Let cool in the baking sheet for 5-10 minutes and then transfer to a wire rack.
    Oatmeal chocolate chip cookies before and after baking

    How Long Are They Good For?

    These cookies will be fine at room temperature for up to 3 days. Make sure to store them in an airtight container.

    You can prolong the life of the cookies by storing them in the fridge. I would let them come to room temperature or even warm them in the microwave or oven before serving.

    Can You Freeze Them?

    You can freeze banana cookies for up to 3 months. I would wrap them individually (or in sets of 2) in plastic wrap and then place in a freezer ziploc bag.

    When you are ready to serve them, let them defrost at room temperature for several hours. You can also warm them in the oven or microwave.

    Plate of banana oatmeal chocolate chip cookies

    More Cookie Recipes

    • Peanut Butter Chocolate Chunk Pudding Cookies
    • Chewy Chocolate Chip Cookies
    • Confetti Cookies
    • Butterscotch Pudding Cookies
    • Peanut Butter Krispie Cookies

    Make sure you subscribe to my email list to get all my new recipes delivered right to your inbox!

    You can also follow me on Instagram, Facebook, or Pinterest for even more! 

    📖 Recipe

    Yield: 16 cookies

    Banana Oatmeal Chocolate Chip Cookies

    Banana Oatmeal Chocolate Chip Cookies
    Prep Time 20 minutes
    Cook Time 13 minutes
    Total Time 33 minutes

    Ingredients

    • ½ cup mashed ripe banana (about 2 medium bananas)
    • ½ cup unsalted butter, softened
    • ½ cup brown sugar
    • ½ cup granulated sugar
    • 1 teaspoon vanilla
    • 1 large egg
    • 1 ½ cup all-purpose flour
    • 2 cups old fashioned oats
    • 1 teaspoon baking soda
    • 1 teaspoon baking powder
    • ½ teaspoon salt
    • ½ cup semisweet chocolate chips

    Instructions

      1. Preheat oven to 350 F.
      2. In a large bowl combine mashed bananas, butter and sugars. Beat on low with an electric hand mixer or stand mixer until smooth and creamy. Add egg, vanilla. Mix on low until combined. Set aside.
      3. In a separate large bowl, stir together flour, baking soda, baking powder, salt, and oats.
      4. Add dry ingredients to wet ingredients gradually. Beat on low until combined.
      5. Fold in chocolate chips.
      6. Scoop 2 tablespoonfuls of dough and roll into balls.
      7. Arrange the cookie balls on a baking sheet lined with parchment paper at least 2 inches apart. Don’t press down!
      8. Bake for 11-13 minutes or until golden brown.
      9. Let cool in the baking sheet for 5-10 minutes and then transfer to a wire rack.

    Recommended Products

    As an Amazon Associate and member of other affiliate programs, I earn from qualifying purchases.

    • Wire Rack
      Wire Rack
    • Parchment Paper
      Parchment Paper
    • Rimmed Baking Sheet
      Rimmed Baking Sheet

    Nutrition Information:

    Yield:

    16

    Serving Size:

    1

    Amount Per Serving: Calories: 215Total Fat: 8gSaturated Fat: 5gTrans Fat: 0gUnsaturated Fat: 3gCholesterol: 27mgSodium: 184mgCarbohydrates: 33gFiber: 2gSugar: 16gProtein: 3g

    Did you make this recipe?

    Tag me in your Instagram photo - @fakeginger

    © Amanda Livesay
    Category: cookie

    Melon Margaritas

    Feb 15, 2022

    A melon twist on the classic margarita! Melon Margaritas are delicious, only 3 ingredients, and are the most beautiful bright green color. Top it with fresh honeydew melon!

    If you love melon cocktails, try Cantaloupe Coconut Margaritas and Watermelon Mint Margaritas!

    I know it’s the middle of February but I am dreaming of summer and cocktails by the pool so we’re talking margaritas.

    These Melon Margaritas may be the prettiest margarita I’ve ever made. They are bright green and I searched far and wide (3 stores) for a honeydew so I could make cute little melon balls to go on top.

    (If you live near an HEB, they have bags of frozen melon balls that are perfect for cocktails! Like Melon Ball Sangria!)

    These margaritas are nice and light and refreshing. I’m not a melon person but I really love these.

    And did I mention they’re only 3 ingredients?! And no sugary margarita mix required!

    Overhead shot of a melon margarita with fresh honeydew on top

    Ingredients

    • Limes – you need a wedge to rim the glasses and the fresh juice for the drink
    • Coarse salt
    • Tequila – I suggest a silver tequila so that the green stays nice and bright
    • Melon liqueur – you can find this at any liquor and it’s super cheap. It’s what gives the drink it’s bright green color!
    • Honeydew melon balls – use a melon baller to scoop out the honeydew

    How To Make Melon Margaritas

    • Prepare the glasses. Run a lime wedge on 2 glasses and dip in coarse salt. Fill with ice.
    • Make drink. In a shaker, combine tequila, melon liqueur, and lime juice. Add ice and shake virorously.
    • Pour. Pour drinks over ice and top with honeydew melon balls.
    Green margarita with salt

    Tips and Tricks

    • If you like a sweeter margarita, a tiny dash of simple syrup in the shake will sweeten it up
    • Serving these to a crowd? Double or triple the recipe and keep it in pitcher. Give it a stir and then pour individual drinks into the shaker

    More Margarita Recipes

    • Frozen Prickly Pear Margaritas
    • Raspberry Margaritas
    • Blue Margaritas
    • Watermelon Mint Margaritas
    • Skinny Kiwi Margaritas
    • Blackberry Margaritas

    Make sure you subscribe to my email list to get all my new recipes delivered right to your inbox!

    You can also follow me on Instagram, Facebook, or Pinterest for even more! 

    📖 Recipe

    Yield: 2 margaritas

    Melon Margaritas

    Melon Margaritas

    A melon twist on the classic margarita! Melon Margaritas are delicious, only 3 ingredients, and are the most beautiful bright green color. Top it with fresh honeydew melon!

    Prep Time 10 minutes
    Total Time 10 minutes

    Ingredients

    • 2 lime wedges
    • coarse salt
    • ice
    • 1 ounce fresh lime juice
    • 3 ounces tequila
    • 3 ounces melon liqueur

    Instructions

    1. Run a lime wedge around 2 glasses. Dip each glass in salt. Fill with ice. Set aside.
    2. In a shaker, combine lime juice, tequila, and melon liqueur. FIll with ice and shake vigorously. Strain over ice.
    3. Top each drink with honeydew melon balls.
    4. Serve immediately.

    Recommended Products

    As an Amazon Associate and member of other affiliate programs, I earn from qualifying purchases.

    • Stimless Margarita Glasses
      Stimless Margarita Glasses
    • Cocktail Shaker
      Cocktail Shaker
    • OXO Good Grips Double-Sided Melon Baller
      OXO Good Grips Double-Sided Melon Baller

    Nutrition Information:

    Yield:

    2

    Serving Size:

    1

    Amount Per Serving: Calories: 135Total Fat: 0gSaturated Fat: 0gTrans Fat: 0gUnsaturated Fat: 0gCholesterol: 0mgSodium: 300mgCarbohydrates: 12gFiber: 2gSugar: 5gProtein: 1g

    Did you make this recipe?

    Tag me in your Instagram photo - @fakeginger

    © Amanda Livesay
    Category: drink

    Chuy’s Creamy Jalapeño Dip

    Feb 10, 2022

    If you like Chuy’s Creamy Jalapeño Dip, you’re going to love this homemade version! It’s creamy, spicy, and ready in less than 10 minutes. Dip tortilla chips in it or use it as a topping for salads, tacos, or burritos!

    If you love spicy, creamy dips, try Avocado Salsa!

    Tortilla chip being dipped in creamy jalapeno dip

    Before we moved to Dallas, my kids and I would roadtrip to Houston a couple time a year for events or to go to Sea World. Our tradition on those trips was to stop at Chuy’s for dinner because we didn’t have one near us.

    Even now that we live near several, I still make my kids go after every Six Flags visit.

    I love Chuy’s more than I can explain. My favorite thing at Chuy’s though, is the creamy jalapeño dip. No matter what I order, I always ask for the jalapeno dip.

    It’s creamy and spicy but not too spicy and it’s just so delicious on tortilla chips or on a salad or just dumped on whatever you ordered.

    My homemade version is pretty spot on. It’s full of pickled jalapenos, ranch dressing mix, and lots of cilantro.

    Any time I make a batch, it doesnt even last the night because we all love it.

    Ingredients

    • Sour cream
    • Mayonnaise – if you are absolutely opposed to mayo, you can use all sour cream instead but I promise you won’t taste the mayo
    • Dry ranch dressing mix
    • Pickled jalapeños
    • Fresh cilantro
    • Lime
    • Buttermilk

    How To Make Creamy Jalapeño Dip

    • Add ingredients. Combine all ingredients in a blender or food processor.
    • Blend. Blend until smooth.

    How Long Is It Good For?

    Creamy jalapeno dip will be good for about a week in the fridge. Make sure to store it in an airtight container.

    Can You Freeze It?

    I don’t recommend trying to freeze this dip. I think the texture woud change once frozen and defrosted.

    What To Serve with Creamy Jalapeno Dip

    • Dip tortilla chips in it
    • Dressing for burrito bowls or salads
    • Drizzle is on tacos

    More Dip Recipes

    • Buffalo Chicken Dip
    • Jalapeno Popper Dip
    • Avocado Feta Salsa
    • Restaurant Style Salsa
    • Roasted Red Pepper Hummus

    Make sure you subscribe to my email list to get all my new recipes delivered right to your inbox!

    You can also follow me on Instagram, Facebook, or Pinterest for even more! 

    📖 Recipe

    Yield: about 8 servings

    Creamy Jalapeño Dip

    Creamy Jalapeño Dip
    Prep Time 10 minutes
    Total Time 10 minutes

    Ingredients

    • 1 cup sour cream
    • ½ cup mayonnaise
    • 1 (1 ounce) package dry ranch dressing mix
    • ¾ cup pickled jalapeños, drained
    • ½ cup fresh cilantro
    • juice of half a lime
    • ¼ cup buttermilk

    Instructions

    1. Combine all ingredients in a blender or food processor.
    2. Blend until smooth.

    Recommended Products

    As an Amazon Associate and member of other affiliate programs, I earn from qualifying purchases.

    • Ranch Dressing Mix
      Ranch Dressing Mix
    • My Favorite Blender
      My Favorite Blender

    Nutrition Information:

    Yield:

    8

    Serving Size:

    1

    Amount Per Serving: Calories: 184Total Fat: 16gSaturated Fat: 5gTrans Fat: 0gUnsaturated Fat: 10gCholesterol: 23mgSodium: 596mgCarbohydrates: 9gFiber: 1gSugar: 6gProtein: 2g

    Did you make this recipe?

    Tag me in your Instagram photo - @fakeginger

    © Amanda Livesay
    Category: appetizer

    Coconut Macaroons

    Feb 08, 2022

    Classic Coconut Macaroons are soft, chewy, and full of coconut flavor! Only 5 ingredients and ready in no time. Dip them in chocolate or leave them plain – they are delicious either way!

    Coconut macarons on a cooling rack

    Coconut macaroons are one of my favorite, classic cookies. They are so easy, need only 5 ingredients, and they are just so delicious.

    If you’ve never had one, they are chewy coconut cookies made with whipped egg whites so they’re a little fluffy and almost candy-like.

    They are also naturally gluten free (no flour required!) so they are a great option for your gluten free friends.

    Chocolate dipped coconut macaroon with more macaroons in the background

    Ingredients

    • Sweetened flaked coconut – make sure it’s the sweetened coconut, the unsweetened coconut won’t work in this recipe
    • Sweetened condensed milk
    • Vanilla extract
    • Egg whites – use the yolks for homemade ice cream!
    • Kosher salt
    • Dark chocolate melting wafers – the chocolate is optional, you can definitely leave the cookies undipped if you prefer

    Instructions

    • Stir. In a medium bowl, mix together the coconut, sweetened condensed milk and vanilla extract by hand.
    • Beat egg whites. In a separate medium mixing bowl, beat egg whites and salt, with a hand mixer, until stiff peaks form.
    • Combine. Fold the egg whites into the coconut mixture until fully incorporated.
    Ingredients for coconut macaroons
    • Shape. Using a 1 Tablespoon scoop, place mounds of coconut mixture onto a parchment-lined baking sheet, spacing about 1 inch apart.
    • Bake. Bake for 21-23 minutes, or until the tops and edges are golden brown. Cool completely.
    • Dip in chocolate. If dipping the coconut macaroons in chocolate, place the chocolate melting wafers in a microwave safe bowl and heat on high for 1 minute. Stir until the chocolate has completely melted and is smooth. Dip the bottoms of the cookies into the chocolate and place on parchment or wax paper to set. The melted chocolate can also be put in a ziploc baggie with the corner cut off for easily drizzling.
    How to make coconut macaroons

    How Long Are They Good For?

    Coconut Macaroons are good for up to 3 days at room temperature or up to 7 days in the refrigerator. Make sure to store them in an airtight container.

    Can They Be Frozen?

    You can freeze these coconut macaroons for up to 3 months. I recommend wrapping them tightly in plastic wrap and then placing them in a freezer ziploc bag.

    Coconut macarons on a baking sheet with a bowl of chocolate

    Tips and Tricks

    • Don’t use egg whites in a carton! You need to use the real thing. Carton egg whites don’t always get to stiff peaks and you want stiff peaks for macaroons.
    • Stiff peaks are reached when the beaters can be lifted out of the mixing bowl and the whites will form tips that don’t bend down when the beater is turned upright. The mixing bowl can also be turned upside down and the eggs will stay put. It depends on how fast the mixer is going, but this should take somewhere between 2-4 minutes.
    • Don’t overmix the whites when adding them into the coconut mixture. This can deflate the whites and cause your cookies to lose their shape. Use a rubber spatula to gently fold the egg whites into the coconut.
    Coconut macaroon being dipped in a bowl of chocolate

    More Easy Cookie Recipes

    • Almond Bark Drop Cookies
    • Chocolate Chip Pizookie
    • Chocolate Chip Pudding Cookies
    • Chocolate Snowball Cookies
    • Trail Mix Cookies
    • Lemon Poppy Seed Cookies

    Make sure you subscribe to my email list to get all my new recipes delivered right to your inbox!

    You can also follow me on Instagram, Facebook, or Pinterest for even more! 

    Coconut macaroons dipped in chocolate

    📖 Recipe

    Yield: about 40 cookies

    Coconut Macaroons

    Coconut Macaroons
    Prep Time 15 minutes
    Cook Time 23 minutes
    Total Time 38 minutes

    Ingredients

    • 1 (14 ounce) bag of sweetened flaked coconut
    • ¾ cup + 2 tablespoons sweetened condensed milk
    • 1 teaspoon vanilla extract
    • 2 large egg whites, at room temperature
    • ¼ teaspoon kosher salt
    • ¾ cup dark chocolate melting wafers (optional, for dipping)

    Instructions

      1. Preheat the oven to 325°F. Line a baking sheet with parchment paper. Set aside.
      2. In a medium bowl, mix together the coconut, sweetened condensed milk and vanilla extract by hand. Set aside.
      3. In a separate medium mixing bowl, beat egg whites and salt, with a hand mixer, until stiff peaks form.
      4. Fold the egg whites into the coconut mixture until fully incorporated.
      5. Using a 1 Tablespoon scoop, place mounds of coconut mixture onto the prepared baking sheet, spacing about 1 inch apart.
      6. Bake for 21-23 minutes, or until the tops and edges are golden brown.
      7. Let cool on the pans for a few minutes, then transfer to a wire rack to cool completely.
      8. If dipping the coconut macaroons in chocolate, place the chocolate melting wafers in a microwave safe bowl and heat on high for 1 minute. Stir until the chocolate has completely melted and is smooth. Dip the bottoms of the cookies into the chocolate and place on parchment or wax paper to set. The melted chocolate can also be put in a ziploc baggie with the corner cut off for easily drizzling.

    Recommended Products

    As an Amazon Associate and member of other affiliate programs, I earn from qualifying purchases.

    • Dark Chocolate Melting Wafers
      Dark Chocolate Melting Wafers
    • Parchment Paper
      Parchment Paper
    • Rimmed Baking Sheet
      Rimmed Baking Sheet

    Nutrition Information:

    Yield:

    40

    Serving Size:

    1

    Amount Per Serving: Calories: 41Total Fat: 2gSaturated Fat: 1gTrans Fat: 0gUnsaturated Fat: 1gCholesterol: 1mgSodium: 22mgCarbohydrates: 5gFiber: 1gSugar: 4gProtein: 1g

    Did you make this recipe?

    Tag me in your Instagram photo - @fakeginger

    © Amanda Livesay
    Category: cookie

    Banana Nut Bread

    Feb 07, 2022

    The best way to use ripe bananas! Classic Banana Nut Bread is moist, delicious and full of chopped nuts.

    Love banana bread? Try PB&J Banana Bread and Cream Cheese Banana Bread!

    Slices of banana nut bread

    Banana nut bread is probably the thing I make most often. It seems like we constantly buy too many bananas and banana bread is the easiest way to use them up. If you were to look in my freezer right now, I guarantee there’s at least one loaf of banana bread.

    This recipe makes the most delicious, moist banana bread! Plus it has nuts throughout and nuts on top which add the best crunch.

    3 slices of banana nut bread stacked

    Ingredients

    • Ripe bananas – you want to use very ripe bananas, they should have brown spots on the peel
    • Granulated white sugar
    • Unsalted butter
    • Eggs
    • Plain yogurt – you can use buttermilk instead
    • Vanilla extract
    • All-purpose flour
    • Baking powder
    • Baking soda
    • Salt
    • Nuts – you can use walnuts, pecans or any other nut you like
    How to make banana nut bread

    Instructions

    • Prepare. Preheat the oven to 350 F. Line a 9×5-inch loaf pan with parchment paper or spray with baking spray.
    • Mash bananas. Mash the bananas in a large mixing bowl until smooth. Few chunks here and there is fine.
    • Combine wet ingredients. Add sugar, butter, eggs one at a time and using a handheld mixer whisk on low until combined. Beat in yogurt and vanilla.
    • Combine dry ingredients. In a separate mixing bowl stir together flour, baking powder, baking soda, and salt.
    • Combine everything. Add the flour mixture to the banana mixture. Mix on low until everything combines.
    • Add nuts. Fold in walnuts.
    • Trasnfer to pan. Transfer to prepared pan. Top with more nuts as desired. Make a small cut lengthwise about ½ inch deep in the center of the bread.
    • Bake. Bake for 50-55 minutes until the toothpick inserted into the center comes out clean or with a few breadcrumbs.
    • Cool. Cool in pan for about 10 minutes and then invert onto a wire rack to cool completely.
    3 photos of banana bread in the baking process

    How Long Is It Good For?

    Banana bread is good for up to 5 days at room temperature. Make sure to store it in an airtight container.

    Can You Freeze It?

    You can freeze banana bread for up to 3 months. I recommend wrapping it tightly in plastic wrap and then placing it in a freezer ziploc bag.

    Let it defrost at room temperature for several hours before serving.

    Sliced banana nut bread

    Variations

    • Substitute half of the nuts for chocolate chips
    • Make muffins instead by using a muffin tin and baking for 20 – 22 minutes

    More Quick Bread Recipes

    • Meyer Lemon Zucchini Bread
    • Glazed Lemon Bread
    • Blueberry Orange Bread
    • Blueberry-Orange Bread
    • Lemon Raspberry Zucchini Bread

    Make sure you subscribe to my email list to get all my new recipes delivered right to your inbox!

    You can also follow me on Instagram, Facebook, or Pinterest for even more! 

    Overhead shot of sliced banana bread with nuts on top

    📖 Recipe

    Yield: 10 - 12 servings

    Banana Nut Bread

    Banana Nut Bread
    Prep Time 25 minutes
    Cook Time 50 minutes
    Total Time 1 hour 15 minutes

    Ingredients

    • 4-5 ripe bananas (2 cups mashed)
    • ½ cup granulated white sugar
    • ½ cup unsalted butter, melted and cooled
    • 2 large eggs
    • 2 tablespoons plain yogurt, such as greek yogurt (or sub with buttermilk)
    • 1 teaspoon vanilla extract
    • 2 cups all purpose flour
    • 1 teaspoon baking powder
    • 1 teaspoon baking soda
    • ½ teaspoon salt
    • ¾ cups walnuts or pecans

    Instructions

      1. Preheat the oven to 350 F. Line a 9x5-inch loaf pan with parchment paper or spray with baking spray.
      2. Mash the bananas in a large mixing bowl until smooth. Few chunks here and there is fine.
      3. Add sugar, butter, eggs one at a time and using a handheld mixer whisk on low until combined. Beat in yogurt and vanilla.
      4. In a separate mixing bowl stir together flour, baking powder, baking soda, and salt.
      5. Add the flour mixture to the banana mixture. Mix on low until everything combines.
      6. Fold in walnuts.
      7. Transfer to prepared pan. Top with more nuts as desired. Make a small cut lengthwise about ½ inch deep in the center of the bread.
      8. Bake for 50-55 minutes until the toothpick inserted into the center comes out clean or with a few breadcrumbs.
      9. Cool in pan for about 10 minutes and then invert onto a wire rack to cool completely.

    Recommended Products

    As an Amazon Associate and member of other affiliate programs, I earn from qualifying purchases.

    • Parchment Paper
      Parchment Paper
    • Loaf Pan
      Loaf Pan

    Nutrition Information:

    Yield:

    10

    Serving Size:

    1

    Amount Per Serving: Calories: 361Total Fat: 17gSaturated Fat: 7gTrans Fat: 0gUnsaturated Fat: 9gCholesterol: 63mgSodium: 313mgCarbohydrates: 45gFiber: 3gSugar: 18gProtein: 8g

    Did you make this recipe?

    Tag me in your Instagram photo - @fakeginger

    © Amanda Livesay
    Category: breads

    Buffalo Chicken Dip

    Jan 31, 2022

    Classic Buffalo Chicken Dip is a must make for all your parties! It’s creamy, cheesy, and spicy – everyone is going to love it.

    If you love spicy dips, try Jalapeno Popper Dip and Avocado Salsa!

    A tortilla chip being dipped in a bowl of buffalo chicken dip.

    Originally published February 3, 2012. Updated January 31, 2022.

    This is my forever favorite party snack. I’ve made it twice in the last month for all the playoff games and the second time, I had to double it because it just goes that quickly.

    It is the easiest, 5 ingredient recipe and I’ve never met anyone who doesn’t like it. It’s full of chicken and cheese and lots of spice! It’s also easily adjustable if your family doesn’t love a lot of spice.

    If you want to make it in the instant pot, try my Instant Pot Buffalo Chicken Dip!

    Overhead shot of buffalo chicken dip with a plate of celery and carrot sticks and a bowl of tortilla chips

    Ingredients

    • Cream cheese – no need to bring it to room temperature because it’s going to be melted.
    • Ranch dressing
    • Frank’s Red Hot Sauce – you can use your favorite buffalo sauce.
    • Cooked chicken – this is a great use of a rotisserie chicken.
    • Cheddar jack cheese – you can use all cheddar or all monterey jack if you prefer.

    Instructions

    • Melt cream cheese. Put cream cheese in a small saucepan over low heat. Stir until melted completely.
    • Add remaining ingredients. Stir in ranch dressing, Frank’s Red Hot, and chicken.
    • Top with cheese. Transfer to 2-quart baking dish. Sprinkle with cheese.
    • Bake and serve. Bake at 350F until bubbly, about 15 minutes.
    How to make buffalo chicken dip

    What To Serve With Buffalo Chicken Dip

    • Tortilla chips
    • Carrot sticks
    • Pita chips
    • Celery sticks
    • Crackers

    How Long Is It Good For?

    Buffalo chicken dip will be fine in the fridge for 3 days. Make sure to store it in an airtight container.

    You can reheat it in the microwave when you are ready to serve it.

    Celery stick dipped in buffalo chicken dip

    Can You Freeze It?

    You can freeze Buffalo Chicken dip for up to 3 months. Make sure use an airtight freezer-safe container.

    When you are ready to serve it, let it defrost overnight in the fridge and then transfer to your baking dish and bake as instructed. It may need a few extra minutes of baking time – just watch for the bubbly cheese.

    Bowl of buffalo chicken dip with celery, carrots, and tortilla chips

    More Dip Recipes

    • Creamy Jalapeño Dip
    • Chicken Burrito Dip
    • Dill Pickle Dip
    • Cheesy Sausage and Spinach Dip
    • Muffuletta Dip
    • Crawfish Dip
    • French Onion Dip

    Make sure you subscribe to my email list to get all my new recipes delivered right to your inbox!

    You can also follow me on Instagram, Facebook, or Pinterest for even more! 

    📖 Recipe

    Yield: about 8 servings

    Buffalo Chicken Dip

    Buffalo Chicken Dip

    Classic Buffalo Chicken Dip is a must make for all your parties! It's creamy, cheesy, and spicy - everyone is going to love it.

    Prep Time 15 minutes
    Cook Time 15 minutes
    Total Time 30 minutes

    Ingredients

    • 1 (8-ounce) block cream cheese
    • ½ cup ranch dressing
    • ½ cup Frank's Red Hot Sauce (use less or more depending on your preference)
    • 2 cups cooked chicken, diced or shredded
    • 1 cup cheddar jack cheese

    Instructions

    1. Preheat oven to 350F.
    1. Put cream cheese in a small saucepan over low heat. Stir until melted completely.
    2. Stir in ranch dressing, Frank's Red Hot, and chicken.
    3. Transfer to 2-quart baking dish. Top with cheese.
    4. Bake until bubbly, about 15 - 20 minutes.

    Recommended Products

    As an Amazon Associate and member of other affiliate programs, I earn from qualifying purchases.

    • Rubber Spatulas
      Rubber Spatulas
    • My Favorite Skillet
      My Favorite Skillet
    • 2 Quart Baking Dish
      2 Quart Baking Dish

    Nutrition Information:

    Yield:

    8

    Serving Size:

    1

    Amount Per Serving: Calories: 212Total Fat: 17gSaturated Fat: 6gTrans Fat: 0gUnsaturated Fat: 10gCholesterol: 53mgSodium: 639mgCarbohydrates: 2gFiber: 0gSugar: 1gProtein: 12g

    Did you make this recipe?

    Tag me in your Instagram photo - @fakeginger

    © Amanda Livesay
    Cuisine: American / Category: appetizer

    Hawaiian Macaroni Salad

    Jan 18, 2022

    The most delicious side dish! Hawaiian Macaroni Salad has macaroni noodles, grated carrots, onions, and a creamy dressing. It’s tangy and sweet and delicious!

    Hawaiian Mac Salad in a white bowl

    I got really into a Hawaiian place near our old house several years ago. So much so that after we loaded up the moving truck, our final stop before moving an hour away was to get one last loco moco plate with Hawaiian macaroni salad.

    Traditional Hawaiian mac salad is really so simple but has so much flavors. It’s elbow macaroni that gets tossed with apple cider vinegar (so it soaks up all that tanginess), finely grated carrots and white onions, and it’s all tossed in a creamy dressing.

    You’re going to want to make this for all your BBQs this spring and summer! Or, you know, just a regular ol’ dinner side dish in the middle of January. Either way!

    Overhead photo of Hawaiian macaroni salad with grated carrots

    Ingredients

    • Elbow macaroni – you can use any small pasta shape but elbow macaroni is the traditional one used.
    • Apple cider vinegar – this gives the dressing it’s signature tang.
    • Mayonnaise – this is what makes the dressing creamy and delicious.
    • Milk
    • Granulated sugar – it isn’t going to be overly sweet but it does need a bit of sweetness
    • Carrots – you are going to finely shred these. They add a fun texture and a tiny bit of sweetness to the salad.
    • White onion – the sharp onion really cuts through the sweetness. Plus, it gives a fun texture.

    How To Make Hawaiian Macaroni Salad

    • Cook pasta. Cook pasta, strain, and return to pot. Toss with apple cider vinegar. Let cool for about 10 minutes
    • Make sauce. While pasta cools, whisk together mayonnaise, milk, and granulated sugar until smooth. Stir in grated carrots and onion. Season to taste with salt and pepper.
    • Combine. Pour sauce over the slightly cooled pasta and toss to make sure everything is coated.
    • Chill and serve. Refrigerate at least an hour before serving. Add more milk as necessary, only a splash at a time.
    How to make Hawaiian Mac Salad

    How Long Is It Good For?

    Hawaiian Macaroni Salad will be fine in the fridge for up to 5 days. Make sure to store it in an airtight containers – these are my favorite containers.

    It will get a little thick in the fridge so I like to add a tablespoon or so of milk to it and give it a good stir before serving.

    What To Serve With It?

    I like to serve this Hawaiian Mac Salad with Slow Cooker Huli Huli Chicken, Hawaiian BBQ Ribs, and Hawaiian Sloppy Joes.

    Can You Freeze It?

    I don’t recommend trying to freeze this macaroni salad.

    Can You Make It Ahead?

    It needs to be made an hour ahead of time but it can be made up to 6 hours ahead. Just cover and chill until you are ready to serve it.

    Close up shot of Hawaiian Macaroni Salad; macaroni noodles with grated carrots in a creamy dressing

    More Pasta Salad Recipes

    • Broccoli Grape Pasta Salad
    • Caesar Pasta Salad
    • Cole Slaw Pasta Salad
    • Pepperoni Pizza Pasta Salad
    • Broccoli Pasta Salad

    Make sure you subscribe to my email list to get all my new recipes delivered right to your inbox!

    You can also follow me on Instagram, Facebook, or Pinterest for even more! 

    📖 Recipe

    Yield: 10 - 12 servings

    Hawaiian Macaroni Salad

    Hawaiian Macaroni Salad

    The most delicious side dish! Hawaiian Macaroni Salad has macaroni noodles, grated carrots, onions, and a creamy dressing. It's tangy and sweet and delicious!

    Prep Time 15 minutes
    Cook Time 20 minutes
    Total Time 35 minutes

    Ingredients

    • 1 pound elbow macaroni
    • 2 tablespoons apple cider vinegar
    • 2 cups mayonnaise
    • ½ cup milk
    • 2 teaspoons granulated sugar
    • 2 large carrots, grated
    • ¼ cup white onion, grated
    • salt and pepper

    Instructions

    1. Cook elbow macaroni according to package instructions. Once cooked, drain and return to pot. Toss with apple cider vinegar. Let cool for about 10 minutes
    2. While pasta cools, whisk together mayonnaise, milk, and granulated sugar until smooth.
    3. Stir in grated carrots and onion.
    4. Season to taste with salt and pepper.
    5. Pour sauce over the slightly cooled pasta and toss to make sure everything is coated.
    6. Refrigerate at least an hour before serving. Add more milk as necessary, only a splash at a time.

    Recommended Products

    As an Amazon Associate and member of other affiliate programs, I earn from qualifying purchases.

    • Rubber Spatulas
      Rubber Spatulas
    • Mixing Bowls with Lids
      Mixing Bowls with Lids
    • My Favorite Food Processor
      My Favorite Food Processor
    • Clip On Pasta Strainer
      Clip On Pasta Strainer

    Nutrition Information:

    Yield:

    10

    Serving Size:

    1

    Amount Per Serving: Calories: 389Total Fat: 34gSaturated Fat: 5gTrans Fat: 0gUnsaturated Fat: 27gCholesterol: 19mgSodium: 321mgCarbohydrates: 18gFiber: 1gSugar: 3gProtein: 4g

    Did you make this recipe?

    Tag me in your Instagram photo - @fakeginger

    © Amanda Livesay
    Cuisine: American / Category: Sides

    Slow Cooker Huli Huli Chicken

    Jan 17, 2022

    A Hawaiian classic made in the crockpot! Slow Cooker Huli Huli Chicken is cooked in a sweet and sour pineapple sauce and is so tender and delicious!

    Serve this chicken with traditional Hawaiian Macaroni Salad!

    Chicken drumsticks with a sweet and sour sauce and green onions on top

    Originally published January 7, 2014. Updated January 17, 2022.

    Huli Huli Chicken is a Hawaiian chicken dish that’s typically made over a fire but this version is super simple in the slow cooker.

    And then because slow cooked chicken can look kind of pale, you finish it off in the oven, brushing it with the delicious sweet and sour sauce.

    Oh, the sauce! The sauce is made from pineapple juice, brown sugar, ketchup, lime juice, soy sauce, garlic, and ginger. It is sweet and sour and one of my favorite ways to enjoy chicken.

    Use whatever parts of the chicken you want – the recipe calls for bone-in chicken because chicken on the bone tends to stay more moist and juicy but if you absolutely opposed to bone-in chicken, go ahead and the boneless stuff.

    Huli hulu chicken drumsticks on parchment paper

    Ingredients

    • Pineapple juice – you can’t make huli huli chicken without pineapple juice! It adds a sweetness and a tang.
    • Brown sugar – for just a tiny bit of sweetness.
    • Ketchup – ketchup adds flavor and sweetness to the sauce. And gives it a nice color.
    • Fresh lime juice
    • Soy sauce – you can use coconut aminos if you are gluten free.
    • Garlic
    • Fresh ginger – ground ginger is fine if you don’t have fresh.
    • Bone-in, skin-on chicken – you can use thighs, breasts, or drumsticks, whichever you prefer.
    how to make slow cooker huli huli chicken

    How to Make Slow Cooker Huli Huli Chicken

    • Make sauce. Simmer pineapple juice, brown sugar, ketchup, lime juice, soy sauce, garlic, and ginger in a medium saucepan until thickened and measures about 1 ½ cups, about 10 minutes. Season with salt and pepper to taste.
    • Cook chicken. Transfer ½ cup of the sauce to the slow cooker; reserve remaining sauce separately. Season chicken with salt and pepper, add to slow cooker, and coat evenly with sauce. Cover and cook until chicken is tender, 4 to 6 hours on low.
    • Bake chicken. Preheat oven to 450F. Transfer chicken, skin side up, to an aluminum foil lined baking sheet; discard braising liquid. Brush chicken with some reserved sauce and baking, brushing with more sauce every few minutes, until it has a deep, mahogany color, 20 to 30 minutes.
    • Serve. Serve hot.
    overhead photo of huli huli chicken drumsticks on parchment paper

    How Long It It Good For

    Huli Huli Chicken will be good for up to 3 days in the fridge. Make sure to store it in an airtight container.

    When you are ready to serve it, you can reheat in the microwave or in the oven.

    Can You Freeze It?

    You can freeze huli huli chicken for up to 3 months. I recommend using a freezer ziploc bag.

    When you are ready to serve them, let them defrost overnight in the fridge. You can reheat in the microwave or oven.

    Huli huli chicken drumsticks with green onions on top

    More Slow Cooker Chicken Recipes

    • Slow Cooker Cool Ranch Chicken 
    • Slow Cooker Honey Sesame Chicken
    • Slow Cooker Cheesy Chicken and Rice
    • Slow Cooker Chicken Teriyaki
    • Slow Cooker White Chicken Chili
    • Slow Cooker Orange Chicken

    Make sure you subscribe to my email list to get all my new recipes delivered right to your inbox!

    You can also follow me on Instagram, Facebook, or Pinterest for even more! 

    📖 Recipe

    Yield: 8 servings

    Slow Cooker Huli Huli Chicken

    Slow Cooker Huli Huli Chicken

    A Hawaiian classic made in the crockpot! Slow Cooker Huli Huli Chicken is cooked in a sweet and sour pineapple sauce and is so tender and delicious!

    Prep Time 20 minutes
    Cook Time 6 hours
    Total Time 6 hours 20 minutes

    Ingredients

    • ⅔ cup pineapple juice
    • ½ cup packed brown sugar
    • ½ cup ketchup
    • ¼ cup fresh lime juice, about 2 limes
    • ¼ cup soy sauce
    • 6 garlic cloves, minced
    • 2 tablespoons fresh ginger, grated or minced
    • salt and pepper
    • vegetable oil spray
    • 4 pounds bone-in, skin-on chicken (breasts, thighs, and/or drumsticks)

    Instructions

    1. Simmer pineapple juice, brown sugar, ketchup, lime juice, soy sauce, garlic, and ginger in a medium saucepan until thickened and measures about 1 ½ cups, about 10 minutes. Season with salt and pepper to taste.
    2. Spray slow cooker with vegetable oil spray. Transfer ½ cup of the sauce to the slow cooker; reserve remaining sauce separately. Season chicken with salt and pepper, add to slow cooker, and coat evenly with sauce. Cover and cook until chicken is tender, 4 to 6 hours on low.
    3. Preheat oven to 450F. Transfer chicken, skin side up, to an aluminum foil lined baking sheet; discard braising liquid.
    4. Brush chicken with some reserved sauce and baking, brushing with more sauce every few minutes, until it has a deep, mahogany color, 20 to 30 minutes. Serve hot.

    Recommended Products

    As an Amazon Associate and member of other affiliate programs, I earn from qualifying purchases.

    • Pastry Brush
      Pastry Brush
    • Programmable Slow Cooker
      Programmable Slow Cooker
    • Rimmed Baking Sheet
      Rimmed Baking Sheet

    Nutrition Information:

    Yield:

    8

    Serving Size:

    1

    Amount Per Serving: Calories: 225Total Fat: 9gSaturated Fat: 2gTrans Fat: 0gUnsaturated Fat: 6gCholesterol: 53mgSodium: 656mgCarbohydrates: 22gFiber: 1gSugar: 17gProtein: 15g

    Did you make this recipe?

    Tag me in your Instagram photo - @fakeginger

    © Amanda Livesay
    Cuisine: American / Category: slow cooker

    Pistachio Marshmallow Salad

    Jan 12, 2022

    Pistachio Marshmallow Salad is a light and fluffy fruit salad made with Cool Whip, pistachio pudding, pineapple, and marshmallows. It’s the BEST fruit salad!

    If you want a fruit salad without pistachio, try Marshmallow Fruit Salad or Banana Split Fluff!

    Pistachio marshmallow salad with chopped pistachios on top

    Okay, we’re using the word “salad” very loosely here. 

    My kids love stuff like this. What kid wouldn’t love a fruit salad full of marshmallows?! 

    And I love it because it’s so easy. You just stir everything together and let it sit for a couple hours in the fridge. So it’s great for a party or holiday where you know you’ll be really busy preparing a million other things. 

    Watergate salad with chopped pistachios on top

    What Is Pistachio Marshmallow Salad?

    Pistachio marshmallow salad is a fruit salad that’s sometimes referred to as pistachio fluff because it turns out so airy and fluffy. It’s also sometimes called Watergate Salad.

    It’s a delicious dessert or a fun side dish option. It’s also great for potlucks and holidays!

    Ingredients

    • Cool Whip – make sure to let it the Cool Whip defrost completely before starting the recipe
    • Instant pistachio pudding mix
    • Pineapple tidbits – these are the tiny bits of pineapples
    • Miniature marshmallows
    • Green food coloring – you can leave this out if you want. I just like a really bright green pistachio color
    • Pistachios – they add the best crunch and a tiny bit of saltiness to the fruit salad

    Directions

    • Combine. Fold together Cool Whip, pistachio pudding mix, pineapple tidbits, miniature marshmallows, and green food coloring until well combined
    • Chill. Cover and refrigerate for at least 2 hours
    • Serve! Sprinkle with chopped pistachios before serving, if desired
    Ingredients for Pistachio Marshmallow Salad

    Can You Make Marshmallow Salad Ahead?

    Pistachio marshmallow salad needs to be made 2 hours ahead in order for the pudding to set and for it to become fluffy. I don’t recommend making it more than 8 hours before you plan to serve it. 

    How Long Is Marshmallow Salad Good For?

    Marshmallow fruit salad is best served the day it’s prepared but it will stay good in the fridge for several days. The Cool Whip may start to deflate and be less fluffy the longer it sits but it will still be delicious.

    Can You Freeze It?

    I don’t recommend trying to freeze Pistachio Marshmallow Salad.

    Ingredients for Watergate Salad. Pistachio pudding, pineapple, cool whip, and marshmallows

    More Fruit Salad Recipes

    • Pineapple Fluff Salad
    • Tropical Marshmallow Fruit Salad
    • Summer Fruit Salad
    • Grape Salad

    Make sure you subscribe to my email list to get all my new recipes delivered right to your inbox!

    You can also follow me on Instagram, Facebook, or Pinterest for even more! 

    Pistachio Marshmallow Salad in a white bowl with pistachios on top

    📖 Recipe

    Yield: about 12 servings

    Pistachio Marshmallow Salad

    Pistachio Marshmallow Salad

    Pistachio Marshmallow Salad is a light and fluffy fruit salad made with Cool Whip, pistachio pudding, pineapple, and marshmallows. It's the BEST fruit salad!

    Prep Time 10 minutes
    Total Time 10 minutes

    Ingredients

    • 1 (16 ounce) container Cool Whip
    • 1 (3.4 ounce) box instant pistachio pudding mix
    • 1 (20 ounce) can pineapple tidbits, drained
    • 3 cups mini marshmallows
    • 5 drops green food coloring, optional
    • pistachios, for topping

    Instructions

    1. In a large mixing bowl, fold together Cool Whip, pudding mix, drained pineapple tidbits, mini marshmallows, and food coloring (if using) until well combined.
    2. Cover and refrigerate for at least 2 hours.
    3. When ready to serve, sprinkle to pistachios, if desired.

    Recommended Products

    As an Amazon Associate and member of other affiliate programs, I earn from qualifying purchases.

    • Rubber Spatulas
      Rubber Spatulas
    • Mixing Bowls with Lids
      Mixing Bowls with Lids
    • Pistachio Pudding Mix
      Pistachio Pudding Mix

    Nutrition Information:

    Yield:

    12

    Serving Size:

    1

    Amount Per Serving: Calories: 58Total Fat: 1gSaturated Fat: 0gTrans Fat: 0gUnsaturated Fat: 0gCholesterol: 0mgSodium: 24mgCarbohydrates: 13gFiber: 0gSugar: 10gProtein: 0g

    Did you make this recipe?

    Tag me in your Instagram photo - @fakeginger

    © Amanda Livesay
    Cuisine: American / Category: salad

    Valentine’s Day Pretzel Hugs

    Jan 11, 2022

    Valentine’s Day Pretzel Hugs are a delicious sweet and salty treat and so easy to make! Perfect for a Valentine’s Day party or a homemade gift for your Valentine.

    Need more Valentine’s Day ideas? Try Cupid’s Crunch or Pink Velvet Funfetti Cupcakes!

    Square pretzels topped with Hershey's hugs and an M&Ms; pink and red for Valentine's Day

    How cute are these Valentine’s Day Pretzel Hugs?! I’m obsessed.

    I love a sweet and salty treat to begin with but these are made with the best candy ever, Hershey’s Hugs! And they get topped with a Valentine’s Day M&M!

    They’re cute, delicious, and so easy to make! Definitely perfect for a class party or to put in cute Valentine’s Day bags and deliver to all your friends.

    Overhead shot of square pretzels with Hershey's Hugs and M&Ms on top

    Why You Are Going To Love This Recipe

    • Sweet and salty is the best combination!
    • They are SO EASY! You can make the entire batch in about 15 minutes.
    • Change up the colors for different holidays. Do red and green M&Ms for Christmas, pastels for Easter, etc.

    Ingredients

    • Square pretzels – also called Snaps or Butter Snaps. You can find them in any grocery store with the rest of the pretzels
    • Hershey’s Hugs
    • M&Ms – grab a Valentine’s Day mix to be festive!
    How to make pretzel hugs. Square pretzels with Hershey's Hugs on top

    How To Make Pretzel Hugs

    • Prepare. Preheat oven to 200F. Line a baking sheet with parchment paper.
    • Assemble. Lay pretzels out on baking sheet. Top each pretzel with an unwrapped Hershey’s Hugs candy.
    • Bake. Bake for about 5 minutes, until the candies just begin to melt.
    • Top with M&Ms. Remove the pretzels from oven and gently press an M&M on top of each Hershey’s Hug.
    • Let set. Let the chocolate set completely before you serve and store.
    Valentine's Day Pretzel Hugs on parchment paper

    How Long Are They Good For?

    These will be good for several weeks in the fridge. Make sure to store them in an airtight container.

    You can serve them straight from the fridge or let them sit at room temperature for a few minutes to take the chill off. They are delicious either way!

    Variations

    • If you can’t find the square pretzels, use the regular pretzel shape or even the round ones.
    • You can use Hershey’s Kisses if you prefer milk chocolate.
    • I used milk chocolate M&Ms but you can use peanut, dark chocolate, white chocolate, whatever flavor you like. You can even use Reese’s Pieces if you want to add some peanut butter flavor!
    Valentine's Day pretzel hugs in a Valentine's Day cup

    More Sweet and Salty Recipes

    • Peanut Butter Pretzel Brownies
    • Sweet and Salty Pudding Cookies
    • White Chocolate Peanut Butter Ritz Crackers
    • Crockpot Candy
    • Valentine’s Day Cake Pops

    Make sure you subscribe to my email list to get all my new recipes delivered right to your inbox!

    You can also follow me on Instagram, Facebook, or Pinterest for even more! 

    Overhead shot of Valentine's Day pretzel hugs with red and pink heart sprinkles

    📖 Recipe

    Yield: 40 pretzels

    Valentine's Day Pretzel Hugs

    Valentine's Day Pretzel Hugs

    Valentine's Day Pretzel Hugs are a delicious sweet and salty treat and so easy to make! Perfect for a Valentine's Day party or a homemade gift for your Valentine.

    Prep Time 10 minutes
    Cook Time 5 minutes 4 seconds
    Total Time 15 minutes 4 seconds

    Ingredients

    • 40 square (Snaps) pretzels
    • 40 Hershey's Hugs, unwrapped
    • 40 Valentine's Day M&Ms

    Instructions

    1. Preheat oven to 200F. Line a baking sheet with parchment paper.
    2. Lay out pretzels on baking sheet.
    3. Top each pretzel with a Hershey's Hugs candy.
    4. Bake in preheated oven for about 5 minutes. You want the hugs to just begin to lose their shape but not melt.
    5. Remove from oven and immediately press an M&M on top of each Hugs candy.
    6. Let set completely before serving and storing.

    Recommended Products

    As an Amazon Associate and member of other affiliate programs, I earn from qualifying purchases.

    • Valentine's M&Ms
      Valentine's M&Ms
    • Hershey's Hugs and Kisses
      Hershey's Hugs and Kisses
    • Square Pretzels
      Square Pretzels
    • Parchment Paper
      Parchment Paper
    • Rimmed Baking Sheet
      Rimmed Baking Sheet

    Nutrition Information:

    Yield:

    40

    Serving Size:

    1

    Amount Per Serving: Calories: 472Total Fat: 23gSaturated Fat: 14gTrans Fat: 0gUnsaturated Fat: 7gCholesterol: 17mgSodium: 64mgCarbohydrates: 60gFiber: 3gSugar: 53gProtein: 5g

    Did you make this recipe?

    Tag me in your Instagram photo - @fakeginger

    © Amanda Livesay
    Cuisine: American / Category: holiday

    Pink Velvet Funfetti Cupcakes

    Jan 04, 2022

    The cutest Valentine’s Day cupcakes! Pink Velvet Funfetti Cupcakes start with a cake mix but taste like something from your favorite bakery. Plus, they are topped with whipped buttercream frosting and lots of sprinkles.

    I know I say every holiday is my favorite but Valentine’s Day is for sure my favorite. An excuse to make pink cupcakes?! And then cover them in pink sprinkles?!

    What’s not to love?

    Need more Valentine’s treats? Try Valentine’s Chex Mix or Valentine’s Day Pudding Cookies.

    Why You’re Going to Love This Recipe

    • Cake mix! That’s number one. It makes this recipe so quick and easy.
    • Pink cupcakes are perfect for Valentine’s Day and other occasions, like a baby shower, birthday party, or Easter! Who doesn’t love funfetti cupcakes, especially when they’re pink?!
    • The pink velvet cake is so moist and delicious – these cupcakes really do taste like a fancy bakery cupcake.

    Ingredients for Pink Velvet Cupcakes

    Keep scrolling for ingredient amounts!

    • White cake mix – make sure it’s a white cake mix and not yellow
    • All-purpose flour
    • Granulated sugar
    • Salt
    • Sour cream – don’t worry, your cupcakes won’t taste like sour cream, the sour cream makes them really moist and delicious
    • Egg whites – using egg whites instead of whole eggs makes the cupcakes light and fluffy
    • Vegetable oil – you can use canola oil or coconut oil if you prefer.
    • Vanilla extract
    • Pink food coloring
    • Valentine’s Day sprinkles – you can order them online if you can’t find any around you.
    Process shots for red velvet funfetti cupcakes

    How To Make Pink Velvet Funfetti Cupcakes

    • Prepare. Preheat oven to 325 degrees. Line cupcake pans with cupcake liners
    • Combine dry ingredients. Whisk together, cake mix, all-purpose flour, granulated sugar, and salt
    • Add wet ingredients. Add in water, sour cream, egg whites, vegetable oil, and vanilla extract. Mix until everything has been combined
    • Add the color. Add 3 drops of pink food gel coloring to the cupcake batter, and mix.
    • And sprinkles! Stir in sprinkles to the batter.
    • Divide into muffin cups. Pour or spoon batter into the lined cupcake pan. Make sure to only fill about ⅔ of the cupcake liner, since the batter will rise a bit.
    • Bake and cool. Bake in preheated oven for 22 minutes or until the center is baked. Remove from oven and allow to cool on a cooling rack.

    Ingredients for Whipped Buttercream

    • Unsalted butter
    • Shortening – you can use all butter if you don’t like to use shortening. Just use an equal amount of butter
    • Milk
    • Clear vanilla extract – you want to use clear so the vanilla doesn’t tint the frosting
    • Confectioners sugar

    How To Make Buttercream Whipped Frosting

    • Combine wet ingredients. Beat together butter and shortening until smooth and creamy, about 3 minutes. Add in milk and vanilla extract.
    • Add sugar. Add in confectioners sugar a little at a time.
    • Adjust. If frosting is too thick you can add 1 teaspoon of milk until you have reached the texture you are looking for.
    • Keep mixing to whip frosting. Mix frosting for another 3 minutes.

    How Long Are They Good For?

    These cupcakes are good for up to 3 days. Make sure to store them in an airtight container.

    Storing them in the refrigerator will get you another day or 2 but it will also dry them out. I definitely recommend you bring them to room temperature before serving them.

    What Piping Tip For Cupcakes

    If you want that bakery cupcake look at home, I recommend 2A, 1M, 6B, and 2D. I love this piping tip set for cupcakes.

    Where To Find Valentine’s Sprinkles

    I find most of my holiday sprinkles at Walmart or Target in their holiday section. You can also find them at craft stores like Michael’s, Hobby Lobby, or Jo-Ann’s Fabrics.

    More Cupcake Recipes

    • Red Velvet Cupcakes
    • Peanut Butter Cupcakes with Chocolate Buttercream
    • Pumpkin Spice Cupcakes
    • Cinnamon Toast Crunch Cupcakes
    • Vanilla Bean Cupcakes

    Make sure you subscribe to my email list to get all my new recipes delivered right to your inbox!

    You can also follow me on Instagram, Facebook, or Pinterest for even more! 

    📖 Recipe

    Yield: 24 cupcakes

    Pink Velvet Funfetti Cupcakes

    Pink Velvet Funfetti Cupcakes

    The cutest Valentine's Day cupcakes! Pink Velvet Funfetti Cupcakes start with a cake mix but taste like something from your favorite bakery. Plus, they are topped with whipped buttercream frosting and lots of sprinkles.

    Cook Time 25 minutes
    Additional Time 2 minutes
    Total Time 27 minutes

    Ingredients

    • 1 white cake mix
    • 1 cup all-purpose flour
    • 1 cup granulated sugar
    • ½ teaspoon salt
    • 1 ⅓ cup water
    • 1 cup sour cream
    • 4 egg whites, room temperature
    • 2 tablespoons vegetable oil
    • 1 teaspoon vanilla extract
    • 3-4 drops pink food gel coloring
    • ½ cup pink and purple sprinkles

    Buttercream whipped frosting

    • 1 cup or 2 sticks unsalted butter
    • ¾ cup shortening
    • 5 tablespoons milk
    • 2 teaspoon clear vanilla extract
    • 4 cups confectioners sugar

    Toppings (optional)

    • Sprinkles
    • Candy hearts

    Instructions

      1. Preheat oven to 325 degrees. Line cupcake pans with cupcake liners and set it aside.
      2. In a large mixing bowl whisk together, cake mix, all-purpose flour, granulated sugar, and salt.
      3. With an electric hand mixer or a kitchen aid mix dry ingredients on low.
      4. Slowly, add in water, sour cream, egg whites, vegetable oil, and vanilla extract. Mix until everything has been combined.
      5. Add 3 drops of pink food gel coloring to the cupcake batter, and mix.
      6. Stir in sprinkles to the batter.
      7. Pour or spoon batter into the lined cupcake pan. Make sure to only fill about ⅔ of the cupcake
      liner, since the batter will rise a bit.
      8. Bake in preheated oven for 22 minutes or until the center is baked.
      9. Remove from oven and allow to cool on a cooling rack.
      10. While cupcakes are cooling, prepare the frosting.
      11. With an electric hand mixer or a kitchen aid, mix together butter and shortening until smooth
      and creamy, about 3 minutes.
      12. Add in milk and vanilla extract.
      13. Slowly, add in confectioners sugar a little at a time. If frosting is too thick you can add 1 teaspoon of milk until you have reached the texture you are looking for. Mix frosting for another 3 minutes.
      14. Add frosting to a piping bag and pipe cupcakes.
      15. Top with sprinkles or candy hearts.

    Recommended Products

    As an Amazon Associate and member of other affiliate programs, I earn from qualifying purchases.

    • Parchment Muffin Liners
      Parchment Muffin Liners
    • Valentine's Day Sprinkles
      Valentine's Day Sprinkles
    • Wilton Piping Tips 
      Wilton Piping Tips 
    • My Favorite Muffin Tin
      My Favorite Muffin Tin

    Nutrition Information:

    Yield:

    24

    Serving Size:

    1

    Amount Per Serving: Calories: 333Total Fat: 20gSaturated Fat: 9gTrans Fat: 0gUnsaturated Fat: 10gCholesterol: 30mgSodium: 70mgCarbohydrates: 38gFiber: 0gSugar: 32gProtein: 2g

    Did you make this recipe?

    Tag me in your Instagram photo - @fakeginger

    © Amanda Livesay
    Cuisine: American / Category: cake

    Sugar Cookie Dip

    Dec 13, 2021

    The most delicious dessert dip! Sugar Cookie Dip tastes just like a sugar cookie and only needs 4 ingredients. Dip fresh fruit, cookies, or crackers.

    Dessert dips are perfect for a holiday party! Other sweet dips I love are Hot Cocoa Dip and Creamy Caramel Apple Dip.

    Sugar cookie dip with sprinkles on top; vanilla wafers for dipping

    Sweet dips are my favorite easy dessert.

    Sugar Cookie Dip only calls for 4 ingredients and you just have to mix everything together! No baking, no stove, nothing.

    It’s so easy and so delicious! Perfect for a party or just a special after school snack.

    Plus you can change the sprinkles to match the holiday! Christmas sprinkles like I did here, pink for Valentine’s day, pastel for Easter, the options are endless!

    Overhead shot of sugar cookie dip with Christmas sprinkles on top

    Ingredients for Sugar Cookie Dip

    • Cream cheese – just a block of plain cream cheese. You can use low fat cream cheese if you prefer
    • Sugar cookie mix – I used the Betty Crocker sugar cookie mix, any dry sugar cookie mix will work
    • Cool Whip – you need to thaw it overnight so it is easy to fold into the dip
    • Sprinkles – I like jimmies (the shape of sprinkles) in this recipe but you can use any kind. I used these Christmas jimmies but rainbow jimmies would be cute if you aren’t making it for the holidays
    Process photos of making Sugar Cookie Dip

    How To Make Sugar Cookie Dip

    • Combine cream cheese and sugar cookie mix. In a large mixing bowl, use an electric mixer to beat together cream cheese and sugar cookie mix until well combined.
    • Fold in remaining ingredients. Use a rubber spatula to fold in Cool Whip and sprinkles. Try not to deflate the Cool Whip too much while folding.
    • Chill. Refrigerate until ready to serve.
    Process photos of making Sugar Cookie Dip

    What To Serve with Sugar Cookie Dip?

    For these photos, I used mini vanilla wafers. Some other ideas:

    • Fresh strawberries
    • Pretzels
    • Graham crackers
    • Sliced apples
    • Animal crackers

    How Long Is It Good For?

    Sugar cookie dip will be good for about 5 days in the refrigerator. Make sure to store it in an airtight container.

    It will firm up in the fridge so you may need to let it sit at room temperature for 10 minutes or so before serving.

    Can You Freeze It?

    I don’t recommend freezing sugar cookie dip. I think the texture would be completely different once frozen and defrosted.

    More No Bake Desserts

    • Almond Bark Drop Cookies
    • No Bake Peanut Butter Pie
    • Fluffy Cheesecake
    • Banana Pudding
    • Holly Crackles

    Make sure you subscribe to my email list to get all my new recipes delivered right to your inbox!

    You can also follow me on Instagram, Facebook, or Pinterest for even more! 

    📖 Recipe

    Yield: about 8 servings

    Sugar Cookie Dip

    Sugar Cookie Dip
    Prep Time 15 minutes
    Total Time 15 minutes

    Ingredients

    • 1 (8 ounce) block cream cheese, softened
    • 1 cup dry sugar cookie mix
    • 4 ounces Cool Whip, thawed
    • ¼ cup sprinkles, divided

    Instructions

    1. In a large mixing bowl, use an electric mixer to beat together cream cheese and sugar cookie mix until well combined.
    2. Use a rubber spatula to fold in Cool Whip and sprinkles. Try not to deflate the Cool Whip too much while folding.
    3. Refrigerate until ready to serve.

    Recommended Products

    As an Amazon Associate and member of other affiliate programs, I earn from qualifying purchases.

    • Sugar Cookie Mix
      Sugar Cookie Mix
    • Christmas Jimmies
      Christmas Jimmies
    • Electric Mixer
      Electric Mixer

    Nutrition Information:

    Yield:

    8

    Serving Size:

    1

    Amount Per Serving: Calories: 225Total Fat: 13gSaturated Fat: 6gTrans Fat: 0gUnsaturated Fat: 7gCholesterol: 13mgSodium: 118mgCarbohydrates: 26gFiber: 0gSugar: 18gProtein: 2g

    Did you make this recipe?

    Tag me in your Instagram photo - @fakeginger

    © Amanda Livesay
    Category: snack

    Sugar Cookie Truffles

    Dec 12, 2021

    No bake Sugar Cookie Truffles are such a cute holiday treat! Only 3 ingredients (plus sprinkles!) and they are so easy to make.

    I love no bake treats for the holidays! Some of my other favorites are Peppermint Oreo Balls and White Chocolate Peanut Butter Ritz Crackers.

    Inside of sugar cookie truffles

    No bake treats are a holiday staple in my house. Three kids, 4 dogs… I need easy treats that require minimal effort.

    And these Sugar Cookie Truffles are perfect. They take about 30 minutes, they only need 4 ingredients (one of them is sprinkles!), and everyone loves them.

    Plus they are great for little helpers since there’s lots of rolling and sprinkling.

    Sugar Cookie Truffles with Christmas sprinkles on top

    Ingredients

    • Sugar cookies – you can bake your own or buy some from your grocery store’s bakery section. If you bake your own, you want to make sure you give them plenty of time to cool completely.
    • Cream cheese
    • White almond bark – you can find this in the baking aisle of every large grocery store or order it online.
    • Sprinkles – sprinkles are totally optional but make them more fun! Change them up with the holidays if you want.
    Process shots of making Sugar Cookie Truffles

    Instructions

    • Prepare cookies. Crumble cookies into a large mixing bowl. I used my hands to crumble them but you can use a food processor if you prefer.
    • Make truffle mixture. Add cream cheese and use an electric mixer to combine.
    • Shape truffles. Roll into tablespoon-size balls and place on a baking sheet lined with parchment paper. Freeze for about 15 minutes.
    • Prepare chocolate. Melt almond bark in microwave in 30 second increments, stirring after each one, until melted and smooth.
    • Dip in chocolate. Working with one ball at a time, use a fork to dip them in the melted almond bark, letting excess chocolate drip back into bowl.
    • Add sprinkles. Place back on parchment paper and immediately add sprinkles to the top. The almond bark sets very quickly so you need to add the sprinkles pretty fast.
    • Finish all the truffles. Repeat with remaining balls.
    Process shots of making Sugar Cookie Truffles

    How Long Are They Good For?

    Sugar cookie truffles will be good in the fridge for up to a week. Make sure to store them in an airtight container.

    I think they are tasty right out of the fridge but if you want, you can let them sit at room temperature for 10 minutes or so before serving.

    Can You Freeze Them?

    You can freeze these truffles for up to a month. I would freeze them on a baking sheet for about an hour, until they are good and frozen and then transfer them to a freezer ziploc bag.

    When you are ready to serve them, let them sit in the fridge overnight.

    Sugar cookie truffles with Christmas sprinkles on top

    More Holiday Treat Recipes

    • Crockpot Candy
    • Cranberry Orange Cookies
    • Pistachio Thumbprint Cookies
    • White Chocolate Peppermint Chex
    • Almond Bark Drop Cookies
    • Candy Cane Blossoms

    Make sure you subscribe to my email list to get all my new recipes delivered right to your inbox!

    You can also follow me on Instagram, Facebook, or Pinterest for even more! 

    📖 Recipe

    Yield: about 18 truffles

    Sugar Cookie Truffles

    Sugar Cookie Truffles
    Prep Time 30 minutes
    Total Time 30 minutes

    Ingredients

    • 12 sugar cookies (cooled completely if freshly baked)
    • 2 ounces (¼ of a block) cream cheese, softened
    • 12 ounces white almond bark
    • sprinkles

    Instructions

    1. Crumble cookies into a large mixing bowl.
    2. Add cream cheese and use an electric mixer to combine. (If your sugar cookies were drier or larger than the ones I used, you may need an extra ounce of cream cheese.)
    3. Roll into tablespoon-size balls and place on a baking sheet lined with parchment paper. Freeze for about 15 minutes.
    4. Melt almond bark in microwave in 30 second increments, stirring after each one, until melted and smooth.
    5. Working with one ball at a time, use a fork to dip them in the melted almond bark, letting excess chocolate drip back into bowl.
    6. Place back on parchment paper and immediately add sprinkles to the top.
    7. Repeat with remaining balls.

    Recommended Products

    As an Amazon Associate and member of other affiliate programs, I earn from qualifying purchases.

    • Electric Mixer
      Electric Mixer
    • Christmas Sprinkles
      Christmas Sprinkles
    • Parchment Paper
      Parchment Paper

    Did you make this recipe?

    Tag me in your Instagram photo - @fakeginger

    © Amanda Livesay
    Category: cookie

    Hot Cocoa Dip

    Dec 05, 2021

    Rich and delicious Hot Cocoa Dip is made with only 4 ingredients! This easy, no bake dessert is going to be your new favorite sweet treat.

    Hot cocoa treats are so fun this time of year! If you love them too, you should try Frozen Hot Chocolate!

    Dessert dips have become my favorite thing to make when I need a delicious dessert quickly. They are so simple, you don’t need to bake anything, and who doesn’t love a sweet dip that you can eat with cookies?!

    This Hot Cocoa Dip has only 4 ingredients (plus sprinkles if you want something festive!) and is so easy to whip up whenever you need a last minute dessert.

    Everyone is going to love it!

    Ingredients

    • Cream cheese – make sure to bring it to room temperature before beginning the recipe.
    • Hot cocoa mix – look for the kind without the tiny marshmallow because you’re going to use an electric mixer
    • Cool Whip – you can use a lite or low fat version.
    • Marshmallow bits – these are the really tiny, dehydrated marshmallows, not the fluffy ones. Think Lucky Charms marshmallows! My Walmart has them but you can also order them online.
    • Sprinkles – totally optional but how festive do they look?! Switch it up for different holidays/celebrations!

    Instructions

    • Combine ingredients. Use an electric mixer to beat together cream cheese and hot cocoa mix.
    • Add Cool Whip. Use a rubber spatula to fold in Cool Whip without deflating it too much.
    • Top and serve. Transfer dip to the serving bowl and top with marshmallow bits and sprinkles.

    What To Serve With Hot Cocoa Dip

    I love this dip with graham crackers but you could use so many other things! Here are some ideas:

    • Animal crackers
    • Fresh strawberries
    • Apple slices
    • Vanilla wafers
    • Pretzels (this would make a great sweet and salty combination!)
    • Shortbread cookies
    • Grapes

    How Long Is It Good For?

    This dip will be good for up to 5 days in the refrigerator. Make sure to store it in an airtight container.

    It will become stiffer in the refrigerator so I would let it sit at room temperature for 10 minutes or so before serving it. And it may need fresh marshmallows on top!

    Can You Freeze It?

    I don’t recommend freezing this dip. I think the texture would change once frozen and defrosted.

    More Dessert Dips

    • Creamy Caramel Apple Dip
    • M&Ms Brownie Batter Dip
    • Peanut Butter S’mores Dip
    • Funfetti Dip
    • Sugar Cookie Dip

    Make sure you subscribe to my email list to get all my new recipes delivered right to your inbox!

    You can also follow me on Instagram, Facebook, or Pinterest for even more! 

    📖 Recipe

    Yield: about 8 servings

    Hot Cocoa Dip

    Hot Cocoa Dip

    Rich and delicious Hot Cocoa Dip is made with only 4 ingredients! This easy, no bake dessert is going to be your new favorite sweet treat.

    Prep Time 10 minutes
    Total Time 10 minutes

    Ingredients

    • 1 (8 ounce) block cream cheese, softened
    • 4 (1.38 ounce) packets hot cocoa mix
    • 4 ounces Cool Whip, thawed
    • 2 tablespoons marshmallow bits
    • 2 tablespoons sprinkles

    Instructions

    1. In a large mixing bowl, use an electric mixer to beat cream cheese until smooth.
    2. Add hot cocoa mix and beat until well combined.
    3. Use a rubber spatula to fold in the Cool Whip, being careful not to deflate the Cool Whip too much.
    4. Transfer to serving bowl and top with marshmallow bits and sprinkles.
    5. Serve with graham crackers, cookies, or fresh fruit.

    Recommended Products

    As an Amazon Associate and member of other affiliate programs, I earn from qualifying purchases.

    • Marshmallow Bits
      Marshmallow Bits
    • Christmas Sprinkles
      Christmas Sprinkles
    • Electric Mixer
      Electric Mixer

    Nutrition Information:

    Yield:

    8

    Serving Size:

    1

    Amount Per Serving: Calories: 89Total Fat: 6gSaturated Fat: 4gTrans Fat: 0gUnsaturated Fat: 1gCholesterol: 4mgSodium: 33mgCarbohydrates: 9gFiber: 0gSugar: 8gProtein: 1g

    Did you make this recipe?

    Tag me in your Instagram photo - @fakeginger

    © Amanda Livesay
    Cuisine: American / Category: snack

    Peppermint White Chocolate Sugar Cookies

    Dec 01, 2021

    Easy 3 ingredient holiday treat! Peppermint White Chocolate Sugar Cookies are classic sugar cookies coated in white chocolate and sprinkled with crushed candy canes.

    I love peppermint and white chocolate together, especially during the holidays. Some of my other favorites are White Chocolate Peppermint Chex and White Chocolate Peppermint Fudge!

    Sugar cookies coated in white chocolate and sprinkled with candy canes

    I have the perfect cookie for those last minute parties or when you need just one more treat for your cookie tins.

    Just 3 ingredients and they couldn’t be easier!

    The secret to these Peppermint White Chocolate Sugar Cookies is store-bought sugar cookie dough. You bake that up and then coat the cookies in white chocolate and sprinkle crushed candy canes on top.

    They’re so cute and so delicious and seriously easy!

    Ingredients for peppermint white chocolate sugar cookies. Refrigerated cookie dough, white candy coating, and candy canes

    Ingredients

    • Sugar cookie dough
    • White almond bark – this is a white chocolate candy coating that you can find in the baking aisle of any large grocery store. It will be labeled either candy coating or almond bark.
    • Candy canes – you can use peppermints if it’s not candy cane season

    Instructions

    • Bake cookies. Follow package instructions to bake sugar cookies. Let cool completely.
    • Crush candy canes. While the cookies cool, crush the candy canes. Set aside.
    • Melt almond bark. Once cookies are cool, melt almond bark in the microwave, stirring until smooth.
    • Decorate. Work with 1 cookie at a time and dip half of each one into the melted white almond bark. Sprinkle with crushed candy canes.
    • Let set. Place cookies on parchment paper and let set completely before serving.
    Overhead shot of peppermint white chocolate sugar cookies on parchment paper

    How Long Are They Good For?

    These sugar cookies are good for up to a week. Make sure to store them at room temperature in an airtight container.

    If you are making these during summer or your house is very warm and you notice the white chocolate melting, just pop them in your fridge.

    Can You Freeze Them?

    You can freeze these sugar cookies for up to 3 months. Once the white chocolate is completely set, I would wrap them tightly in plastic wrap and then place them in a freezer ziploc bag.

    Tips and Tricks

    • To crush the candy canes, I always put unwrapped candy canes in a freezer ziploc bag and then use a rolling pin to crush them
    • If you prefer regular chocolate over white, use the chocolate almond bark instead
    Sugar cookies coated in white chocolate and sprinkled with crushed candy canes

    More Holiday Cookies

    • Almond Bark Drop Cookies
    • Christmas Confetti Cookies
    • Italian Sugar Cookies
    • Frosted Eggnog Cookies
    • Pistachio Thumbprint Cookies
    • White Chocolate Peanut Butter Ritz Crackers
    • Snickerdoodles

    Make sure you subscribe to my email list to get all my new recipes delivered right to your inbox!

    You can also follow me on Instagram, Facebook, or Pinterest for even more! 

    📖 Recipe

    Yield: 24 cookies

    Peppermint White Chocolate Sugar Cookies

    Peppermint White Chocolate Sugar Cookies
    Prep Time 20 minutes
    Cook Time 12 minutes
    Total Time 32 minutes

    Ingredients

    • 1 package refrigerated sugar cookie dough
    • 16 ounces white almond bark
    • 4 candy canes

    Instructions

    1. Bake sugar cookies according to package instructions. Cool completely.
    2. Meanwhile, crush candy canes. (I place the unwrapped candy canes in a freezer ziploc bag and use a rolling pin to crush them.) Set aside.
    3. Once cool, melt almond bark in microwave in 30 second increments, stirring after each time. Stir until smooth.
    4. Working with 1 cookie at a time, dip half of it in the melted white almond bark and sprinkle with crushed candy canes. Transfer to parchment paper to set completely.

    Recommended Products

    As an Amazon Associate and member of other affiliate programs, I earn from qualifying purchases.

    • White Almond Bark
      White Almond Bark
    • Parchment Paper
      Parchment Paper

    Nutrition Information:

    Yield:

    24

    Serving Size:

    1

    Amount Per Serving: Calories: 127Total Fat: 10gSaturated Fat: 1gTrans Fat: 0gUnsaturated Fat: 9gCholesterol: 0mgSodium: 99mgCarbohydrates: 7gFiber: 2gSugar: 3gProtein: 4g

    Did you make this recipe?

    Tag me in your Instagram photo - @fakeginger

    © Amanda Livesay
    Category: cookie
    « Previous Page
    Next Page »

    Primary Sidebar

    Amanda Livesay
    Hi, I'm Amanda! DFW food blogger, mom of boys, and crazy dog lady.
    Read more
    Privacy Policy
    Privacy Policy

    Footer

    ↑ back to top

    About

    • Privacy Policy
    • About Fake Ginger

    Newsletter

    • Sign Up for weekly emails featuring new recipes!

    As an Amazon Associate I earn from qualifying purchases.

    Copyright © 2024 FakeGinger.com