• Skip to primary navigation
  • Skip to main content
  • Skip to primary sidebar
  • Home
  • About
  • Recipes

Fake Ginger

menu icon
go to homepage
  • Recipe Index
  • About
  • Subscribe
    • Facebook
    • Instagram
    • Pinterest
  • subscribe
    search icon
    Homepage link
    • Recipe Index
    • About
    • Subscribe
    • Facebook
    • Instagram
    • Pinterest
  • ×
    Home » Page 18

    Roasted Broccolini

    Roasted Broccolini

    May 20, 2020

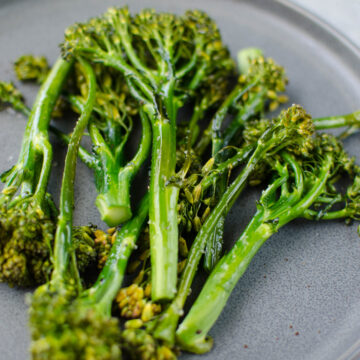
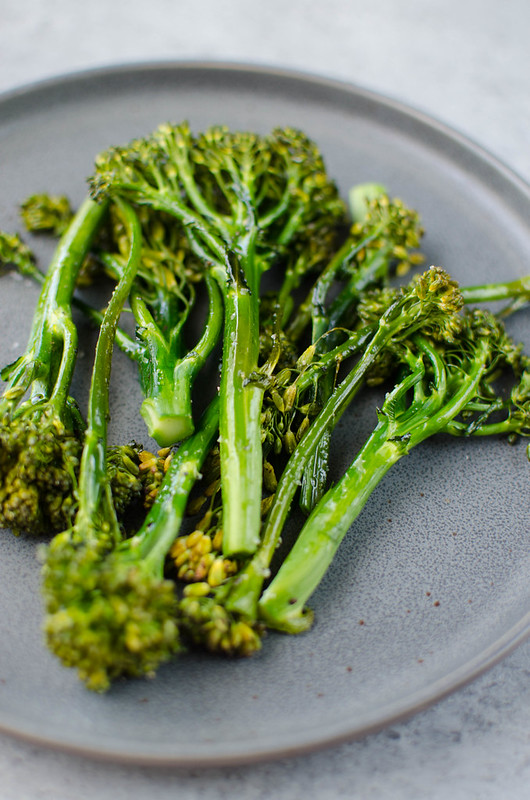
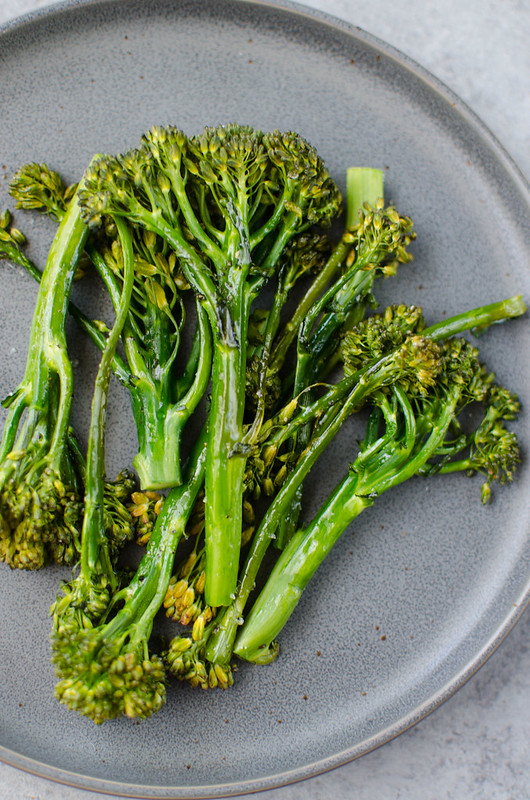
    Simple Roasted Broccolini is the perfect side dish! Just broccolini, olive oil, salt, and pepper baked until tender.

    Roasted Broccolini - simple roasted broccolini is the perfect side dish! Just broccolini, olive oil, salt, and pepper.

    We moved about a month ago (from Austin-ish to Dallas-ish) and the first thing I did when we moved was search for a produce delivery box from a local farm. 

    So now every Friday I sit by my office window and wait for the delivery lady and then I spend 30 minutes laying out all the produce for the perfect picture. It’s my favorite day of the week. 

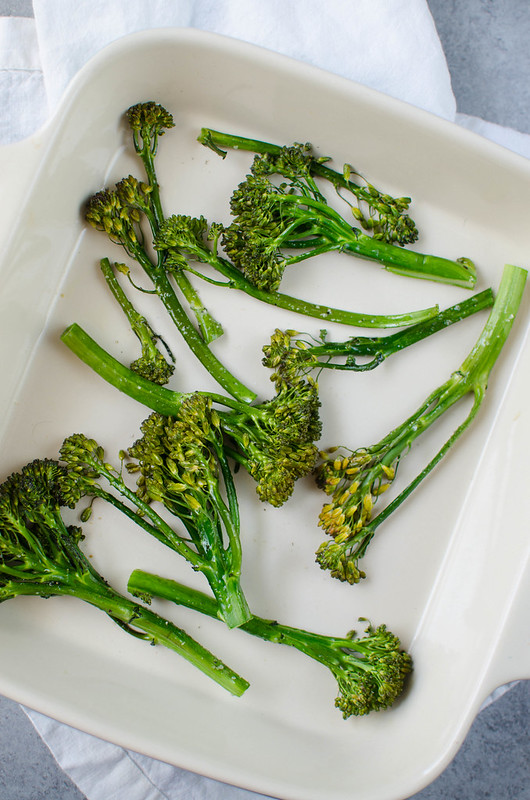
    We got this broccolini in last week’s box and it’s not something I usually buy but it’s something that I love when I do buy it. Definitely one of my favorite vegetables. 

    It makes the perfect side dish when you roast it with just olive oil, salt, and pepper. Quick, easy, and delicious! 

    Roasted Broccolini - simple roasted broccolini is the perfect side dish! Just broccolini, olive oil, salt, and pepper.

    What Is Broccolini

    Broccolini is a cross breed of the broccoli we all know and love and Chinese kale which is a leafy vegetable. So despite sometimes being called baby broccoli, it’s not actually just small broccoli.

    The stem of broccolini is thinner and more tender than regular broccoli. I’d say the texture is closer to asparagus than regular broccoli.

    It also tastes a little sweeter so if you have a kiddo (or a boyfriend) that doesn’t love broccoli, maybe give broccolini a try! 

    Ingredients

    • Broccolini – you should be able to find this all year long.
    • Olive oil – you can use a different oil if you prefer.
    • Salt
    • Pepper

    How To Make Roasted Broccolini

    • Prep. Trim broccolini stalks about 2 inches and slice any really thick stalks in half.
    • Season. Place on baking sheet; drizzle with olive oil and sprinkle with salt and pepper.
    • Bake. Bake for 12 – 15 minutes until broccoli is tender
    Roasted Broccolini - simple roasted broccolini is the perfect side dish! Just broccolini, olive oil, salt, and pepper.

    Can You Make Broccolini Ahead

    Sure! It might not be as crisp as when it’s freshly roasted but if you want to prep a couple batches of broccolini ahead of time for lunches for the week or quick dinners, go for it!

    It easily reheats in the microwave or oven or you could just add it to a salad cold! It’s super versatile so it’s perfect for meal prep.

    How Long Is It Good For?

    Roasted broccolini is good for up to 4 – 5 days. Make sure to store it in an airtight container in the fridge.

    Roasted Broccolini - simple roasted broccolini is the perfect side dish! Just broccolini, olive oil, salt, and pepper.

    More Side Dish Recipes

    • Cranberry Almond Broccoli Salad
    • Cilantro Lime Cauliflower Rice
    • Carrot Apple Salad
    • Balala Salad (Middle Eastern Bean Salad)
    • Sauteed Red Wine Garlic Mushrooms
    • Bacon Cheddar Mashed Potatoes

    Make sure you subscribe to my email list to get all my new recipes delivered right to your inbox!

    You can also follow me on Instagram, Facebook, or Pinterest for even more! 

    📖 Recipe

    Yield: 2 - 3 servings

    Roasted Broccolini

    Roasted Broccolini

    Simple Roasted Broccolini is the perfect side dish! Just broccolini, olive oil, salt, and pepper.

    Prep Time 5 minutes
    Cook Time 15 minutes
    Total Time 20 minutes

    Ingredients

    • 1 bunch broccolini
    • 1 teaspoon olive oil
    • ½ teaspoon salt
    • ¼ teaspoon black pepper

    Instructions

    1. Preheat oven to 375F.
    2. Trim about 2 inches off the stalks (if not already trimmed) and slice any really thick stalks in half. Place on rimmed baking sheet.
    3. Drizzle with olive oil and sprinkle with salt and pepper.
    4. Toss to make sure all the broccolini is coated.
    5. Bake for 12 - 15 minutes, until broccoli is tender but burnt.

    Recommended Products

    As an Amazon Associate and member of other affiliate programs, I earn from qualifying purchases.

    • Parchment Paper
      Parchment Paper
    • Rimmed Baking Sheet
      Rimmed Baking Sheet

    Nutrition Information:

    Yield:

    2

    Serving Size:

    1

    Amount Per Serving: Calories: 39Total Fat: 3gSaturated Fat: 0gTrans Fat: 0gUnsaturated Fat: 2gCholesterol: 0mgSodium: 308mgCarbohydrates: 4gFiber: 2gSugar: 1gProtein: 1g

    Did you make this recipe?

    Tag me in your Instagram photo - @fakeginger

    © Amanda Livesay
    Cuisine: American / Category: Sides

    Chocolate Pudding Pie

    May 13, 2020

    Chocolate Pudding Pie is a creamy chocolate pudding pie topped with homemade whipped cream. Easy and delicious!

    Chocolate Pudding Pie - creamy chocolate pudding pie topped with homemade whipped cream. Easy and delicious!

    Originally published March 13, 2015, updated May 13, 2020. 

    I love desserts like this Chocolate Pudding Pie. It’s almost no bake (only the crust needs to be baked!) and the whole recipe is so simple and you probably even have all the ingredients already on hand. 

    Plus, is there anything better than a chilled dessert during the summer? 

    Chocolate Pudding Pie - creamy chocolate pudding pie topped with homemade whipped cream. Easy and delicious!

    Ingredients

    • Pie crust – I like to use store-bought pie crusts to make life easier but you can use your favorite homemade recipe if you prefer. You want to bake it and cool it before adding the pudding.
    • Egg yolks – this is what makes the pudding so rich and thick and able to keep it’s shape when sliced.
    • Sugar
    • Cornstarch – this helps to thicken the pudding.
    • Cocoa powder
    • Salt – just a tiny bit to help bring out the flavors of the rest of the ingredients.
    • Milk – you want to use whole milk to make the richest, creamiest pudding.
    • Butter – this adds to the richness of the pudding.
    • Vanilla – even though this is a chocolate pudding pie, the vanilla adds more depth to the flavor.
    • Heavy whipping cream – this recipe calls for making your own whipped cream (it’s really easy!) but you can use Cool Whip if you prefer.
    • Powdered sugar – this is to sweeten the whipped cream.

    How To Make Chocolate Pudding Pie

    • Prep. Whisk together egg yolks and sugar until light in color. Whisk in corn starch, cocoa powder, and salt. Whisk in whole milk. 
    • Cook pudding. Put mixture in a pot over medium heat and bring to a boil. Let boil, stirring constantly, until it reaches pudding consistency.
    • Finish pudding. Remove from heat and stir in butter and vanilla
    • Add to pie crust. Cool filling for about 10 minutes before pouring into baked pie crust.
    • Chill. Chill completely before topping
    • Make whipped cream. Beat heavy whipping cream and powdered sugar together until whipped cream consistency.
    • Top pie. Use a rubber spatula to spread the whipped cream over the pie
    Chocolate Pudding Pie - creamy chocolate pudding pie topped with homemade whipped cream. Easy and delicious!

    How Long Is Pudding Pie Good For?

    This chocolate pudding pie will be good in the fridge for up to a week, although the whipped cream will start to deflate the longer it sits.

    I like to store it in an airtight cake container but you can also just cover it tightly with foil or plastic wrap. 

    Can You Make Pudding Pie Ahead?

    I like to make pudding pie the day before I plan to serve it. I find that letting it sit in the fridge overnight allows me to get really clean slices and the layers just look better. I wouldn’t make it any further out than the night before though.

    Chocolate Pudding Pie - creamy chocolate pudding pie topped with homemade whipped cream. Easy and delicious!

    More Pie Recipes

    • No Bake Snickers Pie
    • No Bake Banana Split Pie
    • Chocolate Truffle Pie
    • No Bake Cookie Butter Pie
    • Pecan Pie

    Make sure you subscribe to my email list to get all my new recipes delivered right to your inbox!

    You can also follow me on Instagram, Facebook, or Pinterest for even more! 

    📖 Recipe

    Yield: 8 servings

    Chocolate Pudding Pie

    Chocolate Pudding Pie

    Chocolate Pudding Pie is a creamy chocolate pudding pie topped with homemade whipped cream. Easy and delicious!

    Prep Time 10 minutes
    Cook Time 10 minutes
    Additional Time 10 minutes
    Total Time 30 minutes

    Ingredients

    • 1 prepared pie crust, baked until golden brown

    For the filling:

    • 3 egg yolks
    • 1 ½ cups sugar
    • ¼ cup cornstarch
    • ½ cup cocoa powder
    • ½ teaspoon salt
    • 3 cups whole milk
    • 1 tablespoon butter
    • 1 teaspoon vanilla

    For the topping

    • 1 cup heavy whipping cream
    • 2 tablespoons powdered sugar

    Instructions

    1. In a small pot, whisk together egg yolks and sugar until light in color.
    2. Whisk in corn starch, cocoa powder, and salt until combined.
    3. Whisk in whole milk.
    4. Put the pot over medium heat and bring to a boil. Let boil, stirring constantly, until it's thickened slightly. Remove from heat and stir in butter and vanilla.
    5. Cool for about 10 minutes before pouring into your pie shell.
    6. Chill completely before topping
    7. To make the topping, use an electric mixer to beat heavy whipped cream and powdered sugar together until it reaches whipped cream consistency.
    8. Use a rubber spatula to spread whipped cream on top of pie
    9. Store in refrigerator until ready to serve

    Recommended Products

    As an Amazon Associate and member of other affiliate programs, I earn from qualifying purchases.

    • Pie Storage Container
      Pie Storage Container
    • OXO Mixing Bowls
      OXO Mixing Bowls
    • Electric Mixer
      Electric Mixer

    Nutrition Information:

    Yield:

    8

    Serving Size:

    1

    Amount Per Serving: Calories: 496Total Fat: 23gSaturated Fat: 10gTrans Fat: 0gUnsaturated Fat: 11gCholesterol: 96mgSodium: 321mgCarbohydrates: 66gFiber: 2gSugar: 43gProtein: 7g

    Did you make this recipe?

    Tag me in your Instagram photo - @fakeginger

    © Amanda Livesay
    Cuisine: American / Category: pie

    Dill Pickle Chex Mix

    Apr 30, 2020

    Dill Pickle Chex Mix is my alltime favorite Chex Mix! Chex cereal, bagel chips, pretzel sticks, and cashews coated in a buttery dill pickle and ranch seasoning and baked until crispy and delicious. 

    Dill Pickle Chex Mix - my alltime favorite Chex Mix! Chex cereal, bagel chips, pretzel sticks, and cashews coated in a buttery dill pickle and ranch seasoning and baked until crispy and delicious. 

    This is one of my favorite things I’ve made in a long time. 

    Yes, I know I say that a lot. Yes, I know I need to stop saying it so much. 

    But I love Chex Mix and I love all things dill pickle flavored. It’s Chex cereal, bagel chips, pretzels, and cashews all coated in a delicious buttery savory seasoning. And then it’s all baked until it’s extra crispy. 

    This was so tempting to have in the house. I had it on the kitchen island and would just grab a handful every time I walked by. If you love dill pickle flavored everything like I do, you have to make this!

    Dill Pickle Chex Mix - my alltime favorite Chex Mix! Chex cereal, bagel chips, pretzel sticks, and cashews coated in a buttery dill pickle and ranch seasoning and baked until crispy and delicious. 

    Ingredients for Dill Pickle Chex Mix

    • Corn or Rice Chex cereal – use whichever one you prefer. I like a mix of both.
    • Bagel chips – you can buy them or I have instructions for homemade bagel chips below. I’ve been having trouble finding them in store for some reason.
    • Pretzel sticks – you could use any small pretzel shape.
    • Cashew pieces – you could also use almonds, pistachios, pecans, whatever nut you prefer.
    • Butter – I like to use unsalted butter because the ranch mix tends to be salty enough for the sauce.
    • Ranch seasoning – this is the powdered ranch mix, not the liquid ranch dressing.
    • Dill pickle juice – make sure it’s from dill pickles and not the sweet kind!
    • Dill – the recipe calls for dried dill but if you have fresh dill on hand, you could use that instead.
    • Garlic powder – this just adds extra garlic flavor.

    Instructions

    • Make sauce. Mix dill pickle juice, dried dill, and garlic powder.
    • Combine. Pour the butter mixture over the Chex cereal mixture and gently toss to make sure all the ingredients are coated.
    • Transfer. Transfer to a rimmed baking sheet.
    • Bake. Bake for 1 hour, stirring every 15 minutes
    • Cool. Cool completely before serving and storing
    Dill Pickle Chex Mix - my alltime favorite Chex Mix! Chex cereal, bagel chips, pretzel sticks, and cashews coated in a buttery dill pickle and ranch seasoning and baked until crispy and delicious. 

    What If I Can’t Find Bagel Chips

    I’ve had the worst time trying to find bagel chips lately.

    I took 3 bagels and sliced thin rounds (my bagels were presliced so most pieces ended up as half circle-shaped) and brushed both sides with garlic butter (4 tablespoons melted butter, 3 minced cloves of garlic, and salt) and put them on a baking sheet. I baked them until they were crispy, turning once, about 15 – 20 minute depending on how thick they were sliced. 

    Dill Pickle Chex Mix - my alltime favorite Chex Mix! Chex cereal, bagel chips, pretzel sticks, and cashews coated in a buttery dill pickle and ranch seasoning and baked until crispy and delicious. 

    How Long is Homemade Chex Mix Good For?

    Homemade Chex Mix will stay good for several weeks (I usually say 2 weeks just to be safe but it can last longer) if stored in an airtight container at room temperature.

    Some of the components may start to lose their crunch the longer they sit so keep that in mind. I wouldn’t serve week old Chex Mix to guests, you know?

    Dill Pickle Chex Mix - my alltime favorite Chex Mix! Chex cereal, bagel chips, pretzel sticks, and cashews coated in a buttery dill pickle and ranch seasoning and baked until crispy and delicious. 

    Other Mix Ins for Homemade Chex Mix

    Some ideas of mix ins for this Dill Pickle Chex Mix: 

    • Cheez-Its
    • Oyster Crackers
    • Pecans 
    • Goldfish Crackers
    • Rye Crisps
    • Cheerios
    • Sunflower Seeds

    Can You Freeze Homemade Chex Mix?

    I don’t recommend trying to freeze homemade chex mix. Most of the ingredients would lose their crunch once frozen and defrosted. 

    Dill Pickle Chex Mix - my alltime favorite Chex Mix! Chex cereal, bagel chips, pretzel sticks, and cashews coated in a buttery dill pickle and ranch seasoning and baked until crispy and delicious. 

    More Snack Mix Recipes

    • Parmesan Ranch Oyster Crackers
    • Cheesy Ranch Chex Mix
    • Dirt and Worms Chex Mix
    • Chex Party Mix
    • Cranberry Nut Chex Mix
    • S’mores Chex Mix

    Make sure you subscribe to my email list to get all my new recipes delivered right to your inbox!

    You can also follow me on Instagram, Facebook, or Pinterest for even more! 

    📖 Recipe

    Yield: 24 servings

    Dill Pickle Chex Mix

    Dill Pickle Chex Mix

    Dill Pickle Chex Mix - my alltime favorite Chex Mix! Chex cereal, bagel chips, pretzel sticks, and cashews coated in a buttery dill pickle and ranch seasoning and baked until crispy and delicious. 

    Prep Time 15 minutes
    Cook Time 1 hour
    Total Time 1 hour 15 minutes

    Ingredients

    • 8 cups Corn or Rice Chex cereal
    • 2 cups bagel chips
    • 1 cup pretzel sticks
    • 1 cup cashew pieces
    • 6 tablespoons butter, melted
    • 1 (1 ounce) package dry Ranch seasoning
    • 1 tablespoon dill pickle juice (from jar of pickles)
    • 1 tablespoon dried dill
    • 1 teaspoon garlic powder

    Instructions

    1. Preheat oven to 250F.
    2. In a large mixing bowl, combine Chex cereal, bagel chips, pretzel sticks, and cashews.
    3. In a separate small bowl, whisk together butter, ranch seasoning, dill pickle juice, dried dill, and garlic powder.
    4. Pour the butter mixture over the cereal mixture and toss gently to make sure everything is coated.
    5. Transfer to a large rimmed baking sheet.
    6. Bake in preheated oven for 1 hour, stirring every 15 minutes.
    7. Transfer Chex MIx to parchment paper or aluminum foil to cool completely before serving and storing.
    8. Store in an airtight container at room temperature for up to 2 weeks.

    Recommended Products

    As an Amazon Associate and member of other affiliate programs, I earn from qualifying purchases.

    • Ranch Dressing Mix
      Ranch Dressing Mix
    • Garlic Bagel Chips
      Garlic Bagel Chips
    • Rimmed Baking Sheet
      Rimmed Baking Sheet

    Nutrition Information:

    Yield:

    20

    Serving Size:

    1

    Amount Per Serving: Calories: 250Total Fat: 11gSaturated Fat: 5gTrans Fat: 0gUnsaturated Fat: 6gCholesterol: 9mgSodium: 300mgCarbohydrates: 34gFiber: 3gSugar: 5gProtein: 7g

    Did you make this recipe?

    Tag me in your Instagram photo - @fakeginger

    © Amanda Livesay
    Cuisine: American / Category: snack

    Spicy Salty Dog

    Apr 27, 2020

    Spicy Salty Dog has freshly squeezed grapefruit juice, vodka, and jalapenos! So refreshing and delicious, the perfect spicy cocktail recipe. 

    Spicy Salty Dog - freshly squeezed grapefruit juice, vodka, and jalapenos! So refreshing and delicious, the perfect spicy cocktail recipe. 

    Originally published May 11, 2017, photos updated April 27, 2020. 

    I love a spicy cocktail. If there’s a spicy cocktail on the menu, I’m ordering it. I don’t care what else is in it. If it involves a jalapeno or a serrano or a habanero, I’m trying it. 

    If you love spicy drinks as much as I do, you’re going to love this Spicy Salty Dog! It’s also a really pretty pink color thanks to the fresh grapefruit juice so it’s perfect for a girly brunch or shower. 

    I have a Spicy Cilantro Margarita that you may also enjoy. 

    …

    Read More

    Fritos Corn Salad

    Mar 03, 2020

    Crisp corn, bell pepper, cheese, and Chili Cheese Fritos in a creamy dressing. Fritos Corn Salad is the perfect no cook, super easy summer side dish for all your barbecues!

    If you love corn, try my Corn Casserole!

    Fritos Corn Salad - crisp corn, bell pepper, cheese, and Chili Cheese Fritos in a creamy dressing. The perfect no cook, super easy summer side dish for all your barbecues!

    Hi, is everyone dreaming of summer food?!

    I also can’t wait to grill everything and make pasta salads and no bake cheesecake and all the yummy food that I associate with summer. 

    Today I have one of my alltime favorite summer side dishes. I know we have talked at length about my love of Fritos corn chips so this should come as no surprise.

    It takes just a few minutes to put together and it is always a hit. Take it to barbecues, serve it as a side for dinner, or serve it as a dip at your next party! I promise everyone will love it. 

    No, it’s definitely not low calorie. It’s fine. 

    Ingredients

    Scroll down for ingredient amounts.

    • Canned corn – make sure you drain the corn well so you don’t end up with a soggy salad!
    • Red bell pepper – you can use other color peppers if you prefer the flavor but the red adds a nice contrast in the otherwise yellow and orange dish.
    • Mexican blend cheese – you can use cheddar cheese or Colby Jack.
    • Mayonnaise
    • Black pepper
    • Chili Cheese Fritos – you have to use the chili cheese Fritos, not plain Fritos! It makes it so much better.
    • Cilantro – this is optional, for garnish, but I think it adds such a nice brightness to the salad.

    How To Make Fritos Corn Salad

    This is seriously the easiest side dish to put together. Like, if you need a last minute, no fuss, no cooking side dish to take to a barbecue, this is it! 

    • Combine ingredients. Stir together corn, diced bell pepper, shredded cheese, mayo, and black pepper
    • Add Fritos. Immediately before serving, stir in crushed Chili Cheese Fritos
    • Garnish and serve. Garnish with fresh cilantro if desired
    Fritos Corn Salad - crisp corn, bell pepper, cheese, and Chili Cheese Fritos in a creamy dressing. The perfect no cook, super easy summer side dish for all your barbecues!

    How Long Is It Good For?

    Fritos Corn Salad is tastiest right after it is made, when the Fritos are still crunchy, but it is perfectly fine to eat for up to 3 – 4 days after making it.

    Just keep in mind that the Fritos will get soggier the longer it sits.

    Make sure to store it in the fridge in an airtight container to keep it as fresh as possible – I love these glass airtight containers for storing pretty much all our leftovers

    Can You Make It Ahead?

    You can mix all the ingredients but the Fritos together ahead of time if you need to. Make sure to store it in the fridge in an airtight container until you are ready to serve it.

    Right before serving, add the Fritos and give it a good stir. I also like to take the chill off by letting it sit at room temperature for 5 minutes or so.

    Can You Freeze It?

    I don’t recommend freezing Fritos corn salad. The Fritos will get soggy once frozen and defrosted and nobody wants a salad made of soggy Fritos.

    Fritos Corn Salad - crisp corn, bell pepper, cheese, and Chili Cheese Fritos in a creamy dressing. The perfect no cook, super easy summer side dish for all your barbecues!

    Tips 

    • If you can’t find (or just don’t like) Chili Cheese Fritos, plain Fritos corn chips will work fine in this recipe. 
    • Don’t like red bell pepper? Skip it and use diced red onion instead! 
    • The shredded Mexican cheese blends usually include cheddar, monterey jack, asadero, and queso quesadilla. You can use any combination of those cheeses in this recipe.

    What To Serve With Corn Salad

    This is one of my favorite sides to serve at a barbecue so I would go with something like my Hawaiian BBQ Ribs or Rosemary Ranch Chicken Kabobs.

    I also think it goes well with other cold side dishes like Broccoli Salad or Balela Salad.

    More Barbecue Side Dish Recipes

    • Root Beer Baked Beans
    • Cole Slaw Pasta Salad
    • Hawaiian Macaroni Salad
    • Pepperoni Pizza Pasta Salad
    • Ramen Noodle Salad
    • Pineapple Baked Beans
    • Southwest Orzo Salad

    Make sure you subscribe to my email list to get all my new recipes delivered right to your inbox!

    You can also follow me on Instagram, Facebook, or Pinterest for even more! 

    📖 Recipe

    Yield: 10 servings

    Fritos Corn Salad

    Fritos Corn Salad

    Crisp corn, bell pepper, cheese, and Chili Cheese Fritos in a creamy dressing. The perfect no cook, super easy summer side dish for all your barbecues!

    Prep Time 15 minutes
    Total Time 15 minutes

    Ingredients

    • 2 (15 ounce) cans whole kernel corn, drained
    • 1 red bell pepper, finely diced
    • 2 cups shredded Mexican blend cheese
    • 1 cup mayo (can substitute light mayo)
    • ¼ teaspoon black pepper
    • 1 (9.25 ounce) bag Chili Cheese Fritos, lightly crushed
    • fresh cilantro, for garnish

    Instructions

    1. In a large mixing bowl, stir together corn, diced bell pepper, shredded cheese, mayo, and black pepper.
    2. Right before serving, stir in crushed Chili Cheese Fritos.
    3. Garnish with fresh cilantro if desired.

    Notes

      • This salad is best served right after Fritos are added.
      • If making ahead, wait until right before serving to add Fritos. Store in the refrigerator until ready to serve.
      • This salad is good for up to 3 - 4 days if stored in an airtight container in the fridge but the Fritos will get soggy the longer it sits.
      • If you can't find (or don't like) Chili Cheese Fritos, plain Fritos corn chips will work.

    Recommended Products

    As an Amazon Associate and member of other affiliate programs, I earn from qualifying purchases.

    • Chili Cheese Fritos
      Chili Cheese Fritos
    • The Best Airtight Containers
      The Best Airtight Containers
    • OXO Mixing Bowls
      OXO Mixing Bowls

    Nutrition Information:

    Yield:

    10

    Serving Size:

    1

    Amount Per Serving: Calories: 258Total Fat: 24gSaturated Fat: 7gTrans Fat: 0gUnsaturated Fat: 16gCholesterol: 31mgSodium: 238mgCarbohydrates: 5gFiber: 1gSugar: 1gProtein: 6g

    Did you make this recipe?

    Tag me in your Instagram photo - @fakeginger

    © Amanda Livesay
    Cuisine: American / Category: Sides

    King Cake Ice Cream

    Feb 12, 2020

    It’s Mardi Gras y’all! King Cake Ice Cream is cream cheese ice cream with king cake pieces and sprinkles mixed in.

    Love Mardi Gras? Try King Cake Bread Pudding and Muffuletta Dip!

    King Cake Ice Cream - it's Mardi Gras, y'all! Cream cheese ice cream with king cake pieces and sprinkles mixed in.

    It’s my favorite time of year! 

    Mardi Gras will forever be my favorite holiday. Who doesn’t love a giant party where moonpies get thrown at you?! Plus king cake?! And beads?! There’s just no better holiday.

    I love this King Cake Ice Cream almost as much as I love Mardi Gras. It’s a cream cheese ice cream with diced king cake pieces mixed in and layers of sprinkles.

    King Cake Ice Cream - it's Mardi Gras, y'all! Cream cheese ice cream with king cake pieces and sprinkles mixed in.

    What Is a King Cake?

    If you aren’t familiar, a king cake is kind of like a big, round cinnamon roll. It’s a sweet yeast dough that’s filled with cinnamon sugar and nuts and rolled up like a cinnamon roll and then formed into a ring. It gets baked and then topped with icing and Mardi Gras color sprinkles. 

    Some people get fancy with the fillings and do cream cheese (my favorite!) or a praline filling. 

    How To Make King Cake Ice Cream

    • Make custard. Heat milk, heavy cream, sugar, salt, and vanilla over medium heat. Whisk 6 eggs yolks together in a large bowl. Once the milk mixture is hot, slowly stream about a cup of the the hot mixture into the egg yolks, whisking vigorously. Pour egg yolk and milk mixture back into the pot
    • Heat. Continue heating over medium heat until the mixture is thick enough to coat the back of a spoon
    • Strain. Pour custard through a fine mesh strainer into a bowl
    • Add. Add diced cream cheese and stir until cream cheese is melted
    • Chill. Chill until cold (overnight if possible)
    • Freeze. Freeze in ice cream maker according to manufacturer’s intructions
    • Add. Fold in diced king cake
    • Assemble. Layer ice cream and sprinkles in container
    King Cake Ice Cream - it's Mardi Gras, y'all! Cream cheese ice cream with king cake pieces and sprinkles mixed in.

    Where Do You Get King Cake?

    I live in Texas and can find king cakes during Mardi Gras season so check your grocery store bakery, local bakeries, things like that.

    However, I started making king cakes mid-January before HEB had them and this is my favorite king cake recipe.

    Yes, there are a lot of steps. But yes, it will be worth it. 

    More Ice Cream Recipes

    • Birthday Cake Ice Cream
    • Circus Animal Cookie Ice Cream
    • Caramel Corn Ice Cream
    • Key Lime Pie Ice Cream

    Make sure you subscribe to my email list to get all my new recipes delivered right to your inbox!

    You can also follow me on Instagram, Facebook, or Pinterest for even more! 

    📖 Recipe

    Yield: 8 servings

    King Cake Ice Cream

    King Cake Ice Cream
    Prep Time 20 minutes
    Cook Time 15 minutes
    Total Time 35 minutes

    Ingredients

    • 1 cup milk
    • ½ cup sugar
    • 2 cups heavy whipping cream
    • pinch of salt
    • 1 teaspoon vanilla
    • 6 large egg yolks
    • 1 (8 ounce) block cream cheese, diced
    • 1 ½ cups diced cinnamon-filled king cake
    • purple, yellow, and green sprinkles

    Instructions

    Warm the milk, sugar, heavy whipping cream, salt, and vanilla bean paste in a heavy-bottomed pot over medium heat just until it starts to bubble.

    While the milk mixture is heating, whisk together the egg yolks. Once the milk starts to bubble, slowly stream in about 1 cup of the milk while whisking constantly. Pour the egg yolk mixture into the pot you used to heat the milk.

    Heat the mixture over medium heat, stirring constantly, until the mixture thickens and coats the back of a spoon.

    Pour the custard through a fine mesh strainer and into a large bowl. While mixture is still hot, add cream cheese and stir until cream cheese is completely melted. Chill the mixture overnight.

    Freeze according to manufacturer's instructions. Once frozen, fold in diced king cake.

    Put half the ice cream in the container you plan to freeze it in. Add a thin layer of sprinkles. Top with remaining ice cream and another layer of sprinkles.

    Recommended Products

    As an Amazon Associate and member of other affiliate programs, I earn from qualifying purchases.

    • Ice Cream Maker
      Ice Cream Maker

    Nutrition Information:

    Yield:

    8

    Serving Size:

    1

    Amount Per Serving: Calories: 482Total Fat: 32gSaturated Fat: 18gTrans Fat: 1gUnsaturated Fat: 11gCholesterol: 252mgSodium: 217mgCarbohydrates: 40gFiber: 1gSugar: 25gProtein: 10g

    Did you make this recipe?

    Tag me in your Instagram photo - @fakeginger

    © Amanda Livesay
    Category: frozen goodies

    Chocolate Chip Pancakes

    Jan 30, 2020

    Chocolate Chip Pancakes are the perfect weekend breakfast! Fluffy buttermilk pancakes filled with mini chocolate chips.

    Chocolate Chip Pancakes - the perfect weekend breakfast! Fluffy buttermilk pancakes filled with mini chocolate chips.

    Originally published December 29, 2009. Updated January 30, 2020. 

    Is there anything better than chocolate for breakfast?! 

    These chocolate chip pancakes are a staple in my house. Everyone loves them and I love that I can make a big batch and the kids can just reheat them as needed. They are light and fluffy and just perfect for chocolate lovers!  

    I have a bunch of other breakfast recipes if you are looking for other ideas! 

    Chocolate Chip Pancakes - the perfect weekend breakfast! Fluffy buttermilk pancakes filled with mini chocolate chips.

    Ingredients

    • All-purpose flour
    • Baking powder
    • Baking soda
    • Sugar
    • Eggs
    • Buttermilk – I like to use buttermilk in pancakes because it reacts with the baking soda making for taller, lighter, fluffier pancakes!
    • Mini chocolate chips – you can use regular chocolate chips but I would roughly chop them so there aren’t huge chocolate chunks in the pancakes.

    How To Make Chocolate Chip Pancakes

    • Prepare. Heat a nonstick pan over medium heat.
    • Combine dry ingredients. Combine flour, baking powder, baking soda, salt, and sugar in a large mixing bowl.
    • Add wet ingredients. Add eggs and buttermilk and whisk everything together. There should be small lumps in the batter.
    • Add chocolate. Gently stir in chocolate chips.
    • Cook. Use a ⅓ cup measure to pour batter onto preheated pan. Let cook until bubbles form on top of the batter, 2-3 minutes. Flip over and cook an additional 1 minute or until golden brown. Repeat with remaining batter.
    Chocolate Chip Pancakes - the perfect weekend breakfast! Fluffy buttermilk pancakes filled with mini chocolate chips.

    Tips For Making Chocolate Chip Pancakes

    • I always use my electric griddle for pancakes – it makes the process go faster and makes perfect pancakes
    • If you don’t have buttermilk, mix 1 tablespoon white vinegar or lemon juice to enough milk to measure a full cup. Let sit for a few minutes. (For this recipe, it’s 2 ½ tablespoons vinegar or lemon juice and enough milk to make 2 ½ cups.)

    How Long Are They Good For?

    Pancakes are good for up to 4 days. Make sure to store them in an airtight container to keep them fresh for as long as possible.

    When you are ready to serve them, reheat them in the microwave.

    Can You Freeze Pancakes?

    Yes, these pancakes freeze perfectly! I like to freeze them in a freezer ziploc bag (make sure to squeeze out as much air as possible) and they will stay good for up to 2 months. 

    Defrost them overnight in the refrigerator and then you can reheat in the microwave, toaster, or the oven

    Chocolate Chip Pancakes - the perfect weekend breakfast! Fluffy buttermilk pancakes filled with mini chocolate chips.

    More Pancake Recipes

    • Pecan Oat Pancakes
    • Blueberry Sour Cream Pancakes
    • Peanut Butter Banana Pancakes
    • Buckwheat Pancakes
    • Pineapple Cinnamon Pancakes

    Make sure you subscribe to my email list to get all my new recipes delivered right to your inbox!

    You can also follow me on Instagram, Facebook, or Pinterest for even more! 

    📖 Recipe

    Yield: 20 pancakes

    Chocolate Chip Pancakes

    Chocolate Chip Pancakes

    Chocolate Chip Pancakes - the perfect weekend breakfast! Fluffy buttermilk pancakes filled with mini chocolate chips.

    Prep Time 10 minutes
    Cook Time 15 minutes
    Total Time 25 minutes

    Ingredients

    • 3 cups all-purpose flour
    • 2 teaspoons baking powder
    • 1 teaspoon baking soda
    • ½ teaspoon kosher salt
    • 3 tablespoons sugar
    • 2 large eggs, lightly beaten
    • 2 ½ cups buttermilk
    • 2 cups mini chocolate chips
    • 2 tablespoons melted butter, for brushing the pan

    Instructions

    1. Heat a nonstick pan over medium heat.
    2. Combine flour, baking powder, baking soda, salt, and sugar in a large mixing bowl. Add eggs and buttermilk and whisk everything together. There should be small lumps in the batter. Gently stir in chocolate chips.
    3. Use a ⅓ cup measure to pour batter onto preheated pan. Let cook until bubbles form on top of the batter, 2-3 minutes. Flip over and cook an additional 1 minute or until golden brown. Repeat with remaining batter.

    Recommended Products

    As an Amazon Associate and member of other affiliate programs, I earn from qualifying purchases.

    • Pancake Flipper
      Pancake Flipper
    • Rubber Spatulas
      Rubber Spatulas
    • My Favorite Skillet
      My Favorite Skillet
    • Cuisinart Griddle
      Cuisinart Griddle

    Nutrition Information:

    Yield:

    20

    Serving Size:

    1

    Amount Per Serving: Calories: 189Total Fat: 7gSaturated Fat: 4gTrans Fat: 0gUnsaturated Fat: 3gCholesterol: 23mgSodium: 241mgCarbohydrates: 29gFiber: 2gSugar: 13gProtein: 4g

    Did you make this recipe?

    Tag me in your Instagram photo - @fakeginger

    © Amanda Livesay
    Cuisine: American / Category: breakfast

    Buffalo Deviled Eggs

    Jan 26, 2020

    Buffalo Deviled Eggs are spicy buffalo deviled eggs topped with blue cheese. Perfect for a party!

    Love deviled eggs?! Try Caesar Deviled Eggs and Bacon Pimento Cheese Deviled Eggs!

    Buffalo Deviled Eggs - spicy buffalo deviled eggs topped with blue cheese. Perfect for a party!

    We’re talking about two of my favorite things today: deviled eggs and all things buffalo! 

    These Buffalo Deviled Eggs are the perfect amount of spicy with diced celery mixed in and blue cheese on top to cool the heat down a little bit. They’re a great way to get the buffalo flavor without messy wings.

    Buffalo Deviled Eggs - spicy buffalo deviled eggs topped with blue cheese. Perfect for a party!

    Ingredients

    • Eggs – you need to hard boil them. My favorite (and the easiest!) way to hard boil eggs is with an electric egg cooker.
    • Mayonnaise – you can use lite mayo or even miracle whip if you prefer.
    • Celery – you are going to use the celery itself and the leafy parts on top!
    • Buffalo sauce – I like Frank’s Red Hot for this recipe but use your favorite buffalo sauce.
    • Blue cheese – this is for garnish so if you don’t like blue cheese, you could leave it out.
    Process Photos for Deviled Eggs

    How To Make Buffalo Deviled Eggs

    • Cook eggs. Put eggs in a large pot and cover with water (up to about an inch above the eggs).Bring to a rolling boil; turn off heat and cover the pot. Let sit for 10 minutes. Remove eggs to a bowl filled with ice water. Peel once cooled.
    • Prepare eggs. Cut eggs in half, transferring yolks to a mixing bowl.
    • Make filling. Add mayo, diced celery, and buffalo sauce; mash the egg yolks and mix everything together. Taste and add salt if necessary.
    • Fill egg whites. Spoon the mixture into the egg whites.
    • Garnish and serve. Sprinkle with blue cheese and celery leaves before serving.

    Making Deviled Eggs

    How Long Are Deviled Eggs Good?

    Deviled eggs are good for up to 2 days as long as they are stored properly. Keep them in the fridge and make sure you cover them well. 

    However, if you leave them at room temperature for more than 2 hours, any leftovers probably need to be thrown out. 

    Can You Make Deviled Eggs Ahead?

    Yes! You can make these ahead of time and keep them in an airtight container in the refrigerator. They are technically good for 2 days when refrigerated but I wouldn’t prep them more than the night before you intend to serve them just so they are nice and fresh.

    Hard boiled eggs by themselves are good for up to a week so if you need to do that step a couple days in advance, you should be fine. 

    Variations

    • If you don’t like blue cheese, a sprinkle of powdered ranch seasoning would be really nice on top of these deviled eggs.
    Buffalo Deviled Eggs - spicy buffalo deviled eggs topped with blue cheese. Perfect for a party!

    More Recipes with Buffalo Sauce

    • Buffalo Chicken Meatballs
    • Buffalo Chicken Dip
    • Slow Cooker Buffalo Chicken Sliders
    • Buffalo Chicken Egg Muffins
    • Slow Cooker Buffalo Chicken Tacos

    Make sure you subscribe to my email list to get all my new recipes delivered right to your inbox!

    You can also follow me on Instagram, Facebook, or Pinterest for even more! 

    📖 Recipe

    Yield: 12 deviled eggs

    Buffalo Deviled Eggs

    Buffalo Deviled Eggs

    Buffalo Deviled Eggs are spicy buffalo deviled eggs topped with blue cheese. Perfect for a party!

    Prep Time 15 minutes
    Cook Time 10 minutes
    Total Time 25 minutes

    Ingredients

    • 6 large eggs
    • 2 tablespoons mayonnaise
    • 1 tablespoon finely chopped celery
    • 1 tablespoon buffalo sauce
    • salt, to taste
    • blue cheese, for garnish
    • celery leaves, chopped, for garnish

    Instructions

    1. Put eggs in a large pot and cover with water (up to about an inch above the eggs).
    2. Bring to a rolling boil; turn off heat and cover the pot.
    3. Let sit for 10 minutes.
    4. Remove eggs to a bowl filled with ice water. Peel once cooled.
    5. Cut eggs in half, transferring yolks to a mixing bowl.
    6. Add mayo, diced celery, and buffalo sauce; mash the egg yolks and mix everything together. Taste and add salt if necessary.
    7. Spoon the mixture into the egg whites.
    8. Sprinkle with blue cheese and celery leaves before serving.

    Recommended Products

    As an Amazon Associate and member of other affiliate programs, I earn from qualifying purchases.

    • Electric Egg Cooker
      Electric Egg Cooker

    Nutrition Information:

    Yield:

    12

    Serving Size:

    1

    Amount Per Serving: Calories: 61Total Fat: 5gSaturated Fat: 1gTrans Fat: 0gUnsaturated Fat: 3gCholesterol: 96mgSodium: 161mgCarbohydrates: 0gFiber: 0gSugar: 0gProtein: 4g

    Did you make this recipe?

    Tag me in your Instagram photo - @fakeginger

    © Amanda Livesay
    Cuisine: American / Category: appetizer

    Amish Breakfast Casserole

    Jan 19, 2020

    Amish Breakfast Casserole is a delicious baked casserole made with bacon, hashbrowns, 2 cheeses, and eggs! An easy, hearty weekend breakfast or meal prep it to have all week long.

    Amish Breakfast Casserole - bacon, hashbrowns, 2 cheeses, and eggs! An easy, hearty weekend breakfast or meal prep it to have all week long.

    This post originally published on August 17, 2014 – updated on January 19, 2020. 

    I have been making this Amish Breakfast Casserole for years and had the ugliest photos of it on the blog. You really couldn’t tell what a fantastic meal for any time of day it is from my garbage photos. 

    I made it twice this past weekend. Once to update the photos and then again when my kid that was at a sleepover came home and was upset that I made it while he was gone. We had no leftovers either time. 

    And if you just love breakfast casseroles as much as I do, my Overnight Ham Breakfast Casserole is another one we love.

    Amish Breakfast Casserole - bacon, hashbrowns, 2 cheeses, and eggs! An easy, hearty weekend breakfast or meal prep it to have all week long.

    Ingredients

    • Bacon – this gets cooked before going into the casserole so you don’t have to worry about raw or soggy bacon
    • Onion – these get cooked with the bacon so they aren’t as obvious in the casserole if you have picky eaters
    • Garlic
    • Eggs
    • Salt and pepper
    • Frozen shredded hash browns – you want to make sure you defrost these before assembling the casserole. I usually put it in the fridge the night before I make it.
    • Cheddar cheese
    • Cottage cheese – my kids don’t like cottage cheese but they have no problem with it in this casserole. It just adds more creaminess and extra cheesy flavor.
    • Swiss cheese – you could do monterey jack if you don’t like swiss

    How To Make Amish Breakast Casserole

    • Defrost. Let frozen shredded hashbrowns defrost in refrigerator overnight
    • Saute. When ready to cook, saute bacon and onion until bacon is crispy and onion is soft; add garlic
    • Combine. Combine defrosted shredded hashbrows, bacon mixture, cottage cheese, Swiss cheese, cheddar cheese, and eggs; stir until well mixed
    • Transfer. Transfer mixture to a 9×13-inch pan
    • Bake. Bake about 35 minutes, until the center is set
    • Enjoy! Let stand about 5 minutes before serving

    Can You Make Amish Breakfast Casserole Ahead?

    Yes! You can definitely prep this the night before if you have a busy morning. Follow all instructions up to actually putting it in the oven the night before. 

    The next morning, follow baking instructions. You may need to add a few extra minutes to account for it being chilled. 

    Amish Breakfast Casserole - bacon, hashbrowns, 2 cheeses, and eggs! An easy, hearty weekend breakfast or meal prep it to have all week long.

    Can Yo Freeze It?

    Yes! You can freeze this breakfast casserole either unbaked or baked!

    To freeze it unbaked, assemble it completely and transfer to a freezer-safe and oven-safe container (like a disposable aluminum foil pan). Cover it tightly and freeze for up to 2 months. Defrost it in the refrigerator overnight before baking. 

    To freeze the baked version, I would divide it into individual portions and freeze in separate containers. That way you can just pull out a single serving if that’s all you need. The baked casserole should be good in the freezer for up to 3 months.

    More Breakfast Recipes

    • Honey Ham Biscuits
    • Crockpot Cinnamon Roll Casserole
    • Breakfast Stuffed Acorn Squash
    • Slow Cooker Breakfast Casserole

    Make sure you subscribe to my email list to get all my new recipes delivered right to your inbox!

    You can also follow me on Instagram, Facebook, or Pinterest for even more! 

    📖 Recipe

    Yield: 12 servings

    Amish Breakfast Casserole

    Amish Breakfast Casserole

    Amish Breakfast Casserole is a delicious baked casserole made with bacon, hashbrowns, 2 cheeses, and eggs! An easy, hearty weekend breakfast or meal prep it to have all week long.

    Prep Time 15 minutes
    Cook Time 45 minutes
    Total Time 1 hour

    Ingredients

    • 1 pound sliced bacon, diced
    • 1 medium onion, chopped
    • 1-2 cloves garlic, minced
    • 8 eggs, beaten
    • ½ teaspoon salt
    • ¼ teaspoon pepper
    • 24 ounces frozen shredded hash browns, thawed
    • 2 cups cheddar cheese, shredded
    • 12 ounces 1 ½ cups small curd cottage cheese
    • 1 ¼ cups Swiss cheese, shredded

    Instructions

    1. Preheat oven to 350F. Spray a 9x13-inch casserole dish with cooking spray.
    2. In a large skillet, combine the onion and bacon and cook until bacon is crisp and onions are translucent. Drain off fat; add garlic and stir for about a minute or until fragrant. Remove from heat and set aside.
    3. In a large mixing bowl, stir together the remaining ingredients. Add the bacon and stir until combined. Transfer to the prepared casserole dish and bake uncovered for 35-40 minutes or until a knife inserted near the center comes out clean. Let stand 5 minute before serving.

    Recommended Products

    As an Amazon Associate and member of other affiliate programs, I earn from qualifying purchases.

    • Grater
      Grater
    • 9x13-inch pan
      9x13-inch pan

    Nutrition Information:

    Yield:

    12

    Serving Size:

    1

    Amount Per Serving: Calories: 524Total Fat: 37gSaturated Fat: 13gTrans Fat: 0gUnsaturated Fat: 21gCholesterol: 195mgSodium: 1267mgCarbohydrates: 21gFiber: 2gSugar: 2gProtein: 28g

    Did you make this recipe?

    Tag me in your Instagram photo - @fakeginger

    © Amanda Livesay
    Cuisine: American / Category: breakfast

    Chewy Chocolate Chip Cookies

    Jan 18, 2020

    This Chewy Chocolate Chip Cookies recipe is the BEST recipe to get soft and chewy chocolate chip cookies! You will never make another chocolate chip cookie recipe.

    Chewy Chocolate Chip Cookies - the BEST recipe to get soft and chewy chocolate chip cookies! You will never make another chocolate chip cookie recipe.

    Originally published February 8, 2012 and updated on January 18, 2020.

    This is my alltime favorite chocolate chip cookie recipe. It has been my go to for 8 years now – thankfully I documented it on this blog so I know exactly how long I’ve been obsessed!

    They are soft and chewy and just the most perfect cookie if you are a soft cookie person like me. And the best part is that they stay soft. They’re not going to dry out and be crispy on day 2 or day 3. 

    If you want another option for a chewy chocolate chip cookie, my Chocolate Chip Pudding Cookies are amazing! 

    A stack of chocolate chip cookies on a white plate

    Ingredients

    • Unsalted butter – make sure to soften it to room temperature before starting the recipe. If you need to us salted butter, you can lower the amount of salt you add later in the recipe.
    • Brown sugar – the brown sugar helps to keep the cookies nice and soft.
    • Granulated sugar
    • Egg
    • Vanilla extract
    • All-purpose flour
    • Cornstarch – this makes the cookies soft AND makes them a little fluffier than a normal cookie.
    • Baking soda
    • Salt
    • Semisweet chocolate chips – you can use milk or dark chocolate chips if you prefer.

    How To Make Chewy Chocolate Chip Cookies

    • Combine wet ingredients. Beat together butter, brown sugar, and granulated sugar; add egg and vanilla
    • Combine dry ingredients. Whisk flour, cornstarch, baking soda, and salt together in a separate bowl
    • Combine all. Add dry ingredients to wet ingredients and beat until just combined
    • Add chocolate. Fold in chocolate chips
    • Transfer to pan. Drop dough by tablespoonfuls onto a prepared baking sheet
    • Bake. Bake 8 – 10 minutes
    • Cool. Let cool on the baking sheet for a few minutes before transferring to a wire rack to cool completely before serving
    Chocolate chip cookies cooling on a wire rack

    What Makes These Cookies Chewy?

    It’s a combination of a few different things that keep these cookies chewy. 

    First, the amount of brown sugar. More brown sugar than granulated sugar will usually give you a softer cookie.

    Second, the cornstarch! Most cookies don’t call for cornstarch but the little bit of it in this recipe makes sure your cookies stay soft and chewy.

    And finally, don’t overbake them! As soon as you see the edges turning golden, pull them out! If you overbake them, they will dry out and lose their softness. 

    How Long Are Chewy Chocolate Chip Cookies Good For?

    These Chewy Chocolate Chip Cookies will stay fresh for 3 – 4 days when stored at room temperature in an airtight container.

    The inside of a chocolate chip cookie

    Can You Freeze Chewy Chocolate Chip Cookies?

    Yes! You can freeze either the dough or the baked cookie! 

    To freeze the dough, I like to drop tablespoonfuls of dough onto a baking sheet and put that into the freezer until they are almost frozen, about 30 minutes to an hour.

    From there, you can put the dough balls into an airtight container (like a freeze safe ziploc bag) and store in the freezer for up to 3 months. 

    And then you get a craving for a freshly baked chewy chocolate chip cookie, you can pull out 1 or 2 dough balls and bake them as the recipe says but you will probably need to add another couple minutes to the bake time. 

    To freeze already baked cookie, store them in an airtight container for up to 3 months. Let them defrost overnight at room temperature before serving. 

    A stack of chewy chocolate chip cookies on a white plate

    More Cookie Recipes

    • Cranberry Orange Cookies
    • Italian Sugar Cookies
    • Chewy Monster Cookies
    • Reese’s Pieces Chocolate Chip Cookies
    • Peanut Butter Krispie Cookies

    Make sure you subscribe to my email list to get all my new recipes delivered right to your inbox!

    You can also follow me on Instagram, Facebook, or Pinterest for even more! 

    📖 Recipe

    Yield: 36 cookies

    Chewy Chocolate Chip Cookies

    Chewy Chocolate Chip Cookies

    This Chewy Chocolate Chip Cookies recipe is the BEST recipe to get soft and chewy chocolate chip cookies! You will never make another chocolate chip cookie recipe.

    Prep Time 15 minutes
    Cook Time 10 minutes
    Total Time 25 minutes

    Ingredients

    • ¾ c. unsalted butter, softened
    • ¾ cup brown sugar
    • ¼ cup granulated sugar
    • 1 egg
    • 2 teaspoon vanilla extract
    • 2 cup all-purpose flour
    • 2 teaspoon cornstarch
    • 1 teaspoon baking soda
    • ½ teaspoon salt
    • 1 cup semisweet chocolate chips

    Instructions

    1. Preheat oven to 350F.
    2. In the bowl of a stand mixer fitted with a paddle attachment (or with a hand mixer), cream together butter, brown sugar, and granulated sugar until fluffy. Add egg and vanilla and mix.
    3. In a separate mixing bowl, whisk together flour, cornstarch, baking soda and salt.
    4. Add dry ingredients to wet ingredients and beat until just combined.
    5. Fold in chocolate chips using a rubber spatula.
    6. Drop dough, using a tablespoon, onto a prepared baking sheet. Bake for 8-10 minutes, just until the edges start to brown. The insides will not brown.
    7. Transfer the sheet to a wire rack and let cool for about 5 minutes before removing from pan.

    Recommended Products

    As an Amazon Associate and member of other affiliate programs, I earn from qualifying purchases.

    • Parchment Paper
      Parchment Paper
    • Rimmed Baking Sheet
      Rimmed Baking Sheet
    • Stand Mixer
      Stand Mixer

    Nutrition Information:

    Yield:

    36

    Serving Size:

    1

    Amount Per Serving: Calories: 106Total Fat: 5gSaturated Fat: 3gTrans Fat: 0gUnsaturated Fat: 2gCholesterol: 15mgSodium: 69mgCarbohydrates: 14gFiber: 0gSugar: 8gProtein: 1g

    Did you make this recipe?

    Tag me in your Instagram photo - @fakeginger

    © Amanda Livesay
    Cuisine: American / Category: cookie

    White Chocolate Crockpot Candy

    Jan 09, 2020

    White Chocolate Crockpot Candy is easy 4 ingredient white chocolate peanut clusters! Made completely in the slow cooker. Perfect for holidays!

    My most popular recipe I’ve ever shared is my Crockpot Candy recipe. It is also my personal favorite and I make it for every holiday. I think I made 7 batches this past holiday season. 

    White Chocolate Crockpot Candy - easy 4 ingredient white chocolate peanut clusters! Made completely in the slow cooker. Perfect for holidays!

    So it’s about time that I made a White Chocolate Crockpot Candy! 

    I’m a white chocolate person so I almost prefer this version to the original. It is only 4 ingredients and made in the slow cooker. It’s just so easy! 

    Plus, you can change up the sprinkles you use for the holidays. How cute are they for Valentine’s Day with little heart sprinkles? It would also be cute around Halloween with black and orange spooky sprinkles on top. Or 4th of July red and blue star sprinkles?! Adorable. 

    White Chocolate Crockpot Candy - easy 4 ingredient white chocolate peanut clusters! Made completely in the slow cooker. Perfect for holidays!

    Ingredients

    • White almond bark – this is a white chocolate candy coating. You should be able to find it in the baking aisle of any large grocery store. It sets quickly which makes it perfect for easy treats like this
    • White chocolate baking bar
    • White chocolate chips
    • Dry roasted peanuts – I always use salted dry roasted peanuts but you can use lightly salted or unsalted if you prefer
    • Sprinkles – optional but they make the crockpot candy even more fun
    White Chocolate Crockpot Candy - easy 4 ingredient white chocolate peanut clusters! Made completely in the slow cooker. Perfect for holidays!

    How To Make White Chocolate Crockpot Candy

    • Add ingredients to slow cooker. Add white almond bark, white chocolate baking bar, white chocolate chips, and peanuts to slow cooker. Let cook on low for 1 hour.
    • Stir every 15 minutes. After an hour, stir to combine everything. Allow to cook for another hour, stirring every 15 minutes.
    • Shape and decorate. Drop spoonfuls of candy onto wax or parchment paper. Add sprinkles on top if desired.
    • Let set. Allow to cool completely before serving and storing.
    White Chocolate Crockpot Candy - easy 4 ingredient white chocolate peanut clusters! Made completely in the slow cooker. Perfect for holidays!

    My White Chocolate Crockpot Candy Isn’t Setting Up

    I have had a couple readers mention that their crockpot candy takes awhile to set up. I’ve never had this problem. I have the opposite problem. Mine sets up so quickly that if I’m not adding sprinkles right away, it’s too late!

    If your crockpot candy isn’t setting, transfer it to the fridge for a few minutes and it should set up very fast.

    How Long Is Crockpot Candy Good For?

    Crockpot Candy should be fine for 2 – 3 weeks in an airtight container.

    I always keep mine on the counter since we go through it quickly but if you need it to last longer, store it in the fridge. Just pull it out of the fridge an hour or so before serving so it’s not rock hard. 

    Can You Freeze Crockpot Candy?

    Yes! If you have leftover white chocolate crockpot candy or need to make it ahead of time, freeze them in a ziploc bag, making sure to squeeze out as much air as possible. 

    Let thaw on the counter overnight before serving. 

    White Chocolate Crockpot Candy - easy 4 ingredient white chocolate peanut clusters! Made completely in the slow cooker. Perfect for holidays!

    More White Chocolate Recipes

    • White Chocolate Peppermint Fudge
    • White Chocolate Orange Cookies
    • Pistachio White Chocolate Pudding Cookies
    • White Chocolate Raspberry S’mores

    Make sure you subscribe to my email list to get all my new recipes delivered right to your inbox!

    You can also follow me on Instagram, Facebook, or Pinterest for even more! 

    White Chocolate Crockpot Candy - easy 4 ingredient white chocolate peanut clusters! Made completely in the slow cooker. Perfect for holidays!

    📖 Recipe

    Yield: 50 servings

    White Chocolate Crockpot Candy

    White Chocolate Crockpot Candy

    White chocolate covered peanut clusters made in the slow cooker with only 4 ingredients.

    Prep Time 5 minutes
    Cook Time 2 hours
    Total Time 2 hours 5 minutes

    Ingredients

    • 2 pounds white almond bark
    • 4 ounces white chocolate baking bar
    • 12 ounce bag white chocolate chips
    • 24 ounces dry roasted peanuts
    • sprinkles, optional

    Instructions

    1. Add white almond bark, white chocolate bakig bar, white chocolate chips, and peanuts to slow cooker. Let cook on low for 1 hour.
    2. Affter an hour, stir to combine everything. Allow to cook for another hour, stirring every 15 minutes.
    3. Drop spoonfuls of candy onto wax or parchment paper. Add sprinkles on top if desired.
    4. Allow to cool completely before serving and storing.

    Recommended Products

    As an Amazon Associate and member of other affiliate programs, I earn from qualifying purchases.

    • Rainbow Sprinkles
      Rainbow Sprinkles
    • White Almond Bark
      White Almond Bark
    • Programmable Slow Cooker
      Programmable Slow Cooker

    Nutrition Information:

    Yield:

    50

    Serving Size:

    1

    Amount Per Serving: Calories: 238Total Fat: 19gSaturated Fat: 4gTrans Fat: 0gUnsaturated Fat: 14gCholesterol: 2mgSodium: 154mgCarbohydrates: 12gFiber: 3gSugar: 7gProtein: 8g

    Did you make this recipe?

    Tag me in your Instagram photo - @fakeginger

    © Amanda Livesay
    Cuisine: American / Category: slow cooker

    Instant Pot Buffalo Chicken Dip

    Jan 08, 2020

    Instant Pot Buffalo Chicken Dip is a creamy, spicy dip filled with buffalo sauce, ranch dressing, and shredded chicken! Made in 15 minutes in the pressure cooker. Serve with chips and celery sticks for the perfect party appetizer!

    Football food is my favorite kind of food! Try our Layered Ranch Taco Dip, Cheesy Sausage and Spinach Dip, or Dill Pickle Dip!

    Instant Pot Buffalo Chicken Dip - creamy, spicy dip filled with buffalo sauce, ranch dressing, and shredded chicken! Made in 15 minutes in the pressure cooker. Serve with chips and celery sticks for the perfect party appetizer!

    Hi guys! With the Superbowl coming up, I thought I’d share a classic Superbowl party favorite but made in the pressure cooker! 

    I’ve been making Buffalo Chicken Dip for every Superbowl for at least 10 years. It’s always a crowd favorite and a great alternative to messy wings. 

    Plus, this Instant Pot version takes less than 30 minutes from start to finish! But if you don’t have a pressure cooker or just don’t want to use it, I have a Buffalo Chicken Dip recipe that’s made in the oven, too!

    Instant Pot Buffalo Chicken Dip - creamy, spicy dip filled with buffalo sauce, ranch dressing, and shredded chicken! Made in 15 minutes in the pressure cooker. Serve with chips and celery sticks for the perfect party appetizer!

    Ingredients

    • Boneless skinless chicken breasts – I’m usually a chicken thigh girl but the thighs are a little bit too fatty for this dip.
    • Frank’s Red Hot Sauce – not the buffalo sauce, just the original Frank’s Red Hot Sauce.
    • Cream cheese
    • Ranch dressing – you can’t have buffalo chicken without ranch!
    • Colby Jack cheese – you can use cheddar if that’s what you have.
    • Blue cheese
    • Green onions
    • Tortilla chips and celery – or whatever else you plan to serve with it

    Instructions

    • Add ingredients. Trim fat from chicken and place in insert of Instant Pot. Pour Frank’s Red Hot Sauce over top.
    • Cook. Close Instant Pot and make sure steam valve is also closed. Cook on HIGH pressure for 15 minutes. Once 15 minutes is up, let naturally release for 5 minutes and quick release the remaining pressure.
    • Shred. Use tongs to remove chicken to a bowl and shred with 2 forks. Return to Instant Pot. Set Instant Pot to Keep Warm.
    • Add remaining ingredients. Add cream cheese, ranch dressing, and cheese. Stir to combine.

    Can You Make Buffalo Chicken Dip Ahead?

    Yes, you can make this Instant Pot Buffalo Chicken Dip ahead of time. 

    If you only need to make it an hour or so ahead, just keep the Instant Pot on the Keep Warm feature until you are ready to serve.

    If you need to prep it more than an hour before, store it in the fridge in an airtight container and reheat in the microwave or in the oven. You can also put the Instant Pot on Keep Warm and reheat it that way if you plan to serve it right out of the Instant Pot. 

    Instant Pot Buffalo Chicken Dip Process Shots

    How Long is Buffalo Chicken Dip Good For?

    This Instant Pot Buffalo Chicken Dip should stay good in the fridge for up to 3 days. Make sure you store it in an airtight container.

    You can reheat it in the microwave or put it in an oven-safe dish and bake it at 350F until it starts to bubble. 

    Can You Freeze Buffalo Chicken Dip?

    Yes, you can freeze Buffalo Chicken Dip but the texture may change a little bit after being frozen. It will taste the same but might not be as creamy as it was originally. 

    To freeze, put it in an airtight freezer-safe container. It can be frozen for up to 3 months. Thaw it in the fridge overnight before reheating and serving. 

    Instant Pot Buffalo Chicken Dip - creamy, spicy dip filled with buffalo sauce, ranch dressing, and shredded chicken! Made in 15 minutes in the pressure cooker. Serve with chips and celery sticks for the perfect party appetizer!

    What To Serve with Buffalo Chicken Dip

    I always serve Buffalo Chicken Dip with tortilla chips and celery sticks. You can also serve it with your favorite kind of crackers, baby carrots, pretzels, pita chips, anything you enjoy really! 

    Can You Make Buffalo Chicken Dip in the Crockpot?

    Yes! But it’s going to take awhile. 

    You will need all the same ingredients and follow the same instructions but your chicken is going to need to cook in the slow cooker on high for 3 – 4 hours or low for 5 – 6 hours, until it is easily shredded with a fork. 

    Once the chicken is cooked, add the remaining ingredients like the recipe says. 

    Instant Pot Buffalo Chicken Dip - creamy, spicy dip filled with buffalo sauce, ranch dressing, and shredded chicken! Made in 15 minutes in the pressure cooker. Serve with chips and celery sticks for the perfect party appetizer!

    More Instant Pot Recipes

    • Instant Pot Sesame Chicken
    • Instant Pot Corn Chowder
    • Instant Pot Crack Chicken

    Make sure you subscribe to my email list to get all my new recipes delivered right to your inbox!

    You can also follow me on Instagram, Facebook, or Pinterest for even more! 

    Instant Pot Buffalo Chicken Dip - creamy, spicy dip filled with buffalo sauce, ranch dressing, and shredded chicken! Made in 15 minutes in the pressure cooker. Serve with chips and celery sticks for the perfect party appetizer!

    📖 Recipe

    Yield: 12 servings

    Instant Pot Buffalo Chicken Dip

    Instant Pot Buffalo Chicken Dip

    Creamy and spicy dip filled with buffalo sauce, ranch dressing, and shredded chicken!

    Prep Time 10 minutes
    Cook Time 10 minutes
    Total Time 20 minutes

    Ingredients

    • 1 pound boneless skinless chicken breasts
    • 1 cup Frank's Red Hot Sauce
    • 2 (8-ounce) blocks cream cheese
    • 1 cup ranch dressing
    • 1 ½ cups Colby Jack cheese
    • blue cheese, optional, for serving
    • green onions, optional, for serving
    • tortilla chips and celery, for serving

    Instructions

    1. Trim fat from chicken and place in insert of Instant Pot. Pour Frank's Red Hot Sauce over top. Close Instant Pot and make sure steam valve is also closed. Cook on HIGH pressure for 15 minutes.
    2. Once 15 minutes is up, let naturally release for 5 minutes and quick release the remaining pressure.
    3. Use tongs to remove chicken to a bowl and shred with 2 forks. Return to Instant Pot.
    4. Set Instant Pot to Keep Warm. Add cream cheese, ranch dressing, and cheese. Stir to combine. It may take a few minutes for the cream cheese to melt and become fully incorporated. You can let it sit in the warm Instant Pot for about 5 minutes and then give it a good stir.
    5. You can leave it in the Instant Pot on Keep Warm and serve it like that or transfer to a seving dish. Sprinkle with blue cheese and green onions before serving.

    Recommended Products

    As an Amazon Associate and member of other affiliate programs, I earn from qualifying purchases.

    • Frank's Red Hot Sauce
      Frank's Red Hot Sauce
    • Instant Pot Pressure Cooker
      Instant Pot Pressure Cooker

    Nutrition Information:

    Yield:

    12

    Serving Size:

    1

    Amount Per Serving: Calories: 228Total Fat: 17gSaturated Fat: 6gTrans Fat: 0gUnsaturated Fat: 10gCholesterol: 56mgSodium: 841mgCarbohydrates: 2gFiber: 0gSugar: 1gProtein: 17g

    Did you make this recipe?

    Tag me in your Instagram photo - @fakeginger

    © Amanda Livesay
    Cuisine: American / Category: appetizer

    Crockpot Candy VIDEO – Crockpot Chocolate Peanut Clusters

    Dec 18, 2019

    Crockpot Candy is a must make for the holiday season! It’s like chocolate covered peanuts but better! Only 4 ingredients and made completely in the slow cooker. It makes a ton so it is perfect for cookie tins or holiday parties!

    These are a must make for me for my holiday cookie tins! Some of my other must makes for the holidays are Cranberry Orange Cookies, White Chocolate Peanut Butter Ritz Crackers, and Italian Sugar Cookies.

    Crockpot Candy is a must make for the holiday season! It's like chocolate covered peanuts but better! Only 4 ingredients and made completely in the slow cooker. It makes a ton so it is perfect for cookie tins or holiday parties!

    This is my ultimate, most favorite recipe ever.

    If I had to pick a signature recipe, this would be it.

    And it’s not even mine.

    My best friend Megan and her mom gave me this recipe years and years ago.

    They make it every Christmas and every Christmas I would beg her to bring me some. I honestly had no idea it was so easy until she showed up at my house with all the ingredients on year and threw it all in the slow cooker.

    Now I make at least 2 batches every holiday season to fill Christmas cookie tins and send as teacher gifts. It is so delicious, practically addictive, everyone loves it, and everyone you gift it to will be asking for the recipe! 

    Crockpot Candy is a must make for the holiday season! It's like chocolate covered peanuts but better! Only 4 ingredients and made completely in the slow cooker. It makes a ton so it is perfect for cookie tins or holiday parties!

    Ingredients For Crockpot Candy

    • White Almond Bark – this is a white melting chocolate that’s typically used for making almond bark. You can find it in the baking aisle of all large grocery stores, with the chocolate chips.
    • German Chocolate Bar – this is a sweet baking chocolate that you can find in the baking aisle with the chocolate chips.
    • Semisweet Chocolate Chips
    • Dry Roasted Peanuts – I use salted because I like the sweet and salty flavor. If you don’t even sweet and salty, use unsalted peanuts.

    How To Make Crockpot Candy

    • Combine. Add white almond bark, German chocolate bar, semisweet chocolate chips, and peanuts to slow cooker
    • Cook. Let cook on low for 1 hour without messing with it
    • Stir. After an hour, stir to combine everything
    • Cook. Allow to cook for another hour, stirring every 15 minutes
    • Finish. Drop spoonfuls of the candy onto wax paper and allow to cool completely

    What Size Crockpot Do I Need for Crockpot Candy?

    I use a 6 quart slow cooker for this recipe. I don’t recommend using anything much smaller than that but an 8 quart will work fine.

    How Long Is It Good For?

    Crockpot Candy is good for several weeks in the fridge. Make sure to store Crockpot Candy in an airtight container to keep it good for as long as possible.

    I like mine room temperature so I recommend letting it sit on the counter for 10 – 15 minutes before serving. You can also serve it right from the fridge if you prefer!

    Crockpot Candy is a must make for the holiday season! It's like chocolate covered peanuts but better! Only 4 ingredients and made completely in the slow cooker. It makes a ton so it is perfect for cookie tins or holiday parties!

    What Is Almond Bark?

    Okay, so it’s technically it’s not even called almond bark! It’s a candy coating (either vanilla or chocolate) but the packages usually have “Make Your Own ALMOND BARK!” on the front so everyone just calls it almond bark. 

    There are no almonds or nuts of any kind. It is a chocolaty candy coating that melts really easily and produces a glossy, beautiful candy.

    It also sets up really quickly so you don’t have candy sitting on your counter for hours and hours. 

    Almond bark available in most of the grocery stores near me (plus Walmart and Super Target) year round in the baking aisle right near the chocolate chips. During the holiday season, most stores will have huge baking displays where you can find almond bark as well. Or you can always order almond bark online. 

    If, for some reason, you can’t find it, the candy melts you find in the craft store work similarly. 

    Crockpot Candy is a must make for the holiday season! It's like chocolate covered peanuts but better! Only 4 ingredients and made completely in the slow cooker. It makes a ton so it is perfect for cookie tins or holiday parties!

    Help! My Crockpot Candy Isn’t Setting Up!

    I have never had this problem but I have had readers say their Crockpot Candy takes forever to set up. 

    The amount of almond bark used in the recipe should make it set up pretty quickly, especially if your house isn’t super hot, but if you are having problems, transfer them to your refrigerator for a few minutes and they should set up very fast. 

    Crockpot Candy is a must make for the holiday season! It's like chocolate covered peanuts but better! Only 4 ingredients and made completely in the slow cooker. It makes a ton so it is perfect for cookie tins or holiday parties!

    Can You Freeze Crockpot Candy?

    Yes! If you are looking to get a jump start on your holiday baking, you can freeze it in an airtight freezer ziploc bag, making sure to remove as much of the air as possible.

    Just let it thaw in the refrigerator or on the counter before serving. 

    Variations

    • I really like to make crockpot candy with pecans or cashews! It is a lot more expensive to make it that way but it’s also more addictive!
    • Change up the sprinkle colors based on the time of year or holidays! Halloween, Easter, Valentine’s Day!

    More Crockpot Dessert Recipes

    • Crockpot Crunchy Drop Cookies 
    • Slow Cooker Almond Joy Chocolate Clusters 
    • Slow Cooker Caramel Apple Crumble 

    Make sure you subscribe to my email list to get all my new recipes delivered right to your inbox!

    You can also follow me on Instagram, Facebook, or Pinterest for even more! 

    📖 Recipe

    Yield: 50 servings

    Crockpot Candy

    Crockpot Candy

    Crockpot Candy is a must make for the holiday season! It's like chocolate covered peanuts but better! Only 4 ingredients and perfect for cookie tins!

    Prep Time 5 minutes
    Cook Time 2 hours
    Total Time 2 hours 5 minutes

    Ingredients

    • 2 pound white almond bark
    • 4 ounces German chocolate bar
    • 12 ounce bag semisweet chocolate chips
    • 24 ounces dry roasted peanuts

    Instructions

    1. Add white almond bark, German chocolate bar, semisweet chocolate chips, and peanuts to slow cooker. Let cook on low for 1 hour without messing with it. After an hour, stir to combine everything. Allow to cook for another hour, stirring every 15 minutes.
    2. Drop spoonfuls of the candy onto wax paper and allow to cool completely.

    Recommended Products

    As an Amazon Associate and member of other affiliate programs, I earn from qualifying purchases.

    • Christmas Sprinkles
      Christmas Sprinkles
    • White Almond Bark
      White Almond Bark
    • Pressure Cooker
      Pressure Cooker

    Nutrition Information:

    Yield:

    50

    Serving Size:

    1

    Amount Per Serving: Calories: 233Total Fat: 19gSaturated Fat: 3gTrans Fat: 0gUnsaturated Fat: 14gCholesterol: 1mgSodium: 149mgCarbohydrates: 12gFiber: 4gSugar: 6gProtein: 8g

    Did you make this recipe?

    Tag me in your Instagram photo - @fakeginger

    © Amanda Livesay
    Category: candy

    Christmas Confetti Cookies

    Dec 16, 2019

    Christmas Confetti Cookies – soft and chewy sugar cookies rolled in Christmas sprinkles. Santa is going to love these cookies!

    Some of my other favorite holiday treats are No Bake Avalanche Cookies and Crockpot Candy.

    Christmas Confetti Cookies - soft and chewy sugar cookies rolled in Christmas sprinkles. Santa is going to love these cookies!

    I’ve been blogging for a long time and over the years I’ve claimed that many cookies were my favorite Christmas cookies but these Christmas Confetti Cookies are definitely my most favorite Christmas cookie ever.

    Sprinkles just make everything better so Christmas sprinkles make everything a million times better. 

    Plus, I love a soft sugar cookie. Don’t you? Just a buttery sugar cookie that practically melts in your mouth. The best. 

    This is a really easy, simple recipe that would be great for baking with kids. Kids love sprinkles as much as I love sprinkles so I know they’d love rolling the cookie dough through a big bowl of colorful sprinkles.

    And I’ve been told that Santa also really loves sprinkles. 

    …

    Read More

    Bacon Cheddar Dog Treats

    Dec 10, 2019

    Bacon Cheddar Dog Treats – homemade dog treats made with cheddar cheese and bacon fat! Your dog is going to love these!

    Bacon Cheddar Dog Treats - homemade dog treats made with cheddar cheese and bacon fat! Your dog is going to love these!

    You know what the dogs in your life want for the holidays?

    Homemade dog treats! Specifically, homemade treats with bacon and cheese. 

    My dogs all love them and they are really easy to make. Pack these Homemade Bacon Cheddar Dog Treats up in a cute cookie tin and deliver them to all the cute pups you know!

    The first step in making these Bacon Cheddar Dog Treats is to start saving all the bacon fat from the bacon you cook. Just store it in the fridge until you get at least 10 tablespoons.

    It might take awhile and several packages of bacon. Your dogs will appreciate it the effort, I promise.

    Bacon Cheddar Dog Treats - homemade dog treats made with cheddar cheese and bacon fat! Your dog is going to love these!

    Ingredients

    • 10 tablespoon bacon fat
    • 2 eggs
    • 1 cup milk
    • ½ cup water
    • 5 cups all-purpose flour
    • ½ cup shredded cheddar cheese

    Instructions

    • Preheat oven to 350F. Line 2 baking sheets with parchment paper. Set aside.
    • In a large mixing bowl, beat together bacon fat and eggs until well blended. Add milk, water, and flour and beat until combined. Quickly beat in cheddar cheese. The dough should be stiff enough to roll out.
    • Roll out on a floured surface to about ¼-inch thick.
    • Use a cookie cutter to cut out the treats and transfer them to the prepared baking sheet, leaving an inch between treats. Repeat with all dough.
    • Bake 25 – 30 minutes, rotating baking sheets halfway through, until the dog treats are golden brown. If you want a crunchier treat, leave them in closer to 30 minutes.

    How Long Are Homemade Dog Treats Good For

    These Bacon Cheddar Dog Treats are good for up to a week if stored properly. They should be stored in an airtight container in the refrigerator. 

    Can Homemade Dog Treats Be Frozen

    You can freeze homemade dog treats for up to 6 months if you don’t think your dog will eat them within a week. Put them in a freezer ziploc bag and squeeze as much air out as possible before putting them in the freezer.

    Defrost in the refrigerator overnight before serving. 

    More Homemade Dog Treats 

    • Peanut Butter Pupcakes
    • Pumpkin Peanut Butter Dog Ice Cream
    • Homemade Chicken Jerky for Dogs
    • Peanut Butter and Banana Frozen Dog Treats
    • Pumpkin Apple Dog Treats
    • Carrot, Peanut Butter, and Oats Dog Treats
    Bacon Cheddar Dog Treats - homemade dog treats made with cheddar cheese and bacon fat! Your dog is going to love these!

    📖 Recipe

    Yield: 24 servings

    Bacon Cheddar Dog Treats

    Bacon Cheddar Dog Treats
    Prep Time 10 minutes
    Cook Time 30 minutes
    Total Time 40 minutes

    Ingredients

    • 10 tablespoon bacon fat, melted and cooled
    • 2 eggs
    • 1 cup milk
    • ½ cup water
    • 5 cups all-purpose flour
    • ½ cup shredded cheddar cheese

    Instructions

    1. Preheat oven to 350F. Line 2 baking sheets with parchment paper. Set aside.
    2. In a large mixing bowl, beat together bacon fat and eggs until well blended. Add milk, water, and flour and beat until combined. Quickly beat in cheddar cheese. The dough should be stiff enough to roll out.
    3. Roll out on a floured surface to about ¼-inch thick. Use a cookie cutter to cut out the treats and transfer them to the prepared baking sheet, leaving an inch between treats. Repeat with all dough.
    4. Bake 25 - 30 minutes, rotating baking sheets halfway through, until the dog treats are golden brown. If you want a crunchier treat, leave them in closer to 30 minutes.

    Recommended Products

    As an Amazon Associate and member of other affiliate programs, I earn from qualifying purchases.

    • Rimmed Baking Sheet
      Rimmed Baking Sheet
    • Parchment Paper
      Parchment Paper
    • Bone Cookie Cutters
      Bone Cookie Cutters

    Nutrition Information:

    Yield:

    24

    Serving Size:

    1

    Amount Per Serving: Calories: 164Total Fat: 7gSaturated Fat: 3gTrans Fat: 0gUnsaturated Fat: 4gCholesterol: 24mgSodium: 35mgCarbohydrates: 20gFiber: 1gSugar: 0gProtein: 4g

    Did you make this recipe?

    Tag me in your Instagram photo - @fakeginger

    Category: dog-friendly
    « Previous Page
    Next Page »

    Primary Sidebar

    Amanda Livesay
    Hi, I'm Amanda! DFW food blogger, mom of boys, and crazy dog lady.
    Read more
    Privacy Policy
    Privacy Policy

    Footer

    ↑ back to top

    About

    • Privacy Policy
    • About Fake Ginger

    Newsletter

    • Sign Up for weekly emails featuring new recipes!

    As an Amazon Associate I earn from qualifying purchases.

    Copyright © 2024 FakeGinger.com