• Skip to primary navigation
  • Skip to main content
  • Skip to primary sidebar
  • Home
  • About
  • Recipes

Fake Ginger

menu icon
go to homepage
  • Recipe Index
  • About
  • Subscribe
    • Facebook
    • Instagram
    • Pinterest
  • subscribe
    search icon
    Homepage link
    • Recipe Index
    • About
    • Subscribe
    • Facebook
    • Instagram
    • Pinterest
  • ×
    Home » Page 11

    Snickerdoodles

    Snickerdoodles

    Nov 29, 2021

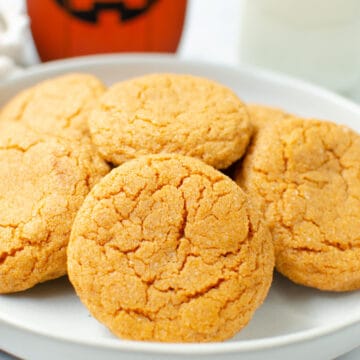
    A classic holiday cookie! Snickerdoodles are soft and chewy cookies rolled in cinnamon sugar before baking. Add them to your cookie tins this holiday season!

    I also have a Gluten Free Snickerdoodles recipe if Santa is gluten free in your house!

    Originally published December 16, 2009. Updated November 29, 2021.

    Snickerdoodles are the quintessential holiday cookie in my mind. They were always on Santa’s plate of cookies when I was growing up and now I make them for my own kids to leave for Santa.

    Snickerdoodles are similar to a sugar cookie but with a delicious chewiness. And they’re rolled in cinnamon roll before baking to make them even more delicious!

    Ingredients

    • Butter
    • Sugar
    • Eggs
    • Flour
    • Cream of tartar – this adds the tang and chewiness that snickerdoodles are famous for
    • Baking soda
    • Salt
    • Cinnamon

    Instructions

    • Prepare. Preheat oven to 350.
    • Combine wet ingredients. Beat butter, 1 ½ cups sugar and eggs thoroughly in a large bowl with an electric mixer until light and fluffy.
    • Combine dry ingredients. In a separate bowl combine flour, cream of tartar, baking soda and salt.
    • Combine wet and dry mixtures. Add flour mixture to butter mixture and still until just combined.
    • Chill. Refrigerate dough for about 10-15 minutes.
    • Make cinnamon sugar. Meanwhile, mix 3 tablespoons sugar, and 3 teaspoons cinnamon in a small bowl.
    • Shape dough and coat. Roll dough into 1 inch balls and then roll in cinnamon mixture. Place on ungreased cookie sheet.
    • Bake. Bake 10 – 12 minutes or until lightly golden.

    How Long Are They Good For?

    Snickerdoodles are best within the first 5 days of making them. Make sure to store them at room temperature in an airtight container.

    Can You Freeze Them?

    You can freeze Snickerdoodles for up to 3 months. I recommend wrapping them tightly in plastic wrap and then placing in freezer ziploc bags.

    When you are ready to serve them, just let them sit at room temperature until thawed.

    More Cookie Recipes

    • Butterscotch Pudding Cookies
    • Italian Sugar Cookies
    • Peanut Butter Krispie Cookies
    • Chewy Monster Cookies
    • Pistachio Thumbprint Cookies

    Make sure you subscribe to my email list to get all my new recipes delivered right to your inbox!

    You can also follow me on Instagram, Facebook, or Pinterest for even more! 

    📖 Recipe

    Yield: about 36 cookies

    Snickerdoodles

    Snickerdoodles

    Ingredients

    • 1 cup butter
    • 1 ½ cups sugar
    • 2 large eggs
    • 3 cups flour
    • 2 teaspoons cream of tartar
    • 1 teaspoon baking soda
    • ¼ teaspoon salt
    • 3 tablespoons sugar
    • 3 teaspoons cinnamon

    Instructions

      1. Preheat oven to 350.
      2. Beat butter, 1 ½ cups sugar and eggs thoroughly in a large bowl with an electric mixer until light and fluffy.
      3. In a separate bowl combine flour, cream of tartar, baking soda and salt. Add flour mixture to butter mixture and still until just combined.
      4. Chill dough for about 10-15 minutes in the fridge.
      5. Meanwhile, mix 3 tablespoons sugar, and 3 teaspoons cinnamon in a small bowl.
      6. Roll dough into 1 inch balls and then roll in cinnamon mixture. Place on ungreased cookie sheet.
      7. Bake 10 - 12 minutes or until lightly golden.

    Recommended Products

    As an Amazon Associate and member of other affiliate programs, I earn from qualifying purchases.

    • Rimmed Baking Sheet
      Rimmed Baking Sheet
    • Parchment Paper
      Parchment Paper

    Nutrition Information:

    Yield:

    36

    Serving Size:

    1

    Amount Per Serving: Calories: 124Total Fat: 5gSaturated Fat: 3gTrans Fat: 0gUnsaturated Fat: 2gCholesterol: 24mgSodium: 95mgCarbohydrates: 18gFiber: 0gSugar: 9gProtein: 1g

    Did you make this recipe?

    Tag me in your Instagram photo - @fakeginger

    © Amanda Livesay
    Category: cookie

    Candy Cane Blossoms

    Nov 27, 2021

    Candy Cane Blossoms are the most festive holiday cookie and made with only 3 ingredient! Refrigerated sugar cookie dough rolled in red and green sprinkles and topped with a Candy Candy Hershey’s Kiss.

    I’ve been told that Santa loves cookies with lots of sprinkles! He’d probably love Christmas Confetti Cookies, Sprinkled Shortbread, and Italian Sugar Cookies.

    Originally posted December 8, 2010. Updated November 27, 2021.

    How cute are these?!

    I love all forms of blossom cookies. The peanut butter with the milk chocolate Kisses get made all year long in my house.

    These Candy Cane Blossoms are the most festive of all the blossoms because the dough is rolled in red and green sprinkles before baking and then gets topped with candy cane Kisses!

    And the best party is that they are made with only 3 ingredients! I use a refrigerated sugar cookie dough in there to make things so simple.

    They’re cute, they’re delicious, and they’re great when little helpers want to help make cookies for Santa because they can unwrap the candies and then put them in top of the baked cookies.

    Ingredients for Candy Cane Blossoms

    • Hershey’s Candy Cane Kisses – they’ve also started making a sugar cookie Kiss that would be very cute in these. If you can’t find them, you can get the candy cane Kisses or sugar cookie Kisses online.
    • Refrigerated sugar cookie dough – use your favorite brand or you could even use a homemade recipe if you prefer.
    • Red and green sprinkles – the sanding sugar type of sprinkles work best for this cookie. They’re usually easy to find in the baking aisle or holiday aisle of your store but if you can’t, you can order green sanding sugar and red sanding sugar online.

    Instructions

    • Unwrap. Unwrap the Hershey’s kisses.
    • Prepare. Preheat oven according to package instructions.
    • Roll. Roll each portion of sugar cookie dough in sprinkles.
    • Bake. Bake according to package instructions.
    • Top. Top with a Hershey’s candy cane Kiss.
    • Cool. Remove from cookie sheet to wire rack. Cool completely.

    How Long Are They Good For?

    These Candy Cane Blossoms will be good at room temperature for up to 5 days. Make sure to store them in an airtight container.

    Can You Freeze Them?

    You can freeze these cookies for up to 3 months. Let them cool completely and then I would wrap them tightly (without squishing the candies) in plastic wrap.

    From there, put them in freezer ziploc bags and place in the freezer, being careful not to squish the candies.

    Tips and Tricks

    • The easiest way to coat the cookie dough in sprinkles is to put about ¼ cup of each sprinkle color on a plate with a bit of a lip (or even a pie plate). And just roll the dough through them.

    More Christmas Cookies

    • Almond Bark Drop Cookies
    • Snickerdoodles
    • Frosted Eggnog Cookies
    • Pistachio Thumbprint Cookies
    • Peppermint White Chocolate Sugar Cookies
    • Red Velvet Peppermint Thumbprints

    Make sure you subscribe to my email list to get all my new recipes delivered right to your inbox!

    You can also follow me on Instagram, Facebook, or Pinterest for even more! 

    📖 Recipe

    Yield: 24 cookies

    Candy Cane Blossoms

    Candy Cane Blossoms
    Prep Time 20 minutes
    Cook Time 10 minutes
    Total Time 30 minutes

    Ingredients

    • 24 Hershey's Cane Cane Kisses
    • 1 package refrigerated sugar cookie dough
    • red & green sprinkles

    Instructions

      1. Unwrap Hershey's kisses and set aside.
      2. Preheat oven according to package instructions. Line a baking sheet with parchment paper.
      3. Roll each portion of cookie dough in sprinkles and place on prepared baking sheet. Leave about an inch between each cookie.
      4. Bake according to package instructions.
      5. As soon as they come out of the oven, place a Hershey's kiss on top of each cookie.
      6. Let cool for several minutes on the baking sheet and then cool completely on a wire rack.


    Recommended Products

    As an Amazon Associate and member of other affiliate programs, I earn from qualifying purchases.

    • Red Sprinkles
      Red Sprinkles
    • Green Sprinkles
      Green Sprinkles
    • Candy Cane Kisses
      Candy Cane Kisses
    • Christmas Sprinkles
      Christmas Sprinkles
    • Parchment Paper
      Parchment Paper
    • Rimmed Baking Sheet
      Rimmed Baking Sheet

    Nutrition Information:

    Yield:

    24

    Serving Size:

    1

    Amount Per Serving: Calories: 31Total Fat: 0gSaturated Fat: 0gTrans Fat: 0gUnsaturated Fat: 0gCholesterol: 0mgSodium: 6mgCarbohydrates: 7gFiber: 0gSugar: 5gProtein: 0g

    Did you make this recipe?

    Tag me in your Instagram photo - @fakeginger

    © Amanda Livesay

    White Chocolate Peanut Butter Ritz Crackers

    Nov 22, 2021

    Easy and delicious no bake holiday treat! White Chocolate Peanut Butter Ritz Crackers are the perfect sweet and salty treat. Ritz cracker sandwiches filled with peanut butter and dipped in white chocolate.

    No bake treats are my favorite for the holidays! My other must makes are Crockpot Candy and Almond Bark Drop Cookies.

    No bake treats are truly life savers during the holiday season.

    Need a last minute classroom treat? Your husband just told you he needs a dessert for a work party tomorrow? You spent all week Christmas shopping and don’t feel like baking batches and batches of cookies?

    No bake treats are what you need.

    These are one of my alltime favorite. They are SO easy. I always have everything on hand. And they are set and ready to go in about an hour.

    It’s Ritz cracker sandwiches filled with peanut butter and then dipped in white chocolate. You can’t go wrong with buttery crackers, peanut butter, and white chocolate!

    I always say that sprinkles are optional but are they really? And you can change up the sprinkles based on the holiday or season.

    Ingredients

    • Ritz crackers – the classic regular Ritz cracker. I wouldn’t recommend trying to do with with any of the flavored Ritz crackers. I’ve had readers say that they use the Town House crackers which is another buttery cracker that I think would be delicious.
    • Peanut butter – you can use crunchy or creamy, whichever you prefer. I like to use crunchy to add a little extra texture.
    • White almond bark – you can find this in the baking aisle of any large grocery store, near the chocolate chips. It will also be in the holiday baking section of most grocery stores around the holidays. Or you can always order it online.
    • Sprinkles – I used this sprinkle mix but you can use any sprinkles. You can also change up the sprinkles based on the holidays or seasons!

    Instructions

    • Assemble cracker sandwiches. Lay half of the Ritz crackers on a flat surface. Place about 1 tablespoon of peanut butter on each cracker. Top with remaining crackers and gently press down to spread peanut butter to the edges.
    • Coat with white chocolate. Melt almond bark in a microwave safe bowl in 30 second increments, stirring after each time, until smooth. Use a fork to dip each cracker sandwich in the melted chocolate and coat evenly. Let excess chocolate drip off and then transfer to a piece of parchment paper. Top with sprinkles. Repeat with remaining ingredients.
    • Let almond bark set. Let set until almond bark is no longer wet.

    How Long Are They Good For?

    These chocolate covered Ritz crackers are good for about 3 days before they get too soggy. Make sure to store them in an airtight container.

    I store them at room temperature when I make them for the holidays but if you are making them in the summer or your house is warm, keep them in the fridge so the chocolate doesn’t melt.

    Can You Freeze Them?

    You can freeze these for up to 3 months. Make sure the almond bark is completely set and then place them in an airtight freezer-safe container. I would also put a layer of parchment paper or wax paper between layers to make sure they don’t freeze together.

    When you are ready to enjoy them, let them sit at room temperature until defrosted. If your house is warm, let them sit in the refrigerator instead.

    Tips & Tricks

    • Don’t worry about spreading the peanut butter to the cracker edges. Just use the top cracker to gently smush it down. The peanut butter will natural spread out.
    • Not into white chocolate? Use chocolate almond bark instead!
    • If you don’t eat peanut butter, you can use almond butter, sunbutter, you can even put Nutella in there! Any kind of spread will work with these.

    More No Bake Treats

    • Crockpot Crunchy Drop Cookies
    • White Chocolate Crockpot Candy
    • No Bake Peanut Butter Pie
    • Creamy Caramel Apple Dip
    • No Bake Peanut Butter Bars

    Make sure you subscribe to my email list to get all my new recipes delivered right to your inbox!

    You can also follow me on Instagram, Facebook, or Pinterest for even more! 

    📖 Recipe

    Yield: about 20 cookies

    White Chocolate Peanut Butter Ritz Crackers

    White Chocolate Peanut Butter Ritz Crackers
    Prep Time 20 minutes
    Total Time 20 minutes

    Ingredients

    • 40 Ritz crackers
    • about 1 ¼ cups peanut butter (crunchy or creamy)
    • 16 ounces white almond bark
    • sprinkles

    Instructions

    1. Lay half of the Ritz crackers on a flat surface. Place about 1 tablespoon of peanut butter on each cracker. Top with remaining crackers and gently press down to spread peanut butter to the edges.
    2. Melt almond bark in a microwave safe bowl in 30 second increments, stirring after each time, until smooth.
    3. Use a fork to dip each cracker sandwich in the melted chocolate and coat evenly. Let excess chocolate drip off and then transfer to a piece of parchment paper. Top with sprinkles.
    4. Repeat with remaining ingredients.
    5. Let set until almond bark is no longer wet.

    Recommended Products

    As an Amazon Associate and member of other affiliate programs, I earn from qualifying purchases.

    • White Almond Bark Coating
      White Almond Bark Coating
    • Parchment Paper
      Parchment Paper
    • Christmas Sprinkles
      Christmas Sprinkles

    Did you make this recipe?

    Tag me in your Instagram photo - @fakeginger

    © Amanda Livesay
    Category: cookie

    Sprinkled Shortbread

    Nov 14, 2021

    Sprinkled Shortbread is going to be Santa’s favorite cookie! Buttery shortbread cookies rolled in sprinkles before baking.

    Sprinkles make everything better! I also love Christmas Confetti Cookies for the holidays.

    Stack of shortbread cookies with green and red sprinkles

    Originally published November 24, 2013. Updated November 14, 2021.

    Shortbread cookies are probably my most favorite. They’re buttery and melt in your mouth and just perfect for every cookie occasion.

    These Sprinkled Shortbread cookies are made festive by rolling the dough in sprinkles before you bake them! How cute are they going to be for Christmas?!

    They’re also the simplest cookies. Made with just butter, powdered sugar, salt, vanilla, and flour. And the sprinkles!

    Roll of shortbread cookie dough coated in red sprinkled and sliced into cookies

    Ingredients

    • Unsalted butter
    • Powdered sugar
    • Vanilla
    • Salt
    • All-purpose flour
    • Holiday sprinkles – I like the tiny color sugars for these cookies but you can use whatever sprinkles you like

    Instructions

    • Combine ingredients. In a stand mixer fitted with the paddle attachment, beat butter until creamy. Beat in powdered sugar, vanilla. and salt until incorporated. Slowly beat in flour and beat until just combined.
    • Shape into logs. Divide the batter into 2 and shape each one into a thick log.
    • Add sprinkles. Pour the sprinkles onto a flat plate and roll the log of batter through the sprinkles until they are well covered.
    • Chill overnight. Wrap in parchment paper and allow to sit overnight in the refrigerator.
    • Prepare to bake. The next day, preheat oven to 350F. Line 2 baking sheets with parchment paper.
    • Slice cookie dough. Remove the logs from the fridge and slice into ¼″ rounds. Place on prepared pan.
    • Bake. Bake in preheated oven for 10 – 12 minutes or until set. You do not want them to brown. Cool on a wire rack.
    Stack of shortbread cookies with green and red sprinkles; one cookie broken in half

    How Long Are They Good For?

    Shortbread cookies are good for a surprisingly long time. They will be fine for about 10 days at room temperature. Make sure to store them in an airtight container.

    Can You Freeze Them?

    You can freeze these shortbread cookies for up to 3 months. I recommend wrapping them tightly in plastic wrap and then putting them in a ziploc freezer bag.

    Stack of shortbread cookies with green and red sprinkles on a white plate

    More Holiday Cookies

    • No Bake Avalanche Cookies
    • Italian Sugar Cookies
    • Frosted Eggnog Cookies
    • Pistachio Thumbprint Cookies
    • Cranberry Orange Cookies

    Make sure you subscribe to my email list to get all my new recipes delivered right to your inbox!

    You can also follow me on Instagram, Facebook, or Pinterest for even more! 

    📖 Recipe

    Yield: about 36 cookies

    Sprinkled Shortbread

    Sprinkled Shortbread
    Prep Time 30 minutes
    Cook Time 12 minutes
    Total Time 42 minutes

    Ingredients

    • 1 cup unsalted butter, softened
    • ¾ cup powdered sugar
    • 1 teaspoon vanilla
    • ⅛ teaspoon salt
    • 2 cups all-purpose flour
    • about 1 cup of sprinkles

    Instructions

    1. In a stand mixer fitted with the paddle attachment, beat butter until creamy. Beat in powdered sugar, vanilla. and salt until incorporated.
    2. Slowly beat in flour and beat until just combined.
    3. Divide the batter into 2 and shape each one into a thick log.
    4. Pour the sprinkles onto a flat plate and roll the log of batter through the sprinkles until they are well covered.
    5. Wrap in wax paper and allow to sit overnight in the refrigerator.
    6. The next day, preheat oven to 350F. Line 2 baking sheets with parchment paper.
    7. Remove the logs from the fridge and slice into ¼" rounds. Place on prepared pan.
    8. Bake in preheated oven for 10 - 12 minutes or until set. You do not want them to brown.
    9. Cool on a wire rack.

    Recommended Products

    As an Amazon Associate and member of other affiliate programs, I earn from qualifying purchases.

    • Christmas Sprinkles
      Christmas Sprinkles
    • Parchment Paper
      Parchment Paper
    • Rimmed Baking Sheet
      Rimmed Baking Sheet
    • Stand Mixer
      Stand Mixer

    Nutrition Information:

    Yield:

    36

    Serving Size:

    1

    Amount Per Serving: Calories: 105Total Fat: 7gSaturated Fat: 3gTrans Fat: 0gUnsaturated Fat: 3gCholesterol: 14mgSodium: 48mgCarbohydrates: 11gFiber: 0gSugar: 5gProtein: 1g

    Did you make this recipe?

    Tag me in your Instagram photo - @fakeginger

    © Amanda Livesay
    Category: cookie

    White Chocolate Peppermint Chex

    Nov 11, 2021

    Easy and delicious holiday treat! White Chocolate Peppermint Chex calls for only 3 ingredients and takes only 15 minutes!

    I love recipes like this when I need a last minute sweet treat to take to a holiday party. Some of my other favorite no bake treats are Almond Bark Drop Cookies and Creamy Caramel Apple Dip.

    Originally published November 19, 2014. Updated November 11, 2021.

    I love cereal mixes around the holidays. Especially for parties! They’re the perfect little snacky thing that people can grab while they’re waiting for real food or just want to nibble on something.

    I have a whole Chex Mix category if you need more ideas.

    This one is great for holidays because it doubles as a snack AND dessert. It’s Chex cereal coated in peppermint white chocolate and sprinkled with crushed candy canes.

    It’s only 3 ingredients and takes minutes to prepare! It’s also great for little helpers since you won’t be using the stove or oven.

    Ingredients for White Chocolate Peppermint Chex

    Ingredients

    • Chex cereal – Rice or Corn Chex, whichever you prefer
    • White almond bark – sometimes it will say ALMOND BARK in big letters and sometimes it will say “vanilla candy coating” like mine in the photo above. You can find it in the baking aisle of any grocery store
    • Candy canes – you are going to crush these. The easiest way to do that is to put unwrapped candy canes in a thick ziploc bag and use a rolling pin or other heavy object to crush them
    Chex cereal with melted white chocolate on top

    How To Make White Chocolate Peppermint Chex

    • Prepare. Place a piece of wax or parchment paper on a flat surface.
    • Add Chex. Put Chex cereal in a large mixing bowl.
    • Melt almond bark. Put almond bark in a microwave-safe bowl and microwave in 30 second increments until melted; stir until smooth
    • Add candy canes. Stir half of the crushed candy canes into the melted almond bark.
    • Combine ingredients. Pour the almond bark mixture over the Chex cereal and use a rubber spatula to gently stir the cereal until coated.
    • Transfer. Carefully spread the Chex over the wax or parchment paper and quickly sprinkle remaining candy canes on top.
    • Allow to set. Let the Chex sit on a flat surface until the almond bark has hardened.
    overhead shot of white chocolate peppermint chex

    How Long Is It Good For?

    White Chocolate Peppermint Chex is good for about 4 days in an airtight container.

    Can You Freeze It?

    I don’t recommend trying to freeze this Chex. The cereal would likely end up soggy after being frozen and defrosted.

    More Chex Recipes

    • Cheesy Taco Chex Mix
    • Dill Pickle Chex Mix
    • Chex Party Mix
    • Cranberry Nut Chex Mix
    • Cheesy Ranch Chex Mix
    • Dirt and Worms Chex Mix
    • Funfetti Muddy Buddies

    Make sure you subscribe to my email list to get all my new recipes delivered right to your inbox!

    You can also follow me on Instagram, Facebook, or Pinterest for even more! 

    overhead photo of white chocolate peppermint chex

    📖 Recipe

    Yield: about 8 servings

    White Chocolate Peppermint Chex Mix

    White Chocolate Peppermint Chex Mix
    Prep Time 15 minutes
    Cook Time 2 minutes
    Total Time 17 minutes

    Ingredients

    • 6 cups Chex cereal, Rice or Corn
    • 12 ounces white almond bark
    • 6 candy cane, roughly crushed

    Instructions

    1. Lay a large sheet of wax paper or parchment paper on a counter or other flat surface.
    2. Put the Chex cereal in a very large mixing bowl.
    3. Break the almond bark up and place in a microwave-safe bowl. Melt for 30 second intervals, stirring after each one, until the bark is melted and smooth. Stir in half of the crushed peppermints.
    4. Working quickly, pour the melted almond bark over the cereal and use a rubber spatula to make sure all the cereal is coated. Pour the cereal onto the wax paper and spread into a single layer. Sprinkle with the remaining crushed peppermints.

    Recommended Products

    As an Amazon Associate and member of other affiliate programs, I earn from qualifying purchases.

    • White Almond Bark
      White Almond Bark

    Nutrition Information:

    Yield:

    8

    Serving Size:

    1

    Amount Per Serving: Calories: 388Total Fat: 23gSaturated Fat: 2gTrans Fat: 0gUnsaturated Fat: 20gCholesterol: 0mgSodium: 380mgCarbohydrates: 39gFiber: 6gSugar: 7gProtein: 11g

    Did you make this recipe?

    Tag me in your Instagram photo - @fakeginger

    © Amanda Livesay
    Category: snack

    Slow Cooker White Chicken Chili

    Nov 10, 2021

    This best winter comfort food! Slow Cooker White Chicken Chili is full of shredded chicken, green chiles, white beans, and lots of spice! Top it with fresh cilantro, lime wedges, sour cream, and jalapenos.

    I love making big batches of chili in the cooler months. Some of my other favorites are Slow Cooker Butternut Squash and Turkey Chili and Smoky Bacon Chili.

    white chicken chili topped with jalapeno slices, a lime wedge, and fresh cilantro

    Originally published December 2, 2010. Updated November 10, 2021.

    This White Chicken Chili is one of my alltime favorite winter dinners. It’s warm and comforting, spiced but not spicy, and best of all, cooked in the slow cooker!

    It’s full of chicken, white beans, green chiles, and then you can add whatever toppings you like!

    Ingredients

    • Boneless skinless chicken breasts
    • White onion
    • Garlic
    • Cannellini beans
    • Green chilies
    • Low-sodium chicken broth
    • Cumin
    • Dried oregano
    • Salt
    • Black pepper
    • Toppings of choice – we like sour cream, fresh cilantro, jalapeno slices, and lots of lime juice. You could add tortilla chips or cheddar cheese, too!

    Instructions

    • Combine ingredients. Add everything but toppings to slow cooker and give it a stir.
    • Slow cooker. Cook on low for 7-8 hours or high 3-4 hours.
    • Shred chicken. Use tongs to remove chicken to a cutting board and shred chicken. Set aside.
    • Thicken chili. Use an immersion blender to blend up about ¼ of the bean/liquid mixture. This will help to thicken the broth. (If you don’t have an immersion blender, transfer about ¼ of the brothy bean mixture to a blender and carefully blend; return to slow cooker.)
    • Combine everything. Return chicken to slow cooker and stir to combine.
    • Top and serve. Serve hot. Add toppings to individual bowls of chili.

    How Long Is It Good For?

    White chicken chili is good for about 3 days in the fridge. Make sure to store it in an airtight container – these glass airtight containers are my favorite for leftovers.

    When you are ready to serve it, reheat it in the microwave or on the stovetop. If it’s thickened up a lot, add more chicken broth or water to get it back to it’s original consistency.

    overhead shot of white chicken chili topped with cilantro, jalapeno slices, and a lime wedge

    Can You Freeze It?

    I love keeping a batch of white chicken chili in the freezer for busy winter nights!

    To freeze, let it cool completely and then transfer to a freezer-safe airtight soup container. It can be frozen for up to 3 months.

    When you are ready to enjoy it, let it defrost overnight in the fridge and then reheat on the stove. It will probably be thicker than you remember but a couple splashes of chicken broth or water will loosen it up again.

    Tips and Tricks

    • You can start with frozen chicken breasts – no need to defrost! I used frozen and they were ready to shred after 4 hours on high.
    • If you want it to be a spicy chili, add one minced jalapeno to the slow cooker.
    • Look for a creamy chili? Stir in about 4 ounces of cream cheese right at the end of cooking.
    white chicken chili topped with fresh cilantro, jalapeno slices, and a lime wedge

    More Chicken Soup Recipes

    • Chicken Tortellini Soup
    • Lemon Chicken and Rice Soup
    • Chicken and Wild Rice Soup (Panera Copycat)
    • Creamy Chicken Gnocchi Soup
    • Slow Cooker Chicken Tortilla Soup

    Make sure you subscribe to my email list to get all my new recipes delivered right to your inbox!

    You can also follow me on Instagram, Facebook, or Pinterest for even more! 

    📖 Recipe

    Yield: about 6 servings

    White Chicken Chili

    White Chicken Chili
    Prep Time 15 minutes
    Cook Time 8 hours
    Total Time 8 hours 15 minutes

    Ingredients

    • 1 pound boneless skinless chicken breasts
    • 1 white onion, diced
    • 2 cloves garlic, minced
    • 2 15 ounce cans cannellini beans, drained and rinsed
    • 2 (4 ounce) cans green chilies
    • 3 cups low-sodium chicken broth
    • 2 teaspoon cumin
    • 1 teaspoon dried oregano
    • ½ teaspoon salt
    • ¼ teaspoon black pepper
    • toppings (cilantro, sour cream, cheese, jalapeno, limes, tortilla chips)

    Instructions

      1. Add everything but toppings to slow cooker and give it a stir.
      2. Cook on low for 7-8 hours or high 3-4 hours.
      3. Remove chicken and shred. Set aside.
      4. Use an immersion blender to blend up about ¼ of the bean/liquid mixture. (If you don't have an immersion blender, transfer about ¼ of the brothy bean mixture to a blender and carefully blend; return to slow cooker.)
      5. Return chicken to slow cooker and stir to combine.
      6. Serve hot. Add toppings to individual bowls of chili.

    Recommended Products

    As an Amazon Associate and member of other affiliate programs, I earn from qualifying purchases.

    • Diced Green Chiles
      Diced Green Chiles
    • Programmable Slow Cooker
      Programmable Slow Cooker

    Nutrition Information:

    Yield:

    6

    Serving Size:

    1

    Amount Per Serving: Calories: 354Total Fat: 4gSaturated Fat: 1gTrans Fat: 0gUnsaturated Fat: 2gCholesterol: 64mgSodium: 698mgCarbohydrates: 40gFiber: 9gSugar: 2gProtein: 40g

    Did you make this recipe?

    Tag me in your Instagram photo - @fakeginger

    © Amanda Livesay
    Category: soup

    Glazed Eggnog Bread

    Nov 09, 2021

    Glazed Eggnog Bread is going to become a holiday must have! It’s fluffy and delicious with a sweet eggnog glaze.

    We also love Eggnog Fudge and Frosted Eggnog Cookies!

    glazed eggnog bread on a white plate; red mug with eggnog in the background

    This post originally published December 20, 2012. Updated November 9, 2021.

    If you are an eggnog lover, you are going to be obsessed with this quick bread! It is soft, fluffy, moist – everything you want out of a quick bread. With lots of eggnog flavor inside the bread and the glaze is also made with eggnog.

    This is one of my must makes every single holiday season!

    glazed eggnog bread

    Ingredients for Eggnog Bread

    • All-purpose flour
    • Baking powder
    • Sugar
    • Eggnog – use your favorite brand of eggnog.
    • Eggs
    • Butter – make sure to bring it to room temperature before beginning.
    • Nutmeg – this really adds to the eggnog smell and taste so don’t skip it!
    • Rum extract – this will be with the rest of the extracts in the baking aisle of the grocery store.
    • Vanilla extract
    • Instant French vanilla pudding mix
    • Powdered sugar – this is for the glaze. It melts better than granulated sugar so you get a really smooth glaze.

    Instructions

    1. Prepare. Preheat oven to 350F. Spray loaf pan with baking spray.
    2. Combine dry ingredients. Sift together the flour, baking powder, salt and nutmeg. Set aside.
    3. Combine wet ingredients. Beat eggs, add sugar, eggnog, butter, rum and vanilla extract until well combined.
    4. Add dry ingredients to wet ingredients. Add the flour mixture to the wet mixture and mix well.
    5. Add pudding mix. Add the instant pudding and blend.
    6. Transfer to pan. Pour into prepared loaf pan.
    7. Bake. Bake for 50 – 55 minutes, or until a toothpick inserted into the center comes out clean.
    8. Cool. Cool in pans 10 minutes. Remove and cool completely on a wire rack before glazing.
    9. Glaze. Whisk together the powdered sugar and eggnog until you get a good consistency. Drizzle or pour over breads.

    Tips and Tricks

    • You could use 4 mini loaf pans if you want to give these as holiday gifts.
    • If you don’t like rum flavor, you can leave the rum extract out
    slices of glazed eggnog bread

    How Long Is It Good For?

    Eggnog Bread will be good for about 3 days. Make sure to store it in an airtight container to keep it fresh for as long as possible.

    You can add a day or 2 by storing it in the fridge but it will lose some of the moisture.

    Can You Freeze It?

    You can free eggnog bread for up to 3 months. I recommend slicing it and then freezing the individual pieces separately by wrapping them tightly in plastic wrap and then placing them in a freezer ziploc bag.

    When you are ready to enjoy it, you can pull the slices out of the freezer and let them sit at room temperature for a couple hours.

    2 slices of glazed eggnog bread on a white plate

    More Holiday Treats

    • Crockpot Candy
    • Cranberry Orange Cookies
    • White Chocolate Peppermint Fudge
    • Peppermint Oreo Balls
    • Buckeye Fudge

    Make sure you subscribe to my email list to get all my new recipes delivered right to your inbox!

    You can also follow me on Instagram, Facebook, or Pinterest for even more! 

    📖 Recipe

    Yield: 1 loaf

    Eggnog Bread

    Eggnog Bread

    Glazed Eggnog Bread is going to become a holiday must have! It's fluffy and delicious with a sweet eggnog glaze.

    Prep Time 20 minutes
    Cook Time 1 hour
    Total Time 1 hour 20 minutes

    Ingredients

    • 2 ¼ cups all purpose flour
    • 2 teaspoon baking powder
    • ¼ teaspoon salt
    • 1 ¼ cups sugar
    • 1 ¾ cups eggnog
    • 2 eggs, beaten
    • ½ cup butter, melted
    • ¼ teaspoon nutmeg
    • 1 teaspoon rum extract
    • 1 teaspoon vanilla extract
    • 1 3.4 oz package instant french vanilla or vanilla pudding

    For the glaze:

    • 1 cup powdered sugar
    • Enough eggnog to make a glaze to drizzle over bread

    Instructions

    1. Preheat oven to 350F. Spray loaf pan with baking spray.
    2. Sift together the flour, baking powder, salt and nutmeg. Set aside.
    3. Beat eggs, add sugar, eggnog, butter, rum and vanilla extract until well combined.
    4. Add the flour mixture to the wet mixture and mix well.
    5. Add the instant pudding and blend.
    6. Pour into prepared loaf pan.
    7. Bake for 55 - 60 minutes, or until a toothpick inserted into the center comes out clean. Cool in pans 10 minutes. Remove and cool completely on a wire rack before glazing.

    To make the glaze:

    1. Whisk together the powdered sugar and eggnog until you get a good consistency. Drizzle or pour over breads.

    Recommended Products

    As an Amazon Associate and member of other affiliate programs, I earn from qualifying purchases.

    • Loaf Cake Container
      Loaf Cake Container
    • Rum Extract 2 oz
      Rum Extract 2 oz
    • Loaf Pan
      Loaf Pan

    Nutrition Information:

    Yield:

    10

    Serving Size:

    1

    Amount Per Serving: Calories: 444Total Fat: 14gSaturated Fat: 8gTrans Fat: 0gUnsaturated Fat: 5gCholesterol: 103mgSodium: 307mgCarbohydrates: 71gFiber: 1gSugar: 47gProtein: 8g

    Did you make this recipe?

    Tag me in your Instagram photo - @fakeginger

    © Amanda Livesay
    Cuisine: American / Category: breads

    Almond Bark Drop Cookies – No Bake Avalanche Cookies

    Nov 08, 2021

    Santa’s favorite cookie: almond bark drop cookies! Peanuts, Rice Krispies, and marshmallows coated in white chocolate and peanut butter! No baking required!

    These cookies are a must make for my family every Christmas! Some of our other favorites are Cranberry Orange Cookies, Italian Sugar Cookies, and Frosted Eggnog Cookies!

    Originally published December 24, 2013. Updated November 8, 2021.

    These Almond Bark Drop Cookies are at the top of my must make holiday cookies every single year. We’ve been making them for at least 10 years and we make several batches. We give them as gifts, we take them to parties, we leave them for Santa!

    They are the best combination of textures – the crunchy peanuts and Rice Krispies with the soft marshmallows and chocolate!

    And they’re no bake! You can put them together in 10 minutes! Plus they are great for little helpers – my kids have been making these on their own for years now.

    All the work is done in the microwave and then after that, everything gets stirred together and dropped onto parchment paper. They are so easy!

    Ingredients

    • White almond bark coating – this is a vanilla flavored candy coating that you can find in the baking aisle with the chocolate chips. It melts so much easier than chocolate and also sets a lot quickly than chocolate.
    • Crunchy peanut butter – don’t use the natural stuff, you want the yummy Jif or Skippy!
    • Dry roasted peanuts – I use salted because I love a sweet and salty treat but you can use unsalted if you prefer.
    • Rice Krispies – the cereal adds the perfect crispy crunch to the cookies.
    • Miniature marshmallows – these add a total different texture from everything else in the cookies.

    Instructions

    • Prep. Melt the white almond bark in a microwave for 2 minutes, stir and microwave 2 minutes more until melted.
    • Combine. Stir in peanut butter until well combined and smooth. Add remaining ingredients.
    • Drop. Drop by tablespoons on wax paper and allow to harden.

    How Long Are They Good For?

    Almond bark drop cookies are fine for a couple weeks in the fridge. Make sure to store them in an airtight container to keep them fresh for as long as possible.

    You can serve them straight from the fridge or let them sit at room temperature for 10 – 15 minutes.

    Can You Freeze Them?

    You can freeze these cookies for up to 3 months. Once the cookies are completely set, transfer them to a freezer-safe airtight container (I recommend using freezer ziploc bags) and place them in the freezer.

    When you are ready to serve them, let them defrost overnight in the fridge.

    Where To Find Almond Bark

    You can find almond bark in the baking aisle of pretty much any grocery store. Almond bark is a chocolate candy coating so it should be with the chocolate chips and other baking chocolates. 

    If you can’t find it in your grocery store, you can use candy melts that you can find at the craft store. Or you can order it online.

    More No Bake Christmas Treats

    • Crockpot Candy
    • Holly Crackles
    • Almond Joy Chocolate Clusters
    • White Chocolate Peanut Butter Ritz Crackers
    • Sugar Cookie Truffles

    Make sure you subscribe to my email list to get all my new recipes delivered right to your inbox!

    You can also follow me on Instagram, Facebook, or Pinterest for even more! 

    📖 Recipe

    Yield: 36 cookies

    Almond Bark Drop Cookies

    Almond Bark Drop Cookies

    Santa's favorite cookie: almond bark drop cookies! Peanuts, Rice Krispies, and marshmallows coated in white chocolate and peanut butter! No baking required!

    Prep Time 20 minutes
    Cook Time 5 minutes
    Total Time 25 minutes

    Ingredients

    • 2 (24 ounce) packages of white almond bark coating
    • 1 cup crunchy peanut butter
    • 2 cups dry roasted peanuts
    • 2 cups Rice Krispies
    • 4 cups miniature marshmallows

    Instructions

    1. Melt the bark in a microwave for 2 minutes, stir and microwave 2 minutes more until melted. Stir in peanut butter until well combined and smooth. Add remaining ingredients. Drop by tablespoons on wax paper and allow to harden.

    Recommended Products

    As an Amazon Associate and member of other affiliate programs, I earn from qualifying purchases.

    • Parchment Paper
      Parchment Paper
    • White Almond Bark
      White Almond Bark

    Nutrition Information:

    Yield:

    36

    Serving Size:

    1

    Amount Per Serving: Calories: 114Total Fat: 8gSaturated Fat: 1gTrans Fat: 0gUnsaturated Fat: 6gCholesterol: 0mgSodium: 81mgCarbohydrates: 9gFiber: 1gSugar: 4gProtein: 4g

    Did you make this recipe?

    Tag me in your Instagram photo - @fakeginger

    © Amanda Livesay
    Category: cookie


    Jalapeno Popper Dip

    Oct 25, 2021

    Creamy, cheesy Jalapeno Popper Dip will be a hit at your next party! It has pickled jalapenos, green chiles, 2 cheeses, and a crunchy topping. Serve it with tortilla chips or fresh veggies.

    I love serving spicy dips during football season. Some of my other favorites are Creamy Jalapeño Dip, Avocado Salsa, and Queso Blanco.

    Tortilla chip being dipped into a jalapeno cheesy dip

    This post originally published November 10, 2010. Updated on October 25, 2021.

    Back when I originally posted this Jalapeno Popper Dip recipe, we were obsessed with it. Football season 2010, we made it every single weekend for the Bama game. We’d even double it in case people stopped by because everyone we knew loved it.

    It is a jalapeno cream cheese dip that has just the right amount of heat (not too much though – my kids are all fine with it) and lots of cheese! It’s just the perfect thing to graze on while you’re watching football or at a party.

    Ingredients for jalapeno popper dip

    Ingredients

    • Cream cheese
    • Mayonnaise
    • Chopped green chiles – you should be able to find these in the Mexican section of any grocery store. They aren’t spicy at all but they add so much flavor.
    • Pickled jalapenos
    • Mexican style cheese
    • Parmesan cheese
    • Salt
    • Black pepper
    • Butter
    • Panko breadcrumbs

    Instructions

    • Prepare. Preheat the oven to 375F. Spray a 2 quart casserole dish with oil. Set aside.
    • Make dip. Using an electric mixer, beat cream cheese and mayo until smooth. Add green chiles, jalapenos, cheeses, and salt and pepper; beat until combined. Spread mixture into the prepared baking dish.
    • Make topping. In a separate small bowl, combine melted butter, panko breadcrumbs, and Parmesan. Sprinkle over cream cheese mixture.
    • Bake. Bake for 20 – 25 minutes, until mixture is bubbling and topping is golden brown.
    • Serve. Serve with tortilla chips.
    Pan of jalapeno cream cheese dip with panko breadcrumbs on top

    How Long Is It Good For?

    This dip will be good in the fridge for 3 – 4 days. Make sure to store it in an airtight container – these glass airtight containers are my favorite for leftovers.

    When you are ready to serve the leftovers, I recommend reheating in the oven so the breadcrumbs will crisp up again. You could also make another batch of the breadcrumb mixture to add to the leftovers.

    What To Serve With It

    I like to serve Jalapeno Popper Dip with tortilla chips. You could also use pita chips or plain crackers like Wheat Thins.

    If you want something lighter, you could serve this dip with baby carrots, sliced carrots, sliced radishes, anything like that.

    Jalapeno popper dip with jalapenos on top with a white plate and tortilla chips in the background

    More Cheesy Dips

    • Chicken Burrito Dip
    • Hatch Chile Cheese Dip
    • Cheesy Sausage and Spinach Dip
    • Crawfish Dip
    • Layered Ranch Taco Dip

    Make sure you subscribe to my email list to get all my new recipes delivered right to your inbox!

    You can also follow me on Instagram, Facebook, or Pinterest for even more! 

    Jalapeno popper dip topped with panko breadcrumbs and pickled jalapenos

    📖 Recipe

    Yield: about 12 servings

    Jalapeno Popper Dip

    Jalapeno Popper Dip

    Creamy, cheesy Jalapeno Popper Dip will be a hit at your next party! It has pickled jalapenos, green chiles, 2 cheeses, and a crunchy topping. Serve it with tortilla chips or fresh veggies.

    Prep Time 10 minutes
    Cook Time 20 minutes
    Total Time 30 minutes

    Ingredients

    • 2 (8 ounce) blocks cream cheese, at room temperature
    • 1 cup mayonnaise
    • 1 (4 ounce) can chopped green chiles, drained
    • 1 cup pickled jalapenos, roughly chopped
    • ½ cup shredded Mexican style cheese
    • ½ cup shredded Parmesan cheese
    • ½ teaspoon salt
    • ¼ teaspoon black pepper
    • 4 tablespoons butter, melted
    • 1 cup Panko breadcrumbs
    • ½ cup grated Parmesan cheese
    • tortilla chips, for serving

    Instructions

    1. Preheat the oven to 375F. Spray a 2 quart casserole dish with oil. Set aside.
    2. Using an electric mixer, beat cream cheese and mayo until smooth. Add green chiles, jalapenos, cheeses, and salt and pepper; beat until combined. Spread mixture into the prepared baking dish.
    3. In a separate small bowl, combine melted butter, panko breadcrumbs, and Parmesan. Sprinkle over cream cheese mixture.
    4. Bake for 20 - 25 minutes, until mixture is bubbling and topping is golden brown.
    5. Serve with tortilla chips.

    Recommended Products

    As an Amazon Associate and member of other affiliate programs, I earn from qualifying purchases.

    • Electric Mixer
      Electric Mixer
    • 9x9-inch baking dish
      9x9-inch baking dish

    Did you make this recipe?

    Tag me in your Instagram photo - @fakeginger

    © Amanda Livesay
    Category: appetizer

    Garlic Parmesan Cheese Ball

    Oct 24, 2021

    Garlic Parmesan Cheese Ball is going to be your new favorite appetizer for parties! Full of Parmesan cheese and garlic and rolled in chopped walnuts. Serve it with crackers or sliced veggies!

    Cheese balls are one of my favorite things to serve at parties. If you love them too, try Classic Cheese Ball, Pineapple Cheese Ball, and Bacon Cheese Ball!

    Garlic parmesan is one of my favorite flavor combinations. If we’re getting wings, I’m ordering garlic parmesan. I love any sort of garlic bread with parmesan. I always roast my veggies with garlic and parmesan.

    Put garlic and parmesan on anything and I love it. It’s just one of the best combinations.

    This cheese ball has lots of Parmesan, lots of garlic flavors, and it’s rolled in walnuts for a really delicious crunch.

    It’s perfect for all your holiday parties, a football party, or just a day you feel like eating a ball of cheese!

    Ingredients

    • Cream cheese
    • Sour cream
    • Grated Parmesan cheese – the stuff in the green bottle is perfect for this!
    • Garlic powder
    • Italian seasoning
    • Walnuts – you can substitute pecans if you prefer
    • Crackers and sliced veggies

    Instructions

    • Beat cream cheese. Using an electric mixer, beat cream cheese until smooth.
    • Add seasonings. Add sour cream, Parmesan cheese, garlic powder, and Italian seasoning; beat until combined.
    • Shape and chill. Shape into a rough ball in the mixing bowl and refrigerate for about 1 hour.
    • Roll in nuts. Once chilled, remove from mixing bowl and shape into a ball. Roll the ball in chopped walnuts until covered.
    • Serve. Chill until ready to serve.

    What To Serve with a Cheese Ball

    I almost always serve Ritz crackers with cheese balls because I love them but you can use Wheat Thins, Triscuits, whatever cracker you like!

    If you want something lighter, try baby carrots, sliced celery, sliced radishes, or jicama! Any veggie that you already enjoy raw would be delicious.

    Hw Long Is It Good For?

    This Garlic Parmesan Cheese Ball will be good for about a week. Make sure to store it in the fridge in an airtight container – these glass airtight containers are my favorite for leftovers.

    Keep in mind that the nuts may lose their crunch after a couple days in the fridge so don’t serve this to guests on day 5!

    Can You Freeze It?

    You can freeze this cheese ball before you roll it in the walnuts. Wrap the cheese ball tightly in plastic wrap and then place it in a freezer ziploc bag.

    It should be fine in the freezer for up to 1 month.

    When you are ready to serve it, let it defrost overnight in the fridge and then roll it in walnuts before serving.

    More Party Snacks Recipes

    • Dill Pickle Dip
    • Chicken Burrito Dip
    • Slow Cooker Cranberry Meatballs
    • Instant Pot Buffalo Chicken Dip
    • Caesar Deviled Eggs
    • Pepperoni Crescent Rolls

    Make sure you subscribe to my email list to get all my new recipes delivered right to your inbox!

    You can also follow me on Instagram, Facebook, or Pinterest for even more! 

    📖 Recipe

    Yield: about 8 servings

    Garlic Parmesan Cheese Ball

    Garlic Parmesan Cheese Ball
    Prep Time 15 minutes
    Total Time 15 minutes

    Ingredients

    • 1 (8 ounce) block cream cheese, at room temperature
    • ¼ cup sour cream
    • ⅓ cup grated Parmesan cheese
    • ¼ teaspoon garlic powder
    • ¼ teaspoon Italian seasoning
    • 1 cup walnuts, roughly chopped
    • crackers and sliced veggies, for serving

    Instructions

    1. Using an electric mixer, beat cream cheese until smooth.
    2. Add sour cream, Parmesan cheese, garlic powder, and Italian seasoning; beat until combined.
    3. Shape into a rough ball in the mixing bowl and refrigerate for about 1 hour.
    4. Once chilled, remove from mixing bowl and shape into a ball. Roll the ball in chopped walnuts until covered.
    5. Chill until ready to serve.

    Recommended Products

    As an Amazon Associate and member of other affiliate programs, I earn from qualifying purchases.

    • Electric Mixer
      Electric Mixer

    Nutrition Information:

    Yield:

    8

    Serving Size:

    1

    Amount Per Serving: Calories: 138Total Fat: 12gSaturated Fat: 3gTrans Fat: 0gUnsaturated Fat: 9gCholesterol: 11mgSodium: 97mgCarbohydrates: 5gFiber: 1gSugar: 1gProtein: 4g

    Did you make this recipe?

    Tag me in your Instagram photo - @fakeginger

    © Amanda Livesay
    Category: appetizer

    Pumpkin Pudding Snickerdoodles

    Sep 29, 2021

    The softest, most delicious pumpkin cookies! Pumpkin Pudding Snickerdoodles are made with pumpkin spice pudding to keep them chewy and are rolled in cinnamon sugar before baking.

    Who doesn’t love a pumpkin dessert this time of year? Some of my other favorites are Pumpkin Crunch Cake, Pumpkin Pie Milkshake, and Pumpkin Spice Cupcakes!

    This post originally published October 10, 2013. Updated September 29, 2021.

    Pumpkin Pudding Snickerdoodles are my favorite pumpkin cookies ever. I originally made this recipe about 8 years ago and then I could never find the pumpkin spice pudding mix again until this year.

    Every year I would get comments on this post asking WHERE DO I GET THE PUDDING MIX?!

    I find it at Walmart in the seasonal baking section but snatch them up quickly because they sell out!

    Pumpkin pudding mix just makes the most delicious pumpkin cookies. They’re soft and chewy and the cinnamon sugar on the outside gives them just a hint of a crunch.

    If you happen to see pumpkin spice pudding mix at your store, you have to buy it and give these cookies a try!

    Ingredients

    • Butter
    • Brown sugar – these snickerdoodles use more brown sugar than white so they stay extra soft
    • Granulated sugar
    • Pumpkin spice instant pudding mix – this is a seasonal item that I’ve only ever found at Walmart in their fall baking section. If you see it, grab 5 of them be cause they disappear quickly! Or you can order it on Amazon.
    • Eggs
    • Vanilla
    • Baking soda
    • Cream of tartar – cream of tartar is used in snickerdoodles to make the cookies a bit chewier than they would be otherwise
    • All-purpose flour
    • Cinnamon – the cookies get rolled in cinnamon sugar before baking

    Instructions

    • Combine dry ingredients. Sift together flour, cream of tartar and baking soda and set aside.
    • Combine wet ingredients. In a large bowl, cream butter, sugars and pudding mix together. Add eggs and vanilla and mix well.
    • Add dry ingredients to wet ingredients. Add flour mixture slowly until well incorporated.
    • Make cinnamon sugar. Combine sugar and cinnamon in a shallow bowl or plate.
    • Shape cookies. Roll cookies into 1″ balls. Roll each cookie into cinnamon-sugar mixture to coat outer surface of ball entirely. Place on a prepared cookie sheet and repeat for remaining dough.
    • Bake. Bake at 350F for 10-12 minutes.

    How Long Are They Good For?

    Pudding cookies are good for about 4 days at room temperature. Make sure to store them in an airtight container to keep them fresh for as long as possible.

    You can keep them fresh a day or 2 longer by storing them in the fridge but it will suck some of the moisture out of them. They’re soft enough that they should be fine for a day or 2 though.

    Can You Freeze Pudding Cookies?

    You can freeze these cookies for up to 3 months. Let them cool completely and then put them in a freezer ziploc bag.

    When you are ready to enjoy them, just let them sit at room temperature for several hours. If you prefer warm cookies, pop them in the oven or toaster oven at very low heat for a couple minutes.

    Tips and Tricks

    • White chocolate and pumpkin is one of my favorite combinations! Add 1 cup of white chocolate chips if you love it, too.
    • These cookies are orange because of the pudding mix so they’re not going to turn golden brown like a normal cookie – you want to pull them out of the oven before they start to brown

    More Pudding Cookies

    • Peanut Butter Chocolate Chunk Pudding Cookies
    • Butterscotch Pudding Cookies
    • Sweet and Salty Pudding Cookies
    • M&Ms Chocolate Chip Pudding Cookies
    • Chocolate Chip Pudding Cookies

    Make sure you subscribe to my email list to get all my new recipes delivered right to your inbox!

    You can also follow me on Instagram, Facebook, or Pinterest for even more! 

    📖 Recipe

    Yield: about 36 servings

    Pumpkin Pudding Snickerdoodles

    Pumpkin Pudding Snickerdoodles

    Prep Time 20 minutes
    Cook Time 12 minutes
    Total Time 32 minutes

    Ingredients

    For the cookies:

    • ¾ cup 12 tablespoons butter softened
    • ¾ cup brown sugar
    • ¼ cup sugar
    • 1 3.4 oz box pumpkin spice instant pudding mix
    • 2 eggs
    • 1 teaspoon vanilla
    • 1 teaspoon baking soda
    • ½ teaspoon cream of tartar
    • 2 to 2 ¼ cups flour

    For the cinnamon-sugar:

    • ½ cup sugar
    • 1 teaspoon cinnamon

    Instructions

    1. Preheat oven to 350F. Grease or line a cookie sheet.
    2. Sift together flour, cream of tartar and baking soda and set aside.
    3. In a large bowl, cream butter, sugars and pudding mix together. Add eggs and vanilla and mix well.
    4. Add flour mixture slowly until well incorporated.
    5. To make the cinnamon-sugar, combine sugar and cinnamon in a shallow bowl or plate.
    6. Roll cookies into 1″ balls. Roll each cookie into cinnamon-sugar mixture to coat outer surface of ball entirely. Place on a prepared cookie sheet and repeat for remaining dough.
    7. Bake at 350F for 10-12 minutes.

    Recommended Products

    As an Amazon Associate and member of other affiliate programs, I earn from qualifying purchases.

    • Pumpkin Spice Pudding Mix
      Pumpkin Spice Pudding Mix
    • Parchment Paper
      Parchment Paper
    • Rimmed Baking Sheet
      Rimmed Baking Sheet
    • Stand Mixer
      Stand Mixer

    Nutrition Information:

    Yield:

    36

    Serving Size:

    1

    Amount Per Serving: Calories: 139Total Fat: 5gSaturated Fat: 3gTrans Fat: 0gUnsaturated Fat: 2gCholesterol: 21mgSodium: 85mgCarbohydrates: 23gFiber: 1gSugar: 8gProtein: 2g

    Did you make this recipe?

    Tag me in your Instagram photo - @fakeginger

    © Amanda Livesay
    Category: cookie

    Pumpkin Apple Muffins

    Sep 28, 2021

    These are going to be your new favorite fall breakfast! Moist and delicious Pumpkin Apple Muffins are filled with pumpkin and diced apples and topped with a crunchy streusel topping.

    Some of my favorite things to make during fall are pumpkin muffins. If you love them like I do, try Pumpkin Chocolate Chip Muffins, Pumpkin Walnut Muffins, and Pumpkin Banana Muffins.

    pumpkin apple muffin with crunchy streusel topping

    I’ve made these Pumpkin Apple Muffins three times this month. It’s the perfect way to combine everyone’s favorite fall flavors: pumpkin and apple!

    The muffins are moist and delicious and then they get topped with the best crunchy streusel topping.

    They are the perfect easy breakfast, after school snack, or you can toss them in the freezer for a day when you just don’t feel like cooking.

    Overhead shot of pumpkin muffins with streusel topping

    Ingredients

    • Vegetable oil – you can use coconut oil or butter if you prefer – just make sure to melt them and let them cool slightly before mixing in the rest of the ingredients
    • Granulated sugar – sugar is going in both the muffin batter and the streusel topping
    • Pumpkin puree – not pumpkin pie filling. You want the only ingredient to be pumpkin. If you have extra pumpkin, use it to make Pumpkin Pancakes!
    • Eggs
    • Vanilla
    • All-purpose flour – flour is going in the muffin batter and the streusel topping
    • Baking soda
    • Pumpkin Pie Spice – if you don’t have pumpkin pie spice, use 1 ½ teaspoon cinnamon, ¼ teaspoon ground ginger, and a dash of allspice and cloves
    • Butter – for the streusel topping
    • Cinnamon – for the streusel topping
    Making pumpkin muffin batter

    Instructions

    • Combine wet ingredients. In a large mixing bowl, combine vegetable oil, pumpkin puree, granulated sugar, eggs, and vanilla. Whisk until smooth.
    • Combine dry ingredients. In a separate mixing bowl, stir together all-purpose flour, baking soda, and pumpkin pie spice.
    • Make batter. Add dry ingredients to wet ingredients and stir until well combined.
    • Fill muffin cups. Fill 18 muffin cups lined with paper liners about ¾ full.
    • Make streusel topping. Use a pastry blender or 2 knives to combine butter, granulated sugar, all-purpose flour, and cinnamon until crumbly.
    • Top muffins. Sprinkle the streusel topping on top of muffins.
    • Bake muffins. Bake at 350F for 20 – 22 minutes, until a toothpick inserted into the center of a muffin comes out clean.
    • Cool completely. Let cool on a wire rack before serving.
    Steps for making pumpkin apple muffins

    How To Make Streusel Topping

    To make the streusel topping for muffins, you combine butter, sugar, flour, and cinnamon.

    You want to “cut” the butter in so that it’s crumbly. The easiest way to do this is with a pastry blender but you can also use 2 knives to do it.

    How to make streusel topping for muffins

    How Long Are They Good For?

    Pumpkin apple muffins are good for about 3 days at room temperature. Make sure to store them in an airtight container to keep them fresh for as long as possible.

    Can You Freeze Muffins?

    You can freeze muffins for up to 3 months. I recommend wrapping them individually in plastic wrap and then putting them in freezer ziploc bags.

    When you are ready to serve them, just let them sit at room temperature for several hours. You can also warm them in the microwave or oven at low temperature.

    4 pumpkin muffins with streusel topping on a white plate; apple and a cup of coffee in the background

    More Muffin Recipes

    • Blueberry Bran Muffins
    • Pineapple Upside Down Muffins
    • Sour Cream Banana Nut Muffins
    • Banana Chocolate Chip Muffins
    • Banana Muffins with Nutella Swirl
    • Double Chocolate Chip Banana Muffins

    Make sure you subscribe to my email list to get all my new recipes delivered right to your inbox!

    You can also follow me on Instagram, Facebook, or Pinterest for even more! 

    📖 Recipe

    Yield: 18 muffins

    Pumpkin Apple Muffins

    Pumpkin Apple Muffins

    These are going to be your new favorite fall breakfast! Moist and delicious Pumpkin Apple Muffins are filled with pumpkin and diced apples and topped with a crunchy streusel topping.

    Prep Time 10 minutes
    Cook Time 20 minutes
    Total Time 30 minutes

    Ingredients

    • ½ cup vegetable oil
    • 1 cup pumpkin puree
    • 2 cups granulated sugar
    • 2 eggs
    • 1 teaspoon vanilla
    • 2 ½ cups all-purpose flour
    • 2 teaspoons pumpkin pie spice
    • 1 teaspoon baking soda
    • ½ teaspoon salt
    • 2 cups apple, peeled and finely diced

    For the streusel topping:

    • 2 tablespoons butter
    • ½ cup granulated sugar
    • ¼ cup all-purpose flour
    • 1 teaspoon cinnamon

    Instructions

    1. Preheat oven to 350F. Line 18 regular size muffin cups with paper liners.
    2. In a large mixing bowl, combine vegetable oil, pumpkin puree, granulated sugar, eggs, and vanilla. Whisk until smooth.
    3. In a separate mixing bowl, stir together all-purpose flour, baking soda, and pumpkin pie spice.
    4. Add dry ingredients to wet ingredients and stir until well combined.
    5. Fill prepared muffin cups about ¾ full.
    6. To make the streusel topping, use a pastry blender or 2 knives to combine butter, granulated sugar, all-purpose flour, and cinnamon until crumbly.
    7. Sprinkle the streusel topping on top of muffins.
    8. Bake in preheated oven for 20 - 22 minutes, until a toothpick inserted into the center of a muffin comes out clean.
    9. Transfer to a wire rack to cool completely before serving.

    Recommended Products

    As an Amazon Associate and member of other affiliate programs, I earn from qualifying purchases.

    • Pastry Blender
      Pastry Blender
    • Parchment Muffin Liners
      Parchment Muffin Liners
    • My Favorite Muffin Tin
      My Favorite Muffin Tin

    Nutrition Information:

    Yield:

    18

    Serving Size:

    1

    Amount Per Serving: Calories: 263Total Fat: 8gSaturated Fat: 1gTrans Fat: 0gUnsaturated Fat: 6gCholesterol: 24mgSodium: 148mgCarbohydrates: 46gFiber: 1gSugar: 30gProtein: 3g

    Did you make this recipe?

    Tag me in your Instagram photo - @fakeginger

    Cuisine: American / Category: breakfast

    Dill Pickle Soup

    Sep 23, 2021

    Dill Pickle Soup is a must make for pickle lovers! It’s a hearty soup full of potatoes, bacon, cheese, and pickles. It’s delicious and ready in about 30 minutes!

    Soup season is my favorite season! Some of our other favorite soup recipes are Lemon Chicken and Rice Soup, Creamy Tomato Tortellini Soup, and Broccoli Cheddar Soup.

    Dill pickle soup in a white bowl with sliced pickles and fresh dill on top

    It’s soup season in north Texas! We’ve had several days in the 50s (in the very early morning) and I am so excited to start making all my favorite fall comfort foods.

    Soup is just the best, isn’t it?

    Especially a nice hearty soup full of potatoes, bacon, cheese, and yeah, pickles.

    This soup is so delicious and if you have a pickle lover in your house, you have to give it a try! It’s basically a cheesy potato and bacon soup but with pickle juice and diced pickles added.

    My boyfriend isn’t a pickle person (who asks for no pickles on burgers?! He does. Is that a red flag?) but he liked the soup. So it’s not overly pickle-y.

    If you love pickles like I do, try Dill Pickle Saltines, Dill Pickle Dip, and Dill Pickle Chex Mix!

    Overhead shot of potato and bacon soup with pickles and fresh dill on top

    Ingredients for Dill Pickle Soup

    • Bacon – you are going to use the bacon and the bacon fat so I don’t recommend a lean bacon like turkey
    • Onion
    • Garlic
    • Russet potatoes – you can use red potatoes or gold potatoes but if they are smaller than the average russet potato, you will need more than 5
    • Chicken broth – make sure to use low-sodium so the soup doesn’t end up too salty
    • All-purpose flour – this is to thicken the soup
    • Whole milk – you can use a nondairy milk but make sure it’s a thicker one like oat milk
    • Dill pickle juice – just the juice from a jar of dill pickles. Make sure it’s dill and not bread and butter – you don’t want a sweet pickle soup!
    • Dill pickles – from the same jar you got the juice from
    • Cheddar cheese – you can also use a cheddar jack blend
    • Fresh dill – just a sprinkling for garnish

    Instructions

    • Cook bacon. In a large soup pot, cook bacon until crisp and remove to a plate. Save about 2 tablespoons of bacon fat.
    • Cook vegetables. Sauté the onion and garlic in the reserved bacon fat.
    • Cook potatoes. Add potatoes and chicken broth. Simmer until potatoes are tender.
    • Thicken soup. Whisk together flour, milk, and pickle juice. Stir into soup and simmer until thickened.
    • Finish the soup. Remove from heat and stir in pickles and cheese.
    • Garnish and serve. Sprinkle with fresh dill and enjoy!
    Dill Pickle Soup is a must make for pickle lovers! It's a hearty soup full of potatoes, bacon, cheese, and pickles. It's delicious and ready in about 30 minutes!

    How Long Is It Good For?

    Dill Pickle Soup will be good for up to 3 days in the fridge. Make sure to store it in an airtight container – we love these glass containers for all our leftovers.

    I recommend reheating it on the stove. It will likely thicken as it sits in the fridge so you may need to add a little extra chicken broth or even water to get it back to it’s soupy consistency.

    Can You Freeze It?

    You can freeze this soup for up to 3 months. I recommend using a freezer-safe soup container.

    When you are ready to serve it, let it defrost overnight in the fridge and then reheat on the stove. If it has thickened a lot, use chicken broth or water to get it back to it’s original consistency.

    What To Serve with Soup

    I think homemade bread is wonderful with soup. I love Oatmeal Rolls with it because they are great at soaking up the soup.

    You could also serve it with a simple salad.

    More Soup Recipes

    • Chicken Tortellini Soup
    • Autumn Squash Soup (Panera Copycat)
    • Loaded Baked Potato and Cauliflower Soup
    • Ham and Lentil Soup
    • Spiced Carrot Soup

    Make sure you subscribe to my email list to get all my new recipes delivered right to your inbox!

    You can also follow me on Instagram, Facebook, or Pinterest for even more! 

    📖 Recipe

    Yield: about 6 servings

    Dill Pickle Soup

    Dill Pickle Soup
    Prep Time 10 minutes
    Cook Time 20 minutes
    Total Time 30 minutes

    Ingredients

    • ½ pound bacon, diced
    • 1 small white onion, diced
    • 3 cloves garlic, minced
    • 5 russet potatoes, peeled and diced
    • 4 cups low-sodium chicken broth
    • 3 tablespoons all-purpose flour
    • 1 cup whole milk
    • ¾ cup dill pickle juice
    • ¾ cup dill pickles, diced
    • 1 ½ cups cheddar cheese, shredded
    • salt and black pepper
    • fresh dill, for serving

    Instructions

    1. In a large stock pot, cook diced bacon over medium-high heat until crispy. Use a slotted spoon to remove bacon to a paper towel-lined plate. Pour off all but about 1 tablespoon of bacon fat.
    2. Add onion to hot pot with bacon fat and cook, stirring frequently, until onion is soft and translucent. Add garlic and cook another 30 seconds, until fragrant.
    3. Add potatoes and chicken broth. Bring to a boil, lower to a simmer, and cook until potatoes are fork tender, about 15 minutes.
    4. In a small bowl, whisk flour, milk, and dill pickle juice until smooth. Stir into soup and let simmer until thickened, about 5 minutes.
    5. Remove from heat and stir in pickles and shredded cheese.
    6. Taste and season with salt and pepper. It probably won't need salt but taste it to be sure.
    7. Sprinkle with fresh dill before serving.

    Recommended Products

    As an Amazon Associate and member of other affiliate programs, I earn from qualifying purchases.

    • Slotted Spoon
      Slotted Spoon
    • Dutch Oven
      Dutch Oven

    Did you make this recipe?

    Tag me in your Instagram photo - @fakeginger

    © Amanda Livesay
    Category: soup

    Crockpot Cheesy Potatoes

    Sep 11, 2021

    Crockpot Cheesy Potatoes are the perfect easy side dish for weeknight dinners or even a holiday party! Diced potatoes in a creamy, cheesy sauce – all cooked in the slow cooker!

    If you love cheesy potatoes, try Hashbrown Casserole!

    Diced potatoes with cheese, cream of chicken soup, green onions, and black pepper in a white bowl

    Is there anything better than potatoes with melted cheese? Fried, mashed, roasted… they’re all amazing on their own but even better with melted cheese!

    These Crockpot Cheesy Potatoes are diced potatoes that are cooked in a creamy, cheesy sauce. It’s almost like a hashbrown casserole. And it’s all done in the slow cooker so it’s mostly hands off and really easy!


    It’s one of our favorite side dishes because it’s so delicious but takes minimal effort. It’s also perfect for Thanksgiving, when you don’t want to take up oven space!

    ingredients for crockpot cheesy potatoes

    Ingredients

    • Frozen diced hash brown potatoes – make sure it’s just diced potatoes and not the kind with peppers and onions.
    • White onion – these soften up really nicely in the crockpot so don’t worry about picky eaters being able to spot them.
    • Sour cream – this makes the sauce super creamy and delicious.
    • Cream of chicken soup – you can use the fat free version if you want.
    • Butter
    • Garlic powder
    • Salt and pepper
    • Cheddar cheese – I like to use a sharp chedddar in these potatoes but use whatever cheddar you like.
    • Green onions – these are optional but they add a really nice brightness to the finished dish.

    How To Make Crockpot Cheesy Potatoes

    • To the slow cooker, add the hash brown potatoes, diced onion, sour cream, cream of chicken soup, butter, garlic powder, salt and pepper, and 1 cup of cheddar cheese. Stir to combine.
    • Set slow cooker to high for 4 hours. After the 4 hours, sprinkle remaining cheese on top and let cook for another 15 minutes on high.
    • Taste and season with more salt if needed.
    • Sprinkle with green onions and serve!
    crockpot cheesy potatoes

    How Long Is It Good For?

    These crockpot cheesy potatoes will be good for up to 5 days in the fridge. Make sure to store them in an airtight container.

    I would suggest reheating these in the microwave when you are ready to serve them.

    Can You Freeze It?

    I don’t recommend freezing these potatoes. I think the texture would change once they are frozen, defrosted, and then reheated again.

    How To Make Cheesy Potatoes in the Oven

    Preheat oven to 350F. Spread the potato mixture into a baking pan and sprinkle with cheese. Cover and bake for 40 minutes. Remove foil and bake another 10 – 15 minutes, until the top is nicely browned.

    Variations

    • Use frozen shredded hashbrowns! They probably won’t take as long to cook so check on them after 2 hours and then again after 3.
    • Want some spice? Use pepperjack cheese instead of cheddar!
    • Make it a main dish by stirring in some diced ham in the last hour!
    Overhead shot of cheesy potatoes topped with green onions and black pepper in a white bowl

    More Side Dishes

    • Glazed Ranch Carrots
    • Broccoli Salad
    • Fritos Corn Salad
    • Spicy Honey Roasted Brussels Sprouts
    • Green Beans Almondine
    • Corn Casserole

    Make sure you subscribe to my email list to get all my new recipes delivered right to your inbox!

    You can also follow me on Instagram, Facebook, or Pinterest for even more! 

    Cheesy potatoes with green onions and black pepper on top; in a white bowl with a white and green striped towel in background

    📖 Recipe

    Yield: 6 - 8 servings

    Crockpot Cheesy Potatoes

    Crockpot Cheesy Potatoes

    Crockpot Cheesy Potatoes are the perfect easy side dish for weeknight dinners or even a holiday party! Diced potatoes in a creamy, cheesy sauce - all cooked in the slow cooker!

    Prep Time 15 minutes
    Cook Time 4 hours 15 minutes
    Total Time 4 hours 30 minutes

    Ingredients

    • 1 (32 ounce) bag frozen diced hash brown potatoes
    • 1 small white onion, diced
    • 1 cup sour cream
    • 1 (10.5 ounce) can cream of chicken soup
    • 4 tablespoons butter, melted
    • ½ teaspoon garlic powder
    • ½ teaspoon salt
    • ¼ teaspoon pepper
    • 2 cups cheddar cheese, shredded

    Instructions

    1. To the slow cooker, add the hash brown potatoes, diced onion, sour cream, cream of chicken soup, butter, garlic powder, salt and pepper, and 1 cup of cheddar cheese. Stir to combine.
    2. Set slow cooker to high for 4 hours.
    3. After the 4 hours, sprinkle remaining cheese on top and let cook for another 15 minutes on high.
    4. Taste and season with more salt if needed.
    5. Sprinkle with green onions and serve!

    Recommended Products

    As an Amazon Associate and member of other affiliate programs, I earn from qualifying purchases.

    • Programmable Slow Cooker
      Programmable Slow Cooker

    Nutrition Information:

    Yield:

    6

    Serving Size:

    1

    Amount Per Serving: Calories: 344Total Fat: 30gSaturated Fat: 16gTrans Fat: 1gUnsaturated Fat: 10gCholesterol: 82mgSodium: 693mgCarbohydrates: 8gFiber: 0gSugar: 2gProtein: 11g

    Did you make this recipe?

    Tag me in your Instagram photo - @fakeginger

    © Amanda Livesay
    Cuisine: American / Category: Sides

    Pineapple Cheese Ball

    Sep 08, 2021

    Pineapple Cheese Ball will be a hit at your next party! Cream cheese, pineapple, green bell pepper, onion, and walnuts – so many flavors and textures! Serve it with crackers or sliced veggies.

    Try Classic Cheese Ball or Everything Cheese Ball if pineapple isn’t your thing!

    Cheese ball coated in walnuts on a white plate with Ritz crackers around it

    Okay, stay with me.

    You know that pineapple cheese casserole that’s popular in the south? That sounds gross but somehow the sweet pineapple, savory cheese, and crunchy buttery crackers just all work together?

    This Pineapple Cheese Ball is kind of like that casserole.

    It’s savory with just a hint of sweetness. It’s rolled in walnuts for some crunch and then you have to serve it with Ritz crackers.

    Pineapple cheese ball with a bit taken out; on a white plate with Ritz crackers around

    Ingredients

    • Cream cheese – make sure to bring it to room temperature before beginning the recipe.
    • Crushed pineapple – drain the juice off really well so your cheese ball holds it’s shape.
    • Green bell pepper
    • White onion
    • Seasoned salt – such as Lawry’s.
    • Walnuts – you could do pecans if you prefer.
    • crackers or chopped veggies

    Instructions

    • Prep. Using an electric mixer, beat cream cheese until smooth.
    • Add. Add drained pineapple, diced bell pepper, diced onion, and seasoned salt. Beat until combined.
    • Chill. Shape into a rough ball in the mixing bowl (mixture will be very soft) and refrigerate for about 30 minutes.
    • Shape. Once chilled, shape into a ball and roll in chopped walnuts.
    • Chill. Place on serving platter and refrigerate until ready to serve.
    • Serve. Serve with crackers and fresh chopped veggies.

    What To Serve with a Cheese Ball?

    For this Pineapple Cheese Ball, I like to serve it with Ritz crackers so it tastes kind of like that classic pineapple cheese casserole that’s topped with Ritz crackers.

    You could also do Wheat Thins or whatever plain cracker you like!

    I think baby carrot, sliced celery, or sliced cucumbers also go really well with this cheese ball.

    Pineapple cheese ball on a Ritz cracker with the rest of the cheese ball in background

    How Long Is It Good For?

    This cheese ball should be fine in the fridge for about a week. Make sure to keep it in an airtight container – these glass ones are my favorite – and throw it out if it starts to cook or smell funny, of course.

    The walnuts may start to lose their crunch the longer it sits in the fridge so keep that in mind.

    Can You Freeze It?

    Yes, you can freeze this Pineapple Cheese Ball before you roll it in the walnuts. Once you have it shaped into a ball, wrap it tightly with plastic wrap and then place it in a freezer ziploc bag.

    It should be fine in the freezer for up to 1 month.

    When you are ready to serve it, let it defrost overnight in the fridge and then roll it in the walnuts.

    Top view of cheese ball coated in walnuts on a white plate; Ritz crackers around it

    More Cheesy Appetizer Recipes

    • Hatch Chile Cheese Dip
    • Bacon Pimento Cheese Deviled Eggs
    • Chicken Burrito Dip
    • Instant Pot Buffalo Chicken Dip
    • Cheesy Sausage and Spinach Dip

    Make sure you subscribe to my email list to get all my new recipes delivered right to your inbox!

    You can also follow me on Instagram, Facebook, or Pinterest for even more! 

    📖 Recipe

    Yield: about 12 servings

    Pineapple Cheese Ball

    Pineapple Cheese Ball
    Prep Time 15 minutes
    Total Time 15 minutes

    Ingredients

    • 2 (8 ounce) blocks plain cream cheese, at room temperature
    • 1 (8 ounce) container crushed pineapple, drained
    • ¼ cup green bell pepper, finely diced
    • 2 tablespoons white onion, finely diced
    • 2 teaspoons seasoned salt (such as Lawry's)
    • 1 ½ cups walnuts, roughly chopped
    • crackers or chopped veggies, for serving

    Instructions

    1. Using an electric mixer, beat cream cheese until smooth.
    2. Add drained pineapple, diced bell pepper, diced onion, and seasoned salt. Beat until combined.
    3. Shape into a rough ball in the mixing bowl (mixture will be very soft) and refrigerate for about 30 minutes.
    4. Once chilled, shape into a ball and roll in chopped walnuts.
    5. Place on serving platter and refrigerate until ready to serve.
    6. Serve with crackers and fresh chopped veggies.

    Recommended Products

    As an Amazon Associate and member of other affiliate programs, I earn from qualifying purchases.

    • Electric Mixer
      Electric Mixer

    Nutrition Information:

    Yield:

    12

    Serving Size:

    1

    Amount Per Serving: Calories: 114Total Fat: 10gSaturated Fat: 1gTrans Fat: 0gUnsaturated Fat: 8gCholesterol: 2mgSodium: 268mgCarbohydrates: 7gFiber: 2gSugar: 4gProtein: 3g

    Did you make this recipe?

    Tag me in your Instagram photo - @fakeginger

    © Amanda Livesay
    Category: appetizer
    « Previous Page
    Next Page »

    Primary Sidebar

    Amanda Livesay
    Hi, I'm Amanda! DFW food blogger, mom of boys, and crazy dog lady.
    Read more
    Privacy Policy
    Privacy Policy

    Footer

    ↑ back to top

    About

    • Privacy Policy
    • About Fake Ginger

    Newsletter

    • Sign Up for weekly emails featuring new recipes!

    As an Amazon Associate I earn from qualifying purchases.

    Copyright © 2024 FakeGinger.com